A warm water floor is a special heating system, which is characterized by a simple installation technique, an affordable price and low costs during use. It is also worth noting that the water system, unlike the electric one, is completely safe for people and animals.
We provide installation services for heated water floors in an apartment, house or commercial premises.
There is nothing complicated in the installation technology, so with the desire and certain knowledge, anyone can install heated floors. As a result, this will reduce costs, which directly affects the cost and operation of the heating system.
Advantages and disadvantages
The main advantage of a hydraulic heating system is uniform horizontal heating of the room. The heat in the room spreads vertically, thereby providing a healthy microclimate, which radiator devices cannot provide. Warm floors are an ideal option for rooms with high ceilings.
Also, water-heated floors benefit from an aesthetic point of view. They are completely invisible and do not take up free space. In addition, they are more economical when used.
The efficiency of the system will depend on the quality of the thermal insulation. This is due to the fact that the level of heat loss directly affects the reduction in heat transfer. But it is worth considering that installing such a system in a bathroom or toilet has certain disadvantages. The heating element is usually connected to a heated towel rail, which can cause the floors to overheat.
Also, water-heated floors “take away” the height of the room due to the thick concrete screed. In addition, concrete pouring makes the entire structure heavier, so sometimes there is a need to strengthen the coatings.
Design
Installing a water circuit in cottages with gas boilers is considered a particularly profitable and optimal solution. This design is less expensive in terms of energy consumption and is easy to operate, making it the most efficient.
The system can work flawlessly only if there is a professionally designed project and proper installation.
Therefore, before you start installing water heating in a frame house or in a country house, the first thing you need to do is prepare a project. When drawing up a project, you should consider the type of material that will fit into the “pie” and the thickness of each layer.
In addition, it is necessary to prepare a pipe placement plan. You can draw the diagram on a regular sheet of paper with a box, where each box will be a step in laying out the contour.
The step depends on the climatic characteristics of the region. In temperate climates:
- with good thermal insulation in the house - step 20 cm;
- in the absence of high-quality insulation of walls made of brick, concrete or wood - 10 cm;
- in large rooms, in the presence of warm and cold walls, the step taken is different, for warm walls it is larger, for cold walls it is smaller.
Premises requirement
Since the structure has significant weight, a large length of pipes and many connecting nodes, the installation of the system has its own characteristics.
As a result, each layer must be laid strictly according to the instructions. But before that, you need to carefully study all the features of preparing the premises.
Warm water floors are most often used in private homes. In multi-storey buildings, they create a large load on the floors, and the risk of flooding the neighbors below cannot be ruled out.
It is also worth considering that the coolant circuit is connected to a general heating system, which most often is not intended for such purposes. As a result, cold risers may appear in your or a neighboring apartment. As a result, the relevant authorities rarely issue permission to install the system in high-rise buildings.
At the moment, two systems are often installed in new buildings at once. The first is intended for standard heating, and the second is specifically for heated floors.
The optimal solution is to install heated floors yourself at the construction stage.
When installing the structure in a finished structure, it is necessary to take into account:
- foundation strength;
- door frame size. The minimum height must be at least 2 meters 10 centimeters;
- distance from floor to ceiling, since the concrete screed is quite voluminous.
In addition, the heat index should not exceed 100 W/m2.
Design and principle of operation
For water heating of a heated floor, a system of pipes is used through which the coolant circulates. Most often, pipes are poured into a screed, but there are dry installation systems - wooden or polystyrene. In any case, there is a large number of small cross-section pipes laid under the floor covering.
Where can it be mounted?
Due to the large number of pipes, water heating is done mainly in private homes. The fact is that the heating system of early high-rise buildings is not designed for this heating method. It is possible to make a warm floor using heating, but there is a high probability that either your place will be too cold, or your neighbors above or below will, depending on the type of power supply to the system. Sometimes the entire riser becomes cold: the hydraulic resistance of the water floor is several times higher than that of a radiator heating system and it can block the movement of the coolant. For this reason, it is very difficult to obtain permission from the management company to install a heated floor (installation without permission is an administrative offense).
Water-heated floors require a large number of small-diameter pipes
The good news is that in new buildings they began to make two systems: one for radiator heating, the second for water heated floors. In such houses, permission is not required: the corresponding system was developed taking into account higher hydraulic resistance.
Principles of organization
To understand what you need to make a water heated floor with your own hands, you need to understand what the system consists of and how it works.
Adjusting the coolant temperature
In order for your feet to feel comfortable on the floor, the temperature of the coolant should not exceed 40-45°C. Then the floor warms up to comfortable values - about 28°C. Most heating equipment cannot produce such a temperature: at least 60-65°C. The exception is condensing gas boilers. They show maximum efficiency at low temperatures. From their output, the heated coolant can be supplied directly to the underfloor heating pipes.
When using any other type of boiler, a mixing unit is required. In it, cooled coolant from the return pipeline is added to the hot water from the boiler. You can see the composition of this connection in the diagram for connecting the heated floor to the boiler.
Diagram of a water heated floor
The operating principle is as follows. The heated coolant comes from the boiler. It goes to a thermostatic valve, which, when the temperature threshold is exceeded, opens the admixture of water from the return pipeline. In the photo there is a jumper in front of the circulation pump. A two-way or three-way valve is installed in it. Open it and mix in the cooled coolant.
The mixed flow through the circulation pump enters the thermostat, which controls the operation of the thermostatic valve. When the set temperature is reached, the supply from the return stops; if it is exceeded, it opens again. This is how the temperature of the water heated floor coolant is adjusted.
Contour distribution
Next, the coolant enters the distribution comb. If a water heated floor is made in one small room (a bathroom, for example), in which only one loop of pipes is laid, this unit may not exist. If there are several loops, then it is necessary to somehow distribute the coolant between them, and then somehow collect it and send it to the return pipeline. This task is performed by the distribution comb or, as it is also called, the underfloor heating manifold. Essentially these are two pipes - supply and return, to which the inputs and outputs of all underfloor heating circuits are connected. This is the simplest option.
Heated floor mixing unit with the ability to automatically maintain temperature
If the heated floor is installed in several rooms, then it is better to install a collector with the ability to regulate the temperature. Firstly, different rooms require different temperatures: some prefer +18°C in the bedroom, others need +25°C. Secondly, most often, the circuits have different lengths and can transfer different amounts of heat. Thirdly, there are “internal” rooms - in which one wall faces the street, and there are corner ones - with two or even three external walls. Naturally, the amount of heat in them should be different. This is ensured by combs with thermostats. The equipment is not cheap, the circuit is more complicated, but this installation allows you to maintain the desired temperature in the room.
There are different thermostats. Some control the air temperature in the room, while others control the floor temperature. You choose the type yourself. Regardless of this, they control servomotors mounted on the feed comb. Servomotors, depending on the command, increase or decrease the flow area, regulating the intensity of the coolant flow.
Theoretically (and practically it happens), situations may arise when the supply to all circuits is cut off. In this case, the circulation will stop, the boiler may boil and fail. To prevent this from happening, be sure to create a bypass through which part of the coolant passes. With this system design, the boiler is safe.
You can watch one of the system options in the video.
Water heated floor design
The water heated floor includes:
Pump
The control system for a warm water floor includes a pump, since without forced circulation it is simply impossible to achieve uniform flow of coolant. In addition, this device helps maintain a constant temperature in the system.
For warm water floors, only centrifugal pumps are used. They are designed for different operating modes; accordingly, to change the temperature of the coolant, the device pushes water into the circuit at different speeds.
Boiler
A boiler is necessary to heat the coolant, but if the floor is connected to a central hot water supply, then it is not necessary. It is usually installed for autonomy.
Its distinctive feature is the operating temperature, which does not exceed 45°C. This fact is worth paying attention to if the system is powered by a gas boiler.
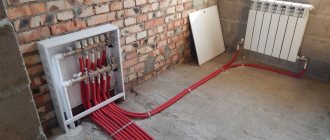
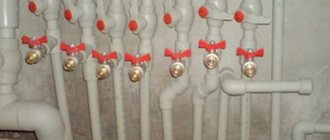
Collector
The circuits, boiler, pump and other elements of the control unit are connected to each other using fittings. This creates several contacts, seams and joints. The risk of leaks will depend on their number. In order to minimize the chances of a breach occurring, a collector is used. It consists of two combs, each of which is represented by a pipe with holes. Their diameter varies from 8 to 12. The first pipe is designed to distribute hot liquid along the circuits, and the second to collect cooled coolant.
Thermostat
A water heated floor system rarely consists of a single circuit. Each of them is regulated separately. Servo drives and thermostats allow you to control the system automatically. As a result, the user will be able to save up to 30% of energy consumption.
In addition, thermostats with touch or remote control are often installed. They have full functionality. They are often used in the smart home system.
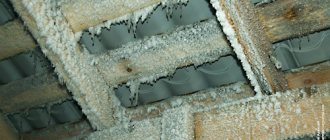
Pipe insulation
More detailed information about the insulation of pipes in horizontal ceilings can be studied in the standards SP 41-102-98.
Corrugation or shell is used to maintain a certain temperature in the pipeline. At the sites. Condensation sometimes accumulates with cold liquids, and insulation helps significantly reduce the risk of excess condensation.
When arranging a concrete screed, corrugation is most often used. As a result, the pipes are additionally protected from solution pressure. It is possible to find materials in blue and red colors on sale.
If the height of the screed exceeds 10 centimeters, then use rigid corrugation. If an additional shell is put on, the layer height can reach up to 7 cm. Double protection helps to cope not only with the pressure of the concrete screed, but also with subsequent loads.
Installation errors and their consequences
Strict adherence to the recommendations of specialists when installing heated floors yourself is an important condition for the successful functioning of the system.
Most often, beginners make the following mistakes:
The height difference between the beginning and end of the pipe. If it exceeds half the diameter of the pipes, air pockets will form inside. As a result, the circulation of the coolant will be difficult and the quality of heating will decrease. To prevent this from happening, it is important to place the pipes strictly parallel to the floor.- Connection of pipes within one circuit. There is no point in installing a circuit of 2 pipe sections and filling it with concrete. This may cause leakage. Each circuit must consist of a whole piece of pipe. Connections should only be made to the collector group.
- Neglect of hydraulic testing. A test run of the system at maximum pressure must be carried out before pouring concrete into the pipes. Otherwise, it will be almost impossible to find a leak, if one occurs.
- Pouring screed onto empty pipes. The concrete pushes through the pipe material and the circulation of the coolant will subsequently be difficult.
- Premature heating start. Heating the pipes until the concrete gains strength will lead to cracking of the screed.
Which pipes to choose
Currently, manufacturers offer a large number of pipes that are suitable for laying warm water floors.
They are made from a variety of materials:
- Stainless steel corrugation. This type of pipe can be spliced with confidence. In this case, they use fittings that are among the most durable and reliable. The material bends easily while maintaining position.
- Copper. Copper pipes cost quite a lot. In addition, during the pouring process you will have to take care to protect the base from alkaline influence.
- Polypropylene. This type of pipe is not used for heated floors. This is due to the fact that the material is too strong to bend, so it is simply impossible to organize a 20-centimeter hose without soldering. This is unacceptable.
- Polyethylene. Pipes are made from cross-linked polypropylene. The material has two classifications: PEX-a and PEX-d. Only the first group is suitable for heated floors, since the second shrinks over time.
- Metal-plastic. Metal-plastic pipes do not cost too much, and besides, there are no problems with their installation.
Screed
IMPORTANT: the top layer of screed is poured only when the contour is filled. But before this, the metal pipes are grounded and covered with thick plastic film. This is an important condition to prevent corrosion due to electrochemical interactions of materials.
The issue of reinforcement can be solved in two ways. The first is to place a masonry mesh on top of the pipe. But with this option, cracks may appear due to shrinkage.
Another method is dispersed fiber reinforcement. When pouring water-heated floors, steel fiber is best suited. Added in an amount of 1 kg/m3 of solution, it will be evenly distributed throughout the entire volume and will qualitatively increase the strength of hardened concrete. Polypropylene fiber is much less suitable for the top layer of screed, because the strength characteristics of steel and polypropylene do not even compete with each other.
Install the beacons and mix the solution according to the above recipe. The thickness of the screed must be at least 4 cm above the surface of the pipe. Considering that the pipe ø is 16 mm, the total thickness will reach 6 cm. The maturation time of such a layer of cement screed is 1.5 months. IMPORTANT: It is unacceptable to speed up the process including floor heating! This is a complex chemical reaction of the formation of “cement stone”, which occurs in the presence of water. And heating will cause it to evaporate.
You can speed up the maturation of the screed by including special additives in the recipe. Some of them cause complete hydration of cement within 7 days. And besides this, they significantly reduce shrinkage.
You can determine the readiness of the screed by placing a roll of toilet paper on the surface and covering it with a pan. If the ripening process is over, then in the morning the paper will be dry.
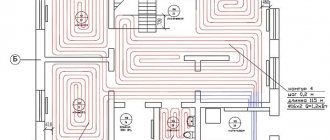
Laying schemes for water heated floors
Water heated floors can be laid in a spiral, snake, double snake and corner snake.
Spiral pipe laying is considered the most effective, since the floor is heated as evenly as possible. In a “snake”, the further the pipes are from the collector, the lower the temperature. The “double snake” slightly compensates for this difference, but installing such a system yourself is quite difficult.
Installation in an apartment
Probably, many residents have had the idea to independently connect water heated floors “for free” to a central heating or hot water system. And some even do this, but in most cases it is prohibited by local law.
For example, in Moscow there is government decree No. 73-PP dated February 8, 2005; Appendix No. 2 clearly states that it is prohibited to re-equip public water supply systems for floor heating.
If you break the rules, at best, you can get a fine on your first visit to the plumbers. And at worst, there is a risk of leaving your neighbors without heating.
In some regions the ban does not apply, but connection requires an examination so as not to disrupt the operation of the system.
In general, from a technical point of view, such options are possible, but only if a separate pumping and mixing unit is connected and the pressure in the system is maintained at the outlet.
Note! If there is a jet pump (elevator) in an apartment building, then metal-plastic and polypropylene pipes cannot be used.
How to calculate pipe length
For water heated floors, three main pipe sizes are made: 16x2, 17x2 and 20x2 millimeters. The first and third types are most often used.
It is very important to carry out sizing calculations before purchasing a heating cone. If you doubt your own abilities, then you should seek help from professionals.
To do this, you need to have a layout of the water heated floor and areas of the floor where furniture and plumbing will be placed. It is important to consider that pipes are not installed under furniture.
It is important that for a product with a diameter of 16 millimeters the contour length does not exceed 100 meters, and for a product with a diameter of 20 millimeters - 120 meters. Accordingly, each of them will occupy no more than 15 m², otherwise the system will not be able to provide the required pressure.
If the area of the room is much larger, then it is divided into several such circuits. It is important that they are the same size. The difference should not exceed 15 meters. If there is good thermal insulation, then the standard laying step is 15 centimeters, but if desired, it can be reduced to 10 centimeters.
In the first case, 6.7 meters of pipes will be needed per square meter, and in the second - exactly 10 meters.
Also, when calculating the size of the system, you should take into account the material of the pipes, heat loss, power of the system and floors, flooring, etc.
To determine the size of the outline, you can use a standard formula. That is, the heated area (m²) must be divided by the laying step (m). The size of the curls and the distance to the collector are added to the resulting value.
Methods for laying the contour
There are three main ways to lay a circuit in a private house with your own hands, but they all have one thing in common - the pipes are mounted from the walls towards the center:
- “Snail” - the contour is laid in a spiral from the walls to the center, and back. At the same time, the structure tapers towards the center of the room. When drawing up a diagram, you should remember that you need to leave space between the pipes for them to return to the supply source. Using this scheme, the heating of the floor covering is uniform, while the level of hydraulic resistance is reduced. The amount of pipe material with this installation is less than with other methods. The main disadvantage is complicated installation.
- “Snake” - pipes are placed along the walls in the form of loops. The option is easy, but with it it is not possible to achieve uniform heating of the floors, since the temperature at the entrance and exit differs significantly.
- Combined method - it combines both schemes. Suitable for rooms with cold walls. The contour is laid along the walls in a “snake” pattern, and along the . This method allows you to save on pipes and increase the energy efficiency of the device.
Installation of a warm water floor on a concrete screed
It is important to consider that self-installation of a warm water floor with a concrete screed is a labor-intensive and time-consuming process, since it takes at least a month for the concrete to harden.
When constructing a structure, it is necessary to proceed in several stages, which will be discussed below.
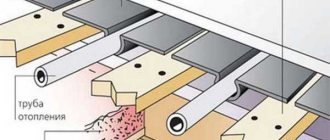
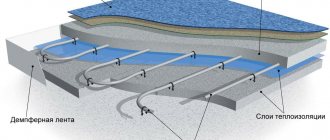
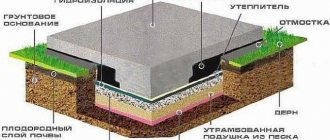
Layers of water heated floor
Water heated floors are a “pie” that consists of several layers. Place them in a certain sequence. Typically, the thickness of the structure varies from 8 to 14 centimeters, and the load on the floors reaches 300 kilograms per square meter.
The heated floor includes:
- reliable and solid foundation;
- a vapor barrier layer with a thickness of 0.1 millimeters;
- insulation, that is, extruded polystyrene foam;
- reinforcement, which gives the structure strength;
- heating elements, that is, pipes that are laid according to the diagram;
- concrete screed with a plasticizer, the thickness of which can reach 5 centimeters.
After the concrete has hardened, a finishing floor covering can be laid on its surface.
Waterproofing
The waterproofing layer is laid on a previously prepared subfloor, which must be clean and as level as possible.
The most commonly used waterproofing material is polyethylene film, which is overlapped one on top of the other and 20 centimeters apart on the walls. To make the joints as tight as possible, they are usually glued with tape.
Damper tape
The damper tape is used to compensate for the expansion of the screed as the system heats up. It helps protect the surface from cracking. The thickness of the tape usually does not exceed 8 millimeters, and the height is 15 centimeters.
The tape is glued around the perimeter of the room, at the junction of the floor and walls. It is important that it is higher than the screed. After completion of work, the excess can be trimmed with a knife.
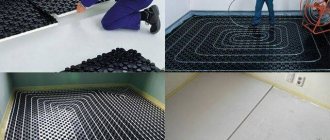
Laying insulation
Choosing the right insulation is very important. The efficiency of the equipment largely depends on it, since it should not waste heat.
Experts advise using extruded polystyrene foam or profile polystyrene mats.
When installing yourself, it is very important to choose the right thickness of the material. If the installation of a heated floor is carried out above a warm room, then 3 centimeters is more than enough, then if the system is located on the ground, then at least 10 centimeters.
It is important to lay sheets of insulation around the perimeter of the area and fix them to the base.
Reinforcement
The mesh helps to significantly increase the strength of the structure. In addition, it is responsible for the uniform distribution of heat, since heating elements are attached to it.
Typically, the diameter of the reinforcing mesh rods does not exceed 5 centimeters, and the size of the cells depends on the laying step.
It is best to lay two reinforcing layers. The first is located on the insulation, and the second is laid on top of the pipes. The meshes are connected to each other using wire.
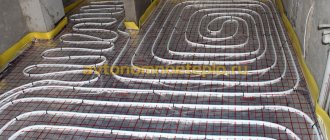
Laying and fastening of pipes
The most important step is laying the heating elements. It is worth considering that a device is needed that makes it possible to unwind pipes in coils, because removing them with rings is prohibited due to the high voltage, which interferes with the installation process.
The installation process will become simpler if the insulation has markings. Otherwise you will have to apply it yourself. Marks are made in accordance with each step of the heating elements. It is possible to mark a line and draw a route using masking tape.
It is necessary to retreat 15-20 centimeters from the walls. Ideally, each contour should be uniform, that is, without seams and with a maximum size of 10 centimeters. Installation is carried out according to a certain scheme. The permissible step near the walls is 10 centimeters, and closer to the center - 15.
It is important to install the circuit in the most distant areas from the collector. Transit sections are usually insulated with foamed polyethylene, thereby saving energy and preventing heat from being lost along the way. It is worth considering that both ends must go to the place where the manifold cabinet is located.
To fix the contour, fastening profiles are used. They are screwed to the floor using dowels. After this, the pipes are pressed against the reinforcing mesh and secured with plastic fasteners. It is not recommended to pinch the pipe, since the loop should fit freely against it.
Since the material is subject to deformation, the contour must be bent carefully, especially if the pipes are made of polyethylene. Polypropylene pipes are difficult to bend, as they tend to spring. As a result, during installation they are fixed directly to the mesh with a significant degree of angle. If streaks or white spots appear on the materials, it should not be used.
Pipes with a diameter of 16 to 20 millimeters can be bent with your own hands, without the use of special equipment
Hydraulic tests
Immediately after installation, the system must be connected and checked for integrity and operability.
The collector, which is responsible for supplying coolant, has a ball valve to which tap water is connected. In this case, a pressure testing pump must be connected to the outlet of the connecting pipes.
The system filling process looks like this:
- all channels except one are closed, and the air vents are opened;
- water is supplied, after which its cleanliness and exit from the system are monitored through the drain hose;
- when the air is completely released and the water becomes completely clean, the tap is closed and the filled system is shut off;
- if the system has several circuits, then each one must be checked;
- as soon as all circuits are washed and filled, you need to close the tap that supplies water.
As soon as the procedure is completed, only air should remain in the works, and the water should be crystal clear.
If a leak is detected, the pressure in the system must be relieved and repaired.
Installation of beacons
In order for the screed to be level, it must be poured along the beacons. Most often, a plasterboard profile is used as beacons.
Beacons are installed in accordance with the level of the finished floor, subtracting the thickness of the coating itself. To secure the guide profile, use mortar pads on which the plasterboard product is placed
Filling the screed
The solution must be laid from the far corner of the room. Filling is carried out in accordance with the beacons. The process must end with a strip at the exit. During the leveling process, you should not try to immediately create an ideal surface. The main thing is that there are no large holes. The minimum layer thickness is 3 centimeters.
In this form, the screed must be left for a couple of days for it to set. Only after this is it possible to begin cleaning work.
Expansion joints
If the temperature gaps are located incorrectly or are not there at all, the screed may collapse.
The need to install shrinkage joints arises if:
- the room has a curved shape;
- room area more than 30 m²;
- the size of the walls exceeds 8 meters;
- the difference is more than double in the length and width of the room.
It is necessary to lay damper tape around the perimeter of the seams. The reinforcement at the seams must be separated. The thickness of the gap for deformation should be 1 cm.
The upper part of the seam must be treated with sealant. If the room has a non-standard shape, then it is divided into parts that have a rectangular or square shape.
Cracks in the screed
After hardening, cracks often appear on the screed. This can happen due to incorrect ratio of components in the solution, poor compaction of the solution, or a variety of other factors.
To avoid cracks, you must:
- prevent the concrete from rapidly hardening by covering it with plastic film a day after pouring;
- dividing large rooms with shrink joints;
- using insulation with a density of at least 40 kg/m3;
- using a more plastic solution for pouring, which contains fibers and a plasticizer.
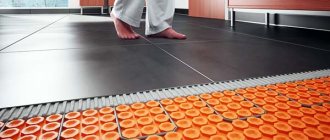
Laying the finishing coating
It is important to choose only a topcoat that is specifically designed for installation on heated floors. It is best to use ceramics and porcelain stoneware. You can also use laminate, linoleum or parquet if there is a marking that allows installation of the material on heated floors. It is important to lay the flooring only on a well-dried concrete screed.
Control system and circuit testing
The control system for water heated floors includes:
- Pump;
- Boiler;
- Collector;
- Thermostat.
The arrangement of all elements in compliance with technical parameters is a very complex thermal engineering task. A lot of parameters are taken into account, starting from the number of fittings and the length of pipes, and ending with the thickness of the walls and the region of the country. In general terms, you can focus on the following data:
- The pump can only be used as a circulation pump. The “wet” type of pump is more reliable than the “Dry” type and less demanding to maintain.
To calculate performance, use the following formula:
P = 0.172 x W.
Where W is the power of the heating system.
For example, with a system power of 20 kW, the pump capacity should be 20 x 0.172 = 3.44 m3/h. Round the result up.
The pressure is calculated using a more complex technique. After all, the pipes are located horizontally, and the pump characteristics show vertical pressure. Use the following formula: H = (L * K) + Z/10. Where L is the total length of the circuits, K is the pressure loss coefficient due to friction (indicated in the pipe passport, converted to MPa), Z is the pressure reduction coefficient in additional elements
Z1 – 1.7 thermostat valve;
Z2 – 1.2 mixer;
Z3 – 1.3 valves and fittings.
Using an example, it looks like this, let’s say there are 3 circuits, 120 m each. In total there are 18 fittings, 3 thermostat valves, 1 mixer. Pipe – corrugated stainless steel ø16 mm, loss coefficient 0.025 MPa.
H = (120*3*0.025) + ((1.7 * 3) + (1.3 * 1) + (1.2 * 18))/10 = 9 + (5.1 + 1.3 + 21 .6)/10 = 11.8 m. The result is rounded up - the pump head is 12 m.
- The boiler power is calculated using the formula W = S * 0.1. Where S is the area of the house. There are also a lot of correction factors, depending on the thickness and material of the walls of the house, the climate of the region, the number of floors, and the presence of adjacent rooms.
Please note that the outlet water temperature should be more than 30 – 35˚C. To withstand this temperature, a mixer is installed in front of the collector. In it, water is mixed to the desired temperature before entering the circuit.
- The collector regulates the water supply in each circuit. Without it, the water will follow the path of least resistance to flow, that is, along the shortest circuit. The adjustment is carried out by servo drives, according to data from the thermostat.
- Thermostats monitor the temperature in controlled rooms by taking readings from temperature sensors.
Before crimping the circuit, it is washed and only then connected to the manifold. Water is supplied at normal pressure, but the temperature is increased by 4˚C per hour, up to 50˚C. In this mode, the system should function for 60-72 hours. IMPORTANT: constant monitoring is required during crimping!
At home, without the use of special equipment, it is impossible to pressurize with high pressure.
If the inspection does not reveal any installation flaws, then you can proceed to further operations.
Types of pipes used
To install heated floors, pipes made of metal-plastic or plastic are used. Polypropylene is also considered an excellent choice: it is sealed, resistant to deformation, and has high thermal conductivity.
When choosing pipes, their technical characteristics are important. You should pay attention whether they are suitable for heating systems or only suitable for plumbing. The markings on the product will help you navigate these subtleties. The following indicators must be indicated on pipes for heating systems:
- linear expansion: up to 0.025 mm/m;
- thermal conductivity: from 0.43 W/m°C.
To calculate the number of pipes required for a particular heating system, you need to know the diameter of the pipe and the laying pitch. It is better to select pipes with a specialist who will pay attention to both quality and technical nuances.
Finish coating
It is laid on a dried concrete screed after the system has been fully tested for functionality. When choosing a material for a finishing coating, it is important to focus not only on taste, but on the labeling of the product - there should be a symbol on the packaging stating that the material can be combined with heating coatings.
If the room has a high level of humidity, it is optimal to choose any type of floor tiles. Ceramic has proven itself best.
Installation
The whole event consists of several steps: design, preparation, installation of heated floors, testing, shelter. At the first stage, all necessary calculations are made, a list of materials, a diagram of the location of pipes and the control unit are drawn up.
Requirements for the foundation, how to eliminate the shortcomings?
At the preparatory stage, a foundation study is carried out. It is important that the height differences are less than a third of the internal diameter of the pipe. If they are present, then you can use ready-made leveling solutions.
Before making a warm floor, measures are taken to insulate the base. This is necessary in order not to heat the ground or neighbors below. And also so as not to flood the underground.
Damping tape or foam
An increase in temperature is always followed by thermal expansion. All materials have this property to one degree or another. To prevent pressure from being applied to the walls, a gap of up to 2 cm is created. This will prevent deformation of the coating.
Damper tape Source plitkahelp.com
Thermal energy tends towards cold energy. Therefore, to avoid losses through the gaps, they are filled with damper tape or polystyrene. Both options have a low thermal conductivity coefficient and return to their original shape after compression.
Hydrobarrier
A warm water floor is installed in a private house on a concrete or wooden base. For insulation, as a rule, coating or roll materials are used in wet rooms, and polyethylene film in dry rooms. The wooden subfloor must be treated with antiseptic compounds.
Thermal insulator
The installation of a heated water floor on a concrete base is necessarily accompanied by laying a layer of thermal insulation material of 7-10 cm. The reason for this is the high thermal conductivity, which is approximately 30 times higher than that of air. Accordingly, the subfloor will be heated first, then only the room.
The barrier is installed with a height of 5 to 10 cm. In terms of durability and strength, extruded polystyrene foam stands out among others. There are also ready-made slabs for laying heated floors with grooves for fixing pipes.
Expanded polystyrene for laying underfloor heating pipes Source p2.zoon.ru
The foil layer on the heat insulator acts as a heat reflector. Therefore, such materials are also often laid in front of the system. But it’s worth considering that a concrete screed will destroy a thin layer of metal after just 3 months. The membrane is only suitable for dry floors.
Advantages
A water-based heating system has many advantages. These include:
- achieving the desired level of comfort , since the floors will always be warm and the air in the room will be heated evenly;
Decision table for choosing a water heated floor system
- safety , but only in a private home. Such floors will not cause electric shock, and the worst thing that can happen is a leak. But in a private house it is not as critical as in an apartment building. Moreover, even if a leak occurs, then at most the owner’s property will suffer, but not the owner himself, since there is simply no risk of getting burned with hot water;
- saving is also one of the advantages. Water floors will save a lot of natural and financial resources, since the same water will be used as a coolant. You can also warm up the room faster using water floors if the ceiling height is very high;
- compatibility with all floor coverings is also a plus. Indeed, it is only in rare cases that certain coatings cannot be laid over the heating system. And then, if everything is done correctly, then any coating can be laid on top of the water system;
You can combine water heated floors with all floor coverings
- The cost of the water system is low , which will save some money during installation.
But such a system also has disadvantages. For example, during installation you cannot do without pouring the screed, and this is quite hard work that requires certain skills. Plus, the screed will have to be dried before use, and this will add 28 days to the duration of the repair. And during this period nothing can be done in the room being repaired. Another disadvantage is the difficulty of repairing the system itself if necessary. So it’s important to do everything efficiently from the beginning in order to avoid troubles over a long period of time.
Total costs for underfloor heating systems over 5 years
Design for a private house
Neglecting this rule may cause negative consequences. This is explained by the constant movement of the soil and, accordingly, all the layers located above. Movements can be observed even on compacted and compacted soil that has been lying unloaded for a long time.
After laying a heated floor cake, which has a fairly impressive mass, cracks may form due to subsidence. The most negative consequence may be the tearing of the elements of the heated floor, that is, all the costs for its arrangement will be in vain.