Increasingly, warm floors are being installed in apartments and private houses. It makes it possible to heat the room evenly over the entire area, making the microclimate as comfortable as possible for residents. During the installation of such a system, waterproofing of the heated floor will be mandatory. The need for this measure is explained by the following reasons.
- Waterproofing under a warm water floor is a prerequisite when installing such a heating system, since if the seal of the pipes with the coolant is broken, the base will begin to collapse. This is especially true for an apartment that is not located on the ground floor, since there is a high risk of flooding of neighbors.
- Waterproofing a warm water or electric floor is needed to separate the insulation from the concrete base, since due to changes in low and high temperatures, condensation will occur, which will negatively affect building materials.
- Waterproofing the floor in a private house on the ground floor, between the soil and the screed, to create a protective layer that prevents capillary moisture from penetrating upward.
The need for waterproofing
Everything is quite obvious here. Such a measure will direct heat upward, preventing it from passing through the ceilings. Quite often, many people forget about installing waterproofing under a warm water floor, but its necessity is explained by several reasons:
- It is imperative to install waterproofing under a warm water floor, since leaks in the pipes in which the coolant moves can cause damage to the base. And if the apartment is not located on the first floor, the neighbors living below you will suffer from the flood;
- Under water and electric floors, a waterproofing layer is necessary to separate the insulating material from the concrete floor. Changes in temperature and cold emanating from the base will cause condensation to appear, negatively affecting the layer of insulating material;
- in rooms on the first floor or located on the ground, it is recommended to lay waterproofing between the ground and the screed to create protection from capillary moisture. The second solution to the problem is to lay waterproofing between the insulation layer and the rough screed.
When using insulation material that is vulnerable to water from any side, experts advise laying it between two waterproofing layers in the following situations:
- The underfloor heating system is being installed, but there is a possibility of leaks;
- the installation of the floor is carried out using the wet method, and the insulation must be protected from the water that is in the solution;
- the floor is installed in a bathroom or other room with high humidity, and there is a possibility of water penetrating through the floor coverings.
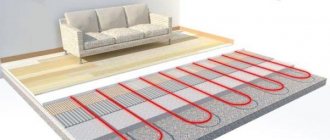
As a rule, in underfloor heating systems, the underlay acts as a waterproofing layer for the insulation on top. For example, foamed polyethylene with a foil surface is responsible for reducing heat loss, uniformity of its distribution, and protects the insulating layer from moisture.
Many people are interested in whether waterproofing is necessary under a heated floor in principle, and whether in wet rooms there is a need to lay waterproofing on top of a heated floor - corrosion can begin from water leaks, and in the case of an electrical system there is a possibility of a short circuit.
Such worries are groundless, since heating elements and coolant pipes are created in such a way that they can be mounted under a screed, which creates an aggressive environment before final drying.
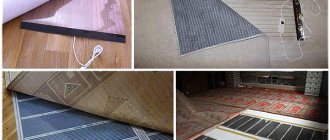
Cable and electrical underfloor heating systems, like water-based ones, have their own waterproofing, so the penetration of moisture from above does not pose a threat to them.
How to install heated floors in the bathroom
Making a water heated floor in a bathroom yourself is not that difficult, especially after obtaining all the necessary permits to change the heating system. It is enough to follow the basic installation steps.
- Preparatory work - at this stage, water supply and sewer risers are changed. The layout of the future heated floor is calculated. Components and consumables are purchased.
Waterproofing the floor in a bathroom or shower - for this, use a special film or euroroofing felt. To create a durable protective layer, the joints between the waterproofing are treated with a blowtorch or a hair dryer. It is extremely important to create reliable protection against moisture penetration. If the floor structure leaks, water will flow to neighbors on the floor below. In this case, waterproofing will be the only thing that will prevent water from immediately leaking to the neighbors in an apartment building.
Rough layer - the quality of the warm water floor cake depends primarily on the screed. The base is poured using expanded clay or small crushed stone. The base is poured along the beacons. After pouring the floors in the bathroom, it is necessary to wait at least 5-6 days before continuing work. During this time, you will need to wet the floor with water to prevent the concrete from cracking.
Foil layer - in order for the flooring in a bathroom with a water-heated surface to have maximum heat transfer, you will need to create a kind of screen that prevents heat loss. In an individual house, you can use either extruded polystyrene or any other thermal insulation for this. At the same time, the floors are insulated. For an apartment where reducing the ceiling height is critical, foil thermal insulation is laid.
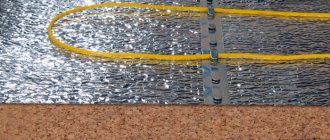
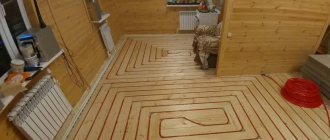
Pipe laying - the water circuit is mounted either on a special reinforcing mesh or on a styrene substrate. The pipes are fixed using clamps or a special strip. You must first calculate the floor and select a suitable heating scheme.
Pouring the second layer of screed. The installation technology requires the use of special adhesive solutions with additives for this task that allow them to withstand constant temperature changes.
- Finishing - usually heated floors in the bathroom are made to look like tiles.
- Maintain strength - heated floors are subject to constant stress from changes in temperature and humidity. To reduce the negative impact, you will need to lay a layer of reinforcing mesh. The fittings are especially necessary if you plan to install a drain in the shower room.
How to fill a bathroom floor
Independent installation of heated floors is much easier to carry out when using special leveling and leveling mixtures. At the same time, in order to make water heated floors in the bathroom and shower, you need to take care of the quality of the screed, which must meet the requirements:
- It is almost impossible to withstand temperature changes - making your own cement composition that will not crack after several years of use, so it is best to opt for ready-made mixtures.
The composition of the floor “pie” consists of: waterproofing, reinforcing mesh, foil insulation and thermal insulation. A high-quality screed allows you to connect all four types of layers and create an almost monolith.
How to connect a water floor in the bathroom
There are several solutions for how to create and power a water floor in a shower or bathtub. Each has its own advantages and disadvantages.
Criteria for selecting waterproofing materials
According to the specific application, such materials are divided into different types, but their selection is subject to the same requirements:
- atomosphere resistance - protection from moisture must be distinguished by the ability to retain its original properties and quality characteristics for the longest possible period;
- moisture resistance and resistance to water is a very important criterion that determines the ability not to let or absorb water;
- chemical resistance - this parameter is important in order to avoid damage from exposure to chemical elements during operation;
- resistance to temperature changes - this property helps to maintain original performance at certain temperatures;
- biological stability - this characteristic allows you to prevent the penetration and impact of bacteria and microorganisms on the structure of the waterproofing material.
When deciding which waterproofing material to use for underfloor heating, it is recommended to pay attention to the following important aspects:
- price. As a rule, rolled materials are cheaper. Mastic materials and primers are more expensive, but provide better protection from moisture;
- features of the premises - for rooms with a small area it is better to use mastic, but large rooms are easier to cover with roll materials;
- the possibility of installing waterproofing on your own - it is easiest to work with impregnating compounds, but difficulties may arise with the deposited layer.
In most cases, manufacturers of underfloor heating systems recommend types of waterproofing materials as recommendations. These include:
- polyethylene and polyvinyl chloride film materials. They are equipped with thermo-reflective layers. For ease of installation, the edges are heated and joined, insulation is performed with adhesive flax;
- cement-polymer - a freshly prepared elastic composition is applied to the surface using a roller or spatula, and a special tape is laid at the joints. The result is a durable and waterproof coating that is excellent for concrete surfaces. Many note its elasticity, which is very important during changes in temperature conditions and shrinkage of buildings recently put into operation;
- cast - the most reliable option. Today, liquid silicone membranes are used for this purpose, creating good adhesion and being elastic.
Liquid silicone membranes - a type of waterproofing for underfloor heating
Marking the room
To facilitate the process of laying tiles, you need to mark the room. The easiest way to do this is with a laser level. Although it is possible to use the old, proven method - a lace with dye powder.
The process looks like this:
- A line is drawn in the center of the room parallel to the longest wall:
- the second line is located perpendicular to the first, also in the center;
- A block of wood is installed in the doorway; it will serve as a limiter.
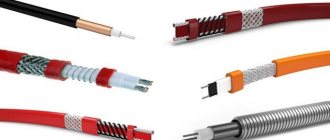
Types of waterproofing under a water floor
Several types of waterproofing materials are known, differing in composition, principle of operation, and efficiency.
Roll
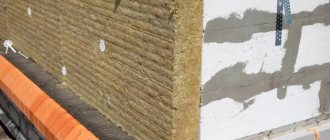
Inexpensive and most common option for insulation. For this type of protection, roofing felt, a thick polyethylene film, is used. Fused waterproofing materials are applied using the gluing method with pre-heating with a gas burner or a hair dryer.
Water based mastic
Creates maximum surface protection from moisture penetration. Recommended for use in multi-storey buildings for maximum protection against water leakage if the water circuit has lost its integrity. In order to prevent leaks, the water circuits of heating systems are placed in special corrugations as an additional measure. This measure ensures that if the integrity of the pipes is compromised, water will not flood the lower floor.
Water-based mastic is one of the options for waterproofing under heated floors
Which flooring should you choose?
For a fine finish, you need to choose not only a beautiful, but also a moisture-resistant coating.
It can be:
- tile;
- laminate;
- uninsulated linoleum;
- self-leveling floor
Materials with high thermal insulation are not suitable because they simply will not allow heat to pass through or will allow it to pass through much more slowly.
This will lead to overheating of the pipes, reducing their service life, as well as high costs.
Prohibited:
- cork;
- insulated linoleum;
- parquet;
- carpet
Laying principle
The laying technique and preliminary preparation of surfaces will be determined by the selected material. There are simple application options that can be done independently; in other cases, special skills and appropriate tools are required.
Roll materials
This type of waterproofing under a heated floor is laid over a rough screed. The materials are spread over the surface so that the joining areas form an overlap of several centimeters.
If bitumen covering materials are used, then waterproofing is arranged as follows. The base must first be leveled and treated with a primer. The roll of waterproofing material is gradually rolled out, while its lower surface warms up. The seams are processed especially carefully. Bituminous materials are glued to the base, creating high-quality protection against water penetration and condensation.
Rolled materials for waterproofing under heated floors
Liquid mastic
Working with such material on your own is quite simple. The mastic is applied with a brush or spray gun in several layers. Impregnations penetrate deeply into the surface, creating a moisture-proof layer. Ultimately, reliable protection against leaks is provided if the water circuit breaks. It is worth noting that this option of waterproofing under heated floors is recommended for installation in the bathroom.
The technological process of working with mastic involves careful surface treatment, applying the next layer perpendicular to the previous one.
Waterproofing helps prevent the formation of condensation and provides high-quality protection against leaks if damage occurs in the water circuit. If such a layer is missing, it means that the installation work was carried out with a gross violation of technology.
Common mistakes during installation and connection
To install heated floors in the bathroom, everything must be done in accordance with the manufacturer's instructions. Judging by consumer reviews and reports from teams who have to remodel and repair heating systems, the main violations during installation are:
- Lack of waterproofing of the bathroom with water heated floors. During installation work, the prevention of leaks is neglected. Waterproofing is a layer that prevents moisture from reaching neighbors in the event of a water circuit break. It is also necessary to waterproof the floor before installing the underfloor water heating system of the bathroom in a heated polypropylene floor.
Lack of work plan and installation scheme. Preliminary calculations help to carry out installation quickly and efficiently, and avoid waste of material.
Carrying out installation work without obtaining permission. After installation, obtaining approval is much more problematic.
Optimal insulation thickness
It is important to make the right choice not only of the insulation model, but also of its thickness; thermal energy savings depend on this.
For your information! If the thickness of the insulation is small, then most of the heat goes under the floor, its amount is equal to the flow of warm air rising upward.
The thickness of the insulation should be selected depending on climatic conditions. It is clear that in areas with a cold climate, the layer of thermal insulation material should be larger.
The type of room located under the warm water floor also plays an important role. If this is a cold basement, or the structure is laid on the ground, then the insulation layer should be made thicker, 100 - 120 mm. When constructing a heating floor over a heated room, a sufficient thickness of 30 - 50 mm.
Installing a thermal insulation layer under a heated water floor is not a luxury, but a necessity. Incorrectly done insulation will lead to deterioration in the quality of heating and unnecessary costs.
Seam processing
After the glue has dried, it should be carefully removed from the seams with a spatula, and the separators should also be removed. Now you can start cleaning the seams.
Using a rubber spatula, apply a little mixture to the seams using cross-shaped movements. Excess is immediately removed from the tiles with a rag.
The mixture should be allowed to harden slightly and the quality of filling the joints should be checked. In places where there is not enough grout material, you should add a solution. Photo - Grouting joints
For your information! The grout mixture protects the seams from mold and dirt accumulation.
Turning on a water heated floor laid under the tiles is allowed only 20 - 25 days after the installation of the tiles. This time is necessary for the screed to completely harden and the tile adhesive to dry.
A warm water floor plus tiles is an ideal option that allows you to justify your financial investment in a short period of time. In addition, this design will provide comfort in your home for many years.
Briefly about the main thing
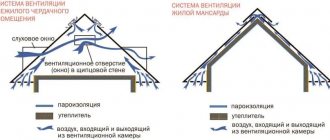
If you don’t know how to install a vapor barrier on the floor of a wooden house correctly, you can find out within a couple of years that it has begun to rot, and the insulation has gotten wet and stopped working. The main rule is not to use impenetrable films that are prone to condensation accumulation for vapor barrier of wooden structures. The material must retain excess moisture and gradually evaporate it. Special films and membranes have these properties, some of which are intended for indoor use, others for outdoor use. During installation, it is important to take into account that such materials are double-sided and to lay them correctly.