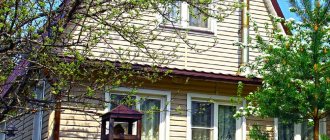
To eliminate the largest heat losses in a residential building, it is impossible to do without insulation. The process of insulating the floor of the first floor using wooden beams located above the basement begins at the construction stage, but the work can be done after construction. Mandatory thermal insulation and sound insulation of horizontal structures of the upper floors is also required.
Floor design
The basis of a wooden floor is beams that are supported on load-bearing walls and serve as a kind of “foundation” for the remaining structural elements
. Since the beams will bear the entire load during operation of the floor, special attention should be paid to their proper calculation
For beams, they usually use solid or laminated timber, logs, and sometimes boards (single or fastened in thickness with nails or staples). For floors, it is advisable to use beams made of coniferous trees (pine, larch), which are characterized by high bending strength. Hardwood beams perform much worse in bending and can deform under load.
Rough boards (OSB, plywood) are fixed to the floor beams on both sides, on top of which a facing covering is sewn. Sometimes the floor of the second floor is laid on logs, which are secured to beams.
It is worth remembering that the wooden floor on the side of the first floor will be the ceiling, and on the side of the second floor (attic, attic) will be the floor. Therefore, the upper part of the ceiling is sheathed with floor materials: tongue-and-groove boards, laminate, linoleum, carpet, etc. The lower part (ceiling) - clapboard, plasterboard, plastic panels, etc.
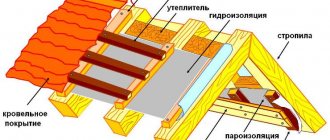
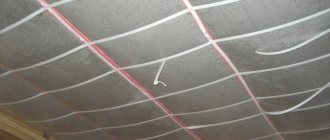
Thanks to the presence of beams, space is created between the rough boards. It is used to give the ceiling additional properties. Depending on the purpose of the second floor, heat-insulating or sound-proofing materials are laid between the floor beams, protected from moisture by waterproofing or vapor barrier.
In the event that the second floor is a non-residential attic that will not be heated, thermal insulation must be included in the ceiling structure. For example, basalt wool (Rockwool, Parock), glass wool (Isover, Ursa), polystyrene foam, etc. A vapor barrier film (glassine, polyethylene and polypropylene films) is placed under the thermal insulation layer (from the side of the first heated floor).
If EPS, which does not absorb water vapor, was used as thermal insulation, the vapor barrier film can be excluded from the “pie”. A layer of waterproofing film is laid on top of heat-insulating or sound-proofing materials that absorb and can deteriorate from moisture. If during finishing the possibility of atmospheric moisture entering the attic was excluded, the insulation does not need to be protected with waterproofing.
If the second floor is planned as a heated and living space, then the floor “pie” does not need additional thermal insulation. However, in order to reduce the impact of noise that will occur when people move along the floor, a soundproofing layer is laid between the beams (usually conventional thermal insulation materials are used).
For example, basalt wool (Rockwool, Parock), glass wool (Isover, Ursa), polystyrene foam, sound-absorbing ZIPS panels, soundproofing membranes (Tecsound), etc. When using materials that can absorb water vapor (basalt wool, glass wool), a vapor barrier film is laid between the first floor and the sound insulator, and waterproofing is placed on top of the sound insulator.
Scheme of insulated layers of the pie
In general, regardless of the thickness of the insulation and its origin, the thermal insulation pie looks standard with minor nuances. Most insulation materials one way or another require additional hydro- and vapor barrier.
Therefore, the layout of the layers looks like this:
- A vapor barrier is nailed to the wooden beams.
- Logs are nailed across the beams (but not always) to provide cells for future insulation.
- Mats, slabs or bulk insulation are placed on top. The foam material requires a continuous sheathing to prevent it from penetrating through cracks into the ceiling of the lower floor.
- A layer of waterproofing is laid on beams or joists that slightly rise above the insulation, which at the same time serves as a wind barrier.
- A subfloor is placed on top. This can be plywood, OSB boards or regular board sheathing.
- The final stage is laying the finished floor, cladding.
On the reverse side of the floor, that is, to the ceiling of the lower floor, sheets of plywood or boards are also nailed to the wooden beams as the bottom sheathing. If the lower floor is residential, it is also finished with various decorative materials; if not, a rough ceiling is left, for example, in the basement.
Basic requirements for floors
During the construction of floors, a sufficient degree of noise insulation should be ensured; the value is established by design standards. To do this, you should close the gaps at the places where the material joins; only in this case, sounds from neighboring rooms will spread minimally. Floors that separate rooms with a certain temperature difference must meet thermal protection requirements. This indicates the need to use an additional layer of thermal insulation. Any structure, especially one made of wood, is not able to withstand prolonged exposure to fire. It should be remembered that each material is characterized by a certain fire resistance limit. For reinforced concrete floors it is 60 minutes, but if the structure is made of wood with backfill and has a plastered surface underneath, then the fire resistance will last 45 minutes. Wooden floors that are protected with a layer of plaster can withstand flames for about 15 minutes. If there are wooden floors that were not protected with fireproof materials during the installation process, it should be taken into account that their fire resistance limit is even lower.
Sand as a soundproofing layer
Soundproofing with sand has been used for a long time because the material has the ability to absorb both low and high sounds. In its mass it is porous with small cells inside between the particles. It is there, reflected from the walls of the air chamber, that sound waves are damped.
But sand has several negative characteristics:
- high specific gravity, which requires the construction of floors using powerful beams and a rough foundation (ceiling);
- high thermal conductivity, it is impossible to insulate floors with sand, you will have to add an additional layer of thermal insulation material;
- If you do not assemble a sealed structure, sealing all the cracks and holes, then sand will penetrate into the premises of the house.
Sand is used as a soundproofing layer in wooden floors
Installation of wooden floors between floors in a brick house
The installation of such an element in a brick house as an inter-beam floor should be carried out at the time of its construction. It is worth noting that the depth of the socket under the beam must be at least half the thickness of the material installed in the wall. It is not uncommon for beams to be installed through a cross-section, but such a structure must then be carefully insulated. Many people prefer to build a house themselves, even if it is made of brick.
To connect wooden floors to each other, special fasteners should be used
It is worth noting that you need:
Follow technology; Follow the instructions; Pay attention to the advice of experts.
It is necessary to calculate the support on the beams as clearly as possible in order to choose the optimal step between the beams
It is important to remember that beams are permissible for use as floors, including roof slabs, only if the house does not exceed 8 meters in length (beam support). Beams must be laid according to a certain principle
As a rule, they are installed on brick pillars, if we are talking about covering the first floor, and also on strong pillars made of thick timber, for the second.
In addition to many dangers, wood is the best option for building a house and forming floors, since it is environmentally friendly, completely safe and does not cause allergies or other reactions. Now it is very fashionable to build wooden houses, as they are warm, stylish, durable and, most importantly, not expensive.
Characteristics of thermal insulation materials
The production of materials for retaining heat indoors keeps pace with the times. Every year, new and improved materials come into production.
Consumer health and the environment come first. KnauF insulation products fully comply with these requirements.
Eco-friendliness is in fashion, as is taking care of your own body.
When choosing materials, first of all you need to pay attention to:
- heat conductivity level;
- ease;
- moisture resistance;
- fire resistance;
- low level of release of toxic substances or their absence;
- non-susceptibility to putrefactive and fungal processes;
- breathability;
- resistance to rodent attacks;
- flexibility and strength at the same time;
- sorption humidity;
- heat and frost resistance.
The heat retention level varies from 15% to 35%. In areas with a harsh climate, it is necessary to carefully insulate the floors in the attic, otherwise you will have to spend considerable sums on heating the house.
A good level of attic insulation results in smaller temperature changes and reduces condensation under the roof. And this, in turn, is good protection against mold.
Important! High-quality installation of thermal insulation materials guarantees the preservation of a favorable microclimate in the house. Saves you from the cold in winter and from the heat in summer.
Vapor barrier protection against moisture increases the service life of the roof of the house and interfloor ceilings. Metal parts are less susceptible to corrosion. Proper installation of windows in the attic, as well as ventilation holes, prevent increased humidity and allow drafts to appear.
The quality of installation of thermal insulation in the house is indicated by the absence of ice and icicles under the roof, or their minimal presence. In order to avoid the outflow of heat from the house and the appearance of high humidity, at the initial stage of building a house, it is necessary to carefully insulate the interfloor floors.
The advantage of wooden floors is the simplicity and ease of installation work. Wood has a low thermal conductivity, which reduces the outflow of heat during the operation of the home.
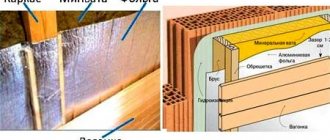
Insulation with cotton wool
Comparison of mineral and ecowool. Click on photo to enlarge.
Today on the market you can find a variety of thermal insulation materials in the form of rolls or layers of cotton wool. This wool can be mineral, slag, basalt, etc. Among its attractive characteristics are the following:
- low thermal conductivity;
- excellent noise absorption;
- high level of fire safety;
- hygiene and environmental friendliness;
- resistance to mold, rot, destruction by insects and bacteria.
Today, not only floors, but also walls, roofing and slopes in window and door openings are insulated with cotton wool.
Features of thermal insulation
Interfloor wooden floors do not differ from each other in construction technology. But in terms of insulation, they differ somewhat from each other. Thermal insulation of residential and non-residential premises requires a special approach.
Attic
The attic itself comes in two types:
Cold .
This is a non-residential premises that is either completely empty or designated as a warehouse for equipment, old things, etc. In the first case, maximum requirements are set for the ceiling, the insulation layer is thicker, and vapor and waterproofing are required.That is, there should not be the slightest chance for a cold corridor to arise. The ceiling is insulated to the maximum, since the temperature in a cold attic in winter rarely exceeds 8 degrees.
- Warm .
This is a full-fledged room, an attic where people live, an office or a recreation room. If there is an attic, the requirements for floor insulation are the same as for a conventional interfloor. You can lay a small layer of sound insulation. Since there will be no strong temperature changes, the likelihood of condensation accumulation is also low, so a vapor barrier will not be required if the room is well ventilated. On the attic floor, walls and vaults are mainly insulated.
Basement and basement
The basement differs from the basement only in the level of ceiling above ground level. But even this is enough to make a difference between insulation methods. The basement is underground, the wind does not get into it, so the temperature there never drops below zero. However, laying vapor and waterproofing is necessary, because the moisture coming from the ground is enormous.
The basement floor is raised slightly above the ground, which means that cold can penetrate through small cracks between the brick, stone or wooden walls. The temperature there will be like in the attic, so it is necessary to insulate the basement floor more carefully, using high-quality, thick insulation.
Between floors
If the entire building has interfloor ceilings of the same type, wooden, and all rooms, upper and lower, are heated equally, then there is no need for a thick layer of insulation .
In this case, it is laid only as sound insulation. If the room is dry and warm, then there is no point in paying much attention to hydro- and vapor barriers. It is laid only to protect the insulation itself from rotting and moisture accumulation.
If there is high humidity in the room, for example, there is a bathroom on the lower floor and a bedroom on the upper floor, then high-quality waterproofing is needed. Firstly, there will be strong temperature changes in the bathroom, and secondly, moisture and hot air will rush upward, the insulation will accumulate moisture, the wooden beams will rot and everything that comes from it.
Installation of wooden floor beams
The technology for installing floors using beams involves performing work in several stages:
1. Calculation of the cross-section (diameter) of a wooden floor beam taking into account the requirements of SNiP 2.01.07-85 “Loads and impacts”.
Calculated indicator of the maximum permissible load per 1.m2. is:
- for basement and interfloor ceilings - no more than 210 kg;
- for the attic - no more than 105 kg.
In more detail, the section is calculated taking into account the distance between the beams (see the table of sections of floor beams).
Table of cross-sections of floor beams
When calculating the length of the beam, it is important to remember that wood is prone to bending
Calculation of the deflection of a wooden beam
for basement and interfloor ceilings, the minimum deflection cannot exceed 1/300 of its length. Those. beam 3,000 mm long. cannot bend more than 10 mm. in the place furthest from the support;
for the attic - no more than 1/200.
Deflection can be eliminated by bending the beam. Construction lifting, as this process is called, allows for compensation of deformations. Roughly speaking, the beam should be slightly curved inward in order to take into account the bending to take the proper shape.
2. Purchasing timber, logs or lumber and treating it with an antiseptic, fire-fighting, antifungal solution and biological protection.
3. Selecting the type of fastening of the beam to the wall.
Attaching wooden floor beams to a load-bearing wall is carried out in two ways:
wall mount. The beam is embedded into the load-bearing wall to a depth of 150-200 mm.
Fastening wooden floor beams to a load-bearing wall
With this installation method, the end of the beam must be cut at an angle of 60°. To protect the ends of the beam, they need to be wrapped in two or three layers of roofing felt. In this case, the end of the beam remains open, and it should not rest against the wall. There is a gap of 20-25 mm. will allow for free air exchange. And the resulting niche (gap) is filled with mineral wool.
hanging fastening. In this case, the beams are fixed to the wall using metal plates.
Fastening wooden floor beams using the hanging method
4. Laying wooden floor beams
At this stage, beams of the required length are prepared. The length depends on the installation method. If the beam is inserted into the wall, then it is calculated as follows: the length of the room plus 300-400 mm. for wall mounting. If attached to the wall, then the length of the beam is equal to the length of the room.
Installation of wooden floor beams begins with the outer beams. Each beam is checked with a building level. After this, the beams are fixed in the wall sockets using dry crushed stone.
Next, intermediate beams are installed. To do this, it is advisable to stretch the fishing line between the outer beams and set the rest along it. The distance between adjacent beams should be the same.
When the beams are installed exactly level and the horizontal position is checked, they can be concreted in the landing sockets.
Conclusion
Flooring with wooden beams made using this technology will reliably serve you for several decades. However, to extend its service life, it is necessary to treat the wood and carry out periodic inspections to monitor their condition. If there are defects, carry out repairs (partial or complete replacement of damaged elements).
Bugs and difficulties
The most common problems are:
- Sometimes manufacturers indicate the working side on vapor barrier rolls, sometimes not. How to determine which side to lay the vapor barrier on? On one side, it absorbs moisture, that is, it has small holes; if you run your hand over it, you can feel the roughness. It is this side that is absorbent; it must be laid “facing” the lower room. If the film is double-sided, then it should be laid as the roll unfolds.
- You only need to attach vapor barriers to each other, as well as to the walls, using special tape designed specifically for vapor barriers. No stapler or regular tape will provide the necessary sealing. If the sealing is not done well, condensation will begin to accumulate between the beams, which will cause them to rot, mold and complete destruction of the beams and the insulation itself.
- The width of the thermal insulation must clearly coincide with the pitch of the beams. You cannot place rolls or slabs of mineral wool with a gap or leave the remaining part in a raised state.
- The thickness of the insulation must correspond to the climatic conditions for a particular region. If the layer is smaller, freezing in a cold attic is possible on the outside of the insulation, especially mineral wool. All the frost in the form of water will penetrate into the cotton wool and go further to the ceiling of the lower floor.
- Rotting of insulation and wooden beams occurs mainly due to poor ventilation of the room. Therefore, the attic and basement must have a ventilation system connected to the street.
- Mineral wool tends to shrink over time. If 15 cm thick insulation is planned for the attic or basement, then it is better to lay 20 cm at once. In a year or two it will shrink to the required size. Manufacturers offer the highest quality material in the form of slabs; mats are softer and retain heat less well.
- The hydrobarrier cannot be replaced with ordinary polyethylene, as many private developers do. The waterproofing roll is designed in such a way that it can allow air to pass through, but cannot allow moisture to pass through. If you use ordinary film, there will not be proper ventilation between it and the insulation, moisture will begin to accumulate and the thermal insulation, along with the beams, will begin to rot.
- If yellow, damp spots begin to form on the ceiling, but the attic is dry and the roof is not leaking, then most likely moisture has accumulated in the insulation layer.
- Between the floors where the wiring is planned to be laid, it is better to wrap it separately in polyurethane foam so that it does not come into direct contact with the insulation and wooden elements. You should not rely on fire retardants and fire resistance of cotton wool.
From a monolithic slab
Monolithic slab ceiling
This type of ceiling consists of a monolithic slab, which is manufactured on site and rests on the walls. Reinforcing mesh and concrete are used for manufacturing.
Monolithic slab flooring has a high surface quality and can be manufactured in any form of complexity.
Note! The disadvantage of making a monolith floor is the mandatory installation of formwork. If you choose the right covering option for your house and carry out all the installation and concrete work efficiently, you will get a durable and reliable covering
If you choose the right roofing option for your home and carry out all the installation and concrete work efficiently, you will get a durable and reliable floor.
See the video on the technology of pouring a ribbed monolithic floor below:
Attic insulation
Unlike a cold attic, the thermal insulation of which is done solely to minimize heat loss through the roof, the attic is a full-fledged living room, so the task is to insulate the room so that it can be lived in.
How to properly insulate an attic floor
- A vapor barrier material is laid over the wooden beams, the canvases are laid overlapping each other with a margin of 20-25 cm.
- On the vapor barrier from the lower floor, boards are placed on the beams, which will serve as the subfloor of the attic and the base for the ceiling of the second floor.
- Fine expanded clay is poured between the ceilings, which will serve as insulation and at the same time soundproof the room.
- Another layer of vapor barrier is laid on top of the expanded clay, and the film is fixed to the beams using slats.
- The bars are mounted perpendicular to the beam floors; the distance between them should be equal to the width of the selected insulation.
- Plates of insulating material are laid between the bars, bringing them as close as possible to each other. A vapor barrier layer is laid on top.
- If ecowool is used as thermal insulation, instead of wooden blocks a truss is made from metal profiles. Installation of a metal frame and insulation with ecowool are jobs that are difficult to do yourself. To do this, you need to have professional equipment and devices, so such thermal insulation is usually not done independently, but is entrusted to specialists.
- Boards or thick plywood are laid on top of the insulating pie, which are attached to wooden blocks.
Insulation of the ceiling and walls of the attic floor
The method of insulating these elements depends on the design features of the room. If the attic roof reaches the floor, the ceiling is insulated as follows:
- Waterproofing is laid from the floor itself to the ridge. The film must cover the entire surface, so that no open spaces are formed, the sheets must be placed on top of each other. The material is secured to the rafters with a stapler.
- The sheathing is made from wooden slats, which are attached to the beams at a distance of 50-60 cm from each other.
- Insulation is laid between the lathing slats; its thickness should correspond to the width of the joists. The slabs are laid from the bottom of the room, moving towards the top.
- The top of the pie is covered with a vapor barrier film, which is attached to the sheathing with thin slats, and the joints between the sheets are additionally taped.
- Finishing finishing material, for example, lining or decorative panels, is mounted to the sheathing.
If the ceiling and walls of the attic are separate parts of the room, then insulation of the walls is carried out as follows:
- Lay a layer of waterproofing.
- They make wooden sheathing around the windows.
- A horizontal base beam is installed below along the entire length of the wall, and vertical racks are mounted from it in increments equal to the width of the insulation.
- A heat insulator is laid between the beams.
- Everything is covered with a vapor barrier film.
- A counter-lattice is made from thin slats to create a ventilation gap.
- Finishing is being installed.
Methods for laying basement floors
For a wooden plinth structure, a cranial block is required. It will allow you to insulate the floor. After all, it is on this that the panels or board covering the insulation are mounted.
The more popular option is a rough layer of rolled or unedged boards. The material is mounted on a wooden block with a square cross-section and a side of 5 or 4 cm. It is best to attach the cranial beam to the logs with self-tapping screws, but you can also use nails.
Advice! You can attach the board not to the skull block, but to a groove (quarter). It needs to be cut with chisels or power tools. It will take longer.
The subfloor of the basement is insulated with bulk materials, including sand. Antiseptic-impregnated sawdust or mineral wool 10 cm thick is often used. To protect wood structures, a waterproofing layer is laid underneath. The most practical option is bitumen roll materials. For rooms in contact with moisture, waterproofing is also installed on top.
Insulation technology
It is assumed that there is already a floor made of wooden beams and nothing else, so it is possible to insulate the floor, starting gradually from the bottom up. Moreover, the insulation will be double with a damper layer on top of the subfloor.
- screwdriver;
- hacksaw, jigsaw;
- construction knife with replaceable blades;
- construction corner;
- hammer;
- scissors.
- vapor barrier with heat-reflecting screen;
- timber 40x30 mm;
- edged board 20 mm;
- floorboard 30-40 mm;
- MDF 22 mm;
- mineral wool 50(100) mm with a high sound absorption coefficient;
mineral plate 50 mm;
- sunbond, geotextile;
- damper tape;
- self-tapping screws 75 mm;
- stapler and staples 14-16 mm;
- metallized tape.
Work order:
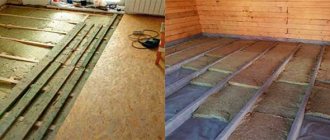
- Skull blocks 40x30 are secured along the lower edge of the beams using 75 mm self-tapping screws, every 50 cm.
- A wooden ramp is laid on top of the beams from a 20 mm thick board, laid across the beams with emphasis on the cranial bars. It is important to leave a gap of approximately 10mm on each side between the edge of the board and the beam.
- From below, the ceiling is hemmed with a vapor barrier and a heat shield directed downwards. This can be a single material made of film or polyethylene foam covered with aluminum foil. All joints are taped with metallized tape.
- Mineral wool 50-100 mm thick is laid on top of the roll, depending on the required insulation.
- The insulation layer is covered with a vapor-permeable membrane, spunbond or geotextile. Its task is to prevent mineral wool fibers from entering the room through underground ventilation. Fastening is carried out on top of the beams with fixation directly along the border of the laid insulation using staples and a construction stapler.
- Logs are laid on the beams under the subfloor or immediately a floorboard if the thickness of the ventilation gap above the insulation along the beams is 30-40 mm.
- The next layer is a dense slab of mineral wool or EPS, laid end-to-end over the entire floor area. A gap of 10-15 mm from the walls is left around the perimeter or a damper tape made of foamed polyethylene is laid.
- The insulation layer is covered with MDF sheets (OSB) 22 mm thick.
- Be sure to have ventilation holes in the corners covered with gratings to ventilate the underground space. It is allowed to install ventilation ducts and include them in the general ventilation system of the house, which will allow for more efficient removal of steam and moisture from the floors.
Wooden floor construction
The most common material used for installation of interfloor, roofing and floor coverings is wood. Especially in private buildings, since this material is easy to process, environmentally friendly, and easy and quick to install. Restrictions on the span length of wooden floors are eight meters. The main load-bearing elements are beams with cross-sectional dimensions of 5x15 cm (minimum) and 14x240 (maximum). Sometimes sanded logs of suitable diameters are used to make beams. The varieties of coniferous trees used for the ceiling are the most durable. Before installation, wooden structures must be thoroughly dried.
The quality of drying can be determined by tapping an ax on the products; the ringing and clear sound will confirm this.
The advantages of wooden floors include lightness, the ability to impart proper thermal and acoustic properties to the structure
Other structural elements are also used in floors to strengthen the beams, connect them firmly and create a reliable frame for the house. When constructing them, the following are used:
- Skull block is a 5x5cm wooden block, which, as a rule, is attached to the bottom of the beam, for hemming the ceilings below the located room.
- Subfloor boards. Even low-quality boards - unedged and unplaned - are suitable for the device.
- Floorboards are specially made, well-planed boards with tongue and groove.
- Insulation material - it can be ecowool, polystyrene foam (penoplex), rolled material for thermal insulation.
- Waterproofing and vapor barrier films that serve to prevent moisture from entering and remove condensation.
- Antiseptic impregnations, bitumen, paint, roofing felt.
- Decorative finishing materials.
Vapor barrier device in the interfloor ceiling
Some features of wooden floors
As mentioned above, the structure of the floors consists mainly of wooden elements, but the technology for finishing the floor and ceiling can use any modern material. Correctly installing various parts into a single floor structure is an important task; in this case, the beams will be reliable and will last a long time.
In particular, one of the important functions of floors is sound insulation. The advantage of wooden floors is that any insulating materials can be easily attached to them. The installation of decorative finishes is also good to give a modern design to the room.
Another difference between wooden floors is that they do not provide additional load. Therefore, by choosing wooden structures, it is possible to save on the construction of a reinforced foundation for the house. Proper installation of floors between the levels of the house allows the rooms to “breathe”, maintain the desired temperature and have good sound insulation. Wooden beams are very reliable and durable.
Proper installation of wooden floors between floors will eliminate noise and create a comfortable atmosphere in the house
The distance between the beams is calculated depending on the number of storeys of the building, its area and floor loads. Varies from 60 centimeters to 1 meter.
The length of the beams is selected taking into account their strong support on the walls of the building in special nests.
Choice of insulation
It is necessary to determine not only the insulation material that will be laid between the floor beams. It is important to decide on the entire insulation complex, which will contain a number of materials and layers.
The main idea of interfloor insulation is to localize thermal energy separately on each floor. Ideally, the bottom layer of the ceiling should be a heat-reflecting screen that can turn back most of the radiant energy.
The insulation is placed between beams and joists without taking up extra space or increasing the height of the ceiling. Due to the absence of a significant temperature difference, there is no need to talk about the minimum required layer thickness; the material is laid at the level of the beams and joists. Or a little less by 3-4 cm, to form a ventilation gap. The table shows the optimal thickness of insulation depending on the thermal conductivity coefficient of the material:
| Insulation with thermal conductivity coefficient l, W/m °C | Insulation layer thickness, mm |
| 0,03 | 115 |
| 0,035 | 135 |
| 0,04 | 155 |
| 0,044 | 170 |
| 0,045 | 175 |
| 0,046 | 180 |
| 0,047 | 185 |
| 0,05 | 195 |
The soundproofing properties of insulation come to the fore. It is important to achieve good sound absorption, especially of the impact type.
It is not advisable to use foam for this. It conducts sound quite well on its own. Considering that it will be laid between the beams, polystyrene foam will act as a membrane, transmitting sound waves with almost no reduction in power.
It would be more relevant to use mineral wool, for example Rockwool with an increased sound absorption coefficient or an affordable analogue.
Much depends on the design of the ceiling.
In the simplest case, the insulation is laid between the floor beams, the bottom of the beams is hemmed with sheet material or boards, logs and a subfloor made of boards are laid on top, on top of which the flooring immediately goes. In this case, it is better to choose mineral wool for insulation and lay it on top of a heat-reflecting vapor barrier.
Mineral wool is one of the best materials for insulation
In another case, an additional layer of insulation is formed on top of the subfloor from dense slabs of mineral wool or extruded polystyrene foam, which acts as a damping layer. Chipboard and finished flooring are laid on top.
The use of bulk materials for insulation of interfloor ceilings is not justified. The mandatory presence of ventilation gaps with access to the interior of the upper floor increases the risk of fine suspended matter and dust from the insulation getting into the air. Soundproofing properties are also not high. The latter also applies to expanded clay.
The use of polyurethane foam indoors is not recommended due to its unsafety. It is impossible to guarantee a low level of toxicity and completely eliminate the possibility of polymer decomposition.
Types of wooden floors
Houses have a basement and attic space, and often have an attic. The type of overlap depends on this, for which different requirements are imposed in different cases.
There is the following division of load-bearing vaults by type:
- An interfloor ceiling that does not require good insulation, since it separates residential areas. The main requirement is good sound insulation.
- Attic, separating living quarters from the attic. Depending on whether the attic (attic) is heated or there is no heating in the room under the roof, the flooring is made of the necessary insulating material. But a vapor barrier layer is required to prevent the formation of condensation.
- Basement or basement, serving as the boundary between the basement. Here, thermal insulation comes first, cutting off the cold coming from below.
Attic floor made of I-beams
Depending on the requirements for the flooring, layers of insulation, vapor barrier or soundproofing materials of a certain thickness are added.
Wooden floor installation
Standards and requirements for sound insulation of wooden floors
The technologies described above should ensure maximum efficiency of floor insulation. But do not forget that there are standards and requirements for such an indicator as sound insulation. Many thermal insulation materials are good sound insulators. So the thermal insulation provided can be considered sound insulation.
The main requirement for reducing the penetration of noise into the premises of a house from the outside is to reduce it to 45 dB. What can such an indicator guarantee?
- Mineral wool with a density of at least 50 kg/m³, laid with a thickness of at least 100 mm.
- Acoustic mats with a density of 30 kg/m³ and a thickness of 100 mm.
- Construction felt with a density of 20-30 kg/m³ and a thickness of 20-40 mm.
Construction of interfloor vaults in a house made of aerated concrete
The main feature is that aerated concrete, despite all its positive properties, does not have sufficient strength. Because of this, it is not recommended to build buildings with more than two floors from ordinary aerated concrete.
Installation of wooden floors between floors
To install flooring between floors, especially when it is necessary to install the ceiling of the 2nd floor of a house made of aerated concrete, a reinforced support from a reinforced concrete belt located along the perimeter of the building or room is prepared in advance.
DIY work stages:
- The ends of the beams must be sawed at an angle of 60°-70°, creating an additional cavity for ventilation after installation.
- Next, the bars at the point of contact with the wall are wrapped with roofing material, which prevents abrasion of the structure stop. The end must be left open to remove moisture from the wood during ventilation.
- When creating niches for laying wood, it is necessary to calculate their size so that the gap between the wood and the wall above is at least 50 mm. After laying the beam, insulation, for example, mineral wool, is placed in this gap.
- Installation begins with the outer beams, mounting the ceiling along wooden beams. Then the intermediate slabs are installed, checking the correct installation according to the building level.
- The beam vault is fixed to the reinforced belt using metal corners, pins or special plates.
- The next step is the installation of boards and bars secured to the bottom of the beams.
- After fixing the bottom layer of the structure, the insulating layer is distributed, selecting its properties depending on the type of floor - providing thermal insulation, improving sound insulation or waterproofing.
Floor finishing on beams
Finally, logs are laid on top, on which the finished floor is mounted. The lower part of the vault is also refined, covered with clapboard, fiberboard, plywood or other finishing material.
Of all types of floors, those made of wood are more preferable when building a house on your own - wooden interfloor structures require less cost and are not very labor-intensive. Using timber, you can build any type of floor - interfloor, attic or basement (basement). You just need to correctly calculate the load and choose the right lumber for construction, which will ensure the strength and durability of the structure.
Features of insulation from the attic
The generally accepted procedure for insulating a wooden house from the attic side with the simultaneous formation of a vapor barrier layer involves the sequential implementation of the following operations:
- leveling the floor surface by arranging a cement screed with the addition of sand;
- the formation of a vapor barrier protective layer made from ordinary polyethylene or from a membrane film sprayed in liquid form;
- laying basalt wool slabs over the vapor barrier layer or filling with expanded clay granules.
Additional information: The choice of these thermal insulation materials for insulation from the attic side is explained by the fact that they are lightweight, have good sound absorption and do not attract small rodents (i.e., they are optimally suited for insulating the attic space with your own hands).
If you want to get a full-fledged floor covering in the attic, a reinforcing mesh is laid on top of the insulation with a vapor barrier, on which a concrete screed is then made. After it hardens, the rough floor base is covered with linoleum or other decorative material suitable for these purposes.
Calculation of the floor structure in a wooden house
It is on how correctly the expected load is calculated that you can create a high-quality, reliable structure that will perform its main functions and last for a very long time.
Most often, beams in a room are laid in the direction of the shortest wall. This makes it possible to keep the span to a minimum. The pitch between the beams will depend primarily on the size of the section. On average this size is 1 meter. Making the distance smaller is not worth it, as this will only increase the consumption of material and the complexity of the work.
Floor beam installation diagram.
It is better to give preference to beams with a large cross-section rather than making a floor with a small pitch and weak overlap.
The main dimensions of beams for a certain span size:
- 2200 mm span – section 75*100 mm;
- 3200 mm span – section 100*175 mm or 125*200 mm;
- 500 mm span – section 150*225 mm.
If the ceiling is made between the first floor and the attic, then the step between the material should be the same, but the cross-section of the beams can be chosen much smaller. This is due to the fact that the loads in the attic will be significantly less than on a full floor.
Floor installation
After all the necessary materials have been purchased and all preparations have been completed, you can begin construction work directly. The construction of interfloor slabs can be divided into several main stages.
Installation of beams
The installation of load-bearing beams is most often carried out during the construction of the walls of the building. Before laying the load-bearing beams, their surface is treated with all necessary impregnations.
Then their ends are cut at an angle of 60° and the part that will be walled up in the wall is wrapped in 2-3 layers of rolled waterproofing.
The ends of the beams are usually also coated with waterproofing compounds, but some experts advise leaving them open to allow the moisture contained in the wood to freely escape.
The depth of the beams inserted deep into the wall should be at least 15 cm. The laying step of the beams is usually taken at 0.6 m, but depending on the expected load on the floors, as well as on the thickness of the beam section, this figure can be reduced or increased.
The choice of interval between beams is also influenced by the technical characteristics of the material used for the finished floor.
If the top flooring is supposed to be made of inch boards, plywood or chipboard, then the distance between the beams should not exceed half a meter, otherwise the floors will sag when walking. For more information about installing beams, watch this video:
Floor joists must lie in the same plane
The installation of load-bearing beams begins from the two outer walls, while the beams should be located at a distance of 5 - 10 cm. After installing the two outer beams, we install the rest, observing the required interval.
When laying beams, special attention should be paid to the horizontal slope: all floor beams must lie in the same plane. To do this, place an edged board between the two outer beams, or pull the twine tightly.
If the base on which the beams are laid is uneven, then mortgages should be installed under the ends of the beams to level the horizontal level. For mortgages, a material is used that is resistant to rotting and physical stress - metal plates, pieces of tile, etc.
It is not recommended to use wooden wedges to adjust the level of beams, as they can rot quite quickly, which will cause individual floor beams to lower and bend the floor line.
The load-bearing beams are attached to the wall using anchor bolts and steel corners.
Fastening the support bars
After all the floor beams have been exposed, bars with a cross section of 5 x 6 cm (the so-called “cranial” bars) are attached to them. They serve as a support for laying the subfloor and are attached along the entire length of the supporting beam, on both sides.
They should be nailed in such a way that their lower part is flush with the lower part of the beams.
Installation of subfloor
To construct a subfloor, edged boards are taken and laid across the beams on support bars. Since the distance between the beams usually does not exceed 0.6 - 0.8 m, then an inch or thirty board is quite suitable for subfloors: the pressure on them will be limited only by the weight of the insulation.
You can also use a trimmed slab for these purposes. You can also combine the subfloors of the second floor with the finished ceilings of the first floor or basement. In this case, the edged boards are hemmed from below, from the side of the first floor to the beams. For more information about the draft field, watch this video:
Thermal insulation flooring
After installing the subfloors, compartments are formed between the beams, which, if necessary, can be filled with thermal insulation materials.
To do this, a hydro- or vapor barrier (roofing felt, isospan, etc.) is laid on top of the subfloor boards, and then mineral wool, polystyrene foam, slag with sawdust, etc. are laid.
In this case, the entire space between the bars must be densely filled. We fill the gaps between the beams and the foam sheets with sealant.
It is also advisable to lay waterproofing on top of the insulation, which will protect it from moisture leaks from above.
Technical requirements for floors
Interfloor structures consist of the following elements:
- beams;
- bars;
- layer of board;
- heat and sound insulation layer;
- waterproofing film;
- finishing board;
- ventilation slot;
- baseboards.
The following requirements are recommended for floor structures:
If the floors between which the floors are installed have a temperature difference of more than 10 degrees, then it is necessary to lay thermal insulation materials. Most often this happens between residential floors and the basement or attic. In such rooms it is impossible to do without a heat insulator. Regardless of the type of wood, the beams of the structure must have high strength. They need to withstand the load of the structure, the interior of the room and people. But in addition to this weight, there must be a certain reserve. It should be remembered that the minimum load on such floors is 210 kg/sq.m. m. For attics, the figure starts from 100 kg. The deflection value is applied to wooden structures. It should be less than 4 mm per meter. The indicator is calculated as follows: the length of the board is divided by 250 and the maximum deflection value is obtained. For the surface on which it is planned to lay tiles, the figure is divided not by 250, but by 400. For attics, the figure is divided by 200. The sound limit for materials should not be more than 50 decibels. This is worth considering when choosing sound insulation. Thermal insulators can significantly reduce noise
Sounds should not pass through ceilings and communications. When calculating floor materials, it is also important to take into account the length of wooden beams. It should not be more than 5 meters
For attics - 6. However, it is rare to find wooden structures more than 6 meters. If the area of the rooms exceeds 6 meters, supports are installed under the beams.
Note! Wood belongs to the class of highly flammable materials. In addition, it is susceptible to putrefaction, fungi and various bacteria.
Therefore, materials for floors must be processed before installation. The minimum set of impregnations consists of fire retardants and antiseptics.
Construction material
Before you begin installing the floor on the second floor using wooden beams, you should make a list of all the necessary materials. This will allow you to avoid unexpected downtime and delays during work caused by the need to purchase additional building materials.
Beams
The basis of the entire structure of interfloor wooden floors is beams. They act as load-bearing elements, and the strength of the structure depends on them. For them, a beam or carriage with a section of 15 x 15 cm or 18 x 18 cm is usually taken.
This cross-section is usually enough to provide sufficient rigidity for a specific load of 400 kg per sq.m. In this case, it is necessary to comply with the parameters recommended by construction standards: the span length is 4 m, and the step between the beams is 60 cm. Based on these parameters, you can also calculate the required amount of timber.
The table shows the recommended cross-sectional dimensions of the load-bearing beam for a certain span length.
| № | Span length (mm) | Beam cross section (mm) |
| 1 | 2000 | 75×150 |
| 2 | 2500 | 100×150 |
| 3 | 3000 | 100×175 |
| 4 | 3500 | 125×175 |
| 5 | 4000 | 125×200 |
| 6 | 4500 | 150×200 |
| 7 | 5000 | 150×225 |
However, in the absence of timber and small values of the expected loads on the floor, it is quite possible to use boards 50 or 40 mm thick, knocked together in pairs and placed on edge. This option is suitable for installing floors in an attic or in a small country house.
For the first floor of a residential building, this option is not suitable due to the low load-bearing capacity of the boards: to ensure the necessary rigidity, the pitch between the board beams will have to be significantly reduced, which will lead to an unjustified waste of material.
Pine is most often used as a material for beams. This is the best option in terms of price-quality: its wood is quite affordable and at the same time has good technical characteristics.
Beams made from wood of stronger species (larch, oak) can rarely be found on the open market, and their price is incomparably higher, and pine wood, after appropriate treatment with antiseptics, will be little inferior in durability to the same larch.
When purchasing timber, you should choose a material with dry wood. Otherwise, after installation of the beams, they may become deformed during the drying process - bending and twisting.
Flooring
Typically, the flooring of interfloor floors is two-tiered: below are subfloors, on which insulation is laid, and on top is a pre-finish flooring mounted on top of the load-bearing beams. Decorative flooring is laid directly on it.
To determine the nature and amount of material for the flooring, you should clearly think through the design of the floors.
When constructing a subfloor, either 5 x 6 cm bars, packed onto load-bearing beams, or grooves made in the beams can be used as support for the flooring boards. The latter option is quite labor-intensive, so most often 5 x 6 cm bars are used to create support.
To calculate the required number of bars, it is enough to count the number of beams and multiply them by the length of each of them. We multiply the resulting footage (the total length of all beams) by two more (since the bars will be packed on both sides of each beam).
A wide range of materials can be used for finishing flooring. This can be plank flooring, plywood, chipboard panels, MDF, OSB, etc. Each of these materials has its own advantages and disadvantages, after reading which you can choose one of them. To calculate the required amount of material, simply calculate the area of the room.
When purchasing building material, you should always purchase it with a reserve of 10–15%, since during construction unforeseen material overruns are inevitable.
This will save you from having to interrupt your work and buy the missing part.
Impregnations
To maximize the service life of wooden structures, they must be treated with antiseptic materials.
It would also be useful to treat the wood with fire retardants, which increase its fire safety.
To calculate the required amount of impregnation, you should read the instructions for its use - the approximate consumption of the mixture per sq.m. is always indicated there.
How to protect the floor between floors
It is not enough to simply build a house correctly; it must also ensure that no problems arise during operation. To do this, even at the design stage, all factors contributing to its durability and protection of building structures are taken into account.
It is of no small importance to solve two problems - protection from fire and biological influence of the environment
Based on flammability, materials are divided into five categories, ranging from highly flammable to non-flammable. Structures made from various materials are distinguished by their ability to prevent the spread of fire. Fire-resistant properties - completely eliminating the spread of fire and semi-fire-resistant - capable of delaying its spread for some time. It should be noted that flammability is not the same as fire resistance. Fire resistance is understood as the ability of a structure or material to maintain load-bearing and enclosing functions in the event of a fire.
Protection from fire, fungus and insects
For these purposes, the wood is treated with fire-resistant solutions to ensure fire resistance for at least 30 minutes under experimental conditions. In residential construction, the structure of the second floor floor structure must have at least semi-fire-resistant properties.
When drawing up a design for floors, it should be borne in mind that beams are exposed to fire not only from the bottom side, but also from the sides.
The combustion rate of coniferous wood, according to resistance parameters, is 0.8 mm/min. Taking into account fire resistance, you should choose a material with a cross section of 11 by 24 cm, because with a beam height of 24 cm and a span width of 5.8 to 5.85 m, their width is increased to 120 mm or more.
The problem of protecting wooden structures from biological influences is also very relevant:
- water, which disrupts the structure of the tree and is a breeding ground for microorganisms.
- mold fungi, rot.
- insects that cause damage to the wood structure and rottenness.
- ultraviolet radiation, which contributes to the softening and darkening of wood.
Unlike other materials, wood is an environmentally friendly product, which is important for living spaces. In addition, wooden floors retain heat well in the house.
Now there is a tendency to return to natural materials that were previously used everywhere. Means have already been created to effectively protect wood from harmful influences that worsen its performance characteristics.
Vapor barrier between 1st and 2nd floor
Moderator: Izospan
Re: Vapor barrier between 1st and 2nd floor
Izospan » 02 Oct 2012, 17:46
The problem you have is that: 1. There should be a vapor barrier film underneath the insulation, which serves to protect the insulation and floor structures from penetration of steam from below from the heated room. In your structure, when heating begins, moisture from the room begins to freely penetrate into the insulation, which leads to its moistening and a decrease in thermal insulation properties. In addition, a vapor barrier also serves to protect against the penetration of insulation particles into the living space. Glass wool particles entering a room can cause allergies. 2. On top of the insulation there should be a vapor-permeable membrane that allows moisture from the insulation to evaporate. Since you have a vapor barrier on top, there is simply nowhere for moisture to go. And when the insulation gets wet, it begins to release binding chemical components into the living space.
Re: Vapor barrier between 1st and 2nd floor
Edward » Oct 31, 2012, 9:02 pm
Good evening! After reading here, I chose for myself three “pies” of the ceiling between the 1st and 2nd floors (1st heated, 2nd only summer room):
1. plasterboard – 20mm sheathing – isospan “C” (rough side down) – 100 mm insulation – 50mm ventilation gap (as it happened) – second floor floor or: 2. plasterboard – isospan “C” (rough side down) – 100 mm insulation – ventilation gap 50mm – floor of the second floor or: 3. plasterboard – ventilation gap 20mm – insulation 100 mm – ventilation gap 30mm – isospan “C” (rough side down) – floor of the second floor
which one is more true?
Re: Vapor barrier between 1st and 2nd floor
Izospan » 01 Nov 2012, 13:59
Re: Vapor barrier between 1st and 2nd floor
Feb 2014, 20:15
Re: Vapor barrier between 1st and 2nd floor
Izospan » 02 Feb 2014, 10:04
Re: Vapor barrier between 1st and 2nd floor
Stanislav » 02 Feb 2014, 15:29
Re: Vapor barrier between 1st and 2nd floor
Izospan » 02 Feb 2014, 18:15
Re: Vapor barrier between 1st and 2nd floor
Sergey 113 » 02 Feb 2014, 22:49
Re: Vapor barrier between 1st and 2nd floor
Stanislav » 03 Feb 2014, 11:49
Re: Vapor barrier between 1st and 2nd floor
Izospan » 03 Feb 2014, 12:49
Private low-rise construction has become increasingly popular in recent years.
Country houses and country houses built with their own hands are occupying an increasingly large share of the total volume of housing put into operation.
The most popular material in private construction is wood, due to its affordable cost and ease of processing. But not all individual developers have sufficient experience and knowledge to independently carry out the entire range of construction work. So, the question often arises of how to properly lay the floor of the second floor in compliance with all building regulations and technologies.
Selecting material for interfloor slabs
There are 3 types of floors for houses of different heights:
- basement (basement, lower);
- attic (upper);
- interfloor.
Any of them consists of 2 structural elements: supports (beams) and sheathing (flooring). Depending on the purpose of wooden floors, different materials are used for their construction. Since they all consist of wood, installation work can be done with your own hands, without involving complex lifting equipment.
Wooden floors can only be built if the span between the structural elements of the building is no more than 8 m.
Beam selection criteria
The following materials are used as supporting elements:
- solid timber;
- knocked down boards;
- debarked logs.
The standard section of beams is 150/150 mm or 20/150 mm for timber, 140/240 or 5/20 mm for boards. You can use laminated veneer lumber. In terms of bending strength, it is not inferior to a solid one, and often exceeds it. Any material chosen for the installation of wooden floors must be well dried and free from defects in the form of cracks, knots and wormholes.
Logs are selected by tapping them with the butt of an axe. The tree should produce a clear and ringing sound. It is recommended to use coniferous wood, as they bend much better than hardwood. The length of the beams must be such that it is possible to place the support in the sockets in the walls intended for this purpose.
Requirements for wooden floors
- the structure must be durable and flawlessly withstand the expected loads;
- all floor elements in a wooden house must be designed for a service life that corresponds to the planned period of operation of the building;
- interfloor ceilings must provide for the presence of heat and sound insulation components.
Calculation of expected load
Before starting work, calculations are performed that help determine the required cross-section of beams, the pitch between them, and the amount of lumber. For this purpose, they either use special programs or focus on standard indicators. They are:
- For flights whose width does not exceed 2200 mm, beams with a section of 75x100 mm are used.
- For spans of 3200 mm - a section of 100x175 mm or 125x200 mm.
- For spans with a width of 500 mm - beams with a section of 50x225 mm.
The supports are laid in increments of at least 60 cm. If the beams are of a large cross-section, the distance between them is increased to 1 m. Installation of the floor begins from one of the short walls of the house. The beams (logs) should be laid perpendicular to the long walls.
Types of insulation and their choice
Thermal insulation protection of a wooden house along the floor beams includes a whole range of installation work related to insulating the floor of a “cold” attic or second floor from the outside and the ceiling of the living room from the inside.
For reliable thermal insulation of the specified structural elements of a private house, the following insulation materials can be used outside and inside:
- foam plates of a certain size and thickness;
- mineral or basalt wool;
- penoplex or expanded polystyrene;
- expanded clay filling (to protect the floor part of the ceiling).
All of the materials listed above have a very affordable price and allow you to organize high-quality insulation of floors in your home with your own hands.
Insulation for insulation inside residential premises
Please note: The first three types of insulation products are most often used for insulation inside living rooms. Expanded clay, as a bulk insulation material consisting of many light porous granules, is ideal for insulating floors on the attic or second floor side of the house (i.e., outside).
Insulation and finishing
The location of the horizontal partition in the cottage determines the use of insulating and finishing materials. The thickness of the floors between floors depends on the height of the beams, the number of layers and the characteristics of the finished flooring. Do-it-yourself reeling device diagram:
- 50x50 mm cranial bars are nailed to the bottom of the side surfaces of the beams. They will support the roll-up and the insulation layer;
- a roll is laid on the bars, which can be done by knocking down shields from boards;
- the shields are connected and attached to the cranial bars;
- if the ceiling is basement, then a vapor barrier film and insulation are laid on the “sub” floor. Waterproofing and a finished floor are laid on top;
- Interfloor floors are lined from below with a vapor barrier coating, then with ceiling boards, plywood or wood boards. After laying the heat and sound insulation, the structure is covered with a steam membrane and floorboards are laid.
Floor boards are impregnated with protective agents, painted or varnished. Linoleum, laminate, and parquet are laid on chipboards. The ceiling is leveled with decorative tiles, boards or plasterboard. Then the finishing coat is applied.
1. Wooden elements are treated with water-based products that are intended for indoor use. Senezh Ognebio, made in Russia, is suitable for this - complex impregnation belongs to the 1st group of effectiveness of protection against fire and the influence of biological factors on wood.
2. The ceiling opening should not exceed 6 m, and the step of laying load-bearing beams should not exceed 1 m.
3. The minimum distance between the support beams and exhaust ventilation shafts is 250 mm.
4. The minimum thickness of the thermal and sound insulation layer is 100 mm between living spaces and 200–250 mm for attic and basement systems.
Expanded clay with a fraction size of 5–10 mm, perlite, slag, dry sand, polystyrene foam or mineral wool are used as insulation. Bulk materials are more accessible, but make the structure heavier. The most acceptable option for a private home - mineral wool has low thermal conductivity, repels moisture and, unlike foam plastic, allows air to pass through.
Installation
Insulation of the interfloor ceiling can be done both from the ceiling and from the floor. It’s just from the floor side, it’s easier when the plane is horizontal. But in the case of polyurethane foam, the insulation can also be applied to vertical surfaces, to the ceiling. It fits perfectly to the plane, no matter what position it is in.
But for solid materials (mineral wool, polystyrene foam) the work progress is as follows :
Sheets of plywood (OSB) are nailed to the wooden beams treated with antiseptic on the side of the ceiling (lower floor) or sheathed with boards.- A vapor barrier film is nailed to the formed cells from the floor (upper floor) side with a stapler, the rough side to the plywood, the smooth side to the insulation.
The film is nailed with an overlap of about 15 cm and secured together with special self-adhesive tape.It must completely follow the bends of the beams, that is, it must be nailed not in tension, but to each of the 4 corners of the beam itself and the cells between the beams. If the humidity of the lower floor is high, a vapor barrier is nailed under the beams, that is, from the ceiling side.
- Insulation (mineral wool, sawdust, expanded clay) is placed on top of the vapor barrier membrane closely between the joists, leaving no gaps. If the width of the insulation is not enough to cover the entire distance between the joists, it is cut and compacted tightly.
- If the insulation is laid in 2 layers, then the thickness of the bottom layer should correspond to the height of the beams. The second layer of insulation is placed on top randomly to cover the gaps of the bottom layer.
- If a second layer of insulation is not provided, then a layer of waterproofing is laid on the thermal insulation, also not in a stretched form, but slightly loosened, so that it seems to be real. If there is 1-2 cm between the insulation and the waterproofing along the height of the beams, this is normal. Sometimes craftsmen deliberately leave space for additional ventilation. For a cold attic, waterproofing over insulation is not necessary.
- Slats or beams with a small cross-section are nailed to wooden beams parallel to each beam.
- The subfloor (plywood, sheathing, OSB boards) is nailed to the slats.
- A finished floor made of linoleum, tongue and groove boards or any other beautiful material is placed on the subfloor.
This type of insulation is suitable for interfloor ceilings, basement (from the living room side) and attic. If a cold attic is being insulated, and there is no plan to create a living room in it, then a finished floor is not needed. The same applies to the basement; there is no need to install a finished ceiling in the basement.
For insulation based on foam materials and polystyrene, vapor and waterproofing is not needed. These materials have water-repellent properties and do not accumulate condensation.
Insulation of floors with slabs
https://youtube.com/watch?v=3wvmUOlkEwE
Insulation of the floors of basements, living rooms and attics is very often carried out by installing fire-resistant, rot-resistant slabs in the niches of the interfloor wooden floors. You can buy them, or you can make them yourself. You can independently determine the shape and area of such a slab in order to best fit it into the space between the beams. The density of such slabs reaches 500 kg/m3, that is, a slab with an area of 1 sq.m and a thickness of 1 cm weighs about 5 kg.
View of the interfloor floor prepared for insulation. Click on photo to enlarge.
Raw materials for slab insulation
The most common types of raw materials for insulation boards are foam concrete, slag concrete and sawdust concrete. Here are some recipes:
- sawdust, clay, sand, cement, water in the ratio 4:1:2:0.3:2.5;
- sawdust, lime paste, cement, water in a ratio of 1:1.5:0.5:2.
All components must be mixed well until a homogeneous mixture is obtained, and then poured into pre-prepared frame molds, the length, width and height of which are determined depending on the design of the floors in the house (the distance between the beams). The slabs are kept in a shaded and protected from moisture place until the mixture is completely dry.
The last requirement - the complete absence of moisture in the slabs - is mandatory, otherwise insulation along the interfloor beams will be ineffective. If moisture collects in the insulation already during the operation of the floors in the house, this also threatens the slabs with a complete loss of thermal insulation characteristics.
A recipe using roofing felt also shows good results. First, roofing material is spread over the beams, and a layer of sand-clay mixture is poured on top of it. When this composition is completely dry, it is covered with a layer of sawdust, wood shavings or slag. If in your region the temperature in winter does not drop below minus 20°C, then 14-16 cm of slag, 5-6 cm of sawdust, 7-8 cm of shavings is enough.
Next, a mixture of water, clay, cement and sawdust is prepared in proportions 4:4:0.3:1. Slabs are formed from this mixture, dried, and then laid on roofing felt. The joints between the slabs are filled with clay.
Remember that between the layer of thermal insulation and the finished floor it is necessary to maintain a distance sufficient to ensure free circulation of air and removal of vapors from the insulation. If the finishing floor covering is laid close to the thermal insulation layer, the wood of the floor may rot or become infected with fungi and mold over time.
The beams themselves and the cranial bars that are attached between them must be pre-treated with an antiseptic or a special wood primer to protect the wood from waterlogging and the same fungi.
If, upon completion of all floor insulation work, the temperature of the finished floor differs from the air temperature in the room by no more than 2°C, we can speak of effective thermal insulation.
Insulation materials
Various thermal insulation materials can be used as interfloor insulation for a wooden house:
- glass wool;
- basalt wool;
- slag;
- Styrofoam;
- penoplex;
- expanded clay;
- foamed polyurethane;
- shavings, sawdust.
The choice is based on the availability of the material, its cost, and characteristics. Thus, mineral wool and expanded clay are the most acceptable from the point of view of fire safety. At the same time, penoplex does not absorb moisture, does not cake, and has high thermal insulation properties. Sometimes materials are combined to increase thermal protection.
Various types of cotton wool
Most often, various types of construction thermal insulating mineral wool are used to insulate interfloor ceilings. They are made by melting and drawing fibers from raw materials. These fibers are then intertwined on special machines and formed into mats or rolls. In some cases, such mats or rolls are stitched with synthetic threads to increase the strength of the products.
For glass wool, the raw materials are waste and waste from glass production; for mineral wool and basalt wool, igneous rock melts are used. Slag is produced by melting blast furnace slag.
Different types of cotton wool have different properties. They have different densities and different thermal conductivities. These characteristics depend not only on the type of feedstock, but also on the specified production parameters.
Foam plastic and penoplex
These are two similar materials in properties and production method. The starting materials for their production are plastics of various compositions. During the production process, they foam and, when hardened, are formed into sheets of the correct geometric shape. The difference lies in the fact that during formation, penoplex is extruded through a special device - an extruder.
Both foam plastic and penoplex have closed pores filled with gas in their volume. Only in polystyrene foam it is ordinary air, and when foaming polystyrene foam, carbon dioxide is usually used. In terms of thermal conductivity, both materials are almost identical. But due to the fact that the pores in the penoplex mass are distributed more evenly and they themselves have almost the same size, its strength is much higher.
Very often, when forming sheets of penoplex, their ends are not made even, but in the form of two or more ledges. When insulating, two adjacent sheets, connecting to each other during installation, provide better insulation, since the joints are not blown through and retain heat well.
Expanded clay
Expanded clay is a building material that consists of many oval granules - pellets with an average diameter of 10 to 20 mm. The material of these granules is clay and shale sand. The pellets themselves are obtained by firing pre-prepared semi-finished products in special ovens. When heated, pores of different sizes appear in the volume of expanded clay, as a result of which it has a very low density. One cubic meter of bulk expanded clay can weigh only 300 kg. For comparison, it can be noted that one cubic meter of pine wood weighs 500-550 kg at natural humidity.
Note! Expanded clay is an environmentally friendly material. It is durable and will not rot or decompose.
Polyurethane
Foamed polyurethane is used, as a rule, for insulating basement and attic floors. It is simply applied using special equipment, and later it foams in air and takes on a three-dimensional shape. The advantage of using such material is that it fills all the leaks and cracks in the ceiling structure, allowing you to create a sealed water- and windproof thermal protection.
Sawdust
Wood shavings and sawdust have recently been used much less frequently, but more recently they have also been used to insulate interfloor ceilings, filling the cavity between the beams. To prevent such insulation from rotting inside the ceilings, it is treated with special compounds that kill putrefactive bacteria and woodworms. When laying, shavings or sawdust are mixed with lime.
Vapor barrier
To properly insulate interfloor ceilings, it is not enough to use only materials with thermal insulation properties. If you do not protect the insulation from the action of moisture located in the interior of the premises, various microorganisms will multiply in the material, which can subsequently lead to mold or mildew. To avoid this phenomenon, it is necessary to make the correct vapor barrier for the insulation.
Any of the many options produced by industry can be used as a vapor barrier. Ready-made protective membranes are very widely represented on the building materials market. When building and insulating a private house with your own hands, you can use available materials if you know their strength and vapor barrier properties and use them correctly.
As the main layer, the coefficient of vapor permeability of which should be minimal, you can use ordinary polyethylene film or foil. This layer is laid below the insulation, preventing moisture vapor from the basement or lower floor from penetrating into it.
As the second layer, which will be on top of the insulation, you can use wax paper or glassine. These materials have greater vapor permeability than foil or polyethylene. They will facilitate the free release of vapors from the thickness of the insulation upwards.
When to insulate the ceiling
According to the laws of physics, warm air always rises to the top. If the attic space is not heated, heat from the lower floor goes out through it. Heat loss can be up to 40%. Warm air escapes through small cracks in concrete and pores in wooden ceilings. Properly performed thermal insulation will prevent freezing and reduce heating costs.
In all private houses with a cold ceiling, it is recommended to thermally insulate the ceiling. Such work can be performed at the construction stage or in an already constructed house. In the second case, insulation is carried out if the coatings were made a long time ago and over time have lost their heat-insulating properties.
Main workflow steps
The instructions for carrying out the work will be divided into several stages so that you can understand all the features as best as possible. And we will start by laying out the main supporting elements.
Fastening beams
Work in wooden buildings can be carried out in several ways; consider the sequence of required operations:
- First of all, you should prepare the products - clean them of dirt and bark residues, if any, and also coat them with a special fire-retardant composition. This will protect the wood from fire and damage from woodworms and will significantly extend the life of the structure.
It is most convenient to carry out the treatment before attaching the elements; if you have a sprayer, the work can be done with your own hands very quickly
- Next, all the necessary measurements are taken; if cutting of beams is required, then it is better to double-check all the dimensions, since cutting off the excess will simply ruin the product, the price of which is quite high. Cutting is easiest done with a chainsaw or other special woodworking device.
Fastening is carried out in three main ways:
- The first is cutting out recesses to fit the ends of the beams and securing each element in special recesses. This option has been very widely used for several centuries. It is important to cut the material carefully so that the laying level of all elements is the same, the joints are sealed and thermally insulated using tow, this helps protect all cutouts from the penetration of cold air.
Laying in recesses is convenient because each element is located in its place, which is prepared in advance
- The second solution is laying on the ends of the walls, with each of them fixed in a stationary position using staples or special screws. This option is applicable if cutting the recesses would be too time-consuming and complex, and the configuration of the building allows the beams to be laid with sufficient overlap on the walls so that they rest securely and provide high load-bearing capacity.
- The newest option - the use of special supports for timber - is used if it is necessary to make a partition anywhere on the wall surface without cutting out recesses or where the beams extend into the walls only a few centimeters. The work is simple: the fastening element is fixed to the base, after which the element is inserted into it and fixed using self-tapping screws.
The supports are highly durable and provide the necessary load-bearing capacity
Ring fastening, waterproofing and insulation
After the beams are installed, you can begin covering the structure with rough flooring, the work is carried out in different ways, we will consider the simplest and most cost-effective option:
- The underside is filled with rough flooring, which is most often made from inexpensive unedged boards of the same thickness. The optimal solution is a 20-25 mm pine board. Its cost is low, and for this type of work it is ideally suited.
Important! Be sure to remove the bark from the ends if there is any, as it may contain pest larvae, which can greatly harm your home in the future. Also, do not forget about treating all elements with a fire-retardant composition.
- The boards can be laid on a cranial block specially fixed at the lower level of the beams (50x50 mm in size) or screwed directly to the beams. We strongly recommend using self-tapping screws for these purposes; they are much more reliable than nails and will hold all the elements much better.
This is what the construction of the second floor floor in a wooden house using a cranial block looks like
- Next, the surface must be waterproofed, and if previously various options were used for this - from clay-based putty to roofing felt, then in our time special materials have appeared that release moisture from the wood, but prevent its penetration from the outside. These are so-called membranes, and we recommend using them.
Special membrane materials are an excellent solution for floors
- Now let's look at how to insulate the floor of the second floor of a wooden house. Previously, different options were used - from sawdust and slag to expanded clay and various mixtures. With the advent of mineral wool, all work has been simplified - this type of material is characterized by high performance properties and excellent heat retention. In addition, mineral wool is an excellent sound insulator.
Insulating the floor of the second floor in a wooden house using mineral wool is a quick and simple process; it is important to lay the material as tightly as possible
- From the outside, the surface is covered with another layer of waterproofing material, at which point this stage of work can be considered complete.
Floor construction
The floor of the second floor on wooden beams can be laid in two main ways:
- Directly along the surface of the structure, this option is applicable if the thickness of the insulation inside the structure is less than the height of the beams and there is a small cavity below for ventilation. If the mineral wool is located flush with the top edge of the beams, then it is better to use the second option.
- Logs are laid on the beams, which makes it possible to create a so-called “floating floor”, since it is not rigidly connected to the walls and can move slightly due to temperature changes. This option allows you to improve sound insulation in a wooden house.
The work also varies depending on the material used:
- If you decide to make a wooden floor, then purchase a special board 32 mm thick or more with a special tongue-and-groove fastening system. The work is simple: the board is secured with screws or nails through the recess, i.e. groove, then the next element is inserted so that the connection is tight; if necessary, you can tap the end with a mallet. This results in a smooth surface without nail heads or screws.
- If you decide to lay laminate, parquet or other covering, the easiest way to cover the surface is with sheet materials: plywood or oriented strand board. The second option has high moisture resistance, so it is used more often. The work is simple: the sheets are combined so that the connections go along the beams and are screwed with self-tapping screws.
Design nuances
The ceiling, made on beams, consists of wooden beams that are laid at a certain distance from each other. They determine the degree of strength and reliability of the entire structure. Usually they are sheathed (on one side or both) with various materials of a flat configuration. These can be sheets, panels or slats. Inside a structure equipped with this method, voids appear between the beams, inside of which it is convenient to lay insulation.
Another feature is the presence of wooden beams, which are fragments of lumber. Attaching additional elements to a wooden structure is very simple. The fastening elements can be self-tapping screws or nails; there is no need to glue or embed the heat insulator. Thus, the process of installing insulated floors becomes as simple and convenient as possible.