Any heat source that burns fuel emits a byproduct - toxic exhaust gases. Accordingly, installing a heat generator in a private house or apartment involves installing a chimney pipe that discharges harmful gases to the street. In terms of labor costs and price, these works make up a significant portion of the entire installation. We decided to highlight this stage and specifically explain how to properly make an inexpensive chimney for a gas boiler. Let's not ignore other types of heating units.
How to make a chimney for a solid fuel boiler yourself: step-by-step instructions
- First of all, prepare all the constituent elements: bends, transitions, extensions and fasteners.
- Cut a hole in the roof and ceiling using a grinder and install a fastening clamp at the bottom of the roof covering and under the ceiling.
- The upper chimney pipe is fixed in the designed location, having previously installed a protective umbrella and a water deflector on it.
- Assemble the required number of meter-long (standard length for individual elements) pipes from the roof surface to the ceiling. Connected to the top element and secured under the ceiling. When installing near a wall, each meter section of the chimney is secured with a clamp.
- After this, pipes are assembled with a tee, which is designed to connect to the boiler or extension cord. Then the upper part is inserted into the connecting socket of the chimney duct under the ceiling and the horizontal socket of the boiler is joined to the assembled structure. Using wooden spacers, tightly knock down the joints of the smoke exhaust system. After making sure that the individual elements are firmly seated, the assembled structure is secured with clamps.
The distance between horizontal sections should not be more than 1 meter.
If the length of the connected pipe sections is longer, then inclined installation elements are used. The cavities around the pipes, at the intersections with the roof and ceiling, are filled with foam for tightness.
After completing the work, check the tightness of the ceiling, and especially the roof. Water should not flow under the water deflector or seep through the pores of the mounting hole.
The chimney is ready for use. We can say with confidence that the use of heat-resistant stainless steel is the optimal solution for the construction of a chimney system. Compliance with all requirements, including fireproof ones, will allow the assembled structure to be used for a long period of time.
Make it yourself or order it
Order a chimney from professionals or do it yourself – it’s up to you.
Proper independent installation of a smoke exhaust system will definitely save the family budget. When installing, be sure to comply with all requirements of SNiP and fire regulations.
Despite the fact that the temperature of the exhaust gases is low, the harm from them is no less than from any other emissions. Therefore, special attention should be paid to the tightness of joints.
It is also mandatory to organize a condensate collection system.
Chimney device
All chimneys, regardless of the material used, location and design, have a similar structure.
They always contain the following components:
- Chimney is a vertical or partially inclined channel (pipeline) of rectangular, square or round cross-section for the removal of combustion products. Made from durable fire-resistant material.
- Condensate collector - located in the lower part of the chimney after the boiler flue is inserted and serves to collect condensed vapors contained in the flue gases. Equipped with a dump valve. Absent in mounted chimneys, made double-walled with a heat-insulating layer.
- The draft control device is a rotary or retractable damper.
Calculation of chimney parameters
Correctly selected height and cross-sectional area of the chimney is the key to its reliable operation. Almost all industrial boilers have recommendations regarding these values.
For equipment with thermal power up to 90 kW, the following values are recommended:
| Boiler performance, kW | Chimney diameter, cm | Pipe cross-sectional area, cm2 | Pipe height, m |
| 20 | 13 | 196 | 7 |
| 30 | 15 | 196 | 8 |
| 45 | 18 | 378 | 9 |
| 65 | 20 | 540 | 10 |
| 90 | 25 | 729 | 12 |
Ceramic pipe for boiler
Complex design - a fragile ceramic tube is covered with heat-insulating material and inserted into a solid expanded clay block.
The inner tube is smooth, round in cross-section with a smooth surface, which is optimal for good traction.
Making a chimney with your own hands
Many owners of private houses make gas removal devices themselves. They are not difficult to make, but this work must be preceded by appropriate preparation. An incorrectly designed homemade chimney will not only have poor draft, but can also cause carbon monoxide poisoning. Fires often occur due to improperly manufactured devices. If you are not sure that the calculations will be performed correctly and that the structure will be manufactured and installed correctly, it is better to contact specialists or buy the structure in a store.
Selection of pipe material and calculation of basic parameters
The most common material for making chimneys is stainless steel, but at home it is difficult to make a pipe from sheet material, because This requires special welding. The diameter of the pipe must provide stable traction. This can be achieved if the cross-sectional area of the chimney is not lower than the cross-section of the outlet pipe of the heat source.
For solid fuel boilers, the smoke removal device must be higher than for a gas appliance. There are special formulas for calculating the height of the chimney, but in practice they are used extremely rarely. The draft in the heating device will be stable if the head of the smoke device rises 5-9 m relative to the horizontal section.
Required Tools
To make a chimney you will need:
- welding machine;
- a set of locksmith tools;
- electric drill and grinder;
- fastener
To seal the exit point of an uninsulated pipe through the roof, sealants designed for the temperature of the exhaust gases are used. The outlets of coaxial and insulated chimneys are sealed with polyurethane foam.
Pipe manufacturing
To make parts of the chimney, a template of the appropriate diameter is used. Metal sheets are bent along it and welded with a continuous longitudinal seam. For ease of installation, the diameter of the lower part is made slightly larger.
Insulation
Basalt wool or other heat-resistant material is used as insulation. The thickness of the layer should be at least 5-10 cm. A casing is installed on top of it.
Chimney assembly
The structure is assembled from individual modules from bottom to top. Every 1.5-2 m the chimney is attached to the wall with brackets. The joints are sealed, and a spark arrester is installed on the head.
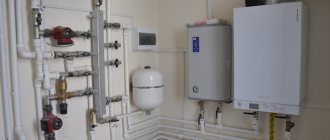
What is heating boiler piping
Piping a heating boiler is connecting a gas boiler to the heating system, water supply (if provided) and gas as fuel. The boiler wiring includes the connection of all necessary devices that ensure reliable operation and control of the boiler.
According to construction regulations and manufacturers' instructions, gas supply to the heating boiler must be carried out only through a rigid connection. By rigid connection we mean a metal pipe, and the connection is made using plumbing technologies for connecting metal pipes, through a metal “squeeze”. Polypropylene pipes with fiberglass for hot water supply are also suitable. If you live in Kazakhstan, you can view and download the pipe catalog on the Allpipes.kz website.
Important! To seal gas supply pipe connections, EXCLUSIVELY paronite gaskets are used. Other gaskets such as rubber, as well as sealing the threads of connections with fum tape and tow are PROHIBITED. Paronite is a sealing material based on asbestos, mineral fibers and rubber, made by vulcanization and is non-flammable
Paronite is a sealing material based on asbestos, mineral fibers and rubber, made by vulcanization and is non-flammable.
Steel chimney
Steel chimney: collapsible design
You have the choice of a chimney made of regular or stainless steel. As you understand, the latter is becoming increasingly popular, since the service life of a conventional steel chimney is no more than 3-5 years.
high heat resistance - they can withstand temperatures from 500ºС to 700ºС.
resistance to condensation formation - and this, in turn, ensures the reliability and durability of the system itself
316, 316L, 321 - grades of stainless steel, which are suitable as a material for the chimney of a solid fuel boiler.
affordable price is another important plus that attracts attention.
the ability to adjust the design of the chimney - unlike glass or brick, you can easily add the necessary details to the device, for example, a damper, if you forgot about it in the original version.. Read more about the construction of a steel chimney in our article
Read more about the construction of a steel chimney in our article.
Nuances of the device and installation
The design of the pipe, as such, is not particularly important. The number of bends, turns and other obstacles in the path of flue gases only worsens the draft, so you should try to make the pipe as straight as possible.
However, the main qualities of draft are determined by the height of the pipe, which is measured from the outlet of the boiler to the head of the pipe. The pipe head is the end of the pipe that is hidden under the umbrella. By the way, the existence of an umbrella is mandatory; this is protection intended, first of all, for the boiler itself. Moisture entering the combustion chamber can lead to damage to all boiler equipment.
Another point worth noting is the welds and penetrations through the building envelope, i.e. walls, ceiling or roof surface. Welding seams must be made with the utmost care. A minimal rupture can lead to smoke entering the room.
Chimney made of steel pipe
All passages through enclosing structures must be made in the form of a sleeve. A sleeve is a pipe with a cross-section larger than the cross-section of the chimney itself. The space between the sleeve and the chimney is clogged with sealant. This is done in order to protect the space surrounding the pipe from rising temperatures.
Let's summarize the features of chimney installation:
- The height of the pipe must be selected in accordance with the boiler power. Special tables will help you select the height, but it’s easier to just look at the boiler’s passport; as a rule, you can find the required pipe height there.
- All welds must be made neatly and without breaks.
- The passages through the fences are lined and sealed.
- The chimney should not be laid near the passage of wiring and other communications. The outer part of the pipe should be located at a distance from trees.
Wiring a chimney through the ceiling
Features of chimney maintenance
The chimney of a potbelly stove needs maintenance - inspection of the external condition of the structure and cleaning of the internal space of the pipe. The frequency of maintenance depends entirely on the material.
If it is an asbestos-cement chimney, then it will have to be cleaned more often. This is all due to the rough inner surface of the pipe, where soot accumulates with a vengeance.
Also, an asbestos chimney, if it was installed to remove smoke from a potbelly stove, may soon become stained or even rupture during operation. This will lead to additional expenses - the chimney pipe will need to be replaced.
Stains that appear on an asbestos pipe not only create an unpleasant impression with their appearance, but are also harbingers of the appearance of unpleasant odors
For a metal chimney, the average frequency of pipe cleaning is once a year
It is also important to inspect the external condition of the material - it is quite possible that some areas may burn out
To remove soot from a metal pipe, you can:
- burn aspen wood;
- treat the burned logs with a special chemical composition that is easy to buy;
- make a hook for delicate soot removal.
Compositions for getting rid of soot are easy to use. They do not require any special skills - just treat the firewood with the product from the bag and light the potbelly stove as usual. Combustion products will not contain harmful impurities. This is a safe way to clean a metal pipe.
The consumption of the product and the method of applying it to logs are indicated in the manufacturer’s instructions
It is important to read the recommendations carefully and strictly follow them. In a metal pipe that exhausts smoke, soot most often accumulates in a section running horizontally
In a metal pipe that exhausts smoke, soot most often accumulates in a section that runs horizontally.
Experienced users of such chimneys have found a convenient solution - drill a small hole and build a hook-shaped structure to remove soot. This device will not damage the pipe wall, but will clear the accumulated fumes.
The hook-shaped design is easy to manufacture and quite convenient to use. Most often this is a section of the pipeline located on the street
A thorough inspection of the external condition of the chimney will allow you to timely diagnose the need to replace a particular section. This measure should not be neglected - after all, through the holes in the chimney, smoke will flow into the room, and further operation of the heating device will become impossible.
Regular cleaning of soot from the internal walls will help extend the life of the smoke exhaust pipe. And the draft will always be at the required level, which has a positive effect on the efficiency of the potbelly stove.
There are also other articles on our website that contain detailed information about the best methods for cleaning a chimney and recommendations for choosing a cleaning product. We invite you to familiarize yourself with them:
- How to clean a chimney from soot: how to properly clean a smoke duct
- Chimney cleaning products: what is the best way to clean a chimney from soot
- Chimney Sweeper log for cleaning chimneys: composition of the product and instructions for use + reviews from owners
Building regulations
All chimneys must comply with SNiP 2.04.05-91, DNP V 2.5-20-2001, SNiP 42-01-2002, as well as SP 7.13130. Under no circumstances should you use products that have not passed certification.
Basic fire safety requirements for chimneys:
- The cross-section of the chimney should be selected according to the power of the boiler;
- Deviations of the pipe from the vertical by more than 30 degrees are not allowed;
- The thickness of the walls of the chimney duct is at least 6 cm for heat-resistant concrete, at least 12 cm for brick and is not standardized for sandwich and asbestos cement;
- The length of the branch (horizontal section) of the chimney should not exceed 1 m:
- The minimum distance between the pipe and walls made of combustible materials is 250mm, and those of non-combustible materials are 50mm. Where the pipe passes through walls and partitions, it is necessary to install high-quality thermal insulation;
- The diameter of the chimney duct is selected equal to or greater than the boiler outlet;
- The air in the system should move at a speed of 15-20m/s;
- The distance from the hot surface of the channel to the wooden floor elements should be more than 13 cm for concrete, brick and sandwich and 25 cm for a pipeline made of ceramics or asbestos cement;
- At the base of the chimney it is necessary to organize a pipe to remove condensate;
Traction Requirements:
- The chimney for gas boilers should not be lower than 3 m in height (5 m recommended);
- Pipe height above roof:
- flat roof - up to 500mm;
- level with the ridge when removed from it by 1.5-3m;
- at the level of an imaginary line drawn from the ridge at an angle of 10 degrees to the pipe, with a distance between the pipe and the ridge of more than 3 m;
- The permissible radius of curvature of pipes in the system is equal to the diameter of the product;
- It is necessary to arrange pockets for cleaning (revisions);
- The chimney should not have narrowings or bends.
It should be taken into account that the smoke exhaust system should not contain more than three turns. Otherwise, traction decreases sharply.
You already know about the consequences of poor traction.
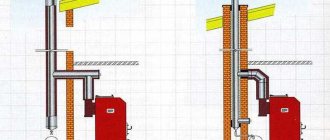
Sandwich installation diagrams
You can make a chimney from modular sandwich pipes in 3 ways:
- The vertical part is located on the street, attached to the outer wall of the building. The horizontal chimney crosses the external fence, enters the house and is connected to the boiler (stove) pipe.
- The vertical smoke channel passes through the roof, descends into the boiler room and ends with a condensate collector. The heat generator is connected to it by a horizontal pipe.
- The trunk again crosses all roof structures, but is connected to the heater directly, without a pocket or horizontal sections.
Installation diagram of a wall chimney (left) and an internal duct passing through the roof (right)
The first option is suitable for ready-made houses of any type - frame, brick, log. Your task is to place the boiler against the outer wall, take the sandwich outside, and then secure the main pipe. In terms of financial and labor costs, this is the most profitable way to install a chimney.
Installing a modular system according to the second scheme is much more difficult. In a one-story house, you will have to go through the ceiling and roof slope, arranging fireproof cuts. In a two-story house, the piping will get inside the room and make you think about decorative cladding. But you won’t need to go around the roof overhang and secure the end of the chimney with guy wires.
The latter option is suitable for sauna stoves and fireplace inserts. The former get very hot and practically do not condense, the latter are hidden behind a fire-resistant plasterboard finish. To organize cooling of the sandwich channel, ventilation is provided in the space between the lining and the pipe. The photo above shows convection grilles that remove heated air from under the fireplace insert casing.
Design and procurement of materials
To select the correct parts for a modular chimney and calculate the amount of materials, perform a number of preparatory steps:
- Study the requirements for gas boiler chimneys.
- Determine the installation method, channel diameter and thermal insulation thickness.
- Draw a diagram and make a list of materials.
For reference. As a rule, the installation of a heat source in a country house begins with the installation of flue ducts and ventilation exhaust pipes. Placement of the heat generator in the boiler room and connection to the heating is done secondarily.
It is better to build internal channels during the construction phase of the house.
The clever words “calculation” and “project” in the above list may confuse some homeowners. In reality, these steps do not pose a big problem. So that you don’t have to look for regulations on the installation of chimneys, we will provide them here.
Regulatory requirements for chimney pipes
The instructions given in the building codes and regulations (SNiP) must be taken into account for a simple reason: the fuel supplier company will not accept the gas boiler into operation and will not connect it to the main line if the gas duct is installed incorrectly. The requirements sound like this:
- The total length of the horizontal sections preceding the vertical smoke shaft is a maximum of 3 meters. A slight slope towards the heating unit (1-3°) should be provided.
- It is allowed to deviate the vertical channel by 1 m to the side in order to bypass the roof overhang. The slope of the bypass section from the axis of the chimney is 30°.
- The number of pipe turns is limited - no more than 3. Bends that go around the roof overhang are not taken into account.
The specified cutting width of 51 cm is due to the installation of an unprotected steel pipe. For a sandwich the gap will be reduced to 38 cm - The flow area of the outlet channel cannot be less than the size of the corresponding heat generator pipe.
- Floor-standing and wall-mounted boilers equipped with an upper pipe are connected by a vertical section at least 25 cm long.
- The distance between a flue duct not lined with insulation from combustible building structures of a wooden house is at least 0.5 m, from non-combustible ones - 10 cm.
- The intersection of wooden walls or ceilings (cutting) is carried out with an interval of 38 cm between the combustible structure and the inner wall of the sandwich type chimney. You cannot connect sections inside the wall.
- The outlet pipe for a gas boiler must rise to a certain height so that the head does not end up in the zone of wind support, which significantly reduces the force of natural draft. The lifting height depends on the distance to the ridge and is determined according to the diagram.
In the lower blind part of the vertical section there is a hatch for cleaning (inspection) and a condensate collector with a discharge fitting. The section of pipe near the boiler can be made single-walled, but the sandwich must go outside or into the adjacent attic.
Important. The minimum height of the smoke exhaust structure should be 6 m, counting from the gas burner or grate of the solid fuel boiler.
Determine the diameter and method of laying
The solution to the first question is found in the requirements for chimney ducts: look at the connecting dimensions in the heat generator’s data sheet and select a sandwich chimney with an identical or larger diameter than the outlet pipe.
Indentations when installing a coaxial chimney
Question two: how to choose the thickness of the thermal insulation of the sandwich, because the manufacturer offers at least 2 options - 5 and 10 cm. To protect the chimney connected to the gas boiler from excessive condensation and freezing, an insulation thickness of 50 mm is sufficient. 10 cm insulation should be used in northern regions with critically low winter temperatures.
It remains to choose a laying method from two possible ones:
- bringing the horizontal section out through the wall and connecting it to a vertical attached chimney;
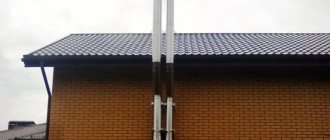
- pass a vertical pipe through the ceilings, attic and roof, that is, lay a smoke exhaust duct inside the house.
Installation options for conventional and coaxial smoke ducts
Note. Both options are suitable for installing coaxial flue ducts, but in most cases the first one is implemented with a passage through the outer wall.
Laying the pipe along the shortest path to the street and lifting the pipe along the wall is the simplest and cheapest way. You will have to cross only one structure, and in the second option - at least two. Plus sealing of the junction of the roofing covering and the chimney.
On the second floor, such a structure will have to be sewn up
Try in every possible way to avoid indoor installation, since in a house with two floors or an attic roof, a healthy pipe will inevitably pass through the rooms, taking up useful space. Draw a sectional diagram of the building and a passing chimney if it cannot be mounted outside.
We make a list of parts according to the diagram
To install an attached chimney connected to a gas or solid fuel boiler, you will need the following elements of a modular sandwich:
- tee with 89° branch pipe for joining the horizontal section with the vertical one;
- tee with inspection hatch;
- section with condensate collector;
- a section of a single-wall pipe and a coupling for connecting a heat generator;
- transition between ordinary pipe and sandwich;
- straight sections - the number and length are selected according to the length of the gas duct;
- 2 30° elbows are required to bypass the roof overhang;
- an upper cap in the form of a nozzle that protects the insulation of the last section from precipitation.
Detailed diagram for outdoor installation
Important point. The installation of fungi and decorative canopies on the chimney of a gas boiler is prohibited. During periods of extreme frost, the top will freeze and the flow area will decrease, which is dangerous for the lives of residents.
The fastening parts will require wall clamps with brackets and a support platform that can support the weight of the mounted structure. If you plan to install a flue inside the building, you will additionally need ready-made units for passage through the ceilings, a roofing sealing lining (otherwise known as kryza, master - flush) and 90° elbows for installing a chimney in the boiler room.
Semolina casserole with pumpkin and dried fruits
If children do not want to eat healthy pumpkin, you can hide it in a delicious semolina casserole. Dried fruits in the recipe are not only a “zest”, but also additional vitamins. If desired, they can be replaced with pieces of fresh fruit. For example, pear and apple, plum and peach are suitable. Any combination of fruits in semolina dough will be useful.
Ingredients:
- 200 g semolina;
- half a glass of milk;
- 50 ml filtered water;
- 25 g butter;
- 60 g pumpkin;
- 1 tbsp. l. Sahara;
- a pinch of salt;
- 100 g of any seedless dried fruit (dried apricots, prunes, raisins, dogwood);
- two raw chicken eggs;
- 50 g of premium wheat flour;
- 11 g baking powder.
Cooking method:
1. Rinse in warm water and soak dried fruits. Cut them into small pieces (except for raisins, do not cut them).
2. Cook semolina porridge in a saucepan. To do this, mix water with milk (take cold), add semolina and butter. Add sugar and salt. Stir and leave for now.
3. Peel the pumpkin and grate it on a fine grater or, using a blender, grind it into puree. Add to porridge.
4. Place the pan on the fire and, constantly stirring with a whisk or tablespoon, bring the porridge to a boil. Remove from heat and cool for a few minutes, stirring with a whisk.
5. Add eggs, flour and baking powder to the porridge. Stir until smooth and add dried fruits. Mix again.
7. Place the semolina porridge casserole dough on a baking sheet lined with paper or foil. If desired, grease it with additional oil.
8. Place the dish to bake until done.
You can serve semolina casserole with pumpkin and dried fruits with a glass of milk or a cup of tea. Casseroles prepared according to these recipes will become your favorite breakfast. It’s easy and simple to delight your loved ones with a new casserole recipe every day. Just write down the recipes and create amazing desserts from ordinary semolina!
Pros and cons of homemade chimneys
A homemade chimney has a number of pros and cons. The advantages are provided mainly by independent production of components:
- Savings up to 60% of the total cost
- The ability to independently install pipes in a way that is convenient for the owner
- Possibility of independent selection of materials
The disadvantages mainly arise due to installation errors:
- Possibility of loose installation, which will cause flue gases to penetrate into the room.
- If the pipe height is chosen incorrectly, the draft may overturn, which will lead to the penetration of flue gases into the room and damage to the boiler equipment.
- An incorrectly chosen material can quickly deteriorate, which at best will lead to the replacement of a homemade chimney, at worst to damage to all boiler equipment.
But, if you follow the instructions exactly, carefully select materials and correctly calculate the height of the chimney, then no problems will arise, and independent installation will result in significant savings.
Homemade pipes
The correct chimney for a solid fuel boiler with your own hands
Immediately after installing the solid fuel boiler, you should begin creating a system for the release of gas and smoke. This work can be entrusted to hired craftsmen, but this will cost money. Self-installation will not only save money, but also completely understand the structure of the chimney, which is useful for its further operation and maintenance.
Order or make a chimney for a solid fuel boiler with your own hands - which is more profitable?
The answer to this question is not as obvious as it seems. By design, solid fuel boilers are similar to conventional stoves. And it may seem that installing a chimney is a simple task for him. You shouldn't fall for this misconception. For high-quality removal of combustion products, a well-thought-out, durable and reliably executed design is required. Neglecting these rules is unacceptable, because the lives of people living in the premises depend on it. Loose joining of materials or design errors lead to the penetration of carbon monoxide, which is hazardous to health.
Therefore, in the absence of stove installation skills, it is wiser to entrust such a responsible job to a professional. If you have experience and confidence in your own abilities, you can carry out the installation yourself. However, it is better to order the calculation of chimneys for a solid fuel boiler from a specialized organization.
Chimney device
Regardless of the material used for installation, all chimneys for solid fuel boilers are structurally similar. The smoke removal system consists of the same functional components:
- Chimney. A cylindrical or rectangular section through which combustion products are removed from the boiler. Must be made of durable and heat-resistant material.
- Condensate collector. Everyone remembers from the physics course that heated air, when it comes into contact with a cold surface, forms condensation on it - small accumulations of moisture. To prevent drops of water from flowing into the boiler, the chimney must be equipped with a means to remove them from the system. A condensate collector is equipped in its lower part, which does not contact the boiler directly, but is connected through a tee.
- Gate - a barrier to stop the supply of air to the system from the boiler. The damper is necessary for economical operation - so that after the boiler stops operating, the exit of warm air into the external environment is blocked.
This is a typical smoke exhaust system. When working with specific materials, it may have slight differences and additions. For example, steel chimneys are equipped with a linear deformation compensator. It is responsible for the tightness and reliability of the system, because constant cycles of heating and cooling lead to loosening of the chimney. This reduces the density of components joining.
Installation rules
- Fire safety should be the most important guideline when constructing a smoke exhaust structure for a solid fuel boiler. The distance from the chimney walls to other surfaces must be at least 38 cm. When building an internal type chimney, you need to be extremely careful in insulating the places where it passes through the ceilings.
- The walls should not be narrower than 10 cm, including insulation.
- Height directly affects the efficiency of gas removal and the draft force in the chimney system. It is necessary that the top point of the chimney be at a distance of at least a meter relative to the roof.
- Accurate calculation of the internal cross-sectional area. It is necessary that this value remains constant throughout the entire length of the chimney in order to avoid a decrease in efficiency.
- The maximum length of horizontal sections in the system is 1 m.
- The design must have a condensate collector and doors for maintenance.
How to calculate the chimney diameter for a solid fuel boiler
The correct chimney for a solid fuel boiler with your own hands
How to make a chimney for a solid fuel boiler with your own hands. Types of chimneys for solid fuel boilers. Chimney structure and installation features.
One- and two-pipe heating systems
The choice of pipes is also influenced by the pipeline layout (single-pipe, two-pipe) through which the coolant moves.
The presented figure schematically shows one-pipe and two-pipe heating systems, each of which has its own advantages and disadvantages (+)
Let's look at the differences in the installation of both circuit solutions.
Option #1 - single pipe system
In this case, the “supply” departs from the boiler - the main line, which has a large diameter. It simultaneously serves both to transfer hot coolant and to collect cooled liquid.
The figure shows one of the possible boiler piping diagrams, including an anti-condensation pump and a deaerator unit (+)
Heating radiators are connected in series to the central artery. For this, two thin pipes are used, one of them receives the coolant, and the second - releases it.
In a single-pipe heating system, the liquid passes through all the radiators in turn, transferring part of the heat energy along its path.
Two types of one-pipe circuits
Based on the design features, two system options can be distinguished: flow-through and with bypasses. The flow-through design does not provide for risers, limiting itself to the direct connection of radiators on the upper floor with their counterparts located below.
When using this scheme, you must not forget about the ban on the use of control valves, since they can prevent access to the coolant flowing to the devices.
Such a system is easy to implement, but it has a number of disadvantages. The coolant in the circuit cools down quite quickly; in addition, it is impossible to repair or adjust the system without completely shutting it down.
In this figure you can clearly see the installation features of two popular types of single-pipe systems (+)
A heating system with bypasses also involves connecting radiators with risers, which are responsible for supplying the networks with coolant. At the same time, the batteries are separated from the circuit by closing links.
The coolant is distributed over all connected devices in portions at almost the same time, due to which the heated liquid cools down significantly less than in flow-through circuits.
With a heating circuit with bypasses, it is possible to adjust the temperature and repair the outgoing device without shutting down the system.
Selecting elements for a one-pipe system
The most popular option for implementing single-pipe heating schemes are steel products, which have reasonable prices and good technological characteristics. They are especially common in older apartment buildings.
When installing pipes, it is necessary to observe a slope, the value of which should exceed 5 millimeters per 1 linear meter. Such installation ensures free transfer of coolant, which will continue even in the event of a sudden or planned shutdown of the circulation pump.
In addition to steel elements, products made of plastic can be used for laying single-pipe systems. Due to the lower hydraulic resistance of polymer pipes, elements of smaller diameter can be used
For wiring the forward and return lines of a single-pipe system, elements of large diameter (<50 mm) are used, while for connecting heating radiators in an open system, structural elements with a diameter of 32 mm are sufficient.
Option #2 - effective two-pipe scheme
This version of the heating circuit provides two lines: along one of them - “supply” - the coolant is transported, which is heated in the boiler, and along the second - “return” - cooled liquid is collected, which is discharged to the heating unit.
With forced circulation, the heated liquid rises along the main riser, after which it is distributed among series-connected batteries. In systems with natural circulation, the design does not provide for return risers, and the devices are connected using the top wiring (+)
This modification of the heating system provides for parallel connection of batteries. Since the intensity of liquid circulation depends on the difference in temperature between the supply and return connections, the coldest battery will warm up faster, and, consequently, the temperature in all connected devices will be equalized.
The advantages of two-pipe systems include:
- high coolant circulation rate;
- the ability to create hidden systems with pipelines hidden in walls or floors;
- air heating efficiency;
- hydrodynamic stability of the system;
- possibility of easy connection of a device used to regulate the supply of hot water.
Two-pipe systems can be of different types:
- with bottom or top wiring;
- with associated or dead-end coolant transfer;
- natural and forced circulation (in the latter case, a circulation pump is used).
A two-pipe system is significantly more expensive than a single-pipe system, and is also more difficult to install than the latter. At the same time, this option guarantees more comfortable operating conditions.
Among the disadvantages of such a system are such factors as:
- double the number of pipes required to lay the structure, which significantly increases its cost and increases the time required for installation;
- the need to use various types of control and shut-off valves.
Despite the comments made above, it is the two-pipe system that is considered the preferable solution, especially when it comes to a network connected to autonomous boilers.
It works with greater efficiency and allows you to quickly achieve a comfortable microclimate. The compatibility of such structures with all types of boilers and various types of heating batteries also attracts attention.
Design elements for two-pipe systems
When choosing parts for the construction of two-pipe structures, it is better to give preference to polypropylene elements, although you can use other options (copper, metal-plastic) that can withstand high temperature and pressure.
Modern materials and technologies make it possible to install systems without the use of welding, and to carry out installation according to the principle of a designer. Since each pipe bend contributes to an increase in hydraulic resistance, turns should be avoided and pipes should be laid as straight as possible.
Pipes with a diameter of 50 mm are optimally suited for the supply and collection lines that are connected to the boilers. Similar parts are also used to make risers to which radiators are attached.
Connection to the supply and return of batteries is made with pipes of various diameters, the choice of which is influenced by the number of sections:
- to connect 25-35-section radiators, pipes with a diameter of 1.5 inches are required;
- 10-25 section – 1 inch;
- less than 10 sections - three quarters of an inch.
To prevent heat loss, all pipes and connections must be thermally insulated.
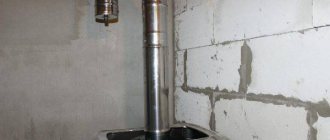
What can a chimney be made from?
To use a potbelly stove, you will need to take care of smoke removal. To do this, you have to build a chimney, selecting the optimal material.
You can invite specialists to carry out the work, or you can do everything on your own, especially since the amount of work is small.
Types of chimney pipes
Various materials are used to make smoke exhaust pipes.
Initially, depending on the material of manufacture, there are 2 options:
- Take ready-made pipes made at the factory;
- Make pipes from stainless steel sheets or other sheet metal.
The cheapest way is to make your own pipes
The undoubted advantage here is that the pipe will be of the required diameter, which is especially important for homemade potbelly stoves
For the chimney of a potbelly stove, you can independently make not only ordinary pipes, but also double ones - sandwich pipes. To do this you will need 2 pipes of different diameters and heat-resistant insulation.
The second advantage of homemade pipes is cost. To make them, you can use improvised material, or purchase metal sheets with a thickness of 0.6 mm. Or better yet, 1 mm.
Moreover, you can also make an insulated chimney pipe by making 2 pipes of different diameters from sheets. Or take ready-made metal ones of different diameters. In addition to making chimney pipes yourself, you can opt for a simpler and faster option - buy ready-made pipes from the required material.
An elementary option for assembling a chimney for a potbelly stove involves the use of ready-made steel pipes and a corner element. A smoke channel is assembled from them and welded to a homemade stove:
The most common materials are:
In addition to these options, the market offers many other products. Thus, you can find pipes made of heat-resistant glass, from which it is quite possible to build an exotic chimney. But this is done extremely rarely - skill is required to install and connect individual structural elements to each other.
It is not advisable to buy expensive pipes for a potbelly stove. To make a chimney, it is enough to buy metal heat-resistant pipes and adapters for installing the entire structure
Recommendations for choosing a pipe for a potbelly stove
To make a chimney for a potbelly stove, it is not necessary to construct pipes from metal sheets with your own hands. This will require some skill and time.
After all, the sheets will first need to be rolled into a tube of the required diameter, and then the seam must be tightly secured using rivets and heat-resistant sealant. It is much easier and faster to buy the necessary products produced at the factory.
To assemble the entire chimney structure and tightly fasten its individual components, you need to use a heat-resistant sealant that can withstand temperatures from 1000 degrees Celsius
As for the material, it is not worth taking cheap asbestos-cement pipes for these purposes - this material will not withstand if the temperature during the combustion process rises above 300 degrees Celsius. And the pipe itself is quite heavy.
It will also absorb condensation. But making a hole to clean out soot or remove condensation will be problematic.
Making a chimney for a potbelly stove out of brick is an unreasonably high expense. Firstly, rarely do any home craftsmen know how to do proper masonry. And secondly, this is a bulky structure that requires additional strengthening of the foundation. A potbelly stove is a temporary heating equipment.
A metallized corrugation can serve as a temporary replacement for a stationary metal pipe, but for permanent use it must be replaced with a metal pipe:
It is optimal to take metal pipes made of stainless steel, or better yet, alloy steel. A structure made of such material can serve as a chimney for 7-10 years. This is provided that the pipes are of sufficient thickness - 6-10 mm or more. And the quality of assembly of all elements of the smoke exhaust system plays an important role.
Another undoubted advantage of metal pipes is their lightness. The light weight allows you to carry out all the work on constructing a chimney for a potbelly stove alone.
We also recommend that you read more complete information on choosing a chimney pipe.
Having decided on the material for the future chimney, you can begin purchasing all the components and constructing a correct and functional structure.
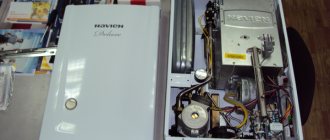
Gas boiler design
Open burner. This is a boiler installed on a special foundation, with an open firebox. In this option, pipes made of brick or ceramics are best suited since the main task of the chimney is to provide good draft.
IMPORTANT! A brick chimney is heavy and difficult to install. In addition, it is hygroscopic.
Closed burner (turbocharged boiler). With this option, a coaxial chimney or a system of sandwich pipes and fittings is best suited
Chimney installation
The smoke removal system is installed in the following sequence:
- The solid fuel boiler is installed in the boiler room so that the pipe faces the outer wall of the boiler room.
- A chimney for solid fuel boilers is purchased. There are various models that may differ in power, on which the diameter of the outlet pipe depends. The diameter of the pipe that will be used in the exhaust gas removal system must be correctly selected so that it completely coincides with the boiler outlet pipe.
- Using a jackhammer or other suitable tool, a hole is made in the wall that is larger than the diameter of the pipe.
- On the back side of the wall, a bracket is installed directly under the hole in the wall. The bracket must be securely fastened to the wall using threaded fasteners. The mass of the chimney is quite significant, and in strong winds, even a round pipe has windage, so the chimney must be secured very securely in the lower part.
- The second bracket is installed at a distance of 3 meters above the bottom bracket and is also securely fixed to the wall. If the household has more than one floor, then it is necessary to install another bracket directly under the roof of the house.
- A part of the pipe is installed into the hole in the wall, which is specially designed for this purpose. Typically this segment consists of two layers of steel pipe and insulation between them. Decorative overlays are installed on this section on both sides, which are secured to the wall with screws. Thus, the hole in the wall will be completely sealed - only in the middle of the chimney will smoke and other combustion products pass through.
- From the boiler room side, this part of the smoke removal system is securely connected to the boiler using a special single-layer metal adapter.
- A tee is installed on the back side of the part of the pipe that was passed through the wall, so that one part of the tee faces down, the other up, and the third is placed in the cavity of the pipe section passing through the wall. The lower part of such a tee is installed on a bracket and securely fixed with a special clamp.
- Two or three sections of the smoke removal system are connected to each other, this assembly is installed on the upper outlet of the tee, and is fixed in the upper bracket with a clamp.
- The remaining part of the smoke removal system is assembled on the ground, then installed on an already fixed section of the chimney. If the length of this third part is significant, then a stretcher must be made, which is attached to the very top part of the pipe. The chimney is installed, you can check the operation of the boiler. If the installation of the chimney was carried out correctly and the cross-section and length of the pipe correspond to the power of the heating device, then the draft will always be good and the fuel will burn, intensively releasing the maximum amount of thermal energy.
The smoke removal system for solid fuel heating devices, which is made of refractory bricks, is also erected parallel to the wall. In this case, the pipe from the boiler is directed through a hole in the wall into the internal cavity of a smoke removal system of this design.
A system of this design is inferior to systems consisting of stainless pipes. In such structures, the thrust will be noticeably lower at the same height. This is due to the too prominent inner surface of the pipe, as well as the rectangular shape of this design. A significant disadvantage of brick structures is the high time required for the construction of such a smoke removal system.
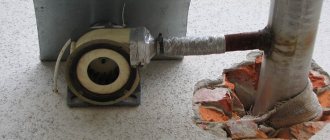
Coaxial pipe for gas boiler
This option was introduced recently, but it is already very popular.
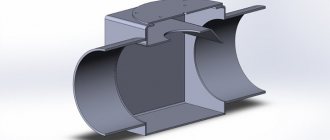
In structure, these are two pipes that are inserted into one another.
The main advantage is that additional ventilation in the house is not required, since the air enters the pipe from the street, and not from the room.
Thanks to their non-standard design, coaxial chimneys for gas boilers perform 2 tasks simultaneously - the inner pipe removes exhaust gas, and cold air flows back through the outer pipe.