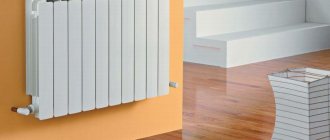
When installing a traditional heating system, problems with radiators constantly arise.
I would like to hide them somewhere away so that they do not stand out and spoil the interior with their appearance. What if we initially made a system in which batteries would not be needed at all? And we are not talking about heated floors here.
What is there in every room that doesn’t catch your eye at all? This is a plinth. So why not hide the heating in it, the manufacturers thought and launched the so-called warm baseboard onto the market.
It looks quite a bit different from the usual one. Its height ranges from 14 to 20cm, width about 3cm. With such dimensions, such a system will fit into any interior without any problems.
Is this heat source enough to fully heat a house or apartment? Quite. Despite its small size, do not forget about its length.
So, in a room up to 20 m2, when installing a plinth along three walls, the total area of such a heater reaches 2 m2. At the same time, it is not these square meters that emit heat, but something else.
To find out what exactly, let's take a closer look at the operating principle of a warm baseboard and find out all the details about its effectiveness.
What is the difference between a baseboard system and conventional heating systems?
Answer: Traditional heating devices create convective currents with air circulation. Cold air is heavier and sinks; warm air rises to the ceiling, where a thermal cushion is formed. This pillow takes 30% of any energy carrier.
Warm baseboard works in combination with the wall. Thanks to the precise matching of profile and thermal output, the baseboard transfers heat to the wall and then the warm, dry wall radiates heat, like a stove. The warmth of the walls can be felt almost immediately. The warmth of the walls has a beneficial effect on the microclimate of any room and person.
What is a warm baseboard and how does it work?
A warm baseboard differs from heating radiators in that it heats up the entire wall and thus forms a thermal curtain or screen.
The heat is instantly distributed evenly throughout the room, and not just near the windows.
Moreover, such a system is suitable for any type of floor. The air in the room does not overheat, does not dry out and does not raise dust.
Many people mistakenly believe that such heating heats the room by convection. Something like floor convectors.
However, this is not at all true. The fact is that convection currents of warm air from the baseboard contribute to heating the room by only 20-30%.
The main heat comes from the heated wall.
You get unique huge radiators from floor to ceiling inside the house. Therefore, in rooms where the ceilings are low and there is a minimum of furniture, the efficiency of the system is maximum.
In the kitchen it is better to install it under a set that has high legs.
It is often recommended to use it instead of floor convectors for panoramic windows. However, keep in mind that full compensation for the thermal gap in such a place cannot be created with a baseboard!
It's all about radiant energy. Unlike walls, here you will not notice the effect of heat accumulation and distribution. It will not “stick” to the glass, but will immediately go outside.
But with the task of simply eliminating the discomfort of being next to a cold window, skirting boards successfully cope.
The whole system works on the Coanda effect. In 1910, this Romanian aviator, trying to improve aircraft engines, used special plates that were supposed to reflect the heat flow from the fuselage so that it would not catch fire.
However, he got exactly the opposite effect. The warm air did not reflect, but on the contrary, seemed to lick the fuselage. How is this effect used in a warm baseboard system?
The heated air flow from them rises along the wall. Moreover, its speed from below is greater than the speed from above.
That is, the further it moves from the surface of the wall, the less its intensity and speed. And here we need to remember Bernouli’s law with pipes of different sections through which liquid or gas moves.
It states that the minimum flow rate and maximum pressure of the medium will be on a section of pipe with a large cross-section, and vice versa. That is, the faster the flow moves, the less pressure there is.
In relation to a warm baseboard, this means that air flows that move near the wall will have less pressure than at some distance from it. Due to this pressure difference, a force arises that seems to press the warm air against the wall.
Therefore, with baseboard heating, the wall is heated first, and then all objects in the room are heated from it. Real heating of the walls is felt at a height of up to 1.5 meters.
This is what a thermogram of heat distribution over a surface heated by a baseboard looks like in a thermal imager.
As you understand, convection does not play a significant role here. The main factor is the radiation from the heated wall. So-called radiant energy, as in infrared heaters and paintings.
Thanks to this method of heating, the air temperature in the room does not have to be brought up to +24-25C. Even at 20-21C you will feel comfortable. Your walls will be heated several degrees more.
And the human body reacts more precisely to the difference in temperature with surrounding solid objects than to cold air. Place you in a refrigerator at -1C or outside at the same temperature (without wind), you will immediately feel the effect.
Therefore, the heated wall creates thermal comfort of radiation balance, which a conventional battery cannot create.
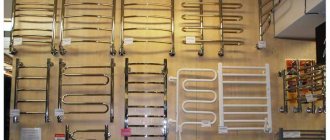
Which heating baseboard to choose for heating
When purchasing heated floors, you should pay attention to the product manufacturers. It is better to purchase skirting boards from well-known brands with a long history.
Among the manufacturers that have proven themselves to be of good quality equipment:
- "Mr. Tectum"
- "Rehau"
- "Besta Board".
When installing electric heated skirting boards, it is necessary to first assess the need for electricity consumption and the possibility of connecting the equipment to the network. An important factor determining the choice of heating baseboard is the material of the walls. The typical characteristics of the premises are also taken into account.
Design and types
Structurally, a warm baseboard is:
- A prefabricated box made of heat-conducting material (most often, aluminum alloy), including bottom and top covers, and a front panel. A decorative coating is required, most often white or brown, allowing the design to fit into almost any interior.
- Inside the box there are heating elements (electric heaters or pipes of the water heating circuit) with a developed heat exchange surface. The latter, as a rule, is achieved by installing many plates of a material with high thermal conductivity (most often copper or brass, less often aluminum) on the heating element pipes.
Depending on the type of heating element, warm baseboards are distinguished:
- Electric.
- Water.
The differences between the designs of both types are minimal. The heating element consists of two pipes connected by metal radiator plates.
- In the electrical system, the lower one is a heating element, and the upper one is a channel in which a current-carrying cable in heat-resistant insulation is laid.
- In a liquid system, both pipes are included in the coolant circulation circuit, with the lower one, as a rule, being used as supply, and the upper one as return. In this option, not only metal pipes can be used, but also made of polymer materials, for example, cross-linked polyethylene.
Heating modules can have a length from 0.7 to 2.5 m, which greatly facilitates the selection of the required footage for installation on a specific wall.
Modules of different sizes differ in power, which must be taken into account when calculating the heating system.
The connection of individual modules into a common system is carried out using standard methods:
- For an electric warm baseboard, a cable equipped with end caps is screwed onto threaded contact pins. The modules are connected in parallel.
- For a water heating system, the modules are assembled sequentially into a circuit using polyethylene pipes with standard threaded fittings. If a cross-linked polyethylene pipe is used, connection with press fittings is possible.
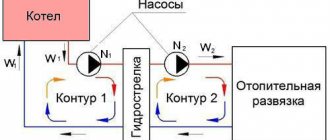
Most manufacturers limit the maximum permissible circuit length to 12.5-15 m. If a larger length is required when calculating the heating system, it is necessary to organize several circuits powered from the boiler through the manifold assembly.
To stabilize and regulate the temperature, a regulator or thermostat is included in the system.
Instead of an epilogue
An analysis of the Russian market for warm skirting boards showed that domestic buyers prefer domestic models. This is all thanks to the fact that searching for components for them is not burdensome, and some samples can be assembled independently. And even their apparent simplicity does not make them something of low quality in the eyes of a potential user. On the contrary, most Russian models are well balanced in terms of price/quality parameters. At the same time, foreign samples can cost many times more (or even tens of times), however, even due to their perfection and the use of new technologies in them, they are not in particular demand in the Russian Federation.
Often asked
Is it possible to install warm baseboards on walls that are covered with furniture?
It is possible to install modules on such walls, especially since, thanks to the gentle thermal effect of the furniture, there is no danger of drying out or warping. However, the specifics of the system’s operation show that such walls (especially those closed to the full height by cabinets) make virtually no contribution to the heating of the volume.
Is it possible to connect a warm baseboard to centralized heating systems?
Water modules from most manufacturers are designed so that the temperature drop in the circuit does not exceed 5°C, which practically does not interfere with the heating of other apartments in apartment buildings. From this point of view, there are no obstacles to connecting the system. However, in most cases, the coolant temperature and pressure in the central heating lines exceed the maximum permissible parameters for warm baseboard heating modules. In addition, water hammers, which pose a danger to the modules, cannot be ruled out. Therefore, it is preferable to use warm baseboards in autonomous systems.
Is the warm baseboard mounted close to the floor or is there a gap required?
For air intake, it is recommended to install heating modules with a gap from the floor covering of at least 10 mm.
Is it necessary for an electric warm baseboard to have a three-wire connection with a ground loop?
Since most of the module components are made of metal, according to electrical safety regulations, grounding of the housing is mandatory.
Is special preparation of the walls required when installing warm baseboards?
No, it is not required, all elements can be easily mounted on walls with any coating and unevenness. The only thing that needs to be taken care of is additional thermal insulation under the heating modules to ensure high system efficiency.
Construction of a plinth convector
The electric baseboard heater has a heating element made of a special alloy as a heating element, resistant to high temperatures and ensuring durability. The tube into which the heating element is inserted is long.
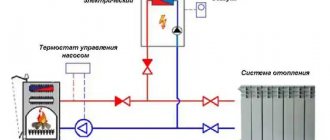
The principle of operation of a baseboard heater is the same as that of electric heated floors. Its design includes:
- A thermostat that ensures that the temperature inside the apartment is maintained at a given temperature. With its help, you can set various modes within the framework of its functions.
- Thermal sensors installed on the wall at human height to take the current temperature values and transmit them to the thermostat.
USEFUL INFORMATION: Flushing radiators: methods and techniques
Design, scope, price
Thin, elegant heaters that harmonize with the overall decor allow you to implement the most non-standard design ideas.
The peculiarity of the baseboard heating system is that it does not take away any free space from the room, and it can be placed next to furniture, antiques, household appliances, and musical instruments.
The material from which the flooring and walls are made also does not matter - there will be no damage or harm.
A palette of hundreds of colors and shades makes it possible to choose the appearance of the case to your liking. The texture can be a flat and smooth surface or an imitation of granite stone, marble, or wood.
A baseboard radiator will equalize the temperature in colder corner and end rooms; owners of cottages and country houses who want to create an elegant interior in their homes are interested in this technology. And in high-rise buildings, many people want to heat loggias and balconies, and this task is also easily solved using a similar heating scheme.
Wherever baseboard heating is used - in greenhouses and winter gardens, swimming pools and gyms, in museum buildings, concert halls, etc. Panoramic construction is in fashion, but you cannot install ordinary radiators along a wall that is solid glass.
A wide range of textures and shades of the warm baseboard body allows it to be used as a decorative element. In this case, it merged into a single whole with the door frames
Traditional heating also loses in rooms with high ceilings. No matter how much you heat them with radiators, warm air will still rush up to the ceiling, leaving the lower zone cool, and with the help of a thermal baseboard the situation can be easily corrected.
As for the price, the purchase and installation of heated baseboards is comparable to the cost of heated floors. Both will not be cheaper than installing a classic heating system with batteries.
Unfortunately, all energy-efficient devices cannot be called cheap, but the costs are worth it. In order not to overpay, you need to complete the system in advance - each of its elements has its own price. Only a specialist can do this correctly.
Calculation of warm baseboard
The calculation of the length of heating baseboards is based on room heating standards. The standard indicator for living rooms is 60-100 W of heat per 1 sq. m. It is relevant for central Russia. For northern regions, the room heating rate increases to 150-200 W.
In addition to the regional amendment, other adjustments must be made:
- the appearance of the glazing;
- wall thickness;
- number of window and door openings, etc.
After determining the heating rate, this indicator is multiplied by the square footage of the room that is planned to be heated. The resulting value is divided by the amount of heat generated by 1 linear meter of thermal baseboard.
Installing a water baseboard yourself
You can create a comfortable microclimate in your home yourself, but you need to have some skills in working with water supply systems. By the way, specialists install a warm baseboard in a room in 3 hours.
Installation of a warm baseboard can be completed in 3 hours
Important! It should be remembered that the total length of one skirting board contour should not exceed 15 m.
In addition to the warm baseboard kit itself (with holders, overlays, plastic wedges, plugs and fasteners), you will need two types of adhesive-based tapes: heat-reflecting aluminum and heat-insulating PE foam.
Types of tapes required for work
To assemble the circuit, you cannot do without connecting fittings, couplings and rotating elements.
Connection fittings
In addition, you should prepare: a screwdriver, mounting adhesive or self-tapping screws for installing the top strip, a construction knife, a hacksaw, a tape measure, a square, pliers, an edge cutter, a blowtorch, a flux mixture, wrenches, and a screwdriver.
Step 1 . The bottom strip is fixed at the level of installation of the plinth. To fix it, screws or glue are used (the first method is preferable).
Attaching the bottom bar
Step 2 . Thermal insulation tape is glued to the location of the heating module (parallel to the installed bottom bar). Its width should slightly exceed the height of the heating element. The excess part of the tape is cut off with a construction knife.
Thermal insulation tape is glued
Step 3 . The upper parts of the corners and brackets are installed on the upper edge strip.
Installing the top of the corners and brackets
The brackets are fixed to the wall using self-tapping screws with countersunk heads (they should not protrude on the surface). The lower part of the brackets must be removed. It is only needed to ensure that the top bar is positioned strictly parallel to the bottom.
Screwing the bracket
The brackets (their width is 2 cm) are fixed along the entire length of the plinth in increments of 50 cm.
Step 4 . Wider brackets, 3 cm wide, are installed in places where the plinth will be joined in line.
Example of installation of a wide bracket
Preparations for installing the heating module have been completed.
Step 5 . Based on the measurements taken, which determine the distances for connecting the modules to each other and the wiring, elements of the required length are prepared. If necessary, excess parts are cut off. To do this you will need a hacksaw (you can also use a grinder).
Trimming an element
Step 6 . Several lamellas are removed from the edge of the heating module (to do this you will have to use pliers).
Removing several slats
You can cut yourself on the slats, so it is recommended to wear gloves.
It's better to work with gloves
The edges of the pipes should be cleaned using an edge cutter.
Cleaning pipe edges
Step 7 . The outline is being assembled. Its tightness is ensured by using hot soldering or connection with fittings. When soldering, the oxide film is first removed from the tubes (from the joining areas). The prepared surface is treated with a flux mixture.
Treatment of prepared surfaces
The coupling is connected to the tubes. The gap should not exceed 0.5 mm. The connection area heats up (this will require a temperature of about 300 degrees). You can solder copper tubes using a gas torch. Heating should be carried out as evenly as possible. To do this, the burner flame must constantly move smoothly along the structure. There cannot be overheating of any one area.
Heating with a gas burner
When using fittings to connect the circuit, first put on the union nuts, then the conical brass rings (the conical part should be oriented towards the union nut),
Connection using fittings
The middle parts of the fittings are installed last on the tubes. It must be remembered that the inner diameter of the fittings and the inner diameter of the heating module tubes must be the same. This will help eliminate additional hydraulic resistance and have a positive effect on the movement of the coolant. The union nuts are tightened using wrenches.
Tightening the nuts
Step 8 . The heating system is being assembled. The pipes leading to the collector are cut and flared. A tightening nut, a locking ring and a fitting are attached to them.
Heating system assembly process
After this, the pipe is connected to the distribution manifold. To do this you will need a wrench.
Pipe connection
Automatic air vents are installed on the collector.
Step 9 . The supply pipeline is connected to the heating module tubes.
Connection to heating module tubes
The bottom tube of the warm baseboard is connected to a straight supply line (usually marked red). The upper one, the return one, is connected to the outlet pipe (blue). To connect the plinth, pipes with a diameter of 16 or 20 mm made of cross-linked polyethylene, polypropylene or metal-plastic products are used. Their fittings are pre-pressured.
Step 10 . The assembled heating module is installed in brackets.
The module is installed in brackets
Plastic wedges are inserted between the brackets and the heating element. They are necessary for rigid fixation of the module. The part of the plastic protruding beyond the plane of the heater is cut off with a construction knife.
Trimming excess plastic
Step 11 . The heating module closes. The inner side of the front strip is sealed with heat-reflecting tape.
Applying heat-reflective tape
The bar is fixed on the assembled structure. Its upper part is fixed to the brackets and the cladding below is snapped into place with force. The inner and outer corners are fixed (their upper parts have already been installed previously). For better fixation, the front strip can be secured with self-tapping screws (these with plugs are included in the kit). The brackets have special gear slots for this purpose. Using a drill with a drill with a diameter of 2 mm, holes are made (you need to act very carefully) opposite the brackets. The strip is attached to them with self-tapping screws. The fastener preparations are closed with plastic plugs.
Plastic plug
Important! Experts recommend starting the system first, and only then covering the heating module with the front panel.
The assembled system is connected to the boiler or riser. It is filled with coolant. The circulation pump starts or the required valve on the distribution manifold opens (depending on the selected circuit). To regulate the thermal power, balancing valves are installed on the collector.
Valves for power control
The baseboard becomes warm, which means the work is finished.
White floor plinth in the interior
Adviсe
When installing water-type heating baseboards in residential areas for heating, it is important not to exceed the maximum permissible circuit length. It should be no more than 15 m. If you want to make a circuit longer than 15 m, you need to break it into several autonomous parts.
Expert opinion
Grebnev Vadim Savelievich
Heating system installer
Installation of a heated floor heating system involves installing its own separate circuit in each room. Large premises are heated by several circuits.
Installation technology
Installing a warm electric baseboard with your own hands is much easier than a classic radiator or heated floor systems. Before installing a baseboard system, it is necessary to measure the perimeter of the room and determine the power of the devices.
Measuring the perimeter of the room
To work, you will need a screwdriver, a construction knife, a tape measure, pliers and metal scissors or a jigsaw. Installation is carried out after finishing and comes down to the following five steps:
- installation of a lower guide profile around the entire perimeter;
We install the lower guide profile around the perimeter of the room
- securing the insulating foil material;
We attach a strip of heat-reflecting material to the wall
- installation of the upper profile with fastenings;
Attaching brackets to the upper profile
Recommended distance between brackets 50 cm
Installation of the top profile to the wall
We fasten the brackets with self-tapping screws
We use special gaskets
Ready-made fastening system
- installation of a heating device - IR film, cables, heating elements and connecting them to the network;
Installation of heating elements
- installation of external decorative panel.
Installation of decorative panel
Advantages and disadvantages
Differences from other heating systems in the principle of operation of a warm baseboard give it tangible advantages.
Pros:
- Elimination of dampness and mold on heated walls.
- Uniform heating of the room, which significantly reduces the risk of drafts.
- Accelerated set temperature throughout the entire volume, compared to systems using point sources (radiators).
- Reduced heat loss due to the formation of a more heated layer of air along the walls.
- Ability to work with low-temperature sources.
- Compatible with all types of flooring and wall finishing.
Minuses:
- Difficulty in installing supply lines. And this applies to both the electric and water versions. For the first, it is advisable to organize a separate power line with switching devices. For the second, with a significant estimated length of the main line, several circuits and a collector unit will have to be installed.
- Relative high cost of the system. It is explained not even by the limited supply on the market (although this plays a role), but by the high cost of the components of the heating module.