Agree, you do not always monitor the boiler and try to check it as rarely as possible. At the same time, you may like to repair household appliances yourself, and not necessarily for the sake of saving money. If you have been using boilers for a long time, then you know about the peculiarities of their heat exchangers, as parts that often cause breakdowns. If you want to repair the gas boiler heat exchanger yourself, read our instructions and make sure that it is not at all difficult.
From our article you will learn how to remove the primary and secondary heat exchangers from the boiler. In addition, you will learn how to care for and repair these parts. If you are not familiar with the structure of the boiler, then, among other things, you will understand the structure of the exchangers, learn about their location, and the principle of operation.
A lot of water passes through the heat exchangers of boilers; over time, they become clogged and sometimes become deformed. In this article we have provided important information about their cleaning, repair and replacement. We'll cover enough about heat exchangers so that you can repair these boiler parts on your own.
Types of contours
To stabilize surges in the pressure gauge needle, special compensating tanks are installed in the circuit.
The pressure in the heating expansion tank forces the working fluid back into the pipe. They come in two types. Design differences allow them to be used in systems of different types: with access of coolant to air;
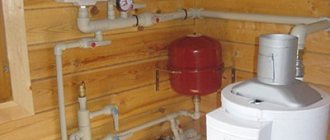
In open circuits, the circulation of the working fluid occurs due to gravity. What pressure is in the expansion tank of an open-type heating system is not of key importance; its volume is more important. These systems are designed in such a way that there is an expansion tank at the highest point. This is a vessel of certain dimensions made of metal or plastic. It is not sealed and the coolant in it comes into contact with air. An open-type tank may not have a lid, but it’s still better when it has one. Thanks to it, garbage or insects, if any, will not get into it;
without access of the working fluid to air;
The pressure in the expansion tank of a closed type heating tank is higher than that of a conventional one. In closed circuits, water is pumped by an electric pump, which is the root cause of pressure. Without a pump, circulation is impossible. Schemes of such systems require the installation of a sealed expansion tank. It can be installed at any point on the contour, with the exception of segments:
- after the electric pump;
- after the heater.
Its location in space also matters. Air bubbles are pushed upward by the coolant. They can't get into the tank. Since this will affect what pressure will be in the expansion tank of a sealed heating system.
People often start talking online about what the pressure should be in the expansion tank of the heating system. To find out the latter, the average person will have to sift through a decent amount of information, since the answers of the participants often contradict. Let's try to sort everything out and start with the design.
Navien boiler error 10
This error is related to the smoke removal system of the gas boiler. Combustion products must be removed; for this purpose, the boilers are equipped with a fan. To control the operation of the fan and determine the presence of permissible draft for boiler operation, a differential relay is used, which is connected to the turbine by two plastic tubes. When the fan is running, a vacuum is created, the relay closes, and the boiler functions normally.
Reasons for error 10
may be a clogged chimney, the presence of reverse draft, or incorrect connection of the air pressure control sensor to the fan. For the latter case, you need to check that the yellow tube is connected to the bottom of the fan, and the transparent one is connected to the top, and the tubes themselves are not damaged, deformed or condensation inside.
Increased resistance in the chimney can occur due to direct gusts of wind or blockage of the chimney (bird nest or cobwebs, freezing in winter). That's right, the location of the chimney should be taken into account the direction of the winds of a particular region at the design stage and the chimney should not be installed on the leeward side of the house.
We focused on the most common malfunctions of Navien boilers, but in fact there are significantly more error codes. Methods for checking and troubleshooting are the topic of a separate article. For convenience, here is a summary table of codes with a brief description:
| Fault number | Brief description of the problem |
| 02 | Low water pressure in the heating system or breakdown of the flow sensor |
| 03 | No signal from the ionization electrode |
| 04 | Incorrect signal from flame sensor or short circuit. Make sure there is no contact of the ionization electrode with the boiler or burner body, and diagnose the control board. |
| 05 | Damage to the heating temperature sensor. Measure the electrical resistance of the sensor and its compliance with the temperature table, and make sure that the connection between the sensor and the control board is secure. |
| 06 | Short circuit of the heating water temperature sensor circuit. Ring or replace the sensor. |
| 07 | Damage to the DHW temperature sensor. Check the dependence of the resistance on the temperature on the sensor, make sure that the connection of the sensor to the control unit is secure. |
| 08 | Short circuit of the DHW temperature sensor. Ring or replace the sensor. |
| 09 | Fan failure. Measure the resistance of the fan winding (test value is approximately 23 Ohms). Make sure that there is a voltage of 220 V at the fan terminals. There may be a problem with the control board circuit (diagnostics of the Navien board is required) |
| 10 | Malfunction of the combustion products removal system |
| 13 | Short circuit of the CO flow sensor. The sensor is stuck or the control unit is faulty. |
| 15 | Internal control board error (requires diagnosis and repair) |
| 16 | Boiler overheating. Signal from the emergency thermostat. The causes of overheating may be insufficient coolant circulation (see error 02), a clogged heat exchanger, or a malfunction of the thermostat itself. Operation occurs at 98 degrees, the alarm turns off when it cools down to 83 degrees. |
| 27 | Open or short circuit of the air pressure sensor circuit |
Which tap needs to be turned on the boiler to increase the pressure in the system (cm)?
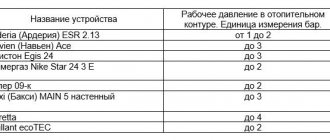
Gas double-circuit boiler Ariston.
Before starting, you need the pressure sensor to show 1.0 - 1.15 bar.
Mine shows 0.5 bar.
How to increase the pressure in the system?
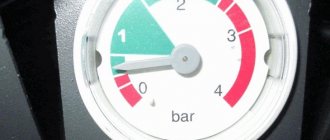
Looking at the diagram of a heating gas boiler, it is not difficult to guess which valve is responsible for the pressure in the heating system. Of course, the fact that your pressure gauge shows 0.5 bar is a very low pressure for normal operation of the boiler. The fact that the instructions say 1.0-1.15 bar is the minimum. Considering that I seem to have the same boiler, I want to show you a close-up of the control panel, namely the pressure gauge scale.
Please note that the red stripe is right up to number 3. And don’t look at the fact that my blood pressure is low. I haven't turned on the heating yet. What I want to say. The minimum pressure should be 1.15 bar and the maximum 3.0 bar. Therefore, I am always for the golden mean. Try to keep the pressure around two. As soon as it drops below two, open the tap number 16 in the diagram (feed tap). In my boiler, this tap is made of blue plastic (if you look under the boiler, you can see it). Especially for you, I put my phone “under the skirt” of the boiler and took a picture of what the feed tap looks like.
Differences between Navien Ace and Navien Delux
Navien Delux is a modified model that replaced Navien Ace. Navien Delux Coaxial is a series of boilers with two heat exchangers with a power from 10 to 30 kW with a closed combustion chamber and forced smoke removal using a turbine. The manufacturer notes the following features of Navien Delux:
- Frost protection system. Unlike boilers from other manufacturers, in addition to automatically turning on the burner when the temperature drops below 6 degrees, at temperatures below 10 degrees the boiler ensures continuous movement of the coolant by activating the circulation pump.
- Fan with variable speed. Navien Delux boilers are equipped with a turbine with adjustable blade rotation speed depending on the readings of a special air pressure sensor. This ensures an optimal gas-air mixture ratio and increases boiler performance.
- The heat exchanger is made of stainless steel. By using a fan with variable rotation speed and increasing combustion efficiency, it became possible to replace the copper heat exchanger with a stainless steel heat exchanger, which certainly has a significantly longer service life.
- It is also noted that the boilers are protected from the influence of mains voltage surges by a special protective chip and the ability to operate at low (up to 4 mBar) pressure of main gas and water. In other words, the manufacturer tried to make a product that is maximally adapted to the worst operating conditions.
Materials
Substances transfer heat in different ways. It is necessary to take into account pressure, maximum heating temperature, and corrosion resistance. Heat exchanger materials:
- steel;
- cast iron;
- copper;
- aluminum.
What are the differences?
Steel
The heat exchanger made of steel is the most durable. Tolerates pressure and temperature changes well. Can be repaired and is cheaper than other materials. Disadvantage: severe corrosion. Stainless steel heat exchangers last a long time.
Cast iron
Cast iron models tolerate exposure to water well and are difficult to corrode. They take longer to heat up than steel ones, but stay hot longer. The fragility of the material does not allow impacts.
Carefully. Cast iron does not tolerate sudden changes in temperature. If it is necessary to replenish the system with water, the boiler must be cooled before filling.
To remove scale, the heat exchanger is washed at intervals:
- once a year if running water is used;
- once every 2 years, when using antifreeze;
- once every 4 years, when the coolant is purified water.
Cast iron is the heaviest material.
Copper
Copper transfers heat well, can be soldered, and is lightweight. Almost resistant to corrosion.
Advice. If you install it yourself, you may make a mistake. If there is an electrical circuit in the wall behind the boiler, fistulas will appear in the heat exchanger.
Disadvantages: cost, they burn out quickly.
Aluminum
Lightweight heat exchanger with good thermal characteristics. Does not tolerate scale and requires annual maintenance. Disadvantages: heavy soldering and welding.
What are the advantages of Navien Ace boilers
Navien Ace is a double-circuit version of a wall-mounted boiler. It is equipped with an open combustion chamber with natural release of combustion products. The advantages of Navien boilers are eloquently demonstrated by the instructions for their operation - they work even in conditions under which competitors’ equipment fails.
Did you know?
To increase the service life of Navien boilers, they are made of stainless steel, since stainless steel has a fairly high thermal conductivity.
Among the main advantages of Navien Ace boilers it should be noted:
- versatility;
- simplicity of control commands;
- compactness;
- High-quality anti-corrosion material was used in production;
- fully electronic, Russified control system;
- compliance with high European standards (quality, comfort, safety);
- reliability and resistance to various conditions (voltage surges up to 30%);
- the ability to work in a frankly emergency situation (low gas and liquid coolant pressure, low-quality gas, unstable pressure in the water supply system);
- economical fuel consumption;
- environmental friendliness (mainly carbon dioxide is emitted);
- acceptable price.
Important! In the event of power surges, the SMPS function in the unit is activated, and the boiler continues to operate uninterruptedly.
Manufacturers, reviews
Based on reviews, you can get a picture of quality and hidden problems.
Thermona
Czech manufacturer, can work with antifreeze. Floor and wall models. Works with different types of gas. You can select a unit with the required power. Available with one or two circuits. Heat exchangers are made of different materials, they can be primary, secondary, biothermal. Equipped with automation. The service life promised by the manufacturer is 15 years, with a cast iron heat exchanger - 25 years.
Review of the THERM 35 EZ/B model: the user says that at first it was good, but after a while the burner began to work poorly and had to be sent in for service repair.
Hydrosta
The South Korean company Gofra-E produces a wall-mounted double-circuit boiler. Power - 11.6 - 46 kW. The automation is assembled on a microprocessor. There is a digital display, sound alarm, and a portable control panel. The room thermostat expands the capabilities of the device.
Buyers complain about the high price, but are satisfied with the quality. The boiler is repairable, with parts available for repair.
Master Gas
Since 2010, the Armavir Gas Equipment Plant has been producing boilers with a capacity of 24–30 kW. The heat exchanger is double-circuit, secondary, plate. The difference is that the combustion chamber is covered with dark glass. Korean Master Gas Seoul is double-circuit, with a power of 14–21 kW. For DHW - 20.9 kW. Gas consumption - 620/1990 l/h (minimum, maximum). The coolant is water. Temperature control range 40–80⁰С, for hot water supply 37–60⁰С. There are no complaints from users.
Arderia
In 2008, the first wall-mounted boilers appeared, jointly produced by Russia and a South Korean company. In 2015, production became domestic. The plant is located in the village of Enem, near Krasnodar. Reviews are contradictory; at the beginning of production there were complaints about noise and high gas consumption. Another user complained about a malfunction of the three-way valve; it turned out that it needed to be disassembled and lubricated. Happened after three years of use.
Fondital Victoria Compact
Italian company. The biothermal copper heat exchanger makes it possible to use the boiler for heating and domestic hot water. Electronics protect the gas appliance from freezing. Good feedback from users.
Saunier Duval
Made in France. Primary circuits are made of copper and steel plate circuits for hot water supply. Equipped with pressure sensors. The portable remote control allows you to program gas heating for a week. The reviews are positive; for some, the boiler has worked for more than 10 years. The service received criticism - expensive repairs of components.
Demrad
Large Turkish company. The boiler has two circuits, circuits with separate, joint (biothermal) heating. The heating circuit is a primary steel heat exchanger; for hot water supply, a copper plate heat exchanger is used. Combustion chamber - open, closed. Some users note the unreliability of the design and expensive repairs.
AEG
Famous German company. The gas burner flame adjusts to the water flow and prevents sudden temperature changes. There is a security system. Adjusts to changing gas pressure in the range of 13–20 mBar. The downside is the high price of the product and repairs.
"Beleto"
The famous Tula plant also produces gas equipment. The boiler has one or two circuits. The double-circuit heat exchanger uses a copper heat exchanger. The combustion chamber is closed, open. Power - 12.5 - 20 kW. A special feature is energy independence, the boiler can operate with natural circulation. Reviews are mixed.
Operating principle of the Navien boiler
The operating principles of modern gas boilers are almost the same for all manufacturers, the only differences are in the configuration of the equipment and the internal arrangement of the actuators. The flow diagram of water in the boiler is shown in the figures. The Navien boiler works either to maintain the required temperature in the CO, when heated water from the first heat exchanger is pumped by a circulation pump in a large circle, or in the DHW preparation mode. The DHW mode is a priority, which means that if it is necessary to heat the water, a special three-way valve switches the circulation to the DHW plate heat exchanger, and the coolant flow through the heating circuit is blocked. The signal to switch the boiler to the DHW preparation mode comes from the flow sensor located on the hydraulic unit with the make-up tap.
Liquids for flushing heat exchangers
Regardless of the cleaning method you choose, you will need a flushing reagent. You should approach the choice of flushing fluid wisely, as some of them can damage and even destroy the heat exchanger of your gas boiler. Let's look at in what cases certain solutions are suitable:
Hydrochloric acid
An aqueous solution of hydrochloric acid with a concentration of 2-5% is successfully used to clean heat exchangers made of copper or stainless steel. Special additives – inhibitors – help protect the metal without interfering with the dissolution of oxides and carbonates. Washing with hydrochloric acid is the job of professionals who are aware of their actions when working with this aggressive reagent. It is highly not recommended to clean the heat exchanger of a gas boiler with this product on your own, at home, without a clear understanding of the processes taking place.
Sulfamic acid
Flushing the heat exchanger with sulfamic acid is especially effective for removing deposits containing metal oxides. This cleaning product is safe for any materials and can be successfully used at home. The composition for flushing the heat exchanger includes a 2-3% aqueous solution of sulfamic acid and corrosion inhibitors.
Orthophosphoric acid
Flushing with orthophosphoric acid is effective for heat exchangers of gas boilers of all types. This cleaning product not only perfectly removes scale and dirt, but also does not cause any harm to the metal and even creates a protective film. To obtain an effective reagent, it is necessary to dilute orthophosphoric acid in water to obtain a 13% solution.
Lemon acid
A solution of citric acid at a temperature of 60°C perfectly removes scale and oxidation without affecting the metal of the heat exchanger.
The most common malfunctions and troubleshooting of boiler operation
Despite its functionality and electronics, there are certain disadvantages and malfunctions that can be encountered when operating the Navien Ace boiler.
Most often, users encounter a problem when the unit stops working and the electronics signal a critical error. This situation can be caused by various factors, including the sensitivity of the sensors. The most common mistakes:
Smoke removal. Fault code “10” indicates problems with the removal of combustion products. Possible reasons: turbine malfunction, pressure sensor tubes are connected incorrectly, chimney is clogged, pipe is too long.
If none of this reason is identified, and the Navien Ace boiler continues to signal an error, then the cause may be ordinary gusts of wind. This problem can be solved by redoing the chimney. As a quick response option, you can open the boiler body and disconnect the air supply hose. However, this measure is temporary. For common errors on the Navien gas boiler, see this video:
Important! The manufacturer recommends installing boilers with a chimney outlet on the leeward side
- Flame sensor failure. Fault code “03” may indicate poor gas quality. The problem can only be solved by elimination. First of all, the cleanliness of the gas supply nozzles is checked. If they are in order, you need to select the optimal position of the controller electrode (it should be in the hot phase of the flame).
- Equipment overheating. Fault code "01". A possible cause is a clogged heating system, a malfunction of the circulation pump or a decrease in flow. Ways to solve the problem: check the system and filter for the presence of air, check the serviceability of the pump and the coil resistance for short circuits, check the impeller in the circulation pump.
- The Navien gas boiler is working, there is heating, but no hot water. Error code "02". The remote control shows a jump in the water temperature (sharply increases to a maximum and immediately drops). There may be a blockage in the hot water system. Reasons may include: lack of pressure in the water supply system, airiness of the system, the circulation pump cannot gain momentum, the distribution valve is closed, or the flow controller does not work. To eliminate this malfunction, you first need to adjust the pressure, bleed the air in the system, check the resistance of the pump coil and impeller for damage, open the boiler distribution valve, disassemble the regulator body and clean the flag.
In addition, when turning on hot water, the Navien boiler may hum or make an incomprehensible noise. In this case, there is no error information on the display and the pressure is normal. As a rule, this is due to a clogged heat exchanger. To fix the problem, you can clean the heat exchanger or replace it.
Did you know?
It is best to choose boilers that are equipped with smooth adjustment - this will allow you to change the performance depending on the air temperature.
Navien Ace gas boilers are distinguished by high quality indicators and operational reliability. However, the duration and features of operation depend on how correctly you were able to install and configure the Navien Ace boiler, as well as on the quality of the fuel used.
Which is better, separate or bithermic?
It is impossible to say which one is preferable or better in everything. With good quality performance, both designs cope with the assigned tasks. The operating mode and features associated with this, which the consumer sees, are either not felt or are of a similar nature, that is, in one case, in another, you need to get used to some restrictions or specifics of the boiler’s operation.
A bithermic heat exchanger, or rather a ready-made boiler with it, will cost less, which for many can be a determining factor. Moreover, without significantly complicating the design, the boiler uses only one heat exchange unit, which can be maintained even easier than separate circuits.
With a bithermic heat exchanger it is easier to decide on a high-quality boiler model. Oddly enough, even in the same line of boilers with separate radiators, there is often a combination of heat exchangers for heating and hot water of different designs and materials. When choosing a boiler, you will have to carefully check the features and technical characteristics of all its elements in order to avoid mistakes. After all, if you set your sights on a high-quality heating circuit, you may end up with a problematic unit responsible for hot water.
It is impossible to say that double-circuit boilers with separate heat exchangers are better due to their maintainability; this would be a clear exaggeration. The problem with scale or other types of deposits on the walls of the tube is equally relevant for any boiler when using untreated water. The repair principles and techniques used are the same for heat exchangers of any design. If we take into account that a plate heat exchanger can be used in a separate radiator, it turns out that the bithermic one is much more durable.
Location of expansion tanks
There are several options for expansion tanks depending on their location in the system.
- Built-in closed - all modern boiler models are already equipped with expansion tanks. Their volume directly depends on the size and performance of the boiler. The greater the expected load on the tank, the larger the displacement of its expander.
- External open - usually used under conditions of natural gravitational circulation of fluid in the system. It is an open container installed at the top point. The liquid displaced from the pipes rises up along with the air, and goes back into the system under the influence of natural atmospheric pressure and gravitational force.
Basic actions in case of breakdowns
There are a number of primary actions that need to be performed when repairing plate heat exchangers or its analogues.
This list includes:
- Replacing batteries, cleaning power contacts.
- Diagnostics of the draft indicator of chimneys and pressures in cold water supply systems.
- Fuse diagnostics.
- Cleaning strainers. This element can be found on pipes that supply cold masses of water resources.
- Diagnostics of ignition electrodes.
It is worth noting that these are superficial actions, and not all breakdowns can be repaired in this way.
How to install
Installing an expansion tank is not particularly difficult, that is, it is not at all necessary to have any skills or craftsmanship. The installation process will also not take much time. Installation is easy and quick. But, nevertheless, you should follow the instructions and carefully follow each step.
- First you should turn off the heating system, that is, turn off the boiler. Then you should take the tank and use a regular car pump to inflate it with air. To do this, remove the special plug located on the top of the device. This is the first stage of preparatory work.
- Then you need to drain all the water from the heating lines. To do this, you need to open the tap and wait until all the liquid is released from the pipes and radiators.
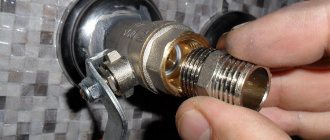
- Now you can install the tank. In general, the tank can be mounted anywhere, but it is advisable to install it near the boiler on the pipe through which water enters the boiler. For installation, special tees are used. It is also recommended to use a shut-off type valve. It is needed in order to, if necessary, block the coolant inlet into the tank.
- Now open the tap and fill the system with coolant. Then turn on the boiler.
That's all! If the tank is installed in accordance with all instructions, it will function correctly.
When the temperature of the coolant rises, excess liquid will flow into the tank, and when the temperature returns to normal, the liquid will return to the pipes.
If the tank is not selected correctly, then its capacity may not be enough for the amount of coolant that expands when heated. If this happens, the pressure will increase, resulting in liquid being discharged from the system automatically and the boiler will stop operating. After turning off the boiler, it can be turned on again. If there are no residents in the house for a long time, and there is no one to turn on the system, then due to frost, it will simply stop functioning. The boiler will have to be replaced.
Based on the foregoing, we can conclude that the expansion tank is one of the most important elements of any heating. It plays the role of a kind of fuse, where part of the coolant will flow in the event of its thermal expansion. If the system does not have such a tank, then as the temperature of the liquid rises, constant emergency shutdowns will occur.
So, in order for all heating to work uninterruptedly and bring warmth and comfort to the house, the tank must be selected correctly, because it is the correct expansion tank that contributes to the correct operation of the entire heating system.
Replacing the Baxi main5 24F heat exchanger
Replacing the Baxi main5 24F heat exchanger
Post by Dmitriyup33 » Oct 11, 2016, 10:03 am
Replacing the Baxi main5 24F heat exchanger
Post by RADAR » 11 Oct 2016, 14:30
Replacing the Baxi main5 24F heat exchanger
Post by Olegbez » 11 Oct 2016, 14:51
Replacing the Baxi main5 24F heat exchanger
Post by BAXI-Ural » 11 Oct 2016, 15:41
Replacing the Baxi main5 24F heat exchanger
Post by Dmitriyup33 » 11 Oct 2016, 16:03
Replacing the Baxi main5 24F heat exchanger
Post by BAXI-Ural » 11 Oct 2016, 16:11
Have you ever tried to heal your teeth?
Release the tubes from below and, together with these tubes, drag the heat exchanger towards you. If you are not convinced of the hint, call a specialist
Replacing the Baxi main5 24F heat exchanger
Post by Dmitriyup33 » 11 Oct 2016, 16:52
BAXI-Ural wrote: Have you tried to heal your teeth?
Release the tubes from below and, together with these tubes, drag the heat exchanger towards you. If you are not convinced of the hint, call a specialist
Replacing the Baxi main5 24F heat exchanger
Post by garry » Oct 11, 2016 10:45 pm
Replacing the Baxi main5 24F heat exchanger
Post by Olegbez » 12 Oct 2016, 15:36
I wasn’t too lazy and took a visual photo comparing two 24 kW heat exchangers. Supply pipes for cold/beautiful mountains of water: 24 Main Four - 22 mm, Main5 -11 mm, Dimensions of the heat exchanger - reduced, working area: 59.5 cm2 - on Main 5, on outdated models - 73 cm2. Even a person far from all this will be able to prove that the 5th series is cut down!
Replacing the Baxi main5 24F heat exchanger
Post by BAXI-Ural » 12 Oct 2016, 15:57
Replacing the Baxi main5 24F heat exchanger
Post by Olegbez » 12 Oct 2016, 16:10
Replacing the Baxi main5 24F heat exchanger
Post by Dmitriyup33 » 18 Oct 2016, 09:36
Inspect the ends with great attention, maybe wash them somewhere. It may immediately seem that you can crawl up to clean the end and the seat of the seal from scale with a very small sandpaper, and clean the tube in your hands. Just don't make deep scratches. As an option, you can use sealant (red automotive sealant), just be careful so that it doesn’t get inside, otherwise that’s the end of it all.
Thanks for the advice. In short, I removed all the scale and this tube began to push further inside. Previously, due to scale, I was not able to push it deeper.
Good afternoon. My Baxi luna 310 fi is almost 10 years old. I noticed a leak from the hole where the rod in the hydraulic toggle switch of the secondary heat exchanger comes out and presses the toggle switch. The code for ordering the assembled DHW PRESSOSTAT is 5629950. Even the office representatives in Samara couldn’t find anything like this, so I decided to repair it piece by piece.
I ordered from them: 128. O-ring seal 2.6 x 1.9 / Code 5405400 127. Hydraulic tumbler membrane fabric / Code 5405330 107. Rod seal assembly / Code 5630250. If anyone repaired it.
Hello. There is a saber boiler , a separate air channel of 80 mm. The voltage is fine, 230V, there is ground. when the neighbors arrive (and only) E42 begins to fall and after it E01. With the front cover open, it does not stop working, but it is noisy enough and this is not the case. Boiler
suffocating?
In the photo the air channels are as they were under the developer, now the boiler has been moved to the side
2 meters to the right + 2 elbows of 90 degrees of rotation.
I pray for help, what should I do? Should we call the gas workers and let them sort it out?
Boiler BAXI mainfour 24 flushing the heat exchanger
Advantages and disadvantages
Closed expansion tanks have a number of advantages over open ones:
- Closed analogues do not necessarily need to be installed in the attic; they can be installed near the boiler itself. And open ones must be installed at the highest point of the system.
- In closed tanks, water does not have access to contact with air, which means that oxygen will not dissolve in the water and interfere with the movement of the coolant.
- Most people have converted the attics of their homes into living spaces, so using closed tanks saves space as they can be installed anywhere.
The disadvantages of closed tanks are as follows:
- High price.
- It is necessary to pump air into the device from time to time.
Organization of basic access
All boiler inspection and repair operations require lowering the lower control panel. It is also necessary to remove the outer casing.
Removing the front panel
- Loosen the front panel mounting screws “A” located at the bottom of the front panel. (Fig. 1.1);
- The control panel slides down and extends forward, pivoting on two side hinges; the panel remains in a horizontal position on the floor, which allows access to the internal components of the device (Fig. 1.2);
- to increase the service space, you can lift and rotate the panel to a completely horizontal position (Fig. 1.3);
- Unscrew the screws “B” from the bottom of the front panel (Fig. 1.4);
- Lift the front panel up and forward, after unscrewing the screws on top. (Fig. 1.5)
Removing the front combustion chamber cover
- Unscrew the screws “C” (Fig. 1.6);
- Remove the front cover from the guide pins
(Fig. 1.7).
Removing the side panels
- Unscrew the 4 screws “D” for each of the side panels (Fig.1.8);
- Pull the bottom of the panel away from the chassis, then lift it slightly and disconnect it from the boiler (Fig. 1.9).
Design and principle of operation
Tank diagram
The pressure in a sealed, closed-type heating expansion tank is created due to its design. It consists of two chambers, which are separated by a rubber membrane. In one of the chambers there is a coolant, it is connected to a common circuit, and in the other, sealed, there is air. Its quantity is regulated depending on the characteristics of the heating system. For this purpose, a nipple is provided in the air compartment, to which a conventional machine pump fits. There is no connection between air and coolant. In order for the coolant from the circuit to enter the expansion tank for closed-type heating and back, the pressure must be correctly adjusted. This is a prerequisite to compensate for the expansion of the liquid when heated. Increasing in volume, it acts with greater force on the walls of the pipes. Slowly, excess coolant is forced into the reservoir. After the temperature of the working fluid decreases and it decreases in volume, the air in the gas chamber will displace it back into the circuit.
Purpose
Heat exchanger is a device for transferring heat from one medium to another. Cold transfer is not possible. Even in a refrigerator, the heat exchanger takes away excess heat rather than transferring cold. The coldest substance is warmer than absolute zero. Transmission occurs through insulating material. Rules:
- The insulating material must be a thermal conductor.
- It should not allow one medium to pass into another, otherwise mixing will occur.
To increase the effectiveness of the first condition, the surface area is increased. For example, soldering plates perpendicular to the tubes. They try to make the walls of the insulating material thinner. Limits the pressure of the environment. The heat exchanger material affects heat transfer.
Calculating pressure in two ways
- design. At this stage, a decision is made about which rooms will be heated and which will not, diagrams are drawn and the volume of the system in liters is calculated;
- boiler selection. Based on the volume of the system and the area of the heated premises, a heater is selected. For 15 liters of coolant, one kilowatt of heater power is required;
- determining the required volume of the expansion tank.
Now let's look at several different methods for calculating the pressure in the expansion tank of a sealed heating system.
Option #1.
For this we need the following quantities:
- system volume (OS);
- tank volume (VT);
- the maximum permissible value of the pressure gauge scale for a given system (DM);
- water expansion – 5%.
By the time you have to make calculations, you already know how many liters the system holds. The required volume of the tank is calculated by dividing the capacity of the circuit in liters by ten. Although this is an approximate calculation, it is very working.
The volume of the tank in a closed system may be more than necessary, but it cannot be less. An error will lead to replacement or installation of an additional one.
Air vent
Option #2.
It's good that we live in a world of fierce competition. To ensure that the client is satisfied with the purchase and does not have any problems with operation, boiler manufacturers indicate the required pressure of the heating expansion tank in the product data sheet. If for some reason this cannot be found out, then you can calculate this value, knowing what the pressure gauge readings should be in the operating mode of the system.
The latter can be found with one hundred percent probability in the technical documentation or on the boiler. Then 0.2-0.3 atmospheres should be subtracted from the working pressure. What is it for? If the pressure in the tank is greater than the working pressure in the system, the coolant will not be squeezed into the tank. He simply cannot do this, as an even greater force acts on him from the side of the tank. And if there is not enough air in the tank, then there will be difficulties with returning the coolant to the system.
Organization of access to the control system
Attention!
Switch off the power supply to the boiler at the external switch before performing the following operations.
Checking the status of fuses
- Remove the back cover on the control panel
(Fig. 1.54);
- Remove the fuses (Fig. 1.55).
Removing the timer
- Disconnect the electrical connector “P1” from the timer (Fig. 1.56);
- Unscrew the screws “Q1” (Fig. 1.57);
- Remove the timer from the control panel (Fig. 1.58).
Removing the control board
- Disconnect the boiler from the power supply
- Remove the back cover of the control panel
- Disconnect all electrical connectors on the control board
- Unscrew the screws “R1” (Fig. 1.59);
- Detach the front decorative panel from the base of the control panel
- Unscrew the “S1” screws and remove the control board (Fig. 1.60).
Navien boiler error 03
In gas boilers, the presence of a flame on the burner is checked by a special sensor - an ionization electrode. The operating logic of the unit is to continuously check for the presence of a flame after opening the gas valve. Symptoms of error 03 on Navien boilers can be divided into two groups:
- unsuccessful attempts to ignite (no flame appears)
- ignition occurs, but the flame goes out
If ignition does not occur, you need to check:
- gas pressure at the inlet and outlet of the gas valve (can only be carried out by a qualified specialist using special equipment - a differential pressure gauge)
- condition of the ignition electrodes (compliance of the gap with the manufacturer’s standard, contamination of the electrodes). The normal distance between the electrodes is 3.5-4.5 mm.
- integrity of the insulation of the electrode power wire (you can visually verify that the spark breakdown occurs specifically on the body of the gas burner, and not somewhere else)
- correct setting of the boiler power on the DIP switch (valid if there is a problem during the first start of the boiler or after replacing the electronic board)
- presence of voltage on the ignition transformer
Error 03
on the Navien boiler will also appear when combustion is unstable (intermittent flame) or if the control unit is unable to detect the presence of a flame. In this case, you need to make sure that the connection between the ionization electrode and the control board is reliable, check that the boiler is grounded and that there is no contamination on the electrode. Unstability of combustion can be caused by an increase in fan speed, so you need to make sure that the yellow hose going from the turbine to the APS sensor is securely connected and not damaged.
If during the checks it was not possible to normalize the operation of the boiler, diagnostics of the boiler board, repair or replacement will most likely be required. We recommend watching a video in which one of the users simulates error 03 on a Navien boiler:
How to repair the heat exchanger of a BAXI gas boiler
In order to begin repair work on a gas boiler, it is worth disassembling it, the method is as follows:
- After a detailed study of the diagram, we proceed to removing the front cover, it will protect the inside of the boiler. To do this you will need to unscrew 4 bolts, this should not cause any problems.
- Unscrew the protection from the firebox.
At this step you will need a vacuum cleaner, thoroughly clean the firebox from dust and debris. - After unscrewing the two screws and removing the wires and terminals, remove the fan.
- Wipe the burner with sprayers with a wet cloth; if you notice clogged sprayers, you can use a brush, but not an iron brush, so as not to damage or break burner parts.
- Now you should remove the heat exchanger, it’s very simple. Disconnect all sensors. Remove the clips from the tubes and lift the heat exchanger to the top with gentle rocking.
When the boiler is completely disassembled, we begin to repair it or take preventive measures.
Very often, replacing the heat exchanger makes it possible to solve the problem of incorrect operation.
Flushing the boiler heat exchanger
Washing should be done both in the middle and on the outside.
To do this, pour clean water into a basin, add special agents to it that help fight scale and rust - place a heat exchanger in it for a while. At the end of this time, using pressurized water, remove any remaining scale and rust from the inside and outside of the heat exchanger.
After completing all the described procedures, we begin assembling the gas boiler. Do the described method in reverse order. As you can see, even an inexperienced technician can repair a baxi gas water heater with your own hands, which will serve you for a very long time.
Published 1 opinion
If you have no experience in handling the units or if there are no special tools, it is better to entrust the boiler repair to a competent technician.
The most popular models of Navien Ace wall-mounted boilers
The most reliable Navien boilers, the work of which can only be met with positive reviews, are distinguished by an optimal price-quality ratio. They are divided into two categories:
- Ace ATMO. Traditional boiler with an open combustion chamber. Equipped with atmospheric exhaust of combustion products.
- Ace TURBO. An advanced boiler equipped with a turbocharged burner and a special SMPS control system that regulates the gas combustion process.
Important! Navien Ace gas boilers can operate in both automatic and manual modes, which allows you to more accurately set the boiler operating parameters and eliminate operating errors as much as possible.
Primary heat exchanger of a gas boiler
The primary, or simply heat exchanger, is a large pipe-like piece with bends through which thin plates pass. This shape and the device itself are also called a coil.
Manufacturers make heat exchangers from stainless metals such as copper and stainless steel. For different brands of boilers, they hardly differ in structure - shell-and-tube in the form of a coil.
Coil heat exchangers are actively used in industry. They sometimes combine two systems: water and steam, water and antifreeze, water in two ways
The device transfers thermal energy from gas to a coolant - usually water. The units differ in power, and the greater the length of the pipe and the number of ribs (bends), the higher it is. The heat exchanger works well as long as soot outside and salts inside do not accumulate in excess. Then circulation is disrupted and the thermal conductivity of the walls decreases. Heat exchangers should be cleaned on time and protected with water filters.
In the boiler design, the primary exchanger is located in the combustion chamber, above the main burner flame. The manufacturing material with high heat transfer retains heat well and loses it quickly enough, as necessary. Thanks to the narrow plates, thermal energy is distributed more evenly. The primary heat exchanger is the main heating element of a gas boiler, excluding the burner.
Primary heat exchanger repair
The exchanger deteriorates due to poor quality coolant or the materials from which it is made, as well as other factors. Pressure, high temperatures and their differences lead to cracks, which is why the element begins to work less powerfully and breaks down over time. The life of the heat exchanger can be extended if purified water is supplied and the boiler is not overloaded.
It will be more difficult to eliminate cracks than clogs. The heat exchanger is soldered for this purpose. Select solder from the same material as the unit itself. Boiler heat exchangers are usually made of copper, less often cast iron or steel. Aluminum, silicon, manganese, nickel and zinc are added to the composition.
Leaks on the primary heat exchanger can occur due to exposure to flames, water hammer, and in some cases they are caused by corrosion
Additional solder requirements:
- melting point not lower than 700 °C;
- sufficient viscosity;
- fluidity is the same as that of a heat exchanger.
Copper-zinc solders are considered one of the best. They are used for soldering most non-ferrous metals with a higher melting point than the support material itself. Solders with inclusions of silicon or tin - up to half a percent - are safer for the human body.
It is better to avoid copper-phosphorus materials, and if exchangers are soldered with them, do so without any load such as shock or vibration. Well-chosen solder is half the battle.
Heat exchangers are soldered with gas burners and blowtorches. Before soldering, the desired area is cleaned with fine-grained sandpaper and wiped with a rag with a solvent, and then heated. The area is heated with a hairdryer or a weak burner/soldering iron. At this moment, the main thing is to get into the temperature corridor and take into account subsequent cooling. Barely noticeable damage is found by small greenish spots.
Before heating, the water is drained, and its remains are removed with a compressor or blown out through a flexible hose. The hose is fixed by thread if it has a union nut and the design features allow this. If you leave water, it will take away part of the thermal energy.
Solder spools: At high temperatures, the material wets the base and spreads across it, gets into the smallest gaps and stretches, resulting in an intermediate layer of base and solder combination
Solder is preferred in the form of a wire or rod: when soldering, the molten end will be well immersed in the flux, which will stick to it. If the wire lays on the exchanger itself too intermittently or loosely, the preheating was weak. After work, the soldering area is sometimes coated with heat-resistant paint for better insulation.
Over the next two weeks, the soldered area is checked daily for integrity. At the first detected leak, you should contact a specialist. If it appears in the first fortnight, it means the soldering was of poor quality.
The flux is suitable for universal use, as well as gel soldering flux. Avoid rosin, unusual options like aspirin and others.
Cleaning the primary heat exchanger
Buy a solution for washing heat exchangers - it removes even severe contamination. Use special brushes and scrapers to manually clean accessible areas inside and outside the exchanger. Remove the soot.
Soot appears due to too intense operation of the boiler and small fuel leaks; a special metal brush can remove most of the soot
In a difficult situation, order a chemical flush. The masters will clean the exchanger through a booster, to which they will add acid - sulfamic acid, for example. After special treatment, no old and persistent deposits will remain. Or you can wash the heat exchanger yourself. To do this, we suggest using the following instructions.
Cleaning is possible without disassembly - with hydrodynamic flushing. Small particles under high pressure will remove any contamination.
Replacing an old or broken heat exchanger
To remove the exchanger for flushing or replacement, first of all, you need to disconnect the boiler from the gas supply and the electrical network. Then remove the front panel of the boiler and block the supply and return heating pipes. The coolant is drained through the drain valve on the boiler.
Further actions require greater precision and concentration of effort:
- We remove the fastenings on the tube supplying gas to the combustion chamber. Disconnect this pipe.
- We free the combustion compartment cover from suitable communications: we move the ignition and control electrodes to the side.
- We remove the sensors from the combustion chamber. We unscrew the fasteners on its cover and remove the latter.
- Disconnect and take out the fan.
- We remove the clamps from the pipes approaching the primary heat exchanger. Let's remove these tubes.
- We detach the combustion chamber from the boiler wall and move it outside.
- Unscrew the hardware of the upper combustion compartment cover. Remove the top.
- We remove the fasteners that hold the primary heat exchanger and take it out.
Now we can replace the faulty exchanger with a new one. We fix it in the combustion chamber, separate from the boiler. We fix it around the perimeter with hardware and return the top cover to its place.
Diagram of the internal structure of the Navien Deluxe Coaxial boiler for natural and liquefied gas with a turbocharged combustion chamber and a stainless steel primary heat exchanger
We attach the combustion compartment back to the inner wall of the boiler. We attach the front cover. We return all disconnected parts and removed components near the combustion chamber to their place.
Look at what the seals look like inside the gas boiler and change them at the necessary connections before installing the heat exchanger. After complete assembly, prepare the boiler for operation and do a test run.