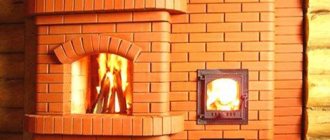
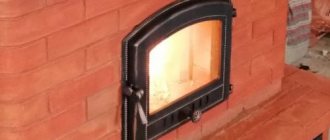
Fireplace on a reliable support
When building a country house, the design of which includes a fireplace, many people wonder whether a foundation is needed for a fireplace. Some owners do not consider it necessary to install a solid foundation and limit themselves to installing supports, but over time, such a structure will shrink and gradually collapse. There is a technology for performing the work, according to which the foundation of the house should not be connected to the foundation for the furnace structure, since they are designed for different load-bearing loads.
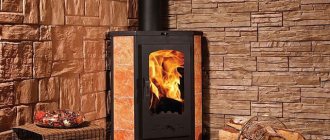
DIY fireplace solution
We select the desired clay.
Let's take a look at the instructions on how to make a fireplace. To prepare the mortar for masonry, you will need well-known consumables and components. The usual option is clay in an aqueous solution. If you cannot find one on sale or simply prepare it, then you will have to add additional components to the solution, which will result in additional financial costs.
We prepare the clay for work. Clay of the required amount and normal consistency is soaked in water for 2-3 days.
Masonry mortar. Mix the future solution with an ordinary shovel, or you can use your feet, after putting on rubber boots
Pay attention to the condition of the clay solution; if any debris and dirt appear, remove them immediately
In the absence of normal clay, you can mix fatty and lean clay in equal proportions. Separately, these 2 types of clay are not used for mortar, even with the addition of other components.
Ready clay mixture. It is first necessary to check the resulting mixture for quality properties. We make 2 small balls from the solution, place one to dry in a dark, dry place, and flatten the second to a flat cake.
We leave both products to dry for 2-3 days and check the material. It should be free of any cracks or flaws. If the result is a greasy solution, mix it with cement. If there are no cracks, then you have a normal or thin solution.
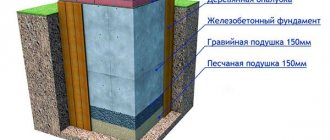
Technology for building a foundation for a fireplace
In order to build a foundation for a fireplace in a house, it is necessary to clearly define the dimensions of the proposed structure and clarify all the features of construction work, which can be done with your own hands.
In principle, it is best to build the foundation for the fireplace at the same time as the house itself. Then it will be easier for you to decide on the location of the bookmark and it will be more convenient to work. If construction is to take place in an already residential area, you will have to remove the flooring and, quite possibly, partially dismantle the walls. It should be remembered that load-bearing walls are prohibited from being touched.
The foundations for the entire house and the fireplace should not be combined into a common structure, since the load effects on both foundations will be significantly different. It is also recommended to provide a gap between the foundations of at least five centimeters, which should then be filled with sand.
Necessary calculations
In your preliminary calculations, you need to take into account a number of features:
- the fireplace radiation surface should be located opposite the windows;
- all objects in the room should be at a distance of one meter;
- The minimum room area is 11 square meters.
The minimum area of the room where the fireplace will be should be 11 square meters. It is believed that the average fireplace is 1 ton.
To prevent cracks from appearing in it, it is necessary to build a solid foundation. As a rule, the dimensions of the foundation should be ten to fifteen centimeters larger than the fireplace itself, if we consider the cross section. The pipe is designed as centrally as possible, because it is this that gives the greatest load. This will make the shrinkage process uniform and make the load symmetrical.
The dimensions of the foundation for the fireplace will be influenced by the following factors:
- type of soil composition and level of its strength;
- freezing depth;
- groundwater.
In any case, the depth is at least sixty centimeters.
Rubble concrete base
In this case, the work is carried out in several stages. First, a formwork structure is installed, lined with glassine on the inside or coated with a bitumen compound to reduce the absorption of cement laitance. A layer of large stones is laid, the remaining space between them is filled with crushed stone. This structure is generously filled with a solution of cement and sand prepared in a ratio of 1 to 3.
The depth of the foundation for the fireplace must be at least 60 cm
The final leveling of the surface is done with a mixture whose consistency resembles sour cream. In this case, cement material and sand are mixed in a ratio of 2 to 1.
There is one peculiarity in this work - everything is done at once, without interruptions. Laying the next layer is done within a day.
Reinforced concrete slab foundation
Let's look at how to properly lay out a reinforced concrete base. This will require sand, gravel, and Portland cement. Four parts of the sand-gravel mixture are poured into the cement portion, and the filling is performed in two stages. After the first layer, a mesh reinforcement frame is installed, concreting is performed, and the surface is compacted and leveled. The concrete will finally set after two days.
In summer, the formwork is removed after five days; in winter, this period is doubled.
Brick foundation
In the case where the pit walls are able to maintain verticality and groundwater does not accumulate below, the foundation can be laid out of moisture-resistant iron ore brick.
The rows are laid using sand-cement mortar, the proportions of which are taken at a ratio of 3 to 1
An important feature is the fact that the soil is likely to freeze, which can cause deformation of the brickwork; for this reason, it is recommended to lay the initial row twenty centimeters below the freezing point. This fact can be ignored if the room is heated around the clock in winter, because in this case freezing is unlikely
Whatever type of base you choose, its surface is checked for horizontal evenness.
The top of the foundation should rise about seven centimeters above the level of the floor covering; to install insulation, two layers of roofing material are laid on its surface.
There is probably no longer any doubt about whether a foundation is needed for a fireplace, and how to make it correctly. All that remains is to choose the most convenient option and get to work. The event is troublesome, but completely doable on your own. As a last resort. You can always use the services of professional craftsmen.
Types of materials for manufacturing
A special feature of construction work on the construction of a foundation for a fireplace is the layer-by-layer filling of a pre-prepared recess with concrete mortar of various compositions. The following materials can be used in the work:
- sand – river or quarry sand, free of foreign impurities and debris;
- cement material is the main binding component for concreting. To obtain a high-quality foundation, it is necessary to choose this material correctly - the cement must be homogeneous and loose in consistency, and not have lumps or expired shelf life. Its brand must be no lower than M400;
- crushed stone is a not very large stone of natural origin. The most commonly used is limestone gravel or granite. The first option is not expensive, the second has better frost resistance;
- rubble stone is a natural material, represented by large pieces of rock, the weight of which reaches fifty kilograms.
Rubble stone can be used to make a foundation for a fireplace
Cladding an outdoor stove with bricks and making a smoke extractor (with photo)
The surface of the cornice is usually covered with clinker slabs, and its edges are decorated with facing bricks cut to the size of the end.
During facing work, it is necessary to ensure that the seams between the bricks are of the same width. After completing the masonry, use a narrow trowel to press the mortar into the seams so that they are completely sealed. Then smooth out the solution, let it dry, and then remove the seams.
After completing work with the fireplace, you can proceed directly to the manufacture of the smoke extractor. Blanks made of sheet copper 1 mm thick should be pre-cut. The width of all allowances for creating the sides should be 29 mm, and the height of the pipe should be 50 cm. To make it, you will need four blanks, each 25 cm wide. On the two outer blanks on the left and right, you need to carefully bend the edges 25 mm wide at a right angle. After this, you need to attach the smoke eliminator hood to the fireclay insert guard. Instead of copper, you can use other sheet metal (stainless steel or galvanized iron) for the smoke eliminator.
To create the edges of thin sheet metal, you need to fix the workpiece between two pieces of hardwood, then use a rubber mallet and a mounting block to carefully bend the protruding edge. Then, on the workpieces at equal distances from each other, you should first make markings, and then drill holes with a diameter of 4 mm for the rivets. For a fastened smoke extractor, it is recommended to strengthen the edge of the hood using brass corners.
On top it is necessary to install a square chimney with a weather vane. You can simply put it on the cap, but it is still recommended to attach it using rivets. In this case, the pipe will definitely not be blown away by the wind.
The smoke extractor must be fixed to the furnace fence using galvanized steel brackets. Before this, they need to be bent and attached to the cap with rivets 12 mm long. In order to correctly mark the points for drilling holes for dowels, the cap with the pipe must be attached to the fireplace, determine the future location of the brackets, only then make the markings, remove the cap and drill the holes. The cap can then be placed and screwed on.
In the hearth there is a frame for hanging the grill grate and installing an ash pan. To make it you will need steel corners. They must be connected to each other with screws or welding. As supports for the grill grate, it is recommended to attach two vertical elements made of strip steel to the rear transverse element of the frame.
In addition, you will need a weather vane, which is a cap that crowns the chimney. It is necessary to prevent precipitation and birds from entering the mouth of the pipe and to protect it from moisture.
You can purchase a ready-made grill for cooking roast, but you can save money and weld it yourself from pieces of steel rod with a cross-section of 8 × 8 mm and a length of 540 mm each, having previously bent them. Do not forget that two pieces of such a rod will be needed for the grille frame, which is made first, and then the remaining rods (about 18 pieces) are welded onto it. Screws can be used instead of welding. After assembly, it is recommended to chrome plate the grille. Two similar pieces of rod must be attached to the longitudinal elements of the frame from above, which are used as guides for the retractable ash pan. The distance between them should be slightly larger than the width of the ash pan. The retractable ash pan itself is best made from black sheet metal 1.5 mm thick.
Watch step by step how to make an outdoor fireplace in the video below on this page:
Brick finishing
If you are looking for an answer to the question of what is the best way to decorate a fireplace, then you don’t have to think long and leave the exposed brickwork without decorative decorations. But you still have to work hard. Firstly, you need to more clearly highlight the coating by applying a hydrochloric acid or sulfuric acid solution.
And secondly, it is advisable to carefully sew the seams. To do this, a space of up to 7 mm unfilled with mortar is left on the outside of the masonry. They need to be treated with grout, but only after the glue mixture has dried. It is advisable to sand the surface of the brick. The originality comes from chamfering the edges.
Features of foundation installation
Place
Something has already been said about this. It remains to clarify some points:
- The base for the fireplace must be separate. It is prohibited to use part of the foundation of the house itself for these purposes. This is due to the difference in load and further shrinkage of the structures.
- There must be a gap (minimum 50 mm) between the walls of the foundations (buildings and furnaces), which is filled with a loose mass (usually ASG). This provides “decoupling” of the bases, so the shrinkage of one does not affect the other.
Laying depth
As with all types of foundations, taking into account the depth of soil freezing. In some cases, it is possible to install a slab-type foundation (if groundwater comes close to the surface, if the soil is classified as problematic - clay, sandstone and a number of others).
The rule regarding depth can be neglected if, for example, the area of the house is large, its foundation is well insulated, and the owners permanently live in the building (that is, it is heated all season). This ensures that the soil under the building itself will not freeze as much. It turns out that there are several options, but the meaning is clear - to prevent the fireplace from sagging.
Foundation type
There are so many recommendations on this issue that it is worth going into more detail. When choosing a specific project, you should focus on:
- the mass of the fireplace;
- soil characteristics;
- ease of excavation work (this is important for an already inhabited house).
Tape foundation
It makes sense to build a monolithic one (for example, reinforced concrete) for a massive fireplace. It is better to use this option - block.
A cheaper technology is to fill the prepared trench with natural stone, crushed stone or pebbles of large fractions, and lay brick on top (the figure explains everything well).
Explanation: floor level (1), brickwork (2), cut-off waterproofing (3).
Columnar foundation
There are also many nuances here. Which material to choose? Probably, such an option as in the figure is too expensive and labor-intensive.
Upper: position 5 – cut-off waterproofing.
Lower: pos. 3 – leveling layer; pos. 4 – reinforced concrete lintel (slab),
A more economical foundation is made of metal pipes into which the solution is poured. If it is being built during the construction of a house, then you can use ready-made reinforced concrete blocks. The ceiling is a reinforced concrete slab.
Here is one of the options, although given the complexity of the work and the cost of materials, not everyone will choose it.
Materials
A few clarifications:
- For brickwork, it is recommended to prepare lime mortar. He is considered the best for this job. Preparation: dilute lime in water in a ratio of 1 to 3. The mixture is brought to the desired consistency by adding sand.
- All recessed parts of the base must be protected from liquids (vertical waterproofing). Most often, it is arranged by coating the surfaces with fatty clay, diluted to a thick sour cream. As a rule, this is enough for a fireplace, especially if the foundation of the house is a strip monolith.
- Even in the process of preparing the pit, clay is placed on the bottom and compacted. This creates the first layer of cut-off waterproofing, which protects the “cushion” under the masonry.
Stages of building a foundation for a fireplace
First of all, it is necessary to have information regarding the soil on the site where the house is being built (already erected). If the soil is clay deposits, then it should be taken into account that with high humidity, the fireplace structure may even tilt - the base will not be able to withstand the load.
In the case where the soil mainly contains sand, the pressure of the weight of the fireplace will cause shrinkage. If the soil is composed of rocks, you don’t have to think about the freezing depth
Provided that the fireplace is lit constantly, this circumstance should also not be paid attention to, since this degree of operation does not allow the soil to freeze.
When the soil analysis has been carried out, we begin to prepare the necessary building materials, including:
- gravel;
- bottle;
- crushed stone;
- sand;
- cement;
- old broken brick.
Concrete made independently from materials - sand and cement, mixed in a ratio of 6:1 is used as a binding solution.
How to make a foundation for a stove in a house - a step-by-step guide
«.
The foundation is laid in the following sequence:
- the first layer of 20 - 25 centimeters consists of fine gravel or crushed stone. It is filled with concrete;
- the second layer consists of large stones, they are also filled with mortar, and gravel or crushed stone is poured into the remaining gaps.
The technology for creating a foundation involves strict adherence to horizontal and vertical positions on all sides, which will avoid side loads, as a result of which only the weight of the fireplace structure will act on the base. The occurrence of side loads leads to uneven subsidence of the soil and displacement of the base or its deformation.
Concrete is laid 15 centimeters below the level of the floor covering. Then it is leveled with a screed and the first layer is laid, according to the fireplace arrangement diagram.
The base of the masonry is created in two rows with the installation of waterproofing in two layers. The result is a structure that is level with the subfloor.
A fireplace table is placed on top of the brickwork - the lower part of the firebox.
Recommendations and nuances of work
When starting construction work, we must not forget that the foundation for the fireplace and walls experience completely different loads. This circumstance is the reason why they need to be built separately. When installing fireplaces with your own hands in a previously built house, you should very carefully choose its future location (for more details: “How to build a fireplace with your own hands - a step-by-step guide”). You should take into account not only general nuances, such as interior design, heating efficiency, but also how convenient it will be to install the fireplace. You also need to take into account that the location of the fireplace cannot violate the integrity of the load-bearing walls. The sole for the stove structure must meet a number of requirements:
- the depth of the pit, depending on the soil, should be more than 50 centimeters;
- the area of the foundation must be made larger than the size of the base of the fireplace;
- The depth of the hole is determined depending on the degree of soil freezing and exceed it by at least 20 centimeters.
Fireplace base
First of all, you need to dig a hole of the required size, which will serve as the foundation for the foundation of the furnace. So, first, a small amount of gravel is poured into the hole, which must be compacted well and tightly.
Next, you need to put metal corners on the finished pillow, double the corners, and additionally weld them with a welding machine for reliability.
It is very important to make a cement mortar; its consistency should be a little thick, like sour cream. This will ensure the solution penetrates into all hard-to-reach places
After this, you need to let the prepared structure dry well for several days.
Construction technology
The construction of the fireplace is carried out in three stages:
- Laying the foundation.
- Laying walls.
- Chimney installation.
Laying the foundation
The step-by-step construction of the foundation is carried out as follows:
- We mark the selected area: we drive pegs around the perimeter that exceed the dimensions of the fireplace base by 20-30 cm in width and length, and pull a rope over them.
- Use shovels to dig a pit to a depth below freezing of the soil, but not less than 50-70 cm.
- We lay a layer of waterproofing on the bottom, and then 20-30 cm layers of sand and crushed stone, which we carefully compact.
- We install the formwork and lay the reinforcing mesh.
- Mix the concrete and pour it into the formwork.
- After 7 days we remove the formwork.
- We install waterproofing on the side walls.
- The foundation is ready for use after 28 days.
Wall masonry
Laying the walls of a country outdoor fireplace is carried out in the following sequence:
- We prepare a cement-sand mortar with the addition of fireproof modifiers (fireclay chips in an amount of up to 10%). We make the volume of the solution so that it can be completely used up in 30-40 minutes.
- We lay a layer of waterproofing on the foundation.
- We lay a continuous row of bricks on top of the insulation. Using a level, make its surface perfectly flat.
- We form rows according to the previously drawn up diagram. At the same time, we control the position of the bricks horizontally and vertically. The amount of solution should be minimal (1-2 mm). Every 2-3 rows we lay reinforcing bars. We lay out the rows with dressing.
- On the 3rd row, we begin laying out the firebox and adjusting the bricks for installing the grates.
- From the 6th row we lay the supporting part. We install metal hinges at the door fastening points. We prepare a place for a shelf for frying.
- We lay down the frying shelf and create a place for installing the chimney.
To lay out buildings correctly, it is recommended to take short breaks every 3-4 rows so that the cement mortar partially sets. This will prevent the rows from shifting under load and properly center the bricks.
Chimney installation
Installation of the chimney is done as follows:
- We install a cap for the chimney.
- We fasten the steel pipe in a strictly vertical position.
- We line the pipe around the perimeter with bricks.
- We install a cap on the top of the chimney.
After completing the construction of the fireplace, we begin decorating. To do this, we use facing bricks or natural stone.
Creation Rules
Work begins with digging a pit, the dimensions of which will be 10-15 cm larger than the size of the foundation. The depth of the pit varies between 60 centimeters for a one-story building and 70-100 cm for a two-story building. There should be no irregularities on its bottom. The laying should be carried out in layers: for these purposes, small crushed stone or stone is used. The solution is poured to a depth of 20-25 cm. The distance between large stones should be 3-5 cm. The upper part of the base can be made:
- level with the floor;
- near the floor;
- lower by 15 cm with the goal of subsequently leveling it and making the first layer of brickwork.
The laying is done in two rows along with two layers of waterproofing. If everything was done correctly, the level of the finished foundation and the subfloor should coincide and be at the same height.
We begin to pour the foundation for a brick oven with our own hands
Foundation for a brick oven
Step 1. Marking for the foundation and pit
- Once you have decided on the location of the future furnace, you need to correctly calculate its dimensions based on power. It depends on the area of the room, the number of doors, windows, etc.
- We draw the required size of the oven on the ground. The foundation should be 15-20 cm larger than the heating structure. Make markings and install pegs that will mark the boundaries of the pit for the foundation pit.
- Using a bayonet shovel, dig a hole 70-100 cm deep, depending on the density of the soil and the climate zone (see above).
- We lay a sand cushion 10-15 cm thick at the bottom of the trench. We compact it tightly with a shovel and pour a layer of medium-fraction gravel to a height of 30 cm. Pour a bucket of water onto the surface of the sand-crushed stone cushion and compact it tightly.
Step 2. Installation of formwork and reinforcement
- Let's start building formwork from boards. In principle, any old boards or plywood that you have on the farm are suitable for formwork. This does not in any way affect the technical properties of the foundation.
- The formwork is a wooden box, which, for reliability, is fastened at the corners with metal corners. Connect the boards together using nails.
- We lower the finished formwork to the bottom of the pit.
- After the pillow is firmly compacted, it is necessary to waterproof the base. To do this, we measure the size of the pit onto the polyethylene, cut it out and attach the polyethylene to the walls along the perimeter of the formwork using a construction stapler.
- Reinforcement of the foundation is necessary in order to give rigidity to the entire structure. We will reinforce with steel rods with a cross-section of 12 mm, which must be connected to each other by welding in the form of a frame or metal wire with a cross-section of 0.8 mm.
- The final work on the construction of the foundation is joining the floor to the foundation. It is better to do this by laying an even row of bricks.
Step 3. Prepare the concrete mixture for pouring the foundation
We prepare a mixture of the following proportion: for 4 parts sand, take 1 part cement + 3 parts crushed stone of the middle fraction.
Concrete mixer
Stir the dry mixture well with a bayonet shovel and add water. Mix the solution well using a concrete mixer. In consistency, it should resemble thick sour cream.
Preparing concrete solution
We fill part of the pit with this mixture, not reaching the level of the base floor by 8 cm. This work must be completed within 24 hours. The concrete solution should be complete and not layered.
Fill and wait 2 weeks
After you fill the entire pit with concrete, you need to once again check the horizontalness of the coating with a building level. After the solution has completely dried, it will be more difficult to correct your mistakes.
We check the levelness of the foundation with a building level
Cover the foundation with a layer of polyethylene or roofing felt and leave for 2 weeks until completely dry.
We remove the upper part of the formwork only after complete drying, beating the boards with a hammer. Pour crushed stone and sand into the resulting gap and compact it well.
Basic moments
What to consider when installing a fireplace:
- the hole for the firebox should correspond to 1/50 of the area of the room;
- the height of the portal should be 2 times greater than the depth of the firebox;
- the chimney diameter is made 10-15 cm, it should be 10-15 times smaller than the firebox area;
- the fireplace is not installed in the path of drafts or near steps;
- The length of the chimney pipe is made at least 50 cm.
Foundation layout diagram
The total length of the smoke exhaust system is 3-4 m, sometimes it is increased to 7 m.
The structure must be protected from moisture. To do this, vertical and horizontal waterproofing is carried out using roll or coating materials.
Combustion chamber
There are open and closed combustion chambers. The closed structure must necessarily include additional components - a gate and transparent doors made of fire-resistant glass. The simplest option would be to purchase a ready-made combustion chamber - this will significantly simplify the installation work, and cast-iron closed fireboxes look very good.
Arrangement of the fuel chamber is one of the most problematic and difficult stages of installing a fireplace. The firebox located under the chimney must have a chimney tooth, which is necessary for the efficient operation of the entire structure. To extend the service life of a metal firebox, it is advisable to line its internal walls with fireclay bricks, which will minimize the contact of open fire with the chamber material.
Since the main working process takes place in the firebox, it is worth considering it now:
- The fuel is removed from the fuel basket, which is usually located under the firebox, and placed on a grate located in the chamber;
- The ignited firewood is set on fire, and the intensity of its combustion is regulated using a slide valve, which provides oxygen access to the working area (if the fireplace has an open firebox, the combustion process can only be changed by adding firewood);
- The burned fuel becomes ash and ends up in the ash pan, located directly under the grate (collected ash must be removed periodically, so the best option would be a retractable ash pan);
- The gas released during combustion goes outside through the chimney (for maximum efficiency, it is worth equipping the chimney with a forced draft, which will also allow you to regulate the heat transfer of the fireplace).
The second option is somewhat more difficult to arrange - it involves installing the back wall at an angle of 30 degrees towards the inside of the fireplace. If you make a fireplace with your own hands using such a scheme, the advantage will be increased reflection of thermal energy into the room.
Fireplace masonry
- Cover the foundation with sheets of roofing iron and basalt cardboard. The last layer can be replaced with felt soaked in a solution of liquid clay,
- Lay out the base of the fireplace, consisting of 2 rows, with ceramic bricks;
- Lay out the hearth part of the firebox in 3 and 4 rows;
- Combustion chamber walls from rows 5 to 11;
- On the 12th row, place metal corners to support the front wall;
- 13-15 rows - smoke collector and rear wall protrusion (tooth);
- A cleaning door is inserted into row 16;
- The body of the fireplace is created from 17 to 23 rows;
- 24-26 rows – chimney;
- A valve is inserted into row 26;
- The chimney is laid out. In accordance with fire safety regulations, ceilings made of combustible materials must be separated from hot gases by brickwork 0.38 m thick.
Instructions for laying a fireplace with a cast iron firebox and a metal chimney
The advantage of installing a chimney pipe made of steel (in our case, sandwich pipes) is that it can be removed through the wall. This greatly expands your options for placing a fireplace in your home.
To build such a fireplace, you will need the same tools as in the previous instructions, and from the materials you need to prepare:
- Cast iron firebox with glass.
- Sandwich pipe set.
- Silicone sealant.
- Clamps, tee.
- Elbow 45 or 90 (depending on the location of the chimney structure).
- Bracket for supporting the chimney pipe.
- Mineral wool (to insulate the passage of pipes through ceilings).
- Protective umbrella for the pipe (from precipitation and debris).
- The arrangement of a separate foundation is carried out in a standard manner with the deepening of the soil, the construction of formwork and cementing.
- Insulation of walls from the fireplace. The fireplace cannot be mounted close to the wall. Therefore, it is necessary to lay super insulation between the wooden wall next to which the fireplace will be located. If space allows, you can build an additional thin wall of sand-lime brick. Please note that in this case the wall must be built on the same foundation as the fireplace. Take this into account when designing. The size of the wall should exceed the size of the fireplace by 50-70 cm on each side.
- Laying the base (2 rows are laid with solid bricks).
Under the fireplace
- Construction of a pedestal - we lay out 4 rows of red brick in the shape of the letter P. If you have chosen a wide firebox, then the width of the pedestal should also be increased. Use cement-clay mortar when laying bricks. The pedestal will increase the heat transfer of the fireplace, because cold air will be taken from below and, passing through the firebox, rise up.
- Ash pit installation.
- On the 4th row of bricks, we make grooves using a file, and insert metal corners into them with the edges up.
- We lay the 5th row of bricks, which will be the base under the firebox. We apply a layer of fireproof mastic on it.
- We install a cast iron firebox.
Installation of a cast iron firebox
You will need an assistant for this job due to the heavy weight of the structure. It is necessary to carefully lower the fuel chamber from bottom to top, at a distance of 5 cm from the back of the wall. While the mastic or fire-resistant glue has not hardened, check the degree of horizontal inclination with a building level. At this stage, you can still correct errors.
Connecting the pipe to the firebox pipe
Installation of a chimney made of sandwich pipes.
Scheme for installing sandwich pipes
Brick lining of the firebox. After the firebox is connected to the chimney, it is necessary to cover it with bricks using heat-resistant glue or cement mortar.
Lining a cast iron firebox with bricks
When lining the firebox, it is very important to take into account the thermal gap of 5 mm between the cast iron wall and the outer casing. The order in this case is not important, since, in essence, you are building a brick box according to the dimensions of the finished firebox
At the stage of finishing the chimney, it is very important to ensure that the lining does not rest on the pipe. Lining the chimney with plasterboard. Immediately according to the scheme, a frame is erected from a metal profile, onto which drywall is screwed with self-tapping screws.
Portal around the chimney
- It must be insulated from the inside with heat-insulating mats made of non-combustible material. In this case, they should be attached with the foil side to the firebox and chimney.
- We cover the outer part with plasterboard.
- Facing works. You can beautifully decorate a fireplace with any facing material: clinker brick, decorative stone, plaster, etc. After the cladding work has been completed, the flooring can be completed. Keep in mind that parquet or laminate cannot be laid close to the fireplace. The distance must be at least 80 cm.
- Drying the fireplace and heating it.
When all the work is completed, you can decorate the fireplace with a stylish firewood rack made by yourself.
It’s unlikely that anyone would argue that you can look at the flickering fire in the fireplace for an infinitely long time.
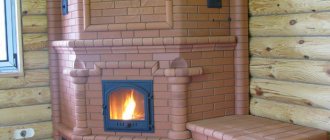
Fireplace with insert
And if everything is strictly followed according to our instructions, then such a fireplace will delight you not only by creating a special aura of home comfort, but will also provide warmth, heating the house.
To make it easier for you to understand how to build a fireplace with your own hands, we suggest that you familiarize yourself with the detailed video instructions.
Chimney installation
If the chimney is not assembled according to all the requirements and rules, then it will be impossible to ensure the operation of even the highest quality fireplace. There are a few simple rules that are best followed in any case:
- First of all, the chimney cannot be built into external walls.
- It is better to place the chimney pipe as close to the ridge as possible. It is better if the section of pipe sticking out on the street is as small as possible.
- Brick is the best material for making chimneys.
- It is better not to place reflectors and umbrellas at the chimney outlet.
- The fireplace will not work if there is no air supply.
- Compared to closed structures, open ones benefit.
By creating the necessary draft, the chimney serves to remove air and gases from any smoke structures and remove combustion products. Among other things, the chimney must be resistant to the effects of an aggressive mixture of condensate and soot, withstand the temperature of the exhaust gases, and comply with operational, fire and building standards.
For each chimney, in principle, processes such as fastening the smoke exhaust structure and its assembly, installation, installation and construction are considered individually. For a brick chimney, the process is as follows:
- Foundation
- Order
- Composition of the solution
- Mopping
- The head and the need for a chimney.
If the chimney is made of ceramics, then the following must be done:
- Foundation and fastening of modular elements
- Audit
- Connection tee.
Most actions are performed for stainless steel chimneys:
- Mounts and brackets
- Pipes “for smoke” or “for condensate”
- The use of bends or elbows to deflect the channel from the vertical
- Passages through floors and roofs
- The head and the need for an umbrella
During the installation process, it is necessary to take into account the thermal expansion that occurs during operation. It is unacceptable to violate the tightness of the installed channel. At the design stage of the fireplace design, the order of installation of the chimney, the correspondence of the component elements, cross-section and height are calculated.
Finishing
In absolutely all cases, the resulting fireplace will have to be decorated from the outside. It can simply be coated with a layer of glossy or matte paint. Here you need to remember the elementary laws from the physics course. Dark bodies emit more energy, and since our task is to remove energy, black colors will be a priority.
Good to know: What kind of fireplace can be installed in an apartment and how to do it
The fireplace can be finished with special fireproof materials. These include tiles made of ceramics, artificial and natural stone. When gluing tiles, you should remember the thermal expansion of the metal, so the seam gap should be slightly increased.
With the possibility of making your own fireplace, a lot of opportunities open up for you to realize your old dream exactly in the form in which it interprets itself. Desire and work in a certain sequence will ensure an excellent result.
Concrete fireplace rings
Prefabricated concrete fireplaces
Modern building materials provide a wide selection of individual fragments for the manufacture of prefabricated fireplace structures. For example, in the form of concrete rings and slabs, which are made on the basis of a refractory mixture. One of the advantages of a prefabricated fireplace is the quick way it is delivered and installed.
Concrete fireplaces, assembled from blocks, harmoniously combine with natural wood in the interior
You can quickly build an open fireplace from concrete rings in your local area.
Photo of a fireplace made of concrete rings
There are several options for making the structure - you can choose the required depth and type of rings so that the hearth is high or low. It may simply be standing on the ground or partially buried.
Concrete rings can be decorated with artificial or natural stone
The process of assembling such a fireplace is that the rings are installed on top of each other, connecting them with cement for strength. The design of the hearth is done using stone. It will acquire a neat and finished look if the stone is laid out not only on the outside, but also on the inside.
Decorating a concrete fireplace with natural stone
Particular attention should be paid to the area around the fireplace. The floor is leveled and tiled, garden furniture is installed - wicker or wooden chairs, benches, tables, and sometimes a canopy is installed that will reliably protect from rain
Foundation preparation and assembly
Concrete bench with fireplace
Concrete fireplaces begin to be installed by preparing the foundation. It is better to carry out this work at the stage of building a house, but sometimes the decision about the need for a fireplace in the house comes later, when the house has already been built. In this case, the floor must first be dismantled.
Concrete fireplace in a modern living room
The work is performed in the following sequence:
- It is necessary to dig a pit with a depth of more than ½ meter and an area slightly larger than the dimensions of the fireplace body;
- A sand-crushed stone cushion is laid on the bottom;
- A cement-sand mixture is prepared in a ratio of 1 to 4 and poured into the pit;
- The upper rows (2-3) are made of brick, laying roofing material between the masonry and the mortar to remove moisture;
- The foundation should not be higher or lower than the floor covering;
- After construction, the base slab is left for a couple of days to allow the solution to harden.
Classic concrete fireplaces
The chimney can be a separate structure with a smoke hole at the bottom, or it can be built into the wall structure during its construction at the construction stage of the house.
- In order for the hole in the fireplace to coincide with the smoke channel, a concrete ring must be attached to the wall of the chimney without using mortar, and the edges of the hole must be marked.
- You can saw a concrete product using a grinder and a special circle. The work of constructing a fireplace is carried out after the chimney is ready.
Modern concrete portal
- For the first two rows, which are not exposed to high temperatures and serve as an ash pit, when laying, a cement mortar is used, to which lime is added.
- For further installation, a clay solution is used, which is crushed after soaking it in water for a couple of days.
- The resulting mixture is passed through a mesh and mixed with sand. An elastic solution is applied to the rings during work, checking the position of each fragment using a building level.
Safety precautions
First of all, you need to choose a suitable location that meets fire safety conditions.
The fireplace is a source of open fire and with a small draft, smoldering coals may ignite. Therefore, it is not recommended to place it opposite windows and doors.
There are a number of rules that should be followed:
Prohibited:
- Place the fireplace on the floor covering, as it is usually heavy and can push through the floor covering.
- Install a large fireplace in a small room in a wooden house with a total area of less than 11 m2. It burns oxygen and dries out the air, thereby damaging the house and deforming the connection of logs and boards.
Classification of fireplaces depending on location
There are 3 main types of stoves without a foundation:
- Built-in. They consist of a firebox and a chimney, which are located directly in the wall, as shown in the photo. Ordinary brick is used as a pedestal and base. This option is most relevant for small houses and cottages, because it allows you to significantly increase the free space of the room;
- Built. Their characteristic feature is the ability to install almost anywhere. The only criterion is a wall or partition with high fire safety. The chimney of such a stove can be removed either separately or combined with an existing one;
Island. They are installed at some distance from walls and partitions. They require a special base, the height of which can reach 50 cm. A metal smoke collector should be installed in the upper part of the island stove.
How to tie to the floor
The first step is to decide what material the foundation will be made of, then decide on the location, then carry out mathematical calculations and start laying the foundation. If the traditional type of concrete is chosen for the construction of the foundation, then temporary formwork is performed and the building mixture is poured.
Within 24 hours, hardening occurs, the base becomes hard and gains strength, which means that such a fireplace can be used for a long time.
It is important to know: for safety reasons, flammable objects should not be installed near the fireplace. It is best to place them at a distance of at least a meter from the fireplace, which will protect your home from fire. Watch the video, which explains the main features of the foundation for the fireplace:
Watch the video, which explains the basic features of the foundation for the fireplace: