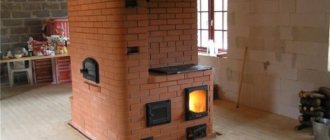
Despite the rapid development of new technologies and improvements in home heating methods, the old proven brick stoves for wood-burning cottages still do not lose their relevance.
Wood burning stove
Indeed, often in houses remote from civilization or located in areas where there are power outages and gas supply is not expected at all, wood-burning brick stoves are the only possible means of heating the room.
Wood-burning stove for a summer cottage
But sometimes people deliberately choose brick stoves for their country house, despite all the benefits of civilization. After all, they help create that unique comfort, give the warmth and atmosphere of solitude that we all look for when going out of town.
We’ll talk about the advantages, design principles and features of laying a brick stove with your own hands today in this article.
Characteristics of heating stoves
Heating stoves are designed for heating residential premises. Their designs were changed several times; multi-turn heating stoves with successive vertical smoke circulations were replaced by single-turn heating stoves with one ascending chimney and several downwards.
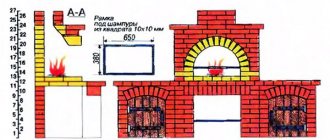
Schemes of gas movement in household stoves a - multi-turn stove with vertical channels; b - single-turn furnace; c - stove with upper and lower heating chambers; d - stove with enhanced bottom heating with upper and lower heating chambers
Single-turn furnaces heat the outer walls more evenly. When installing a grate in the firebox of such stoves, the efficiency increases to 70-75%.
The disadvantage of single-turn furnaces is that their upper part heats up more than the lower part. Because of this, uniform heating of the rooms does not occur with a minimum temperature difference between the floor and the ceiling.
Heating stoves of various sizes and designs with increased bottom heating, given in this article, when used correctly, provide uniform heating of rooms with a minimum temperature difference between the floor and the ceiling of 2-3°C.
By their design, these furnaces consist of two furnaces, placed one on top of the other and connected to each other by one connecting vertical channel. In heating furnaces of these designs, intensive heating of the lower part of the furnace occurs.
Hot flue gases move through the furnace mass as follows. Coming out of the firebox (see Fig. 1), they first heat the lower part of the furnace, then, rising along the vertical connecting channel, they heat the upper part of the furnace. In vertical longitudinal and cross sections, arrows show the movement of hot flue gases in individual parts of the furnace body.
In furnaces of these designs, flue gases travel the same distance before exiting into the chimney as they move through the furnace mass as in single-circuit furnaces with one ascending and several descending channels. Flue gases in heating stoves of this design travel a short distance, overcoming a small gas resistance. In an array of furnaces of such designs, flue gases move according to the principle of “free” gas movement, as discussed below.
“Free” movement of gases
The heating stoves presented in this article refer to thick-walled, moderately heated stoves with increased heat transfer from their lower part. The combustion of these furnaces lasts only 45-60 minutes; fuel is placed in them in 3-4 stages. Typically, these stoves are heated once a day, but at low outside temperatures (up to 35-40°C), it is advisable to heat the stoves twice a day - in the morning and in the evening. With a two-time firebox, normal temperature in the rooms is ensured with a daily fluctuation of 2-3°C.
These stoves are very fuel efficient; their efficiency increases especially when installing hermetic combustion and blower doors. Fuel costs are reduced by half or more compared to the operation of multi-circuit furnaces. It is advisable to use anthracite as fuel, and in its absence, you can use coal, coal briquettes, peat briquettes and any firewood. When preparing firewood, the length of the logs must be adjusted to the size of the firebox of the stove.
Below is the detailed procedure for laying a heating stove measuring 770x640 mm. The masonry of the remaining heating stoves is basically similar to the masonry of the mentioned stove, so their masonry will be described more briefly.
Types of brick stoves for summer cottages
The experience of folk craftsmen and engineer-inventors has given the world a considerable number of types of stoves, from which it is not difficult to choose the only one for the dacha that will quickly warm up the room in the winter cold and help prepare food.
But, despite all the variety of stone stoves, they can all be divided into 3 categories:
- cooking;
- heating and cooking;
- heating structures.
In addition, you can also find multifunctional designs that combine a fireplace, water circuit, etc. Therefore, before you start building a brick stove in your dacha, you should immediately decide on the type of construction.
- Cooking type of construction. This type of stove is chosen by cottage owners only if the house is used only in the summer. This option works well in combination with a water heating tank. Often, owners install such a stove in a house where there is gas and electricity supply, but in order to save money, it is more rational to use a wood-burning stove in the summer.
Brick stove design
The design is a stove with a hob, a water-heating tank and an oven.
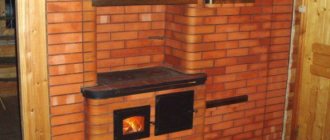
- Heating and cooking stove. This type of design can already be considered multi-functional. The stove includes a hob, oven, fireplace, shelf for drying things, etc. Dimensions and functionality depend on the area of the room and on the purposes for which the cottage is used. Typically, this type of stove is installed in houses where no other type of heating is intended.
- Heating stove. As the name suggests, this type of structure is installed solely for heating purposes. Installation is quite simple, as it is not particularly complicated. The design includes a combustion chamber, an ash pan, and a chimney.
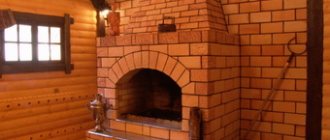
Stove with fireplace
- Stove with fireplace. Of course, this design serves not only for decorative purposes, but also for heating. But such a stove can usually heat no more than one room.
Furnaces for summer cottages are also divided according to the type of construction:
- Russian;
- Dutch (Dutch);
- Swedish (Swedish).
Of course, today you can find many other variations of wood-burning stoves, but these are the most common, which have proven themselves well due to their high efficiency, reliability and efficiency.
Russian stove
This design has been used by our ancestors for centuries, and its main feature is the arrangement of a bed and shelf for drying shoes and clothes. If the house is used all year round, then this option is very effective. But for a summer dacha it is better to abandon the Russian stove.
Russian stove
The fact is that the high efficiency of the Russian stove is achieved only with constant combustion. If you leave such a stove for the winter, then it will take more than one day to then dry it and “put” the stove into operation. Due to its technical features, it quickly gains moisture without a firebox.
In addition, when a wet brick is fired for the first time, it may crack.
The Russian stove is a fairly massive structure, so it will not always look appropriate in a small dacha.
Modern Russian stove with a stove bench
The only advantage is the unpretentiousness of the material itself for the construction of the furnace and a fairly simple masonry scheme.
Dutch
One of the most popular types of stone stoves, the design of which involves the presence of a smoke channel. Thanks to this, the Dutch oven effectively heats several rooms at once.
Dutch oven
The advantages include:
- small dimensions;
- high efficiency;
- fuel efficiency.
But the disadvantages of such a stove are high requirements for the quality of building materials and the quality of firewood. In addition, at sub-zero temperatures outside, such a stove takes a long time to warm up, so it is better to constantly heat it.
Swede
This stove is deservedly popular in our country, as it was designed taking into account the harsh climate of the northern countries. The advantage of the Swede is its compactness, high performance, fast heating and the ability to heat several rooms at once.
Swedish stove
This is achieved thanks to the special design of the furnace. The back side with the fireplace usually opens into the living room, and the front side has an oven and hob. For a summer residence, this type of stove is the most optimal choice.
The only drawback of the Swede is the high requirements for the quality of the material. If a Russian stove can be made from leftover material, then for a Swedish stove you will have to purchase high-quality red ceramic bricks.
Also, high demands are placed on Swedish firewood. They must be well dried, otherwise the stove will not give off heat.
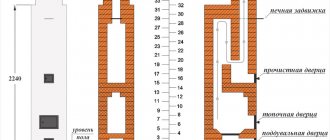
Heating stove with bottom heating size 770×640 mm
The heating furnace has dimensions, mm: 770x640x2310 (Fig. 1,a).
Rice. 1. Heating stove with bottom heating, size 770×640 mm a - facade; b - sections A-A, B-B, B-C; c - masonry 1-17 rows; 1 - ash chamber; 2 — blower door; 3 - grate; 4 - combustion door; 5 - firebox; 6 - smoke valve. Rice. 1. Continuation: g - masonry 18-35 rows
Material consumption (without foundation and pipe):
- red brick - 220 pcs.;
- fire-resistant brick - 170 pcs.;
- red clay - 10 buckets;
- refractory clay - 50 kg;
- sand - 5 buckets;
- combustion door - 250×210 mm;
- blower door - 250×140 mm;
- smoke valve - 130×250 mm;
- grate - 380×250 mm;
- cleaning doors measuring 130×140 mm - 6 pcs.;
- pre-furnace sheet - 500×700 mm.
Refractory brick, if unavailable, can be replaced with ordinary red selected first-grade brick.
Before you start laying a stove, you should purchase the necessary stove equipment and only then begin work, focusing on their dimensions.
The stove can be built by one stove within 16-18 hours; in addition, it takes about 4-5 hours to carry the material and prepare the clay-sand solution.
The size of the stove is small, but it provides heating for a room with a floor area of up to 16 m². The heat output of the furnace with a one-time firebox is 2.8 kW (2400 kcal/h), and with a two-time firebox - 3.5 kW (3000 kcal/h).
The stove has a simple design, increased heating in the lower zone, the fuel for it is anthracite, coal, coal briquettes, peat briquettes, and firewood. Hot flue gases in the furnace move through a well-developed chimney system, heating its internal walls.
In Fig. 1, b shows vertical sections of the furnace along A-A, B-B and B-C, and the rows show the sequence in which the bricks are laid and the installation of furnace appliances is carried out in each row.
The vertical sections show firebox 1, ash chamber 2, grate 3, combustion door 4, ash door 5, smoke valve 6, and cleaning holes.
The arrows indicate the direction of movement of hot flue gases in the heating furnace, and the dashed lines indicate the movement of cold room air in the heated furnace before the smoke valve is completely closed.
The hot flue gases of the heating stove rise from the firebox to the firebox overlap and from the top hole.
Laying the fifth row is not difficult, you just need to pay attention to the correct alternation of seams. This row forms a firebox measuring 250x380 mm.
During the laying of the sixth row, the fire door is installed and secured to the masonry. Before installing the combustion door, it is prepared for installation. The laying of the seventh and eighth rows is carried out according to the procedures. Laying the stove from the ninth to the seventeenth row is not difficult, you just need to follow the rules for bandaging the seams. The eighteenth row covers the firebox and the descending channel. There remains only one channel measuring 130x130 mm. The nineteenth row is laid out with ordinary red brick; the masonry of this row is similar to the masonry of the eighteenth row. During the laying of the twentieth row, cleaning holes are installed.
The twenty-first row is laid out in order. The twenty-second row is covered by cleaning doors. The twenty-third row must be laid out strictly in order. The masonry of this row forms the beginning of the chimney system.
The laying of the stove from the twenty-fourth to twenty-seventh rows is the same, you just need to strictly follow the rules for bandaging the seams. The laying of the furnace from the twenty-eighth to the thirtieth row is carried out according to the order. The thirty-first row covers the top of the stove, leaving a chimney channel measuring 130x250 mm. The thirty-second and thirty-third rows also cover the top of the stove, but they only follow the rules for bandaging the seams. The thirty-fourth row shows masonry (a channel of five bricks and the installation of a smoke damper measuring 130x250 mm.
The chimney begins with the masonry of the thirty-fifth row Laying the pipe is not difficult. The pipe is laid out “fivefold”, observing in detail the rules for ligating the seams, with an internal pipe size of 130×250 mm strictly vertically. When passing through the ceiling and roof, fire safety measures must be observed. After finishing the laying of the stove and chimney, they are dried with test fireboxes, and after drying they are plastered and whitewashed.
Installation of oven doors. Adviсe
Before installing the door, it should be checked for good fit and free rotation on the hinges.
We install doors
- If there are distortions or lack of smooth rotation, such defects should be eliminated, and if this is not possible, then replaced with new ones. You should also determine whether there are holes for mounting.
- For fastening, a soft (knitting) wire with a diameter of 2.5-3 mm and a length of about 50 cm is used. The wire is inserted into the hole and twisted.
- It is impossible to install the door after the masonry has been completed, so it is installed during the masonry process. In order for the door to hold well, the wire must sit in the seams, between the rows of bricks. Since the masonry is laid from bottom to top, the door is fastened in the same order. First, the lower ends of the wire are walled up, and then the upper ones.
- After laying the lower fastening ends, the door must be aligned strictly vertically and horizontally, followed by fixation. After the door is exposed, you can continue further work.
- This installation technique can be used to fasten combustion chamber doors, blower doors and other metal objects, such as valves, soot guards, etc.
- A very important step is installing the slab. It is installed on a clay mortar. The consistency of the mortar should be such that excess mortar comes out freely from under the slab, as a result of the pressure of its own weight. Its quantity should be such that it fills all the free space. We must not allow it to be small. Subsequently, under the influence of high temperature, the clay will sinter and reliably hold the slab on the surface.
Installing the slab
- After finishing the work, you need to allow the stove to dry completely. This is no less than 14 days, after which the stove can be heated.
- To make the stove attractive, it can be covered with tiles. This is where the quality of the masonry can come in handy, especially if it was done with your own hands. It will be easy to lay tiles on a very flat surface, especially since high demands are also placed on its installation due to the presence of high temperatures.
Brick heating stoves: we select drawings depending on the chosen design. Laying the working part is best done using clay mortar. You have the instructions and, having selected the desired model from the photo, you can start working.
Heating stove with bottom heating size 770×770 mm
The heating stove has dimensions, mm: 770x770x2310 (see Fig. 2).
Rice. 2. Heating stove with bottom heating, size 770×770 mm a - facade; b - sections A-A, B-B; c - masonry 1-13 rows; d - sections B-C, D-G; d - masonry 14-35 rows; 1 - smoke valve; 2 — holes for cleaning; 3 - combustion door; 4 — blower door; 5 - firebox; 6 — grate; 7 - ash chamber
Rice. 2. Heating stove with bottom heating, size 770×770 mm g - sections B-C, D-G; d - masonry 14-35 rows; 1 - smoke valve; 2 — holes for cleaning; 3 - combustion door; 4 — blower door; 5 - firebox; 6 — grate; 7 - ash chamber
Material consumption (excluding foundation and pipes) is as follows:
- red brick – 230 pcs.,
- fire-resistant brick - 210 pcs.,
- red clay - 12 buckets,
- fireproof clay - 6 buckets,
- sand - 7 buckets,
- fire door - 250×210 mm,
- blower door - 250×140 mm,
- smoke valve - 130×250 mm,
- grate - 300×252 mm,
- cleaning doors size 130×140 mm - 6 pcs.,
- pre-furnace sheet - 500×700 mm.
The stove can be built by one stove within 18-20 hours; in addition, it takes about 5 hours to carry the material and prepare the clay-sand solution.
The stove is designed to heat a room up to 20 m². The heat output of the furnace with a one-time firebox (with anthracite consumption of up to 12.2 kg) is about 3 kW (2600 kcal/h). The heat output of the lower part of the furnace is 2.3 kW (2000 kcal/h). The heat output of the stove with double firing increases to 3.7 kW (3200 kcal/h).
It is advisable to use anthracite and coal as fuel, but in their absence, you can use firewood, coal briquettes and peat briquettes.
The laying of the furnace in rows does not differ from the previous heating furnace with dimensions of 770x640 mm.
Masonry of a Russian stove
Before work, it is important to study the designs of Russian stoves. There are different options, so the masonry scheme may differ
The drawings cannot be changed - the specified order must be strictly followed.
Complete tightness is important for the safety of the structure. This is ensured by the following points:
- Use quality stone. There shouldn't be any cracks.
- The seams between the rows are 0.5-0.8 cm thick.
- Do not coat the inner walls with clay - soot will be deposited on them, and therefore thermal conductivity will decrease.
- Different departments differ in the thickness of the masonry from ¼ of the thickness of the brick to its full length.
- If the brick is ceramic, then it needs to be soaked to prevent moisture from being absorbed from the mortar.
Heating stove with bottom heating size 890×890 mm
The heating stove has dimensions, mm: 890x890x2310.
Material consumption (excluding foundation and pipes) is as follows:
- red brick - 340 pcs.,
- fire-resistant brick - 270 pcs.,
- red clay - 16 buckets,
- fireproof clay - 7 buckets,
- sand - 10 buckets,
- fire door - 250×210 mm,
- blower door - 250×140 mm,
- smoke valve - 130×250 mm,
- grate - 380-252 mm,
- cleaning doors measuring 130×140 mm - 10 pcs.,
- pre-furnace sheet - 500×700 mm.
The stove can be built by one stove within 24 hours; in addition, it takes about 6 hours to carry the material and prepare the clay-sand solution.
The stove is designed to heat a room up to 25-30 m2. The heat output of the furnace with a one-time firebox is about 3.7 kW (3200 kcal/h), and with a two-time firebox - 4.7 kW (4000 kcal/h). Drawings of sections of the furnace and the order of masonry are shown in Fig. 3.
Rice. 3. Heating stove with bottom heating, size 890×890 mm a - facade; b - masonry 1-16 rows;
Rice. 3. Continuation in - sections A-A, B-B, C-C, D-G; g - 17 - 27 rows
Rice. 3. Continuation d - laying 28-35 rows
Laying a stove in rows is almost no different from laying a heating stove measuring 770x640 mm. Anthracite, hard coal, coal briquettes, peat briquettes and firewood can be used as fuel. In this furnace, the grate is designed for the use of firewood, coal briquettes and peat briquettes. When using anthracite and hard coal, the grate is laid flat at the back with three rows of refractory bricks.
Furnace device
For a good flow of air to the firewood, the furnace firebox is mounted with a grate and a blower. The grate is made of cast iron and serves to support burning wood or coals.
It is made with longitudinal through holes or slots. For larger fireboxes, the grate is made from special single parts - grates.
Blower is an opening in the furnace under the firebox, designed to improve draft and remove burnt ash. If the heating device is made not of brick, but of metal, then it is necessary to provide protection for the firebox from overheating. It is also recommended to build a chamber of heat-resistant fireclay bricks in stone heating devices.
Heating stove with bottom heating, size 1020×890 mm
The heating stove has dimensions, mm: 1020x890x2240.
Material consumption (excluding foundation and pipes) is as follows:
- red brick - 570 pcs.,
- fire-resistant brick - 100 pcs.,
- red clay - 20 buckets,
- fireproof clay - 3 buckets,
- sand - 12 buckets,
- fire door - 250×210 mm,
- blower door - 250×140 mm,
- smoke valve - 130×250 mm,
- grate - 380×252 mm,
- cleaning doors measuring 130×140 mm - 7 pcs.,
- pre-furnace sheet - 500×700 mm.
The stove can be folded by one stove within 24 hours; in addition, it will take about 6 hours to carry the material and prepare the solution.
The stove is designed to heat a room up to 35-40 m². The heat output of the furnace with a one-time firebox is 4 kW (3400 kcal/h), and with a two-time firebox it is about 5 kW (4300 kcal/h).
In this furnace, the grate is designed to use firewood and coal briquettes as fuel. When burning anthracite and hard coal, the grate is laid flat at the back with refractory bricks in three rows.
Drawings of sections and the order of the furnace masonry are shown in Fig. 4. The furnace is laid according to the procedures, observing the rules for bandaging the seams.
Rice. 4. Heating stove size 890×1020 mm a - facade and sections A-A, B-B; b - masonry 1-6 rows
Rice. 4. Continuation in - sections B-C, D-G, D-D; g - masonry 7-14, 16 rows
Rice. 4. Continuation d - laying 15, 17-34 rows and cutting pipes
Rice. 4. Continuation e - laying 35-44 rows
From the thirty-sixth to the forty-third row, the masonry of pipe cutting with an internal pipe section of 130 × 250 mm is shown. The forty-second and forty-third rows must be laid out in the same way as the forty-first row, making sure to follow the rules for dressing the seams (the order of rows 42 and 43 is not given). The masonry of the forty-third row is similar to the masonry of the forty-first row.
How many bricks to hang in grams
Let's consider one of the simple and popular calculation methods that allows you to quickly find out how much brick is needed to build a Dutch oven.
Formula
The following formula is used for calculation:
This formula uses the following parameters:
- B – planned furnace height;
- P – height of one row;
- O – the number of bricks in the first row.
Let's look at a clear example.
Let's say it is planned to build a Dutch house 2.4 m high, at the base of which there are 24 bricks. The height of one row is 7 cm (the thickness of one brick).
- Subtract 0.3 m from the planned oven height for cutting. Thus, after subtraction, 2.1 m remains.
- The resulting number should be divided by the height of one row, resulting in 30 rows.
- We multiply the resulting value by 2/3, that is, we subtract 10 rows.
- 20 rows remain.
- We multiply the resulting number of rows by the number of bricks in the base (24 pieces).
- We get 480 bricks.
- Let's add 50 bricks for cutting.
Arithmetically it looks like this:
The result is 530 bricks - the required number to build a thirty-row Dutch oven.
The number of bricks for the construction of the chimney is calculated separately. It is determined by the height and cross-section of the chimney. Therefore, the formula should be used:
The following parameters are used:
- Chd – number of rows in the chimney;
- N – the number of bricks in one row of the chimney.
These simple calculations will allow you to determine how many bricks will be needed to build a Dutch oven.
Heating stove with bottom heating size 1160×890 mm
The heating stove has dimensions, mm: 1160x890x2240.
Material consumption is as follows:
- red brick - 580 pcs.,
- fire-resistant brick - 140 pcs.,
- red clay - 22 buckets,
- fireproof clay - 5 buckets,
- sand - 13 buckets,
- fire door - 250×210 mm,
- blower door - 250×140 mm,
- smoke valve - 130×250 mm,
- grate - 380×252 mm,
- cleaning doors measuring 130×140 mm - 9 pcs.,
- pre-furnace sheet - 500×700 mm.
The stove can be built by one stove within 26 hours; in addition, it will take about 6 hours to prepare the clay-sand mortar and carry the material.
The stove is designed to heat a room up to 45 m2. The heat output of the furnace with a one-time firebox is 4.3 kW (3700 kcal/h), and with a two-time firebox - 5.4 kW (4600 kcal/h).
In this furnace, the grate is designed to use firewood, coal briquettes and peat briquettes as fuel. When using anthracite and hard coal, the grate is laid at the back with refractory bricks on the edge.
Drawings of sections and order of masonry are shown in Fig. 5.
Rice. 5. Heating stove with bottom heating, size 1160×890 mm a - facade; b - masonry 1-12 rows
Rice. 5. Continuation in - sections A-A, B-B, D-G; g - masonry 13-18 rows
Rice. 5. Continuation d - sections B-C, D-D, E-E; e - masonry 19-28 rows; 1 - firebox; 2 - ash chamber; 3 - grate; 4 - combustion door; 5 — blower door; 6 — cleaning holes; 7 - smoke valve
Rice. 5. Continuation - masonry 29-32 rows
When laying the second row, it is necessary to strictly adhere to the order, since this row forms a system of chimneys for the lower heating chamber. The bottom of the ash chamber is laid with masonry of the fourth and fifth rows. When laying the sixth row, a blower door is attached to the masonry.
Otherwise, the laying of the stove is not difficult and is similar to the laying of previous stoves, but you must strictly adhere to the procedures: you should not make unjustified narrowing of the chimneys. The pipe is placed in five bricks with an internal size of 130x250 mm.
How to install a stove
It is necessary to install the stove only after the owners of the house have decided on its main purpose, based on which it will become clear what the features and nuances will be during its construction.
- For example, in a house with a relatively small area, it would be advisable to build a small stove that will serve as a fireplace. Moreover, it can be used in frying kebabs or barbecues.
- In buildings where the square footage allows for plenty of room, the stove can serve as a heating element. You can also arrange a warm bed on its surface or place a clothes dryer nearby.
The only important point is that the preliminary insulation of the house itself should be taken care of in advance. An additional layer will increase the efficiency of room heating.
Heating stove with bottom heating size 1290×510 mm
The heating stove has dimensions, mm: 1290x510x2310 (see Fig. 6).
Rice. 6. Heating stove size 510×1290 mm a - facade; b - sections A-A; c - masonry 1-5 rows; 1 - foundation in the ground; 2 - soil; 3 - smoke valve; 4 - cutting; 5 - ceiling; 6 - combustion door; 7 — blower door; 8 - waterproofing; 9 - external foundation; 10 - firebox; 11 - ash chamber; 12 — grate; 13 - holes for cleaning
Rice. 6. Continuation of d - masonry 6-30, 33 rows
Rice. 6. Continuation d - masonry 31,32, 34-40 rows
Material consumption (without foundation and pipe) is as follows:
- red brick - 400 pcs.
- fire-resistant brick - 220 pcs.,
- red clay - 16 buckets,
- fireproof clay - 10 buckets,
- sand - 11 buckets,
- fire door - 250×210 mm.,
- blower door - 250×140 mm,
- smoke valve 130×250 mm,
- grate - 300×250 mm,
- cleaning doors measuring 130×140 mm - 4 pcs.,
- pre-furnace sheet - 550×700 mm.
The stove can be folded by one stove within 24 hours; in addition, it will take about 6 hours to prepare the solution and carry the material.
The heat output of the stove with a one-time firebox is about 3.8 kW (3300 kcal/h), with a two-time firebox - 5.1 kW 14,400 kcal/h)^ The stove is designed for heating a room up to 35 m2. It is advisable to lay the furnace from the fourth to the eighteenth row using refractory bricks. With proper operation, the efficiency of this furnace can be up to 80%, and when using hermetic (furnace and blower) doors it reaches 85%.
The laying of the stove is simple, it is carried out according to the procedures, while observing the correct alternation of seams.
Mortar for laying the stove
The thinness and elasticity of the composition and the absence of cracks after drying are important. You can use a ready-made mixture from the store or make it yourself. For this you need purified clay. It needs to be soaked in water, and after a day kneaded with sand - first, several variations of the solution are made for testing, changing the proportions. From each they form cakes, 1 cm thick. After 2-3 days they are examined - where there are fewer cracks, the composition is better.
To ensure uniformity of the clay, after soaking it is wiped through a mesh with 0.5 cm cells. When preparing the solution for the firebox, it is better to replace ordinary sand with fireclay powder. Mix it with clay 1:3(4).
Heating stove with bottom heating, size 1650×510 mm
The heating stove has dimensions, mm: 1650x510x2310.
Material consumption (excluding foundation and chimney) is as follows:
- red brick - 640 pcs.,
- red clay - 22 buckets,
- sand - 12 buckets,
- fire door - 250×210 mm,
- blower door - 140×250 mm,
- smoke valve - 130×250 mm,
- grate - 300×250 mm,
- cleaning doors measuring 130×140 mm - 7 pcs.,
- pre-furnace sheet - 500×700 mm.
The stove can be built by one stove within 26 hours; in addition, it will take about 6 hours to prepare the clay-sand mortar and carry the material. 2
The stove is designed to heat a room up to 50 m2. The heat output of the furnace with a single firebox is 5 kW (4300 kcal/h), with two fireboxes per day - about 6.2 kW (5300 kcal/h). All types of solid fuel can be used in this stove, but when using anthracite and coal, it is advisable to line the stove from the ninth row until the firebox is covered with refractory bricks, and in its absence, the firebox should be laid out using selected red bricks in these rows.
Drawings of sections and ordering are shown in Fig. 7.
Rice. 7. Heating stove with bottom heating, size 1650×510 mm a - facade and sections G-G, D-D, E-E; b - masonry 1-8 rows
Rice. 7. Continuation in - sections A-A, B-B, B-C; g - masonry 9-17 rows
Rice. 7. Continuation d - masonry 18-35 rows
Laying the stove is not particularly difficult. The fifth row determines the main dimensions of the chimneys of the lower heating chamber; this row covers the bottom of the ash chamber. The twenty-fifth row also determines the main dimensions of the chimneys of the upper heating chamber. In a cross-section of the furnace, the inside is visible, as in an x-ray (see horizontal section of the furnace).
Type of material for the project
Scheme of laying furnace rows.
The outer layer of the project is usually made of ceramic bricks. This material is easy to process and has sufficient thermal conductivity.
When purchasing, carefully inspect its surface. High-quality stones of this type have no differences in color over the entire surface, there are no cracks or chips, and the geometry meets the standards.
The furnace firebox requires special refractory bricks that can withstand high temperatures and are highly durable. The latter property is both an advantage and at the same time a disadvantage, since it complicates its mechanical processing.
Refractory bricks are made in various forms. Moreover, it has no voids. This type of artificial stone can withstand temperatures of +1400… +1600 ºС. It differs from the usual type in its composition and characteristic metallic ringing when struck.
It is made from special refractory clay in industrial ovens at very high temperatures. This material has clear edges, which makes it possible to make precise geometric structures from it. But refractory bricks have a fairly high cost. Therefore, it is recommended to divide the building into external and internal decoration.
This allows you to significantly reduce project costs without compromising its safety and thermal conductivity.
Heating stove with bottom heating size 2250×510 mm
The heating stove has dimensions, mm: 2250x510x2480.
Material consumption (excluding foundation and chimney) is as follows:
- red brick - 740 pcs.,
- fire-resistant brick - 40 pcs.,
- red clay - 25 buckets,
- fireproof clay - 1 bucket,
- sand - 15 buckets,
- fire door - 250×210 mm,
- blower door - 250×140 mm,
- smoke valve - 130×250 mm,
- grate - 380×252 mm,
- cleaning doors measuring 130×140 mm - 7 pcs.,
- pre-furnace sheet - 500×700 mm.
The stove can be built by one stove within 30 hours; in addition, it will take about 8 hours to prepare the clay-sand mortar and carry the materials.
The heat output of the furnace with a one-time firebox per day is 6 kW (5100 kcal/h), with a two-time firebox - about 7.1 kW (6100 kcal/h). The stove is designed for heating a room up to 60 m². Drawings of sections and ordering are shown in Fig. 8.
Rice. 8. Heating stove with bottom heating, size 2250×510 mm a - facade; b - sections A-A, B-B, B-C; c - masonry 1-6, 8 rows
Rice. 8. Heating stove with bottom heating, size 2250×510 mm g - section G-G; d - masonry 7 - 18 rows
Rice. 8. Heating stove with bottom heating size 2250×510 mm e - masonry 19-36 rows
When laying the fifth row, it is necessary to strictly adhere to the order, since this row determines the main dimensions of the chimneys of the lower heating chamber. The twenty-third row also determines the main dimensions of the chimneys of the upper heating chamber. It is not recommended to reduce or increase the size of chimneys when laying subsequent rows.
Features of the order of brick stoves
Stoves often serve as interior decoration, so they are lined with clinker, tiles, and tiles. The diagonals in the first row are carefully measured, and a plumb line is hung in the center of the chimney, which is removed on the last rows of the pipe. Also, the diagonals are controlled every 4 rows, and on each row a cord is pulled during installation, which is checked by the rule. Instead of cement-sand mortar, it is recommended to use clay, regardless of the type of furnace being built. Ready-made dry solutions significantly save time spent on clay preparation. To prevent the composition from drying out quickly, the brick must be moistened with water before laying.
Operating costs will be lower if there are no rectangular ledges inside the structure. For this purpose, when creating an overlap (ledge), the stone is tried on without mortar, the overlap line is outlined, and the excess material is cut off with a grinder. Internal seams during laying are regularly checked, and excess mortar is removed from time to time. The pipe is cleaned after completion of the work.
Brick kilns are made of several materials:
- external cladding;
- masonry bricks (main structure);
- fireclay – fireproof material is used to lay out areas exposed to strong heat (furnace, under);
- bricks with high-density edges are located inside the oven.
Clay bricks should not be mixed with fireclay, and ovens, hobs, rods and grates, and water tanks should not be embedded in the masonry - this is due to different expansion coefficients when heated. If metal elements are rigidly embedded in the masonry, the structure will soon collapse.
Heating stove with bottom heating size 1880×640 mm
The heating stove has dimensions, mm: 1880x640x2380.
Material consumption (excluding foundation and chimney) is as follows:
- red brick - 950 pcs.,
- fire-resistant brick - 40 pcs.,
- red clay - 29 buckets,
- fireproof clay - 1 bucket,
- sand - 17 buckets,
- fire door - 250×210 mm,
- blower door - 140×250 mm,
- smoke valve - 130×250 mm,
- grate - 380×250 mm,
- doors for cleaning holes measuring 130×140 mm - 12 pcs.,
- pre-furnace sheet - 500×700 mm.
The stove can be folded by one stove maker within 36 hours; In addition, it will take about 10 hours to prepare the solution and carry the material.
The heat output of the stove with a single firebox per day is about 5.5 kW (4700 kcal/h), with two fireboxes - 6.6 kW (5700 kcal/h).^The stove is designed for heating a room up to 55 m2. All types of solid fuel can be used in this stove. The grate is designed for use as fuel with firewood, coal briquettes and peat briquettes. When using anthracite or hard coal as fuel in this furnace, the grate is laid on the edge with refractory bricks.
Drawings of the furnace sections and arrangement are shown in Fig. 9. The arrows indicate the movement of flue gases in the furnace chimneys.
Rice. 9. Heating stove with bottom heating, size 1880×640 mm a - facade and section A-A; b - masonry 1-5 rows
Rice. 9. Heating stove with bottom heating, size 1880×640 mm (c) sections B-B, B-C, D-G, D-D, E-E; d - smooth 6-10 rows Fig. 9. Heating stove with bottom heating, size 1880×640 mm d - masonry 11-28 rows
Rice. 9. Heating stove with bottom heating size 1880×640 mm e - masonry 29-36 rows
Laying a stove is not particularly difficult, but first you need to carefully study the drawings of sections and the order of brick laying.
From the horizontal section (according to A-A Fig. 9, b) it can be seen that there is a horizontal chimney under the ash chamber. The firebox is made of refractory brick.
When laying the second row, you must strictly adhere to the order. The masonry of the fifth row determines the main dimensions of the chimneys of the lower heating chamber. The laying of the twenty-first row must also be carried out strictly in order; a chimney with a width of 130 mm is left here near the vertical channel. The masonry of the twenty-fourth row also determines the main dimensions of the chimneys of the upper heating chamber. The remaining rows of the furnace masonry are similar to the masonry of previous furnaces.
Buslaevskaya stove: projects
The design has a built-in hood. The oven is small in size. It is ideal for any private home, as it allows you not only to heat the premises, but also to cook food. Despite its compact size, the stove heats spacious rooms well, which is why there are ready-made designs for houses with a stove.
Special schemes for laying brick stoves will help you complete the work without carrying out complex calculations.
For installation you will need the following materials:
- doors - firebox (0.2x0.25 meters), VK (0.39x0.5 meters), blower (0.14x0.14 meters);
- refractory - 43 pieces;
- solid brick – 382 pieces;
- oven-cabinet 28x33x50 centimeters;
- cast iron stove 0.7x0.4 meters with burners (removable rings of different diameters);
- valves - steam exhaust (12x13 centimeters) and smoke (12x25 centimeters);
- grate - grate 30x20 centimeters;
- corner - three equal-flange blanks 1 meter long and 45x45 millimeters in size;
- steel - piece 0.3x0.28 meters;
- strip - 4 pieces of meter (4 graph paper), 0.25 meters (2 graph paper), 0.35 meters (3 graph paper);
- cast iron plate – 0.4 x 0.25 meters; 40x15 centimeters.
Projects for brick stoves of this type look like this:
- Full row.
- Blower door.
- Window opening for cleaning.
- The bottom of the oven is lined with refractory, three sides are lined with iron.
- Installation of the combustion door, grate, refractory under the firebox, cleaning cover, ash door.
- Installation of DS.
- Laying refractory on the edge around the door.
- Laying according to the scheme.
- The oven is top coated with clay (1 centimeter), the heater is covered, and a stove with burners is attached.
- Installation of smoke circulation with cleaning windows, the stove is not laid. Subsequently, the brick is placed on its edge.
- The cleaning is overlapped, channels are created, and 25-centimeter strips are laid.
- The cleaning is completed and the fastening wire is installed.
- The cap is installed.
- Installation of the VK ceiling, while the hoods remain.
- The stoves are laid out according to the diagram.
- The small stove ends in sheet iron, the masonry is done in the same order as a brick stove.
- The cleaning hole of a large stove is laid out, the edges of the side walls of the channels are cramped.
- Laying protrusions.
- The projections are duplicated and the corner is installed.
- The BP chimney is closed in the same way as row 19.
- A three-row neck is made, the size of the chimney is reduced to a section of 26x13 centimeters for the top valve.
- A chimney is created with grooves on this and subsequent rows.
The dimensions of the structure increase when using clinker facing bricks, so using them instead of solid material is not recommended. When finishing with tiles, durability is ensured (the material lasts for decades), in addition, it can be dismantled for cladding other heating structures.
Criterias of choice
- The design of the furnace must be the same size as the area allocated for its installation. The amount of heat transfer depends on compliance with this rule.
- Choose the right oven shape. For heating the room, a shape is suitable where the side walls are long and the front and back walls are narrow.
- The stove must be located in the house in such a way that it does not disturb anyone and at the same time is in its place to perform certain functions.
- A small house does not need a massive stove - its impressive dimensions will not warm the house faster. It is better to have a smaller oven that quickly reaches the desired temperature than a large and wasteful one.
Place for a stove in the house
Its efficient operation will depend on where the stove is installed. The best location would be the intersection of all the walls in the house. With no larger area, it will be possible to effectively heat the entire space. The closer the oven is to the exit, the better. The heated air will prevent cold air from entering from the outside. In addition, in this case it will be easier to deliver fuel for the furnace.
Example:
Factors to consider:
- The structure must be installed so that all side parts can be reached. This is necessary for proper operation and the possibility of complete cleaning.
- The stove should not be part of the general foundation of the house, since its foundation will experience completely different types of loads.
- The location should be such that the chimney pipe does not rest against the floor beams. This needs to be calculated when building a house or when laying the foundation for the stove.
- There must be a fire-resistant floor in front of the firebox door. (sheet metal or ceramic tiles) to prevent accidental fires.