If you want to have a beautiful brick stove at your dacha, then in this article we have collected useful information on its design - indicating the necessary materials and existing schemes. You will learn how to build the simplest brick stove with your own hands for a summer residence and get an excellent, durable result. Thanks to such a simple but useful device, you can cook various foods and use it as a heating element.
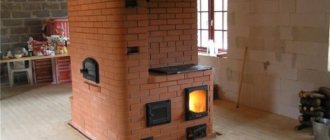
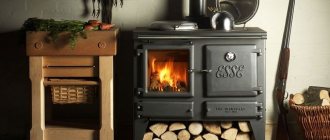
Heating stove with hob Source zemeljka.ru
Furnace designs
Brick kilns have not lost their relevance in the private sector for many years. This is due to their economy and efficiency. The thick walls of the structure can retain heat for a long time.
Stoves are distinguished by purpose and are heating, cooking, combined and multifunctional. We will describe each variety below.
For heating
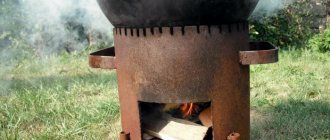
The most common and simplest. Used for heating only. It is mainly used in houses remote from gas pipelines. It is also often installed as a fireplace stove. These include fireplaces that can have a closed or open firebox, which can effectively heat up to 20 m² of space. Includes a combustion chamber (can be laid out or purchased separately), an ash pan and a chimney.
Stove-fireplace in the country Source pechnoy.guru
Heat transfer depends on the type of masonry, the size of the walls and the materials used. The most popular masonry option is one brick. The walls warm up to 600 degrees. The shape can be elongated, wide, round, triangular. The choice of shape depends on the desires of the home owner, the interior and the area of the room itself. Stone, plaster and tiles are used for decoration.
The easiest way is to make a rectangular or square oven. All other options should be entrusted to a good specialist, since there are many nuances and features of masonry that should always be remembered. To increase the tightness, the stove can be equipped with sheet metal on the outside, which makes it possible to heat large houses.
With hob
A good choice for a summer house that is used in warm weather. The emphasis is not on heating, but on the convenience of cooking. Additionally, a tank for heating water can be installed, which ensures comfortable living. Widely used in homes with heating by electricity or natural gas. The building is made of brick, inside the structure there is a chimney, an ash pit and a firebox. Place a stove on top, you can make an oven.
Option with hob and built-in oven Source gost-kamin.ru
Combined models
Used for cooking and heating at the same time. The project is much more complicated than the previous ones, since it is necessary to make an ash pit, a fuel combustion chamber, a chimney, install a cabinet and a hob. This option is quite heavy and massive, so it is used for spacious houses that require a solid foundation. Used if there is no other heating method. Sometimes they are equipped with drying chambers for preparing various preparations, clothes, and firewood. They are also often equipped with water tanks, beds, and ovens.
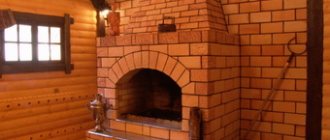
Combined stove in the gazebo Source avatars.mds.yandex.net
Multifunction ovens
They are mostly done only in large gazebos. They simultaneously heat the structure and allow you to cook food. As in the previous case, they can have an oven and dryer. The main difference between these ovens is that they can additionally have several more sections for frying food over coals or smoking. Naturally, it is simply impossible to make such a stove yourself without the appropriate skills and knowledge. Therefore, trust the work to qualified craftsmen with extensive experience. This is the only way you will get a good result that will always please you.
Briefly about the main thing
A brick heating and cooking stove, installed by professionals, may additionally have a fireplace section, a heated bench, a chamber for drying vegetables and other useful compartments. Today, many projects of such structures for private houses have been created. Moreover, they have a T-shape, wide or narrow design.
The stove is selected depending on the area of the room and the entire residential building. Its location is also taken into account. After all, it can be located at the corner, in the middle or against the wall of the room.
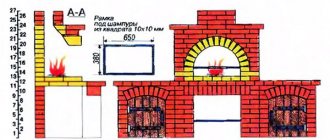
One of the interesting options is the Swedish stove-fireplace, designed by Ryazankin. This is a small but functional design. During the laying of each row, from 5 to 36 bricks are used.
Simple and economical furnace laying
There are several options for how to build a brick oven with your own hands for a house with a stove, step by step and correctly. First of all, you must first determine what the main purpose of the structure is - heating or for cooking. You may choose an option with the additional elements listed above or a direct-flow design. The main thing in resolving this issue is the purpose of the future design.
Design of a small stove Source avatars.mds.yandex.net
Designs with weak gas revolutions do not provide high heat transfer. They are mainly used for small areas - up to 16 m² and garages.
With hob
How to make a stove of this type is described below. The simplest model is small in size - 78x53 cm (WxD) and allows you to place one burner. You can use red brick, but it must be selected very carefully - only smooth and without cracks. This will save on the purchase of fireproof stones.
For the solution, take clay/water/sand (4/1/8 hours). The amount of mortar is determined in accordance with the amount of brick. If the seam is 3-5 mm, then it will be enough for 50 pieces. stones.
The process of laying a slightly smaller stove is as follows:
- A base is prepared that is approximately 10 cm wider than the future structure; the first brick on the base is placed at floor level. With an underground of 0.5 m or more, a hole is not needed.
- Formwork is made 74x61 cm, roofing material is placed on top (in two layers) and concrete is poured. Construction of the structure begins in 7 days and not earlier. It is necessary that the foundation dries well, otherwise the structure will simply sag, may tilt and crack.
Foundation for a stove Source bricks.su
- The depth of the structure is 3 stones, the width is half as much - 1.5 (76x39 cm). The stones are adjusted first without mortar. The layer of mortar for the bottom row is no more than 5 mm.
- On the next tier a hole is left for the blower door. Fastening occurs with wire, its ends are laid in the seams. They leave a gap between the metal and the stone.
- 4 tiers of stones are laid on edge, a firebox is created, and a smoke circulation is created at the back. One stone is placed at the back without using mortar; it must be removed to clean the chamber. Two stands are made in the chimney; they hold the partitions.
- The 5th row is laid flat, leaving a hole for the door, there will be channels at the back.
- From the 8th the door is closed. A brick with a beveled end is placed in the back of the firebox.
- After the 9th tier, a cord (asbestos) is laid, it is used as a sealing material for joints.
- On the 10th, the firebox is covered with a stove.
- Row 11, a valve is placed in the pipe, the pipe is sealed with a cord.
On the next 2 tiers the walls of the pipe are made. How to build a brick oven with your own hands for a house with a small stove - stick to this design and everything will work out. But we must remember that there are a number of nuances and emerging difficulties that need to be resolved immediately. If you make mistakes, you will not get the desired result. Therefore, it is better to contact a specialist.
The big picture
Furnace drawings can be found in abundance on the Internet or on the pages of monographs devoted to this matter. That's not the difficulty. It can be much more difficult to choose the optimal project that best suits the specific conditions, requirements and expectations of the developer.
And observing the subtleties of technology can be an overwhelming task for a beginner - as in many traditional crafts, experience plays a big role in the stove business. Too much in the technological chain is tied to some kind of tactile sensations and intuition. These nuances are almost impossible to teach remotely - too much is transmitted only through personal contact between master and student.
Fortunately, now the load on stoves is no longer as heavy as before, when they were the main way to heat a home during the cold season. Now these structures play the role of fun or an additional, backup heater. Consequently, the former thoroughness of their installation is no longer so in demand.
A stove that is not used so often and not with such intensity does not require careful adherence to technological subtleties when laying. Although, of course, you should still strive for this.
In cities, stoves are no longer installed - engineers have long come up with more advanced and cheaper ways to warm a home. But outside the city limits, in a dacha, a stove that is simple in design and unpretentious in maintenance may still be in demand.
Video description
How to lay a small stove, watch the video:
Direct flow type
There is nothing particularly difficult about how to make a direct-flow furnace. But it is very important to strictly adhere to all requirements and be sure to choose a quality stone.
Used for heating small rooms. A strong foundation is needed. Design dimensions 51x64 cm (WxD).
The arrangement of the furnace is as follows:
- For the foundation, crushed stone is poured into a layer of up to 20 cm and filled with mortar. Each stage must be carefully aligned. You can lay the stone only after a few days.
- The depth of the structure is 2.5 stones, the width is 2. There is no blower chamber; instead, holes are drilled in the door.
- Only the 6th row will cover the door. The general procedure is very simple, you just need to observe the dressing.
- From the 8th row, the structure is narrowed using halves of ¾ pieces of stone. Firebox outlet 12.5x25 cm.
- The 9th row is laid with a whole brick, similar to the 7th.
Laying a direct-flow furnace Source blog-potolok.ru
- The next row is placed edge flush with the inner edge.
- Then again, flat (4 pcs. ¾ and 2 pcs. whole), narrowing the smoke channel.
- Next, the stones are edge-on, there is a brick in the middle of the channel, the structure rises 5 tiers.
All other channels are laid flat. On the last 2, the channel is narrowed in halves to dimensions of 12x12 cm. The valve and pipe are installed last.
See also: Catalog of companies that specialize in the installation of stoves and fireplaces, grill houses and gazebos.
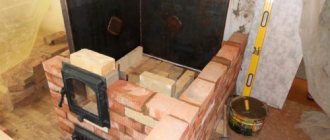
For heating
Let's look at how to build a brick stove for heating. For example, let's take a stove 51cm x 90cm x 2m 38cm (WxDxH).
The following materials will be required:
- sand/clay/brick (18/9 buckets/390 pieces, red, solid);
- doors (cleaning and blowing doors);
- roll of waterproofing roofing felt (60cm x 1m);
- one valve and grid 40x25 cm;
- one pre-furnace steel sheet 70x50 cm.
Brick stove-fireplace for heating Source svoimirukami.lesstroy.net
The masonry process is as follows:
- The base protruding in the first row is laid. Be sure to check the horizontal level with a level. The hardest thing to work with is the corners. It is recommended to install template posts at the corners from bottom to top.
- Two stones with beveled edges are placed at the end.
- The air vent door is installed and secured.
- On the next 2 tiers an ash chamber is made.
- The fire chamber is laid out and a grate is installed.
- The firebox door is placed from the 7th to 8th tiers, beveled bricks are placed at the back (they improve the draft inside the stove).
- At 9 the firebox door is closed.
- The smoke exhaust and fuel chamber are placed from rows 10 to 16.
- The cleaning door is installed on the 17th row.
- Smoke circulation channels are made on 18-30 rows. The walls must be smooth; the inside of the walls must be rubbed with a wet rag.
- On the next two tiers, the roof of the furnace is made.
- The last 2 tiers are laid out for the chimney.
Laying a heating stove Source eurolain.ru
How to make a brick stove for your home with your own hands, if the room is small, is described above. The main thing is to adhere to all requirements and rules. Upon completion of the masonry, the structure must be left to dry. After seven days, a test fire is required.
Economical option
If your budget is limited and the room itself is small, then such a design will be a real salvation. There are many fairly simple designs for economical stoves. You can try making them yourself or order installation. But in any case, you need to understand how to lay a brick stove with your own hands. Even if you don’t do the masonry yourself, knowing how to build a stove will allow you to control all the work.
Heating stove Source i.ytimg.com
Video description
For a clear overview of laying and applying mortar, watch the video:
- Duplicate row, but the stones are laid flat.
- The brick is on edge, the walls are wiped with a wet rag.
- The brick is laid flat, and on the back side - on the edge.
- Next, the firebox is closed, 2 bricks should hang over the chamber (if the structure is planned to be used as a fireplace and the firebox is not covered), the flame will be directed to the middle of the structure.
- The stones are moved a little to the back side, they will support the door. Before laying the brick, wet strips of asbestos are laid to seal it. The panel cannot be placed on the mortar - cracks will appear due to the difference in thermal expansion.
- A pipe is formed to remove smoke. A smooth expansion is made towards the back. Stone is used for the base; light metal is used for everything else.
- A valve is installed, it is necessarily sealed with asbestos, first coated with a solution. This completes the construction of the structure.
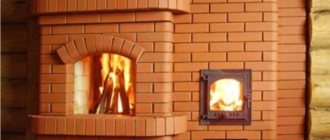
Decorated stove for cooking and heating Source mainavi.ru
At the end, several tiers of the chimney are made, and a pipe is inserted into it. The brick (installed without mortar) and all debris are removed. The joint of the structure near the floor is closed for decoration with metal. The structure will dry completely after 1-2 weeks.
How to build a simpler type of oven if you don’t have the time, necessary materials or skills? Take advantage of the following structure, which can be erected in just a few hours. It has the simplest operating principle.
Fuel is placed below, which burns there, and where it settles. The draft is created by temperature changes. This design is characterized by a minimal amount of smoke and almost complete combustion of fuel. For this option, two half stones and 20 whole bricks are enough. There are five rows in the stove, the stones are tied together with mortar, but you can lay out the stove without using it - it will be a temporary structure.
Type of fuel
Stoves in country houses can be heated in two different ways.
- Solid fuel;
- Universal.
Solid fuels include coal and firewood. They are superior to electric and gas.
Heating with gas or solid fuel can be considered universal. In this case, when one fuel runs out, you can switch to another. From gas to wood or coal and vice versa.
Advantages of a simple stove
All simple type ovens have many unique advantages. For example, a minimum of time is spent on their construction. Some models can be erected in just an hour, while others take 1-2 days to install. Small structures are lightweight, which means they do not require a foundation, which saves time, money and effort. You can choose any place to install the structure; if mobile versions are made without using a binder solution, then it can be disassembled at any time, moved and installed in a new location. Any materials can be used for fuel - pine cones, logs, stems of large plants, and so on.
Option for decorating a fireplace stove Source o-remonte.com
It is also important that such designs have lower fuel cell consumption. For example, compared to potbelly stoves, you will need several times less firewood. If you use the simplest stove without binding stones with clay, you can increase the heat transfer, which will be greater than from an open fire. This is a great option for hiking, but not very convenient if you travel without transport. Since the brick is heavy and capacious, it is inconvenient and difficult to carry.
An additional big advantage is the minimal level of smoke, and the fuel itself practically burns without waste. After good heating, the temperature of the stones can reach 1 thousand degrees, which guarantees not only good and fast heating, but also quick cooking of various dishes.
Materials
The heat transfer and durability of the stove will depend on the material used in construction. Therefore this stage is very important.
For cladding, ceramic bricks are used - grade M-500. It is insensitive to temperature changes. And the combustion chamber needs to be laid out only from refractory bricks.
In addition to bricks, the following is used:
- Sifted sand.
- Clay – normal fat content.
Do you need a drawing?
Drawings “how to build a stove with your own hands correctly” are not required in this case, especially if a specialist is working. A clear and detailed description allows you to do without them. It is the simplicity of the designs and minimal costs that make it possible to save yourself from complex and lengthy work.
A high-quality and detailed drawing is only necessary if you are building a large stationary stove for heating your home and cooking food. But even in this case, an experienced specialist can do without it.
Multifunctional large oven Source i.ytimg.com
Selection of working tools
Compliance with the technology and the quality of the work performed will also directly depend on the auxiliary measuring instruments and tools that must be used during the work on laying the furnace.
When laying a furnace, measuring, construction and many other auxiliary tools are used:
- Jointing - pours the mortar into the seams and gives the joints an aesthetic appearance. It will come in handy if the stove is left without lining or plaster.
- Trowel.
- Hammer-pick.
- Shovel for mortar.
- Plumb.
- Stove line.