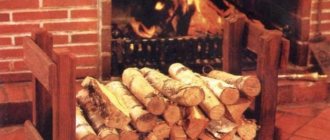
Dishes of Caucasian and oriental cuisine, cooked independently over an open fire, are especially tasty, healthy and appetizing. The aroma emanating from the food being prepared in the cauldron is very good and pleasant.
Stove for cauldron
The dishes acquire special taste due to the uniform heating of the bottom and walls of the cauldron by open fire. It’s no wonder that owners of their own dachas, country houses, or those simply going on vacation in nature strive to assemble with their own hands a structure adapted for preparing culinary delights in a special semicircular cauldron.
Such ovens can be stationary or mobile. The former are a permanent structure that is easy to use year-round, while the latter are usually foldable and can be taken with you on a trip or assembled for a seasonal holiday outside the city. Stoves for cauldrons are assembled from metal or brick.
Variation from discs
The metal variation can be created using an even simpler principle.
Car wheels are used for this. For a summer residence this is a very convenient and fast way. Especially when you don’t have a lot of time to create complex structures. Stages of creating a variation from rims: 1. Identical rims are selected. On one of them, the partition is sawed off (a grinder is used). It looks like this:
2. One disk is placed on the second, the partition of which is at the bottom. The function of the oven falls on it. The discs are fastened by welding.
3. The door is cut out. Handles-stand are mounted to the finished stove.
The stove can be heated a little by adding firewood.
Empty cylinder design
Widespread gasification has left us with a gift of memories of the past in the form of empty gas cylinders, which every owner of a country house can find. The cylindrical shape of this cylinder can be used to make homemade items.
Construction from an old cylinder
The upper part of the cylinder is cut off with a grinder; a cauldron will be installed on the end. Naturally, the idea will be realized if the dimensions of the cauldron and the diameter of the cylinder are compatible with each other. The total height of the stove should be three times greater than the planting depth of the cauldron. A hole is cut in the lower part of the cylinder wall for the firebox door. This door should be made from the freed piece of metal by welding hinges and a handle to it.
As a grate, you can use a bottom with drilled holes or install a separately made grate. The entire structure, if it does not have an ash pan, must be mounted on legs. This algorithm can be used when constructing a furnace from a piece of pipe of suitable diameter. The result will be a portable device with which it will be convenient to install a cauldron and cook various dishes in it.
Preparing for construction
When choosing a brick, not only its color and size are taken into account, but also its markings. For a standard design, two types of bricks will be required:
- refractory;
- building.
Refractory stove bricks are selected with the marking ShB-I or PB-I, and for large structures - the ShAK brand.
Attention! A booming sound when tapping a brick means the presence of voids and low quality, and small crumbs when splitting indicate low strength or possible use of the material previously. For the construction of structural elements that are not exposed to high temperatures, building clay bricks of the M-125 or M-150 grades are suitable. For the construction of structural elements that are not exposed to high temperatures, building clay bricks of the M-125 or M-150 grades are suitable.
For the construction of structural elements that are not exposed to high temperatures, building clay bricks of the M-125 or M-150 grades are suitable.
For the fastening solution, either refractory cement or ordinary cement with the addition of limestone is used.
Estimate estimate
To build a standard outdoor version, consisting of a grate with a firebox for barbecuing and a smoking chamber for hot smoking, the following materials will be required:
- refractory brick - 50-80 pieces, 800-1600 rubles;
- clay brick - 230-250 pieces, 1900-2500 rubles;
- cement - 2-3 bags of 40 kg, 500-800 rubles;
- crushed stone and reinforcement for the foundation - 500-1000 rubles;
- corners, hinges and metal for the grille - 500-1500 rubles;
- doors for the firebox - 500-1000 rubles.
In total, to build a smokehouse with barbecue you will need from 5,000 to 8,500 rubles. The cost of additional elements (lamp, sink, decorative cladding) can increase the total amount by 2000-4000 rubles.
Required Tools
The basic list of tools and auxiliary materials for building a street structure includes:
- shovel and rule;
- boards for formwork;
- waterproofing film;
- welding machine;
- trowel and masonry hammer;
- sand and limestone for mortar;
- pliers, nails and hammer.
To stir the cement solution you will need a bucket or tank. When laying, string and a building level are used for leveling.
Making a stove for a cauldron from sheet steel
This is also one of the simplest options for making a stove, which will require:
- the cauldron itself to measure the diameter of the combustion chamber;
- welding, electrodes for it;
- steel sheets - the thicker they are, the better for the structure;
- hammer;
- corners for making handles and supports;
- electric drill;
- Bulgarian.
Note! Work should be done outdoors, near a source of electricity. At the same time, you must also follow safety rules
Step 1. Measure the circumference of the cauldron - according to the obtained size, further work will be carried out.
Step 2. Using a grinder, cut a rectangle from a sheet of steel, the length of which would be equal to the circumference of the cauldron. Make a hole in the rectangle.
Step 3. In the upper part of the future structure, mark and make several vertical slits so that the smoke can subsequently escape freely. Next, cut a rectangular hole at the bottom for loading firewood.
Step 4. Roll the sheet into a cylinder. To do this, use the appropriate form, wrap the steel around it and achieve extreme precision with a hammer, or (if possible) use special sheet bending equipment.
Step 5. Cut out supports and handles for the structure from the corners.
Step 6. Using welding, connect the sheet into a cylinder, then weld the bottom, handles and support elements to the structure. Although the latter can be screwed using ordinary bolts, having previously made holes in the steel.
Note! To protect the stove from corrosion, paint it with heat-resistant paint in several layers. That's it, you can put the cauldron in, load fuel and start a fire! Let's improve the design
Let's improve the design
For this purpose, we equip the stove with a chimney pipe, grate, ash pan and doors. The manufacturing procedure is the same as described above, but you will have to add a few points.
Step 1. Cut not only the firebox hole, but also another, smaller one located below, for the blower. At the top, cut a third hole for the chimney.
Step 2. Install a grate between the combustion and blower cutouts by welding supports - pieces of corners - inside the housing. To make a simple grate, you can use steel wire - fold the pieces of the required length and connect them together by welding. There is no need to attach the grate to the supports.
Step 3. Weld the chimney to the corresponding hole in the housing
It is important that the height of the chimney exceeds human height, otherwise smoke will get into the eyes
Step 4. Equip the chimney with a spark arrester - a tin can with numerous holes made in it.
Step 5. You can cut the doors from the same sheet steel, although you can purchase ready-made ones.
As a result, you will get this kind of stove for a cauldron with your own hands, which is convenient to clean from soot and where it is convenient to load fuel. Smoky gases will be discharged into the chimney, and draft adjustment will be carried out by the blower door. Although it is not so convenient to transport such a structure, since it is larger.
Temporary barbecue of their bricks
You can make a temporary barbecue oven out of brick - without using mortar. For these purposes, you can use ordinary brick - an open hearth (without a chimney) and small gaps in the masonry will ensure a thermal regime acceptable for ceramics.
A step-by-step algorithm for constructing a temporary barbecue looks like this:
- Prepare a flat and firm area on the ground. You don’t even have to remove the humus layer - just cut off the vegetation, level and compact the surface.
- Cover with a couple of layers of roofing material.
- Lay out the first tier of bricks with small gaps between the prongs and tongues of adjacent elements.
- The second tier is placed in a dressing with the first, maintaining approximately the same size gaps.
- The next rows are laid out in the same way. The masonry is laid to a height convenient for using a barbecue. You need 10-11 such rows. At this height, a steel sheet is placed on the bricks, which will serve as a tray for coals.
- Lay it dry on the sides and back of the wall, two bricks high. Lay and secure the grate.
- The walls are increased in height by another two or three bricks.
Such a stove can be laid out in a couple of hours. And take it apart in the same amount of time. A good option for a summer house or a small local area.
Furnace design for working with a cauldron
This design is not very complicated. It resembles a barbecue, but round. The cauldron is always used for cooking, only with an open flame. Therefore, this option is taken into account in the design of the stove.
The optimal design for working with a cauldron would be a special system equipped with removable legs. A sufficiently large area allows you to install dishes and cook right in your garden. Transport the stove to any place thanks to its collapsible design. With the onset of cold weather, she can be taken home.
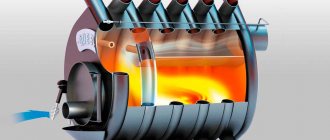
The stove on which the cauldron is placed resembles a metal cylinder. It is supported by massive legs. The bottom is made at the bottom, the top part is missing. If a special desire arises, it can be equipped with a chimney, but this is not at all necessary. In such furnaces, special cutouts are made at the top of the cylinder. They play the role of a smoke exhaust.
When food is cooked, there is an economical consumption of heat, since the flame is well protected from strong winds. In this design, the dishes are completely closed from the wind, therefore, they warm up much faster.
Selection rules
Before choosing, you need to decide how often you cook in a cauldron. If the menu constantly includes pilaf, shurpa, muli, strudl and other Central Asian dishes, then a stationary brick stove is needed. This is especially true for the private housing sector. Moreover, building a stationary slab is quite simple. You need a regular flat area, which is additionally leveled with a small reinforced layer of cement.
If you have your own home, but there is no desire or space to install a permanent stove for a cauldron, then you can choose stationary options made of cast iron or thick metal. In addition, they can be combined with barbecue. In the slabs of capital design, it is necessary to provide removable rings for boilers of different volumes. This will make it more versatile.
For travel or rare use, thin-walled, collapsible fireplaces are better suited. They take up little space, last quite a long time with infrequent use, and are lightweight. But they are not suitable for frequent cooking. For metal or cast iron types, legs are desirable. The fireplace flame, being above ground level, will better heat the entire surface of the boiler. In addition, you won’t need to bend down low every time.
In cases where Central Asian dishes are prepared very rarely or when they are prepared outdoors, a Taganka cauldron is best suited. This stand is perfectly transportable, lightweight, and takes up minimal space. In addition, there are collapsible options.
Pipe cauldron stove
The thickness of the metal firebox wall is an important factor that determines the service life of the product. Thick sheet metal will last significantly longer than thin sheet metal.
The powerful wall perfectly accumulates thermal energy and then transfers it to the cauldron with food. Metal heat generators are similar in their properties to cast iron bodies. Metal has only one drawback, compared to cast iron, and that is susceptibility to corrosion. Therefore, it is best to coat the metal surface with a protective compound.
Mobile stoves are needed by people who often travel outdoors. These are hunters, fishermen, fishermen, gas workers, oil workers, geologists, tourists, summer residents (at the beginning of the season it is brought to the country house, and in the fall it is taken away). Of course, there is not a wide variety of materials for mobile options. The list of mobile ovens is limited to metal models.
The main advantage of such a stove will be mobility and durability. Mobile stoves differ from stationary ones in the thickness of their walls. If the system is stationary, the wall thickness is 3 mm, and the mobile structure is made of steel 2 mm thick. There are mobile installations made of powerful hardware.
Types of stoves for cauldrons
Depending on the material of manufacture:
- metal stoves (factory-made and home-made);
- stationary brick structures.
Brick stoves vary depending on the method of installing the cauldron:
- in classical designs, the cauldron is placed almost completely in a brick recess;
- in modified versions, the cauldron is installed on a specially mounted burner.
Ovens are also divided according to the method of cooking:
- specialized devices only for using the cauldron;
- universal (multifunctional) devices in which food can be cooked using a cauldron and other devices (for example, a grill for frying meat or a portable hot smoker).
The choice of one type of design or another depends on personal preferences.
Features of brick stoves
There are two types of schemes for a brick oven - classic and multifunctional or universal.
A classic oven looks like this:
- steel plate for fixing the cauldron;
- metal corners for securing the plate;
- firebox with door;
- blower;
- smoke channels and chimney;
- external walls that frame the entire structure to achieve a better thermal insulation effect.
If we are talking about creating a universal oven, its design has a number of differences:
- plates for fixing cooking utensils;
- for each device (for example, for a cauldron, a grill for frying meat and a smokehouse) its own firebox is created, because it is necessary to achieve maximum efficiency from each surface;
- in order to combine all the created surfaces into one chimney, it is necessary to erect an arch above them, in which the outlet to the chimney will be made.
Project selection
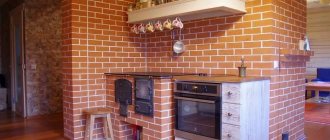
If you love fried meat, then the oven should include barbecue and grill elements. For smoked meats, you can install a smokehouse. The Russian outdoor stove includes a hob, which will provide the owners with healthy boiled, steamed or stewed dishes. And the availability of space for a cauldron - exquisite oriental: pilaf, shulem, shurpa, etc. Each type of stove has its own patterns and subtleties of masonry.
In addition to functionality, you need to think about the overall appearance, which will harmoniously combine with the entire site and the house.
Photo 2. An example of a brick structure project with a Russian stove, sink and cauldron. There is a comfortable warm place to sit on the side.
Product made from wheel rims
Aesthetics are not always important in stove design. There are cases when the bet is made only on the functionality of the device. An example of folk art is a device consisting of two wheels. The disc septum is usually shifted to one side. The lower disk is positioned so that its partition is as low as possible. At the top disk it is completely removed.
933be4d84c9335b98f4b033ec62920bd.jpe Cut part of the disk
The discs are aligned coaxially and connected by welding. The lower partition plays the role of a grate. The cavity of the two disks is the firebox. All that remains is to cut a hole in the side for the door, weld the handles and legs, and you can use the homemade device.
Simple and clear design
Tips for use
Before the first use, the stove must be well warmed up, and it does not matter whether it was purchased at a factory or made with your own hands. Manufacturers apply a special shipping coating to protect the product from damage; it must be burned off before cooking.
The brick hearth requires additional drying to improve the strength of the mortar and finally prepare the material for use.
When using the oven regularly you should:
- systematically remove ash from the grates and firebox;
- clean out layers of soot in the chimney;
- remove carbon deposits from the inside;
- get rid of all possible blockages.
It is unacceptable to burn leaves, grass or debris in the stove provided for the cauldron, otherwise it will quickly become clogged. You cannot extinguish burning wood or coals with water, as well as light them with kerosene or gasoline. To avoid any problems with ignition, you must use only dry logs.
Improper use of a homemade or industrial oven will inevitably lead to its rapid breakdown. In some cases, careless handling creates life-threatening conditions
In addition, it is important to remember that only adults can use such structures.
The stove must be regularly cleaned of ash and carbon deposits.
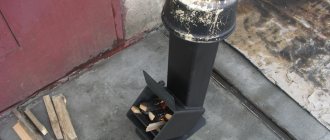
How to make a stove from gas cylinders?
A fireplace for heating a cauldron made from a gas cylinder is a portable device that can be installed in any convenient place and can even be used in camping conditions. To make it you will need the following materials:
- gas cylinder;
- fittings;
- grate;
- Door hinges;
- other related materials.
In the process of assembling a stove from a cylinder, the following consumables will be used:
- cutting discs for grinders;
- grinding wheels for angle grinders;
- sandpaper;
- drill;
- welding electrodes.
Minimum set of required tools:
- welding machine;
- Bulgarian;
- electric drill;
- hammer;
- measuring instruments (tape measure or ruler);
- other related tools.
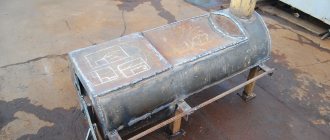
The gas cylinder is installed on its base. At a distance of 60-70 cm from its lower part, a mark is placed indicating the location of the cut. A circular line is drawn through the mark
It is important that it is drawn strictly parallel to the surface on which the cylinder is installed. Along this line, using a grinder and a cutting wheel, the balloon wall is cut
The top sawn part is removed.
Vertical triangular cuts are made in the cutting edge of the cylinder. Their number and depth are determined by the individual design of the future furnace. These cutouts are necessary to maintain stable draft after installing the cauldron on the stove. The absence of draft holes will create a vacuum inside the oven, causing the flame to go out. A rectangle is marked on the side wall of the cylinder. Sawing is performed along the contour line of the rectangle. The resulting hole will serve as the entrance part of the future firebox, and the cut piece will serve as the stove door.
A rectangular section of the cylinder wall is welded to its original place using hinge hinges. On the side of the combustion hole opposite the hinges, a piece of metal is welded from the inside.
Its location should be such that it prevents the door from opening into the cylinder and at the same time does not interfere with loading firewood into the firebox. For convenience, a handle is welded to the surface of the door, which can be made from fittings. In order for the door to close securely, a movable valve is equipped on its edge adjacent to the cylinder body.
Below the main hole, a hole for the blower is cut out. Its width should correspond to the width of the firebox opening, and its height should not exceed 10 cm. The rectangle of metal obtained after the cutout is used to construct a door, which helps regulate the amount of oxygen entering the firebox.
A grate is installed between the combustion door and the blower - a grate that prevents fuel material from entering the ash collector. To arrange a grate inside a round furnace, you can use reinforcing rods, the length of which will vary depending on the round shape of the internal space of the balloon furnace.
To install a grate, it is better to use reinforcement with a diameter of at least 20 mm. This is explained by the presence of high temperatures inside the oven at the time of its heating. Reinforcement with a smaller diameter can quickly burn out.
At a distance of 15-20 cm from the upper edge of the stove, U-shaped handles are welded, with the help of which this stove can be transported. These handles are made from reinforcement with a diameter of 12 mm. To ensure the stability of the balloon furnace, special spacers can be welded to its lower part. The number of spacers is determined individually, depending on the operating conditions and the size of the cauldron that will be installed on the hearth.
A stove for a cauldron, made with your own hands from a cylinder, is a multifunctional device. It can be installed in the country house, and with some modifications it can be used as a barbecue on which you can fry meat. A balloon stove can be used as a heating stove installed in a garage or some other utility room.
429954a20277025c961a0a6075d9403c.jpe
Initial stage of creation
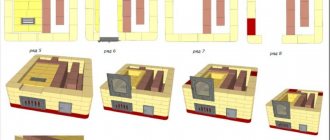
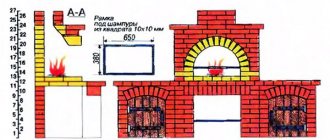
To build a stove for a brick cauldron, first of all, you need to decide on the design of the stove structure and prepare the necessary drawings.
To do this, a general view of the brick structure is drawn, its dimensions and brick order are indicated. An example of such a creation for choosing a simple stove is the following figure: It is recommended to make the roasting pan at a height of ~ 90 cm, which will ensure more comfortable use of the stove.
A diagram of a metal chimney with all its dimensions, both general and its individual parts, is drawn separately.
Having decided on the general appearance of the future creation, it is necessary to select the most suitable site for its placement. A brick stove for a cauldron should not interfere with neighbors and must be installed in such a place that it is completely in harmony with the surrounding landscape.
DIY brick barbecue oven
An ideal location will be considered if the following criteria are met:
- Keep away from trees and flammable objects.
- Protection from direct air currents, that is, wind.
- Removing smoke from entering neighbors and your own residential building.
- Proximity to the dining area.
- Organic combination with the overall landscape.
Then you can stock up on the necessary tools. The list is not particularly long, and the following basic tool equipment will be required:
- Master OK.
- Construction hammer.
- Joining.
- Square.
- Plumb.
- Level.
- Roulette.
Naturally, you will also need a shovel, a bucket and a container for mixing the solution.
The following materials are needed: cement, fatty clay, sand, ceramic and fireclay bricks, as well as fireclay powder.
In addition, the brick stove itself is equipped with a grate, a metal cooking plate, a metal chimney, firebox doors and blowers.
Having prepared everything you need, you can proceed directly to construction work.
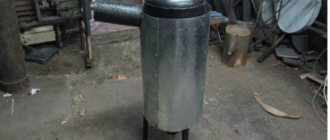
Making a metal stove from a cylinder
As noted earlier, the easiest option for creating a stove is a tripod. We will not consider it, since in this case everything is extremely clear.
And we’ll talk about a portable metal stove, which is advisable in cases where people do not live at the dacha permanently, but, for example, only on weekends. An excellent option for this is an unused, but still usable gas cylinder with a volume of 50 liters. At one time, such cylinders were extremely popular in the village, but not so long ago they were replaced by electric stoves and natural gas. In addition to the cylinder itself, prepare a grinder for work.
The sequence of actions is as follows.
Step 1. Empty the gas cylinder - open the tap and wait at least a week.
Step 2. Mark the cut line. For our design we will need the part of the cylinder with the bottom. Step back about 25 centimeters from the bottom and draw a straight line.
Step 3. Make a neat cut with a grinder, then try on the cauldron. As noted, it should go in about two-thirds of the way. If the cauldron is too large, then make several 5-centimeter cuts on top in increments of about 15 centimeters.
Step 4. Cut a window 20 centimeters from the bottom for loading fuel. The width of the window should be large so that no difficulties arise in the future.
Step 5. Try it on again to make sure that the cauldron fits tightly enough.
Step 6. Next, you should calcine the stove for the cauldron with your own hands. To this end, remove the cauldron, load the firewood and heat until the odors completely disappear.
That's it, the design is ready, and you spent a minimum of materials and tools to make it!
Sequence of work
We make a step-by-step oven for a cauldron with our own hands. Using a grinder, a partition is cut out in one disk, with holes made for mounting bolts. It is better to cut along the border of the holes, this will reduce the labor intensity of the work.
We find places for spot welding that holds the partition and rim. At this point the metal is cut straight to the rim. The operation must be done carefully so as not to damage it.
Cutting the partition should be done at a distance of 1.5–2 cm from the location of the weld spot. The cut off partition can be easily removed. Just pry it out with a flat screwdriver.
It is very important to preserve the remaining part of the partition directly at the welding point. It forms a gap between the stove and the cauldron
As a result, strong draft occurs and the cauldron is evenly heated.
Then welding work is carried out. The prepared disks are placed on top of each other, and the disk with the partition cut out should be at the top.
The entire fastening partition of the lower disk will play the role of the bottom of the stove. Welding of evenly installed disks is performed along the entire circumference. Then the door is made. In well-welded discs, a vertical cut is made corresponding to the dimensions of the door. You need to leave a small metal strip at the bottom. You will get a kind of threshold that does not allow the coals to fall out of the oven.
1cfa14b5944e00aa051822d85c852f1f.jpe 1170eb1a7b51aacfb0d989ec3b7ecea0.jpe
Bolts and nuts are inserted into the cut made. These parts will become loops. Bolts are welded to one side of the cut and nuts to the other. Then a hole is cut for the door. A long bolt is welded. It will act as a strong handle. The ends of the opening and the sharp edges of the door are cleaned of burrs. To do this, you can use an ordinary file or an electric grinding disc.
The next step is to make handles for transporting the stove. The wire is taken, inserted into a vice, where it is bent into the desired shape. To work with such wire you will not need much effort. Right angles can be easily made with a regular hammer.
Nuts are placed on the handles. They are welded to the walls on opposite sides. To make it easier to work with such handles, you need to bend the small tails at a right angle. You will get a reliable stop that prevents the handle from touching the stove body.
The legs are welded to the bottom. The length of such supports should not exceed 30 centimeters. A hole is welded into the disk through which the wheel hub passed. To do this, you can use any piece of metal of a suitable configuration. The stove is loaded with wood. It needs to be well calcined. During this time, the paint will all burn out. Then it will need to be repainted with good heat-resistant paint.
To create such a design, an experienced craftsman will need 2-3 hours. The appearance will have a compact appearance. Thanks to its light weight, it is easy to transport in a car. Such dimensions fit freely in the trunk.
Doors are used to adjust the draft. Its strength changes when opening or, conversely, closing the door. It is better to use wood briquettes as fuel.
Based on materials: https://topkvadrat.ru/interior/article/kak-sdelat-pech-dlya-kazana-iz-kolesnyh-diskov-svo-38043
Sheet steel furnaces
You can truly show your creativity by making a structure from sheet steel. A metal stove will last longer the thicker the material is selected. However, this type of work requires the ability to operate a welding machine.
The size of the rectangular sheet, especially its width, depends on the size of the cauldron. We measure the cauldron around the circumference in the part where it will be held in the stove body, and cut off a sheet of iron with a width equal to the readings taken. The height of this sheet will correspond to the height of the oven. Despite the fact that the distance from the core to the bottom of the cauldron will be adjusted when installing the grate, the height of the entire structure must be selected based on convenience and common sense.
An assistant will be needed to perform further manipulations. The sheet of metal must be rolled up to form a cylinder with a height equal to the height of the sheet. The structure is welded at the seam and is completed with handles, a grate, a stand and a chimney.
Initial stage of creation
To build a stove for a brick cauldron, first of all, you need to decide on the design of the stove structure and prepare the necessary drawings. To do this, a general view of the brick structure is drawn, its dimensions and brick order are indicated. An example of such a creation for choosing a simple stove is the following figure:
It is recommended to make the roasting pan at a height of ~ 90 cm, which will ensure more comfortable use of the stove.
A diagram of a metal chimney with all its dimensions, both general and its individual parts, is drawn separately.
Having decided on the general appearance of the future creation, it is necessary to select the most suitable site for its placement. A brick stove for a cauldron should not interfere with neighbors and must be installed in such a place that it is completely in harmony with the surrounding landscape.
DIY brick barbecue oven
An ideal location will be considered if the following criteria are met:
- Keep away from trees and flammable objects.
- Protection from direct air currents, that is, wind.
- Removing smoke from entering neighbors and your own residential building.
- Proximity to the dining area.
- Organic combination with the overall landscape.
Then you can stock up on the necessary tools. The list is not particularly long, and the following basic tool equipment will be required:
- Master OK.
- Construction hammer.
- Joining.
- Square.
- Plumb.
- Level.
- Roulette.
Naturally, you will also need a shovel, a bucket and a container for mixing the solution.
The following materials are needed: cement, fatty clay, sand, ceramic and fireclay bricks, as well as fireclay powder.
In addition, the brick stove itself is equipped with a grate, a metal cooking plate, a metal chimney, firebox doors and blowers.
Having prepared everything you need, you can proceed directly to construction work.
Brick version
All the different designs of furnaces can be divided into two main types.
- The simplest stove for a brick cauldron is represented by a firebox, in the upper part of which the cauldron is attached. The system is complicated only by the presence of a chimney. However, such a structure leads to the fact that the flame acts directed towards a certain area of the vessel, and the walls heat up unevenly.
- The second option involves complex flows of hot air, from which heating occurs, and the flame itself is somewhat removed from the surface of the cauldron.
Both methods of building a furnace are accompanied by the construction of a foundation. But in this case, due to the fact that the simplified brick structure has a relatively small mass, there is no need to build a full-fledged foundation. A reinforced concrete slab is also suitable. If this is not possible, then the slab is poured independently.
System for cauldrons of different sizes
A pillow is installed in a pit 30 cm deep. In order for the slab to be strong, when pouring it is necessary to reinforce the solution with any suitable available means (rods, stacks, sheets). One of the important conditions for pouring the foundation is the creation of a horizontal layer in the form of a flat plane.
The design for a brick cauldron with your own hands in a simplified form is made in 13 rows according to the established pattern. It is advisable to use time-tested projects, especially for novice craftsmen.
Order for a small stove
The first row is laid out as a continuous base. In rows 2 and 3 there is an ash pan with a door. Its purpose is to collect ash and provide air flow. The 4th row is covered with fireclay bricks, and a grate is mounted in the center, on which the firewood will be burned.
The whole difficulty of laying out 5-11 rows lies in the fact that the firebox is laid out in a cylindrical shape. To do this, the brick is processed with a grinder. This is a rather labor-intensive process, but you should not try to avoid it. The fact is that some craftsmen lay out the circle with untreated brick, adding more mortar in the seams. But the requirements for masonry in places where high temperatures occur is to minimize seams, especially in the case of fireclay bricks. A larger amount of solution will cause the masonry to rupture.
In the 12th row there is a hole for the chimney. Let us immediately note that in such structures the chimney has an initially horizontal direction. Then it must be turned exactly at an angle of 90°. After the overlap, a slab with a cutout for a cauldron is installed in row 13. If it is not possible to purchase such a stove, then having sheet metal, a grinder, a file and some imagination will allow you to get out of the situation.
A more professional approach is implemented in a scheme with lowering channels. Here the walls of the cauldron are heated by moving streams of hot air.
Furnace with sink channels
Despite the complexity of the idea, building such a stove for a cauldron with your own hands is also not difficult.
Material and tools
Required tools: stove hammer, trowel or trowel, shovel, building level, square, cord, tape measure, container for the mixture. A grinder makes cutting bricks very easy. The mixer attachment for the hammer drill will make it easier to mix the masonry mixture. A rubber mallet is convenient for setting bricks.
To lay bricks you will need a stove mixture; we do not recommend making it yourself either for a beginner or for an experienced stove maker - it will turn out worse than ready-made.
Use a high-quality ready-made baking mixture.
Pay attention to the following properties:
- For furnaces where fireclay bricks will be used, a heat-resistant mixture will be required.
- Good water resistance.
- Can be used for dry bricks.
- Good ductility.
At the beginning of work, determine your laying speed. This will help you knead the mixture no more than necessary.
For bricks you will need: fire-resistant fireclay and solid ceramic of plastic molding (clinker can be used as a replacement).
When ordering a brick, you will have to accept that some of the brick will be unusable: damage on the road, chips and other flaws on the outer surface. Therefore, take with a margin of 10-20%.
First of all, before laying, select a brick without flaws - it will work as a facing one.
You will also need an asbestos cord, it will go into thermal gaps, and wire for attaching doors and dampers.
For a simple oven you will need:
- Stove bricks 169 pcs;
- Fireproof brick 57 pcs;
- Fire door;
- Blower door;
- Chimney outlet;
- Plate with rings;
- Annealed or nichrome wire 3 mm with a total length of 9 m.
For a special oven:
- Kiln brick 344 pcs;
- Fireproof brick 231 pcs;
- Fire door;
- Blower door;
- Chimney outlet;
- Plate with rings;
- Annealed or nichrome wire 3 mm with a total length of 9 m.