If you are going to repair the radiator, add or remove extra sections from it, then you will need a radiator nipple wrench . A special radiator key (Fig. 1) can be made independently from construction fittings or a metal rod (grade of steel subject to hardening) of the appropriate diameter, depending on the type of heating device. You can make a key for a radiator with your own hands using the method of thermal heating, mechanical processing (finishing to the required dimensions) and hardening of the heat-treated area.
I will describe a method that I personally have repeatedly used to make the necessary tools for plumbing work, including keys for radiators. They subsequently faithfully and faithfully repeatedly served me and the people for whom they were made.
A suitable piece of reinforcement can be “found” at any construction site or you can buy a piece of rolled metal. Since radiators with two thread sizes (5/4″ and 1″) are mainly used, the choice of workpiece diameter will depend on this. For 5/4″ - 16 or 18 mm (along the body of the rod) and 12 - 14 mm for 1″. The length of the finished key should be at least half the length of the largest radiator being repaired plus 300 mm (disassembly - assembly on both sides), and the maximum - the entire length of the radiator plus 100 - 150 mm (disassembly - assembly on one side).
In order to make a homemade nipple key for a radiator, it is best to use autogen, whose flame temperature is an order of magnitude higher than that of propane. But propane will also work if it is available. I install a cutter on the hoses for greater flame power. This work is usually done by two people: one holds a constantly lit cutter, the other is directly involved in making the key. Sometimes I had to do it alone; to do this, I placed a lit cutter on a metal bucket filled with water.
To make a key for a radiator, you need to forge it on something. A sledgehammer or other massive iron object may work. As a last resort, a metal hatch of an existing sewer or water supply system.
Can you see everyone?
Why are we talking about different ways to dismantle radiators?
How do they differ in connection methods?
- Fittings used. Traditionally, for the installation of Soviet-style cast iron radiators, a combination of a conduit (a pipe with a long thread) and a lock nut were used; now the batteries are more often connected with American ones - quick-dismount fittings with union nuts;
The photo shows the connection of an aluminum sectional radiator by an American woman.
Connection on the lines.
The location of the connections relative to the radiator. The connection can be one-way or two-way
This is important when installing on squeegees: one of the radiator plugs through passage will have a left-hand thread.
A special case
- In many houses built in the 80s and 90s, convectors are used as heating devices. The convector is a coil made of a steel pipe of the same diameter as the riser, with fins that increase heat transfer. The typical method of connecting a convector and a steel line is a butt weld.
The heating device is connected to the riser by welded seams.
Tools you will need to get the job done
First of all, to work, you should find out the exact dimensions of aluminum radiators.
To measure them you will need a construction tape or a special folding meter. Also, if both types of instruments are not available, you can use a standard student ruler. It should be noted that most rulers are only 30 centimeters long, so you will have to make marks on the radiator (it is better to use a pencil, which is easily washed off the surface). Each new mark will be the end of the previous measurement and the beginning of a new one. The resulting dimensions are added to form the true size. Disassembling aluminum radiators also requires other tools that it is advisable to use for dismantling work, namely:
- A complete set of wrenches (socket and ring).
- Radiator key.
- Pliers.
- Screwdriver.
Dismantling aluminum options
Aluminum batteries are monolithic, there are some variations with sections, but usually they are just two radiators connected together. Their dismantling simply involves draining the water from the system and unscrewing it from the pipe. Often it is enough to overlap the pipe that goes to the radiator itself and the pipe that comes from it. Each aluminum battery has a special valve through which water can be drained. The radiator is unscrewed from the pipe using a regular gas wrench.
Work algorithm
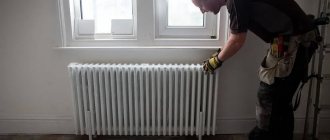
Installing a new one is much easier than removing an old battery. It is possible to do such work yourself without the help of specialists.
The important thing is that when performing work you must strictly adhere to the rules and regulations. When installing the battery, it is imperative to monitor its level, which must be strictly vertical, which is checked by the building level
If this is not done, the system may compromise its tightness and thermal characteristics.
In cases where several cast iron radiators need to be installed in one room, they must be level with each other without error. The easiest way would be to install the fasteners (brackets) using a laser level and then control the installation of the radiator.
The main material for such “patterns and templates” is plywood, which is slightly larger than the structure itself. There are special places on this template that indicate the places of fastenings through which holes for fastenings are drilled. The number of brackets must be equal to the number of blocks in the radiator. Typically, 1 bracket goes per 1 linear meter. The fasteners are mounted according to the level, they should be at zero, without deviations.
Holes are drilled where the marks were indicated. You can drill with either a hammer drill or a hand drill, but it will take a very long time. The depth and diameter must match the fastening so that it extends 13 cm or more. The next step is to cover the holes with mortar to prevent the brackets from falling out. They will be ready for work only after the solution on which they are laid is ready.
The requirements for fastening the brackets were made for a reason due to the enormous weight of the cast iron battery itself. It, but under load, weighs about 12 kg, and not all, but each section, of which there are usually 5.
When everything is ready, the brackets are reattached, the radiator is assembled, all that remains is to mount the radiator on the wall and connect it to the system. Before this stage, it is necessary to remove the plugs. All threaded joints are coated with some tow or foam. This is done to improve the tightness characteristics, as well as eliminate the possibility of leakage.
The main property of cast iron is slow cooling. That is why tools, kitchen utensils and radiators were made from cast iron. This is due to the fact that such radiators retain heat much longer, so replacing them, unless they are broken, is completely unprofitable. The exception is areas with a mild and warm climate, where heating is practically not needed.
Tips for installing and dismantling radiators are in the next video.
Marking the mounting locations
Mounting installation begins with determining where and how the heating device will be placed . The best place is a wall under a window or close to the door. In both cases, the heat that the sections will generate will become a barrier to the movement of cold air.
Installation of fastenings always begins with markings:
- The battery must be placed strictly in the center of the window . The maximum deviation of the center of the device from the center of the opening should not exceed 2 cm. The marking involves drawing a vertical line on the wall. It should be in the center of the window. Next, marks are made on the sides, retreating to a distance equal to half the assembled heating radiator.
- between the floor and the bottom of the cast iron structure .
- There should be 10-12 cm between the window sill and the top of the heating radiator . In accordance with these two rules, horizontal marks are made.
You also need to draw the marks along which the brackets will be installed. First, draw lines that will correspond to the levels of the supports. The top one needs to be drawn below the marks made near the window sill. The distance to them should be equal to the distance between the top of the heating radiator and the lower point of connection of the two sections. The bottom line is drawn above the marks made near the floor. It is raised as many centimeters as there are between the lower points of the section and the connection of the ribs. On these lines, mark with your own hands the places where the brackets should be. It is taken into account that for every 5 ribs there should be 1 fastening, both above and below.
Do-it-yourself disassembly and assembly of an aluminum radiator
The area where the radiator restoration will be carried out is covered with thick fabric. If this is a table surface, then the main work will not take place in weight. The prepared area will protect the soft aluminum from receiving unnecessary deformations and scratches.
Important! Before removing the union couplings, a rag is spread under the radiator to protect the floor from dirty liquid that may leak out during dismantling. You need to have a rag on hand to absorb any remaining moisture remaining inside the sections
Disconnection from the heating network
Before disassembly begins, the radiator is disconnected from the heating network using shut-off valves. If there are no shut-off valves at the radiator, then a housing and communal services worker is invited to turn off the heating riser for repair work.
During the heating season, after shutting off the radiator, they take a break. Since the water in it is still hot, wait for a while until the liquid cools down, and then disconnect the radiator from the heating pipes.
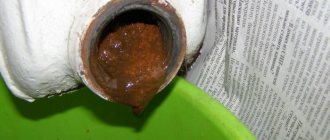
The coolant remaining in the battery is poured into a previously prepared bucket and the sections begin to be separated. Immediately after dismantling, the inner surface of the battery is washed with running water.
How to disassemble and reassemble the battery
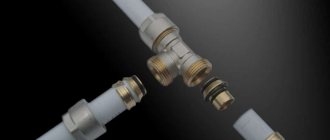
Aluminum sections connected by nipple nuts. The inner part of such a connector has protrusions by which the nipple wrench grabs the nut and unscrews it. The nut is similar to a coupling, only it has external threads. One nipple nut has both right-hand and left-hand threads. They are made in pairs for the top and bottom connections. When the nipple is untwisted, the sections move apart, and when twisted, they are pulled together.
All plugs and adapters are pre-twisted from the ends. The connector must be accessible from all sides by the nipple wrench.
Photo 1. Fastening sections of an aluminum radiator to each other: the nipple nuts unscrew when disconnected.
To disassemble the battery, place the tool blade through the open end of the radiator into the grooves of the unscrewed upper nipple nut and, with some pressure, make a test rotation counterclockwise to move the connection. If the key turns the nut normally, then insert it into the grooves of the lower nipple nut and, as in the first case, try to turn it a couple of turns.
Important! When unscrewing connectors, the sequence of actions must be followed to avoid distortion. After disconnection, the exposed thread is carefully examined for cracks and chips, and for the integrity of the thread.
If necessary, the joints are cleaned with fine emery cloth.
After disconnection, the exposed thread is carefully examined for cracks and chips, and for the integrity of the thread. If necessary, the joints are cleaned with fine emery cloth.
When assembling the radiator sections, paronite O-rings are placed on the upper and lower nipple nuts and placed between the sections. I lightly press the sections together and screw them together alternately. Turning the nuts to prevent distortion is limited to two turns of the wrench.
If something went wrong
During operation, the joints between sections and steel nuts stick to each other. This comes from the quality of the coolant supplied to the heating system. Sometimes even significant physical efforts are useless.
Although adhesion must be dealt with, aluminum warps easily because it is a soft metal.
By heating the joints with a construction hairdryer, you can overcome stuck rust. If this doesn’t help either, because the corrosive build-up is too corrosive, then the edger gets to work.
Advice. If the nipple nut does not turn off under great pressure, then there is no need to increase the applied force with excessive leverage. In the worst case scenario, not only will the nut itself break, but both sections that sit tightly on the nut will crack.
The leaky section is cut off with a grinder, from the reverse side and at a distance from the edge of the joint by no less than half the length of the coupling. This protects the working section from destruction and does not cut the connecting nut. During cutting, the rust bounces off, making it easier to unscrew the surviving section.
During assembly, it is advisable to replace old gaskets with new ones and clean the joints, paying attention to defects and irregularities. Sealed connection protects against premature leaks
Instrument design
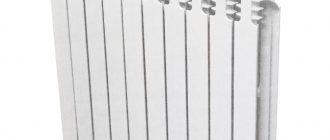
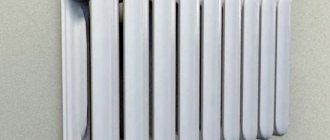
Aluminum heating panels consist of sections that are made of metal alloys with silicon additives. This composition makes the device much more resistant to mechanical damage and exposure to hot temperatures. The metal alloy is not subject to corrosion damage. Often, to enhance the protection of the inner surface from the effects of heating fluid, a thin polymer coating of approximately 50 microns is used.
Radiator panels are usually produced in a standard white color. If desired, they can be repainted with enamel that can withstand high temperatures. Often the original photographic image is applied to the devices.
Advantages of aluminum heating devices
The growing popularity of the devices is due to a number of advantages of their use in the design of a heating system:
- compact, take up little space;
- high heat transfer;
- light weight (does not complicate transportation, installation and connection of devices);
- rapid heating of equipment by coolant;
- the convection heating method prevents the accumulation of dust deposits between sections;
- favorable price-quality ratio;
- attractive appearance;
- the ability to select a custom radiator of any design;
- sections are powder coated to prevent corrosion.
Flaws
These devices, despite all their positive performance qualities, have their drawbacks. Poor quality coolant and water hammer resulting from increased pressure inside the heating system can lead to failure and rupture of the radiator. Also, low quality fluid causes metal corrosion.
Equipment is often connected to pipes made of metals that are antagonistic to aluminum - copper and steel. Their interaction provokes the formation of rust. To avoid this, experts recommend using pass-through plugs made of chrome-plated and nickel-plated metals when installing aluminum radiators indoors.
In what cases are batteries removed?
More often than others, it is necessary to dismantle a cast iron heating radiator that has already served its purpose. But sometimes you have to decide how to remove a bimetallic radiator. Modern heating devices are the easiest to dismantle.
Work to dismantle the heating radiator may be necessary under the following circumstances:
When cast iron batteries leak between sections. At the same time, the distance from the eyeliner is small, there are many sections. With a regular radiator wrench, it may be impossible to reach the nipples that are located on the side of the blind plugs. Therefore, you have to remove the device from the eyeliner side. To do emergency dismantling, you need to know in advance how to properly remove the heating battery. If leaks form in the drainage areas on the connection to the battery
To change the connection (no matter thread or welding), the device must be dismantled. Sometimes it becomes necessary to replace the radiator with another device, with more favorable power characteristics or a more modern design.
Radiators must be removed for preventive maintenance to remove scale inside. Sometimes this is done by annealing. After this procedure, replacement of the intersection gaskets is required. When renovating an apartment for gluing or painting the wall behind the radiator, it must be removed. It is not recommended to glue wallpaper near radiators during the heating season; they will not stick, so you need to take care of this in advance. There are other cases: for example, it was decided to convert a one-pipe system to a two-pipe one. Radiators must be carefully removed to be reused.
Aluminum appliances require special care.
How to install bimetallic heating radiators
In the recent past, cast iron alloy was used to produce heating radiators. Installation of such systems, which have a decent weight, was quite labor-intensive. In addition to this, difficulties were also caused by the need to regularly clean the radiator cavities from mechanical blockages deposited on the internal walls.
Bimetallic radiators, popular today, are among the highest quality systems that meet a number of indicators required by modern heating equipment:
- The strength indicators of such systems are not inferior to, and often exceed, its value for products from a number of previously used traditional materials.
- Excellent ability to withstand the operating pressure at which coolant circulates in the system.
- Resistance to a possible increase in pressure to a value exceeding 25-30 atmospheres.
- Compact size and light weight.
- Long (over twenty years) service life.
Possessing all the qualities required by modern heating systems, bimetallic heating radiators have an excellent appearance, which makes it possible to avoid the use of decorative grilles and barriers that prevent the passage of warm air into the room. When choosing a radiator, you should determine the indicators that the purchased system must meet for the room in which it is to be installed:
It is necessary to determine the diameter of the pipes supplying coolant to the heating devices. It is also necessary to pay attention to the maximum value of power supplied by the radiator.
Building process
Before you expand the heating battery, if it is cast iron, you should remember that this can only be done after the end of the heating season! After all, in order to add new sections of such batteries, it will be necessary to completely disassemble the batteries. And if this is carried out in winter, then the entire system will need to be shut down. And if you live in an apartment building, it is unlikely that any of your neighbors will agree to spend several hours without heat.
Therefore, such a process should be postponed until warmer times. How to build up a heating radiator made of cast iron? Let's look at the process in more detail. We will need the following tools:
- Radiator or adjustable wrenches;
- Nipples are clearly for cast iron radiators (the number depends on the sections);
- Special gaskets to install them between sections.
- Side plugs with gaskets.
So, before you add a cast iron radiator, you will need to remove and disassemble it. Don't forget to turn off the water first!
If the batteries are not new, there may be a build-up of rust and dirt between the sections. To install the gasket and connect the battery sections, such build-up will need to be removed. This is done either with sandpaper or a wire brush.
When you attach the nipple, pay attention to the position of the thread. We begin to twist the nipple on the left, first it is best to attach it approximately 1 turn to the left of the heating radiator. We do the same with the right side.
It is imperative to ensure that the intersection gasket is placed only in the middle of the nipple. The radiator sections must fit snugly against the nipple. Now we insert the radiator wrench into the radiator, and use an adjustable wrench to screw the nipple into the radiator sections.
To make a high-quality expansion of heating radiators, you need to tighten the nipple three to four turns and move to the other side of the sections. We will tighten the sections one by one until they fit one another very tightly.
Now it's time to install special side plugs for cast iron radiators. Do not also forget about gaskets made of a special material - paronite. If there is rust on the surface on which the gasket is supposed to be installed, it must also be cleaned with sandpaper. And only now can you put the plug in. The plugs must be tightened tightly using a pipe wrench.
Step-by-step description of dismantling work
A few words about when it may be necessary to disassemble a heating battery:
- In case of replacing an old radiator with a new one that has greater performance and better appearance.
- If necessary, add additional sections for the battery.
- If it is necessary to replace a separate section or gasket that has leaked.
The instructions begin with preparing the necessary tools:
Step #1: preparing tools
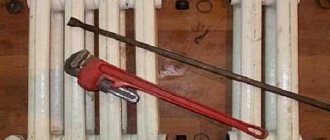
Photo of nipple wrench
Gas key sample
Advice: a nipple wrench, taking into account the fact that it is very rarely needed on the farm, and its price is not the lowest, it is recommended not to buy, but to rent. This will save the family budget.
Step #2: Disconnecting the Battery
Before disassembling an aluminum or cast iron radiator, you must disconnect it from the heating system. To do this, it is imperative to turn off the heating and drain the water from the riser, otherwise you will simply flood the room and get burns.
Advice: before starting dismantling, it is recommended to cover the floor under the radiator with film, rags, or at least newspapers to avoid contact with residual liquid that may end up in the circuit even after draining the riser.
Further, depending on the complexity, three situations can be distinguished:
- Polypropylene pipes. In this case, the coupling connection, as a rule, is twisted with bare hands, without causing any difficulties.
- Steel new. With some effort, you will most likely be able to untwist the inlet and outlet cords of the battery using a gas wrench.
Disconnecting new steel pipes
- Old steel or cast iron pipes. First we try, removing the paint from the joint with a blowtorch and a metal brush, we try to unscrew the connection as described in the previous version. But in systems that have worked for a long time, this most often does not give results, and then we simply cut off the runoff with a grinder or an autogen.
Cutting old squeegees using a grinder
After disconnecting the battery from the pipes, remove it from the hooks and lay it on a flat surface.
Step #3: disassembling the radiator
Battery sections disconnection diagram
A piece of pipe or crowbar
The battery can be cast iron, aluminum or bimetallic.
The most difficult option to analyze is the first one listed, so let’s start with it:
- How to disassemble a cast iron heating radiator on your own:
Carefully, check the thread progress on the futurkas or plugs, which can be either left or right. We insert the nipple wrench inside and increase its torque using a piece of pipe or a crowbar. We tear off the thread by turning the tool a quarter turn, first at the top and then at the bottom. Then we also alternately continue to unscrew the nipples so that the radiator does not warp. The main problem with old batteries is that the seals can become stuck during many years of use and cannot be turned on. In this case, the connection point must be heated in a circular motion with a blowtorch, and then try to unscrew the nipple again
We repeat the procedure until the thread gives way. If it still doesn’t work out, then you’ll have to cut it with an autogenous gun.
Disassembled old cast iron heating radiator
- Let's find out how to disassemble a bimetallic or aluminum radiator? The procedure is almost the same as described above, but has several differences:
- A smaller nipple wrench is used.
- So much effort is not required when unscrewing the nipples.
- Plugs and futuroks are marked with the thread direction in the form of the letters S and D, where the first indicates the left stroke, and the second - the right.
- The metal gaskets located between the sections are wiped, polished and stored until the subsequent assembly of the battery.
Disassembling an aluminum battery
After completing the described tasks, you can replace the leaking part, add a section, or even install a new radiator in place of the old one.
Can you see everyone?
Why are we talking about different ways to dismantle radiators?
How do they differ in connection methods?
- Fittings used. Traditionally, for the installation of Soviet-style cast iron radiators, a combination of a conduit (a pipe with a long thread) and a lock nut were used; now the batteries are more often connected with American ones - quick-dismount fittings with union nuts;
The photo shows the connection of an aluminum sectional radiator by an American woman.
Connection on the lines.
The location of the connections relative to the radiator. The connection can be one-way or two-way
This is important when installing on squeegees: one of the radiator plugs through passage will have a left-hand thread
A special case
- In many houses built in the 80s and 90s, convectors are used as heating devices. The convector is a coil made of a steel pipe of the same diameter as the riser, with fins that increase heat transfer. The typical method of connecting a convector and a steel line is a butt weld.
The heating device is connected to the riser by welded seams.
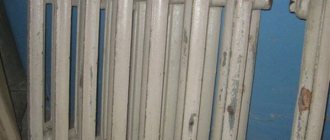
Maintenance of cast iron modifications
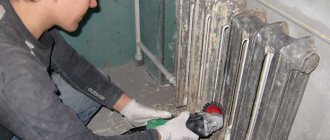
In old residential premises there are often cast iron batteries of the MS-140 type. Their assembly is also carried out using gasket seals and nipple nuts. It is quite difficult to disassemble old models, since during long-term use the sections on the joints become stuck due to rust. In such situations, the key slots are corroded by the coolant.
In addition, when dismantling sections of cast iron heating radiators, you should remember the impressive mass of the material used. One 12-cell battery will weigh at least 90 kilograms; it is very difficult to handle such a device alone. To perform the work you will need the following tools:
- special nipple key;
- a device for unscrewing plugs and fittings;
- small sledgehammer, chisel;
- blowtorch;
- brush with steel base;
- blocks of wood used to lay the radiator on the surface.
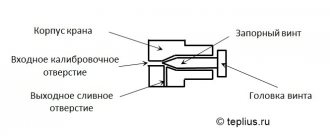
The key is a metal rod that has a round configuration and is flattened on one side.
The diameter of the device is 18-20 millimeters. The flattened part has a thickness of 6 mm, its dimensions are 28x40 mm. A ring is welded on the opposite side of the rod, intended for threading the lever. The length of the radiator key is equal to half the length of the 12-section radiator plus 300 millimeters. Date: September 25, 2022