A brick stove is a time-tested way to warm up a room during the cold season and keep it warm. It is suitable both for heating a home for permanent residence, and for a summer cottage, which is visited once or twice a month. The structure of the hob and oven allows you to combine the functions of heating and a heat source for cooking in the oven. Although today more and more remote settlements are being supplied with gas, the problem of general availability of blue fuel is still acute. Even in the Moscow region, many gardening partnerships and detached estates and farms are located far from gas mains.
Building a brick stove with your own hands means solving the heating problem in the house using a well-proven method at the lowest cost. There are also situations when even the presence of gas on the site still does not make a brick stove a useless anachronism. This means a bathhouse. Unlike a Finnish sauna, which can be electric, a Russian bath must have a stove, and a brick stove is the traditional option, which is only recognized by convinced, consistent adherents of the art of bathing. Therefore, building a brick stove with your own hands will be useful on the farm, regardless of the conditions.
Laying a stove is not an easy task, but it is doable
In addition, there are fewer and fewer true master stove makers over time. Entrusting the installation of a stove to an untested specialist means risking not only finances, but also subsequent comfort and even fire safety. Isn't it better, in conditions of shortage, to temporarily retrain as a stove maker yourself? At the very least, you will only have yourself to blame for the mistakes you make.
Furnace materials
To make roughing with your own hands, you will need to prepare materials. Try to take all the components for making a stove with a stove bench of good quality, because the design will serve you for many years.
- Ceramic brick. This will be the lining of the product. Take it without chips and one color. It comes in various configurations, so first you should draw up a drawing of the product and decide what appearance it will have. Instead of lining a stove with a stove bench, decorative or ordinary plaster can be used. If plaster is used, the surface can then be painted.
- The brick is fireproof. It is able to withstand high temperatures. Calculate how much you will need to make the combustion chamber yourself.
- Clay and sand will be required when making mortar for laying the structure.
- Fireclay powder will be used as an additive to the solution.
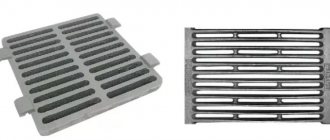
- Grate bars. It is advisable to take ones made of cast iron. Metal ones, when using coal, will burn out very quickly.
- Fire door.
- Blower door.
- Smoke valve.
- For waterproofing, you should take roofing felt.
Blueprints
How to build a stove with your own hands? First, let's draw up the drawings. In order to draw up drawings, you need to know what must be included in the furnace.
- Foundation.
- Frame.
- Chimney.
The oven consists of the following levels:
- Foundation
- Rubble masonry.
- Bookmark depth.
- Waterproofing.
- Furnace array.
Array composition:
- Six.
- Undercoat.
- Sub-bake.
- Dushnik.
- Overlap.
- Valve.
- Half door.
Pipe composition:
- Overlap.
- Cutting.
- Insulation.
- Otter.
- Header.
- Metal cap.
- Pipe riser.
- A metal sheet.
- Pipe neck.
Review of brick kilns
There are many models of furnace devices, which are different both in their form and in their functions. The most popular are Russian, Dutch and Swedish stove units. They are slightly inferior to the Finnish, Kuznetsov stove and housekeeper.
Russian stove
This multifunctional design with large dimensions is one of the oldest models. In past times, it was very common: in every home, the presence of a beautiful Russian stove was mandatory.
Russian stove
The main advantages are:
- possibility of heating the room, beds;
- cooking food;
- use as a drying device for clothes and shoes;
- With regular heating, it provides an even, long-lasting temperature;
- creates a special Russian flavor and will become the main decoration of any room.
Despite their advantages, such brick stoves for wood-burning homes have several disadvantages:
- massiveness requires the installation of a solid foundation;
- occupies a significant area in the room;
- the need for regular cleaning;
- difficulty in installation;
- The efficiency is only 60 percent.
Dutch
Another very popular model is the Dutch oven. This design, which looks like a column, really appealed to the owners of country houses and small-sized premises. Its height is significantly greater than its width, so the Dutch model takes up little space.
Dutch oven
Advantages of a brick stove for a Dutch-type wood-burning cottage:
- compactness;
- low cost of masonry material;
- possibility of rapid heating due to thin walls;
- long breaks between fireboxes do not affect the quality of heating;
- You can heat a medium sized room.
Disadvantages of this model:
- relatively low efficiency, which is equal to 40 percent;
- requires regular cleaning of the ash pan. Without proper care, cravings can get worse;
- requires constant attention during combustion and some skills in maintaining the fire.
Swede
This model is designed taking into account the cold climate of northern countries, so it is ideal for our region.
Stove "Swedish"
Advantages of this model:
- compactness;
- high performance;
- fast heating;
- possibility of heating adjacent rooms.
Flaws:
- the cost of construction increases due to the use of fireclay bricks;
- the need for good thermal insulation to avoid heat loss through the floor;
- not suitable for houses and areas that are rarely heated. If it cools completely and is not heated frequently, the furnace masonry may be damaged.
Housekeeper
This small Russian brick stove for a summer house or home can be installed even in a small room. Its design is very simple, but the oven can also be used for cooking. This model is becoming increasingly popular, because its dimensions contribute to the rational use of space.
Housekeeper
Advantages of the economy stove:
- does not take up much space;
- heats the room well;
- you can cook food.
Flaws:
- You cannot fire two fireboxes at the same time;
- requires constant ash removal;
- takes time to heat up;
- For better combustion, you need to use firewood of noticeably the same thickness.
Finca stove
This heating device differs from other types in its special design: one firebox body is located inside the other.
"Finka"
Advantages of the furnace unit:
- high heat transfer efficiency;
- ease of manufacture;
- low cost;
- fast heating;
- safety and environmental friendliness.
Disadvantages of this type of furnace device:
- relatively large dimensions;
- It is necessary to carefully monitor the amount of fuel in the firebox.
Kuznetsov furnace
The heating device received its name thanks to the name of the developer Kuznetsov. The operating principle of such a unit is based on the movement of free gases.
Kuznetsov furnace
Advantages:
- excellent thermal efficiency;
- complete combustion of fuel;
- no soot;
- a small amount of masonry material.
Flaws:
- difficulty in installation due to the design;
- high requirements for material;
- Some skills are required to fire such a device.
Other stove models
In addition to the above models, there are other, less common:
- V. Bykov's stove, which is only suitable for heating a small room;
- Podgorodnikov’s two-bell stove, which can be heated with either coal or wood.
How to learn to lay stoves?
Hello! I recently encountered a problem, I installed a new roof on my house, only one problem: after the rain, the whole yard is constantly flooded, and water drips from the roof from all edges, it is necessary to make a system for draining water from the roof, please advise how to drain the roof?
Answers from forum users and experts to the question: How to learn to lay stoves?
Indeed, stove laying is a complex art, mastered by craftsmen who lived in rural areas. Now, unfortunately, this art is fading into the background due to gasification and electrification of populated areas. It is better to learn how to lay a stove from a master who has been doing this all his life, since this business has many tricks that are not written about in books.
Answer or clarify the question
Popular questions
Good afternoon. I live in a private house and have installed my heating system so that I can regulate it myself. And one winter it was very hot. And I have to turn off the heating myself. .
Hello. I live in Tatarstan in my own apartment, but I’m tired of this life in the “dovecote”; I want to live in my own house. Please tell me how much the houses cost.
Greetings. I would like to ask you which SNIP sewerage belongs to. External networks. This is how it all sounds. And what else are they talking about?
We have a plot of land and want to build a house. Friends said that there is a program to support young families to build a house. I would like to know what kind of .
We want to build a bathhouse on a country plot, fortunately space allows. What is the best material to build a bathhouse from? Should we just order a ready-made design? Does the material matter?
The photo shows us a bedroom. The designer selected different shades of blue for her interior. The wall near the head of the bed is painted in two colors.
Good to know
...it is best to use stove masonry..., clay mortar for stove masonry...
...you need to draw the contours of the oven and lay the clay with a special...
...to the market and buy a stove there, then bring it home and put it away. How do you understand...
Laying tiles is not difficult. At first... the solution won't set. Keep putting...
... your oven to at least approximately know the weight. Since the stoves are massive...dry...
... In general, there are quite a lot of technologies for laying a furnace. But I would...make the stove patterned...
... there are professional reliable places where you can learn how to lay tiles...
...in order to learn how to lay tiles you need to try... with people who...
Preparatory activities
When preparing, you need to choose a place where the brick stove will stand and its chimney will pass through. For a heavy brick structure, pour a concrete foundation.
Required materials and tools
The main material is solid red brick. For the firebox you need to buy some heat-resistant material. The masonry elements are connected only with clay mortar. It can be purchased at construction stores as a ready-made dry mixture and mixed with water yourself before work.
Related materials include:
- stove fittings (doors, valves, stove, etc.);
- grate according to the size of the firebox;
- steel wire 2-3 mm;
- steel corners 5x5 cm or plates of the same size;
- asbestos cord.
Basic stove maker tools:
- mason's hammer (with a flat striker);
- plumb line and level, measuring instruments;
- trowel or trowel;
- grinder with a disc for stone (optional).
Features of choosing a place to install a heating device
A brick heating and cooking stove is most often located in the central part of the house, at the junction of several rooms. This allows you to bring the cooking part into the kitchen, the side of the stove into the next room, and install the heat exchanger between 2 more living rooms.
But in a one-room house or utility room, garage, etc., the stove is placed so that it does not interfere, and a corner or part of the wall is chosen. With this arrangement, the chimney is often led directly to the street.
Construction of the foundation
The depth of the foundation depends on the design of the stove and its size. Do not deepen the pit more than 50 cm under a brick slab with your own hands. Dig the pit so that it is 20 cm wider than the perimeter of the future stove.
Preparation of the solution
For pouring, use a standard solution of 1 part cement, 3 parts sand and 4 parts crushed stone. When kneading by hand, all components are mixed dry and then approximately 0.5 parts of water are added. The main requirement for the finished mixture is the absence of dry inclusions and areas with a different color.
Mixing in a concrete mixer can be done by sequentially loading a portion of each component and mixing the solution for 7-10 minutes.
Preparatory work, necessary materials and tools for work
How to build a stove with your own hands? Let's look at the preparation:
- Foundation. If the stove is designed to be large (more than 500 bricks), then you need to build an additional foundation for it. If the oven is small, this is not necessary.
- Thermal insulation is mandatory for all types of stoves: both large and small.
- Chimney. Under no circumstances should the chimney be adjacent to the ceiling beams. Also, the distance between it and all beams should be approximately the same.
- Pipe. The projection of the pipe must be half a meter higher than the roof, but no more than one and a half meters.
- Furnace location. The location should be chosen in accordance with the data on the pipe and chimney, that is, take into account what will be located above the stove.
If these points are taken into account, then there are a few more tips:
- It is better to position the stove so that it heats as many rooms as possible. For example, if the house has several adjacent rooms, it is better to place the stove not in one of them, but between them, so that it heats everything.
- If you need to heat one room, then it is better to place the stove closer to the wall, but not right next to it.
Types of fireplace stoves with a chimney: drawing and diagram
Several basic plans for fireplace stoves are common, which are located indoors, for example, in a private house.
Photo 1. A red brick heating stove-fireplace is installed in a spacious room of a wooden house.
The first option is a stove with a large stove bench, which is a rather large building not suitable for small houses.
However, this design has a number of advantages:
Can perform the function of heating the room. If the system of smoke channels in such a stove is made taking into account the need to heat several rooms, then the rooms located along the chimney itself can also be heated from the chimney.
Photo 2. Drawing of a simple heating brick stove-fireplace with order and dimensions in millimeters.
- In the case of building a structure with chambers for cooking, the stove can replace a stove or, in case of problems with gas supply, act as the main means for preparing various dishes.
- If necessary, a bed built as an extension to the stove can be used as an additional heated sleeping area.
- Creating two fireboxes in this design allows you to heat only that part that is needed at a particular moment in time, and the use of both fireboxes increases the heat transfer of the building.
The diagram of such a structure looks like this:
two blowers with doors located under the fireboxes - one under the fireplace, the other under the stove;
Photo 3. Diagram of a multifunctional brick stove-fireplace with a hob and a second firebox. The location of the smoke channels is shown on the left.
- smoke channels for each firebox, which, if desired, can be combined into one chimney;
- the firebox of the stove and the fireplace itself, which, if necessary, can be placed on opposite sides of the structure and, thus, will be located in different parts of the house;
- a chimney that can go through several rooms.
Important! The large dimensions of the structure arise due to the creation of a full-fledged bed
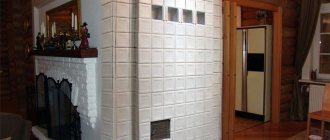
Wall heating stove made of brick
This version of the stove is a fairly compact design designed for heating, as well as for creating comfort. It takes up much less space in the room, but it is problematic to use it for cooking.
The key feature of such a device is both the fireplace and the stove itself.
They are combined into a structure that can, if necessary, be heated and play the role of a heating device for two rooms at once, to the adjacent walls of which it is connected.
A drawing of such a design looks like this:
- a vent under the furnace firebox with a system of smoke channels to remove excess gaseous combustion products;
- firebox with grate and ash pan;
- fireplace insert with a portal and a system of smoke channels for discharging smoke into the chimney;
- chimney in the form of a single pipe.
Reference! There is no hob in this design, which makes it impossible to cook on it. It is better to combine the stove ducts from each firebox into one chimney, which will not worsen the draft, but will save on material.
A variation of this design can be a fireplace stove, which has a square at its base. The device is used to zone rooms if such a design task is assigned to it.
What is the difference between a multifunctional heating stove?
This type of heating structure is a complex structure that meets several tasks at once:
- heating the room (can be used both as an independent heating device and in combination with existing gas units);
- cooking, subject to the installation of appropriate devices in such a structure;
- decorative task when using a fireplace.
In terms of its dimensions, the design differs in that it can be either very large (for example, in the case when a bed is attached to it) or relatively compact (if a limited number of cooking utensils are used).
Its diagram looks like this:
- blower for stove and fireplace inserts;
- under the fireplace you can place a niche for drying firewood;
- a system of smoke channels from each cooking device (if they are heated independently);
- chimney outlet (there may be one for all heated parts of the stove, sometimes an independent element is designed for each part).
Attention! When placing such a structure in a house, it is best to place its fireplace part in the living room or bedroom, and the firebox and cooking equipment in the kitchen
Training opportunity
The order of laying a heating stove
You can search for educational institutions where they teach the profession of a stove maker on your own. Now in many cities short-term courses are organized where the basics of the profession are taught.
It is necessary to take into account that organizations providing training receive accreditation from the Ministry of Justice, as well as the Ministry of Education and Science. In addition, they must have a license from the Ministry of Emergency Situations. Course graduates receive standard certificates that confirm their qualifications.
For example, in Moscow, educational services for training stove makers are offered by the following organizations:
- Russian Technical School;
- Russian Academy of Crafts and others.
The country's vocational education system, after reorganizations, continues to teach blue-collar jobs. In particular, they study to become a stove-maker at the Kostroma Vocational Lyceum No. 6.
Shield schemes
A rough stove can have several purposes and, depending on the purpose of its use, different types of shields are built. Let's consider the possible options for shields:
- Sequential stroke with vertical channels. To build this type of shield, the least amount of materials is required. The scheme is easier to implement for those who do not have sufficient experience, due to the simplicity of the design. If the shield circuit is constructed correctly, the resistance to gases will be the greatest, and the thermal efficiency will be average.
- Sequential stroke with horizontal channels. It is much more difficult to build a circuit than the previous one, but they do not differ in parameters. Thermal efficiency increases by reducing gas resistance.
- Sequential stroke with long vertical channels. The main advantages of the scheme are that the ease of construction corresponds to the first type, and the thermal efficiency corresponds to the second. The disadvantages will be the need for additional construction of the foundation and high costs of building materials.
- Parallel move. A furnace with a shield with a parallel stroke is not compact, it takes up a lot of space, but it has the highest thermal efficiency. It is possible to reduce the furnace power.
Who can study
Almost anyone who feels the need to receive professional training in a specialty that will allow them not only to open their own business, but also to realize their creative potential can come to the stove-making courses.
Interview with the furnace master
The courses can be attended by either a person experiencing financial problems and seeking to improve the current situation, or a school graduate looking for his calling in life. Age is not of fundamental importance, but it is desirable to have sufficiently good physical health, hard work, and endurance. This is due to the specific nature of the stove maker’s activity, which involves lifting heavy objects and working in different, often uncomfortable, positions.
We select bricks and prepare mortar
In order for the stove to serve for a long time, you should choose all materials wisely. There are three types of brick products:
- Ceramic - they are used to build a stove.
- Silicate - absolutely not suitable for this.
- Fireproof - used for laying out fireboxes and fireplaces.
When choosing a certain type of brick for a stove, it is recommended to completely abandon its hollow varieties.
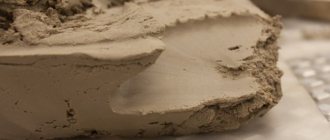
Mix the solution from clay. Red would be a good option if the stove is made of bricks of a similar color. When using fireclay, you will need a specific fireclay clay. Some stove makers still, as in the old days, prepare a solution with their own hands, which contains river sand with a diameter of about 1.5 mm, clay and water. It is better to use quarry sand without foreign substances and fatty clay. But it’s still easier and more reliable to purchase a ready-made baking composition in the store, preparing it according to the instructions.
Useful tips
- Follow the instructions carefully during installation.
- Choose a drawing that suits your needs.
- Place the stove not close to the walls, but not in the center of the room (unless, of course, it is a traditional Russian one).
- Be careful when transporting fire bricks as they are very fragile.
- The side walls of the oven are the warmest, so place them closer to the areas that need to be thoroughly heated.
- Don't forget about automated ovens that will control the temperature.
Laying any of the stoves discussed above will not cause difficulties with careful planning and perseverance. Good luck!
Construction of the foundation
The foundation can be either stone or concrete. Before pouring a concrete foundation, it is necessary to prepare formwork, thanks to which you can achieve a perfectly flat surface. To do this, it is necessary to lay wooden slats around the perimeter of the pit, securing them with strong reinforcement, to the required height.
For the foundation it is better to use high-quality material, however, do not overdo it. For example, M-250 concrete is quite suitable, since the concrete base will be located inside the house and will not bear huge loads. After pouring the concrete solution, it is necessary to allow the foundation to dry thoroughly and harden. After this, construction can continue.
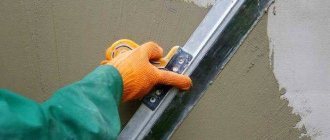
Brick fireplace technology
- When the concrete foundation for the fireplace is ready, laying the fireplace with your own hands begins. The surface of the base is waterproofed using an inexpensive cement-polymer mixture, coated with it several times, using a spatula or brush.
- When a fireplace is adjacent to a wall made of combustible material, fire protection must be installed. One of the options for its arrangement is fireproof cutting of a wooden wall and fireplace with a basalt wool slab, the thickness of which is at least 5 centimeters. From the side of the hearth it is covered with reflective foil.
- When preparing a clay-sand solution yourself, the clay must first be soaked. Water is added to the ready-made mixture according to the instructions supplied with the building material before starting masonry.
Construction of a stove for a summer residence and its features
The main elements of any brick stove for a summer residence are:
- Foundation. For any stove it is necessary to build a separate foundation, not connected to the main foundation of the house.
The foundation is built separately
- Furnace body. Consists of a combustion chamber and a chimney. If the stove design requires additional elements, then it may include a hob, oven, and water heating tank.
- Combustion chamber. The dimensions of the firebox depend on the area of the room and the required power. If the stove is planned to be heated with wood, then the height of the firebox must be at least 40 cm. The thickness of the firebox must be at least 1/2 of a brick. The firebox can be made of fireclay (heat-resistant) bricks or purchased in ready-made cast iron.
- Ash pit (ash chamber). This element of the furnace is designed to collect products during fuel combustion. Oxygen is also taken in through the ash pan, which is necessary for the combustion process.
Ash pan
The ash pan is located below the combustion chamber and is always equipped with a metal door through which cleaning takes place. A grate is laid between the ash pan and the combustion chamber. Typically, the ash chamber is 3 bricks high.
- Chimney. The main element of the furnace through which combustion products are removed. The chimney can be made of brick or made of steel pipes. This does not affect functionality or efficiency in any way. The chimney is discharged from the stove either directly through the roof or through the wall to the street. When constructing a chimney, you must avoid multiple branches and horizontal sections, as this negatively affects draft and can reduce the efficiency of heating the room.
DIY corner fireplace construction
One of the most common modifications is a corner fireplace, which is not only attractive in appearance, but also significantly saves space.
A very original design of this design is when the combustion hole is located symmetrically to the angular axis of the walls in the room. This type of fireplace can be placed either next to an internal or external wall. But when designing it and laying the foundation, you should take into account the location of the pipe. If the stove is located next to an internal wall, then the fireplace chimney should be built slightly higher than the ridges of the roof of the house.
When laying a corner fireplace, be sure to use the order. If you don’t know, ordering is a special arrangement of each of the bricks needed for masonry. Thanks to the ordering, you will be able to calculate the required amount of material and rationally use the available bricks.
Step-by-step instruction
It is not difficult to assemble a heating stove with your own hands; just read the instructions.
Further sequence of actions:
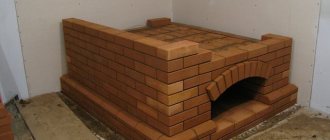
Two examples of brick oven laying
- After the third row has been laid, the blower door should be placed in the oven.
- To keep everything level, a level is used, and an asbestos cord is used to close the gap.
- Then they begin laying out the main part intended for heating. For this purpose, fireclay or stove bricks are used.
- Before laying a brick stove, the ceramic material is cleaned of dust and dirt and moistened with clean water.
- Fireclay bricks should not be wetted.
- Laying out the mortar can be done manually, since it is difficult to achieve a mortar thickness of 3 mm using a trowel.
- The furnace laying must be verified. Tapping and separate editing are not allowed.
- If you can’t do this the first time, you can repeat everything, having first cleared the brick from the mortar.
- After completing several rows of masonry, a grate is installed in the grooves of the fireclay bricks to separate the ash chamber.
- The working combustion door is installed in the furnace in the same way as the blower.
- The body of the furnace is laid out with brickwork.
- If the cast iron slab should be below the level of the bricks, then the last row of masonry should be moved outward.
Before carrying out work, you should consult a specialist.
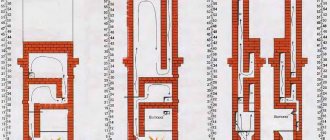
Orders - a detailed diagram of the laying of a brick stove.
How to build a stove with your own hands? Let's look at how to lay brick using the example of a Russian stove. Row number..
- Designed for waterproofing foundations. Lay beveled bricks and ¾. During laying, use cement-sand mortar.
- The second row represents the bases for the walls of the care area.
- The third row is the walls of the guardhouse (3/4 brick).
- The fourth row is the support support.
- The fifth row is located in the corners to create support for the arch. Also use this row to lay out the baked goods.
- The sixth row is laid out according to a wooden template, which will be a temporary arch for the guardianship.
- The row for the vault begins to be laid from the edges to the middle. The center brick is driven in with a mallet to ensure strength. Also, bricks should be placed as close to each other as possible, and brick fragments should be placed in the openings between them.
- The walls of the mantle consist of bricks from this row.
- The walls of the stove and the walls of the cold stove are laid out in this row.
- The final row for guardianship. Fill the gaps between the bricks with sand for insulation.
- Strengthening the roof of the guardhouse with the addition of beveled bricks.
- The use of clay-sand cement begins. Shetsk masonry. The brick should lie flat, but then you still need to sand it.
- The bricks of this row will become the hearth and cooking chamber. Additional installation of the mouth arc.
- Walls of the hearth and furnace.
- Walls of the hearth and furnace.
- Walls of the hearth and furnace.
- Fold down the supports for the roof of the cooking chamber.
- It is made of refractory bricks with a vault.
- Pole walls.
- Pole walls. Fill the gaps with sand.
- Laying the furnace, the beginning of the samovar.
- End of the ceiling. Installation of a choke.
- Samovar canals and over-pipe.
- Same channels.
- Additional channel for views.
- Same channels.
- Half door installation.
- Ligation of sutures and the same channels.
- Ligation of sutures and the same channels.
- Ligation of sutures and the same channels.
- Connection of pipe and vent.
- Installation of the valve.
- Pipe laying.
33+ pipe laying.
Special requirements
We repeat: the advantages are simple - compactness and the ability to build in an existing house without major construction work. But it is not so easy to place a more powerful firebox in a furnace structure of generally the same dimensions; from excessive heat load it will quickly become unusable. If special requirements are not met:
- Furnace foundation.
- Masonry mortars.
- Methods of laying the structure of the furnace.
- The choice and methods of installing stove fittings.
The design of the foundation for the rough is shown in Fig. The crushed stone cushion without sand bedding is leveled to the horizon before pouring. Pouring mortar M150 – cement M300 and sand 1:2. The gap between the rubble foundation and the flooring is 30-40 mm. Don't forget to support the cut joists! Leaving their ends hanging is a common but serious mistake. The dimensions of the foundation in plan should protrude onto the contour of the furnace by at least 100-150 mm.
Construction of the furnace foundation - rough
Note: the brick bed on the foundation under the furnace is laid out with bandaging in the rows and between the rows in the same way as the first 2 rows of masonry for the furnace structure, see below.
To fold the rough, 3 types of solutions are used, see fig. below. The bed on the foundation and the chimney are laid out on lime mortar as it combines sufficient heat and moisture resistance, but the rubble must be laid only on a completely moisture-resistant cement-sand mortar. It is highly advisable to use mountain or ravine sand with rough grains for clay mortar. Ordinary clay - purchased from the oven, guaranteed fat content and, most importantly, purity. Self-excavated clay, brought to the required fat content with sand, is of little use for coarse masonry.
Compositions of masonry mortars for coarse stoves
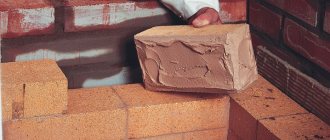
For rough masonry, stove bricks and, if the order (see below) is provided for, fireclay bricks are used; red worker is of the highest quality - light red in color (fully annealed), without burn marks, distortion and swelling. Dry molded brick is absolutely unsuitable. The masonry of the structure is roughly carried out following the trail. rules:
- If you are an inexperienced stove maker, each row of masonry is first laid out dry; detected defects in cutting/chipping bricks are eliminated.
- Before laying on the mortar, each brick is soaked until the release of air bubbles stops. You can’t dump all the bricks into a barrel indiscriminately!
- A 5 mm layer of mortar is applied to the bed and the base of the brick being laid.
- The brick being laid is laid with a smooth movement, slightly tilted, and moved towards the previous one so that there are no air bubbles left in the seam.
- The brick is pressed until the seam comes together to 3 mm; You can't knock!
- Between fireclay and ordinary masonry, the initial seam is 8-10 mm; after pressing – 6 mm.
- The seam between bricks and metal embedded parts (see below) is 10 mm.
- Excess mortar squeezed out of the seam is removed with a trowel (trowel).
- The recesses in the seams found after removing excess mortar are filled with mortar by pressing without transverse movements, but not by rubbing!
Those who prefer to learn visually can watch a video tutorial on laying heating and cooking stoves below:
Video: laying a heating and cooking stove
Incorrect oven door installation
Fittings and grates for roughing require cast iron; doors and latches - with an installation skirt and holes in it for diagonal wire whiskers. Welded steel or cast iron fittings with eyes for straight lugs (laid along the corresponding furnace wall) are unsuitable in this case. However, install the doors/latches as in Fig. on the right, in the rough it is impossible; This is not according to stove rules at all. For a Dutch country house with 2.5 bricks in plan, which is heated once or twice a season, it may be fine, but not for a rough one.
It is necessary, firstly, to crimp the mustache (galvanized wire 2-3 mm) with a twist so that it does not move. Press not too tightly at first, place it at the desired angle (at least 12 mm should remain from the far end of the mustache to the inside of the masonry). Then tighten carefully and shake the door/latch slightly. Didn't leave? Good. Then, secondly, you need to tightly wrap the skirt with asbestos cord (or basalt fiber), and only now put it in place. You can also watch the following videos about installing accessories into the oven.
Preparation for work
For laying a stove with a stove, different types of brick are used. Usually they take red solid one for external masonry and fireclay - to make the internal lining of the firebox, as well as the smoke well.
The foundation is poured with concrete mortar. To prepare it you will need cement of at least M400, preferably M500. The sand can be river or from a quarry, but it must first be sifted to prevent the ingress of impurities. Clean water should also be used. For the solution, you should also take granite crushed stone about 30 mm.
The foundation is backfilled using rubble granite, a suitable fraction is approximately 300 mm. In addition, you will need to prepare a solution of red clay and sand.
Instead of clay, you can purchase clay powder; the instructions for using it are indicated on the package. All components must be of good quality; the integrity and service life of the future stove depends on this. To seal the joints, you need to prepare a high-temperature sealant.
The work is carried out using ordinary construction tools.
You may need:
- containers for mixing the solution;
- Master OK;
- Bulgarian;
- plumb line;
- level;
- roulette;
- rule;
- mallet;
- furnace hammer;
- other devices for processing and laying bricks.
To make a high-quality solution, it is better to use a hammer drill or drill with the appropriate characteristics, as well as an attachment designed for these purposes. A shovel and a sieve will come in handy.
Theory
In the theoretical aspect, course participants will receive basic information about the materials used and study their properties in detail. They will also be provided with information about reliable binder formulations and how to improve their performance using additives. Future course graduates will also acquire other knowledge:
Furnace laying tool
- stove maker's tools;
- range of stove appliances;
- characteristics and types of insulating materials;
- symbols on the drawings;
- classification of heating devices and regulatory requirements for them;
- chimneys;
- technology of laying different types of fireplaces and stoves;
- their device;
- calculation of the required thermal power;
- types and methods of constructing foundations for heating structures; Table of materials for masonry stoves
- drying, test firing;
- conditions for proper operation;
- methods of performing repair work;
- chimney cleaning techniques;
- Fire safety;
- SNiP requirements;
- safety precautions.
Rules and nuances of operation
In order for the operation of the furnace to be truly economically profitable, it is necessary to maintain it in impeccable condition.
Recommendations for using the oven
A small crack in the masonry, up to 2 mm, will contribute to heat loss from the heating system. Approximately 10% of the heat will be lost due to the entry of air masses.
The firewood used should not be wet. It is recommended to pre-dry them naturally and prepare them long before flooding the oven. Damp firewood will play a negative role, since it will cause condensation to accumulate on the brick walls, the action of which will contribute to the destruction of the material.
The firewood does not need to be stacked tightly together; there should be a gap of at least 10 mm between them, and 2 cm should remain free from the top of the stove. The ideal option would be to fill the firebox to 2/3 of the total volume of the chamber.
Some more recommendations:
Fire Requirements Scheme
- If the vent is open during heating, up to 20% of the heat will enter the pipe and the heating will not work effectively.
- When the combustion door is open, about half of the heat will be lost.
- For uniform heating, it is recommended to select logs of the same size, approximately 10 cm thick.
- To make the fire burn better, it is recommended to use wood chips or a splinter, and the use of flammable liquids for these purposes is prohibited.
- The view should be closed, then the heat will not go directly into the chimney, and the heating will be at the same level.
To ensure traction, you should focus on the color of the fire. If the color is yellow, then the combustion mode is optimal; if it is white, then there is a lot of air in the flame and most of the heat goes into the chimney. If the fire is red, then this is due to a lack of oxygen.
A technically competent solution for the operation and care of the stove will ensure long-term and reliable operation.
Practice
Layout of a heating stove
During practical training, future stove makers are taught to read drawings and correctly determine the parameters of created fireplaces and various stoves. Students acquire the skills to make models of future heating devices, prepare mortar and carry out masonry in compliance with all standards and rules. Future craftsmen mastering the stove business will learn how to correctly build a foundation, select an adequate finish and design external surfaces. They will master the techniques of carrying out restoration and repair work, as well as how to care for chimneys.
Types of outdoor Russian stoves. Design diagram
When choosing your project, think about what functions the structure should perform: fry, steam, cook, smoke. In accordance with this, make your choice of an outdoor Russian stove:
- with barbecue;
- with barbecue;
- with space for a cauldron;
- only with hob;
- with smokehouse;
- with a bed.
The stove design can be either the simplest or the most complex; it can include elements traditional for a Russian stove:
- a place for drying firewood - an oven;
- a place for storing dishes and other utensils - a stove;
- a place for hot pots removed from the oven - a hearth;
- the chamber under the pole is the overpipe;
- the surface in the cooking chamber where the cooking utensils are placed - under;
- the chamber itself is a crucible;
- covering the chimney to preserve heat - a view;
- a window leading to the chimney - a choke;
- draft regulator - damper.
Photo 1. Diagram of the structure of an ordinary Russian wood-burning stove, all the main structural elements are indicated.
A design with a couch is also possible, but in the outdoor version it is not very appropriate or serves other purposes.
Important! The diagram and drawings of the furnace should include everything you plan to build
An ordinary Russian stove for the street
The simplest outdoor stove consists of a frame, a one- or two-burner stove, and a tunnel firebox, which is divided into flame and smoke chambers by a smoke tooth. The scheme of such masonry is relatively simple and does not require special knowledge or the use of technology. It is suitable for outdoor use because:
- thanks to the smoke tooth there is no dependence on the strength and direction of the wind;
- cooking becomes possible at any temperature;
- You can cook even with the lowest quality fuel.
The cooking surface can vary from one to two square meters. m or more - depending on the chosen scheme. The height of the crucible according to the standard version can be 70 cm.
The Russian-style mini-oven measures 100 cm by 130 cm. But it is multifunctional and allows you to cook any dishes, bake bread and has a number of advantages:
- low-cost financially;
- convenient and easy to use;
- quickly built;
- prepares dishes quickly;
- does not require a large amount of fuel;
- environmentally friendly
You can build an outdoor mini-oven in one day.
Advice.
Do not start building a mini-oven if there is no drawing, project, or developed design. Get qualified advice from specialists.
Outdoor device with barbecue
The structure of a self-made barbecue includes a tray with fuel and a grate with meat at a height of 10-15 cm.
The hot air after heating the stove will act as an open flame. Food is cooked not over an open fire, but inside a crucible. The firebox can be located either away from the inserted grills for cooking meat or under them. Different stove designs with barbecue imply different construction options. When choosing a project, focus on your culinary preferences.
Note! Meat cooked in a Russian street oven has more beneficial properties. In the oven, cooking takes place in a niche fenced off with partitions.
Thanks to less draft and the absence of wind and temperature changes, the meat is cooked in its own juices
In the oven, cooking takes place in a niche fenced off with partitions. Thanks to less draft and the absence of wind and temperature changes, the meat is cooked in its own juices.
Russian stove in a gazebo under a canopy
Such a project involves the development of a specific design, which should harmoniously fit into the overall interior of the site and fit well with the architecture of the house.
When choosing a design for such an outdoor Russian stove, you immediately think through the gazebo in which the new structure will be located. The project must comply with:
- the size of the area allocated for construction;
- fireproof materials from which it is planned to construct both the gazebo and the stove;
- other characteristics of the gazebo, allowing you to place a structure with a firebox and flame under its arches.
The gazebo should be spacious and beautiful. If desired, it can be designed with closing windows or rollable blinds.
Important!
Before building a gazebo, check out all the interesting and modern projects Date: September 25, 2022
Contents of the course being studied
If you decide to master the furnace business while taking courses, you must complete the proposed levels of training:
- elementary;
- base;
- in-depth.
Russian Academy of Crafts [ads-mob-1][ads-pc-1]
Stove maker courses
For example, the Russian Academy of Crafts allocates 72 hours to master each one. The entry level is focused on a detailed acquaintance with the activities of a master stove maker with training in the basics of the profession. Upon completion, the course participant will be able to consciously determine whether he needs further study or whether the choice of specialization was a mistake. As they continue their training to become a stove-maker, they will begin to comprehend the intricacies of the profession, and the benchmark in course preparation will shift towards increasing the number of practical hours. Other training centers may have their own standards.
The content of the course being studied in different organizations providing course services practically does not differ, since the skills of a stove maker have certain specifics. All study hours reflected in the program are divided into a theoretical block and a practical one.