To make clay crafts durable and strong, they must be subjected to heat treatment. You should not burn clay in a conventional oven or gas-powered stove - this is not only ineffective, but sometimes even dangerous (toxic substances can be released during processing). For such a procedure, you will need a special sealed oven that can be heated to the required temperature. Such a device can be bought in a store, but if you wish, and if you have good instructions, you can make a clay kiln with your own hands.
- 1 Technology for making a pottery kiln
- 2 Method one. Making a chamber stove from a refrigerator or washing machine
- 3 Method two. Making a stove without having a metal casing at hand 3.1 Video - wood burning stove
Classification of pottery kilns
Furnaces for firing clay and ceramics are primarily divided according to temperature conditions. The most powerful of them operate in the range from 1400 to 2000 degrees. The second category includes models whose operating temperature is 900-1400 degrees. Equipment operating in medium temperature conditions provides heating from 400 to 900 degrees. Low-temperature models can heat up no higher than 500 degrees. Of course, a stove with the ability to adjust the temperature will be most functional.
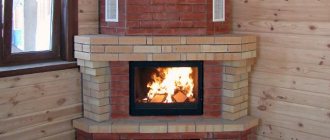
Depending on the fuel used, pottery hearths can be wood, gas or electric. Modern industry produces appliances powered by gas and electricity; wood-burning options can rarely be found and are only home-made. The combustion temperature of wood does not allow obtaining powerful high-temperature equipment.
Gas pottery kiln Electric clay kiln
The power of furnace equipment is one of the main selection criteria. For a small fireplace with a volume of up to 50 liters, 100 W per liter is required. If the chamber has a size of 100 to 500 liters, a power of 50-70 W per liter is sufficient.
The shape of firing furnaces can be bell-type, tubular with vertical loading or chamber with horizontal loading. Round kilns distribute heat evenly, while bell-type and chamber kilns are more convenient for serial firing and working with large products. Beginners are advised to pay attention to models with a viewing window that allows visual control of the process.
New-generation refractory raw materials, which are light in weight and have low thermal conductivity, are used as materials for the manufacture of pottery equipment. Heavy and massive equipment made of fireclay is practically never produced.
Precautions when working with clay
Remember to take some precautions :
- Study the instructions for materials and equipment.
- Remember that the oven you are using is hot and you need to be careful with it.
- Be careful when shaping the clay to avoid injuring yourself.
- Learn what chemicals are in everything you handle.
Many people get great pleasure from making ceramics at home, and in this article we tried to tell you how to do it. If you want to get into pottery and are worried about whether what you do will make the right impression on someone, then just don't think about it. Improve your technique and always create to the maximum of your capabilities, and you will end up with unique clay products that will create coziness and comfort in your home, add color and festivity to your everyday home environment, and emphasize your individuality.
Design features of an electric furnace
The design of the electric furnace consists of a heating chamber and thermal insulation that ensures temperature preservation. The ideal heat accumulator is fire-resistant brick, which 21st century craftsmen additionally insulate with modern materials, significantly reducing the thickness of the walls and simplifying construction.
Depending on the type of arrangement of the heating element, electric furnaces can be muffle and chamber. The structure of a muffle furnace implies the placement of a heating element around a container made of refractory material - it is more difficult to make such a structure yourself, and its heat loss is higher than in a chamber furnace.
Muffle furnace design
What should the ventilation be like?
In reality, manufacturing, or rather the process of firing ceramics itself, is not so beneficial to health. And then many can conclude that the stove has no place in the house at all. There should be a special closet for her. Many people think even longer that they pollute the air a lot and so on and so forth. But compared to other indicators of pollution, the emissions from such a stove are simply nothing to the air.
But for those who dared and brought the stove into the house. What kind of ventilation should there be so as not to cause harm. So, the room must be well ventilated, since the firing time is many hours and during this time there is a constant release of substances that are harmful to health. Ventilation options for a room with a stove for firing ceramics:
several open windows will help make air move and remove all odors and harmful particles immediately from the window;
a special design of the ventilation system (a hole with a fan in the wall itself, through which air from the street will be taken into the room and emissions from the stove will be removed);
Downdraft system and Updraft are special ventilation systems that craftsmen have thought out specifically for rooms where kiln firing takes place.
Here are many ways to help your hands not give up your favorite activity, and your health not to suffer from the harmful release of substances during firing.
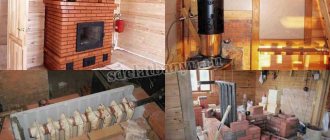
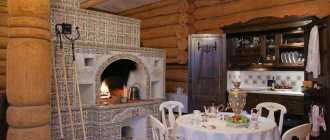
Electric brick kiln for firing clay products
This homemade clay kiln has a working volume of 13 liters. The open spiral allows you to heat the chamber to 1000 degrees in an hour and a half. In this case, the temperature of the external walls of the equipment does not exceed one hundred degrees.
The stand for the unit is welded from a 20*40 mm profile pipe and coated with enamel.
You can paint the metal base with hammer enamel
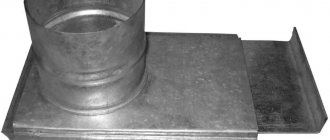
A sheet of galvanized steel 1 mm thick is attached to the top, screwing it with self-tapping screws.
Sturdy metal base
For the walls you will need a lightweight refractory brick - this can be ready-made fireclay brick or made in-house. For masonry you need a good fireproof mixture for fireplaces. First, the shape of the fireplace is laid out dry so that, if necessary, the parts can be adjusted and inconsistencies can be eliminated. This can be done on the table to make it more visual and convenient to work. At the same stage, grooves for the heater are prepared.
Dry assembly and groove preparation
The brick bottom is assembled separately, fastening the parts with mortar. Before continuing work, the structure must dry thoroughly. Before laying, the bricks must be soaked so that they do not take moisture from the mortar.
The first row is assembled on the table
A layer of thermal insulation is laid on the metal base; fire-resistant mats made of ceramic fiber are suitable for this purpose. In order to compact the thermal insulation layer as much as possible, it is wetted before attaching the brick bottom.
The base is ready
Next, the stove is placed as usual, but very carefully filling the seams and possible voids.
Laying the walls of the pottery chamber
The lid for the chamber is formed from refractory bricks, fastening the structure with a metal tie.
Brick cover
The heating coil, and here there are three of them, is placed in the prepared grooves. The outside of the unit is insulated with fire-resistant mats, after which it is covered with a galvanized steel casing, cut to the size of the resulting product.
Chamber after firing Finished brick pottery kiln
Building this oven requires not only bricklaying skills, but also electrical knowledge. If your own experience is not enough, it is better to contact a specialist for full or partial help.
How to choose the right camera size
Which oven to choose based on the size of the chamber. Someone immediately thought, the more, the better and immediately passed it by. In fact, it's better to speculate a little. Estimate how much work is approximately being done and how much will be offended at one time. If you buy one that is too small, the firing time will make any ceramist nervous. The work will be idle and deteriorate. This will also happen if the size selected is too large. The energy consumption will be enormous, but only a small part will be fired. The master will begin to put several works aside, which will wait their turn, when at this time I could already paint the finished works and cover some with glaze.
Basic moments
The instructions for the muffle furnace are quite long, it is difficult to describe the entire process, but it is worth highlighting the main points.
The best option is to have an old steel oven casing on hand, as it already has everything it needs to become an acceptable oven casing. All the thermal insulation is there; you just need to get rid of unnecessary plastic elements, if any. Next comes the heating element, which is key.
It will determine the heating temperature, which means the quality of the ceramic products. Such an element will be previously prepared nichrome wire with a thickness of at least 1.5-2 mm. Then follows the process of arranging the thermal insulation of the furnace. To do this, the body must be lined with fireproof fireclay bricks. The entire structure must be additionally covered with basalt wool on top.
The price of a ceramic kiln starts from 40,000 rubles and can reach up to 700,000 rubles.
fb.ru
Good time. This morning was really good. The sun was truly spring. It’s warm.. And the first thing I decided to do was... plant onions. It's really unexpected. Don’t make a stove, but plant onions on the greens. Crazy old man, I myself was surprised at my reckless courage. After all, it’s March 7th. But you shouldn’t blame me indiscriminately. I was led to this decision. First, onions in the underground - which have already sprouted. It would be a shame to throw it away, because no matter how little, 3 bags will rot. Second, to my surprise….. sprouts of young onions appeared in the garden, which had not been harvested since the fall… I planted everything, and began to wonder, scratch the top of the head.. What else could I create?. So I went to get some bread. I walked the dog, I have a noble one - with the name Goddess, if translated from Sanskrit. On the way, I told the electrician everything I thought…..and no, he can’t open his mouth. And if it happens, I’ll close it for him myself and sprinkle some earth on him... He confused the phase with zero... It was a good day! The thermometer showed +20 degrees. Looking at it, my thoughts drew a parallel between degrees and a thermocouple. We need to make a kiln. Project kiln for firing ceramics, day 3 continued under the link..... Using my miracle markings, I marked the barrel for drilling holes for fastening buttons. In the bottom half of the oven, around the entrance (where the burner is) and around the top edge. That is, it turned out, if you look from the side, one line from the edge. Because I think it will be enough. In the Upper half it is also the stove lid, around the outlet, along the edge of the lid, and on the side, in a circle from two edges. Now about cutting out the thermomat. The diameter of the barrel is 60 cm. It’s lucky, because the width of the mat is 60 cm. This means that the circumference of the barrel is 180 cm. I need 3 layers of 60 cm each for the bottom and roof. I cut 180 cm and fold it into a square. You need 2 such squares. But first you need to make the walls. I cut another 360 cm, fold it in half to make a strip 360 x 30 cm and roll it out along the wall. It turns out 4 layers with a slight overlap. Which was cut on both sides and set into each other. Like layers in a Napoleon cake. In total, the total thickness of the layers is 8 cm. The same procedure with the lower part. All this will be sewn with buttons. Now lining the top of the lid or how to fit a square into a circle. Of course you could cut the edges in a circle. But the small, domestic, amphibian pet fiercely grabbed its throat, screaming about the inadmissibility of wasting a valuable resource. I had to bend the edges into the inside of the barrel. It turned out beautiful and weighty. Below is another song. Since I planned to lay an additional layer of fireclay brick there, I had to cut circles out of felt. Cried and cut. Remembering hedgehogs and cacti. Well, the time has finally come to attach the buttons with nichrome wire. And then I realized that I had forgotten where she was. …I searched, searched, searched, searched…. And that’s it….I found a fur-bearing animal…. Now you have to wait until the end of the weekend to buy a spiral for the stove..... Don't tell me until you jump over. Happy holiday dear women..
vk.com
Iron
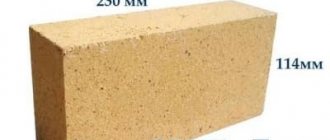
The volume of the oven's internal space is approximately 147 liters. The vault is domed to avoid the occurrence of stagnant zones at the top of the furnace. The supporting frame is a corner 45x45. Sidewalls, doors and arch - sheet iron 2 mm. Door arch - strip.
Lining
The dimensions of the furnace are multiples of the dimensions of lightweight fireclay bricks ШЛ-0.5, standard size No. 5. Brick dimensions 230x113x65. In the photo it is white. Yellow ones are some other refractory brick with slightly different dimensions. But for my needs this is not important. If necessary, I will make everything from ShL-0.5. Since lining a door with bricks is another task, so for lining the door I used a Cerablanket mat (blanket) from the Sukholozhsky plant. Fire resistance up to 1260 gr. (In practice, withstands the direct flame of a gas burner). Sold by the meter in rolls 610 mm wide, thickness from 13 to 50 mm. I would like to warn you against some ambushes that may await you when making the lining. First of all, I want to warn you if you are tempted to use asbestos. Yes, it melts at 1500 degrees, but at 800 degrees it loses chemically bound water and turns into powder. Therefore, products made from it, such as cardboard or cord, can work up to this temperature.
Regarding the use of fibrous materials on a mineral (basalt) basis, I will repeat what I wrote on one of the forums. It's almost the same thing. Produced by melt blowing. Holds temperature well. But they have a binder that will not withstand even 250 degrees. But on the Internet, cunning sellers cite the fire resistance of the fiber itself. Formally, they are right. But they don’t write that after the first calcination the binder will burn out and they will fall off in a heap. There are varieties with a refractory binder, but there is very little information. Only indirect signs - for example, intended for baths and fireplaces. And again the fire resistance of the fiber itself is tested. So if there is a risk of flying, it is better to use already tested ones. And of the ones I tested, mullite-silica felts are most suitable, for example, MKRVKh-250 (1300 g) and this Cerablanket. Since mats still had to be used for the door, the vault was also made from it. If necessary, I will lay out everything with an SHL brick, since the camera is already sized for it. The mats are attached to pins made of stainless electrodes. One end is sharpened, the other is welded to the furnace wall with a stainless electrode. The holders are pieces of stainless steel sheets with cross-cut slits.
Burners
The burners are taken from those I described earlier. On the right is a small burner, which I have called a 1/2-inch stationary corner burner. On the left is a 3/4 inch corner stationary burner. Their use was not calculated by some scientific method, but was stupidly selected from practice. With a small burner I heat up to 340 degrees, with a large burner I can heat it up to 620 degrees, and with both burners running I can easily heat it up to 730 degrees. I don't need anymore. If you need more, there is nothing stopping you from adding two larger ones.
The burners are placed diagonally. When they operate, hot air swirls in the chamber counterclockwise. This allows for a more uniform temperature distribution throughout the chamber volume. Opposite the burner nozzle, on the opposite corner are triangular bumpers made from scraps of ShL brick. To introduce the flame inside the furnace, it is better to use sleeves, whatever you can find. On my right is a sleeve made from a piece of mullite-silica MKR tube. On the left is from a piece of stainless pipe.
Gas supply can be solved in any way. In the photo, using a half-inch pipe and the same ball valves (view from the bottom of the muffle body). The structure is attached to the furnace body and to the panel. The handles are brought out through the panel. Don’t forget to draw where to close, otherwise you will turn in the wrong direction in the heat of the moment