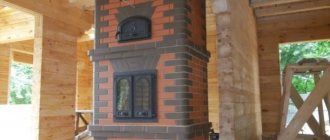
Despite the huge number of modern heating devices, stoves in the house do not lose their position. However, brick buildings of the 21st century differ in many ways from their predecessors - bulky classic Russian stoves with a large stove bench and very limited heat transfer.
One of the most effective solutions is the Russian stove with a stove - more compact and suitable for heating both a country house and a building for permanent residence. We suggest considering the diagrams and arrangements of the model with a slab, which you may need if you decide to start building it yourself.
Problems when building a mini-oven with your own hands
Amateur stove makers, due to inexperience, make mistakes, which then lead to problems. Let's look at the most common cases:
- Laying stoves with deviations from the design. As a result, there is no normal draft in the smoke ducts, and the walls heat up unevenly. The solution to the problem will be to disassemble the stove and lay it according to proven schemes.
- Laying stoves “by eye”, without using a level, frame, plumb lines, or rules. The device warps, the center of gravity shifts, and during operation the device collapses faster.
- Incorrect preparation of the solution. The masonry is cracking and crumbling. A temporary solution to the problem is to purchase a factory-made mixture and seal the cracks with a new solution. If the masonry cracks constantly and deeply, the stove will have to be moved.
- Firebox of a freshly built and wet device. This will lead to cracking of the masonry, which will need to be covered with mortar.
Preparation for work
For laying a stove with a stove, different types of brick are used. Usually they take red solid one for external masonry and fireclay - to make the internal lining of the firebox, as well as the smoke well.
The foundation is poured with concrete mortar. To prepare it you will need cement of at least M400, preferably M500. The sand can be river or from a quarry, but it must first be sifted to prevent the ingress of impurities. Clean water should also be used. For the solution, you should also take granite crushed stone about 30 mm.
The foundation is backfilled using rubble granite, a suitable fraction is approximately 300 mm. In addition, you will need to prepare a solution of red clay and sand.
Instead of clay, you can purchase clay powder; the instructions for using it are indicated on the package. All components must be of good quality; the integrity and service life of the future stove depends on this. To seal the joints, you need to prepare a high-temperature sealant.
The work is carried out using ordinary construction tools.
You may need:
- containers for mixing the solution;
- Master OK;
- Bulgarian;
- plumb line;
- level;
- roulette;
- rule;
- mallet;
- furnace hammer;
- other devices for processing and laying bricks.
To make a high-quality solution, it is better to use a hammer drill or drill with the appropriate characteristics, as well as an attachment designed for these purposes. A shovel and a sieve will come in handy.
Types of furnaces
Based on the principle of operation, there are several types of brick kilns:
Russian – Large and multifunctional. It has an open firebox, which is closed with a damper; the chimney runs along all the walls of the stove. In addition to heating, you can cook any food in a Russian stove.
The disadvantage of the Russian stove is that it needs to be constantly heated, since when cooling, condensation forms in the stove, which remains on the bricks and the bricks crack the next time they are used.
Also, a Russian stove requires constant cleaning of the chimney.
Dutch - a stove with a vertical chimney. It has small dimensions and a fairly low price.
Bell-type - have wide straight channels. The smoke rises and lingers until it cools completely. Then it goes down, heating the walls of the furnace. The advantage of such furnaces is their low cost, simple design, and fast heating.
Possible difficulties and problems
When building stove walls, inexperienced craftsmen do not use a frame made of wooden beams and a plumb line, which leads to the walls deviating from the vertical.
If during the construction process a distortion of the walls is discovered, the masonry should be dismantled and repositioned.
After finishing the work and natural drying, the mini-oven begins to be heated with small portions of firewood.
In this case, the stove walls become covered with cracks due to the fact that shrinkage processes are taking place in the heating structure. To eliminate cracks, dilute the solution and cover the seams.
a07ff0f2bc47417ca4e38dc4d992141a.jpe
Improper sealing of the door fasteners can cause the door to move. To avoid skewing the door, do not leave it open until the fasteners are completely sealed into the seams. If displacement is discovered during construction, the rows are dismantled and the fasteners are sealed again.
Preparatory work
Before you start building a Russian stove, you should make sure that everything you need is available.
Selecting a location
A lot depends on the choice of place to build a furnace. It is necessary to maintain a gap of 30-40 cm to walls made of flammable material or provide them with protective cladding with asbestos. Gaps will also be required for access to the outer walls of the stove for the purpose of inspection and repair.
A heavy unit weighing several tons requires a solid foundation (foundation) protected from ground moisture. A place is provided in advance where the chimney will pass through the ceiling and roof. There should be no ridge or rafters here.
Masonry tools
Basic working tools for a stove maker:
- a narrow trowel (trowel) for laying mortar and cleaning excess from seams;
- a hammer-pick to give a solid brick the required shape;
- building level and plumb line.
To mix the solution you need a shovel and a container.
Stove maker's tool
Now cutting bricks into wedges, removing corners and grinding the cladding is done with a hand-held power tool (grinder) with diamond wheels. This greatly simplifies the work of the master.
Necessary materials
Basic materials for constructing a reliable fireplace: brick and refractory mortar
Their quality is given close attention. You will also need: cast iron for doors, dampers, latches, grates and a hob
Brick selection
The correct selection of bricks for the job is a key factor in the efficiency of thermal output and the long service life of the future fireplace. Therefore, it makes sense to purchase red clay bricks of the M150-M200 brand only of the first grade. Hollow material is unsuitable for stove masonry.
Bricks with obvious signs of defects are also not suitable for such work:
- non-compliance with the standard (230x125x65 mm), to which all standard orders are oriented;
- with traces of burns, warping, shape and surface defects;
- with shells after the release of gases;
- having cracks and burrs from cutting.
Special grades of premium quality bricks, called hearth bricks, are sold individually and are ideal for laying stoves.
Foundation
The base of a heavy furnace is placed on a concrete foundation, which is cast over a compacted crushed stone bed in a hole up to half a meter deep. Horizontal waterproofing from groundwater is made of 2 layers of roofing felt on bitumen mastic.
Masonry mortar
The requirements for a solution suitable for furnace work are seriously different from the usual ones.
The material is required:
- resistance to high temperatures;
- coefficient of thermal expansion as close as possible to that of masonry bricks.
Refractory mixture for laying stoves
Since the quality of the clay plays a leading role here, it is better to buy a ready-made dry mixture at a hardware store.
Checking the quality of clay
The suitability of clay for stove masonry can be checked using a folk method. From the solution, make a spherical lump the size of a child's fist and slowly squeeze it between two planks. If the clay is of high quality, the lump will crack only after being compressed to half its size. Skinny, unusable clay does not deform at all, and material of average condition will burst after being compressed by about a third.
Preparation of the solution
To prepare the solution, you need to stock up on a suitable container, as well as a sieve with 3x3 mm cells. To work with the mixture you will need a shovel, a drill mixer and a small board. The solution will include water, sand and clay. The harvested water must be clean, without the smell of mold and with a minimum amount of mineral additives.
If the tap water in your area is contaminated, try to bring it in advance in the right quantity. Its volume depends on the number of bricks that the masonry will contain: for example, for every hundred there are from 15 to 20 liters of liquid. The solution requires fine sand. It is sifted through a sieve to remove pieces of crushed stone and gravel. In addition, you need to purchase high quality clay: the strength of the solution depends on it.
Preparation of the mixture begins by mixing water and clay in such proportions that the mass is not too liquid, but not too thick, homogeneous mass.
After it becomes plastic, add sifted sand in a ratio of 1 liter per bucket of water. You can check the readiness of the solution by lowering a board into it: the thickness of the mixture adhering to it should be at least 2 cm. When the desired result is achieved, stop adding sand.
Main manufacturers
If you decide to buy a cast iron hob, contact a specialized salon or use an online store. The minimum price for a product is 500 rubles. It depends on the size, material and manufacturer. The most common sizes are slabs of 34*41 cm, 71*41 cm, 58.5*34 cm, 66*41 cm, 51*34 cm.
The most popular and sought-after foreign manufacturers include the Finnish brands Pilsa and HTT. But domestic manufacturers also produce products that are worthy competitors to foreign ones. These are the trademarks NMK, Litkom and SibStalShar, which create durable, high-quality models with an attractive design.
Buslaevskaya stove: projects
projects of houses with a stove For installation you will need the following materials:
- doors - firebox (0.2x0.25 meters), VK (0.39x0.5 meters), blower (0.14x0.14 meters);
- refractory - 43 pieces;
- solid brick – 382 pieces;
- oven-cabinet 28x33x50 centimeters;
- cast iron stove 0.7x0.4 meters with burners (removable rings of different diameters);
- valves - steam exhaust (12x13 centimeters) and smoke (12x25 centimeters);
- grate - grate 30x20 centimeters;
- corner - three equal-flange blanks 1 meter long and 45x45 millimeters in size;
- steel - piece 0.3x0.28 meters;
- strip - 4 pieces of meter (4 graph paper), 0.25 meters (2 graph paper), 0.35 meters (3 graph paper);
- cast iron plate – 0.4 x 0.25 meters; 40x15 centimeters.
Projects for brick stoves of this type look like this:
- Full row.
- Blower door.
- Window opening for cleaning.
- The bottom of the oven is lined with refractory, three sides are lined with iron.
- Installation of the combustion door, grate, refractory under the firebox, cleaning cover, ash door.
- Installation of DS.
- Laying refractory on the edge around the door.
- Laying according to the scheme.
- The oven is top coated with clay (1 centimeter), the heater is covered, and a stove with burners is attached.
- Installation of smoke circulation with cleaning windows, the stove is not laid. Subsequently, the brick is placed on its edge.
- The cleaning is overlapped, channels are created, and 25-centimeter strips are laid.
- The cleaning is completed and the fastening wire is installed.
- The cap is installed.
- Installation of the VK ceiling, while the hoods remain.
- The stoves are laid out according to the diagram.
- The small stove ends in sheet iron, the masonry is done in the same order as a brick stove.
- The cleaning hole of a large stove is laid out, the edges of the side walls of the channels are cramped.
- Laying protrusions.
- The projections are duplicated and the corner is installed.
- The BP chimney is closed in the same way as row 19.
- A three-row neck is made, the size of the chimney is reduced to a section of 26x13 centimeters for the top valve.
- A chimney is created with grooves on this and subsequent rows.
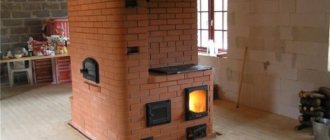
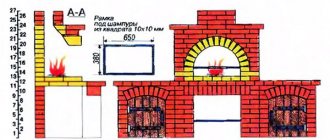
Kitchen stove with oven and hot water box
To lay a kitchen stove with an oven and a hot water box measuring 1290x640 mm, the same materials are required as for the previous stove. Additionally, you should purchase a water heating box measuring 510x280x120 mm.
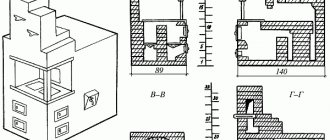
The figure below shows a general view, a horizontal section along A-A and a vertical section along B-B of the slab.
Kitchen stove with oven and hot water box: a - general view; b - cuts. Definitions: 1 - firebox; 2 - cast iron plate; 3 - oven; 4 - water heating box; 5 - smoke valve; 6 - ash chamber; 7 - angle steel trim
A kitchen stove with an oven and a hot water box is placed in the same order as a kitchen stove with an oven. The only difference is that after laying the third row, instead of a brick partition, a water-heating box in a case is installed on the edge between the oven and the vertical channel. The height of the hot water box should correspond to the height of four rows of flat brickwork. The rest of the masonry is completely similar to the masonry of a kitchen stove with an oven.
Where is it more efficient and safe to place a small-sized stove?
In order for the heating stove to efficiently release heat, it is placed in the middle of a one-room dwelling or built into interior partitions. Small heating and cooking stoves are placed in the center of the kitchen or against the wall.
The heating structure will be safe if the ceiling is properly cut. A spark arrestor is placed on the chimney.
The combustion chamber is a source of increased danger. The stove is placed so that coals and sparks do not fall on walls, doorways, or furniture. If necessary, walls are protected with non-combustible materials (flat slate, ceramic tiles).
Interior of a village house with a stove
The method of designing the stove structure depends on the chosen design trend. Finishing materials will determine its appearance.
Tile
If you want to create a luxurious atmosphere in a rustic kitchen, the stove can be refined using tiles - special ceramic or clay heat-resistant tiles created specifically for finishing stoves. The unique shape of the tiles makes them easy to install, and the unique pattern will allow you to create a delightful design, unlike others. In the 19th century in Rus', tiled stoves were in fashion among the upper strata of society and were considered an indicator of prosperity and luxury.
Ceramic tiles heat up quickly and retain heat for a long time
A more affordable option for designing a stove structure is to use tiles. It can be of any shape, rectangular, square or imitate various natural fibers.
Tiles will help create a unique stove design
Design of a stove in a private house, decorated with tiles
When choosing tiles, you need to choose fire-resistant samples that can easily withstand high temperatures and have a dense structure. Thanks to these properties, they will last a long time and will not require cosmetic repairs.
Very often, tiling is carried out only in the part where the fire is ignited and maintained.
Stone
Upgrading the surface of a Russian stove with stone allows you to get a unique rustic interior with an antique accent. This option is quite labor-intensive and requires significant financial investments. But by spending time and money, you will get a unique design that will delight more than one generation of your family.
A stone stove will become the main highlight in the house
Plaster
When designing the kitchen of a private house in rustic, Provence, country or Russian styles, plastering with clay mortar is an excellent way to finish the stove. After it hardens, heat-resistant paint is applied to the surface. With its help, the stove can be decorated with an original ornament, ideas for which are suggested in the following photos.
Decorative plaster gives a Russian stove a special charm. It will help you recreate any pattern you like on its surface. The following selection of photos will convince you of this and inspire you to create an extraordinary design.
The rustic style almost never completely went out of style. Even having their own huge dacha, stuffed with ultra-modern equipment and perfect, economical heating devices, people strive to build something on their site in the old style - a small gazebo or sauna. But many, having acquired a country house, want to completely transform it, turning it into something like an old Russian hut with a real stove.
Schemes of small brick stoves
Compact stoves do not take up much space, which is especially important for small spaces. Heaters have a rectangular cross-section at the base
The height of the stoves depends on the height of the building and the chosen model. A brick chimney is often replaced with a factory-made steel pipe.
Heating and cooking mini-oven
In small stoves designed for heating the home and cooking, a niche for the stove is built in.
An oven or water heating container can be built into another niche located above the firebox. Niche space is often used for drying things.
bbf7fb962a830ba83a9417eeb9ffbf86.jpe
b906bdd2e27548d30c2db6edec3f39da.jpe
Let's consider a specific diagram of a compact stove with a base size of 0.64 x 0.51 meters (2 x 3.5 bricks) and a height of 2.15 meters (32 layers of masonry).
This heater model is designed to heat small and medium-sized houses with an area of 25 to 40 square meters. Ceramic solid (ordinary) brick is suitable for masonry.
The oven is built in the kitchen (in the middle of the room or against the wall). The furnace of this model contains the following structural elements:
- combustion chamber;
- blower;
- smoke ducts;
- hole for cleaning smoke ducts;
- hole for building a chimney;
- niche with cooking floor;
- niche for installing an oven or hot water tank.
Metal elements for the heater are purchased at a hardware store. The list of factory parts includes:
fire door measuring 20 x 20 cm (solid cast iron or with fireproof glass in a metal frame);
Photo 1. Fire door measuring 30 by 30, made of polished cast iron and fire-resistant glass. It is possible to regulate traction.
- door for the blower (14 x 14 cm);
- 2 doors for cleaning smoke ducts (20 x 14 cm);
- grate (45 x 25 cm);
- cooking floor measuring 20 x 35 cm (with or without hole);
- 2 valves;
- steel corner profile 50 cm long (attached between the firebox sheet and the stove wall);
- pre-furnace metal sheet measuring 50 x 60-70 cm.
The oven and hot water tank are welded from steel sheet. Asbestos cardboard of the same size is placed under the firebox sheet. For furnace work you will need:
- 222 units of solid red brick;
- ready-made masonry mixture for fireplaces and stoves (or a solution of sand and ordinary clay taken locally in a quarry).
Small heating device
Let's consider a specific heater circuit. The base of this model has the shape of a rectangle measuring 0.89 x 0.51 meters (2.5 by 2 bricks). The height of the stove is 2 meters 38 cm.
Compact dimensions allow the heater to be installed in a corner or in the center of the room. If the dacha has a kitchen and a couple of living rooms with a total area of up to 40 square meters, the heater is built into the wall openings (interior partitions).
The main elements of this model:
- firebox;
- blower;
- smoke channels;
- outlet to the chimney.
A door with heat-resistant glass in a metal frame or a solid cast-iron door is built into the firebox portal. The furnace is built on a solid foundation buried in the ground. The foundation is made solid or columnar.
Important! The stove is made of ceramic and fireclay bricks. The firebox is made of fireclay bricks, and the lower and upper parts of the heater are made of ceramic bricks.
The masonry is done using sand-clay and fireclay-clay mortars.
Overview of cast iron decking
The most popular are Finnish models. But domestic production also produces decent and high-quality goods.
- Pilsa (HTT) Plate 3A. Material: cast iron. Black color. Size: 985 x 650. Diameter of burners: Ø 32, 393 mm. Weight: 51 kg. Price – from 49 thousand rubles.
- 2-burner stove “Russian casting”. Cast iron stove 710x410. Weight: 25.08 kg. Price – from 3000 rub.
- 2-burner stove "R". "Furnace casting Russia". Cast iron stove for oven 700 cm by 400 cm. Weight: 25 kg. Price from 3 thousand rubles.
- Cast iron stove for cauldron H2521 “HALMAT stove casting”. Dimensions: 505×455. Weight: 21 kg. Price from 15,000 rub.
- PLATE 5A SVT 301. Manufacturer: SVT. Dimensions: 460 x 700. Price 0t 17,000 rub.
Types of stoves
In the past, houses were built “from the stove”, that is, it was installed first, and then the walls and ceilings were erected. Nowadays, it is not necessary to do this, but it is advisable, especially when you plan to position the stove in such a way that it heats several rooms at once.
454581eb825c7405a99754f8687d5b66.jpe
9c05dcdd6e25fb34fe8fcae867d33ffb.jpe
72d6731b9b342a72d16bb6ae4cf3b6f7.jpe e1cf46657f7d139dbcb2f33aebb6bdc3.jpe
The most common types of stoves are Russian, Swedish and Dutch. At the same time, the Russian one must be erected before the construction of the house begins, and besides, it requires a separate foundation. In general, any kiln consisting of 500 bricks or more needs a foundation that is separate from the base of the building. It's easier with Dutch and Swedish ovens. They are compact, can be installed in an already constructed building and do not require an additional foundation.
There is another wood-burning stove - a bell-type stove. Its advantage is its efficiency, reaching 70% compared to 50% for other types of furnaces. The disadvantage of such a stove is its complex design, which makes it almost impossible to assemble it with your own hands. Also, the stove cannot be equipped with a hob - the design is intended exclusively for heating premises.
Characteristics of cast iron stove
The hob is installed horizontally on the stove.
The hob is installed on top of the horizontal plane of the stove. It is made by casting from gray cast iron grade SCh 15-20. This durable and fire-resistant metal is an iron-carbon alloy, which also includes silicon, phosphorus, manganese and sulfur. These impurities significantly increase the physical and chemical characteristics of the metal.
The cast iron hob for the stove has the following qualities:
- Resistance to temperature changes. The product does not deform if you follow the instructions for use.
- Anti-corrosion characteristics. Immediately after casting, the panels are coated with a layer of rust, making them resistant to corrosion.
- Heavy weight. Cast iron slabs are heavy, which gives them stability.
The quality of the product is subject to such requirements as evenness of the surface, absence of scratches, chips and other damage.
Basic concepts for making your own brick kiln
To lay the furnace, you can contact specialists. But to save money, you can make a brick oven with your own hands. This will not be difficult even for a beginner, as it does not require special knowledge.
First you need to choose the type of stove, then find a masonry diagram. There are many DIY brick oven designs on the Internet for every taste.
After the scheme has been found, it is necessary to make a foundation. It should be slightly larger than the oven itself on each side.
The chimney is also made of brick. After completing the laying of the stove, you can line it with finishing materials to give it a beautiful look.
It is also very important to choose the correct installation location. If the stove has a cooking function, it is better to install it so that the cooking part is in the kitchen and the heating part in the living room.
Conclusion
A cast iron stove stove is an excellent option for cooking and heating the room. A large selection of these products will satisfy even the most fastidious buyer.
Cast iron material is characterized by heat resistance, durability, and ease of use. A high-quality cast iron stove will serve you reliably for several decades.
But its purchase should be made in a specialized store. Experienced consultants will help you choose between a prefabricated or solid slab, and will also select the right size at an affordable price.
Attention must be paid to the quality, absence of defects and weight of the product. You can even install this flooring yourself. To do this, it is worth considering only a few nuances.
When melted and used, cast iron decking will remain in its original condition throughout its entire use. It will become not only a functional item, but also a decoration for your interior.
Russian stove: drawings of brick stoves
Russian brick stoves To lay the stove you will need the following materials:
- solid red brick – 1610 pieces;
- view for a valve measuring 0.3x0.3 meters - 2 pieces;
- dry clay solution in dissolved form;
- samovar 14x14 centimeters - 1 piece;
Heating stoves for a brick house - we do it ourselves. To work, you will need the following tools:
- trowel – for laying and leveling the mortar;
- pick - a multifunctional hammer with a blade located perpendicular to the axis of the handle. At its other end there is a square windshield;
- bubble level for masonry and hydraulic for the first row;
- rule - serves to align the bricks of each row;
- plumb lines - one of them must be permanently attached to the axis of the chimney (floor), and with the help of the second the verticality of the corners is checked;
- brush – needed for grouting joints;
- cord - it is pulled over each row of masonry.
Drawings of brick stoves for any type of home look like this:
- Cooking chamber. For masonry, 3/4 ground corner bricks with locks are used.
- Under. There is a slope from the back, for the purpose of which the space is filled with sand, on which the brick is laid.
- Covering the bottom. The structure is covered with bricks along rods, corners or sheet blanks.
- Vault with a castle. In some cases a central lock is used, in others the last two symmetrical bricks are used.
- Rows to the lower arch. The bricklaying of the stove is carried out in the usual way, then a vault template assembled from chipboard or springs cut from wood are installed on top of it.
- Wells. They are tied rows in which a hole is left leading to the underside.
- Sub-bake. Bricks are laid on a foundation mortar; hollow stones are not allowed.
- VK code. For convenience, the bricks are cut into a wedge-shaped shape.
- Covering the channel above the samovar. It is solid, only solid stones are used.
- The holes above the pole become smaller. The brick is cut in accordance with the drawing.
- Alignment of walls. At the same time, the over-pipe is reduced and the samovar channel is laid.
- Installation of a samovar. The structure is closed with a separate lid.
- Installing a view. To embed the structure, two rows are laid.
- Chimney. The height of the pipe from the bottom to the top must be at least 5 meters. The upper rows form a canopy that prevents precipitation from entering the chimney.
Stove models
When existing brick stove designs are considered, attention is paid to the features of each design. After all, you can fold the device with a complex or simpler internal configuration of smoke exhaust channels. The final decision is always made on an individual basis. That is why it is recommended to contact specialists in order to avoid mistakes at the initial stage.
A brick heating and cooking stove can be manufactured in the following options:
- T-shaped and have a massive structure.
This stove is often placed in the middle of a large room. This arrangement allows you to divide the room into separate zones. In addition, a T-shaped stove can be placed between two or even three rooms. This location option will allow you to effectively heat 2 or 3 rooms at once.
T-shaped brick heating stove Source remontnik.ru
On a note! The T-shaped model is an ideal option for a medium-sized private residential building.
- A narrow design in which the hob protrudes from one side.
These types of stoves take up less space in the premises. At the same time, they have a simple design and are installed to heat a maximum of two rooms.
A brick stove in which the hob protrudes from the left side Source iz-kirpicha.su
On a note! Narrow stoves with a protruding part are often heated with dry branches, created in country houses and placed between the kitchen and living room.
- Heated protruding bed, aesthetic appearance and medium size.
Such brick stoves for a home with a hob are smaller than full-fledged Russian heating structures. At the same time, they provide owners with the opportunity to use a large number of functions. Usually in these stoves the hob is located in a built-in chamber. It is convenient to prepare a variety of dishes here.
Some models have an additional built-in camera. It will allow you to bake homemade bread. There are also options with an upper chamber, intended, for example, for heating dishes or drying vegetables.
Stoves with a stove bench and hob are equipped with doors that are entirely made of cast iron or have glass filling. The size of this element can be large, which will allow the structure to be used even as a fireplace. At the same time, any family member will always be able to relax in a warm bed, since the design of such stoves includes a bed, under which there are channels for flue gases.
Brick stove with heated stove bench Source pechiexpert.ru
- Open or closed fireplace fireplace.
This brick heating and cooking stove can be placed in the middle of a residential building. With this arrangement, the fireplace will be located, for example, in the bedroom or living room, and the hob will be in the kitchen. If the stove is placed in the middle of the house, then the entire floor will be filled with heat from the structure. Even the rooms located behind the rear stove wall will be heated.
Modern versions of stoves are most often designs that are simultaneously equipped with a “summer” operation and the ability to work exclusively in warm weather. This device will allow you to save fuel by using only the stove in the summer. At the same time, in warm weather the entire structure will not heat up completely. Therefore, the premises will have a comfortable atmosphere. After all, people in the rooms of the house will not have to endure the heat of the stove in the summer.
Original stove with fireplace insert and hob Source dompech.ru
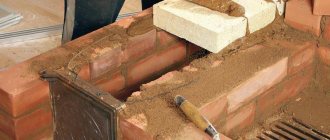
Laying the furnace in order
During masonry, special attention will have to be paid to the strength and evenness of the surface. So, there should be no excess mortar or voids in the seams, and all channels from the inside should be perfectly smooth
In this case, they bandage it into half a brick.
Swedish stove stove When laying a Swedish stove with your own hands, special attention is paid to the cross-section of the smoke channel. It must remain unchanged throughout the entire laying of the furnace.
Otherwise, even with minimal narrowing, flue gases may escape into the room.
Once the first row is ready, you can install the blower door. Further work will be carried out based on the chosen order. To form the internal space of the main elements of the furnace, including the blower, the bricks used for them are somewhat cramped. Already on the next row the doors can be closed.
50e706ce2b402c827a19ce0e27a05ae1.jpe
Operating principle and design of the Swedish oven
The compact dimensions of the stove (1020x885x2030mm) allow it to be placed in a small country house or dacha. But despite its small size, these dimensions of a Swedish stove are enough to effectively heat a room of 30-35 square meters.
Depending on the type and type of Swede, the designs will vary. So, for example, to equip a Swede with a sunbed, it is necessary to equip horizontal channels with a winter/summer mode. Thanks to a special valve, which is installed in a straight vertical channel, it is possible to block the latter.
In winter, such a valve closes, and the heat moves in a large circle, warming up the entire stove along with the sunbed. And in the summer, the damper opens a direct outlet for warm air into a vertical pipe through which the gases escape outside. This makes it possible to use only the hob and oven without heating the room.
Swedish stove
The “Dutch” design was taken as the basis for the Swedish stove. This model was already very popular, but it did not allow for effective heating of the room, and the fuel consumption was too high.
Taking into account the harsh climate of Scandinavia, the developers improved the “Dutch” model and added a hob with an oven. Thus, elements were added not only for cooking, but also for heating water and drying clothes.
Whatever the design of the stove - with a sunbed, with an oven or just a stove - the principle of its operation will be the same: channel, like the “Dutch”.
Swedish: scheme
The metal oven is located on the side of the firebox and is designed to directly transfer heat into the room. But cooking and baking is not the main function of the oven.
After lighting the wood, it warms up in literally 5 minutes. The figure shows why the oven heats up so quickly.
Swedish design
Before going down, combustion products heat the oven in the top and sides. On the other hand, the stove is heated by the firebox. The stove warms up from the firebox, heating the room itself.
The upper part was originally designed for the purpose of drying clothes; it is heated by the stove and the ducts running behind it. The channels, going around the entire oven, go into vertical channels and transfer heat to things that are hung out to dry.
How the Swedish oven works
The design of the Swedish stove is the result of improved engineering. Unlike Russian and Dutch stoves, it has a more complex device with high efficiency. It has significantly greater thermal power and heat transfer.
If we take the same amount of material and fold the “Dutch”, we will get a power of 2500 kcal/hour, while the Swede will produce all 3500 kcal/hour. In this case, it will be enough to lay only 2 portions of firewood per day to keep the house warm.
Swedish woman in a modern interior
If in Scandinavia the Swedes were traditionally installed between the kitchen and the bedroom so that on a cold winter night it would warm the room, today in stylish and modern houses you can increasingly find a stone structure that stands between the living room and the kitchen.
At the same time, it performs a double function: it serves for cooking and is the main decorative decoration of the living room. On one side it can be equipped with an oven, and on the other with an open fireplace, decorated with an openwork forged damper.
Swede with fireplace
The high efficiency and efficiency of the stove is due to a complex smoke exhaust system, which allows rational use of the heat generated by burning wood. One of the undeniable advantages of the design is the ability to create winter and summer versions of the stove.
The fact is that each type has its own smoke path. This makes it possible to cook food in summer without heating the room.
Many summer residents are familiar with the situation when, at the beginning of the heating season, when lighting the stove, the room begins to smoke. There is also a separate smoke exhaust system, which allows you to effectively use the stove with different functions in both winter and summer.
Selection of bricks and heating elements
For the construction of passages and heated elements of the furnace, refractory bricks are used. Ordinary brick is used to furnish parts that are not exposed to high temperatures. The dimensions of any type of brick are 250 mm in length, 120 in width and 65 in height. If necessary, brick blocks are broken.
Thus, a distinction is made between a three-quarter brick, the length of which is 3/4 of the whole, and a half-brick - with a length cut in half. Very small pieces of brick, equal to 1/4 of the whole, are called quarter bricks. The cutting of the material is carried out using a sharp steel knife and a squeegee - cutting a metal pipe. To build a furnace, you will also need metal elements, including:
- a door for the firebox, a door for the blower and a door for cleaning passages;
- view valve;
- grate
All listed details must be comparable to the dimensions of the brick blocks. The stove is waterproofed using roofing felt. The length of the sheets of this material depends on the dimensions of the structure. This factor determines the number of bricks. Typically, the amount of building materials needed is indicated in the project documentation or calculated individually. Knowing the number of rows, the size of the brick and the dimensions of the oven, this is done simply.
Construction stages
Foundation for a two-story oven
The first thing the work begins with is marking to lay the foundation
It is important to remember that the dimensions of the foundations in any case must be larger than the foundation itself. To set up the structure you will need the following:
- plywood for formwork construction;
- sand and cement;
- fittings;
- crushed stone;
- waterproofing sheet (preferably made of roofing felt).
Stages of work:
- Prepare a place for the foundation, cut out part of the floor boards if necessary.
- Make sure that the future structure will not rest against the load-bearing beams of the ceiling, otherwise you will have to change the layout of the top.
- A pit is dug taking into account the work plan.
- Crushed stone and sand are poured into the bottom and the composition is compacted.
- The formwork frame is constructed so that the concrete does not leak out of the walls.
- Reinforcing mesh is installed. The fittings for a two-story stove are made stronger than for a conventional one.
- A concrete solution is poured and left to dry for several days.
Masonry scheme
Once the foundation is ready, you can begin laying the foundation. The ordering is carried out strictly according to the scheme and includes the following steps:
- The order of laying the first row on the waterproofing sheet is noted.
- The solution for work is mixed.
Next, the rows are built:
| Row No. | Execution of work |
| 1 | Laying out without using a clay mixture to understand the further course of action |
| 2 | Mounting a blower using wire |
| 3 | Formation of the combustion chamber |
| 4 | Laying asbestos strips along the side openings of the fire chamber for further installation of the grate |
| 5 | Installation of a combustion door, similar to the blower door |
| 7—10 | Standard installation scheme |
| 11 | Mounting the hob, installing metal corners |
| 12—16 | Formation of the cooking chamber |
| 17—19 | Laying out continuous brick rows of lines, forming a place for the chimney |
| 20—22 | Installing corners, fixing doors for the cleaning chamber |
| 23—24 | Raising the sides of the drying chamber |
| 25—30 | The filling proceeds without changes, the valves are formed |
| 31—38 | Forming channels for smoke exhaust, expanding the masonry and leading to the ceiling |
The following stages concern construction on the second floor:
- From the 1st to the 26th row, the standard work scheme is used.
- The 27th stage ends with the formation of the valve. And up to 31 everything goes according to plan.
- Rows 31 and 32 are considered to be the beginning of the chimney pipe.
Progress of laying rows
The construction of the furnace begins with the installation of guide posts. The formwork is attached to them - a wooden box without a bottom. It is needed to ensure that the masonry is even. The formwork is designed for several rows: when they are completed, it is raised to the top. It is also used to create vaults and arches, although for this purpose semicircular formwork is used, and not in the form of a box. When the masonry is higher than the chest, you will have to work on platforms.
When everything is ready, you need to choose the ordering method for laying heating stoves and construction technology. There are two popular options for installing blocks - splice and spoon. They got their name depending on which part of the brick faces outward. There is another method - bed, when the bricks are installed on a spoon or a poke, but it is unreliable. To avoid problems, it is recommended to monitor the thickness of the seam: it should be at least 5 mm.
Laying stages
Let's take a closer look at the stages of laying a stove in a house using a Swede as an example. The first layer of brick is the most important; it is laid strictly in compliance with the level. Bricks are not placed in the place where the ash pit chamber is located. There will be a blower between the chamber and the front side of the furnace; the blocks behind it are cut at an angle to make it easier to remove the ash. A three-quarter brick is placed in front of the ash pit.
The second and third rows are placed after the ash pan is secured. Otherwise they are similar to the first
It is important that the height of the third row coincides with the height of the blower door. In the fourth row, a door is installed for cleaning the passages with your own hands, and the passages themselves are laid out directly behind it
A row of bricks from above blocks the door of the blower.
With each subsequent row, the opening of the ash pan is narrowed. A grate is installed on the fifth row of bricks. The combustion chamber door is mounted on top of the sixth row above the ash pit. It is necessary that its height coincides with the height of the ninth row.
The first ten rows are made of refractory bricks, the next superstructure is made of ordinary building material. A hob is placed on top of the bricks of the tenth row. In the next rows, the passages for the movement of heated air smoothly transform into a smoke outlet. A more detailed arrangement of the furnace is determined by the configuration and purpose of the structure.
A little bit of history
In our country, the Swedish stove is quite popular as a fairly efficient and economical heating design. It can be used both for heating the house and for cooking and heating water.
Swedish stove in a country house
In terms of performance, it is in no way inferior to the classic Russian stove, which from time immemorial has been used in our country for heating the house and cooking. But in terms of fuel efficiency and small dimensions, it can leave the Russian stove far behind.
Therefore, if you are now wondering what design to use to heat your home, pay attention to the technical details of this stove and carefully study its advantages.
As the name suggests, this stove model was invented in Sweden. Some sources indicate that the new masonry technology was brought by Peter I to Russia, while others claim that it was invented much later.
Swedish stone oven
One way or another, the Swede was designed by Swedish engineers in accordance with all the requirements and subtleties of the local climate. This model is very similar in design to a Dutch oven, but its main difference is the presence of a wall, which allows you to place the heating structure in two rooms at once.
Considering the cold and damp climate most of the year, the oven had to not only heat, but also dry clothes overnight, because in the morning hunters and fishermen, who were the majority of the local population, needed to start work again and, in order not to get sick, clothes should should be well dried and warmed up.
Another remarkable difference of the Swedish stove is the combination of two functions: heating the room and cooking. The large cooking surface allows you to prepare dinner for the whole family and heat water. And in the oven, which is usually equipped with a Swede, you can bake bread.
Swede between kitchen and living room
In addition, the unique shape of the firebox - in the form of a bell - allows you to burn fuel efficiently and maintain the smoldering of wood for a long time, which increases the efficiency of the stove.
A small Swedish stove with a hob and oven is designed to be placed in the wall between the kitchen and living room. This type of placement is traditionally used in the northern countries.
Due to this arrangement, the kitchen quickly warms up, it is convenient for the housewife to prepare food, and the residual heat that is generated for cooking effectively warms up the entire room. Thus, with one stack of firewood you solve two problems at once: the house will be both warm and satisfying.
Swede with a bed
In the old days, such stoves were equipped with additional sunbeds that protected them from the cold at night. Now in modern homes you can find small and compact Swedish stoves with an oven and hob, which are both a functional design and a stylish interior decoration.
Today on sale you can find a wide variety of Swedish stoves of various designs: with a water circuit, with an oven, with a hob.
Example of a Swedish oven with two ovens
Or you can build it with your own hands, having basic experience in laying a stove.
Furnace structure
The Dutch oven is a classic wood-burning channel stove. Its operating principle is based on the circulation of hot air along passages laid in the body of the furnace.
But installing a tank for heating water will not work: this will lead to a decrease in efficiency due to the accumulation of soot in the channels. In addition, even without a tank, the efficiency of the furnace barely reaches 40%.
In turn, the “Swedish” has an efficiency of 60%. It is considered the most advanced heating and cooking oven, where the oven serves as an air chamber. In the chamber part, the combustion gases burn out, and they go into the convector heated to 800°C. The convector itself is narrow, but has a large height, due to which the house is heated evenly.
The Swede can be equipped with a heat exchanger for the hot water supply system. The storage tank is placed on the roof or in a drying niche. As a result, the efficiency does not decrease: there is no feedback energy connection between the oven and convector on the one hand and the combustion part on the other.
f81d8331c0cbcabbffbacb2c82230306.jpe
f33d6b7f2ad72e47625b790336eb38f8.jpe
Firebox, shield and chimney
The main differences from a solid fuel stove are a more powerful firebox and the absence of a pass (smoke tooth) in the firebox. The tooth traps hot gases under the hob, which in a summer stove allows you to reduce fuel consumption for cooking. In the rough it is not needed, because excess heat will be used for heating.
A rough stove should have a more powerful firebox because the shield provides additional resistance to the flow of flue gases. A chimney with increased draft will not help here: the gases in the shield will immediately expand and cool. Their thermal energy will turn into mechanical energy, which will successfully fly out into the chimney. Figuratively speaking, a firebox with a chimney in a stove with a shield operates on the push-pull principle, and “push” here is a firebox of greater power. This explains the special requirements for the firebox and stove fittings, see below.
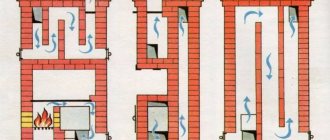
Depending on the purpose of rough heating shields, they are made of different types. Diagrams of heating panels for furnaces are shown in Fig. below; The fuel part is shown conditionally everywhere.
Schemes of heating panels for stoves
- Sequential stroke with short vertical channels. The least material-intensive and easiest to build. The resistance to gas flow is greatest. The compactness and thermal efficiency of the stove are average. The most commonly used scheme;
- Sequential stroke with horizontal channels. The dimensions and weight of the oven are the same as before. case, but building a shield with horizontal channels is much more difficult. Gas flow resistance approx. 1.5 times less. As a result, the thermal efficiency of the furnace is higher. It is possible to install a bed, i.e. the upper channel does not heat up much;
- Sequential stroke with long vertical channels. Thermal efficiency is the same as that of a shield with horizontal channels, the technological complexity is the same as that of a shield with short vertical channels. It occupies the smallest area, but requires a lot of materials and a good foundation (see below) due to the high specific pressure on the support. The best option for a home heating stove for 2-3 rooms, see below;
- Parallel move. Highest thermal efficiency, lowest weight per unit of thermal power. The occupied area and technological complexity are the greatest. Can be used with a reduced power firebox. Optimal for adding to an existing slab without altering it.
Note: there are also series-parallel or chessboard shields. The most complex, but also the lightest, have the least resistance to the flow of gases. The only possible option for roughing in a house with a heated attic, see below.