Space heating systems using infrared radiation have appeared relatively recently.
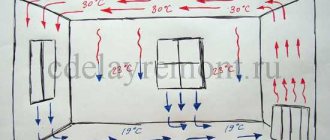
This radiation not only gives comfort and warmth, but also ionizes and does not dry out the air in the room, destroys bacteria and unpleasant odors and significantly saves energy.
Such floors will be useful for people with poor health.
This makes infrared flooring more and more popular. But such systems also have their drawbacks. We'll talk about them too.
Main types and characteristics of infrared floor
There are two technologies for floor heating using infrared radiation:
- film technology;
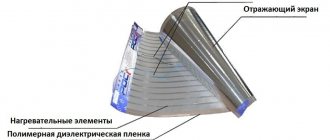
In such a system, the heating element is a special film made of carbohydrate or two types of metal.
This film is laid under laminate, carpet, linoleum or parquet and is most often used in living rooms.
This flooring is produced by CALEO.
- cable technology;
The main heating element in such a system is a flexible electrical cable, which is laid on a layer of insulation. You can make a cement screed on top of the tiles and lay the tiles. This type is used in kitchens, bathrooms, hallways and balconies. Such products are manufactured by HotLux.
Let's look at the main pros and cons of each type.
Advantages of film floors
- the film does not need to be poured on top with a cement screed, but the floor covering can be laid immediately;
- due to its small thickness, the film does not raise the floor level in the room;
- film systems have the lowest level of energy consumption;
- low price compared to other types;
- the finished surface is very pleasant to the touch.
Disadvantages of film flooring
- the film must be laid on a perfectly flat surface, otherwise it will not work correctly;
- Not everyone succeeds in connecting the contact to the film the first time. In case of an error, it has to be cut off and connected to another contact, of which there are several in the set;
- such a surface does not guarantee complete fire safety;
- An infrared film floor can heat up the surface of furniture and appliances quite strongly, which can cause darkening of their surface.
Pros of cable systems
- suitable for wet areas;
- does not heat the surface of the furniture;
- has automatic self-regulation;
- fireproof;
- heats up quickly;
- easy to install.
Disadvantages of cable systems
- higher price compared to film;
- high energy consumption;
- It is inconvenient to repair burnt sections of wire. To do this, you will have to disassemble part of the surface;
- the surface is not as warm as with film heating.
Connecting film heated floors to the network
From the step-by-step instructions we learned how the wiring is connected to the heating elements. Next, the cable goes to the thermostat, where the temperature sensor is connected. Nothing complicated.
Very important! Never connect live wires to the temperature sensor. All work is carried out with the power supply turned off! Take care of your life and health!
Installation of a thermostat for a film heated floor system
The thermostat is mounted directly next to the outlet so that there is no need to pull wires. Next to the socket, using a crown, a similar hole is drilled, into which, in addition to the wiring from the temperature sensor and infrared film, the phase and zero from the socket are inserted. To understand how to connect an infrared heated floor to a thermostat, you need to look at the diagram that comes with the kit.
The thermostat may look like this
Safety rules for installing electrical equipment
As already mentioned, the main rule is to relieve tension before starting work. But even with the tension removed, you should understand that complete composure and attentiveness are required. You cannot deviate from the scheme, even if it seems that a different way is better. This may result in a short circuit. At best, some apartments will be left without electricity, at worst, there will be a fire.
Basic rule! If you doubt your ability to assemble a circuit even for a moment, call a specialist.
Electric shock is life-threatening
Results
Both types of infrared flooring have their pros and cons. You need to think very carefully before making your final choice.
It is best to visit friends who have already installed such flooring, find out reviews from experts, or read messages on forums.
Many reviews advise paying attention to the following qualities of such floors:
Versatility
Warm infrared floors can be installed in all areas of your home. The main thing is to choose the right installation technology, which depends on the purpose of the room.
Can be installed under almost any surface. Tile, carpet, laminate, linoleum perfectly conduct the heat of an infrared floor.
To be sure that your laminate or tiles will not deteriorate from exposure to heated floors, choose those types of coatings that are specifically designed for this.
Easy installation
The performance of your heated floor will largely depend on its correct installation and connection. Before installation, you must know exactly where your floor should be heated.
A properly installed warm infrared floor will not heat up or damage adjacent surfaces.
You can really install it yourself because you don't need any special tools to install it. The main thing is to strictly follow the instructions.
Economical use
Heated floors consume much less electricity compared to floor heaters and distribute heat much better.
If you cover 70-80 percent of the room with such a floor, then you most likely will no longer need heating radiators.
Design flexibility
Due to the fact that both the film and the cable are flexible and thin, they are easy to store and install. Now there are types of film and cables that are not at all afraid of breakdowns and creases.
Even with mechanical damage, the floor will continue to work properly for 20-25 years.
Design mobility
Heating elements can be removed from the system and moved to another location. It is also possible to partially replace or repair damaged elements. You can make a warm floor not in the entire room, but in certain areas. This will save money and protect the furniture from heating the surface.
Find out how to make a water-heated floor under tiles. Installation steps and instructions. We will answer the question: is it possible to lay linoleum on linoleum?, in this article. Features of choice, expert advice.
Important question: How to choose linoleum for an apartment? Read here! and you will learn about the types, characteristics and secrets of choosing linoleum.
Where to buy film heated floors: price of material
You can purchase infrared film for heated floors either in a regular store or online. In the latter case, the cost will be significantly lower - about 15-20%. Here are the most famous brands with some characteristics and cost of products.
| Brand | Teplolux | Q-Term | Caleo |
| Power, W | 150-220 | 180-220 | 130-230 |
| Thickness, mm | 0,334 | 0,4 | 0,4 |
| Film width, m | 0,5 | 0,5 | 0,5-1,0 |
| Strip length, m | — | up to 150 | 8 |
| Cell length, m | 0,25 | — | — |
| Voltage, V | 220 | 220 | 220-230 |
| melting temperature, 0С | — | 110 | 110-130 |
| Cost, rub./m2 | 1000 | 900 | 850 |
Prices for such material may vary depending on the region.
Reviews
“We made a warm film floor in the bedroom around the bed. The film was placed between the substrate and the laminate. Due to the joints between the sheets of film, the laminate turned out to be uneven. Warmth is only felt if you set the sensor to 28 degrees. In general, it can be adjusted from 0 to 60 degrees.” Alexandra, Samara
“We have warm Kaleo flooring under linoleum and carpet. We set the temperature to 23-24 degrees and walk only barefoot - it’s very comfortable. Costs about 1200 per square. Nothing is being done to the linoleum, but the pile of the carpet has turned red in the place where the sofa stood. I’m sure nothing can happen to the legs of the furniture - their area is too small.” Vladimir, Kazan
“We were afraid to install film flooring in the children’s room. What if there is a short circuit or fire. Therefore, we made a cable floor under the screed and laid linoleum. The floor is on all day, we turn it off at night or when we leave for a long time. Now we are sure that our child is warm and comfortable.” Svetlana, Tver
“The whole house has warm floors. We made cable because we heard that film can ruin the coating if you turn on a high temperature. For some friends, the film ruined all the tiles. The seams between the tiles burst and the tiles came off. The tiles are now rattling. It’s nice to walk, but in extreme cold it doesn’t help and you have to turn on additional heaters.” Yaroslav, Yakutsk
Final works
The temperature sensor must be inserted into a corrugated plastic tube. Before laying an electric heated floor under linoleum, reviews of which we provide in this article, you will need to analyze the integrity of the cable cores using a tester and a megger. Now the master pours the screed, the thickness of which can vary from three to five centimeters. After the concrete has hardened, you can connect the grounding and power wires to the corresponding elements on the control unit block.
DIY infrared film installation
At the first stage, the surface for laying is prepared. It is cleaned of dust and leveled to differences of about 2.5 mm , which are allowed.
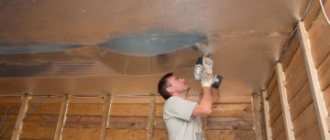
A vacuum cleaner is used to get rid of dust. Installation of moisture insulation is mandatory. Next, a layer of insulation is arranged, which must necessarily contain a layer of foil. This will prevent infrared rays from going down and reduce their losses. In this case, foil penofol works very well, acting as insulation and blocking the flow of rays. A layer of cork and foil is placed under the ceramic flooring. The layer is leveled, and the joints are sealed with adhesive tape such as tape.
After this, a film laying scheme is drawn up. It is placed at least 10 cm from the walls and no more than 35 cm. Select a place to install the regulator; to do this, make a hole about 15 cm deep in the surface. If heating with infrared floor film is the main one in the room, then its area should occupy at least 75% from the floor area . When installed as additional heating, this figure decreases to 35–40%.
When laying strips, they can be cut along special marked lines for convenience. Laying is done with copper contacts down and towards the location of the temperature regulator. Wires are connected. The longer the film, the fewer connections are required. But the maximum length is also limited to 8 m.
The temperature sensor is connected and insulated. Installation of the regulator is carried out after the final laying of the strips and connection of the wires. The regulator can be installed permanently or plugged into an outlet. Most of the wires are successfully hidden in the baseboard.
To prevent the heating film from sliding and changing position during further finishing, it can be secured with nails or screws directly through the edge of the transparent side rim.
When connecting the leads of the copper connections, small bulges will appear. But according to the instructions, after installation the surface must be extremely flat. To avoid incidents, small recesses are made in the body of the insulation directly below the connection point.
After installing the film, it is checked for functionality, paying attention to the degree of heating, the operation of the regulator and the uniformity of heat supply. Only after satisfactory results do they begin laying the selected flooring.
