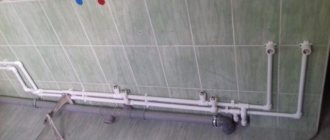
Welding of polypropylene pipelines is carried out during the installation of heating systems, sewerage, water supply, as well as during the repair or modernization of an existing pipeline. When joining the elements, a strong connection, tightness and safe operation of the pipeline for a long time are ensured. Soldering of polypropylene pipes is carried out using a soldering iron. The tool is also called a welder or an iron for polypropylene pipes.
Soldering a polypropylene pipe Source besplatka.ua
Soldering technology
When heated, polypropylene becomes soft, resembling plasticine in consistency. Particles of liquid material mutually penetrate into the adjacent part. After cooling, it hardens and becomes resistant to tearing. The cooled seam is not inferior to the base material in technical parameters. To ensure a quality connection, it is recommended to meet the following conditions:
- polypropylene is heated with the device to a state of viscous fluidity, following the instructions in the instructions for the equipment;
- solder products from the same material, you should not connect polypropylene parts with different markings, the strength of the connection will be impaired;
- the ends and fittings are joined tightly, avoiding gaps and distortions; a tight fit is ensured by sanding the cut edge of the pipes with sandpaper;
- polypropylene hardens quickly, leveling is possible within a few seconds, after hardening it will be impossible to correct the defect.
Iron for welding pipes Source nehomesdeaf.org
Thanks to the thermoplastic characteristics of polypropylene, reliable joining of elements is ensured. A strong seam is obtained only if welding technology is followed and quality materials are selected. Let's look at how to solder polypropylene pipes below. On devices that support the installation of several nozzles, the sleeve can be installed in a convenient position. The location of the heating cartridge does not affect the quality of heating.
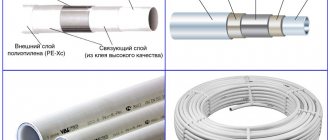
Which polypropylene products to choose
For low-pressure cold water supply networks, PN16 products are the most practical. They can easily withstand pressure up to 2 atmospheres at temperatures up to +40 degrees. This is quite enough to withstand the loads of a water supply system in a private home or a watering system in a greenhouse or garden.
Polypropylene pipes and fittings: types, markings, installation
Polypropylene products of the PN20 brand are more resistant to various influences, which are considered universal and can be used, among other things, for heating with a coolant temperature of up to 95 degrees.
But the most reliable pipes in any water supply system are PN25 pipes reinforced with aluminum or fiberglass.
Difficulty of welding
Test installation and connection of the first link of the system can be performed on a table or on the floor in a convenient place. Further welding on site is carried out under various technical conditions. Some areas of the system are difficult to access with an iron.
Before soldering pipes in hard-to-reach areas, it is recommended to choose a comfortable position. An inconvenient location causes delays in work and the appearance of various defects, for example:
- overheating of parts with melting of polypropylene and its spreading;
- the connection is deeper or smaller than required by the standard;
- installation with bending or rotating the element.
Installation of equipment on the platform Source static.onlinetrade.ru
When heating and connecting, synchronous actions should be observed: both parts are heated and removed from the nozzle at the same time. There is no delay before assembling heated parts. The pause occurs due to the need to place the device on the platform. Technical downtime directly depends on the experience of the technician and his speed of work. Errors in work lead to sagging, seam mixing, cracking and damage to the joint.
Construction of a classic brick fireplace
Strictly speaking, open hearths are not suitable for heating private cottages due to the low efficiency of burning wood, the efficiency is only 20-30%. While the fire is burning in the firebox, heat spreads throughout the room through infrared radiation. After attenuation, the heating intensity decreases and stops after 2-3 hours, when the brickwork has cooled.
Important point. It is unrealistic to build even a small wood-burning stove in an apartment in a multi-storey building - there is nowhere to vent the chimney, and the ceiling is not designed for such a weight. Reference: the weight of the mini-fireplace, whose design is presented below, is more than 700 kg, size – 0.5 x 1 m (load area – 0.5 m²).
Despite their low heat transfer rates, fireplaces remain attractive to homeowners because they create a unique homely atmosphere. The structure of a classic English hearth is shown in the diagram and includes the following elements:
- underground part - foundation;
- base of 2-3 rows of bricks;
- bottom part with a protruding pre-furnace platform;
- portal - brick frame of an open firebox;
- smoke collector - an umbrella-shaped channel tapering upward above the combustion chamber;
- the fireplace tooth at the beginning of the smoke collector serves for better heat extraction from hot gases;
- chimney pipe leading to the roof;
- the traction force is regulated by a valve.
Diagram of a classic open hearth
If the construction budget allows, then the outside walls are tiled, as was done above in the photo. It is not necessary to decorate the walls of the structure - the correct brickwork looks quite neat.
Procedure for performing diffuse soldering
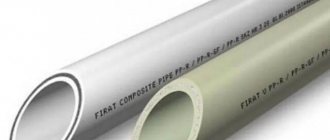
The ends are joined directly by socket soldering or using couplings. The coupling is a shaped part that is used as a connecting link. It is suitable for pipes with a diameter of up to 63 mm. Instead of a coupling, cuttings of pipes with a larger diameter than the section being welded are suitable. The section of pipe and coupling at the junction melts, providing reliable fastening.
Pipe cutting Source stroy-bloks.ru
A socket connection requires precise joining of pipe elements. The edges must be perfectly protected. Irregularities and burrs after trimming are not allowed. After the ends are melted by the apparatus, their diffuse connection occurs. If errors occur during trimming, a leak or rupture of the joint will form when water is supplied.
PPR connection without welding
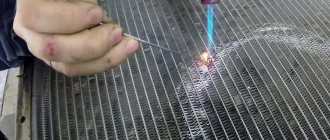
There are situations in life when the use of traditional soldering of polypropylene parts is excluded. For example, the joint is located in a hard-to-reach recess, or during installation the power suddenly turned off, and you only have to weld the last connection. There are 3 one-time methods:
- heating with a gas burner and subsequent docking;
- use of Gebo type compression coupling;
- planting elements on anaerobic glue.
Why are these options considered one-time use? Gluing and heating with a torch cannot provide the required reliability of the joint and are used only as a last resort on cold water supply lines. It is highly undesirable to connect heating and hot water pipes in this way. Gebo couplings are reliable, but too expensive.
The connection technology without a soldering iron is simple - the parts are degreased, gently heated with a burner flame, joined and fixed for 6-10 seconds. The technique is demonstrated in the video below.
Bonding is carried out according to the instructions on the packaging of the anaerobic sealant. The end of the pipe and the fitting socket should be cleaned, degreased and glue applied with a small brush. The elements are then fastened together using compression.
Preparation for welding
Before installing new pipes, it is recommended to draw a diagram of the pipeline on the wall. A simplified diagram represents lines drawn in accordance with the location of the future highway. Markings on the wall allow you to control the orientation of the pipeline.
In order not to adjust the pipes to size during soldering, you should measure the exact length of each pipe in advance. If the connection is made using couplings, allowance should be made for their installation. When installing end-to-end, deformation changes are taken into account. When melted, the pipe decreases by 1-2 mm.
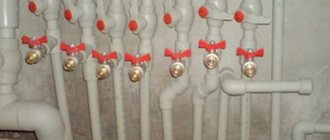
Soldering iron attachments Source opttorg-volga.ru
For ease of welding pipes with a diameter of over 40 mm, an iron with centering is required. It can be used by craftsmen who know how to solder polypropylene. The tool comes with several different Teflon nozzles measuring 14-63 mm, which act as a heating element. There are nozzles in the form of a sleeve and a mandrel. The first type of heating element is designed to melt the outer part of the pipe, the second - from the inside.
Teflon nozzles must be clean. Do not leave particles of melted material on them. Immediately after soldering, the hot body is wiped with a coarse cloth that is resistant to high temperatures, for example, a tarpaulin. It is not recommended to clean cooled elements, otherwise the Teflon layer will be damaged, which will lead to the adhesion of molten polypropylene in the future.
Project No. 1 – compact mini-fireplace
This hearth is suitable for heating a room of 16-20 m² in a country house or a small country house. Another option for using the structure is as an outdoor barbecue built in a garden gazebo. A special feature of the fireplace is the side convection channels that heat the air in the room. The size of the building is 102 x 51 cm.
To lay out a mini-fireplace, you will need the following materials:
- solid ceramic brick – 240 pcs. (chimney pipe is not taken into account);
- inspection door 24 x 14 cm – 1 pc.;
- cast iron grates 18 x 14 cm;
- valve 25 x 14 cm;
- stainless steel sheet 1 mm thick, size 500 x 1000 mm;
- sheet of black or galvanized metal, laid in front of the firebox, dimensions - 70 x 50 cm.
Sectional drawing of a mini-fireplace. Convection channel outlets are provided on the side walls
Note. A stainless steel sheet serves as the rear screen of the firebox. It is allowed not to install it, but then you will have to form an inclined wall from trimmed bricks.
The mini-fireplace shown in the drawing is laid out in the following order:
- The first tier is solid. On the second, 3 air channels are laid - 2 side and one in the middle, located under the grate.
- On the third row, the bottom part and the grate nest are formed (made 5 mm wider than the product). Then the grill itself is installed.
- From the 4th to the 10th tiers a fireplace insert is built. On row V, 2 metal rods Ø5 mm are laid for mounting a stainless steel sheet.
- In the 10th row, the rear brick protrudes a quarter into the firebox, the side stones move outward by 40 mm. The width of the firebox in this place is 49 cm.
- The ends of the side stones of the 11th tier are filed at an angle of 28° to the vertical line. You will get the supporting platforms of the arched vault. 2 stones in the depths of the firebox are placed on edge.
- The vault is built from 9 stones, cut in the form of a trapezoid with base sizes of 65 and 52 mm, as indicated in the order. The circle radius is 51 cm.
- On the 12th tier, the formation of the vault is completed, the upper steel rods are installed and a stainless screen is installed.
- Tier 13-14 forms the outlet openings of the convection channels. An inspection door is installed here.
- 15th row - the ceiling is being built, 16-18 - the beginning of the chimney.
The master will tell you in detail the algorithm for laying a mini-fireplace in his video:
Equipment preparation
Not all models include a stand. The soldering iron is installed on a level surface in an easily accessible place so that it does not tip over due to carelessness. Nozzles of the required diameter are placed nearby. Some types of irons allow you to simultaneously use replaceable components of different diameters.
Iron components Source teplo-online.com
See also: Catalog of companies that specialize in water supply and sewerage.
The heating element is heated evenly along its entire length to a predetermined temperature. The degree of heating is pre-set on the panel. For polypropylene, the soldering temperature of polypropylene pipes on the scale is set at 260⁰. Warming up the device lasts 10-15 minutes. A cold room takes longer to warm up than a heated room. At temperatures below 0⁰, welding is prohibited.
Project No. 2 - simple heating fireplace
The dimensions of this structure are 112 x 65 cm, height – 2022 mm. The internal size of the portal is 52 x 49 cm. Accelerated heating of the room is provided due to the convective air channel. The set of building materials looks like this:
- clay solid brick – 345 pcs.;
- the valve used in the chimney is 250 x 130 mm;
- 2 steel equal angle corners 45 mm wide and 70 cm long;
- metal sheet 500 x 700 mm.
The peculiarity of the masonry of the fireplace shown in the diagram is the placement of a large number of bricks at the base on an edge. Above, a narrow long channel is arranged where the heated air of the room moves. Let's move on to the construction algorithm:
- The first tier is solid, consisting of bricks placed “on the butt”. On the second tier, a heating channel with a cross-section of 65 mm is formed, on the third, the base of the firebox is laid.
- From the 4th to the 9th rows the portal walls are erected. The duct moves inside the back wall of the fireplace. On the 9th tier, corners are placed - floor supports.
- Tier No. 10 – firebox overlap. On the 11th row, the front stones extend 130 mm, the 12th tier is a fireplace mantel. The convective channel is divided into 2 narrow shafts.
- Rows 13-25 make up the smoke box. The heating channel ends at the 14th tier.
- Row No. 26 covers the flue, which narrows to the chimney. The valve is installed on the 27th tier.
- The remaining rows 28-31 form the beginning of the chimney.
The test fireplace lighting technique is demonstrated in the latest video:
Preparing pipes for welding
The edge of the pipe is cut with special scissors at a right angle. The cut area is sanded and degreased with ethyl alcohol or soap solution. The surface is thoroughly dried. Products marked PN 10-20 are welded immediately, and those with PN 25 are additionally cleaned with a shaver, removing part of the polypropylene and aluminum to the soldering depth. They are oriented according to the size of the nozzle up to the limiter.
Important! For degreasing, it is prohibited to use any solvents, gasoline, vodka, or acetone. Aggressive liquids corrode the surface of polypropylene.
When using a socket connection, it is important to adhere to the stripping depth and chamfer width. The degree of stripping must match the depth of installation of the elements.
Table for stripping pipes of different diameters
Security measures
When working with a heating device, it is necessary to observe personal protective measures:
- The soldering iron must be installed on a horizontal surface in a place free from materials.
- The technician must wear protective gloves (for working with hot tools) and comfortable overalls.
- Avoid bending over melting plastic as this process releases harmful fumes.
- The room should be relatively clean. The working surface is free from dust and debris.
- The connection between the soldering iron plug and the network must be tight and the cord must be loose.
We recommend that you read: How to clean rust from a metal pipe
The welding tool is preheated for 20 minutes if it does not have a corresponding indicator.
Warming up polypropylene
Installation of polypropylene pipes includes two stages: heating of the joining areas and connection. The part is put on a nozzle of the appropriate diameter. The pipe is installed in the sleeve up to the limiter for the entire stripped length, and the fitting element is placed on the mandrel until it stops. It is necessary to control the heating depth; the pipe must be located in the sleeve without distortion until it stops at the limiter. Maintain the necessary time to warm up. The holding time and soldering temperature of polypropylene pipes depend on the product parameters; the table displays all the important welding parameters at a room temperature of +20⁰.
The heating time must not be exceeded, otherwise the surface will be deformed, which will lead to distortion of the geometry and the inability to join the parts without gaps. When joining molten sections inside the pipeline, polypropylene swelling appears, which hardens into large ridges. Protruding material reduces the passability of the highway.
Table of welding delay values Source montagtrub.ru
Important! Temperature measurements on the iron mirror are carried out with a thermal probe.
Welding plastic pipes is impossible without a technical pause of a few seconds after heating, which is necessary to remove parts from the heating element. In a cold room, during this period the heated areas have time to cool down, which deteriorates the quality of the joining. To ensure a strong seam, it is recommended to increase the heating time by a few seconds so that the material melts more strongly. The optimal additional time is calculated by selection, taking into account :
- ambient temperature;
- nominal pipeline cross-section;
- holding time for warming up.
The temperature is set within 255-265⁰. If it exceeds 270⁰, the seam will turn out thin and unable to hold the water pressure. This occurs due to the rapid heating of the outer layer until it melts. At the same time, the material does not have time to warm up deeply, so diffuse penetration of polypropylene into adjacent areas of the parts does not occur.
Stages of pipeline welding Source svarkaspec.ru
Recommended thickness of floor screed
The height of a correctly poured screed is the same size around the entire perimeter. The efficiency of the heating device and the uniform heating of the floor depend on it. We suggest finding out the optimal, minimum and maximum thickness of the screed for a water heated floor.
Therefore, it is correct to fill a warm water floor with concrete only on a flat rough base.
The height of the screed is determined by the specifics of the room, in apartments - from 5 to 8 cm, in industrial facilities - 10 cm. At the same time, the layer under the contour is at least 1 cm, and above the pipes 3 cm.
In addition, the following points influence the correct determination of thickness:
- when using a conventional cement-sand composition, the minimum thickness above the heating system is 5 cm;
- if the filling is made with plasticizers, its thickness above the heating element can be less than 5 cm, but not less than 3;
- when installing a structure using reinforcing mesh, a thickness of 2 - 2.5 cm is acceptable, without it - at least 3 cm.
For your information! One of the functions of the screed is heat accumulation. Therefore, if there is a thin layer, the floor will cool faster, and the coolant will be heated more often. In this regard, the optimal thickness is considered to be 7 - 8 cm.
Soldering Features
Welding of polypropylene pipes is carried out with quick movements by applying heated sections to each other so that the pipe section enters the fitting cup to the required depth. It is necessary to monitor the edge ratio to avoid distortion at the seam. Cleaning and length adjustment must be performed before welding, otherwise the system will depressurize due to static stress.
To prevent the seam from cooling down during a technical pause, the equipment is positioned so that the distance from the installation site to the installation of the device is minimal. This nuance should be provided for in advance. Time spent moving equipment and components results in heat loss. The seam is weak due to partial diffusion between the layers of polypropylene.
Welding technology for polypropylene pipes Source provodoprovod.ru
It takes 2-4 seconds to adjust the position. During this period, the elements cannot be rotated, bent or disconnected. If the seam fails, the area is cut off and the procedure is repeated. It should be remembered that such mistakes lead to a decrease in the length of the pipe and waste of material. If you have no experience or knowledge of the theory of how to properly solder polypropylene pipes, it is better to entrust welding to a professional.
What to pay attention to when planning pipe installation in an apartment or house
The process of welding polypropylene pipe
Independent welding of pipe elements for plumbing and heating will be successful if you take the following steps in advance:
- select pipeline materials and methods of connecting them
- select equipment for welding PP pipes
- identify difficult areas and decide whether independent installation of pipes in these areas is possible
If in doubt, you can consult with specialists. If you decide to carry out the installation yourself, you should pay attention to the selection of equipment and training.
Cooling and leak testing
The seam cannot be cooled forcibly. Due to temperature changes, cracking and deformation in the melting zone is possible. The pipeline must be given time to cool naturally. You can control the temperature by touch. The cooled area is first checked for leaks by blowing. At the end of soldering, water is passed through the pipeline, gradually increasing the pressure, and the seams are inspected for leaks and permeability.
Pipeline installation Source https://i.ytimg.com/vi/qTaP9btjoP4/maxresdefault.jpg
How to fill a heated floor
How to properly fill a water-heated floor - there are three methods that can be used. All of them are simple in technology, their process is similar, although each method has its own characteristics.
| Floor filling method | Description | pros | Minuses |
| Concrete | A common option is a cement-sand composition. To give greater strength to the floor structure, sand is replaced with filler. It prevents the base from crumbling when heated. In addition, when using filler, the thickness of the mortar layer decreases from 50 to 30 mm. | Strength, durability and uniform heating of the floor surface. | Significant floor weight and long curing period. |
| Semi-dry composition | The main difference is that it contains less water than in the first composition. Mandatory presence of polymer additives and fiber fibers. | Increased strength of the floor, dries much faster, has less shrinkage and the resulting surface from this composition is practically not subject to cracking. | Less plastic, this may cause voids. After drying, the resulting base should be protected from water. |
| Self-leveling mixtures | The composition resembles a cement-sand mixture. It can be used to make both a rough base for the floor and a finishing coating. But for screeding a warm water floor, only a coarse leveler is suitable. It comes with different bases: gypsum and cement. Both types can be used to fill heated floors. | It has the greatest plasticity, hardens quickly, and does not require careful leveling, as it spreads under its own weight. | High price. |
Errors during soldering
Most often, errors occur among craftsmen who do not have practical experience in soldering, even when they know how to weld polypropylene pipes. Many people neglect the step of measuring the length of pipes, performing installation by eye with trimming after the fact, or they measure without taking into account tolerances. If the length of the pipe is incorrectly calculated, it is very difficult to install the iron for joining the elements.
Many craftsmen try to bend the pipe in place to increase the distance between the parts. This leads to an increase in static voltage in the network links and a decrease in tightness. Such errors worsen the appearance of the highway. Attention is paid to the aesthetics of the system when laying communications externally.
Sequential heating is a mistake that leads to rapid cooling of the joined areas and the impossibility of connection. While the second element is heating up, the first has time to cool down. Partial diffusion leads to rupture of the connection when pressure increases and water hammer. This is a gross violation of technology. It is absolutely impossible to operate such a highway.
Warming up parts Source https://www.malolikto.ru/wp-content/uploads/2016/12/maxresdefault-4.jpg
Preparatory work
Before pouring the screed onto a warm water floor, some preparatory work is required:
- level and clean the base;
- install a heating system.
When installing a heated floor, you need to fill it after installing the entire “pie”; it is important to lay all its layers correctly.
The sequence of laying layers in the “pie” of a warm water floor is as follows:
- Rough screed - it is cleaned and leveled.
- Waterproofing - a polyethylene film with a thickness of 200 - 250 microns is placed.
- Thermal insulation - foamed polyethylene with foil coating is installed.
- Reinforcing mesh - it is necessary to give strength to the structure. In addition, pipes can be attached to it if the polystyrene foam base with bosses does not fit.
- Heating circuit (metal-plastic or polypropylene pipes with a cross-section of 20 mm) - it is fixed either to the mesh with special fasteners, or is laid on polystyrene plates between the bosses.
- Reinforcing mesh - it can be laid on top of the heating system, if desired, to give greater strength to the structure.
Before filling, it is necessary to connect the system to the collector, check it for leaks and how it heats . After which, a beacon is installed, which helps to obtain a level base from the concrete composition.
How to reduce the likelihood of marriage?
It is recommended that two people work together to solder elements in difficult-to-access conditions. The second specialist helps remove the second element from the nozzle and puts the soldering iron on the platform. The first master carefully joins the parts with both hands with a minimum pause. Sometimes assistance from a third party is required. His services are used when a pipe needs to be fixed in a wall in an adjacent room. Attempts to perform all operations independently in difficult areas always lead to defects and the need to perform welding again.
Planting depth marking Source files.builderclub.com
During soldering, precise movements must be observed. The correct inclination of the fitting element relative to the second part, its axial angle of rotation on the pipe, and the depth of entry into the fitting cup must be maintained. To control the depth of entry and the angle of rotation of the fitting, marks are made on the surface of both parts. In order not to measure the allowance each time on sections of the same cross-section, use a template.
The iron does not need to be turned off during the entire welding period. The technician will lose time warming up the equipment. The soldering iron is ready for use after the heating indicator goes out. A lit indicator shows that the mirror is heated to the desired temperature. If you start welding during this period, the pipe will not warm up properly. In order to comply with the technological process and holding time, it is recommended to check the parameters according to the table, which is recommended to be kept at hand.
If combined pipes are purchased, they are connected only after mandatory stripping. The chamfering depth should be 2 mm greater than the depth of the sleeve into which the element is inserted. Reinforcement reduces deformation expansion by 10 times. On products with external reinforcement, before soldering, a part of the surface is removed with a shaver to the required depth for joining. Pipes with internal reinforcement do not require stripping. Their installation is faster.
Temperature gaps
The main reason why cracks appear on a concrete screed is the incorrect location of expansion gaps.
According to the instructions, when installing a screed heated floor in rooms with a complex layout or having a large area, it is correct to divide the room into zones before pouring the concrete. The demarcation needs to be done with a damper tape, 5-10 cm thick, and the entire area along the walls is laid with it.
The damper tape helps protect the heating system from damage, because during the heating process the structural elements expand. If you do not install the damper tape, the concrete floor screed will quickly crack.
There are several points by observing which you can correctly arrange expansion joints:
- Each zone that is fenced with tape should be no more than 30 m2, and the sides should be no more than 8 meters long.
- If the room has a complex layout, it is divided into square or rectangular zones.
- In some conditions, it is possible to make divisions at 1/3 of the depth of the solution.
- After the floor screed has hardened, the seams are sealed.
Activities before pouring
Before starting preparatory measures for screeding a warm water floor, other types of work should be carried out, such as plastering the walls in the room. You should also install windows and doors in the room, lay all possible communications (electrical wiring, sewerage, water supply, etc.). The entire surface for the subsequent installation of a warm water floor system must not only be flat, but also very clean, without defects.
There may be cases when the walls in the room were plastered after pouring the concrete solution. In this case, the surface is thoroughly cleaned of pieces of solution. BSL can be used for this. To prevent the plaster from getting on the base of the floor, it can be covered with polyethylene film.
An angle of 90 degrees must be maintained between the walls and the base. Otherwise, it will not be possible to achieve a tight fit of the insulation under the warm water floor to the walls and surface.
When one circuit is located in a room, a discrepancy in the surface level is allowed, but not more than 5 mm. Otherwise, you may encounter deformation of the pipes and the appearance of air pockets. If you use branded damper tape, which has an adhesive layer for attaching to the wall, then putty a part of the wall to a height of about 40-50 cm. This will improve the quality of tape fixation.
The process of laying a warm coating under the tiles
Depending on the thickness of your floor covering, it is better to choose one or another type of warm electric floor. If the thickness is not too large, then we recommend choosing heating mats or infrared film for installation. Below we will talk about the features of laying both types of coatings.
How to lay a heated floor consisting of heating mats
What are heating mats? These are fiberglass reinforced meshes, to which a screened section is attached, with the following characteristics:
- the maximum thickness of the mats is 3 mm;
- the presence of technology for connecting the hot and cold parts of the floor without couplings, which ensures maximum reliability of the structure;
- meshes allow penetration of screed material or tile adhesive.
- Laying with mats has the following features:
- before the installation process, draw up a special diagram indicating the placement of all furniture and other items in the room;
- After you have chosen a place to place the thermostat, you need to equip a junction box there, make grooves in the wall and the base of the floor for the connection wires and temperature sensor.
The rough coating must be very well cleaned of dirt, dust and unnecessary things. To ensure a reliable bond between the special adhesive and the tiles, prime it.
The sensor should be installed inside a pre-prepared channel, which is installed as follows:
- calculate its depth so that it does not interfere with laying the tiles;
- place the channel at the same distance from the cable turns;
- the channel must not intersect with the heating cable or be in close proximity to it.
If necessary, thanks to the channel it will be possible to quickly change the heated floor sensor.
When you have completed all the preliminary work, you can begin laying the structure itself. Thermal insulation measures are not necessary in this case, since installation of thermal insulation can lead to the cable overheating and failure.
Laying consists of several stages. To begin with, the mat needs to be rolled out according to a specially prepared pattern along the entire floor area using the “snake” method. To do this, when rolling out, it may be necessary to cut the fiberglass mesh
This should be done very carefully and carefully, trying not to damage the cable:
- make a turn and cut the mesh crosswise;
- Unroll the mat with each laying cycle from one wall to the next. When turning, you must maintain a minimum distance between turns of 6 cm;
- Obstacles that arise must be avoided so that the distance to the cable is about 5 cm;
- remove the mesh partially if you cannot get around the obstacle. A free cable is placed along it;
- if the room has an unusual shape, then the mesh can be removed and the cables can be laid in any shape. It is not recommended to bend it too much, but do not forget to maintain a distance of at least 6 cm between the turns.
And to connect it to the thermostat you need about 4 power wires, and when there are not enough cold ends, you need to cut the heating cable out of the mat without removing the coupling from the screed.
The final installation stage looks like this:
- after you have cut and stretched the mat, you need to roll it up again in the cut form into a roll, open the protective strip of adhesive tape on the underside, and then roll it out again over the entire surface of the floor;
- cover the entire covering with a special tile adhesive with a layer of up to 7 cm. When it dries, you can lay the tiles;
- when the heating mat is laid, connect the wires to electricity, this turns on the thermostat, sensor and safety shutdown device.
Features of laying an electric floor with infrared film
The infrared film that floors of this type are equipped with is an extremely thin insulating film up to 1 mm, in which electrically conductive material is placed inside.
The preparatory measures are practically no different from the option of laying the floor on heating mats. However, you must not forget to lay the thermal insulation materials, but only lay the infrared film itself on top in parallel sheets; you cannot lay them overlapping. Next, you should install the thermostat and check the system for functionality.
Now we attach the mounting mesh so that the screws cannot damage the contacts, and then we fill the mesh with a screed made of cement and sand. Test the system again for functionality.
Wait for the screed to dry and lay the tiles using a special adhesive that has heat-resistant properties.
You can turn on the infrared heated floor almost a month after installation, when the tile adhesive is sure to dry.
Composition of the solution
The mixture for screeding a heated floor can contain not only standard, but also additional ingredients. However, there is no hard and clear indication of their total number. Special components can be plasticizers, catalysts, and composition strengtheners. It is worth noting that the overall composition will depend on which particular screed option is chosen for implementation.
Liquid pouring mixtures are characterized by a classic mixing option, which includes, in addition to cement, sand. The proportions of content in the solution are 1 to 3. As soon as a certain amount of water is added to the mixture, a homogeneous liquid mass should be obtained. Plasticizers can be added to the final solution. Gypsum is not used in such mixtures for the reason that the system is highly hygroscopic.
If you are preparing a large amount of mixture for pouring screed over a heated floor, it is better to use a concrete mixer, which allows you to obtain homogeneity of the components. In this case, the cooking process itself will be less time-consuming.
For semi-dry mixtures for screeding a warm water floor, the composition is slightly different. In addition, the preparation of the solution is carried out in two stages. Initially, two components are mixed - sand and cement in a ratio of 2 to 3. That is, 10 kg of cement will require 1 kg of sand. Fiber fiber is added to this after thorough mixing. A similar size of mixture will require about 15 grams of additive. Add 4 liters of water to the resulting volume of mixture for filling the heated floor. Water should be stirred gradually in portions to ultimately obtain a homogeneous mass. What happens should stand for 20-30 minutes, after which a second portion is added for the final solution - sand, water and fiberglass, in a ratio of 20 kg, 4 l, 15 g. That is, cement is no longer used a second time . The resulting mass is used to install a screed over a warm water floor.
An online mortar calculator will help you calculate the required amount of screed materials.