Solid fuel boilers are gaining popularity again today. The reason for the increased interest in this type of heating equipment lies in several aspects. The greater power and autonomy of solid fuel mechanisms, compared with gas and electricity, provide the consumer with ample opportunities for equipping an autonomous heating system in the home. Installation of a solid fuel boiler is especially important for residents of those areas where there is no centralized gas supply. In terms of choosing a heating device and heating system, the fact that for installation on solid fuel does not require obtaining official permission from the supervisory and control authorities is captivating.
The installation of the heating boiler is carried out taking into account the design data. Further, the working heating system is subject to registration by the Ministry of Emergency Situations authorities responsible for stove heating and the safety of objects heated by solid fuels. Schematically, the installation and connection of solid fuel heating units is as follows.
Having assessed all the obvious advantages of individual heating using fossil fuels or wood waste, the pros and cons of solid fuel appliances, you can safely begin installing heating equipment in a private home. The only thing that is of interest in this situation is how to connect a home solid fuel boiler to other devices and to the heating system itself
Let's consider the features and nuances of connecting equipment of all types.
Preparatory stage
As a rule, in warm weather the heat supply structure is not used. Therefore, before starting heating in a private house, it is necessary to ensure the integrity and reliability of its elements and carry out a number of preparatory work. Before using a closed heating system, you need to determine the amount of deviation of its actual indicators from the calculated parameters.
According to the rules, preparation for the heating season is carried out in a certain sequence. First of all, a visual inspection of communications and heating equipment is carried out. For the property owner, the first question should not be how to put the radiator into operation. First of all, he needs to make sure that there is no mechanical damage to the device body and check the reliability of its connection to the pipeline.
Also, before starting the heating system, a number of preventive measures are carried out:
- Checking the condition of the smoke exhaust system. To start a boiler, there must be sufficient draft force in the chimney to maintain combustion. For this reason, the internal cavities are cleaned of soot and the integrity of the pipe is inspected. In a brick structure, if necessary, replace damaged elements. Rust, if any, is removed from galvanized pipes.
- Visual inspection of pipes. Without this, running the heating system is dangerous. You need to find out how tight the pipes are and whether there are any cracks or noticeable defects.
- Battery condition monitoring. Before starting heating in an apartment building, the management company must warn residents about this, and they must check the integrity of the radiators. You cannot disconnect individual devices from the heating network. When filling the pipelines, make sure there are no coolant leaks.
This is a list of rules without which the first start-up of the system should not be done. In order for the heating season to start correctly, a number of measures must be taken. A test run of the heating system in an apartment building is carried out 1–2 months before heating starts. It is best for property owners to stay home during this time to ensure there are no leaks.
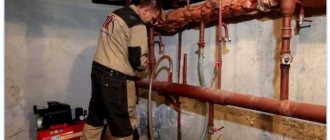
We install the heat generator and chimney
As such, installing a heating boiler on the floor or foundation is not difficult - the unit must be placed in the design position and aligned vertically using adjustable legs or metal pads. It is not necessary to scrupulously maintain the alignment of the chimney pipe and the hole in the wall: they can be combined without problems by turning the knees.
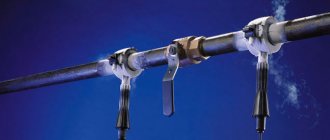
Important point. To avoid problems with the formation of condensation during operation, it is strongly recommended that the chimney of a wood-burning heater be assembled from insulated pipes - sandwiches. The second option is to make a chimney with your own hands: take an ordinary pipe and cover it with basalt fiber.
Factory-made and home-made sandwich pipes for chimneys
The easiest way is to install an external chimney duct of an attached type. That is, attach the pipe vertically to the wall and connect the gas duct from the TT boiler through a tee. In a wooden house, the passage through the outer wall or ceiling for access to the roof is carried out in compliance with fire safety rules using the following technology:
- Cut a square opening in the partition, the dimensions of which are 38 cm larger than the internal chimney pipe in each direction. For example, if the diameter of the channel is 100 mm, and the thickness of the sandwich insulation is 5 cm, then the size of the opening will be 100 + 380 x 2 = 860 mm.
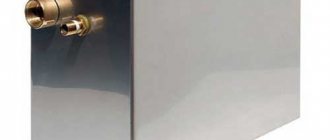
- Install a pass-through unit made of galvanized steel in the form of a box.
- Pass a sandwich pipe through it, and fill the void with basalt wool.
- Secure the outer assembly cover.
Note. A chimney is laid through a wall made of brick or foam block using a steel liner and seal.
Scheme of assembly and connection of an attached chimney from a sandwich
Next, we list the requirements that must be met when installing a chimney duct:
- number of pipe turns – no more than three, minimum height (calculated from the boiler grate) – 5 m;
- sections (modules) are joined together in such a way that condensate can drain inside the pipe, and rain can drain outside;
- mount the horizontal part with a slight slope towards the heat generator;
- install an inspection hatch and a condensate collector in the lower part;
- To avoid having to cross the roof eaves, go around it with a pipe using two 30° elbows;
Drawing of a gas duct laid from the boiler inside the house with exit through the roof - wall brackets should not coincide with the joints of the chimney sections;
- Place a cap in the form of a cone or a rotating weather vane on the head of the chimney.
The correct installation and assembly of a modular chimney is reflected in two connection diagrams, which show external and internal installation through the ceiling.
Minimum pipe head height depending on the distance to the roof ridge
Important note. Make sure that the head of the chimney duct does not end up in the area of wind support on the roof of your or a neighboring house. To ensure stable traction, raise the pipe to the mark shown in the diagram above.
Filling the heating system with coolant
Previously, it was recommended how to check the heating system in a private house - including a visual inspection of all its components. If malfunctions are detected, individual elements are replaced. Then they begin the process of filling the risers with coolant.
If radiators are not filled with water, a slight rusty coating appears on their walls. Therefore, before filling the heating system, experts recommend cleaning it. If there are liquid residues in the pipes, they should be removed. To do this, use a special pipe located in the lowest point of the heating system; the make-up unit should also be located there.
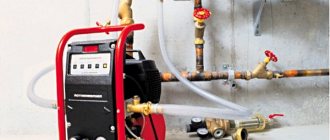
Then you can begin to solve the problem of how to start the heating correctly. For closed systems with forced circulation of liquid, hydrodynamic flushing is used. To do this, you need to purchase or rent a special pump with filtration and a chamber designed for cleaning agent.
Washing is done in a certain sequence:
- the pump pipes are connected to the system;
- launch and visually monitor the degree of contamination of water that has passed through the pipeline through a full cycle;
- if necessary, change the fluid to a new one;
- flushing procedures are performed several times until the water becomes clear.
Next, pressure testing is done. Before starting the heating radiator, carefully check the condition of its connection to the pipes. Experts advise changing gaskets and keeping the integrity of the couplings under control.
When it is necessary to start a closed system, an increased volume of coolant or air is pumped into the pipeline and thus the reliability of the joining of structural elements and assemblies is checked. In this case, the pressure value should exceed the nominal value by 1.2 times.
The liquid used in the flushing process must not be discharged into the sewer system, as it contains harmful substances that can negatively affect the functioning of the autonomous sewer system.
How to properly install supply and exhaust ventilation
There are several objective reasons why ventilation in the boiler room is necessary:
- supplying a sufficient amount of oxygen to the boiler to maintain the combustion process;
- removal of carbon monoxide that accidentally entered the room from the furnace outside the premises;
- compensation of the amount of air used during the combustion process.
Please note that to burn 1 kg of firewood you will need 4.6 m3 of air, and burning coal requires about 8-9 m3, based on the quality of the fuel.
Here are some tips for arranging a ventilation system:
- Openings for air inflow and outflow should be located on different sides of the boiler room. The supply opening is made at the bottom of the wall as close as possible to the heat generator, and the exhaust opening is under the ceiling.
- If the boiler is equipped with a smoke exhauster or a blower fan, you should not place the hood next to it (read: “How to choose a smoke exhauster for a solid fuel boiler - types, differences”). Otherwise, the draft will reverse, and the exhaust hole will become a supply hole.
- If the door from a residential building opens into a furnace room, then it is advisable to install a grille for the inlet opening in the door leaf. Warm air entering the boiler will improve the combustion process.
- The size of the exhaust opening should be smaller than the supply opening, since most of the incoming air enters into a thermochemical reaction and exits through the chimney in the form of CO2.
You can calculate the required size of the hood if you multiply the boiler power by 8 - we get the hole area in cm2.
Adding coolant volume to the heating structure
The working medium can be ordinary distilled water and antifreeze. Filling is carried out before starting the heating system in a private house, through the make-up unit located at the lowest point. This order is very important, since trying to add liquid through other pipes located above leads to the formation of air locks.
To ensure correct startup of the radiator, check the presence and functionality of Mayevsky taps. To do this, each of them is opened.
Then a certain procedure follows:
- It is necessary to open the air and bleed valves located at the highest point of the structure.
- Next, smoothly open the tap of the make-up unit, while keeping the water pressure low so that air pockets do not occur.
- After coolant begins to flow from the pipes of both valves, they are shut off.
- Mayevsky's taps remain open until working fluid flows out of them instead of air. This point is important, since starting the heating boiler if there are air pockets can lead to damage to the entire system.
If pressure testing has not been carried out previously, it is done during the process of filling with coolant. When starting the heating system, pressure gauges installed on the collectors, safety group, and boiler help control the pressure when filling with water.
Installation
Installing the boiler on a wooden floor is possible with your own hands without the help of a specialist. To carry out work there is no need to obtain special permission from the relevant authorities. It is necessary to prepare a special, well-ventilated combustion chamber. It is equipped in accordance with fire safety requirements.
Important! Building regulations from 2000 state that a separate room is required for a heating unit with a power of 60 kW or more. Boilers of lower power can be installed in a kitchen with a room volume of at least 15 m3 and a ceiling height of 2.5 m.
There are a number of requirements regarding the firebox design:
- it is necessary to install a window in the room for ventilation;
- installation of utilities (ventilation, water supply system, sewerage).
The glazing area depends on the volume of the room: at least 0.03 m2 for every 1 m3 of furnace volume.
Foundation
Particular attention should be paid to the foundation for a boiler in a log house. When installing a floor-standing unit with a power of up to 50 kW, you can use a cement-sand screed as a base, but when installing more powerful units this will not be enough. You will need a separate concrete foundation, which will protrude 25–30 cm from the dimensions of the boiler installation.
When installing the unit, certain requirements regarding the floor material are imposed. The equipment must not be installed on a flammable wooden base. If it is not possible to pour a concrete foundation, then the boiler in a log house is installed on a podium made of refractory brick, sheet metal or asbestos. The base should protrude from the dimensions of the boiler by at least 15 cm on each side and 20 cm in the firebox part.
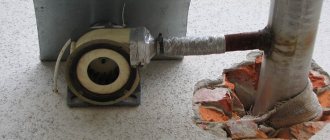
Ventilation
The correct supply ventilation system can increase the efficiency of the boiler installation and ensure the required level of fuel combustion. Utility parameters are calculated based on the size of the furnace and the power of the installed equipment.
For normal operation of a small boiler with a power of up to 35 kW, it is enough to punch a small hole with a cross-section of 30 × 30 cm on the wall opposite the boiler in the lower level to provide fresh air flows. An exhaust vent with a cross-section of 40 × 40 cm is also equipped at a distance of 30 cm from the ceiling level in the opposite part of the room.
Note! The need for a supply and exhaust ventilation system arises through the vacuum that occurs as a result of fuel combustion. It is compensated by the influx of fresh air, and the hood is used to remove exhaust gases outside the house.
Chimney
Any heating equipment in which fuel is burned must be equipped with a chimney. The location of this channel is indicated at the design stage of the building. If the chimney is not provided for in the design documentation, it is made independently from brick or special material.
A modern version of the chimney are insulated sandwich modules, which are made of stainless steel and insulation (mineral wool). The exhaust gas removal shaft is assembled from parts of the required diameter. The standard height of the components is 1 m. There are certain requirements for the chimney of a solid fuel boiler:
- constant cross-section along the entire length of the pipe;
- shaft diameter for household models is within 15–20 cm;
- no tilts or bends;
- It is prohibited to join sandwich modules within the floor slab.
If necessary, you can move the chimney, but no more than 1 m from the standard position. To prevent the possibility of fire in roofing materials or other building structures, chimneys are equipped with spark arresters.
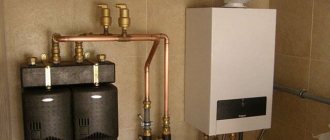
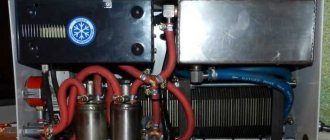
Connecting the unit to the heating system
After installing the boiler, preparing the ventilation system and installing the chimney, they begin piping the heating unit. One important rule must be observed: under no circumstances should cold water come into contact with the heat exchanger of a running installation. Due to the temperature difference, condensation forms on the walls of the combustion chamber, on which soot settles and turns into viscous stable accumulations. Sticky deposits are difficult to clean off and reduce the efficiency of installed equipment.
Standard piping with a three-way valve and bypass helps reduce condensation. The circuit is adjusted to the coolant temperature in the range of +50–55 °C. As a result of heating, the water moves along the circuit of the heating system until it warms up to the specified parameters. After this, the three-way valve is turned on, which mixes the cooled liquid from the return of the heating system.
When piping a solid fuel boiler, it is necessary to proceed from the manufacturer’s requirements, which are set out in the instructions for the specific model of the unit. It is important to correctly connect the burner to the control unit. European models of heating equipment often have a fire protection system. The mechanism is connected to the central water supply.
First start of the heating boiler
The sequence of actions when starting the boiler for the first time before the start of the heating season largely depends on the model of the device and its type, but it requires a visual inspection. This is one of the important stages that precedes the final start of heating in the house.
The heat exchanger is the most vulnerable component of the unit. Checking it is a must, since during operation it is constantly exposed to high temperatures. Simultaneously with starting the radiator, inspecting the boiler is one of the most important tasks of the preparatory stage.
Strapping schemes
Having finished installing the channels that discharge flammable gases, you need to start piping the solid fuel boiler, and there are no less subtleties in it. Very often, such heat generators are equipped with a water tank, which is used in a variety of connection schemes. The role of the device is to dampen stresses that may arise when the boiler is under maximum load.
The choice of heat accumulator depends on the personal tastes of the owner. Moreover, when purchasing, you should pay attention to the need to maintain a certain load for a specific time with a heat accumulator.
You also need to pay attention to the dimensions, since the device will be massive and it will not fit everywhere.
Usually they focus on a thermal energy storage size of 30–50 liters per 1 kW of maximum boiler power. If the peak heat consumption significantly exceeds the average daily level in terms of 1 hour, and especially if this consumption lasts for a long time, it is necessary to install a more capacious tank.
It must be designed for pressures greater than the planned operating maximum. Regardless of the chosen connection scheme, it is necessary to install safety valves and an expansion tank. You should carefully carry out all the calculations, and ideally turn to professionals both for them and for the installation itself.
Correct piping always contains a so-called safety group, which should be placed directly at the outlet of the supply pipe.
This is a set of systems that will automatically release pressure if it exceeds set values. This kind of manipulation is carried out by a safety valve, which is complemented by a pressure gauge and a device that removes air outside. From the safety kit to the boiler itself, the use of any kind of locking fittings is unacceptable. When the fuel begins to flare up, the circulation pump runs and the valve located at the inlet to the heating circuit is closed.
In this case, the fluid moves in a reduced circle. As soon as the return pipeline warms up to 50 or 55 degrees, the thermal head, at the command of the sensor, begins to slightly open the closed circuit. This is done smoothly so that the mixing of cold water with the hot water contained in the bypass occurs evenly. As the radiators warm up, the temperature rises, and a moment comes when the valve closes the bypass completely. In this case, 100% of the coolant is directed through the boiler heat exchanger.
This configuration is the simplest and can be done with your own hands. It is completely safe to use polypropylene pipes, but you only need to check their official origin and compliance with the necessary characteristics. It is recommended to use exclusively metal for the gap between the boiler and the safety group.
The thick walls of the polypropylene pipe have poor thermal conductivity, due to which external sensors give incorrect readings, and the three-way valve is late in responding to changing conditions.
Important: a metal pipe should also be installed from the pump to the copper flask; the addition of a heating element will allow you to maintain the temperature in the room more accurately.
Solid fuel unit
Before starting the heating system, check the condition of the boiler operating on solid fuel. It is necessary to clean its surface from rust and make sure that devices such as thermometers and pressure gauges are working.
Then a series of works are performed:
- Clean the combustion and ash chambers from soot using a metal brush.
- Check the condition of the chimney - its pipe must be securely connected to the unit's branch pipe.
For pyrolysis and pellet devices, the functioning of the electronic control unit, nozzles and fans must be tested. When heating is started, if these elements do not work correctly, sudden temperature changes may occur, which will directly affect the condition of other components.
It is prohibited to store flammable substances in the room where the solid fuel unit is installed. To store fuel, you should arrange a separate utility room or build an extension.
Additional settings
When the main parameters are set, you can move on to the auxiliary ones.
The first option is that you can adjust the ignition time of the pellets. By default it is 5 minutes. This is exactly how long the special halogen lamp is turned on, which is responsible for igniting solid fuel.
High quality pellets ignite faster - in 3-4 minutes, and in this case the ignition time can be reduced. In the case of inexpensive fuel, it is recommended to increase the parameter to 6-7 minutes.
Also, installing a pellet burner in a solid fuel boiler necessarily involves setting such indicators as:
- burn-out time (characterizes the maximum fan power after stopping the fuel supply);
- coolant temperature “return” (once it is reached, the burner changes the “Heating” mode to “Maintenance” - it is set to approximately 60 ° C);
- supply coolant temperature (critical value within 90-95° - at this temperature the supply of pellets stops, and an “Overheating” warning signal appears on the control panel display);
- auger control (two modes - “On” and “Off” - when activated, pellets are smoothly fed into the combustion chamber).
If the burner operation must be stopped, under no circumstances should the plug be pulled out. Such a sudden disconnection from the power supply will provoke a pressure surge inside the system, which will lead to the fan stopping, which, in turn, will provoke the release of soot and ash onto the internal elements of the boiler and extinguishing the pellets. Next time the fuel will ignite noticeably worse.
APG-25 will pause operation if you press the red “Stop” button on the control panel twice. Pressing once will enter the system into pellet burning mode.
Correct setting of a pellet boiler is the key to its smooth operation.
A gas boiler
To live in a house in comfort, you need to know how to properly start the heating system if the water is heated by a gas boiler. For different models of units, the startup sequence is different, which is due to differences in their design.
This especially applies to condensing devices, in which condensate must form correctly during operation, because without it, heating the secondary heat exchanger is impossible.
To correctly start heating with a gas boiler, after filling the system with liquid, you need to perform certain actions:
- The valve located at the bottom of the unit should be opened to prevent liquid from entering the circuits, since it is usually closed after the end of the heating season. As a result, the pressure gauge readings change, and the pressure value cannot exceed 3 atmospheres.
- When the coolant has heated up, open the make-up valve again. In order to remove the remaining air pockets, Mayevsky cranes are used. During this procedure, the pressure decreases slightly.
- In reality, the radiators have to be started 2 times - when filling with hot water and when turning on the boiler.
- The correct operation of the unit is monitored using the values that appear on the dashboard.
If you strictly follow the instructions for starting the heating system, it will maintain a stable temperature without pressure surges in the pipelines.
It is advisable that the first start-up of a gas boiler is carried out by employees of specialized service centers for servicing this heating equipment. It also doesn’t hurt to know what to do if the gas boiler blows out with the wind, in order to solve such a problem if necessary.
Boiler room arrangement
The first question that needs to be resolved by someone who wants to install a solid fuel boiler in their wooden house is the question of allocating a special room: a furnace room, a boiler room, a boiler room, or, as is more correct from the point of view of the compilers of regulatory documents, a mini-boiler room .
A properly assembled heating system is the key to comfort in your home. For solid fuel boilers, the requirements for room arrangement are not as stringent as for heat generators using liquid fuel or gas. However, there are restrictions and rules on which the efficient, long-term, uninterrupted operation of the equipment and your safety depend.
Separate room
The best option is to plan the location of the furnace at the design stage of the house. But this is not always possible: it happens that the heat generator is installed in a finished house or during the reconstruction of an old home. The room for installing the boiler must be non-residential. It is not recommended to install it adjacent to living rooms, or to place it under stairs or in attics. The furnace room cannot be used as a storage room, cluttering it with things and objects that are not related to the boiler room equipment.
Boiler room. Photo from the site klass.photolandiya.ru For units with a total power (for heating and hot water supply) of less than 150 kW, placement on any floor is possible. If the power of the heating equipment is from 150 to 500 kW, the boiler room can only be located on the first, semi-basement or basement floor, or even better - in a separate extension to the main building, especially if it is a wooden house. An extension for the boiler room is installed on the side of a blank wall, and the distance to window and door openings must be at least 1 m. For the construction and decoration of this auxiliary room, non-combustible materials are used - capable of withstanding fire for at least 45 minutes. The foundation of the boiler room should not be connected to the foundation of the main building. For installation of the boiler, it is possible (recommended) to pour an additional podium with a height of 150-200 mm. The podium area should be no more than 50 mm wider than the dimensions of the heat generator.
Separate mini-boiler room. Photo from econet.ru Think about the option of installing a free-standing boiler room. This may be beneficial from an aesthetic point of view, as well as being more effective for reasons of safety and ease of construction. Boiler rooms located separately from the house can be either full-fledged (accommodating all the equipment) or solely for housing the boiler, and boilers, pumps, automation, etc. are located in the house. Such designs are called modular mini-boiler rooms .
When size matters
The optimal size of the boiler room depends on the selected boiler and other equipment, taking into account convenient maintenance. But its area must be at least 7 m², and its cubic capacity must be 15 m³. This is for boilers with a power of up to 30 kW. If the equipment is more powerful, then add another 0.2 m³ for each kilowatt of power. The ceiling height in the furnace room is at least 2.5 m. How much space to allocate for installing the boiler itself depends on its type and model. If pellets are used as fuel, then it is necessary to take into account the size of the bunker, as well as the method of loading it.
Do not forget to take into account the dimensions of the fuel bunker. For a bunker designed for 400-600 liters, a reserve of space and height is required. To load, you will need to provide a small, stable ladder, since lifting heavy bags over your head is inconvenient. For boilers using sawdust or husks, the method of fuel supply is also important: a circulation or screw agitator takes up more space than a pneumatic supply. In addition, wood waste boilers have a high firebox, and the feed occurs from above. This means that the ceiling height should be higher than standard. There is no need to place the boiler close to the walls; there should be free space around it for service and repair - at least 500 mm. If 2 boilers are used, then the distance between them is at least 1 m. There must be 2 m of free space in front of the device. The manufacturer must indicate the installation requirements in the boiler passport. There may be special recommendations specific to your model, so be sure to read the instructions. In our market, where offers from large online stores are presented, you can choose heating equipment for your home. Go to the selection of solid fuel boilers. Solid fuel boiler Zota “Сarbon-26” RUB 51,990
Stoves here Solid fuel boiler Zota “Pellet”-40S
RUB 239,900
Stoves here Solid fuel boiler Zota “Pellet”-63S RUB
329,900
Stoves here Solid fuel boiler Zota “Topol-14M”
RUB 33,890
About windows, doors, ventilation, etc.
The boiler room must have an opening window for emergency ventilation and daylight. Its dimensions are also regulated. The window area is calculated as follows: for each cubic meter of boiler room volume there should be 0.03 m² of glazing.
Checking heating system elements
Without the correct functioning of all components of the heating system, it will not be possible to start it correctly. First of all, you need to check the operation of measuring devices - thermometers and pressure gauges.
It is also necessary to check the functioning of the protective elements. The system may not start if the bleed valve or air vent seats do not move due to limescale or rust. For this reason, each of them is opened manually.
The pressure of the air chamber controls the expansion tank; it must exceed the nominal value in the system by 5-7%. If the design of the tank allows you to change the membrane, it should be disassembled and checked in what condition it is.
The cost of the service for launching a heat supply system in a private household depends on many factors and is determined individually.
Solid fuel boiler Sakovich W Standart 10 kW
The advantage of the boiler is a large combustion chamber and large loading doors, operating time on one load, simplicity and durability of the design, and the ability to be used in a non-volatile system. Reviews (2)
RUR 2,029 Buy
Bestseller!