About the manufacturer
Since 2006, Keber gas boilers have been produced by the domestic company, which is part of the Tactical Missile Arms OJSC corporation. These heating devices are well adapted to Russian operating conditions; they operate smoothly even in places characterized by very low temperatures.
If necessary, such heating devices can be used for heating premises in the Far North.
Keber's product range includes both household and industrial models.
Single-circuit and double-circuit units are distinguished. The first are used exclusively for heating, while others provide the room not only with heat, but also with hot water.
Peculiarities
The ATEM brand has invested all its efforts in the development and production of high-quality devices for autonomous heating. For more than 27 years, the company has been providing heat to its consumers in the form of Zhytomyr gas boilers. Since the introduction of the first boiler, a huge rebranding has been carried out, the device has received changes from the internal base of spare parts to the external design. Today, the Zhitomir boiler is a neat, small-sized unit with switching instructions that even a child can handle. The main quality inherent in boilers of this brand is the quality and reliability of the device. Product specifications have also changed as new technologies emerge. Not only these components, but also many other facts allowed the ATEM brand to receive the European Quality award.
Technical characteristics and device
Keber boilers are distinguished by their reliable assembly and long service life. The manufacturer provides a 15-year warranty. Also, units of this brand are characterized by high efficiency.
Keber gas boilers are equipped with gas burners, which ensure:
- stable heating of the coolant;
- maximum complete combustion of fuel.
In addition, these elements are distinguished by high anti-corrosion properties.
Due to the fact that Keber boilers have gas burners, the size of their fuel chambers is smaller than that of similar heating devices produced by other manufacturers. Thanks to the special design of the Danko automation, fuel burns as efficiently as possible, even if the flame height reaches 7 cm.
The Danko nozzle is a certified design, which is in no way inferior in quality to its European counterparts.
Also included in the package is the Arbat automatic system, which is responsible for regulating the operation of heating equipment and its safety. There are five levels of protection. If the pressure in the water or gas supply system decreases, the unit will turn off automatically. The design of the automation is simple, which has a positive effect on its reliability, and in case of problems, repairs will be simple.
It is worth saying that, if desired, users can order from the boiler manufacturer Keber a model with a more expensive, but at the same time more reliable and high-quality Italian Eurosit automation. Such units can operate practically without third-party intervention.
You can read about the types of automation for gas boilers here.
The assortment of the company that produces Keber boilers includes a wide selection of models of different powers: 10, 12.5, 16, 20 kW, etc.
Let's look at the technical characteristics of the device using the example of the Keber 12.5 floor-standing model:
- type of execution - floor-standing;
- combustion chamber - open;
- power - 12.5 kW;
- Efficiency - from 85%;
- mechanical control;
- gas consumption - 1.62 m³;
- weight - 39 kg;
- heated area - 125²;
- The maximum water pressure in the heating system is 3 bar.
Gas non-volatile boiler KS-G Keber 12.5 with EUROSIT automation
Instructions for preparing for launch
To use gas, you need to follow simple instructions. The first launch is carried out when the installation of equipment and piping are completed, and the correct installation is checked. All fastenings and location of the boiler must be made in accordance with fire safety rules. A certain distance must be maintained from the boiler to the wall. Which one you need to look at in the instructions for the boiler. For some models of gas boilers, this condition is not necessary. You need to make sure that there are no flammable objects or materials nearby. The boiler should not be placed near windows, as its operation will be disrupted. Great attention must be paid to ensuring that the body is mounted smoothly and there are no distortions.
After this, the equipment is connected to the cold water supply, all plugs are removed from the pipes, and a special filter with a ball valve is installed at the inlet. This helps protect the system from contaminants that could cause breakdowns. Ball valves must be installed on each pipe used for piping.
When solving the problem of how to start a boiler, great attention must be paid to the installation of gas pipes. In this case, it is not recommended to carry out the work yourself; for this purpose, an employee of the relevant service is invited who makes such a connection, sealing, and, if necessary, installs a gas meter.
What else needs to be connected before launch? It is necessary to install a separate power line for the boiler. The equipment is supplied with an electrical cable and plug; during installation, it is necessary to ensure that there is an outlet next to the boiler; it is better to separate it from the others. Next, a connection is made to the chimney pipe, its draft and performance are checked. The pipe itself must go outside; the conditions for its installation depend on what type of chimney is chosen. The last part of the preparation for starting is to disconnect the boiler from the electricity so that it can be filled with cold water. Next, the absence of leaks is checked, the thermostat is turned on to the maximum value so that the mode switch automatically lights up.
Return to contents
Malfunctions of Keber gas boilers
Of course, any equipment can fail. Keber boilers are no exception. Let's look at the most common problems that owners of such equipment have to face:
- Unstable operation of the igniter. This problem is usually solved by cleaning the nozzle. In some situations, it is necessary to check the meter, since it may not allow gas to enter the system in the required quantity.
- The gas burner goes out a few minutes after being turned on. There can be many reasons that lead to this, but most often it is due to the failure of the traction sensor. It is best to contact specialists.
- There is no gas supply to the injectors. If you purchased a boiler with an Arbat automatic, then most likely the stem is jammed in the middle part of the structure. You can drop a little machine oil yourself, then check the automation for gas leaks. If the above steps are unsuccessful, then you should contact a specialist.
Review of the Keber KSG 10K-01 boiler
For what reasons does a gas boiler go out?
To summarize all of the above, it is worth saying that the Keber gas boiler is an effective heating device. User reviews indicate that the unit is economical, easy to use and has a long service life.
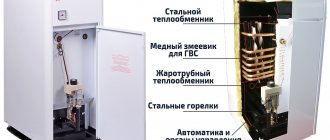
Design Features
The main elements of the Zhitomir boiler are:
- a housing in which the main components and equipment are installed;
- gas burner unit located in the firebox. Here gas combustion occurs and heat flow is released;
- recuperative heat exchanger, in which heat exchange occurs between combustion products and coolant;
- gas exhaust system, its responsibilities include removing combustion products outside the boiler and releasing them into the chimney.
In order to increase the efficiency of heat transfer, the gas boiler Atem Zhytomyr 3 has the following design features.
- The heat exchanger pipes made of heat-resistant steel have a rectangular cross-section; this device allows you to increase the contact area of the flue gas and the coolant.
- The counter movement of coolants was organized, this solution made it possible to increase the efficiency of the heat exchange device to 92%;
- To increase the area of interaction between combustion products and the coolant, as well as to prevent the accumulation of soot on the surface of the steel pipes of the ATEM boiler heat exchanger, turbulators are installed. Soot accumulates on the lower surface of the turbolizers, while the pipe walls remain clean. To remove soot, you need to periodically remove the turbolizers and clean them of soot.
- Gas double-circuit turbocharged boilers in Zhitomir have a coil of copper pipelines around the heat exchange heating pipes.
To organize a stable gas combustion process, a POLIDORO gas burner device is used. Its distinctive feature is a single-stage atmospheric burner. The edges of the burners themselves are made of heat-resistant steel, which allows you to maintain the combustion mode at different gas supplies to the firebox. Even at low gas consumption, the heating of the edges is sufficient to maintain stable combustion.
The gas supply mode is regulated by the EUROSIT gas valve. This device automatically switches the gas supply to the burners depending on the temperature of the coolant. The user independently sets the temperature of the coolant, focusing on the temperature in the open air. As the ambient temperature decreases, the temperature of the coolant increases.
Sources
- https://www.stroy-podskazka.ru/otoplenie/kotly/zhitomir/
- https://ProfiTeplo.com/gazovye/56-kotly-zhitomir.html
- https://SpetsOtoplenie.ru/gazovoe-otoplenie/gazovye-kotly-evropejskogo-proizvodstva/chto-nado-znat-pro-gazovyj-kotel-zhitomir.html
- https://teplospec.com/gazovoe-otoplenie/kak-zapustit-gazovyy-kotel-vpervye.html
- https://microklimat.pro/otopitelnoe-oborudovanie/kotly/kak-vklyuchit.html
Let's move on to cleaning the column
Turn off the gas supply valve to the boiler. Using wrench No. 10, unscrew the fastening screw under the boiler door and remove the door.
Disconnect the wire connecting the piezoelectric element and the ignition electrode.
Using key No. 10, unscrew the thermocouple clamp. Using wrench No. 9, unscrew the thermocouple from the valve.
Note:
It is necessary to ensure that the thermocouple does not turn while unscrewing.
We note the depth of insertion of the nozzle into the main burner so as not to disturb the boiler settings.
Using wrench No. 17, unscrew the nut securing the copper tube from the burner to the valve. Using wrench No. 10, unscrew the ignition electrode from the pilot burner and the copper tube from the pilot burner and valve. Using a flat-head screwdriver, unscrew the two screws securing the pilot burner.
The gasket installed under the pilot burner has become unusable. It will need to be replaced.
Remove the nozzle from the pilot burner.
Tip: if the nozzle is stuck, you can lightly tap the burner with a key.
We unscrew the four screws securing the main burner to the boiler body and the screw securing the housing to be able to remove the main burner.
Lowering the main burner down, remove the copper tube from the valve.
Remove the main burner.
Remove the thermometer sleeve from the boiler body.
Using wrench No. 10, unscrew the four screws securing the top cover of the boiler and remove it and the insulation sheet under it.
Unscrew the two nuts securing the flue to the boiler body.
Remove the terminals from the draft sensor.
We remove the gas duct.
We remove the swirlers from the boiler heat exchanger. We clean them with a brush. If necessary, use a metal brush.
Clean the outer part of the heat exchanger with a metal brush. We clean the heat exchanger channels with a brush to the full depth. Clean the bottom of the heat exchanger with a brush. We also clean the gap between the boiler body and the floor. We clean the loose debris using a vacuum cleaner.
Using wrench No. 13, loosen the screw that fixes the depth of insertion of the nozzle into the main burner and remove it.
We clean the burner with a brush and a brush, and clean its holes with a vacuum cleaner. We clean the flue of dust from the outside and inside.
We clean the outer surface of the nozzle with a brush, then clean the nozzle holes with a needle or wire.
Note: The needle should be smaller in diameter than the nozzle hole. Even a slight increase in the diameter of the nozzle hole can affect the combustion mode.
We install the main burner in place.
We install a copper tube with a nozzle and attach its nut to the gas valve.
Only after this do we secure the nozzle to the burner at the mark using wrench No. 13.
Note:
This sequence is necessary in order not to strip the threads in the valve body.
Finally tighten the nut of the copper tube with wrench No. 17.
Clean the pilot burner with a metal brush.
This is how the thermocouple should be installed in the pilot burner (the tip of the thermocouple opposite the flame).
We install the pilot burner on a new gasket.
Before installing the nozzle into the pilot burner, it must be slightly rubbed against the tip of the copper tube for better sealing. The nozzle should also be cleaned or purged.
We connect the copper tube to the pilot burner and to the valve using a number 10 wrench.
The remaining parts of the boiler are assembled in the reverse order. When connecting, the ignition electrode should not be clamped with a key; it is enough to do it by hand, since it is made of ceramic and can easily crack.
We carry out control washing of all compounds. It will be possible to check the tightness of the connections of the copper tubes to the main and pilot burners only when the boiler is turned on.