Material Information
Penoplex is the same extruded synthetic polystyrene. This polymer insulation is produced in various thicknesses with the following properties:
- helps to effectively retain heat;
- has good mechanical strength and provides a strong base for plaster and putty;
- has high-quality sound insulation;
- does not absorb liquid;
- resists the emergence of harmful microorganisms.
The disadvantages of the material are its toxicity and rather high price, so it is unlikely that you will be able to save money on it.
What is penoplex?
Penoplex is a brand of insulating material produced by a company specializing in the production of insulators based on polystyrene foam. Today this name has become a household name. Penoplex is foamed polystyrene boards that are produced using a gas-free method.
- To achieve the effect of porosity of the finished material, the initial raw materials for its production - polystyrene itself and the solid filler that forms gases - are driven through special filters under significant pressure and at high temperatures.
- The resulting foamed substance passes through roller rollers, where it is flattened and divided into strips corresponding to the required thickness.
- The frozen material is cut into fragments of the required size.
Why do you need a detailed acquaintance with the structure of penoplex? The use of this material in facade insulation often causes a flurry of criticism, which is not always justified
When choosing insulation, it is important to rely on facts related to its real nuances and characteristics
This type of thermal insulator is universal, not susceptible to chemicals and has significant strength indicators. Penoplex is successfully used to insulate foundations, plinths, and even to create road surfaces. Many experts are convinced of the high flammability of the material, which is why it is not recommended to use it for thermal insulation of facade planes located above the first floor of a building. In fact, such a limitation is relevant for brands of ordinary EPS, which are really only installed in the ground or under a concrete coating layer.
Expert opinion
Konstantin Alexandrovich
In order to insulate or finish the façade of a house without risks, the manufacturer recommends using only a special converted type of extruded polystyrene foam, produced under the brand name. Thanks to improved production technology, including the addition of fire retardants, the output is an insulating material that almost does not burn, but at the same time retains the valuable properties of low heat conductivity, high strength and moisture absorption.
Tools and materials for work
To properly organize work with penoplex, you must have certain tools and materials. Some expensive tools can be rented.
To cover the walls with polystyrene in an apartment you will need:
- foam boards
- special glue;
- penetrating primer;
- plaster mixtures, mesh, putty;
- materials depending on finishing;
- dowels with dish-shaped caps to fix the slabs;
- perforator with a nozzle - a chisel;
- drill and glue mixer;
- notched spatulas and graters;
- knife;
- sandpaper;
- finishing tools.
If you have all the necessary materials and tools, you can safely begin insulating your walls with penoplex yourself.
Dry mixes: simply reliable
The use of dry mixtures allows you to glue penoplex to concrete and brick without much expense or hassle. The dry mixture is added to the water in proportions determined by the instructions for use. The solution is mixed using a drill mixer attachment operating at the lowest possible speed. The resulting mixture is applied to the surface using a notched trowel; the grooves are filled with the trowel. The insulation, installed in place, is held for one minute.
When attaching penoplex to a concrete wall and brickwork, a cement-based mixture is used as the main fastening element.
The process of insulating walls in an apartment
To insulate walls with your own hands from the inside, adhesive or combined technology is often used. The latter is a combination of glue and disc dowels.
- First you need to apply the glue. It is diluted according to the instructions on the packaging; each brand has its own instructions.
- It is best to mix the glue with a mixer. Let the mixture sit and mix again.
- Penoplex from the wrong side must be rolled with a roller with needles to form a rough surface.
- Carefully coat the slab with glue around the perimeter, placing a little of it in the center.
- The polystyrene plate is applied to the wall, pressed and held for 40 seconds, making sure it is placed evenly. Be sure to use a level in your work.
- Pasting starts from the corner at the bottom and proceeds to the sides and upwards. It is allowed to offset each next row by half the length of the panel.
- At the end of the work, dense slabs are fixed with dowel umbrellas.
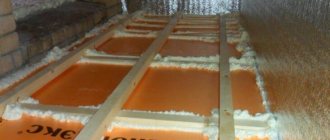
After the glue dries, the small space between the panels is filled with polyurethane foam using a balloon, and pieces of penoplex are inserted into the wider cracks. Detailed instructions for sticking penoplex in this video:
When starting work, you need to trim the protruding corners and edges of the panels with a special knife to simplify further actions.
General installation rules
Correctly attaching penoplex is very important to obtain a high-quality layer of thermal insulation. First of all, you need to secure the starting bar. It can be made independently (we use a wooden beam), or factory-made from perforated metal. In the second case, it is better to purchase a strip in accordance with the width of the insulation, complete with the required number of corners (the corner can be external or internal).
Installation of the strip is carried out as follows. A horizontal line is drawn along the perimeter of the building according to the level. To fasten the “starter” it is better to use dowels. Its use will prevent the insulation from sliding down and maintain the “geometry” of laying the insulation, which is especially important when doing work yourself.
The side of the penoplex on which the adhesive composition will be applied must be rolled with a needle roller to create roughness. The slabs must be installed from bottom to top with an offset of half a slab in each horizontal row.
During installation, the plates are pressed against each other as tightly as possible. For a more durable and “warm” connection, the second row is inserted into the grooves of the first. In order to save adhesive composition, it is possible to seal the joints with polyurethane foam upon completion of installation.
Plastering and finishing process
After gluing the insulating boards, it is necessary to achieve a smooth surface of the walls on which the finishing needs to be applied. The easiest way is to plaster the foam. The sequence of work is as follows:
- A plaster mesh made of fiberglass is attached to the finished slabs using glue.
- A leveling layer 2-3 mm thick is applied to the mesh.
- When it dries, a sufficient layer of plaster is applied in order to hide the roughness of the insulated walls.
- The plaster composition is applied with a wide spatula. It is advisable to complete this work in one step, since the seams between the layers will not be easy to arrange.
- The plastered wall must be rubbed with a special trowel and puttied before painting or other finishing.
Liquid nails: will be a bit expensive
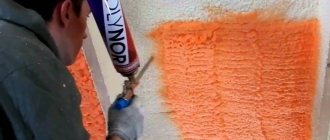
Liquid nails can be used to attach thermal insulation to a well-leveled and primed base. Glue is applied using a sealant gun pointwise around the perimeter and center of the sheet. Fastening is done by briefly pressing it to the surface.
Expensive adhesive significantly increases installation costs. Even with high-quality bonding to the surface and ease of use, the technology of using “liquid nails” is economically feasible for small areas of insulation.
Some tips for insulating private houses
You need to know how to insulate a room in private and country houses. It is advisable to do this during construction to take into account important factors when selecting a suitable method and material. Thermal insulation of the walls of a purchased finished house is also possible. To learn how not to make mistakes when insulating your home, watch this video:
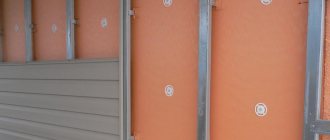
A waterproofing film is stretched over the penoplex
The technology of the internal insulation process looks like this:
- The surface of the walls is cleaned of old finishing, cracks are repaired with a spatula and putty.
- Then it is primed to eliminate the possibility of the appearance of harmful microorganisms. For this, a special acrylic primer is used.
- When the primer has dried, the insulation for the walls inside the house in the country or in a private home is glued - polystyrene. This is done like this: the back side of the tile is smeared with glue and pressed against the wall. You need to start from the bottom and arrange the slabs in a checkerboard pattern. All joints are sealed with polyurethane foam. If necessary, the slabs can be secured with dowels in the center and corners.
- Dense polyethylene is stretched on top of the penoplex, glued at the joints with tape, and then a reinforcing mesh.
- Now you can begin finishing with the selected material.
In conclusion, it is worth noting that in the case of a private house where wooden sheathing is placed on the walls, it is necessary to first cover the wall with plasterboard, then putty all uneven places and areas of fastenings. In this case, it is worth placing a layer of vapor barrier film under this material.
Unfortunately, we quite often see (simply paying attention to houses being built around us or as a result of examinations of problematic facades) that a fairly large number of building facades, especially in low-rise construction, are insulated with extruded polystyrene foam as the main insulation in the system of plaster facades. This is facilitated by the aggressive advertising campaign of extrusion manufacturers, which claims the exceptional effectiveness of using penoplex in “wet systems,” as well as the lack of technical and consumer information about insulation systems for potential buyers.
Why "Unfortunately"? Because extruded polystyrene foam is NOT INTENDED
for insulating walls in facade insulation systems with a thin plaster layer. Only for use in the basement of a building and under tiles.
Certification documents are issued for facade insulation systems in Russia - Technical Certificate of Rosstroy of the Russian Federation. But so far, not a single technical certificate for a facade insulation system with a thin plaster layer specifies penoplex, technoplex or its analogues as the main wall insulation.
That is why you will not find the facade of an administrative building insulated with extrusion, because not a single state inspection organization will approve the insulation project for such a facade (and the insulation of the facades of administrative buildings must be approved), unless it is a “squatter construction”.
For facade insulation systems with a thin plaster layer, two insulation materials are certified - polystyrene foam PSB-S25F (white, density 16-19) or basalt slab (mineral wool).
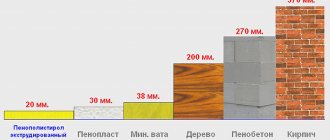
Indeed, penoplex and its analogues have excellent characteristics in terms of thermal resistance coefficient. It is better than PSB-S25F by about 30%. Those. In order to get the same coefficient of thermal resistance of the walls, we must insulate the walls with penoplex 70 mm thick or polystyrene foam PSBS25F 100 mm. Extruded polystyrene foam is 3 times more expensive than ordinary facade polystyrene foam (PSBS25F). That is, by insulating walls with penoplex, you lose 40% on the cost of insulation.
Extruded polystyrene foam has a very, very low vapor permeability coefficient - 0.007 mg/(m×h×Pa) according to Penoplex and 0.018 according to other manufacturers, i.e. it's almost a "vapor barrier". Insulating a house with penoplex prevents moisture from escaping from the wall structure and prevents them from drying out and ventilating. When insulating the facade with penoplex, the microclimate in your home first of all deteriorates - the humidity in the room increases and air exchange decreases. To correct the situation, it is necessary to install forced supply and exhaust ventilation.
Main Differences
Since almost every developer, in the process of constructing a residential building or outbuilding in our climate, is faced with the need to insulate the house, before the heating installation stage, or even earlier, he has to decide which insulation is better: polystyrene foam or mineral wool. Despite the fact that these two insulation materials are used most often in the construction process, there is a big difference between their main characteristics. Due to its sealed structure, polystyrene foam does not have the ability to remove air masses outside. Therefore, if we compare whether polystyrene foam or mineral wool is warmer, the answer will be in favor of polystyrene foam. Thanks to the closed cells, warm air is retained inside the slab and is not vented outside, unlike porous stone wool.
Vapor permeability
Vapor permeability is the main difference between these two types of thermal insulation. For expanded polystyrene it ranges from 0.13 mg/(m*h*Pa) to 0.03 mg/(m*h*Pa). Stone wool indicators range from 0.4 mg/(m*h*Pa) to 0.6 mg/(m*h*Pa).
Comparative characteristics of insulation materialsSource moybalkon.com
This clearly demonstrates that mineral wool insulation removes vapors much better. During the operation of the insulation in the heating mode of the house, vapors are retained on those layers of the wall pie that have the lowest vapor permeability. This means that when using mineral wool alone, the dew point will most likely be located inside the insulation, which will lead to moisture accumulation inside the insulation. If the insulation becomes damp under the influence of vapors, this will lead to a significant deterioration in its properties. Therefore, it is necessary to install a vapor barrier layer inside the house on top of mineral wool. While polyurethane foam thermal insulation itself is non-hygroscopic and does not require the installation of additional membranes.
Fire safety
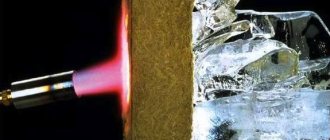
When polystyrene foam or mineral wool are compared in terms of flammability, thermal insulation made from mineral wool wins undisputed primacy.
Consequences of neglecting fire safetySource avatars.mds.yandex.net
All types of polystyrene foam insulation quickly ignite and maintain flammability. Moreover, when burning they melt and fall off in burning drops. Stone wool can withstand high temperatures up to 1000 degrees, does not ignite or burn, which makes its use more preferable in rooms with a risk of high temperatures.
Price
When deciding whether polystyrene foam or mineral wool is better for insulating a house, one cannot ignore the issue of price for the material. Currently, for one cubic meter of stone wool you will need to pay about 2.5 thousand rubles
The same volume of polystyrene foam insulation will cost a little more, and will cost 2.6 thousand. This is a little more expensive, but it is also worth considering the price of vapor barrier, which will cost approximately 15 rubles per square meter.
Choosing insulationSource scientificarab.com
Operation and installation
Installation of polystyrene foam thermal insulation is not associated with the release of airborne particles and dust, unlike stone wool, which generates a lot of dust when cutting. To install EPS layers, you do not need to wear personal protective equipment such as goggles and a respirator, which makes the installation process simpler and more comfortable. It is worth noting that when joining polystyrene foam slabs, there will be a small distance between them, or in other words, a cold bridge. To avoid heat loss in such places, it is necessary to carefully foam each of them. While when joining mats of mineral wool insulation, such gaps do not arise. The mats fit tightly to each other, leaving no gaps or cracks.
A few words about the material
Before starting to describe the technology of thermal insulation work, you should understand the main characteristics of the material itself. Penoplex is the commercial name for extruded polystyrene, a synthetic polymer insulation.
This heat insulator is available in panels of different thicknesses and has the following properties:
- Significant coefficient of resistance to heat transfer . If you are planning to insulate walls from the inside, Penoplex is one of the most effective materials in terms of heat preservation.
- High mechanical strength , which distinguishes this modification of polystyrene from other brands of insulation. The compression resistance of the panel is about 25 t/m2, and therefore insulating the walls from the inside with Penoplex provides a fairly strong basis for plaster and putty.
- High-quality sound insulation . Thanks to their porous structure, wall panels absorb loud sounds well.
- Non-hygroscopic . The material does not get wet and does not allow moisture to pass through, including water vapor. Indirectly, this is also the reason that Penoplex does not become infected with bacteria and fungi.
The disadvantages of a heat insulator include toxicity when ignited, as well as relatively high cost. The price of Penoplex is significantly higher than the cost of polystyrene foam used for similar purposes, so this material is unlikely to be suitable for the most economical insulation.
Specifications
Fine-cell structure of expanded polystyrene
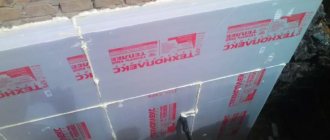
Extruded polystyrene foam Technoplex XPS is distinguished by a homogeneous structure with closed gas cells. The number of closed pores is almost 100%, which ensures minimal water absorption and stable thermal conductivity characteristics. Graphite nanoparticles in the material give it a grayish tint and increase the strength of the slabs.
Technical characteristics of Technoplex insulation:
- thermal conductivity index – 0.032-0.037 W/(m*K);
- water absorption – 0.2%;
- vapor permeability – 0.014;
- density – 26-35 kg/m3;
- compressive and bending strength – 100-150 kPa;
- operating temperature – from -70 to +75°C;
The low weight of the insulation simplifies transportation and installation; the overall weight of the building structure increases slightly. High resistance to deformation allows the slabs to be used in areas with high loads. They are effective in arranging all types of roofs (pitched, flat), and external insulation of foundations subject to soil pressure.
Preparation
Purchase of tools and consumables
So, what do we need to perform a full range of thermal insulation work using polystyrene boards?
- Penoplex itself.
- Adhesive for polystyrene panels.
- Disc-shaped dowels for fixing slabs to the wall.
- Penetrating primer (the brand of primer depends on the material from which the walls of the house or apartment are built).
- Plaster mixtures.
- Plaster mesh.
- Putty.
- Finishing materials - paint, wallpaper, decorative plaster, etc.
Adhesive mixture for polystyrene materials
The set of tools is typical for work related to facing and plastering work:
- Hammer drill (chisel attachment is desirable).
- Drill with glue mixer.
- Spatulas and graters with serrated edges.
- Knife for cutting polystyrene foam.
- A grater with sandpaper for grouting the plaster layer.
- Finishing tools.
When all the materials have been purchased and all the tools are at hand, you can start working.
Pre-treatment of walls
Before insulating a wall with Penoplex from the inside, its surface must be prepared:
- If we carry out work in a residential area and not in a new building, then first of all it is necessary to clean the walls of the old finish.
Advice! If the condition of the plaster under the finishing is satisfactory, then it can be preserved. Otherwise, remove the plaster layer to the base.
- We treat the cleaned wall surface with a primer that improves adhesion.
- If the wall has significant unevenness (for example, we are insulating an old brick house), then we fix a plaster mesh on top of it and apply a leveling compound.
The principle of thermal insulation with penoplex
Sheathing a house with penoplex requires a special approach, taking into account the thickness of the slabs used. Therefore, first of all, it is necessary to understand the thickness of the thermal insulation layer.
Required thickness of Penoplex
So, it has already been indicated above what thickness this material is produced. This is a fairly wide range of sizes, which is not produced in vain. In order to determine this parameter specifically for your home, it is necessary to carry out a thermal engineering calculation. It is based on the requirements of SNiPs, which indicate that all layers separating the interior from the street must create a heat-protective barrier that would not let the outside temperature into the rooms. And this parameter should not be lower than that specified in SNiP.
The thickness of the insulation is selected based on the average winter temperatureSource dovidkam.com
That is, each layer, and this is not only insulation, but also the wall itself, decoration, etc., are barriers that have some kind of protective properties. Some to a greater extent, some to a lesser extent, but each layer performs such a protective function. True, not everything is so simple here, so this calculation is carried out by specialists. In this case, there is no need to engage in amateur activities. The only thing we note is that the thickness of the insulation mainly depends on the region where the house is being built. The colder it is in the construction area, the thicker the thermal insulation layer should be.
Facade insulation technologies
Today, there are two technological schemes for insulating facades: wet and ventilated. Let's look at each separately, but let's immediately note that the method of laying penoplex on the walls is identical. The technological schemes for installing the remaining building materials are simply different.
Insulation technology
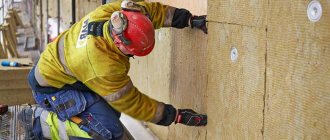
Pasting surfaces with Penoplex
If Penoplex is used as a heat insulator, insulation of walls from the inside is most often carried out using adhesive or combined (glue + disc dowels) technology:
- First you need to prepare the adhesive composition. To do this, pour the dry component into a clean container of water. The instructions should contain information about the proportions, since they are different for each brand of glue.
- Stir the glue with a mixer mounted on a drill, leave for 10 minutes and stir again.
Advice! Dried glue cannot be reused even after diluting it with water!
- We roll the back of the penoplex with a needle roller to ensure a rough surface.
- Apply glue around the perimeter of the slab, adding a small mound in the center.
- We apply the Penoplex panel to the wall and press it for 30-40 seconds, leveling it flat. We control the placement of insulation using a level.
- We cover the wall, starting from the bottom corner, and moving up and to the side. For greater reliability, we shift each next row by half the length of the panel.
- The glued panels can be additionally secured with dowel umbrellas. This is usually done when thick polystyrene slabs are attached.
After the glue has dried a little, we fill the gaps between the panels with polyurethane foam to insulate the walls from a cylinder. We insert pieces of penoplex into cracks more than 10 mm wide.
Advice! Before starting plastering work, it is worth trimming the protruding corners and edges of the panels with a painting knife. This will greatly simplify our further work.
Sequence of plastering and finishing works
Photos of walls ready for plastering
Next, we need to provide a flat wall surface onto which the finishing can be applied.
The easiest way is to plaster Penoplex:
- We attach a plaster mesh made of fiberglass to the wall covered with insulation panels. Most often, leveling adhesives are used for fastening, but mechanical fixation is also allowed.
- Apply the first leveling layer along the mesh. Its thickness should not be more than 2-3 mm.
- After the leveling layer has dried, apply plaster. The thickness of the plaster layer should be sufficient to hide as much as possible all the irregularities of the insulated wall.
- A wide spatula is used to apply the plaster composition. You should try to complete plastering work in one pass, since arranging seams between layers of plaster is quite troublesome.
- We grout the plaster using a special trowel, and then putty it for painting or wallpapering.
If we had wooden sheathing beams attached to the base, then finishing is done much faster. It is enough to sheathe the wall with plasterboard, and then fill in all the irregularities and fastening points.
Advice! Experts recommend laying a layer of vapor barrier film under the gypsum board. Although Penoplex does not allow moisture to pass through, this precaution will not be superfluous.
The final stage is the finishing of our premises.
Results
Extruded polystyrene foam is an improved version of regular foam. It comes in pale orange and gray colors. Graphite has been added to gray EPS, making it even stronger. The thermal conductivity coefficient of EPS is lower than that of foam plastic by 0.005 W/m*C; it is much stronger with a relatively low density of 25 kg/m. cube It is not afraid of moisture and can lie in the ground for half a century without any changes in its characteristics. Contact with IR rays on the material should be avoided, since polystyrene foam and its derivatives slowly deteriorate in the sun.
EPS can be used wherever the material is not required to breathe. Considering the high cost, it is used only when ordinary polystyrene foam cannot be used. Installation does not contain any special tricks; you need to fix the material on the working surface and foam the joints. Where there are high temperatures, for example, in a steam room, it is better to abandon the use of any polymer materials in favor of mineral wool.
Technoplex: properties, scope
Due to the resistance of XPS TechnoNIKOL to moisture and mechanical damage, it is used when pouring and insulating strip foundations. The slabs have an L-edge, which reduces the risk of cold bridges. The material does not lose the characteristics declared by the manufacturer even at 100% humidity, and the absence of formaldehyde in the insulation composition guarantees environmental safety for humans.
Installation of Technoplex slabs is carried out using polystyrene foam glue with additional fastening with wide-headed dowels. Technoplex is warmer than brick; 50 mm of extruded polystyrene foam replaces a 600 mm foam block wall. If we compare Technoplex with polystyrene foam, then, despite the higher cost, the material has a wider range of applications compared to expanded polystyrene.
The main signs of a quality XPS
XPS is produced from polystyrene granules by extrusion. High-quality material is very durable, has a low thermal conductivity coefficient, and does not absorb moisture. Regardless of the area in which the XPS board will protect the object from heat loss, when choosing a material you should pay attention to several key indicators. They are important for any design.
Uniform structure. The edge of the slab should be inspected. The cell size of high-quality material is 0.05–0.08 mm. It is virtually impossible to distinguish such a cell with the naked eye. But if the material is of poor quality, then the cell is easy to notice, and a microscope is not needed for this.