Production of penoplex and types of material
The production of penoplex is organized using the following technology: small polystyrene granules in a sealed chamber are exposed to high temperatures (1300C-1400C), as a result of which they melt, and after adding blowing agents they foam. Porophores are synthetic additives that, when heated, release nitrogen and carbon dioxide, which, after the penoplex cools, turn into frozen air bubbles, evenly distributed throughout the material.
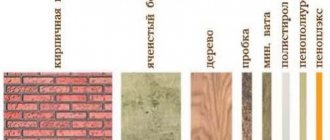
Comparison of thermal conductivity of penoplex and other building materials
Components of blowing agents for the production of extruded polystyrene foam (penoplex):
| Penoplex components | Volume by mass |
| Polystyrene | 100 |
| Fine perlite | 1 |
| Sodium bicarbonate Na2CO3 | 1 |
| Citric acid C6H8O7 | 0,8 |
| Zinc stearate (C36H70O4Zn / Zn(C18H35O2)2) or barium stearate (C36H70BaO4) | 0,2 |
| Tetrabromoparaxylene - an additive to provide self-extinguishing properties to foaming polystyrene | 1,2 |
Production of penoplex
Cured foam may contain some synthetic fillers, the presence of which determines the direction of application of the insulation - for walls, foundations, etc. The most common additives are flame retardants to increase fire safety (reduce the degree of flammability), antioxidants to protect the material from oxidation in the open air, antistatic substances to relieve static and dynamic stress during insulation operation, light stabilizers (protection from the negative effects of UV radiation), modifying additives and etc.
Polystyrene foam is pressed under pressure from the extruder chamber onto a conveyor for final formation into slabs or blocks. The percentage of gases in the insulation reaches 98% of the total volume of the finished penoplex, so the products are light in weight with impressive dimensions. Dimensions for each functional line of insulation are given in the tables below.
Sizes and types of penoplex
The small size of the pores (0.1-0.3 mm) and their complete isolation from each other guarantees high thermal insulation performance of any brand of penoplex. For different construction projects, it is necessary to select the appropriate series and brands of insulation, since structures can be operated under different conditions:
- Brand “K” is designed for insulation of pitched or flat roofs and roofs. Specific gravity (density) of the “K” series – 28-33 kg/m3;
- Series “C” – insulation for internal and external walls with a substance density of 25-35 kg/m3;
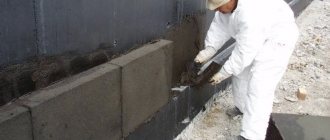
- Brand “F” is used to insulate foundations, basements and basements. Material with high moisture resistance, biological stability and specific gravity ≥37 kg/m3;
- Penoplex brand "Comfort" is a universal series of insulation with a density of 25-35 kg/m3. Direction of application – insulation of apartments, houses, basements, balconies and loggias;
- Brand “45” has the highest frost resistance and strength, specific gravity 35-47 kg/m3. Designed for thermal insulation of road surfaces, runways, and other heavily loaded objects and structures.
Expanded polystyrene sandwich panels
A separate category produces sandwich panels, which are an improved thermal insulator for insulating attics and mansards, facades and foundations of buildings. The sandwich panel has 2-3 layers and a cement bonded particle board as the bottom layer.
Insulation technology
Penoplex Base is excellent for insulating both floors and walls.
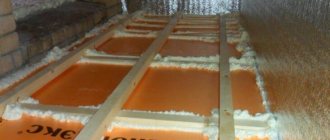
Insulation of a wooden floor with joists
Firstly, all damaged areas on the boards and joists are replaced.
Next, all wooden surfaces are impregnated with antiseptic agents to prevent rotting. Recesses and cracks found on the boards must be filled with special wood putty. Next, all wood surfaces are primed. After the primer has dried, the installation of insulation sheets begins. They are cut according to the distance between the joists and the length of the room and placed on boards.
The joints between the foam boards should remain as tight as possible; they are additionally secured with construction tape. Next, sheets of vapor barrier material are laid overlapping on the foam boards. Boards, plywood or chipboard are attached to the vapor barrier layer. The final stage is the installation of flooring (linoleum, laminate, parquet).
Floor insulation when laid on the ground
When insulating floors in a house with a pile or strip foundation, the method of laying insulating material on the ground is used. First, you need to level the layer of earth and then compact it.
Next, crushed stone and gravel are poured onto the ground. Sand is then poured in and compacted. Penoplex sheets are laid on the sand “pillow”, starting from the corner, pressing tightly.
To protect against moisture penetration, a waterproofing membrane is laid on the foam sheets so that its edges extend 10-15 cm up the wall.
To strengthen the structure, the screed is reinforced with metal mesh. Next, a cement-sand mixture is used for the screed, which is poured over the mesh. Finally, after the cement layer has completely dried, linoleum is laid on it or laminate or parquet is laid.
Insulating the floor under the screed
When using this method of insulation, it is recommended to choose the Foundation modification of penoplex.
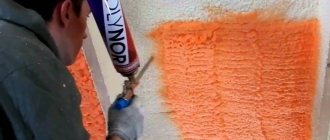
Insulation of walls from the inside
Penoplex Base is often used when insulating the internal walls of a house. Firstly, the walls are cleaned of the old coating and a layer of primer is applied. Next, they begin to attach the foam sheets to the walls.
First, the underside of the base foam sheet is passed with a needle roller to ensure better adhesion. Next, an adhesive layer is applied to the sheet, the sheet is applied to the wall surface and held for half a minute.
Gluing begins from the bottom corner, then moving up and to the side. The glued foam sheets are additionally fixed with plastic dowels with an umbrella cap. After the glue has dried, use foam to fill the gaps between the sheets.
Important: recesses more than a centimeter wide must be filled with scraps of foam sheets.
At the next stage, the fiberglass plaster mesh is attached with glue or using dowels. Next, a leveling layer of plaster is applied, and then a finishing layer of putty. Finally, the surface is painted or wallpaper is glued to it.
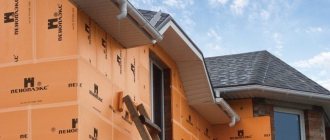
Insulation of external walls
When insulating the walls of buildings and structures from the outside, it is recommended to use Penoplex Facade, which contains special flame retardant substances to reduce the risk of fire.
Operational and technical properties of penoplex, advantages and disadvantages
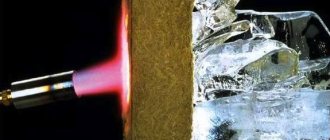
- Thermal conductivity – 0.03 Wm·0С, the indicator does not decrease even with strong humidification;
- Water resistance – 0.4-0.6% when immersed in water for 24 hours and for a month;
- The vapor permeability of the material can be compared with the same indicators of roofing felt with a layer thickness of 20 mm;
- Chemical passivity: penoplex does not react to contact with building mortars and most aggressive substances. Substances with which penoplex contact is contraindicated: kerosene, acetone, formaldehyde, benzene, xylene, toluene, formaldehyde, methyl ethyl ketone, ether, diesel fuel, gasoline, tar, paints and epoxy resins;
- High mechanical resistance to stretching, compression, tensile forces and multi-vector pressure. The compressive strength of penoplex is 0.2-0.5 MPa;
- Biological neutrality - penoplex does not develop mold, does not decompose and does not rot;
- Wide range of operating temperatures – from -50 to +750С. The temperature range for each brand is indicated on the packaging;
- Flammability groups for different brands are different, from G1 to G4, depending on operating conditions;
- Environmentally friendly material without the use of phenols and freons in the production;
- Guaranteed service life ≥55 years without noticeable loss in properties.
Insulation of the balcony with penoplex brand "Comfort"
Advantages of penoplex:
- Thermal conductivity properties make it possible to use penoplex even in the Far North - multiple freezing/thawing cycles of the material do not affect its characteristics;
- Light weight makes transportation, warehousing, storage and insulation of the object easier, allows you to lighten the foundation and not strengthen the ceilings;
- Simple installation without the help of specialists and special tools - penoplex can be easily cut with a regular hacksaw or cutter;
- Safety and environmental friendliness - you can work with the material without personal protective equipment;
- Low cost of all brands of insulation. Even with a large consumption of heat insulator, the costs of its purchase and installation pay off in 2-3 seasons.
Results of wall insulation with penoplex
Disadvantages of penoplex:
- Low fire safety - material of any flammability group, even with fire retardant additives, can catch fire and release caustic toxic smoke;
- Low coefficient of vapor permeability, and under certain weather conditions - negative. Therefore, it is not recommended to use penoplex for internal insulation of house walls. To maintain optimal operating conditions for the insulation, it is necessary to provide forced-air ventilation in the house and ventilation of channels in walls insulated with penoplex;
- Destruction of the material when exposed to ultraviolet radiation - sunlight. It is necessary to protect the insulation layer with plaster or other methods;
- Due to the smooth surface, the adhesion of penoplex to mortars is quite low, so the insulation should only be attached to dowels or special expensive glue, but not to mortars.
Penoplex "Wall"
Penoplex wall insulation: selection, price, step-by-step installation instructions
Any residential buildings located in cold regions of the country require mandatory insulation, since walls not insulated from low temperatures are one of the main causes of heat losses, which can amount to up to 25-30%. Penoplex wall insulation is used for both external and internal thermal insulation of buildings.
Penoplex wall insulation
This material has all the necessary performance qualities that will help protect walls not only from winter cold, but also from overheating in the summer heat. Previously, ordinary polystyrene foam was more often used for these purposes. Although it is made from, in principle, the same raw materials as penoplex, the technology is completely different, so the material has a more porous structural structure, which is not entirely suitable for external insulation.
Main characteristics of penoplex
Penoplex is slabs of expanded polystyrene obtained using extrusion technology - forcing foamed molten plastic mass through molding nozzles (nozzles). As a result of the combined influence of temperature and high pressure, upon hardening the material acquires a finely porous structure, with small air “cells” of approximately the same size (from 100 to 200 microns), each of which is isolated from the others. This structure provides two main characteristics of this type of polystyrene foam - excellent insulating qualities along with high mechanical strength.
Thanks to its microporous structure, penoplex has high insulating qualities and mechanical compressive strength.
To begin with, in order to evaluate the advantages of penoplex, here are briefly a few digital indicators of the main parameters of this material.
Table: technical characteristics of penoplex
| Name | Test method | Unit | Numerical indicators |
| Compressive strength at 10% linear deformation, not less | GOST EN 826-2011 | MPa (kgf/cm²; t/m²) | 0.2 |
| Density | GOST 17177-94 | kg/m³ | 25-32 |
| Water absorption in 24 hours, no more | GOST 17177-94 | % by volume | 0.4 |
| Fire resistance category | F3-123 | group | G3 |
| Thermal conductivity coefficient at (25±5) °C | GOST 7076-99 | W/(m×°С) | 0.03 |
| Sound insulation of partition (GKL-PENOPLEX® 50 mm-GKL), Rw | GOST 27296-87 | dB | 41 |
| Standard sizes | Width | mm | 600 |
| Length | mm | 1200 | |
| Thickness | mm | 20; 30; 40; 50; 60; 80; 100; 120; 150 | |
| Operating temperature range | THAT | °C | -100 … +75 |
Even a preliminary assessment of the given characteristics shows that the material is very effective for thermal insulation work. However, it is worth considering its qualities in more detail:
Low water absorption
This parameter is very important for any insulation, since with high hygroscopicity the material swells, loses its air layer, and freezing of the absorbed water can cause its destructuring, causing it to lose its basic qualities and become useless.
The value of this parameter for penoplex was officially determined through laboratory tests. The material was completely immersed in water and then monitored for a month. At the same time, it was revealed that the penoplex absorbed a small amount of moisture only in the first ten days, and then the humidity in it did not increase at all.
After 30 days, the amount of absorbed moisture in the penoplex was about 0.6% of the total volume of the slab. Based on this, it was concluded that moisture penetrates only into the outer layer of the material and at the site of its cut, but does not enter its internal structure.
This indicator is even close to hydrophobicity, which is extremely important for insulation for external use. By the way, the fact that the material is resistant to mold and rot directly depends on this parameter.
Low thermal conductivity
The thermal conductivity of penoplex, the coefficient of which is only 0.03 W/m×°C, is one of the lowest among all insulation materials. This parameter is largely achieved due to the structural structure of penoplex and its low moisture absorption.
Thanks to these qualities, the insulation can be used for installation in rooms with high humidity, such as basements, as well as for installation outside walls and for thermal insulation of building foundations.
The foundation and basement of the house also need insulation!
The durability of a strip foundation directly depends on its protection from the effects of ground moisture and low temperatures. Penoplex is ideal for these purposes.
How to properly waterproof the foundation and insulate the foundation with penoplex - read in the special publications of our portal.
Resistance to mechanical stress
The technology for manufacturing penoplex using the extrusion method gives a highly homogeneous structure of the material and makes it very durable. Penoplex almost does not press through when you press it. There will be no significant changes in the structure of the insulation and when walking on it, since it can withstand heavy loads perfectly. The only condition for maintaining its integrity when insulating, for example, a floor, is a flat surface for laying.
Low vapor permeability
Since, in essence, penoplex is extruded polystyrene foam, but with improved physical and technical characteristics, it is highly resistant to the absorption of various fumes. The vapor permeability of a two-centimeter slab of this material can be compared with the same indicator of a layer of roofing felt, which is used for insulating hydro- and vapor barriers of walls and floors.
Penoplex is excellent for insulating wet rooms in baths
This makes it possible to use penoplex for insulating rooms with high humidity, for example, baths.
Light weight
In combination with low thermal conductivity and moisture absorption, the insulation is lightweight. This parameter allows you to easily lift the material to any height. Therefore, in recent years it can be seen on the external walls of panel and brick high-rise buildings - it is used to insulate both load-bearing structures of buildings and balconies.
The material is light. does not weigh down the walls, so it is often used for external insulation in multi-storey buildings
In addition, when penoplex is fixed to the surface, it does not weigh down the structure and therefore does not require approvals or permission for installation.
Easy to process and install
Another advantage of penoplex is its ease of processing. In order to cut its sheets, you do not need any special tools - just an ordinary sharp construction or stationery knife is enough. Installation of the material on the surface is quick, and this process cannot be interfered with by bad weather, since the insulation is not afraid of moisture.
Long service life
For material manufactured in compliance with all technological requirements, manufacturers establish a warranty period of up to 50 years. This period is not unfounded, it is calculated based on the results of laboratory and bench tests, which include repeated deep freezing and subsequent thawing of penoplex, heating it to the highest temperatures that can happen during operation in a wide variety of climatic regions.
Moreover, it should be noted that this is a minimum service life, since high-quality material will last longer.
Chemical resistance
Penoplex is not negatively affected by most chemical compounds used in construction. These include: alkalis, saline solutions, water-based paints, alcohol compounds, bleach, carbon dioxide, ammonia, butane and propane, various oils, concrete mixtures and freons.
However, there are also substances that can negatively affect not only the quality of the insulation, but also its integrity, that is, some of them can simply dissolve penoplex. When insulating a house from the inside or outside, you must be sure to read the information about such chemicals in order to avoid mistakes when installing penoplex.
Such compositions include: gasoline, diesel fuel, formaldehyde, acetone, methyl acetate or ethyl acetate based solvents, enamel and oil paints and other active substances.
Soundproofing with penoplex
By installing this material on the walls of the house, the owner receives not only protection from cold and heat, but also from the penetration of street noise, since penoplex has good sound insulation properties. This parameter is especially important if the house is located near a busy highway or railway tracks. Constant noise negatively affects the human psyche, as there is no opportunity for proper rest. Therefore, finishing the walls with soundproofing material is simply necessary, and penoplex is perfect for this role.
Flammability of insulation
Unfortunately, not everything is going smoothly with flammability and smoke formation.
Penoplex is marked on the flammability scale G3, which means its average level. Manufacturers call it self-extinguishing, but this is not always the case. The flammability parameter largely depends on several factors:
- The quality of the material.
- The presence of fire retardants in its composition.
- The composition of the decorative coating - it can promote or resist the maintenance of fire. This also includes materials located near the insulation - they can also increase the spread of the flame.
In addition, one cannot help but pay attention to the smoke that penoplex can create. If, by a coincidence of negative circumstances, a fire does occur, then the penoplex will emit acrid black smoke, which contains highly toxic substances. They can not only cause significant harm to people’s health, but are also extremely dangerous for their lives, as they can cause thermal and chemical burns of the mucous membranes and organs of the respiratory system, cause pulmonary edema, and affect the central nervous system.
Smoke generation characteristics also have their own classification. Material for this indicator is marked with the letter D with a number from 1 to 3, indicating the degree of smoke spread. Penoplex, just like any extruded polystyrene foam, is assigned the third degree, that is, D3.
Such negative qualities of the material predispose to the fact that, when choosing penoplex for insulating walls inside the premises or outside the building, it will be necessary to provide a reliable non-flammable finish, which will contribute to the self-extinguishing of the fire that occurs.
Video: testing penoplex panels
Types of penoplex
Five main types of penoplex are produced, which are intended for certain types of thermal insulation work.
- One of the varieties is used for flooring under road surfaces - this material is the densest and is labeled as penoplex-45. The remaining four types are intended for use in thermal insulation of residential buildings:
Penoplex for thermal insulation of foundations
- “Penoplex foundation” - this type is more suitable for installation on the basement of the house. It protects the foundation from freezing and the formation of cold bridges from the ground into the premises.
Penoplex for wall insulation
- “Penoplex wall” - designed for insulating the outside walls of a house. It has all the necessary qualities that help maintain a comfortable temperature microclimate inside the house, preventing cold or heat from entering from outside, and protecting living or working premises from external noise.
The material is also excellent for roof insulation.
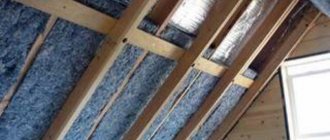
- “Penoplex roof” - this type of material is intended for thermal insulation of attic floors and roof slopes. A roof structure insulated in this way will not only prevent heat from escaping from the house through the attic, but will also create ideal silence indoors during rain or strong wind. In addition, penoplex roofing is very well suited for insulating attic spaces - both their floors and walls.
Penoplex is also used for insulation work indoors.
- "Penoplex-comfort" - manufactured for interior work. It is mounted indoors on walls, ceilings and floors, and is used to transform loggias or balconies into fully functional living rooms.
Do you want to turn a balcony or loggia into a full-fledged room?
This cannot be done without thermal insulation work. And for insulation you can use a variety of materials, including penoplex.
How to properly insulate a loggia in a special publication on our portal.
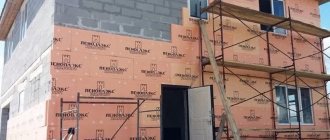
Insulation of external walls of a house with penoplex
Most often, penoplex with a thickness of 100 mm is used to insulate walls. However, it should be noted that in southern climatic zones with mild winter temperatures such a layer will be redundant - a thickness of 30 ÷ 50 mm is sufficient. If the building to be insulated is located in a region with very severe winter frosts, then 50 mm material is not enough. In this case, it is recommended to lay slabs of this thickness in two layers, perpendicular to each other and “with dressing”. This method will be more effective than laying one 100mm layer.
It is recommended to lay the insulation on the walls according to the principle of brickwork - this will create additional rigidity of the structure.
Layout of penoplex slabs on the facade of the house
The scheme of external wall insulation is clearly shown in the diagram offered to your attention, but in order to do everything correctly, you need to consider all stages of the work in more detail.
This is what the entire insulation and finishing “pie” on the outer wall will look like:
For insulation and subsequent finishing work, you will need the following materials: dry construction mixture - assembly adhesive, a calculated amount of penoplex, a starting profile to begin installing the insulation. fastening dowels - “fungi”, reinforcing fiberglass mesh, perforated metal corners with mesh, primer, plaster and putty mixtures, decorative finishing (plaster or tile).
Step-by-step instructions for installing penoplex on external walls:
| Illustration | Brief description of the operation performed |
| For insulation to be effective, the foam boards must adhere well to the wall. Therefore, before installing it, it is necessary to prepare the surfaces. The preparatory process includes such activities as cleaning the walls from old plaster that has begun to peel off, sealing detected cracks that may cause the installed insulation to peel off. In addition, cracks can become “housing” for various insects, which can then move into the house. Before cleaning the walls, all elements located on them, such as ebbs, lamps, air conditioning and others, are dismantled from them. Next, you can begin cleaning, which is usually done with a spatula. If there is a relief pattern protruding more than 5 mm on the wall, then it must be knocked down, as it will interfere with the installation of insulation. | |
| If cracks are found on the wall after removing the plaster, then before sealing, they need to be widened using a chisel and hammer, a grinder with a stone wheel or a hammer drill. Widened cracks are cleaned and treated with a primer, and then filled with sealant or putty compound and leveled. Very wide cracks can be filled with polyurethane foam, and after it expands and dries, the protruding parts are cut off with an ordinary stationery knife. | |
| If there are irregularities on the wall, which can also become an obstacle to a good fit of the slabs, then the surface needs to be leveled. The protruding parts should be removed and the recesses should be filled with plaster mixture. | |
| If the global unevenness of the surfaces is visually visible, that is, there are obvious blockages on them, then they are checked using a plumb line, and then leveled by installing plaster beacons and pouring concrete mortar. The removal of walls is carried out as a rule. There is no need to think that you can then level the surfaces with insulation - it will simply repeat their direction, and thus the deviation of the wall from the vertical will remain. | |
| Using a roller or wide brush, apply a primer to the leveled walls, which must be allowed to dry thoroughly. It will be better if you carry out a double treatment, with the second layer applied only after the first has been completely absorbed and dried. | |
| The dried surface must be marked for installation of the starting profile. To do this, mark a strictly horizontal line at the bottom of the wall at the required height, beat it off with a paint cord, and then attach the profile along it using self-tapping screws. It is necessary to install the first row of insulation on it - the profile will not allow the penoplex to slide below the set level until the panels are securely fixed with “fungi” fasteners. The width of the profile will depend on the selected foam thickness. The profile is fixed to the wall with dowels and washers Ø 5÷7 mm, in increments of 300÷400 mm. To fasten the profile at the corners of the house, special corner joints made of plastic are used. They compensate for the expansion of materials during temperature changes. | |
| Further, if necessary, all communications are carried out along the wall, which must be hidden under insulation and finishing. Flashings are installed on window openings. | |
| The next step is cutting the penoplex into strips of the required width for mounting them on the window slopes. The adhesive composition, 7-8 mm thick, pre-mixed according to the instructions, is applied to the cut-out workpieces and distributed with a notched trowel. Then, they are mounted on the surface, pressed and left until they set securely. After the glue has dried, the penoplex slopes are finally fixed with “fungi” fasteners. | |
| After completing the installation of the insulation on the slopes, you can proceed to installing it on the walls. Fastening the penoplex begins from the bottom row. Glue is applied to the slabs - in strips along their edges and dotted in the middle. You can also use a notched trowel to spread a thick layer. | |
| Then the slabs are installed on the starting profile and pressed well against the wall surface. After installation, all slabs are checked with a level for evenness of installation horizontally, vertically and relative to the wall surface. Installation of subsequent rows is carried out “in a dressing” with an offset of approximately half the length of the slab. The convenience of branded penoplex is that the panels have lamellas for a tight connection at the seams, maintaining the evenness of the masonry - just align the locking parts during installation. | |
| To give the insulation masonry additional rigidity, the slabs are laid at the corners using a so-called “toothed connection” along the entire height of the wall. | |
| After installing two rows, you need to return to the first installed slab and start fixing each of them with dowels - “fungi” - to the wall surface. To do this, holes are drilled through the penoplex so that they extend 50÷60 mm into the wall. A “fungus” is inserted, and then a plastic spacer nail is installed into the hole in the middle of the cap, which is driven in with a hammer. The fastening cap must be pressed into the insulation, that is, be in the same plane with its surface. | |
| After completing the installation of penoplex with glue and “fungi”, before proceeding to the next stage of work, the wall is allowed to dry thoroughly - this process will take two to three days, depending on the thickness of the glue layer and its characteristics, and the weather outside. | |
| Next, the seams between the plates are sealed with polyurethane foam, and after it hardens, the protruding excess is cut off. | |
| After completing the installation and fixing of all the insulating material, it must be reinforced with a special fiberglass mesh. You need to start with the corners - perforated corners with mesh “wings” are attached to them. They will protect the corners of the insulating material from damage during its operation and will make it easier to “remove” the corners during further plastering. | |
| The next step is to strengthen the entire insulated surface by stretching and gluing mesh sheets onto it. Its installation is carried out on top of the wall, from the cornice: First, an adhesive mass is applied to a small area of the insulation surface and distributed over it with a spatula. A mesh sheet having a length equal to the height of the insulated wall is applied to the glue and pressed into the applied layer with a spatula. Excess glue from the surface is removed or redistributed to the lower section of the wall. In this way, all insulated surfaces of the house are reinforced and then left to dry. Since the glue under the mesh is applied in a thin layer, it will take no more than a day to dry. | |
| Next, putty is applied to the dried surface, which should completely cover the reinforcing mesh and make the surface smooth. This layer of putty should dry very well, so it should be left alone for two to three days. | |
| After this period, the surface of the walls must be thoroughly cleaned using a grater with an installed abrasive mesh or sandpaper. The work is done in circular movements, which are done counterclockwise. Grouting must be done carefully, without pressing hard on the wall. | |
| The final stage before decorative finishing is coating the putty wall with a primer containing quartz sand. It is necessary to create good adhesion between the wall surface and decorative plaster or tile adhesive. | |
| Decorative plaster is applied to the prepared and primed wall or tiles imitating stone or wood are glued. |
How to give a wall decorative qualities?
Gray, boring walls can never become a decoration for a home. It’s good that today’s builders have at their disposal many techniques for performing relief plaster .
How to do it yourself is in the corresponding portal article.
Typical mistakes when installing penoplex
In order for insulation to be truly effective, it is necessary to take into account some of the nuances of installing penoplex and avoid making “traditional” mistakes.
The most common mistakes include the following:
- Carrying out work in weather unfavorable for this process. If installation is carried out at higher temperatures than recommended by the manufacturer, the material may slightly change its dimensions, deform or lose its positive qualities.
- You cannot install penoplex on the wall using dowels only, without using glue. Such savings will lead to insufficient adherence of the insulation to the walls, and as a result – to a decrease in the insulating and soundproofing qualities of the structure. We can say that the insulating effect will be lost, and the money will be wasted. It must be remembered that the main fastening material is glue, and the dowels serve only for additional fixation of the penoplex to the wall.
- It is very important to choose the right and high-quality adhesive for installing insulation. Therefore, when purchasing it, it is very important to carefully study the instructions on its packaging.
Typically, craftsmen prefer to work with adhesives sold in the form of dry construction mixtures. You can’t just take any composition you like, since it must have a specific purpose - specifically for thermal insulation work. Then the proper quality of insulation will be ensured.
Pay attention to the purpose of the mixture - it should be specifically for insulation work
The glue can also be sold in finished form - usually it is an acrylic-based composition. True, its cost is much higher, and its use for insulating facade walls can hardly be called cost-effective.
Ready-made adhesive composition for polystyrene foam
- When installing penoplex, it is necessary to completely cover the entire insulated surface, without leaving even small gaps between the plates, otherwise the insulation will not “work” properly.
- Failure to comply with the installation rules according to the principle of brickwork, “in a dressing”, is also considered a mistake, since it is unacceptable to place the vertical joints of the slabs on the same line.
- It is unacceptable to take lightly the preparation of the wall surface for the installation of insulating panels, since an untreated and unrepaired surface covered with penoplex can eventually become covered with fungal colonies and mold, which will be difficult to get rid of. Meanwhile, such microflora is very harmful to human health.
Cost of material and installation work
Penoplex itself has a fairly high price, so before preparing for its installation, you need to find out its cost in the region where you live.
- On average, the price of penoplex 50 mm thick is approximately $5 per 1 m².
- Modified material with improved qualities, including the addition of fire retardants, has a price of 7 ÷ 8 $ per 1 m².
- The work of craftsmen to insulate the walls of a house from the inside will cost an average of $9 ÷ $10 per 1 m².
- Attaching penoplex to the facade of a house will cost about 13 ÷ 15 $ per 1 m², since the work is more complex due to the fact that part of it will have to be carried out at height.
Having become familiar with the basic technological methods of using penoplex as wall insulation, having specified the price level for the insulation itself and the necessary consumables and installation work, each home owner will be able to assess his capabilities and decide whether to do everything himself or invite a specialist .
Having information about typical mistakes that are often made when installing penoplex, you can exercise control over his specialist - alas, among them there are many “leftists”.
In fact, the work is simple and quite accessible to do it yourself; all the necessary tools are available. But, naturally, if you need to insulate the walls of an apartment located above the first floor, then you should not show unnecessary “heroism” - it is better to turn to professionals who have special equipment for performing installation work at height.
And in conclusion, another video about the use of penoplex for insulating a balcony.
Video: penoplex - as a material for insulating a balcony or loggia
Thermal insulation material “Wall” - properties and characteristics
The “Wall” brand is a renamed Penoplex 31 insulation with fire retardant additives, which has been improved for use in insulating “wet” facades, building foundations, plinths and basements, partitions and walls of houses outside and inside, roofs and attics. The characteristics of penoplex brand “Wall” are in the table below:
| Properties | Meaning |
| Specific gravity | 25.0-32.0 kg/m³ |
| Compressive strength | 0.20 MPa (kgf/cm2) |
| Bend limit | 0.25 MPa |
| Moisture absorption in 1 day | 0,4% |
| Moisture absorption in 28 days | 0,5% |
| Fire resistance | Group G3 |
| Thermal conductivity | 0.030 W/(m K) |
| Sound insulation threshold | 41 dB |
| Dimensions (width, length, height) | 600 mm x 1200 mm x 20, 30, 40, 50, 60, 80, 100 mm |
| Temperature range | -50/+750С |
Insulation series “Foundation”
Table of Penoplex materials, the line of which includes 20 mm slabs
| Index | Penoplex Comfort | Penoplex Base | Penoplex Facade |
| Compressive strength at 10% linear deformation, MPa, not less | 0,15 | 0,17 | 0,2 |
| Calculated thermal conductivity coefficient under operating conditions “B” | 0,032 | 0,032 | 0,032 |
| Fire resistance category | G4 | G4 | G3 |
| Density, kg/m3 | from 20 | from 20 | 25-33 |
| Scope of application | Walls, roofs, floors, balcony, loggia, heated floors, utilities | Basements and first floors, walls | Plinths and first floors, insulation system Facade PRO |
Insulation brand "Foundation" - parameters and properties
The “Foundation” brand is a renamed Penoplex 35 insulation without fire retardant additives, which can now be used to create thermal insulation for the bases and plinths of buildings, blind areas and basements. The strength, waterproofness and thermal conductivity of the “Foundation” penoplex series are its main advantages. The characteristics of the “Foundation” are given in the table below:
| Properties | Meaning |
| Specific gravity | 29.0-33.0 kg/m³ |
| Compressive strength | 0.27 (2.7; 27) MPa (kgf/cm2) |
| Bend limit | 0.4 MPa |
| Moisture absorption in 1 day | 0,4 % |
| Moisture absorption in 28 days | 0,5 % |
| Fire resistance | Group G4 |
| Sound insulation threshold | 39 dB |
| Thermal conductivity | 0.03-031 W/(m K) |
| Dimensions (width, length, height) | 600 mm x 1200 mm x 20, 30, 40, 50, 60, 80, 100 mm |
| Temperature range | -50/+750C |
Penoplex brand "Roof"
Available analogues. What is the difference? Which is better and warmer?
- Penoplex or Mineral wool
- Penoplex or Foam plastic
- Technoplex or Penoplex
- Styrex or Penoplex
- Izolon or Penoplex
If you compare these materials, you must take into account their scope of application. For example, mineral wool is definitely not suitable for a foundation or basement: it absorbs moisture well, which leads to weight gain. Accordingly, the insulation slides down, exposing the walls. To avoid these problems, you will have to install additional moisture insulation, and this proportionally increases costs.
However, in terms of heat and sound insulation, Penoplex loses to mineral wool, although the latter material looks more difficult in terms of installation.
Both materials do not absorb moisture, so they are equally suitable for insulating basements. Thermal conductivity indicators are better for Penoplex, but only slightly. It is worth noting that polystyrene foam can be classified as an eternal material, and the service life of Penoplex declared by the manufacturer is 50 years .
Therefore, for internal and external insulation, both materials can be used with equal efficiency, but if service life plays a decisive role, it is better to give preference to polystyrene foam.
These are two materials that are almost identical in their properties. Here you can observe the same indicators of mechanical strength and bending resistance: 250 kPa and 0.4 MPa , respectively.
If we talk about resistance to sub-zero temperatures, then Technoplex looks warmer - the operating temperature of the material: -70 degrees Celsius , however, such temperatures are difficult to meet in most regions of Russia. The thermal conductivity of the insulation is the same: 0.031 W/mK , but Technoplex is more resistant to humid environments.
There are no fundamental differences between these materials, so they have an identical scope of application. Here we can highlight the following difference: Stirex is more resistant to bending deformation, but is more expensive to purchase. In addition, Stirex is more suitable for insulating rooms where there is a significant difference between external and internal temperatures.
Thanks to its structure, Izolon is ideal for insulating floors and roofs, increasing the thermal and sound insulation of rooms. However, for walls it is better to use Penoplex as a material that is more convenient to install.
Penoplex "Roof" - properties and characteristics
Penoplex insulation of the “Roofing” series is a renamed material “Penoplex 35”, which is recommended for use in insulating pitched and flat roofs of any design. The use of the “Roof” series makes the further operation of the roof as simplified as possible, since the reliability and long service life of the insulation minimize the possibility of repairing the roof surface. The popularity of this innovative insulating material is also due to the fact that greenhouses and summer gardens can be built on such a surface - such trends are now in fashion. Penoplex can withstand such high loads that it doesn’t care about soil loads of up to several tons. Characteristics of the foam insulation brand “Roof” are in the table below:
| Properties | Meaning |
| Specific gravity | 28.0-33.0 kg/m³ |
| Compressive strength | 0.25 (2.5; 25) MPa (kgf/cm2) |
| Bend limit | 0.4 MPa |
| Elasticity modulus | 15 |
| Moisture absorption in 1 day | 0,4 % |
| Moisture absorption in 28 days | 0,5 % |
| Fire resistance | Group G3 |
| Sound insulation threshold | 23 dB |
| Thermal conductivity | 0.03-032 W/(m K) |
| Dimensions (width, length, height) | 600 mm x 1200 mm x 20, 30, 40, 50, 60, 80, 100 mm |
| Temperature range | -50/+750C |
“Comfort” is a universal brand of heat insulator
For what purposes is it better to buy thin Penoplex?
The manufacturer produces extruded polystyrene Penoplex in two sizes: 1185 x 585 x 20 and 1200 x 600 x 20 cm. It is most advisable to use the slabs for:
- implementation of atypical projects that require laying insulation of non-standard thickness: 70, 120 or 170 mm. Simply put, you can buy Penoplex 20 as an additional thermal insulation layer in a roofing pie, facade system, for installing heated floors, where you want to “increase” the standard extrusion thickness.
- insulation of window slopes where the existing opening needs to be reduced. Thanks to the use of a thin layer of polystyrene, you will not only save on finishing materials, but also speed up the finishing process, reduce heat loss through windows, prevent condensation, and therefore protect your house from fungus and mold.
Brand of heat insulator “Comfort” - properties and characteristics
Penoplex "Comfort" is a modified and improved "Penoplex 31C" with universal characteristics. The material is actively used for insulating country houses, country houses and cottages. The high speed of installation and minimal labor costs popularize the insulation among private homeowners - it is used to insulate the subfloor, foundation and basement of a house, basement and roof, walls and partitions from the inside and outside of the building. Penoplex "Comfort" has high levels of moisture resistance and thermal conductivity. In the penoplex series line, the Comfort brand is recognized as universal.
Penoplex protects the soil from heaving when it freezes - when the soil is insulated with this material, the freezing point of the soil will rise. This series is optimal for insulating road and railway surfaces, runways and technical areas of airfields. Comfort slabs retain their unique characteristics throughout the entire period of operation. Characteristics of the “Comfort” penoplex insulation brand are in the table below:
| Properties | Meaning |
| Specific gravity | 25.0-35.0 kg/m³ |
| Compressive strength | 0.18(1.8; 18) MPa (kgf/cm2) |
| Bend limit | 0.4 MPa |
| Moisture absorption in 1 day | 0,4 % |
| Moisture absorption in 28 days | 0,5 % |
| Fire resistance | Group G4 |
| Sound insulation threshold | 40 dB |
| Vapor permeability | 0.007-0.008 Mg/(m h Pa) |
| Thermal conductivity | 0.030–0.032 W/(m K) |
| Dimensions (width, length, height) | 600 mm x 1200 mm x 20, 30, 40, 50, 60, 80, 100 mm |
| Temperature range | -50/+750C |
It is a misconception to think that penoplex and foam plastic are brother materials. Some properties of penoplex can be equated to the parameters of polystyrene foam, but not flammability and water absorption.
General characteristics of penoplex
Manufacturers have long mastered the production of both non-flammable polystyrene foam and high-burning polystyrene foam. But the truth is that penoplex cannot spontaneously ignite, and in an open fire zone it will only melt, releasing carbon monoxide (CO) and carbon dioxide (CO2) gases. If the fire is extinguished, the penoplex will not even smolder.
Which brand of Penoplex 20 mm should I choose?
- Penoplex Foundation 20 mm, the cost of which will not hit the pockets of either a private owner or a developer, is perfect for insulating a base, basement, the foundation itself, constructing garden paths and pits - septic tanks.
- Penoplex Comfort 20 mm (affordable price per sheet) is useful for sound and heat insulation of internal walls, loggias and balconies in apartments, installation of roofs, floors, and insulation of the basement and foundation of cottages and private houses.
- Penoplex Base 20 mm - the material is intended for work on insulating pitched roofs, as well as floors, walls and plinths during the construction of residential buildings and industrial facilities.
Many people are interested in the question: how many pieces of Penoplex 20 mm are in a package? This thickness of slabs is produced in quantities of 8 pieces per pack.
How to produce
Expanded polystyrene is a type of foam plastic. It is produced from polystyrene using the technology of foaming molten polymer with gas. The mass, consisting of microgranules, is steamed at high pressure and temperature and increases in volume by 10-30 times. As a result, a rigid foam with microcells evenly dispersed throughout the volume is obtained from the polymer melt.
The foamed mass receives its final form thanks to extrusion technology (pressing the melt through a molding hole). In this way, extruded polystyrene foam is obtained, the density and other technical characteristics of which depend on the parameters of the porous structure.
It is shaped into slabs and labeled with the letters XPS. The cells in its structure are closed and separated from each other, their size ranges from 80 to 180 microns. Externally, the slabs have a smooth orange surface. Natural gas is dissolved in classic polystyrene foam. To obtain a fire-resistant material, carbon dioxide is used and fire retardants are added.
Production of penoplex Source glotr.uz