Several years ago, a new type of heating called electric-water heated floor appeared on our market.
We all know well about electric and water heated floors separately. Each of them has its own advantages and disadvantages.
What kind of miracle is this – electric water heated floor? Is it really capable of combining all the advantages of two types of heating?
Let's look at exactly those parameters that are most often described in advertising brochures as obvious advantages, due to which you, in fact, should make your clear choice in favor of the new product.
Why is it profitable to make heated floors?
The main advantage of heated floors over all other types of heating is that they are hidden from view and are ideal for families with small children. In addition to the fact that babies can crawl safely, they will not get burned on heat sources that are securely hidden under the finishing coating. There are no drafts in the room where heated floors are installed.
Warm floors reduce heating costs in houses with very high ceilings, where it is difficult to rationally organize heating of the entire volume of the room. In apartments located on the ground floor, above damp, cold basements, heated floors will provide a comfortable microclimate.
In addition, they do not dry out the air, which is especially appreciated by sensitive people prone to allergies. When heated floors are an autonomous type of heating, they will help out on cold days in the off-season. Ceramic tiles, even with the best heating system, remain cold, and here the use of warm floors will help out.
Thus, the decision to install heated floors is for the benefit of the health of family members. It is important to choose which system is best to use.
When it comes to which type of heating is better, the debate continues: using liquid coolant or electric heating elements? These methods differ in cost and complexity of work during their installation and connection, and have their own installation and operational characteristics.
Water floors: installation and operation features
Water floors are an economical type of heating due to the use of water as a coolant. After installing them, you don’t need to think about where to put the furniture. There will be no radiators on the walls, floors with a water circuit are not afraid of heavy interior items.
The main distinguishing feature of water floors is the difficulty in connecting them. For example, to install water heated floors in an apartment, you need a document confirming the consent of the management company to connect to central heating.
When the heating is individual, it is necessary to install a unit for heating the coolant. This means that all the difficulties associated with installing and servicing a boiler are added: gas, electric, solid or liquid fuel. You need to allocate a specific place for its installation, and at the same time comply with all the rules and regulations.
Installing a water circuit for a heated floor requires a lot of preparatory work. This is a rather labor-intensive process that requires attentiveness and professionalism, because in the event of a leak, you will have to open the entire finishing coating of the room.
Experts do not recommend leaving warm water floors as the main source of heat in houses where there is no good insulation of walls and windows. In addition, wall-mounted radiators would be more appropriate on landings or in small corridors.
Electric floors: pros and cons
Rooms with electric cables or heating mats installed in the floors are always warm and cozy. To obtain heat energy in this case, only electricity is needed. Electric floors are demanding for premises: they must comply with the standards for the installation of electrical appliances, that is, dry.
If with the water heating method the surfaces are heated unevenly, since they have time to cool down while running through the pipes, then electric ones are stable in this regard and provide heat evenly over the entire area.
But there are also disadvantages of heated floors. Electric floors are not always convenient to use. Many factors need to be taken into account: what kind of finishing coating will be in the room, how to arrange the furniture. Before installation of electric heated floors begins, a floor plan is drawn, which is then adhered to.
Electric floors come in film and cable types. The film is laid on a flat, clean subfloor under the finishing coating. Cable lines, by analogy with a water circuit, are filled with a concrete screed. By choosing any heating option, you can build warm floors in any house or apartment. There is a third method that combines the advantages of water and electric floors: liquid electric heated floors.
Temperature control for individual rooms
Another advantage is that since this system is divided into rooms (one pipe - one thermostat), the temperature in different rooms can be set differently, without unnecessary heat loss from the source (boiler).
Firstly, regarding heat loss during heating from the boiler. On long transits from the collector to the premises, all pipes are usually insulated. But even if the heat is “lost” in this area, it still remains inside the house!
You don’t lay pipes outside the building and heat the street, do you?
Regarding temperature control - who told you that other systems cannot do the same?
The same water-heated floors with a simple thermostat (by air!) and a thermoelectric head on the collector solve the problem of maintaining the set temperature with an accuracy of 1-2 degrees.
In a system with electric water heated floors, ONLY air adjustment is prohibited. This is what the instructions say.
You need to precisely control the heating temperature of the tubes, otherwise you will burn them. This can only be done with a sensor installed in a screed next to the tube, and not with an air thermostat on the wall.
Here's a prime example of one user doing it twice! I burned my electric-water heated floors in a similar way.
What are liquid electric floors?
Consumers have already appreciated the advantages of the new generation of heated floors, which autonomously provide electric floor heating with a liquid coolant. It is not correct to call these floors electric-water, since the coolant is not water, but antifreeze. Therefore, it is correct to say “liquid floors”.
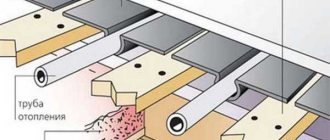
Liquid underfloor heating includes a set of polyethylene tubes filled with coolant. An electrical cable is inserted along the entire length of the tubes. When the electric heating is turned on, the coolant is heated by the cable and begins to release heat to the environment.
In various models of liquid heated floors, the coolant is antifreeze or distilled water.
Peculiarities
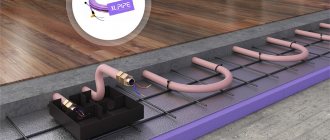
What exactly is an electric water heated floor? Essentially, it is a cross-linked polyethylene pipe with a heating cable inside.
Tube diameter 20mm, thickness 2.5mm. The tube itself is filled with non-freezing liquid. To prevent thermal expansion, an expansion joint is also placed in the pipe.
The entire structure is reliably sealed on both sides and has a given length (7m-14m-21m-28m-35m-42m-56m-70m-84m).
The price of this entire system is significantly more expensive than conventional heated floors. And here a logical question arises: what are we overpaying for and is it worth it?
Advantages of liquid electric floors
The new form of heating compares favorably with its analogues in many respects.
The advantages of electro-fluid systems compared to conventional water systems are as follows:
- no need to connect to a heating boiler or central heating system;
- to perform its function, the coolant does not need the help of a circulation pump;
- installation is extremely simple: there is no need to build a collector and distribution board;
- the operation of the system is ensured by a very small amount of coolant, therefore, even if there is a leak, the apartment is not in danger of flooding;
- warm floors are heated as evenly as possible over the entire surface;
- much less labor is required when installing them, in contrast to water heated floors.
If we talk about the advantages over electric heated floors, then the following qualities should be noted:
- overheating of the cable, which is located inside the liquid, is excluded;
- Repairing liquid floors does not cause problems.
Add antifreeze or change electrical components through a convenient installation box. Damaged areas are identified instantly by wet circles on the screed. The heating effect ensures maximum floor heating due to the fact that the heat energy is stored not only under the screed, but also in the pipe.
There are certain advantages to liquid floors compared to infrared film floors:
- can be installed in rooms with any humidity, which is very important in many cases;
- Liquid floors can be installed under any floor covering.
There are currently two model ranges of electric water floors: XL Pipe and Unimat Aqua. The former are produced in Korea, the latter - in Korea and Russia. These models work on the same principle, but have their own design features.
Better maintainability
One of the main advantages of the system is its good maintainability. If the cable fails, it can be replaced without any problems by simply pulling the old one out of the tube and pulling the new one in.
With a heating cable directly embedded in the screed, this trick will not work. In real conditions, the best maintainability of the system is “slightly” different.
Ask any electrician, can he replace a cable laid in a corrugation under the plaster?
The first question he will ask you is “How many turns will there be and at what angle?”
If there are more than three bends, then it will no longer be possible to do this. Now remember the snake that is used to lay heated floors.
How many roundings and turns can you count in an area of at least 10 m2, not to mention much larger sizes?
If you have an exclusive special machine with a pump (it changes the cable in the pipe due to the circulation of liquid under pressure), this can still be done.
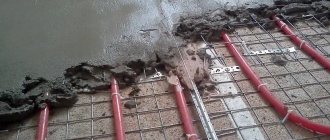
But you won’t be able to replace it yourself with a dry one, without special tools. Problems will also arise if there is a hole in the pipe.
This is what a pipe burned through by a burnt cable looks like. The injected liquid will simply flow through it.
In addition, if there is a short circuit on a conventional heating cable, you can find this place of damage, locally open the floor and install a repair coupling there.
A cable immured in a pipe with liquid cannot be repaired locally. You will have to change the whole thing and pay for it in full.
Was the 84-meter-long circuit damaged in any specific place? Please buy these 84 meters again!
Add to this the likelihood of damage to the tube itself, separately from the cable (accidentally drilled or driven in a nail). As a result, additional detachable connections appear in the screed.
Do you think this is normal for further operation of the system?
So it turns out that reliability is noticeably reduced due to all these factors.
Even the vaunted repairability of pipes does not help when they are heated with a hairdryer. As the advertisement says, if any section is broken, just heat it with a hairdryer, and the tube wall will return to its original state.
In fact, in all the pictures, during such repairs, an empty pipe is heated, without coolant. Which means you have another headache.
How to drain and refill antifreeze while maintaining the factory sealing reliability of the entire heating system?
In addition, we can visually check how the tube wall has “restored” only from the outside. No one knows what is happening to her inside.
A decent manufacturer will not give you any guarantee after such a crease.
XL Pipe: design and principle of operation
The xl pipe warm floor is arranged as follows. The coolant container is a system of thick-walled polyethylene tubes with a diameter of 20 mm. The coolant in this case is antifreeze (of a certain brand). The tubes contain a seven-core electrical cable made of chromium-nickel alloy, covered with a Teflon insulator.
The pipe is hermetically sealed at both ends. That is, there is no need for circulation of the coolant. The entire system warms up very quickly and as evenly as possible.
The energy consumption of the xl pipe underfloor heating system is 14.5 watt/m2.
One of the advantages of XL Pipe is that you can place furniture on top of the covering where they are mounted. Heavy objects will not cause harm, since installation is carried out under a five-centimeter cement screed.
The pipes are laid according to a special pattern. To regulate the temperature, install a thermostat and a temperature sensor. They are connected here in the same way as for other heated floors. However, you need a special thermostat, which is suitable specifically for liquid heated floors.
The manufacturer provides a 10-year warranty on the operation of its product. However, if the installation is done correctly, then such a system will last up to half a century.
XL Pipe performance characteristics
In terms of its operational capabilities, the xl pipe electric water heated floor has several undeniable advantages:
- does not create an electromagnetic field;
- no need to install additional expensive equipment;
- there is no risk of system overheating;
- no negative impact on the finished floor covering;
- You can install furniture and heavy household appliances on top;
- it is possible to repair the system without the need to dismantle the finishing coating;
- savings in energy costs (20-30 percent less electricity required than with conventional electric floor heating);
- It’s not a complicated installation that you can do yourself.
How to install an XL Pipe liquid floor
Installation stages of electric water heating xl pipe:
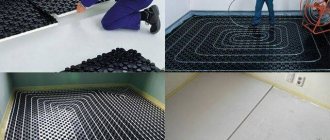
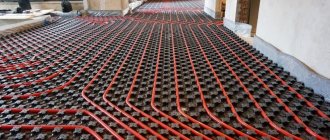
- Prepare the rough base. They clear away debris, smooth out uneven areas, and seal cracks. Extruded polystyrene foam slabs are laid on the base. It plays the role of a heat insulator.
- The heat insulator is fixed using “umbrellas”. To do this, holes are made in the slab for fastening, and umbrella dowels are inserted there.
- A reinforcing mesh is laid on top of the heat-insulating slabs. Cell sizes from 100 to 200 mm.
- The mesh sections are tied together using metal tying wire.
- The heating cable from the heated floor kit is checked for resistance compliance.
- Then the pipes are laid out according to the diagram specified in the instructions. The tubes are fixed with plastic clamps to the reinforcing mesh.
- Connect the power cable from the thermostat to the junction box.
- The wires from the pipe are connected to the power cable. Terminals are usually used for this.
- Grounding cables are connected to the reinforcing mesh.
- Fix the temperature sensor at approximately a distance of 50 mm from the tube.
- Close the installation box. Seal the cracks with sealant.
- Then they make a concrete screed and wait for it to dry. Then a finishing coat is applied on top.
When installing XL Pipe electric water floors, the tubes must not be twisted or pinched. The work is carried out taking into account all the manufacturer’s recommendations. In winter, it is allowed to start the system at an average temperature to ensure the fastest drying of the concrete screed.
This system is expensive and must be handled with care during installation, avoiding tube fractures. The XL Pipe heating method is suitable for premises of any purpose: residential, office and industrial.
Preventative work on XL Pipe is carried out by specialists. As a rule, it is necessary to replace the coolant. This is done approximately once every 10-15 years. The final floor covering is not touched. This is a big advantage of XL Pipe over other systems.
The main disadvantage of this heating method is the rather high price of the system itself. However, the reliability, durability and heating efficiency of such heated floors justify these costs.
Screed installation
Measuring the area of the room
Measure the area of the room and make a schematic drawing. Prepare all necessary materials (see Additional Materials). Determine the location of the thermostat.
Preparing the floor surface
Prepare the floor surface: clean it of debris and foreign objects.
When laying the system, it is necessary that the system is in the same horizontal plane with a difference of no more than 2 cm.
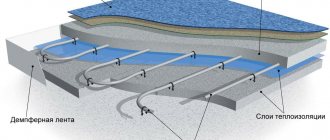
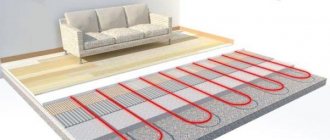
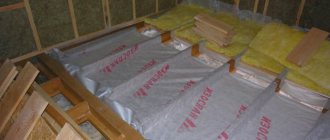
First, thermal insulation must be laid out over the entire area of the room - sheets of extruded polystyrene foam 2-5 cm, with a density of 35 kg/m3 (penoplex, styrex, termite, technoplex, etc.).
On top of the thermal insulation, you can lay a 3 mm thick lavsan underlay for heated floors (optional).
Steel reinforcing mesh
Lay a steel reinforcing mesh on top of the thermal insulation (thickness 3-4 mm, mesh size 100×100 or 200×200 mm). The XL PIPE will then be attached to this mesh.
Installation of distribution box
Place a junction box on the floor near where the thermostat will be located. The box can be secured to the floor with dowels to prevent it from moving. It should lie at the same horizontal level as the system itself.
The junction box must not be installed on a wall or in a hard-to-reach place!
To access the box, you need to make a service hatch (this work is performed by a specialist who will lay the flooring).
System test by measuring resistance
Test the system with a resistance test (see Table 1). If it meets the standard, begin installation.
XL PIPE layout
➤ Lay out the XL PIPE in a snake pattern over the entire area of the room. To begin, insert one end of the pipe into the junction box, and then unfold the entire system. The pipe is attached to the reinforcing mesh using plastic clamps every 50 cm.
➤ The beginning and end of the pipe should be installed in the second outer section of the junction box so that a long piece of pipe remains in the box for possible future maintenance.
➤ The recommended distance between pipe turns is 20-25 cm. The maximum distance (laying step) is 30 cm, but in this case the heating time of the floor and room increases.
➤ Do not attach all the clamps at once. To begin with, it is enough to secure each turn of the pipe at the beginning and at the end to make sure that the system will fit as it should and both ends will fit into the box. After this, fasten all the clamps.
➤ Ground the system through the reinforcing mesh on which the pipes are attached.
➤ To make a turn in the pipe, attach the pipe with a clamp to the grill 40 cm before the place where the turn will be. Then we take 80 cm of pipe: carefully bend it in the opposite direction with a laying step of 20-25 cm and secure it with a clamp opposite the first fastening. It turns out to be a big loop. Pull the pipe through the clamp to form an even bend with a radius of 25 cm. Also attach the top of the bend to the reinforcing mesh with a clamp.
➤ The minimum distance from the pipe to the wall is 5 cm. Avoid kinking the pipe!
If a crease does occur (without damaging the pipe), then reposition the system so that this section is straight, without turns, and level the crease with a hair dryer.
Connecting wires
The connection of wires in the junction box is made by soldering (copper or tin) or sleeves.
Installing a floor temperature sensor
The floor temperature sensor is supplied complete with the thermostat.
The correct location of the temperature sensor when installing the system ensures correct reading of the system temperature, as well as timely shutdown/on of the system. The system will not overheat and will not fail.
➤ Place the floor temperature sensor in a plastic corrugated tube for wiring (diameter 16 mm). Attach the corrugated tube with clamps to the reinforcing mesh, and wrap the end with electrical tape to prevent the screed from getting into it.
➤ The floor temperature sensor is installed at a distance of 0 to 2 cm from the pipe (no more than 2 cm)! If you install the sensor further, the thermostat may not have time to respond to heating due to the large distance, the system will overheat and fail. If you attach the sensor to the pipe itself, then the system may turn off before the room warms up. In this case, you need to manually increase the temperature limit on the thermostat, and the sensor will read the temperature of the system itself.
➤ If the sensor is installed 1-2 cm from the pipe (in the screed), then the temperature reading will be most accurate, and the system will not fail due to overheating. In dry installation without screed, the sensor is installed exclusively on the system itself.
➤ A corrugated tube (with a sensor inside) is supplied to the thermostat, and the sensor is connected to it.
➤ If the floor temperature sensor cable is too long, it can be cut. After this, it is imperative to tin the ends of the cable or crimp them with end sleeves, and only after that secure them in the corresponding terminals of the thermostat.
Connecting the XL PIPE system to the thermostat
➤ Connect the XL PIPE system to the thermostat into the OUTPUT or HEATING contacts - the connection diagram is in the instructions for any thermostat. This will require additional supply wires with a cross section of 2.5 mm. The thermostat itself is connected to the network through the INPUT or L-phase, N-zero contacts.
➤ The system cannot be connected directly to the network without a thermostat. The recommended installation height of the thermostat is 30-90 cm from the floor.
➤ Temperature sensor operating mode: with the XL PIPE system, you can use thermostats in floor sensor-only operating mode. It is prohibited to use thermostats in air sensor mode!
➤ We recommend using thermostats manufactured by Daewoo Enertec. The thermostat should have overheating protection set at a floor temperature of no more than 55-65 °C.
➤ Features of connecting systems for 70 m and 84 m . Only these 2 models have wires coming out of both ends of the pipe. You need to twist two wires coming out from one end of the pipe together, connect them to a cable with a cross-section of 2.5 mm, for example VVGng 3x2.5, which is fed into the thermostat. You also need to do the same with the two wires at the other end of the pipe.
➤ Connect the ground cable directly to the steel reinforcement mesh on which the XL PIPE is attached.
System test by short-term switching on
Test the system by briefly turning it on for no more than 5 minutes (as soon as it starts to heat up, turn it off) or by measuring the resistance (see Table 1).
It is strictly forbidden to connect the system to the network in a collapsed form.
Junction box insulation
Insulate the junction box with sealant. Close the junction box cover and secure it with five self-tapping screws. Apply it to the edges of the box around the perimeter and in places where the ends of the pipe enter the box to prevent moisture and screed from getting inside.
Filling the screed
Fill the screed with a thickness of 4-5 cm. During the process, be careful not to flood the junction box.
The maximum permissible height of the screed is 8 cm. In this case, the heating time of the screed will increase.
It is necessary that the system is at the same level horizontally and at the same distance from the top layer of the screed.
The installed XL PIPE system must not be filled with polystyrene concrete or other similar materials.
Checking work
After the screed has completely dried, which lasts 3-4 weeks, test the system again. And check the operation of the thermostat.
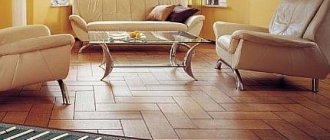
Flooring
Lay the flooring
Features of installing the XL PIPE system over large areas
To install the XL PIPE system over large areas, several systems and thermostats are installed in each room.
Warm-up time
It should be remembered that the first heating of the room requires a certain amount of time, since first the screed must warm up, and then the entire room.
The first warm-up time ranges from 6 to 48 hours, depending on the thickness of the screed, the temperature in the room and its heat loss.
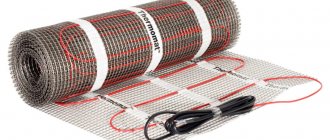
Features of the capillary heated floor Unimat Aqua
Liquid underfloor heating Unimat Aqua differs from XL Pipe in that the system does not consist of one thick pipe, but is equipped with many small diameter pipes. Hence the name of the system - capillary. It is connected to a device that has a power of 2.4 kW. In this way, the coolant is heated and heat is released. The whole system is closed. Installation of an additional heating unit is not required.
The coolant in the Unimat Aqua system is distilled water. It will require no more than 6 liters. The size of the heated area that one set can heat is approximately 20 square meters. How warm the room will be depends on the thermal insulation properties of the walls and ceilings. Warm floors very quickly create a comfortable indoor microclimate.
If necessary, several Unimat Aqua systems can be installed in one room. However, most often it is used to heat a small room. The service life of capillary heated floors is approximately 5 years.
Unimat Aqua comes in two types. Basic, which includes a control unit, an installation kit, and two pieces of pipe for connections. All this will be needed to form a small pipeline. The additional kit consists of a coil of small diameter tubes, which is enough to heat an area of 10 to 20 square meters. meters.
For installation, you need damper tape, tube fasteners and heat-reflecting material. After installation, the floors are filled with cement screed.
Outline length
A significant disadvantage of the system is the multiple length of the segments. Electric water heated floors can be installed in sections that are multiples of 7 meters (7m-14m-21m, etc.).
At longer lengths, sizes jump within 14 meters! You won't be able to cut a smaller piece.
As a result, you will either have a long “tail” (relevant for small bathrooms and bathrooms), or you will be missing a couple of meters. It all depends on the area of the room.
Don’t expect that you can simply lay the “snake” more tightly. No one has canceled the minimum permissible laying step of 200mm.
Reduce it, overheating, violation of instructions, loss of warranty, etc. will follow.
This problem does not arise with water heated floors. Cut the pipe wherever you want.
Pros and cons of the Unimat system
The Unimat system is very smart. It is equipped with a multifunctional control unit that can adjust the room temperature or heating of the coolant to the desired level. You can also set the period and operating time of the system.
Unimat heated floors are highly safe. They are installed in rooms with any humidity (for example, in bath complexes).
The disadvantage of Unimat underfloor heating is that the heating of the floor is not uniform. This is due to the fact that the coolant comes from the heating block hot, then gradually cools down. That is, the disadvantage is similar to conventional heated floors with a water circuit.
How to install Unimat Aqua Caleo underfloor heating
Installation of Unimat Aqua electric water floor heating is carried out as follows:
- Preparing the rough base is the same as for XL Pipe: cleaning, removing uneven surfaces.
- Prepare a place on the wall for the thermostat.
- A groove for the temperature sensor is made on the rough base.
- Heat-reflecting plates are laid out. They are fastened together with staplers.
- From the side where the thermostat is located, they begin to lay out the Unimat Aqua.
- When laying out the system, in the places where the mat is rotated, one of the connecting wires is cut, and the mat is turned 180 degrees. The tubes should not touch or intersect. The power wire is cut strictly in the middle. The maximum permissible strip length is 25 meters.
- The entire system is carefully glued with tape to the heat reflector.
- Mounting wires connect the mats. This is done as follows: the ends are stripped and sleeves are installed, which are clamped with pliers.
- Heat-shrinkable tubes are placed on the wires. The power cable is spliced with the connecting cable.
- The system is connected to the thermostat according to the diagram that is attached to this device.
- To connect the concrete screed to the subfloor, small through holes are cut into the heat reflector.
- A temperature sensor is installed along the rods, previously laid inside the corrugated pipe.
- Checking how the Unimat Aqua works.
- If the tubes have warmed up within 15 minutes and no failures have been identified, the heated floors are filled with concrete screed.
Liquid electric floors are an excellent source of comfortable heat. They can become either a primary or an additional heating device and will perfectly cope with their function in any room.
Low capital costs
Due to the uselessness of the boiler room, capital costs for all equipment for electric water heated floors should be 2-3 times less. But that's what the advertising brochures say.
In practice, if you add up all the numbers, the picture turns out to be the opposite. Here are the data for a residential building of 100 m2 with a pipe length of 300 m (these are calculations with prices without “electrics”, prices at the beginning of 2022).
If we add here the cost of 11 thermostats + 11 automatic switches + differential circuit breakers or RCDs + copper cable to each circuit + distribution cabinet, you get a figure of about 300 thousand rubles.
With water heated floors for the same initial data, the price will be as follows:
- pipes 360m (with transit) – 40 thousand.
- boiler - 50 thousand
- collector - 23 thousand
- manifold and boiler piping – 20 thousand.
In total, with materials from not the cheapest price category, the amount is 133 thousand rubles.
In fact, an electric water heated floor system will cost you at least 2 times more than the equipment of a conventional heated floor along with a boiler room!
At the same time, do not forget that in addition to heating, the boiler can also be adapted for hot water supply, without which you cannot live in your home.