Installation of a heated floor requires subsequent long-term and uninterrupted operation of the heating system. In a city apartment, private house or country house, water-heated floors are equally effective and convenient. Such a heating system can be equipped in almost any residential space, but the effectiveness of its use depends on the compliance of the technical characteristics of the equipment with the design features of the room. Correctly calculated and installed heating circuits and professionally performed pressure testing of the underfloor heating system will allow homeowners to forget about the hassle of servicing heating devices for a long time.
Pressure testing procedure for the heating circuit of warm water floors
However, the idyll cannot continue indefinitely - any technology is not eternal and needs repair over time. Heated floors are a complex complex of a wide variety of equipment, the failure of one of the elements of which can lead to failure of the entire heating system.
In some cases, for example, if there are problems with the throughput or tightness of the floor water heating pipe, it is necessary to drain water from the heating circuit when preserving housing.
Let's take a closer look at the cases in which it is necessary to drain liquid from the underfloor heating system, and how this is done.
Why do you need to remove air?
The formation of voids reduces the efficiency of the heating system. Pumping equipment, like other components, operates less efficiently. To ensure comfortable indoor temperature conditions for users, more resources have to be spent.
As such voids increase, the pressure gradually decreases. After reaching the maximum minimum level, the corresponding signal is sent to the boiler control unit. In addition to electronic devices, mechanical means for similar purposes are used. This is an emergency situation, so the automation turns off the supply of gas or other fuel.
To turn it on again, you have to manually increase the pressure. But there are a lot of gaseous inclusions in fresh water, so negative processes are accelerated. The equipment will turn off more often.
It should be remembered that oxidation, which destroys metals, occurs in the presence of water and oxygen. Adding a new coolant activates the corresponding negative processes. In this operating mode, the durability of heating equipment is reduced.
It is necessary to exclude the appearance of air “plugs” in the heat exchange units of boilers. These parts are exposed to very high temperatures.
The reasons listed above are enough to understand the need for preventive measures. Carrying them out will prevent complex breakdowns and costs associated with restoration work.
Technical subtleties and nuances
In preparation for draining, it is necessary to study the structure of the collector in order to find and mark on the supply and return the location of the valves, marked as follows:
- servers are red;
- reverse flow - blue.
Connection diagram for a compressor for emptying the circuits of a heated floor system.
If you confuse the supply with the return, the drain system will not work - the check valve will block the pipeline.
If there is no receiving container, then you can connect the drain hose to the return valve and stretch it to the nearest sewerage intake - a toilet, sink or drain.
Collector unit for a warm water floor system
Having finished draining water from one circuit, empty all the others in the same way. When draining a section of the system, the valves of the remaining circuits must be closed, and at the end of each stage, the taps of the emptied pipelines must also be closed.
To completely empty the circuits, the purge procedure can be repeated after an hour - when the moisture from the walls of the heat pipes has drained and accumulated in some area.
Draining water in stages
Warm floors are a closed system, so you should take care of the drain taps during installation work. The number of valves must be equal to the number of water circuits.
- This is basically a long hose that is laid on the floor. Laying option, i.e. the configuration of the circuits may be different, but the liquid circuit operates on the same principle - the coolant transfers heat to the surrounding space by heating the floor surface.
Before draining, the heating system must be turned off, then wait the time required for all its elements to cool completely.
Taking into account that the water circuit is connected to the main pipeline, and the connection point is located above the floor level, the water is drained forcibly using an air compressor.
The power of a household vacuum cleaner to drain liquid from a water heating system is not enough.
Emptying is carried out through a return line equipped with a drain valve, and the compressor is connected to the manifold on the inlet pipe; because of this, the check valve can create certain interference when purging the pipe.
After connecting to the collector, the compressor starts to displace the coolant from the circuit and the air supply pressure is slowly increased - until the point after which liquid begins to flow out at the outlet. Do not forget that the volume of water in each of the heated floor circuits is not that large, so an ordinary small container of 8-10 liters is enough to receive it.
The compressor must be turned on until air begins to flow continuously from the pipe immediately behind the water.
When you do not have the opportunity to use a compressor, you can use another method to empty the system of liquid and thereby avoid defrosting the heating system. A suitable size hose 1 meter long with a funnel at the end is put on the inlet of the heat pipe. The end with the funnel needs to be raised higher and antifreeze slowly poured into it (it’s better to take a brightly colored one). Gradually, water will begin to flow from the return pipe, and then liquid. The procedure will take time, but you will not regret the effort.
When and why is water drained?
For any intervention in the heating circuit, which is associated with the replacement of its elements, it is necessary to drain the water from the heating system, because it is impossible to carry out work on a system filled with water.
The main list of works requiring the removal of coolant from pipelines and batteries is as follows:
- replacement of radiators;
- eliminating leaks;
- preventive maintenance, removal of contaminants;
- replacement of coolant.
Draining coolant from an autonomous system
The process of removing water from pipelines and batteries of an autonomous heating system of a private house does not require any permission or approval. What needs to be done next and how to drain the water from the heating system is described below.
The following simple rules must be followed:
- turn off the boiler (of any type) and allow the coolant to cool;
- close the cold water make-up valve;
- open the air valves (for a closed system).
In a properly installed system, there is a drain valve located at the lowest point of the system. It is usually located on the return pipe near the boiler. A hose is connected to the drain tap, through which water is removed from the circuit. After the water has been completely removed, you can begin to realize the purpose for which the coolant was drained. If heated floors are installed, then water can be removed from the pipelines only by connecting a compressor to the inlet pipe to displace it with air pressure.
However, situations often arise that do not require complete drainage of the water. For example, replacing or repairing a separate battery. The answer to the question - how to drain water from a heating battery - is simple if the design of the system has been carefully thought out and installed. To make this operation easy and quick, even when designing the circuit, it is necessary to provide for the possibility of cutting off the radiator from the system, without disrupting its operation.
Let's assume that all the recommendations have been followed, the battery is disconnected from the system by shut-off valves on it, but how to drain the water from the heating battery if there is a very significant amount of water in it, especially if the battery is cast iron. Therefore, it is necessary to install a container of sufficient volume to collect leaking water when disconnecting the radiator from the circuit. If the homeowner does not have the necessary skills, or does not understand how to drain the water from the heating system, then it is better to invite a heating specialist.
Draining water from heating systems of multi-storey buildings
If the apartment is located in a multi-story building, then such an operation is complicated by several factors. When performing repair or modernization work on the heating system, it is necessary to drain the water from the riser. To do this, you need approval from the company that services the heating of the house. Every resident should know where to go regarding heating if problems arise. The water drainage service is paid, and during the heating season it is extremely expensive and hourly. Therefore, it is better to plan the work for the summer period, when the coolant is drained, but permission to carry out the work and shut off the riser must be obtained.
Why do you need to drain the water and when is the best time to do it?
Water from the boiler must be drained in the following cases:
- If the water heater is located in an unheated area, the tank must be emptied before winter arrives. With the onset of frost, the liquid will begin to turn into ice and increase in volume, which can lead to serious damage to the device and loss of its functionality.
- If the warranty period for the boiler has expired, and the structure needs to be repaired or the magnesium anode replaced, the water must also be drained. All such procedures are carried out only with a dry and clean tank. It is worth noting that during the warranty period you cannot carry out repairs yourself, otherwise the warranty will become invalid.
- At least once every 5 years, the water heater must be descaled. If the water supplied to the tank is not of good quality, it is advisable to carry out a similar procedure more often. The sediment that remains in the tank interferes with the rapid heating of water, which means that the boiler consumes more electricity to operate.
Now I would like to consider cases when there is no need to drain water from the boiler:
- When turning off the water heater during the warm season, it is not recommended to drain all the liquid from the tank. If the device is not threatened by frost, it is better to leave some water in the container - this will protect the interior of the tank from corrosion. In addition, if, out of forgetfulness, you plug in an empty boiler, a fire hazard may arise.
- If the device has been left unplugged for some time and the water in it has stagnated, it is also not worthwhile to completely empty the container. Stale water simply needs to be refreshed by filling the tank full several times. It is advisable to repeat this procedure every 3 months, running 100 liters of cold water through the heater.
- If the unit is still covered by the warranty, it is highly not recommended to drain the water, much less repair any parts yourself. In such a case, the warranty will become void. If problems arise with the boiler, it is better to simply call qualified specialists. They will drain the water themselves, fix the breakdowns and do it for free.
You can use a suitable container to drain water from the boiler.
Why drain the water?
There are many reasons why you may need to drain your underfloor heating system. For example, this procedure should be carried out if the owners are away from home for a long time, or when there is a need to replace water as a coolant with antifreeze. Everything must be done correctly so as not to violate the integrity of the system. Below we will consider the rules for draining liquid.
Often this need arises when preserving the heating system for the winter. This procedure is often carried out in summer cottages and in houses outside the city that have been empty for a long time. To simplify and speed up the draining process, a special technique is used.
Remember that water in houses with seasonal use must be drained. Otherwise, frost will cause the system to freeze. That is why the use of antifreeze as a coolant is more preferable - in addition to resistance to low temperatures, this solution also protects pumps from excessive wear.
Another, also important point when using heated floors is preventive maintenance in the heating system. The water from the boiler contains many impurities, which, when heated, precipitate or form deposits on the walls of the pipeline.
Due to a decrease in the internal clearance of heat pipes, the circulation of the coolant in the system is disrupted, and the heat output becomes lower. Therefore, experts recommend draining the coolant from the system at least once a year when using water.
A liquid circuit that is filled does not have this problem. In this case, the coolant can be replaced only once every 3-5 years (the main condition is that the boiler operates without overheating; for heated floors, the maximum threshold for permissible liquid temperature is 45-55 °C).
Another reason why it may be necessary to drain the water is the loss of the liquid’s own physical properties. The antifreeze parameters change after overheating - the solution begins to form foam. When foam fills individual sections of heat pipes, it disrupts the circulation of the coolant in the system and heat transfer becomes lower.
Inconsistency in the installation technology of heated floors and the use of materials that are not intended for contact with chemicals contribute to the formation of corrosion in the heating system. As a result, the circulation of the coolant is disrupted and leaks in the water circuit appear.
Of course, you will have to drain the water from the heated floor circuit when replacing it with antifreeze.
These are the main reasons when systems need to be drained
And no matter what the base, water drainage must be carried out in accordance with all the rules, following safety precautions and the technological sequence of all points
Summarizing
Periodic drainage of water from the underfloor heating system is necessary. The frequency of this operation depends on the intensity of use of the heating system and the quality of the water. In regions with hard water, which also contains a lot of suspended impurities, the water from the heating circuit must be drained at least once a year.
Replacing water in the heating pipeline does not require any monetary costs (in addition to the expected payment for renting an air blower), so it is better to do this manipulation constantly, thereby extending the time of trouble-free operation of the hydraulic circuits.
When using antifreeze, the procedure for draining the coolant is carried out very rarely - once every 3-5 years, but in compliance with very high safety measures - ethylene glycol, used to produce antifreeze liquids, and its vapors are toxic substances that require the use of personal protective equipment (special protective clothing, gloves, safety glasses, ventilation system) and room ventilation.
Consequences of air jams
Possible consequences depend on the installation object, as well as the design features of the heating system.
- Warm floors from a centralized heat supply source: partial or complete cessation of heating, possible freezing of pipelines in corner rooms;
- Houses with heated floors and heating appliances from a centralized heat supply source: partial or complete cessation of floor heating;
- Warm floors from an individual heating source: partial or complete cessation of heating, possible emergency stop of the boiler and freezing of the heating system;
- Houses with heated floors and heating appliances from an individual heating source: partial or complete cessation of floor heating, frequent boiler shutdowns.
Considering the specific design of the “warm floor” heating system, namely: the presence, depending on the area, of one or several water circuits per room and separate wiring for each room, complete cessation of circulation is almost impossible.
Only if air jams occur on all horizontal branches in all rooms at once will the movement of the coolant and the functioning of the system stop.
Materials, equipment and procedure for draining water
To perform the necessary work, you will need a compressor, and of good performance, with a receiver for storing compressed air.
As you already understood, a car one is not suitable for these purposes.
If you are planning to drain used antifreeze, then you yourself understand that it is not worth draining it anywhere.
Clamps of the appropriate size for a reliable hose connection will also be needed.
Connect the hose from the compressor to the underfloor heating supply manifold.
The supply manifold may or may not have a special fitting in its design for filling the system under the hose. Therefore, the automatic air vent is unscrewed on the supply comb and a hose is connected through a suitable adapter and tightened with a clamp.
Arrangement of elements on the manifold for draining
- In the same way, connect the hose to the return manifold and lead it to the drainage point.
- Close the supply and return valves coming from the boiler in the manifold area.
- Using flow meters or valves (depending on your collector), close all underfloor heating circuits, except one, which, on the contrary, needs to be opened to the maximum.
- Turn on the compressor, open the valves or tap (depending on the type of comb) that are designed to fill and drain the system (those with hoses on them). At this moment, the coolant will begin to flow out of the drain hose under pressure. Wait until the water runs out and air comes out. At this point, pay attention to the pressure gauge on the compressor. If the pressure in the receiver at this moment is not high (1-3 atm), then close one of the taps on which the hose is attached (preferably, it would be a tap on the supply manifold, or if the pump is equipped with its own shut-off device, it is better to use it) . Wait for the pressure to rise to 5 atm. (no more) and blow out the floor loop under this pressure.
- Close the blown circuit and open the next one. Repeat the same procedure with him.
- In this way, drain the water from all underfloor heating circuits.
- For better efficiency, repeat the procedure after half an hour, since the remaining droplets of water in the pipe can connect with each other and eventually block the cross-section of the pipe in a certain place.
By following this method, you will solve the problem of how to drain water from a heated floor. The only problem is getting a compressor that can handle this task.
Self-pressure testing of underfloor heating systems
First launch of a warm water floor
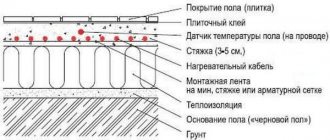
Rules for installing a heated water floor based on a concrete screed
How to flush a heated floor heating system and how to completely flush the heating system in a private house with your own hands
Installation of water heated floors without concrete screed
Warm water floor system technology
Test run of a water floor or pressure testing
After the system is assembled, before pouring the screed, the water floor must be checked for functionality. This way it will be possible to eliminate any shortcomings that might have been made during installation. To do this, first the water floor pipes must be washed, drained well, and then filled with the coolant that will be used.
There is no need to drain the system before screeding: the solution is laid when the pipes are filled so that they take on “working” dimensions.
There are three methods for checking the functionality of the system and identifying installation defects:
- bring to operating temperatures and leave in operation for several days;
- test with cold coolant at high pressure;
- Pressurize heated floors with air.
Before pouring screed or laying rigid base slabs, the underfloor heating system is pressure tested - pressurized
The choice is yours, but running the system at high pressure without a tie may result in the pipes being torn out of their sockets. This is if you used mounting tapes or single fasteners. To prevent this from happening, you can install beacons for the screed before the test run, and secure them with small sections of mortar at a certain step. Pressure testing must be carried out after the solution holding the guides has set. You will get a kind of frame that will hold the pipes, so they will not break out of their sockets. Will the guides interfere with troubleshooting? No. If the pipes were not bent during installation and the coil was rolled out, then your pipes are intact and there will be no problems in this part. If leaks can occur, they will occur at the junction of the pipes and the manifold, in the boiler piping.
You need to make a frame if you used self-focusing fastening systems. If you tied the pipes to the mesh, there are no problems.
Now let's talk about how to test the system using each method.
The first method is running at operating temperatures . The system must be brought to operating temperature gradually, starting from 20°C. After a few hours, raising it to 5°C. All this time you need to monitor the joints, connections, contours. If leaks are detected, stop the system, drain, repair, refill and test. After reaching the design coolant temperature, leave the system for 2-3 days. If no damage is detected, you can fill the screed (after pre-cooling the coolant).
A manual device for pressure testing water supply systems, with which coolant is pumped into a heated floor system
Second method: with excess pressure . Here everything is somewhat simpler: having filled the system with a “working” coolant, create a pressure 1.5-2 times higher than the working one and leave it for a day. If in a system made of PERT or PEX the pressure drop during this time does not exceed 1.5 Bar, there is no leak - you can fill the floor. If there are any shortcomings, everything is exactly the same as when reaching the temperature: stop the system, drain it, fix the breakdowns, fill it, test it.
The third method of dry pressure testing is used if it is impossible to fill in coolant for some reason or for special cases. Then, using a compressor, air is pumped into the system . But in this case you will have to create a pressure that is 2-3 times higher than the working one. This method is not entirely reliable, especially if you use a heated floor with antifreeze. “Anti-freeze” products are characterized by increased fluidity. Therefore, it is advisable to check the system before filling the screed with the working fluid. Moreover, the screed needs to be poured on filled pipes, and air is poorly suited for this.
When testing with pressure above 4 Bar, the air vent valves must be closed, because after a while water or coolant will begin to come out of them.
More about which testing method is used with which pipes. For metal-plastic pipes, testing with cold water at high pressure (6 bar) is recommended. If the pressure in the system has not dropped within a day, then the system is reliable and you can pour the solution or lay base sheets when using flooring systems.
The automatic crimping machine does everything yourself, you just need to control it
Crimping of a system made of cross-linked polyethylene takes place differently. First, the system is checked three times in cold water at high pressure. The test pressure is twice as high as the working pressure, but the lowest is 6 bar. Bring the pressure in the system to 6 Bar, after which it begins to drop. Leave the system for half an hour, then raise the pressure to 6 Bar again, and after half an hour again (3 times in total). After this, raise the pressure to the pressure test (twice as high as the working pressure) and leave it for a day. If during this time the pressure drop is insignificant (less than 1.5 Bar) and there are no signs of leaks, the test was successful.
But that is not all. According to German standards (this country has the most stringent safety requirements for construction technologies and materials), after pressure testing in cold water, the system must also be run at operating temperatures. Smoothly bring the system to operating temperature and leave for several days. After successfully passing all tests, we can confidently say that the system is reliable.
Formation of air masses in a heated floor system
A pump is needed to bleed the system.
How to bleed air accumulated in the system will depend on the incident that led to such a result.
Some circumstances require immediate intervention, while others are not capable of causing significant damage to the system.
If the heated floor was installed with noticeable differences, it is worth acquiring an additional pump for pumping the coolant.
Running the circulation pump will also help expel excess air. The more air has accumulated, the louder the circulation pump will work.
It is worth paying attention that the system must be pumped at maximum speeds. This will significantly save time and allow you to completely remove air from the system.
If it was recently pumped, but the air has already collected again, the problem may be in the pump itself.
Air vent
With the comb installed, each circuit is closed in turn, and the air vent must be open on each of them. It is necessary to bleed air gradually, so after cleaning the first circuit, the next one opens. The descent is carried out in stages and at the moment of bleeding only one circuit should be open.
If this procedure does not give the expected result, the next air release should be carried out no earlier than in a few days.
To properly clean the system, a person must understand the structure of the comb and understand the principle of its operation. If you do not have the necessary knowledge, you should seek help from specialists. watch the release of air in this video:
Replacing a radiator in an apartment building
If you only need to change the radiator for repairs, then every apartment owner must know how to properly shut off the radiator. If the system in the house was installed in good faith, then this possibility certainly exists.
Knowing how to shut off a heating battery is also necessary to prevent various emergencies, such as a severe leak due to the destruction of the radiator. Every owner needs to know the phone number of the organization where to contact about heating immediately in the event of an emergency.
If a single-pipe heating scheme is used, then a bypass must be installed. Every apartment owner should have a clear and precise understanding of how to shut off the heating radiator in this case.
With such a circuit diagram, the following actions are carried out:
- the bypass valve opens completely;
- close the shut-off valves on the battery on both sides.
Having completed these operations, you can begin to remove the radiator from the system.
After replacing the battery, sealing the connections and tightening the locknuts, gradually open the valves at the battery inlet and outlet.
At the same time, the Mayevsky tap opens and the bypass closes. Slowly filling the battery prevents water hammer, and the air from the battery is released through the Mayevsky tap until water appears. This will mean that the battery is filled with liquid, the air has been removed, and the shut-off valves on the battery can be opened completely.
Emergency situation
By emergency we mean a case where the battery leaks. Again, if there is a tap that turns off the battery, turn it off and drain it; if not, you cannot do without calling a plumber.
The battery does not heat up
Cold water in the radiator, although the heating has been turned on a long time ago? Means, . In theory, your radiators should be equipped with a Mayevsky tap. If your battery is installed correctly (the angle in which the valve is installed should be slightly higher), then when you open the valve to bleed off excess air, only air will come out; as soon as the water starts flowing (don’t forget to immediately replace the jar), it means that the air has escaped and there is no more plug. If the radiator is installed completely horizontally, you may have to drain more water.
The rifar radiator has special drain taps
The Mayevsky crane is not installed? Perhaps it is better in this case to turn to specialists. Why?
Equipment tends to break down over time. Imagine that you managed to cope with coking and drain the water. But closing them is no longer possible.
Can you imagine what consequences this will lead to?
- Firstly, you will flood your neighbors, and you will still have to call a locksmith to turn off the heating in the entire house.
- Secondly, you will leave the entire house (or at least the entrance) without heating for quite a long time - until the consequences of your “amateur activity” are eliminated.
- In addition, if heating in your home is provided by an individual boiler, then the contract you concluded with the service organization states that it is prohibited to drain the water yourself. This is due to the loss of the required pressure level, which is signaled by special emergency sensors.
How to start a warm water floor correctly
The first launch of a warm water floor is carried out by heating the coolant to +20-25 degrees. You need to let the system settle for a couple of days, after which every day increase this indicator by 10 degrees if water is used and by 5 if the coolant is antifreeze.
The entire process of gradual heating of the structure directly depends on the size of the room. If it is small, then you can do it in just a couple of days, but since the launch of a warm water floor is arranged after all the checks, pouring concrete and laying the floor covering, it is better not to rush with a sharp rise in temperature. This may cause cracks to appear in the screed.
Where and when to fill coolant
The method of supplying coolant depends on the structure of your system. If tap water is to be used, there is a special tap that opens the supply. To fill other liquids, the supply part of the manifold must have a special tip with a shut-off valve, to which a special pressure testing device is connected, which can also be used to fill the coolant. These devices can be manual or automatic. In principle, you don’t have to buy the device, but rent it from a specialized store. But if you use water as a coolant, you will have to use it every year (you need to change the water in heated floors before each season), so in this case you can think about buying it. A video in which a representative of one of the companies talks about crimping machines is located at the bottom of the page. If you're interested, take a look. To drain the system, there must also be a special tap on the outlet manifold.
Regardless of whether the supply manifold is located at the top or bottom, we supply coolant through the supply shut-off valve
Before adding coolant, the heated floor must be washed with running water. Inside there are inevitably lubricants and compounds that were used in the production of system components. Most likely, shavings, small scraps and other debris got into the pipes during the installation stage. Therefore, washing is a mandatory step. To do this, the system is filled with water several times and then drained. After the water has drained completely clean, the washing can be considered complete.
In addition to the first start-up of the system, flushing is required before each coolant change. If water is used (soft or distilled), replacement occurs annually. When using antifreeze, you must follow the manufacturer's recommendations. Some recommend changing the coolant every 2-3 seasons, and others once every 10-15 years (there are such compositions). But it is necessary to flush the system with water before each coolant change.
How to drain water from a heating system
When is it necessary to drain water from the heating system? Most often, the need for it arises when it is necessary to clean or replace a heating radiator, for example. If we are talking about a city apartment that is connected to a central heating system, then such an operation can be carried out independently on the internal section of the network. In the event that it is necessary to drain the heating system of a private house equipped with a boiler, it will have to be temporarily emptied.
The essence of the
The first step is to shut off the branch of the heating riser that goes to the apartment. It is enough just to close the distribution valve located here. For a private house with an autonomous heating system, this process is slightly different:
- firstly, you need to stop the supply of fuel or electrical energy;
- secondly, you should carefully read the user instructions for this case.
Only after this can the boiler be turned off. Then you should close the valve through which water is drawn into the system.
Only after this can the boiler be turned off. Then you should close the valve through which water is drawn into the system.
To speed up the process a little, you will need to know those places in the system where taps with air-type valves may be located. They all need to be opened. In this case, nothing will interfere with the flow of water to the hose.
During this operation, small leaks of water from the system onto the floor are possible. Therefore, at the very beginning, it is better to place a large bowl or basin under the place where the hose is connected to the tap (drain). As all the water leaves the system, it is necessary to disconnect the hose and drain the remaining water from it into a substitute container.
Only after completing all the described procedures can you move on to the main thing - to the work for which the water was drained from the heating system of a residential apartment or private housing construction.
If the owner of an apartment or house does not quite understand how to drain the water from the heating without harmful consequences, then it is better to contact a qualified contractor. For example, to a plumber from a company that services a specific home.
termosyst.ru
possible malfunctions (leaks and others), the procedure for eliminating them
All problems of heating systems have the unpleasant property of appearing at the most inopportune time.
Troubles occur during severe frosts, when stopping heating is fraught with defrosting of the system, failure of pipelines and other incidents that are difficult and troublesome to deal with.
Some systems have a specific design, the features of which significantly complicate repair work. The most difficult system to repair is a water heated floor, failure of which can mean serious repair and restoration work.
All incidents with heated floors occur unexpectedly, and in order to promptly and correctly troubleshoot problems, you need to be aware of what happens most often and what actions are necessary to quickly resolve problems. This question may concern any owner of a water heated floor, so it should be considered in detail.
general information
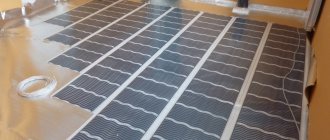
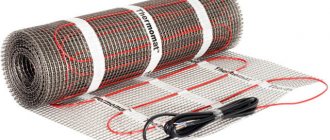
The design of water heated floors is a complex system of pipelines, a pumping and mixing unit, control and measuring equipment and devices. The working body (heater) of a heated floor consists of a set of pipes of small diameter (15-20 mm), placed evenly under the floor covering (linoleum, laminate or tile). The pipes are divided into sections of approximately equal length, called loops or, more commonly, loops. Each circuit is a separate heater connected to the mixing unit manifold.
The contour is laid on the floor surface in a certain shape (spiral, snake, snail) in such a way as to distribute it as evenly as possible over the entire area. All pipes have an equal distance (pitch) between each other, on which the heating efficiency largely depends. The number of circuits is determined by the total heating area; for one system the maximum is 9 circuits.
Each circuit is connected to collectors - a direct one, which distributes coolant at a certain temperature, and a return one, which receives cooled coolant and directs it to the network or to a boiler for heating. In this case, part of the return flow is mixed with the forward flow to obtain a mixture of the desired temperature. This is done in the mixing unit using a two- or three-way valve.
To ensure stable circulation and overcome pipe resistance, a circulation pump is used, located in the mixing unit. It has several connection options, most often it is located immediately after the mixing unit in order to pump cooler coolant, which increases its service life. The heated floor is connected either to its own boiler (for example, gas or electric) or to the central heating network.
The most vulnerable and dangerous, in terms of the possibility of malfunctions, are underfloor heating circuits. They are located in the thickness of concrete (screed), or under the floor covering with a layer of durable sheet material that protects the pipes and creates a rigid base for the covering. Detection of a circuit malfunction means the need to access the pipe in this location, which will require labor-intensive opening of the circuit.
Possible faults
Most possible malfunctions of a heated floor have typical symptoms that help roughly determine the causes of the incident.
The most common sources of problems are:
- contours;
- mechanical devices - pump, valve, etc.;
- regulators, sensors.
In general, two types of breakdowns can be distinguished:
- Visible. Problems that have occurred on system elements that are not difficult to access.
- Hidden. Problems located in the thickness of the screed or under the layers of the heated floor cake (mainly pipes).
Problems that arise on visible elements of a heated floor are quite easy to eliminate - you should replace the failed element with a new, working one. It is more difficult to resolve issues with pipes, since they are not visible, and access to them is significantly difficult.
Even the fact of detecting a leak does not happen immediately, especially if there is not a rupture, but a small crack or puncture. Such malfunctions are detected only by visible traces, when a wet spot appears on the floor surface or by a drop in the amount of coolant in the system.
First actions
First of all, you should turn off the coolant supply and always the circulation pump.
If there is a leak, it will pump a lot of water into the ceiling, or it will remain without lubrication and fail. Then you need to drain the coolant using a special drain valve that should be equipped with a heated floor system.
A warm floor without a coolant is absolutely safe and does not cause any trouble, but if everything happens in frosty winters (and most often this happens), then you need to worry about temporarily heating the house during the renovation period. All this must be done as quickly as possible so as not to increase the damage from the malfunction.
In some cases, you can turn off only the problematic circuit without stopping the entire system. At the same time, you need to be sure that the cause of the malfunction lies precisely in it, so as not to aggravate the existing problem.
Tools and materials
To repair a water heated floor, you will need tools in any case.
The list of tools and materials depends on the nature of the detected malfunction and possible ways to eliminate it.
To replace sensors, regulators or other devices, you will need a minimum of tools; for more serious work - removing part of the screed and opening the pipe, a very wide range may be useful.
In any case, you will need:
- Hammer.
- Pliers.
- Screwdriver.
- Set of wrenches.
- Hammer.
- Chisel (for carefully exposing the pipes).
- Broom, dustpan for immediate removal of debris when removing the screed.
- Connecting fittings.
- Pipe corresponding to that used in the damaged circuit.
- Work gloves for contact with hot surfaces (especially in the first minutes).
In general, the tools needed are the same as for installing the system, but as the work progresses, some unforeseen devices or tools used as needed may come in handy.
Attention! Possible contact with hot water or structural elements. Protective equipment should be used to avoid burns.
Repair process
If suddenly the temperature of the heated floor begins to rise, then the reason most likely lies in the three-way valve. When it receives a signal from the sensor, full operation is possible, which opens maximum access of hot coolant to the circuit system.
In this case, you should shut off the direct pipeline and give the valve time to operate back. This is the danger of three-way valves, since a sudden flow of hot coolant causes the mixture to expand, which can cause rupture of pipes or connections.
If a leak is detected, you must:
- Clear the area of the floor from the floor covering.
- Visually determine the boundaries of the wet spot (if there is a screed), or remove the protective layer and locate the problem area.
- Using a puncher, carefully remove the layer of screed along the intended boundaries. To do this, you need to make a hole in the center of the problem area and gradually expand it in a circle until you find the first section of pipe. Then it will be possible to roughly navigate its location.
- After cleaning the floor area, you need to find the location of the leak - a pipe rupture, poor connection, etc.
- Any damaged section of pipe that is found must be replaced. To do this, you need to prepare two fittings, cut out the damaged area, connect a new whole piece of pipe to the circuit using fittings.
- You should try to find out the cause of the leak. A connection is in any case more dangerous than a solid circuit without connections. If a rupture occurs, it may happen again. Sometimes it’s better to work hard and replace the entire circuit.
- If copper pipes are used, soldering will most likely be required. Its possibility must be organized so that there is no long-term downtime of the system.
- After the pipe repair is completed, all actions should be performed as during the first start - pressure testing, performance testing, elimination of detected deficiencies.
- Then the screed area is restored. Filling is carried out when the pipes are filled under operating pressure.
Problems with visible elements of the system - the mixing unit, manifolds or pump - are much easier to fix, since there is no need to open the floor. In this case, mandatory actions must be taken - shut off the coolant supply, turn off the circulation pump and remove water from the system.
Attention! Replacing elements while the system is running is fraught with the danger of a sudden breakthrough of hot water and burns. Before any action, the coolant supply must be stopped!
Useful video
How to properly repair a leak in a warm water floor is additionally described in the video below:
conclusions
Malfunctions of the underfloor heating system are infrequent incidents, but there is a possibility of such events. To quickly and correctly resolve problems, you need to be prepared for them and have knowledge of the priority actions. To do this, it is recommended to carefully study the operation of the system, understand its characteristics and the functioning of its elements.
This knowledge will help, if any problems arise, to make the right decision, which will help to take the most correct actions to quickly resolve the issue.
ochag.online
We expel the air
It is a well-known fact that air in heating systems accumulates at the highest points of the system. For underfloor heating systems, this is a collector comb, where air discharge devices are installed (Mayevsky valves, automatic air vents or conventional ball valves).
Mayevsky tap installed on the underfloor heating manifold.
To remove air from the underfloor heating system, you must perform the following steps in a certain sequence:
- Shut off all horizontal branches on the collector.
- Remove air from the circulation pump housing.
- Open the Mayevsky valve or ball valve on the comb (in the absence of automatic devices).
- Open the first water circuit, start the pump, setting the minimum capacity on the regulator.
- After waiting for water to appear from the air outlet of the pumped branch, turn off the tap and turn off the pump.
- Repeat the operation several times at intervals of 5 - 6 minutes until the air is completely removed.
- Similarly, perform all operations with the remaining contours.
- Then, switching the pump to maximum performance, pump the entire system as a whole, periodically bleeding air.
- Considering the likelihood of new plugs forming during subsequent warming up of the system, it is necessary to bleed the air again.
Important! Putting the system into operation is possible only after all these measures have been taken and it has been fully checked for leaks. To work with Mayevsky taps, you must have a special key or slotted screwdriver
It would be useful to prepare a special container for drained water.
When using automatic gas vents or separators as air removal equipment, no additional means are required. It must be remembered that as the complexity and quantity of equipment used increases, the cost increases and the reliability of the system as a whole decreases.
Types of fan coil units, their differences and features
The lower the degree of automation of the process, the higher the performance of heated floors. Adjustable manifold valves with a mechanical drive, Mayevsky taps are easy to service or replace with your own hands.
Repair of more complex equipment with servo drives and automation units requires the participation of specialists. In addition, automatic air vents, while effectively removing air pockets, do not always allow immediate detection of system leaks.