Home » Equipment » Warm floor
In houses located outside the city, there is no central heating. They come up with an individual heating system. Some owners prefer to install a “warm floor” line. It can be electric; in this case, thermal film, carbon rods or cable are used.
For large rooms, liquid heating is carried out; a circuit of pipes in which water circulates is laid in the screed. The Korean company offers a unique “xl pipe” underfloor heating system. It combines electric and liquid heating. What is the scheme of this technology? How convenient is it for household members?
Description
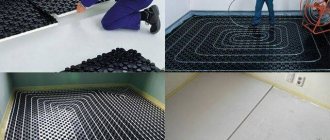
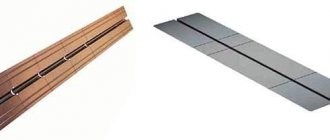
Electro-water heated floor XL PIPE is a patented development of South Korean. The coolant of the system is antifreeze, continuously circulating through polyethylene pipes 20 mm in diameter; an electric cable runs inside the pipe, which heats the liquid. This system is very economical to operate, is not afraid of being blocked by furniture, and can be installed under any floor covering with the exception of cork and boards. Installation of an electric water floor can be done either with or without a screed, using the “dry method”.
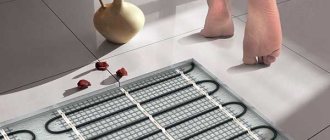
Capillary heated floor UNIMAT AQUA
These water-based electric heated floors have a different operating principle. The main difference here is the diameter of the pipes: it is very small, hence the name - capillary. These tubes are connected to a small device, which simultaneously heats the coolant, controls its temperature and creates pressure in the system (closed system).
Since the diameter of the pipes is small, the system contains a small amount of water - up to 6 liters (necessarily distilled) and its heating is handled by a small heater (no more than 2.4 kW). Therefore, to install this version of a liquid-electric floor, a separate input is not required, although it is better to connect it through an RCD and an automatic circuit breaker.
The maximum heating area is 20m2. Therefore, the system is not very suitable for large rooms, although several devices can be installed that operate independently of each other. Warranty period - 5 years.
Composition of the capillary floor system and its capabilities
In order to assemble this type of heating, you will need at least two kits: basic and additional. The basic UNIMAT AQUA kit includes an assembled control unit, two pieces of connecting pipe and an installation kit (bushings, tees and clamps), with which the pipeline is assembled and connected. An additional kit is one or two coils of capillary tubes for different areas (from 10m2 to 20m2). In addition, for installation you will need insulation, damper tape, a heat-reflecting layer and fasteners for tubes, as well as a cement-sand mortar with a plasticizer for pouring the screed (or a special composition).
Basic set • capillary floor UNIMAT AQUA
The main advantage of this system is the fairly large functionality of the control unit. Here's what the capillary system control unit can do:
- Maintain antifreeze mode (temperature +15°C).
- Control either the condition of the coolant or the room temperature of your choice.
- Maintain the power that you set yourself when starting the system (factory setting is 2.4 kW, but you can set it from 0.1 kW to 2.4 kW).
- Using the timer, you can set the system shutdown time.
Installation of UNIMAT AQUA
As with electric heating systems, everything needs to start with choosing the installation location for the control unit. It is located on the wall, at a height of 1-1.2 meters from the floor level. The installation method is hinged, so there is no need to make holes. You need to securely attach the mounting plate, that's all. Please note that the device is plugged into an outlet, so choose a place close to it.
Connecting pipes from the capillary floor will be supplied to the control unit and to lay them you will need grooves in the wall (or you can lay them in a plastic mounting box mounted on the wall).
Installation diagram of capillary floors from Caleo (click on the picture to enlarge)
The installation of capillary tubes is standard: in the screed. There are no differences from the water heating device or from the method described above. The same requirements apply to the base (must be level) and an excellent degree of thermal insulation is desirable. The “pie” and the editing sequence are similar. The laying pattern for the screed is a double snake (see the picture), the laying step is 10-12cm, the distance from the walls is 10-15cm or more. After laying the heating tubes, they are connected using the components from the installation kit with connecting ones (included in the basic kit). The connecting tubes are easy to distinguish - they have a square cross-section. For greater maintainability of the system, it is advisable to place the connection point in a mounting box fixed to the floor. And from it, run solid pipes to the control unit (in a groove or mounting box on the wall). The control unit has special small pipes onto which the connecting tubes are pulled.
Control unit - the heart and brain of the capillary system of the electric water floor
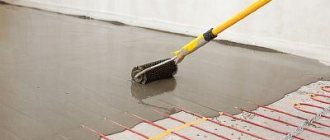
The next stage of installation is filling the system. Distilled water is poured into the receiving hole. Then the system is tested: the heating temperature is set on the control unit and the system begins to operate. After checking, the heating is turned off and the water is not drained. When the coolant has cooled (but not cold), begin pouring the screed. Its thickness is from 3cm to 5cm. The capillary underfloor heating system can be put into operation only after the screed has completely dried (at least 28 days).
Advantages and disadvantages of a capillary heated floor system
This version of the water-electric floor can only be used to increase comfort. It does not have enough power for main heating. The advantage is the safety of the system (no electricity in the floor), which allows it to be installed in wet areas (for example, in the washing compartment of a bathhouse) without any restrictions. On the other hand, the disadvantages of water heated floors remain to some extent: hotter water comes from the block, and therefore the floor warms up unevenly. The disadvantage is not so pronounced due to the recommended double snake when laying pipes, as well as due to the small volume of the system, which allows maintaining a small temperature difference between the supply and return pipelines.
Technical characteristics of UNIMAT AQUA
There is no data on the maintainability of the system, although it is recommended to place the main problem unit - the joining of heating and connecting pipes - in a separate accessible box, which provides for the possibility of repair. All other parts that may fail are located in the control unit, so repairs are possible.
Kit selection table
| vendor code | Length, m | Heating area, sq. m. | Power, W |
| XLPIPE-005 | 7 | 1,4-2,1 | 280 |
| XLPIPE-010 | 14 | 2,8-4,2 | 560 |
| XLPIPE-015 | 21 | 4,2-6,3 | 840 |
| XLPIPE-020 | 28 | 5,6-8,4 | 1120 |
| XLPIPE-025 | 35 | 7,0-10,5 | 1400 |
| XLPIPE-030 | 42 | 8,4-12,6 | 1680 |
| XLPIPE-035 | 49 | 9,8-14,7 | 1960 |
| XLPIPE-040 | 56 | 11,2-16,8 | 2240 |
| XLPIPE-045 | 63 | 12,6-18,9 | 2520 |
| XLPIPE-050 | 70 | 14,0-21,0 | 2800 |
| XLPIPE-060 | 84 | 16,8-25,2 | 3360 |
How to buy XL PIPE Electric-water heated floor?
To order Electric-water heated floor XL PIPE and related products for installation, use the order on the website, the numbers indicated in the header, and e-mail. Orders are accepted around the clock.
We provide inexpensive delivery not only in Moscow, but throughout Russia! See "Delivery" for more details.
We also have more than 350 pick-up points in 214 cities of Russia!
For your convenience, we work with several delivery services, which allows us to deliver your order inexpensively ( often free ), quickly (usually 1-6 days ) and safely (all our shipments are insured ).
Advantages and problems of traditional technologies
A lot has been said about warm floors (WF), and today almost everyone knows what types they come in. In this section we will mention the best that the types of TP known today give the consumer. The problems of these systems, which are solved in XL PIPE technology, will also be given.
Energy intensity of a water floor
Water is an excellent coolant; additives are added to it to improve its qualities, and this product is called a “thermal agent.” The mass of liquid transfers temperature to all points of the system and at the same time maintains it for quite a long time.
Problem. Equipment is required to constantly pump the agent through the system. This is usually a boiler that requires a separate room and expensive, qualified services.
Fast heating and low cost of electric flooring
The electric cable warms up much faster than water, since metal is many times denser than liquid. The cost of the system is the lowest (from 5 USD/m2).
Problem. It also cools down much faster - it requires frequent restarts to warm up. This increases energy consumption and requires a powerful, stable power grid.
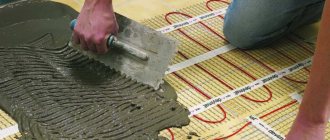
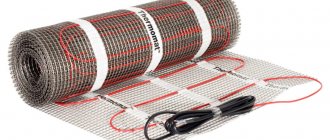
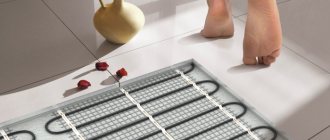
Ease of installation of infrared (IR) TP
Simply roll out the film mat and connect it to the mains (socket) through the regulator. It can be covered with carpet or laminate and can be used multiple times. Ceiling and wall mounting is also acceptable.
Problem. High electricity consumption, comparable to wired TP. Relatively high cost of the film itself (about 30 USD/m2).
Conclusion - despite obvious advantages, all known types of TP have problems in three areas:
- Complex or expensive installation, a lot of equipment.
- High operating costs (electricity costs).
- Rapid loss of temperature.
In accordance with the requirements of the Federal Law of July 27, 2006 No. 152-FZ “On Personal Data,” I consent to the processing, storage and use of my personal data by employees of SV-Servis Vostok LLC (https://sv-servisvostok. ru) without reservations or restrictions, and I confirm that, by giving such consent, I act freely, of my own free will and in my own interests.
This consent is valid until the date of its withdrawal by sending a corresponding written statement signed by me, which can be sent by me to SV-Servis Vostok LLC (https://sv-servisvostok.ru) by registered mail with return receipt requested, or delivered personally against signature to a duly authorized representative of SV-Servis Vostok LLC (https://sv-servisvostok.ru).
If I receive my written application to withdraw this consent to the processing, storage and use of my personal data, the administration of SV-Servis Vostok LLC (https://sv-servisvostok.ru) is obliged to stop processing them and exclude my personal data from the database data, including electronic.
I understand that putting an o in the field to the left of the phrase “I accept the terms of the “Agreement for the collection, processing, storage and use of personal data” on the website of SV-Servis Vostok LLC (https://sv-servisvostok.ru) means my consent with the conditions described therein.
I understand that personal data means any personal information that allows us to identify the User/Buyer accessing the website of SV-Servis Vostok LLC (https://sv-servisvostok.ru) such as: - last name, first name, patronymic; - Date of Birth; - contact number; - E-mail address; - mailing address; - payment details.
I am convinced that the administration of SV-Servis Vostok LLC (https://sv-servisvostok.ru) guarantees the confidentiality of the information received. The processing of personal data is carried out only for the purposes of: - effective execution of orders, contracts and other obligations assumed by SV-Service Vostok LLC; — providing customer support; — receipt by the User/Buyer of information about marketing events; — conducting audits and other internal studies in order to improve the quality of services provided.
The administration of SV-Servis Vostok LLC (https://sv-servisvostok.ru) undertakes not to transfer received personal data to third parties, except for the following cases: - at the request of authorized government bodies of the Russian Federation only on the grounds and in the manner established by law RF; - strategic partners who work with SV-Servis Vostok LLC (https://sv-servisvostok.ru) to provide products and services, or those of them who help SV-Service Vostok LLC (https:// sv-servisvostok.ru) sell products and services to consumers. SV-Servis Vostok LLC (https://sv-servisvostok.ru) provides third parties with the minimum amount of personal data necessary only to provide the required service or conduct the required transaction.
I guarantee that the information provided by me is complete, accurate and reliable, and also that when providing information, the current legislation of the Russian Federation, the legal rights and interests of third parties are not violated. All information provided was filled out by me regarding myself personally.
I agree that the administration of SV-Servis Vostok LLC (https://sv-servisvostok.ru) has the right to make unilateral changes to this Agreement, provided that the changes do not contradict the current legislation of the Russian Federation. Changes to the terms of this Agreement come into force after their publication on the website of SV-Servis Vostok LLC (https://sv-servisvostok.ru).
This consent is valid for the entire period of storage of my personal data, unless otherwise provided by the legislation of the Russian Federation.
DIY XL PIPE installation
The installation procedure for this system is 80% similar to the installation of a water TP from a flexible pipe.
Operating procedure
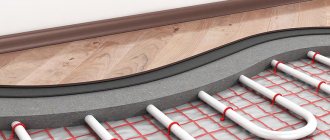
1. Place a heat-reflecting material—a foil backing—on the base (screed made of foam concrete or PPR).
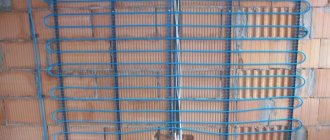
2.Then follows a 100x100 welded reinforcing mesh with a 3 mm rod. If reinforcement was applied in a rough screed, the mesh is laid only on top of the pipes.
3. Lay the pipe on special fasteners (included in the kit) in a “snail” or “zig-zag” pattern. The main requirement is a pipe pitch of 250–300 mm.
Attention! Do not allow the pipe to become kinked, kinked, cut or otherwise deformed.
4. Lead both ends of the pipe into a sealed distribution box (supplied). It will be required for maintenance or repair and should be covered with waterproofing tape.
5. Next, a wire is connected to the ends of the anode and cathode, which goes to the regulator and power source.
6. After installation and testing, install beacons and lay a screed from a special mortar for TP, or cement mortar with additives.
7. At low room temperatures, the system can be turned on at 15–20 C° to accelerate the hardening of the screed.
The location of the distribution box must be determined in advance in such a way that access to it requires dismantling a minimum of floor covering. You should also provide a convenient location for the regulator - the wires from it will go to the box.
Installation of XL PIPE on video
Maintenance of such a system is carried out by specialists, since a special pump is needed to pump liquid. The repair procedure boils down to pumping out the agent, replacing the heating filament (you just need to thread it through the pipe) and reinjecting the liquid. Such prevention is recommended once every 12–15 years, i.e. 4–5 times over the entire service life.