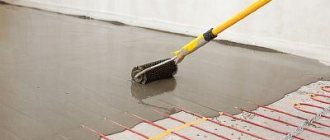
The type of heating in which heat is generated by using electrical energy is distinguished by its simple design, and its installation takes a minimum of time. You don’t have to be a professional to install an electric heated floor with your own hands, you just need to follow all the instructions exactly.
The article we presented describes in detail all types of electric underfloor heating systems, their characteristics and pros and cons are given. For do-it-yourselfers, we have provided step-by-step installation guides. Taking into account our advice, you can build and connect an electric floor with your own hands.
Varieties
Which type should I choose? Scientific developments and modern technologies have made it possible to create several modifications of classic electric surface heating. They look and function with some variations, but the general principle is the same: the power source is electricity.
- Classic cable. Classic cable floor diagram
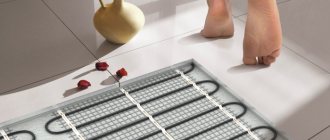
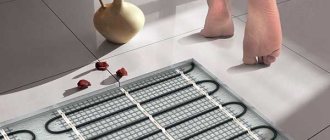
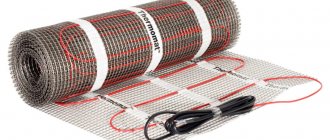
- Electric mats. Instructions for laying an electric mat under tiles
- Film infrared. Infrared heated floor design
All of these varieties have heating elements, with the help of which the top coating is heated. An important aspect of choice is installation with or without a screed. Which option is better to choose? Let's figure it out.
Basic operating rules
When using the system, observe the following rules:
- Maintenance and repair of the electric floor is carried out only after the system has been de-energized.
- Objects that interfere with heat transfer are not placed above structural elements. This leads to overheating and system failure.
- The structure is not subjected to significant mechanical loads. Impacts can lead to breakage of the temperature sensor and damage to the film heating device.
- If a malfunction is detected, turn off the supply of electricity or hot water and contact a specialist.
- If the floor will not be used for a long time, disconnect it from the power supply. When the system is the only source of heating, the minimum temperature setting is set in the absence of residents.
Repairs are carried out only after the system is de-energized.
When operating the system, you must not:
- independently change the design of heating elements;
- connect a rolled cable to the network;
- install heating cables or mats that are not disconnected from the power supply;
- perform installation and maintenance work on the system without the appropriate skills;
- connect the products to an electrical network that does not correspond to the parameters stated in the product passport;
- expose system elements to aggressive substances or lubricants;
- perform work without using personal protective equipment;
- expose system components to mechanical stress;
- leave heating cables unprotected.
Advantages over other types
What are the general advantages of electric heating over other types?
- This is an ideal additional heating that will evenly heat any surface from tiles to laminate, and provide a pleasant, comfortable temperature in cold and damp weather.
Advantages of electric heating systems over convective ones - Its operation in an apartment building does not depend on central heating; it can be turned on at any time.
- Installation of such heating is simpler than water heating; you only need to correctly calculate the cable pitch to prevent cold zones. Modern industry produces ready-made cable mats, which do not require cable pitch calculations.
Typical electrical heating installation diagram - The layer of screed during installation is much thinner (minimum - 5 cm) than when laying water pipes; it does not raise the height of the floor in the premises too much. There are options that do not require screeds at all.
- Burst of pipes and flooding of neighboring premises are excluded.
- No special permit or design or approval is required for the installation of the system.
- If all installation norms and rules are followed, such heating can last up to 50 years.
Electric cable heating has many advantages. The main task during installation is to choose the option that is suitable for you in terms of energy consumption, installation method, and budget.
How to lay and connect an electric heated floor
[ads-mob-1][ads-pc-1]
Flaws
What are the disadvantages of this option?
- In the harsh climatic conditions of the middle zone, a warm floor cannot be the main source of heating in an apartment or house.
Types of heated floors and their descriptions - Only professionals can solve the issue of installation and connection of some types.
- Warm floors should be placed in open areas; furniture can reduce free heat transfer and cause overheating, which will lead to system failure.
- A heated floor is considered effective if it covers more than 70% of the entire heated area.
- When overheated, the entire system fails.
Required tools for installation
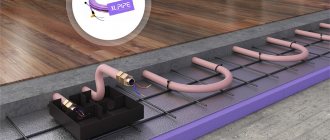
To install a water floor you will need:
- pipes;
- reinforcing tape;
- waterproofing material;
- insulation;
- clamps;
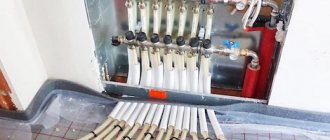
- collector;
- reinforcing mesh.
To install a water floor you will need pipes, insulation, and clamps.
When installing an electric floor, use:
- heating mats or cables;
- heat insulator;
- heat shield (foil);
- thermostats;
- corrugated pipe;
- thermal sensors.
Cable floors
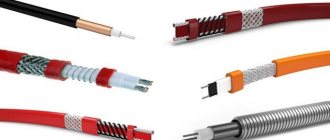
What is classic cable surface heating? It operates using a special heating cable covered with a screed, which releases heat when connected to the network. The cable can be single-core or two-core. When choosing, you should focus on the following parameters:
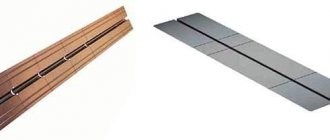
- Single-core cable is cheaper, but its electromagnetic radiation is higher.
- A two-core cable is easier to connect, the electromagnetic radiation is much less, and the price is much higher than that of a single-core cable. Single-core and two-core cables
The next criterion that is worth paying attention to is the power of the additional heating system; it ranges from 150 to 110 W/sq.m. meter. This indicator directly depends on the square footage of the room in which the heating is installed. The higher the power, the more it heats the surface and, accordingly, the more electricity is wasted.
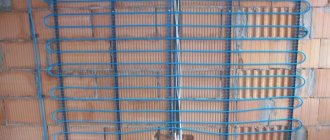
Cable heated floor installation diagram
Another important point: the cable pitch width when installing the system. The cable must be laid in such a way that when the surface warms up, there are no large cold areas left. They will not only create discomfort, but can also damage and warp the floor covering.
An obligatory part of cable electric heating is a thermostat, which will not only control the temperature, but also heat the surface gradually, which is very important if laminate is used as a floor covering. This option goes well with tile or tile flooring in bathrooms and kitchens.
How to choose an electric heated floor: tips, calculations and diagrams
“Heated floor” systems, designed for the main or auxiliary heating of residential premises in apartments or private houses, have ceased to be a kind of “curiosity”. They have fully proven their worth, have firmly taken a certain position among heating equipment, and are finding more and more supporters.
How to choose an electric heated floor
There are two main categories of “warm floors”. The first of them, water ones, are a circuit of pipes located in the thickness of the floor, through which coolant from the heating system circulates. Such a scheme is quite effective, but quite complex to implement; it requires large-scale work, very precise debugging, the purchase of expensive equipment, and in some cases, approval procedures with management companies. Therefore, many homeowners prefer electric floor heating. There is also a lot of hassle in installing it, but still the volume of work and initial costs are not comparable with water. However, it should be remembered that electrical heating can be carried out in different ways. Therefore, if you want to install this type of heating at home, you first need to figure out how to choose an electric heated floor competently.
Depending on the type of heating element, electric “warm floors” can be divided into two types - resistive and infrared. There is also a more substantive division, based on the design features of the systems - this will be discussed below.
But first you need to figure out why such “warm floors” are good, and what power will be required for electric heating of rooms in this way.
Advantages of electrical underfloor heating systems
Firstly, why does underfloor heating create the most comfortable conditions for living in an apartment?
The thing is that it is with such energy transfer that the most optimal heat distribution occurs in the volume of the room. For example, let’s compare how this process works in a room with conventional radiators and with a heated floor surface:
Heat distribution with convection heating and underfloor heating
First, let's look at the left side of the picture. The temperature distribution in the room is extremely uneven, both in height and in relation to the installed radiators. Directly near the radiators there are peak temperatures reaching values of 60 degrees and above, that is, they even pose a certain danger in terms of the likelihood of getting a burn. Further, the air temperature decreases due to convection currents, but in the ceiling area it always remains elevated, about 25 - 30 degrees, while at the floor level these values are minimal - 18 or even less degrees. If we add to all this very unpleasant horizontal air flows, which are akin to drafts, then it becomes clear that such a heat distribution scheme is very far from optimal.
It’s a different matter when the floor surface is heated (in the figure on the right). The transfer of thermal energy takes place at the bottom, and then the heated air rises vertically, gradually cooling as the altitude increases. Thus, the temperature at the floor surface is about 25 - 27 degrees, and at the level of the head of a standing person - about 18. It is this microclimate that is considered the most comfortable for people - how can one not remember the old wisdom “keep your feet warm and your head cold.” There are either no horizontal convection currents at all, or they are reduced to a minimum and do not cause any inconvenience.
Moreover, with the help of “warm floors” you can perform zoned heating, focusing it on certain areas, in the so-called increased comfort zones, for example, in traditional recreation areas or children’s games. Conversely, in some areas where heating is not so important, it is possible to make it much less intense when installing the system by creating a “vacuum” when laying the heating elements. This makes the system more flexible.
So, the main advantage of heated floors is clear. Now let’s take a closer look at why many people choose electrical systems.
- Electrical circuits for “warm floors” are universal, while the installation of water floor heating in a multi-storey building may simply be prohibited.
- No conciliation procedures, drawing up separate projects, or the presence of equipment to interface with existing communications are required. The calculation is made only based on the actual electricity consumed, in the usual manner.
- A water floor is always a massive concrete screed, which increases the load on the floors and significantly reduces the height of the ceilings in the room. With electric heating systems, the screed will be thinner, and with some types of “warm floors” the screed is not needed at all.
- Installation of an electric “warm floor” is much simpler and takes much less time.
- Electric floor heating, when properly installed and adjusted, is much safer than water heating. There is basically no chance of an accident involving a water breakthrough and flooding of lower neighbors.
With water floor heating, alas, no one is immune from such “tragic” incidents
- Electric heated floors easily lend themselves to the most precise, down to one degree, adjustments. It can be included in the “smart home” system, can be programmed for the most economical use of electricity, taking into account preferential night or Sunday tariffs, with minimal energy consumption during the daily absence of the owners, with reaching the optimal heating mode by the time they arrive, etc. .
- Electric “warm floors” are criticized for being uneconomical in terms of energy consumption and the high cost of paying utility bills. One can argue with this - if the system is designed, installed and adjusted correctly, is operated “smartly”, and in the apartment itself the owners paid serious attention to the problems of thermal insulation, then payments for the energy consumed in the most optimal microclimate of the house will always be within reason.
What heating power will be needed
Whatever type of electric floor surface heating is chosen, before purchasing a set of necessary elements and consumables, a mandatory calculation of the system being created is made. Calculation algorithms for specific models may differ slightly, but still a common parameter for all is the minimum required heating power.
This indicator depends on a number of criteria:
- This is influenced by the climatic characteristics of a particular region, that is, average winter temperatures below freezing.
- The orientation of the building and a specific room to the cardinal points, as well as relative to the prevailing “wind rose” in the area, is important.
- The design of the building itself - the material used to construct the walls, their thickness, degree of thermal insulation, roofing material, flooring, etc.
- Completeness and quality of the insulation work carried out, including on the walls, basement of the building, and floors. It takes into account what windows and doors are installed and how great their thermal insulation qualities are.
- An important criterion is the specific purpose of the room in which it is planned to install a floor heating system.
- Finally, the final temperature that homeowners want to see when installing “warm floors” as an additional or main type of heating is also taken into account.
The calculation system is quite complex and cumbersome, and this is, as a rule, the lot of heating engineering specialists. However, the services of specialists are quite expensive, and therefore you can try to calculate the parameters of a “warm floor” yourself, using special programs that are available on the Internet.
You can try to find specialized software for calculations
They usually have a fairly intuitive interface, and all you have to do when asked is enter a number of data about the parameters of your home for the program to make the necessary calculations.
Well, for those who do not like to load their heads with detailed calculations, we can give average values that will be relevant for central Russia, provided that high-quality insulation work has been carried out in the house or apartment and double-glazed windows have been installed. (By the way, if these requirements are not met, there is no point in even thinking about installing an electric heated floor, since the money is guaranteed to fly away in the literal sense of the word - down the drain).
| Type and purpose of the premises | Specific power of electric floor heating (W/m²) | Optimal linear power of the heating cable (W/m) | |
| nominal | maximum | ||
| Sanitary premises (bathrooms, showers, toilets) | 130 — 140 | 200 | 10 — 18 |
| Additional heating in kitchens, living rooms, hallways, etc. | 100 — 150 | 170 | 10 — 18 |
| Premises of apartments located on the ground floors or above unheated rooms | 130 — 180 | 200 | 10 — 18 |
| Electric heated floors mounted in wooden floors on joists | 60 — 80 | 80 | 8 — 10 |
| Electric heated floors without screed (including IR floors, film or rod) | 100 — 120 | 150 | 8 — 10 |
| Floor heating on closed and thermally insulated balconies and loggias | 130 — 180 | 200 | 10 — 18 |
| The use of electric underfloor heating as the main source of heating of residential premises, in floors with thick thermal storage concrete screed | 150 — 200 | 200 | 10 — 18 |
The next important point is the need for a thermal insulation layer under the heating elements of the “warm floor”. There is an opinion that such a measure is mandatory only for floors on the first floors of buildings under which there are no heated rooms. To a certain extent, this may seem fair, however, if you look in more detail, the need for such thermal insulation becomes obvious.
Diagram of heat leakage through the interfloor ceiling
The diagram shows two rooms: under No. 1 is the one in which the electric floor heating system is installed, and under No. 2 is what is located on the floor below. Between them there is always a powerful overlap No. 3.
The electric heating system (No. 4) transfers thermal energy not only upward, to the front covering of the floor (No. 5) but also downward. If we imagine that the thermal insulation layer (No. 6) is not laid, then a huge amount of electricity will be wasted on heating the concrete floor. The heat capacity of this massive structure is enormous, and plus it rests on the main walls, which also “pull” the rub towards themselves. In this case, the air temperature in the lower room will not even be that important, since the temperature of the ceiling itself will in any case be lower, and the amount of heat loss (shown by red arrows) will be very significant.
The task of the thermal insulation layer (No. 6) is not so much to protect the ceiling from the floor surface, but to reduce absolutely unnecessary heat loss for heating the concrete mass downwards. The thickness can be different - it depends on the type of electric heating and on the degree of insulation of the room. For example, for some types of “warm floors” a fairly thick layer of expanded polystyrene will be required, while for others, a polyethylene foam backing with a necessarily reflective foil layer is sufficient.
The diagram below shows the dependence of the amount of heat loss on the thickness of the insulating layer. The y-axis shows the percentage loss of the total thermal power generated by the heating systems. Abscissas are the thickness of the insulating layer (in millimeters) based on ordinary polystyrene foam.
Diagram of the dependence of the amount of heat loss on the thickness of the thermal insulation layer
Calculations were carried out for a room with high-quality thermal insulation of walls, windows, doors, and ceilings. But even in this case, the lack of thermal insulation on the floor leads to the loss of almost a third of the total amount of thermal energy! But even a small layer of insulation immediately reduces unnecessary consumption.
An interesting feature is that increasing the thickness of the thermal insulation layer allows you to reduce heat loss almost threefold. But it is still not possible to completely eliminate this negative effect. And now the value of the thickness of polystyrene foam or polyurethane foam of 35 - 40 mm becomes, in fact, optimal - further increasing it, in principle, does not give a visible result (losses stabilize at the level of 8 - 9%). This means that a thicker layer will only lead to a reduction in the height of the room that is no longer justified.
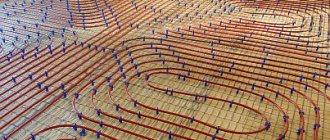
Basic principles of laying electric heated floors
When planning an electric “warm floor” system and drawing up preliminary diagrams and drawings for its installation, several important rules must be taken into account: In particular, the laying of heating elements is never “solid”.
- They should not be placed under stationary pieces of furniture. Heating the floor surface necessarily involves constant heat exchange with the air in the room. If this effect does not exist, then overheating of the cable part is inevitable and its failure is quite likely. In addition, excessive heat is also harmful for furniture - wooden or composite parts will dry out and crack. And from an economic point of view, why waste energy on heating areas of the floor that in no way take part in the overall heat exchange?
Approximate installation diagram for electric heated floors
- The distances from walls or stationary furniture elements should be planned at approximately 50 mm. In places where heating lines (risers) pass or other heating devices are installed, this interval should be increased to at least 100 mm.
- It is usually believed that heating using the “warm floor” principle will be effective if the area covered by the heating circuits is at least 70% of the total area of the room.
- It is advisable to transfer all preliminary calculations and “estimates” to a graphical diagram, first in a draft, and then in the final version - this will help not make mistakes when calculating the required amount of equipment, and will become a guiding document during installation work. It is most convenient to make such a drawing on graph paper, with obligatory adherence to scale.
- Be sure to immediately determine the optimal location for the location of the control unit (thermostat) and temperature sensor. Typically, the unit itself is placed at a height of approximately 500 mm from the floor in a place where it can be easily accessed for visual inspection and manual control, and where it will be most convenient to install both the power wiring and the contacts of the heating elements themselves.
- When planning the placement of the cable part of the “warm floor” on the surface, it is imperative to take into account that under no circumstances can the heating wires intersect.
- The remaining installation parameters will already be specific features of various electrical heating schemes.
Now that we are done with the theory in general terms, let’s move on to considering practical issues - choosing a specific type of electric “warm floor”.
Electric “warm floors” of resistive operating principle
The resistive principle of operation means heating of metal wires when electric current flows through them due to the selected resistance of the metal conductors. Technologically, this principle is implemented in the form of heating cables or special mats.
Cables for underfloor heating systems
Cables are also available in a fairly wide variety. They can be divided into resistive single-core, double-core and semiconductor with the effect of self-regulation of heating.
- Single-core cables are the simplest in design and the most inexpensive in cost. By and large, this is an ordinary long “spiral in insulation”, like the one used in many heating or household appliances.
Scheme of the structure of a single-core heating cable
The single core acts both as a conductor and as a heating element.
The copper braid is only a shield connected to the grounding conductor in order to minimize possible electromagnetic radiation from the cable.
On both sides, installation conductors are connected to such a cable through couplings (they are also commonly called “cold ends”). Obviously, the main inconvenience of such a cable is that both its ends must converge at one point in order to be connected to the terminals of the control unit - the thermostat.
As a rule, such cables are sold in stores in sets of strictly defined length and, accordingly, heating power. These parameters must be indicated in the product passport.
- From the point of view of planning and laying a “warm floor” system, two-core cables are much more convenient.
One cable contains two conductors. One of them can be used for heating, and the second can only be used to close the circuit. There are models in which both wires perform both functions equally.
This is how a two-core heating cable works
The cable always ends with a terminal coupling, in which the contact connection of both conductors is organized. A two-core cable has only one “cold end” - this greatly simplifies the design of a “warm floor” layout, since there is more freedom in the placement of turns - there is no need to pull the second end to the thermostat. For example, compare the two options shown in the figure:
Of course, a two-core cable is easier to install
With an absolutely equal heating area, the layout of a two-core cable (on the right) is much simpler. The diagram shows in numbers:
1 – heating cable;
2 – “cold ends”;
3 – couplings:
4 – temperature sensor cable;
5 – temperature sensor;
6 – end coupling.
In both cases, the use of a heating cable, as a rule, involves filling it with a concrete screed with a thickness of 30 to 50 mm - this, in addition to the function of leveling the floor surface, will play the role of a powerful heat accumulator. The general scheme will look something like this:
Heating cables are almost always covered with screed
1 – ceiling slab;
2 – waterproofing layer;
3 – thermal insulator layer. The materials and required thickness were discussed in more detail above.
4 – Leveling screed on top of the thermal insulator, up to 30 mm thick. In some cases, for example, when using high-density extruded polystyrene foam boards, they can do without it.
6 – heating cable fixed to the mounting tape (5).
7 – finishing screed, 30 to 50 mm thick, which will become the basis for decorative finishing of the floor (8) and a very capacious heat accumulator.
Sometimes you can find recommendations for the possible installation of cable heated floors without screeds - under a laid wooden floor. However, this is rather an exception to the rule. In addition, the efficiency of such heating is still significantly lower than using a screed.
As an exception, the cable can be used in a wooden floor, but the heating efficiency is sharply reduced
1 – thermal insulation (expanded polystyrene, polyurethane foam or mineral wool).
2 – dense aluminum foil, which plays the role of a heat reflector.
3 – metal mesh to which the heating cable loops (4) are tied.
5 – temperature sensor placed in a corrugated tube and connected to the thermoregulation unit (8)
6 – slots in the joists for cable passage
7 – finishing floor covering (usually solid wood).
- Now we need to figure out the question of how much heating cable is needed for the room, and in what steps to lay it on the floor.
The initial data for the calculation are the area of the room where the layout will be carried out (total, excluding areas where cable placement is prohibited), and the required heating power per square meter of area (indicated in the table above).
The first step is to determine the required cable length:
L = S × Р s/Р k
— S – area on which the cable will be laid out. It is easy to calculate on a drawn graphic diagram.
— Р s – specific power of electric heating per unit area (m²), required for efficient heating of the room (see table).
— P k is the specific power of a specific heating cable model - it must be indicated in its technical documentation.
Now it’s easy to decide what interturn distance should be maintained when laying the cable:
H = S × 100/ L
— N – interval between adjacent conductors (turn-to-turn distance) in centimeters.
— S – area, the same value as in the first formula.
— L – previously determined length of the heating cable.
Calculators for calculating the length of the heating cable and laying pitch
The mentioned formulas are entered into the calculator offered to the reader. Enter the values and immediately get the required length of the heating cable:
Go to calculations
The calculated value will serve as a guide for selecting a set of heated floors with a cable whose length is closest to the obtained value. Now it’s easy to find the installation step:
Go to calculations
After the parameters have been fully calculated, you can transfer the installation pattern to a scaled drawing - this will greatly facilitate the subsequent process of installing the “warm floor”.
- Another type of heating cable for the “warm floor” system is a two-core self-regulating one with a semiconductor matrix.
It is not used so often, either due to its high cost, or because information about it is not very widespread. Meanwhile, such a cable is very convenient and economical to use.
Structure of a semiconductor heating cable
Both of its conductors perform only a current-carrying role, and heating is carried out by a semiconductor matrix located along the entire length of the cable. Its special composition causes heating at any point in the cable. Moreover, the heating intensity changes under the influence of temperature.
In colder areas (A), the number of conductive particles (white dots) is maximum, and heating is most intense here. As the matrix heats up, the conductivity of the matrix sharply decreases (region B), and when the optimal temperature is reached, it almost completely stops (C). Thus, the cable itself, without third-party intervention, equalizes the temperature throughout the entire area of the room. – all that remains is to set its maximum value on the thermostat.
By the way, such a cable is not particularly afraid of overlapping heated surfaces with any heavy pieces of furniture - after heating, the conductivity of the matrix in such an area will simply decrease to absolutely safe values.
Self-regulating cables are not yet widely popular, but they undoubtedly have a long way to go
Otherwise, the process of calculating and laying such a cable differs little from its resistive “brothers”.
The convenience of heating cables is the complete versatility of the created “warm floor” - it can be covered with any finishing coating, without exception.
Prices for heating cable and components
Heating cable and accessories
Heating resistive mats
To “make life easier” for installers of heated floors, special mats were invented that significantly simplify both the calculation processes and the installation procedure.
Heating mats with a mesh base are very easy to use
To put it more correctly, this is the same heating two-core resistive cable, but only figuratively laid out with a certain pitch on a fiberglass mesh base. Often, such a mesh also has self-adhesive properties, which makes installation even easier.
The width of such mats is usually about half a meter, and the length can reach 20-24 meters, that is, one set can cover an area of up to 12 m².
It is clear that there is no need to calculate the cable laying pitch here. In addition, such mats have power indicators established by the manufacturer, which are already reduced to the desired value - per unit area. Thus, most of these products are produced with a power density of 100 to 150 W/m². Very rarely, but still there are models that provide heating up to 200 W/m².
If you get the hang of it, laying such mats shouldn’t be particularly difficult. The mesh can be freely cut without touching the cable itself, of course. And with a trimmed base, it will not be difficult to change the direction of laying or even give the mat on the floor a rather complex, curved shape.
Various techniques for laying mesh mats
As a result, you can effectively cover any area with heating elements - from regular rectangles to narrow passages, for example, in a bathroom.
They can cover a room of any degree of complexity.
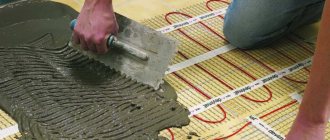
As a rule, such mats are used to create an additional heating system to increase comfort. They are not too powerful, but they do not require a thick screed - just a thin leveling layer. And if the “warm floor” is installed under a covering of ceramic tiles, then the process is made even easier - the tiles can be laid directly on the mats, only slightly, up to 7 ÷ 8 mm, by increasing the thickness of the applied tile adhesive.
A special advantage is that ceramic tiles can be laid directly on them
Such mats, of course, are more expensive than heating cables, but this is fully compensated by the simplicity and speed of their installation.
Prices for different types of heating mats
Heating mat
“Warm floors” based on infrared operating principles
In such systems, the principle of thermal energy transfer is completely different. An electric current passing through special elements causes, with relatively little heating, hard directed infrared radiation, invisible to the eye, but well transmitting energy over considerable distances (a direct analogy with sunlight, only, of course, on an incomparably smaller scale).
Infrared radiation with a wavelength of 4 to 20 nanometers travels in a straight line, causing heating of surfaces in its path. This distribution of heat is the most comfortable for humans.
Infrared floor heating systems can be of two types - film heaters or rod mats.
Film infrared heaters
Between two dense polyester films, two parallel copper conductive busbars are structurally placed, and between them there are black stripes made of a special carbon paste that emit thermal energy when electricity passes.
Roll of Film Infrared Heater
The total thickness of such a film assembly is very small - as a rule, no more than 0.4 mm. However, it becomes a very effective room heater.
When calculating such a “warm floor”, it is assumed that the distance from walls or stationary pieces of furniture should be at least 200 mm. Next, after drawing up an approximate diagram, it is necessary to calculate the percentage of the area on which the heater sheets will be placed to the total area of the room. This is necessary in order to determine the required coverage power.
So, if this ratio is 60% or less, then film elements with a power density of about 220 W/m² will be required. If the coverage area exceeds 60%, then, accordingly, the power of the heating element decreases. The power levels with which such film emitters are produced are from 130 to 230 W/m², in increments of 20 W, that is, it is possible to select the most optimal heating level.
When making calculations and drawing up a laying scheme, it is necessary to take into account the release form of film heaters. They come in widths of 500, 800 or 1000 mm, and the length per roll can reach 50 meters. However, there are limit values for the length of the strips, which are not recommended to be exceeded due to the possible deterioration of thermal characteristics. The limit values are shown in the table:
| Standard Infrared Film Roll Width (cm) | Allowable maximum length of one fragment (m) |
| 50 | 8,5 |
| 80 | 6,75 |
| 100 | 4,25 |
Typically, every 250 mm there is a line along which the film can be cut - this will not in any way affect its performance if the system is installed correctly. Cutting it in other places is strictly prohibited.
Film heated floors, as a rule, are used only by the “dry” method, without the use of screed. They are mainly used for additional heating of parquet, laminated or linoleum floors.
With film heating technologies, a screed is not needed at all
In principle, it is also possible to use them for other purposes, for example, for installation under ceramic tiles, but the technology becomes very complex, using special methods and materials for waterproofing and laying tiles, and therefore it will be easier and much cheaper in this case to lay ordinary heating cable or mat.
Video: one of the varieties of film “warm floor”
Rod infrared heaters
Not so long ago, rod infrared heating mats appeared and immediately gained popularity. They are two parallel conductors in reliable polymer insulation, between which emitter rods are placed.
One of the most innovative solutions is infrared rod mats
The rods are quite flexible and durable; they are a complex structure made of carbon, silver and graphite. When voltage is applied, each such rod becomes a source of infrared radiation in the wavelength range from 8 to 14 nanometers.
The standard width of such mats is 830 mm, the radiating rods are located at intervals of 90 or 100 mm. The length of the mat can be up to 20 m.
When laying, one conductor can be cut in the center between the rods
When laying such heaters on the floor, it is allowed to cut the conductor in the center between the rods, followed by closing the circuit using additional installation wires. An example of such a connection is shown in the figure below.
Approximate diagram of electrical switching of rod mats
Typically, such infrared heating mats, depending on the frequency of the rods, have two options for specific power - 130 or 160 W/m² (the indicator can also be presented as power per linear meter - then it will be 116 or 138 W/m). The minimum permissible length of the mat when installing it on the floor is 500 mm.
An important feature and great ease of use of such mats is their ability to self-regulate. When the selected heating level is reached, the semiconductor rods “lock” and stop emitting thermal energy. This means that even moved furniture or a rearranged refrigerator will not cause any harm to such a heated floor system, and electricity will not be wasted.
Such heating systems are also quite versatile - they can be used with almost any type of floor covering. Typically, such mats are enclosed in a thin screed 30 mm thick - without this condition, self-regulation of the rods will not occur.
Video: how to install a rod “warm floor”
Prices for infrared heated floors
Infrared heated floor
What else do you buy for a “warm floor” system?
When choosing an electric floor heating system, be sure to immediately select monitoring and control elements - a temperature sensor and a thermostat.
Mandatory elements for a “warm floor” are a temperature sensor with a cable and a thermostat with control mechanisms
Very often, a temperature sensor along with a standard cable is included in the kit, for example, when purchasing a cable system or mesh mats. However, it is possible that this device will have to be purchased separately. In this case, you should pay attention to the adequacy of the length of its cable - it should be enough from the installation site of the thermostat to the sensor installation area selected in the diagram. Increasing the length is not recommended, trimming the excess is quite acceptable.
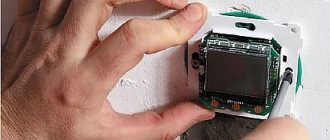
But with the thermostat you need more attention. This device can be quite simple, with electromechanical temperature control. However, more advanced are control devices with an electronic control circuit and an indication panel, which read the temperature both at floor level and in the room itself. It is clear that here the possibilities for fine control and programming of modes are much wider. True, the cost of such devices will also be higher.
Modern thermostats perform many functions and have the ability to be programmed and remotely controlled via various communication channels
It is important to pay attention to the permissible current consumption of such a thermostat. So, if the “warm floor” system consumes less than 2.3 kW in total, then a device rated at 10 amperes will be sufficient. If the heating system consumes more, then a more powerful thermostat is needed - 16 amperes.
By the way, almost everyone always recommends certain types of thermostats for their products. The smartest thing to do is to listen to such advice.
And finally, an electrical safety system should be provided. We are talking about a separate 220 V power line for heated floors - ordinary sockets cannot be used for these purposes! This line must be equipped with wires with a cross-section of at least 1.5 mm² (for power up to 2.3 kW) or even 2.5 mm² if the system is more powerful. An appropriate machine must be installed in the distribution panel. And in order to completely eliminate the possibility of electric shock, it is recommended to install a residual current device (RCD) on the floor heating system.
And at the end of the article - a detailed video about the features of existing electric floor heating systems:
Video: what kind of electric “warm floor” is it intended for?
Mats
Electric mats are a modified heated floor that can be used to facilitate the installation process. They are a dense mesh base on which the cable is attached. In this case, there is no need to calculate the step width. It is enough to roll out the mats in the desired direction, fix the mesh and carry out minimal screeding. What's good about this option?
- The power of the mats is higher than that of classic electric heating. It ranges from 160 to 180 W/sq. meter. Therefore, it is a more energy-consuming option. However, most of the manufactured modifications are equipped with thermostats with overheating control, which significantly increases service life.
Cable heating mats - Installation with a backing made of thermal insulating material will reduce energy consumption when operating thermomats.
- A small layer of screed (up to 3 cm) will increase heat transfer; in this sense, thermomat is the most effective option for cable flooring.
- Installation can be done independently, since the system is equipped with all the necessary thermostats and sensors.
Modern companies specializing in such equipment produce a large number of varieties of electrical mats with various additional characteristics: with single- and double-core cables, in the form of a sandwich with a thermally insulating substrate that does not require screeding, and so on.
Installation of Electrolux heated floors
Significant disadvantages include the high cost and energy consumption of such heating. Which option is better to choose depends on your financial capabilities.
Temperature regulating and monitoring device
The thermostat is responsible for the process of adjusting and controlling the temperature level of the electric floor. After setting, it itself maintains the set temperature.
The thermostat is based on the indicators of the sensor; it is connected to it with a thermal protection wire.
Thermostats are either mechanical or automatic:
- Automatic ones have a digital display, it shows the degree of heating of the room. A convenient component in such a device is a remote control for adjusting the temperature.
- Mechanical - equipped with an adjustment knob, it sets the temperature level.
The thermostat works constantly, so the material from which it is made must be of high quality, and the contact connections are reliable. It reacts to any signals from the sensor - turns off or turns on the heating.
Infrared rod floor
Another type of electrical cable mats is infrared rod or carbon. Rod heated flooring consists of carbon rods connected by a polymer conductor. They are sources of infrared radiation. The power of such a mat is from 130 to 160 W per square meter. meter, advantages in comparison with electric mats:
- When installing rod mats, a layer of screed, or rather an adhesive base, only 3 cm thick is required.
- Not a source of electromagnetic radiation.
- The system regulates the heat generated: when the surface overheats, the carbon rods stop generating it in a limited area. This prevents the system from overheating under furniture or household appliances.
Installation diagram of a warm rod floor
The disadvantages include the high cost of carbon mats, as well as the rapid failure of carbon rods: according to user observations, there is a high probability of the rods burning at the junction with the conductor.
Technical parameters of rod heated floors
Which option is better: carbon rod or electric cable? In 70% of cases, craftsmen note the low reliability of carbon heating.
General requirements for installation work
There is one very important rule that applies to any heated floors - the horizontal surface must be ideal. This must be ensured even before the installation of heat insulation and other work begins. And the reason here is that if the floors are leveled with a screed on top of the cable, then a very unpleasant situation can arise when in different corners of the room the thickness of the screed will be different. As a result, to heat the surface, the cable will work in opposite corners of the room with different intensities. This situation very quickly leads to equipment failure.
Leveling the floors is carried out with a cement-sand screed with a minimum thickness of 4 cm. Please note that the time for the screed to fully mature is calculated using the formula 1 cm thickness - 1 week. To speed up the process, you can use quick-drying mixtures that gain full strength at a thickness of up to 10 cm within 2-3 days.
Attention: all further instructions will assume that the floors in the target room are leveled horizontally.
Film floor
Infrared film heated floors are presented with a unique film coating. This is a thin mat with heating elements located inside. It has a large number of advantages compared to cable predecessors:
Electric film floor
- Film heated flooring is very thin compared to cable flooring and does not require a screed, which saves the height of the room.
- Greater heat transfer efficiency - there is no need to heat the screed first. All the heat immediately heats the floor covering.
- The most economical option.
- Infrared heating does not create an electromagnetic field.
- Its power ranges from 140 to 150 W sq. meter, this allows it to evenly and effectively heat the surface of the final coating.
- The heating elements in the film are connected in such a way that if one element is damaged, the others continue to function.
Connecting contacts and wires of the film floor - Ease of installation - the film is placed immediately under the floor covering, providing only a thermal insulating layer underneath.
- Infrared heated flooring is an ideal option for use under laminate; it can also be laid under linoleum and carpet, in which case it is covered with a layer of fiberboard.
- The service life declared by the manufacturers is up to 20 years.
- An additional advantage is the installation of the film anywhere in the room, for example in the wall.
The disadvantages include:
Thermostats of film floors have a short service life
- Short service life of temperature sensors and thermostats. According to user reviews, the average service life of these devices is 5 – 7 years.
- Does not tolerate heavy loads in the form of furniture or heavy household appliances. Therefore, when installing it, it is better to mount it in an area free from household appliances and furniture.
- To lay the film without causing damage, the base must be perfectly level.
Selection criteria for a private home or country house
The system is designed in accordance with the material used for flooring.
Under laminate
In combination with such a floor covering, a thin infrared film is used. It can be easily placed between layers of insulation. The heat does not flow into the screed, but onto the surface of the laminate. This helps reduce energy loss.
A thin infrared film is used under the laminate.
Under linoleum
This material also conducts well and conserves heat. Both electric and water heated floors can be laid under it.
Under tiles
You can choose any type of heating structure for this material. The tile quickly and completely transmits heat, retaining it for a long time. Therefore, a comfortable microclimate is established in the room.
The tile quickly transmits heat.
Under porcelain stoneware
In this case, 2 types of systems are used:
- Electric options. Installing such equipment takes less time and money. The thermostat helps you set the desired temperature.
- Water structures. Metal-plastic pipes are most often laid under porcelain stoneware. Their disadvantage is considered to be dependence on the temperature of the water in the heating system. Damaged pipes contribute to flooding of the lower floors.
Heating system control
The thermostat allows you to control the underfloor heating system
The temperature in a room heated with underfloor heating is regulated by a special device - a mechanical or electronic thermostat.
Indicators are read by sensors that monitor:
- air temperature (if the cable is the main heating element)
- temperature of the floor covering (if heating a nursery or bathroom)
The selected control type depends on:
- comfort of people in the room
- duration of operation of the heating system
- floor heating efficiency
- saving energy resources
The algorithm for maintaining a comfortable atmosphere in the room is such that the floor temperature on the thermostat must be set in the calculation: the required air temperature plus 5 degrees.
Modern control systems allow you to turn the heating system on and off at the appointed time, interact remotely and monitor indicators in different rooms.