A warm garage is the dream of every motorist. After all, in winter it’s nice to get into a warm car, and if it’s parked in a heated room, then you don’t need to turn on the heater and wait for the car to heat up. In addition, parking in such a garage has a beneficial effect on its technical condition.
In this article we will tell you whether a heated floor is needed in a garage, what types can be installed in a given room, and the advantages of each model. In addition, you can learn how to make a heated floor in a garage with your own hands.
Do you need a heated floor in a garage, its pros and cons
In the garage, it is often necessary to look under the car; to do this, you need to lie on the floor. This is why many owners are thinking about installing heating, with most preferring heated floors.
Carrying out repairs while lying on a heated surface is not only comfortable, but also not dangerous to health. And for a car, standing in a heated box in winter is better than standing in the cold.
In addition, such heating can evenly warm the room. The costs are not significant, since a sufficient temperature for a garage of 15 degrees is comfortable conditions for both a person and a car. And if you use gas or solid fuel boilers, the costs will be even lower. When insulating walls and ceilings, maintaining the required temperature level is easy.
Remote adjustment is possible if appropriate equipment is installed.
It is impossible not to mention the disadvantages of heated floors:
- When a car drives into a heated garage from the cold, the snow begins to melt and flow off. There are places in the car that are not accessible to treatment with anti-corrosion agents, but moist air can get there.
When the liquid heats up, it evaporates and creates condensation, which affects the cold parts of the machine. And until all parts warm up, moisture will have time to negatively affect them. Many people try to solve this problem by installing supply and exhaust ventilation.
- The floor in the garage is under constant pressure from the weight of the car. Therefore, it is necessary to correctly calculate the load and carry out proper installation so that the weight from the wheels does not disrupt the operation of the system.
- Repairing a heated structure is difficult, since the surface will have to be completely dismantled.
- Metal elements on the gate may freeze, and ice may form on the outside of the door.
- When installing a water floor, if there is no source of hot water supply, you will need to install water heating equipment.
- When using electric heating, there will be, although not significant, constant energy costs.
Different combination - does it change the concept?
In various instructions you can see different versions of laying this type of floor - in most cases, the only difference between these theories is the sequence of stages of laying the floor. Some people's eyes widen, but in their heads there is the same, very adequate question - is there a fundamental difference between the numerous options for the sequence of laying layers and is there a most successful option?
The answer is simple - consistency does not play a huge role. It is much more important to adhere to the norms of layer thickness of one level or another.
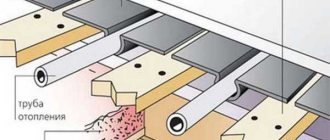
An example of arranging a floor on the ground. Scheme
Types of heated floors
Warm floors come in water and electric types; they differ in heating method, design and construction technology.
Below we will analyze each type in detail, their advantages and disadvantages, and provide instructions on how to install them yourself.
Mermen
A water floor is a structure made of pipes (metal-plastic or steel - find out which pipes are best to choose and why) through which the heated coolant moves. The structure is connected to a central heating system or to an autonomous power source (gas, electric or solid fuel boilers).
There are two technologies for installing a water system:
- by pouring a concrete screed;
- in a flat way.
Such heating is capable of heating concrete evenly, without spending on electricity. However, there are additional costs - for the purchase of a pump and boiler (with an autonomous connection). And if the device does not turn on for a long time, the liquid in the pipes will freeze, and this will lead to failure of the entire structure.
Electrical
Electrical systems run on electricity. They are:
- cable - the heating element is a cable, single or two-core, or self-regulating;
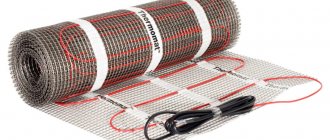
- infrared film, heat source - carbon emitter that emits infrared rays.
The advantage of electric types is that there is no danger of leakage. When installing an infrared model, it is also easy to install. Disadvantages include energy costs.
What tools and materials will be needed
The design of the heated floor resembles a layer cake. For its construction you will need:
- sand-cement mixture;
- reinforcing mesh 8-10 millimeters thick, with cells 15x15 centimeters;
- pipes and boiler or electrical cable and infrared film;
- a set of plastic clamps and supports for fixing the heating;
- hydro- and heat insulator (thick film, roofing felt, reinforced foil and other similar materials);
- finished floor covering: wood, tiles, painting.
The required tools are: a concrete mixer, a level, beacons, a rule and other available tools. It is advisable to make a drawing of the pipes or wires before installation. It is important that the car does not drive through cable laying areas.
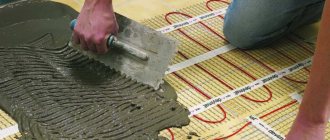
Installation of infrared (film) floor
When deciding to install an infrared floor in a garage, you need to minimize the costs associated with heat leakage through the walls and ceiling, and also make sure that the wiring can withstand additional loads.
HEATED FLOORS IN THE GARAGE WITH YOUR HANDS
Calculation
You need to start by calculating the power of the TP, since its efficiency depends on this. It is better to entrust this work to professionals - heating engineers, because calculations require the use of complex formulas.
If you want to do this yourself, then you need to take average indicators. The calculation is performed using the following formula:
Р=р*S, where:
- P – TP power;
- p – power of the heating element;
- S – room size.
If there are several rooms in the garage box, the calculation must be done separately for each room.
Required tools and materials
The main part of the film floor is the heating element. Its choice must be approached responsibly and this must be done when drawing up a project.
There are several models of film systems:
- Infrared film is a two-layer product, between the layers there is a heating material - carbon plates.
- Rod floor - flexible carbon rods placed parallel on the mat. Heat is produced by infrared waves.
In addition to the heating element, we will need:
- Temperature regulator;
- RCD - device for disconnecting;
- grounding cable;
- fasteners;
- screed mixtures.
To carry out the work we will also need:
- Hammer.
- Chisel.
- Hammer.
- Scissors.
- Screwdrivers.
- Meter.
- Level.
- Level.
Drafting
A laying diagram is drawn up. The film is not placed under heavy objects - lifts, machines and where the car will be located. It must be taken into account that it is spread at a distance of 10 cm from the wall.
If an infrared floor is the only heating in the garage, then it covers up to 70% of the surface. With additional heating - 50% is enough.
Mark the place on the wall where the thermostat will be mounted; it should be placed 15 cm above the surface.
Preparing the base
Unlike installing electric heating in an apartment, installing such systems in a garage does not require dismantling the flooring; the film can be laid on the old floor. It is enough to clean the concrete slab from dust; the presence of minor irregularities is also acceptable.
For large holes and unevenness in the slab, it is recommended to make a thin screed. In this case, it must be allowed to dry completely before continuing to lay the “pie”.
If there is an inspection hole in the garage, before pouring the screed, a brick edging is built around it, to the height of the intended “pie”.
Waterproofing and thermal insulation
Place waterproofing materials - polyethylene film - on the prepared surface. It is placed with an overlap of 10 - 15 cm on the walls. Then, the perimeter of the garage is covered with damper tape.
A heat-insulating material is laid on top of the polyethylene - the Penofol type, 10 cm thick. The foil side is laid down. You can use polystyrene foam - 5 cm.
A reinforcing grid is placed on the insulation. When using fiber fibers and plasticizers, the mesh does not need to be placed.
Laying the heating element
The film is spread onto the mesh according to the prepared pattern. It can be cut along special lines. It is placed with the contacts down, towards the regulator.
The sheets should not overlap each other, and should not be laid tightly against the wall - the recommended distance is 10 cm. The sheets are glued together with tape.
Connection
The electrical infrared system is connected by connecting the film contacts and insulating them with bitumen mastic. After this, the film floor is connected to the temperature sensor, and the connecting points of the wires are also insulated.
The device is then connected to electrical power and tested. If everything works normally, then you can fill the screed.
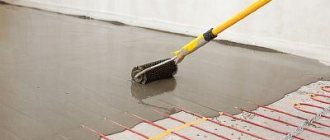
Filling the screed
For the finishing screed, a ready-made mixture or a homemade composition is used, which you can make with your own hands from sand and cement. The room should be filled at one time. The solution must be evenly distributed over the entire area of the garage and leveled.
The screed should dry well, this will take about a month. Only after this can the system be turned on.
General Tips
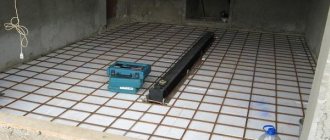
- Do not lay a heated floor (either water or electric) under heavy objects: machines, racks, “lines” along which the wheels of the car will ride, and under the car itself (the place where it will stand).
It can be seen that the cable is laid indented from the hole: it is in this free space that the wheels of the car will roll
- If you plan to come to the garage for a long time, and want the floor to have already warmed up before your arrival, use remote control. To do this, you need to put a router with a SIM card in the garage, and connect a thermostat with a Wi-Fi module to the TP.
- The thickness of the screed above the TP should be at least 5 cm for concrete grade M300.
- The distances from the wall to the TP must be at least 10 cm.
- We must install insulation under the TP, otherwise we will “heat” not only upwards, but also downwards, wasting some of the heat.
Cable floor installation
As mentioned above, cable floors run on electricity, and since the tariffs are quite high, the costs are significant.
Therefore, it is necessary to think through all the ways to save it: the heat capacity of walls and ceilings, the quality of thermal insulation, which we will discuss in detail in this article.
Installation of electric heated floors in a garage
Calculation
The installation of cable electric heating, as well as the installation of an infrared system, should begin with calculating the power; there is a single formula for this.
You can familiarize yourself with the rules for calculating power in the section “Installation of infrared flooring”.
Drawing up a diagram
Before installing any heated floor, it is necessary to prepare a diagram showing the cable laying areas and the location of the regulator.
According to SNiP, if the area of the heating elements exceeds 40 m2, then damper gaps must be made. The rules for placing the mat are similar to laying the film.
Required tools and materials
Before proceeding directly to installing the heating system, you need to purchase the material and prepare the tools that you will need if you are going to do the installation yourself.
First you need to choose the type of heating:
- Resistive cable - there is one or two wires. It produces heat energy, its volume depends on the cross-section of the wire.
- The heating mat is a flexible sheet with a resistive wire already fixed on it. It is comfortable and easy to install.
Any model is suitable for installation in a garage.
The remaining materials and tools for constructing cable heating are the same as for installing an infrared system.
Preparing the base
Preparing a rough base in the garage for laying cables is no different from these works; when installing any heated floor - leveling and cleaning the surface.
Thermal insulation
The detailed process of hydro and thermal insulation is described in the section on infrared floors; it is the same for all electrical systems. That is, polyethylene is laid, damper tape is installed, insulation and fittings are installed.
Laying heating elements
Installation of the heating cable is carried out according to the developed scheme (“snake” or “snail”), for this purpose markings are applied to the insulation. According to these marks, the wire is laid in turns, the standard distance between which is 0.3 meters .
The circuits should be placed parallel, the cable should be bent at an angle of less than 90 degrees or it should be excessively stretched. The wire must be solid, without twisting, as this will affect the quality of work and service life. The cable is fixed to the mesh with clips or antennae on the mounting tape, which is attached to the insulation.
When laying heating mats, the work of installing a warm electric floor in the garage is greatly simplified, because the wire is already fixed to a special mesh. You just need to roll out the mats on the surface and fix them.
INSTALLATION OF ELECTRIC WARM FLOOR IN GROOTS
Connection
A mounting box is attached to the planned location, into which the thermostat is installed. A power and grounding cable is supplied to it.
To install a temperature sensor in the insulation at a distance of 0.5 meters from the wall, it is necessary to make a recess. A corrugated pipe with a sensor placed inside is placed in it. The wire from the sensor is also connected to the regulator.
After connecting, the device must be checked for functionality. The heated floor must be plugged into a separate outlet.
Filling the screed
The solution for pouring the cable floor and the process itself is similar to concreting an infrared system. A concrete screed can be used as a finishing surface in a garage, but it is permissible to lay tiles on top if desired.
Approximate prices
| Material | Price |
| Expanded clay | from 10 rubles for 30 kg |
| Perlite | from 5 rubles per 1 kg |
| Vermiculite | from 320 rubles for 50 kg |
| Expanded polystyrene boards | from 2800 rubles per cubic meter |
| Water heating | from 65,000 rubles per 50 square meters + installation from 350 rubles per square meter |
| Electric heated floor | from 55,000 rubles per 50 sq. meters + installation from 250 rubles per square meter |
Installation of water heated floor
If you have a garage adjacent to the house, it is worth installing a water floor - a budget option, since the connection is permissible to the heating system of the house. If this is not possible, you will have to install an autonomous boiler.
Warm. garage floor. With your own hands. With an inspection hole. As we did for ourselves... Reliably.
Development of laying scheme and calculations
The fundamental factor in the calculation is the pipeline laying scheme. More often, pipes are laid in a “snake” or “snail” pattern.
An important indicator is the laying step and the size of the contour. In order for the garage to warm up well, the distance between the turns should be 10 cm.
And also, it is necessary to correctly determine the installation location of the distribution unit.
When making your own calculations, it is recommended to use average indicators:
- cross-section of metal-plastic pipes - 16 mm;
- loop size, if the area is 60 m2 - from 70 to 80 meters;
- pump power - not less than 2 l/s.
Pipes should be laid more often near walls and gates than in the center of the room. The supply hose is located near the outer walls.
Tools and materials
To install a water floor in a garage with your own hands, you can buy a standard type kit with an automatic regulator, which is produced for non-residential premises measuring 60 - 80 m2, or separately components.
The average amount of material required for a hydrofloor in a garage of a given area, with a pipe pitch of 15 - 20 cm and a screed of 7 cm:
- metal-plastic pipes - 400 meters;
- plasticizer - 80 liters;
- damper tape - 60 meters;
- insulation - 60 m2;
- three-way valve - 1 piece;
- circulation pump - 1 piece;
- thermostat - 1 piece;
- plastic fittings;
- automatic air vent—2 pcs.;
- servomotor—1 pc.
You will also need a standard set of tools for working with metal-plastic pipes, a set of screwdrivers, a tape measure, wire cutters and a mixer for preparing the solution.
Preparing the base
The heated water floor in the garage is mounted on a rough leveling screed. It is poured onto a “pie” of:
- sand - 10 cm;
- crushed stone - 10 cm;
- insulation - polystyrene foam 10 cm;
- waterproofing - polyethylene or roofing felt;
- fittings.
If you have a concrete floor, it is enough to remove the top layer, clean and level the surface. The differences in the garage should not exceed half the diameter of the pipe.
Hydro and thermal insulation
The work on insulating the hydrofloor is the same as when installing an electrical structure. A layer of waterproofing is laid on the rough base - thick polyethylene, but roofing felt is better for a garage; the seams are coated with bitumen mastic.
Then comes the insulation, the material must be thick, as it will experience a large load. To prevent heat from escaping into the floor, the foil side is directed upward.
It is mandatory to apply damper tape around the perimeter of the room.
Pipeline laying
On the thermal insulation, according to the diagram, markings are made for installing pipes. Plastic supports are installed, and sheathing is mounted on them. The grid should be placed above the insulation at a distance of 3 - 4 cm - this will help avoid cracking of the concrete.
The heating element is placed on the fittings, following the markings made. The pipes are secured with brackets or clamps, which are installed every 30 - 40 cm, at turns - 15 cm.
Coils with pipelines need to be unwound gradually, 10 - 15 meters apart. Laying pipes should begin from the collector, from the loop farthest from it. A heat-insulating tube with a fitting is placed on the end of the hose; it is needed to connect the hose to the manifold. The second end of the pipeline, after laying throughout the entire garage area, should also return to the distribution center.
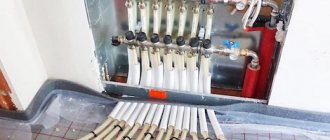
Collector-mixing unit
The mixing unit is the “heart” of a warm water floor. It is designed to regulate and supply hot water to the pipeline, as well as to remove waste coolant from the system.
You can assemble the device yourself, or you can purchase a ready-made one, its cost is reasonable. In a collector, the level of thermal load plays an important role.
The collector consists of:
- supply and drain valve;
- air vent;
- shut-off valve for draining water from the system;
- fittings for connecting pipes;
- circulation pump.
You must select a collector-mixing unit based on the number of circuits; the device must have an output for each.
The collector is installed in the garage, in a specially equipped cabinet. Its standard size is 50 by 50 cm, with a depth of 15 cm. It can be placed on the wall or in an equipped niche.
The mixing unit is connected to the coolant supply source, this can be the main heating system or boiler. Water circulation is carried out by a pump.
After installing the unit, it is necessary to connect both ends of the pipe of each circuit to the supply and return valves with fittings.
Before pouring the screed, you should check the system for leaks. To do this, a coolant liquid is supplied into the main line at a pressure 2 times higher than the working one. If the pressure does not drop within 24 hours, then the structure is installed correctly.
Filling the screed
The concrete screed must be poured at the operating pressure in the system, and the temperature of the pipes must correspond to the temperature in the garage. The thickness of the concrete layer is from 5 to 12 cm.
Filling starts from the far corner of the garage and ends at the gate. The system can only be turned on when the concrete is completely dry, after a month.
We use antifreeze as a coolant
The disadvantage of a water floor is the high freezing point of the coolant. This is especially true in a garage, if it is not constantly heated and water is not drained from the pipeline, then the pipes may freeze and the system will fail.
This problem can be easily solved by using antifreeze; its freezing point is from -30 to -65 degrees. It is made from ethylene glycol or propylene glycol.
The principle of laying a water structure with antifreeze is the same as when using water. But when using antifreeze, a more efficient pump and more expensive equipment are required, but during operation it will pay off.
Safety precautions
Operation of heated floors, all installation work must be carried out strictly in accordance with the instructions from the manufacturers.
There are several risks when working with them:
- leakage – relevant for water and antifreeze floors. In the first case, the quality of heating is simply impaired and dampness increases. Leaks of ethylene glycol antifreeze can cause poisoning. This substance creates toxic fumes that cause various diseases. Propylene glycol is safer. Antifreeze is also fluid and leaks in the most unexpected places;
- short circuit, overheating - relevant for the electrical circuit. This type of floor does not like carpets and other coverings, as they retain heat and lead to overheating of the system. For this reason, the wheels should not rest on the cable.
Methods for insulating a garage
It’s not uncommon for car owners to use plywood as insulation for garage floors. At the same time, the material also serves as a finishing coating.
It is permissible to use several brands of plywood, but the most suitable for a garage is moisture-resistant FSF; it is not suitable for residential premises, as it contains toxic glue, or FK, which is less hazardous to health.
If the product is planned only as insulation, then inexpensive low-quality plywood will do. For the finishing coating it is better to choose a material of higher quality.
The process looks like this: the concrete slab is cleaned of dirt, polyethylene foam is laid, a frame of wooden beams is laid on top, and a subfloor is mounted on them. Plywood is placed on top; if it is to be used as a finishing coating, it should be varnished.
If you want to feel comfortable in the garage and not get cold when carrying out repair work with your own hands, then it is better to install a heated floor. Keeping it in a heated room will also have a positive effect on the technical condition of the machine.