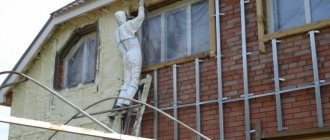
If you decide to insulate the facade, you are not mistaken in your choice. Properly installed thermal insulation has many benefits. Among the many materials for insulation offered on the modern market, penoplex is gaining increasing popularity. It can be used both in the construction of new houses and when creating a thermal insulation circuit on an old building. We’ll talk about how to insulate a facade with penoplex and what pitfalls you need to know about in this article.
What do you need to know about penoplex?
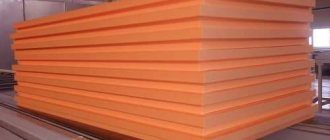
Penoplex is nothing more than extruded polystyrene foam. This is a modern modification of polystyrene foam, which has better technological characteristics and is more durable.
The main advantages of penoplex:
- The thermal conductivity of the material tends to zero.
- The level of moisture absorption is extremely low, that is, the material is almost completely hydrophobic.
- Durable enough, not prone to deformation changes.
- To create a good thermal insulation effect, a minimum layer thickness is required.
- Easy to install. It is quite possible to insulate a house with its help yourself, without resorting to the use of complex construction equipment.
- Biologically stable - mold and mildew will not threaten your façade.
- It is one of the budget insulation products.
- Has a long service life.
Among the mass of advantages, it is necessary to mention one significant drawback of penoplex.
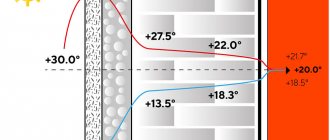
Despite the fact that the material is not flammable, when the temperature rises to a critical level it begins to melt. This releases substances that are dangerous to human life and health. The figure shows the thickness of penoplex and other insulation materials, which give the same effect of heat preservation.
Preparatory work
Having analyzed the advantages and disadvantages, we will consider the stages of preparatory work for external insulation:
- The soil around the house is selected, the depth of which should be equal to the depth of the foundation. Next, for ease of installation, a trench about a meter wide is dug.
- The base is cleaned of dust and dirt.
- If necessary, the surface of the base is leveled using a cement mixture.
Next, waterproofing is performed with roofing felt. However, you can get by with a less expensive method, namely, priming with bitumen mastic. The mastic is applied in 2 layers, with the second layer applied only after the first has completely hardened.
Penoplex thickness for external wall insulation
When choosing penoplex, you must first pay attention to its purpose. There are variations of the material designed for thermal insulation of roofing structures, floors, foundations, etc. In our situation, we need wall foam.
Plates are produced with different thickness parameters. To understand what thickness of material is needed in a particular case, you need to make some calculations.
So, the calculation is carried out according to the formula:
Insulation thickness (m) = heat transfer resistance * 0.028.
The heat transfer resistance parameter varies depending on the region; it can be found in the relevant SNiP.
The average thickness of the material can also be seen in the table.
Features of installing insulation on the foundation
As a rule, the foundation needs insulation in the same way as the walls. Various methods of insulating the base of a building with penoplex are used.
- Vertical method.
- Along the entire foundation there is a lower level for laying insulation.
- The slab is covered with adhesive and pressed in the right place.
- The entire foundation is covered with insulation using the same method. An exception may be places that are in the ground. The slabs in this place are pressed tightly against the foundation with soil.
- Horizontal method.
In this way, the foundation from below is protected from freezing. The work is carried out at the initial stage of construction, when the foundation is just being laid.
- The slabs are tightly placed on the concrete base of the formwork.
- Waterproofing is laid on the insulation, and then the foundation is poured and reinforced.
- After removing the formwork, the sides of the foundation are insulated.
- Thermal protection around the house.
In this case, the foundation and the surrounding area are simultaneously insulated.
- First of all, the foundation is insulated vertically.
- Then formwork is made around the foundations with an indentation of 100 mm, and the blind area is prepared.
- Insulation is laid in a dense layer on the compacted surface between the foundation and the formwork.
- A waterproofing film is installed on top of the insulation, overlapping the foundation, after which the formwork is filled with concrete.
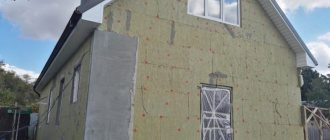
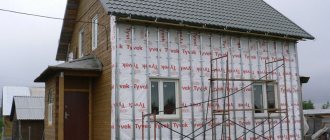
Penoplex insulation under siding
Before you start insulating walls outside with penoplex, you need to remember four main rules:
- The wall necessarily requires a vapor barrier to be installed on the inside.
- The ventilated siding facade will be hung on a sheathing made of wooden bars or steel profiles. All joints between the insulation and the sheathing elements are foamed with polyurethane foam. This is the only way to create a sealed warm circuit.
- Penoplex sheets are hung with glue and dowels, maintaining 2mm gaps. The seams are then also filled with foam.
- The use of windproof membranes is not required.
Video description
The video shows how Penoplex panels can be cut:
This might be interesting!
In the article at the following link, read about roof insulation with penoplex.
Scraps can also be used, but it is better if the insulation is carried out in large slabs. Scraps are often placed in the corners of a building, because the length of the building cannot always be covered with solid insulation panels. But there is one caveat - you cannot install pieces less than 20 cm wide in the corners of the walls.
Installation of insulation with glue Source meiers.info
It is clear that trimming will lead to the removal of connecting ends on pieces. That is, adjacent slabs will be joined with a small gap, no matter how hard the craftsmen try to cut exactly along the drawn line. And gaps and cracks are cold bridges. This problem is being solved today with the help of a special foam type sealant. This material is very similar to polyurethane foam. But it is white and does not expand in air.
I would like to add that the adhesive composition is not the only option for attaching foam boards to the wall. Usually craftsmen add one more fastener, which ensures maximum strength of the connection between the insulation and the wall. This is a plastic dowel-nail with a wide mushroom-shaped cap. It is driven into prepared holes, which are drilled between the laid slabs of heat-insulating material or directly into the slabs themselves. The only thing you need to pay attention to is the length of the fastener. It should be 45-50 mm greater than the thickness of the foam boards used.
Fastening panels of thermal insulation material with dowels and nails Source vse-postroim-sami.ru
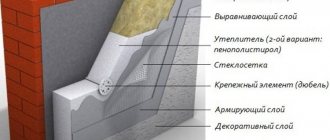
So, the wall is finished with panels, all that remains is to plaster the facade. The plaster mortar itself will not adhere to the flat surface of the insulation. Therefore, a plaster synthetic mesh is first laid on it and secured with screws or staples from a stapler. And a layer of plaster is already applied to it.
Penoplex and plaster
Penoplex for insulating walls from the outside can also be covered with plaster.
- After carefully leveling the surface of the walls, markings are made. To begin with, mark the bottom row of insulation. It must be positioned so that it is 0.3 m lower than the floor on the first floor. This is the only way to protect your home from moisture penetration.
- After marking, they begin to attach the starting profile. It is fixed every 0.3-0.5 m around the entire perimeter of the house.
- Then the slabs are adjusted to size and the adhesive is diluted (according to the manufacturer’s instructions).
- The perimeter of each slab is coated with glue (strip width - 10cm, thickness - up to 25mm). The material is pressed to the surface, the glue that has come out is removed.
- After the slabs have been laid, they must be given several days to dry. Then the insulation is additionally fixed with dowels - “umbrellas”.
- All seams between panels are foamed.
- Then you can perform fiberglass reinforcement. The reinforcing mesh is first attached in strips to the corners and slopes. It is fixed with an adhesive composition. The strips overlap each other by 10 cm.
- After the glue on the mesh has hardened, grouting is done and you can begin plastering the surface. Usually a 5-6mm layer of plaster is applied.
Video description
The video shows the technology of insulating the facade of a house with Penoplex panels:
This might be interesting!
In the article at the following link, read about the technology of foundation insulation with penoplex.
Let us add that wet technologies include any finishing operations that use adhesives. For example, cladding with bricks or slabs, installation of decorative panels of various types, and so on.
Penoplex for brick cladding Source hi.decorexpro.com
Ventilated technology
This method of facade insulation differs from the previous one in that a so-called ventilated facade is mounted on the wall itself. Essentially, it is a frame structure on which slab or panel finishing material is installed. And between the finishing and the wall, penoplex is laid in the same way as in the plastering technology.
Ventilated facade with foam boards. Source 2gis.ru
Here is the sequence of construction operations:
- Preparation
walls: repair and primer;
- application
vertical lines for direct hangers;
- installation
metal profiles made of galvanized steel or wooden blocks, with the help of which the frame is assembled on the wall;
- the distance between the frame and the wall should be 5 cm more
the thickness of the insulation used, this gap will serve as façade ventilation, hence the name of this structure;
- carry out installation of slabs
penoplex, for this purpose, slots are made in them, into which the antennae of direct suspensions are inserted, then these slots are filled with foam sealant;
- technology
installation of panels is exactly the same as in the previous case;
- the frame is assembled
with mounting on hangers, profiles or bars are installed vertically in one plane and connected to each other by crossbars, that is, a lattice structure is formed on the wall;
- mounted on the frame façade cladding
.
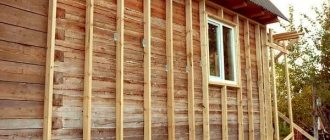
Insulating the walls of a wooden house from the outside with penoplex
Penoplex sheets are perfect if you need to insulate a wooden house. The only important point that you need to know is that it is strictly not recommended to insulate a wooden structure with penoplex from the inside.
The reason is that the material is practically not vapor-permeable, so moisture particles will not be able to escape and will accumulate inside the facades, which will inevitably provoke the growth of fungi and mold. When insulating wooden houses, they usually use the technology used in frame frames. The insulation is placed between the sheathing bars. Then the counter-sheathing is installed, and panels of blockhouse or other material are installed on it.
The lathing is mounted from bars 50X25 or 50X50mm.
Materials: what is better to use?
There are several materials that are most often used for insulation:
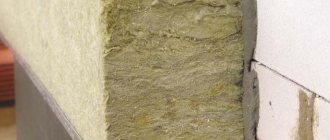
- Mineral wool. It has excellent vapor permeability, but shrinks if installed incorrectly. Some types of this insulation can only be installed using protective equipment. This type of insulation must be securely closed, since wind and other external influences can spray small particles. Capable of accumulating moisture, so it cannot be installed in bad weather. The most popular type of mineral wool is stone (basalt) wool.
- Polystyrene foam or polystyrene foam. They are excellent thermal insulation materials, although they do not have vapor permeability. They do not shrink, are not afraid of cold weather, have a water-repellent effect and are a sound insulator. But polystyrene foam does not tolerate exposure to direct sunlight, which means that it must be covered with decorative materials. In addition, mice love polystyrene foam, and if they make their nests in this thermal insulation layer, their quiet life will end. Penoplex insulation will avoid these disadvantages, but will cost much more.
- Polyurethane foam. Another material that is often used for insulation. The advantages include excellent adhesion to any surface, no need for leveling the wall, priming and construction of the frame, ease of transportation, light weight, it does not weigh down the walls and roof, improved thermal insulation and strength characteristics of the wall during installation, improved sound insulation, resistance to temperature changes , seamless, no fasteners required. Disadvantages include fear of exposure to sunlight, ultraviolet radiation destroys the material, and fire hazard during prolonged exposure to high temperatures.
Typically, a material is chosen that does not block air circulation through the walls of a foam block house. Therefore, it is better not to use polystyrene foam and penoplex.
The cheapest option that meets this requirement is mineral wool insulation.
Insulation with this material should be carried out strictly according to technology, taking into account its characteristics.
Photos of insulated facades
We invite you to look at twenty photographs regarding our topic today.