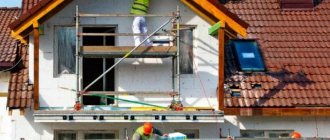
Siding has a lot of positive characteristics, but cannot boast of thermal insulation properties. That is why, when finishing residential buildings, the walls are first insulated, and only then the covering panels are attached. Which insulation for siding has the best properties, what criteria should be used to choose it, and how to properly perform insulation with your own hands - this will be discussed in the article.
Insulation for siding
Basic requirements for insulation under siding
In every hardware store, insulation materials are presented in a wide range, and it is very difficult for an inexperienced person to understand them. Roll and slab, expensive and cheap, domestic and foreign production, different densities and thicknesses - how to determine exactly what you need?
Insulation under siding
First of all, you need to be guided by the requirements that the material must meet:
- low thermal conductivity is one of the most important qualities that insulation should have. The lower this indicator, the less heat escapes through the walls of the room;
- resistance to temperature changes and moisture - since the insulation is located on the outside of the building, it is exposed to high and low temperatures, and not all materials retain their original properties. When moistened, the same thing happens, in addition, the risk of fungus appearing under the casing increases;
- environmental friendliness - the presence of toxic compounds in the composition poses a health hazard and requires additional protective measures when performing thermal insulation;
- fire safety - insulation should not contribute to the spread of fire during a fire and emit toxic smoke when burning. Therefore, preference should be given to fire-resistant and self-extinguishing materials;
- durability - here it is meant that the insulation must fully retain its characteristics, including geometric shapes, throughout its entire service life. Unfortunately, many materials shrink after just a few years or begin to crumble, which leads to a decrease in thermal insulation properties.
Not all materials fully possess such qualities, and below we will consider only the most suitable ones. Next, you need to take into account the installation method, especially if you are going to do all the work yourself. Roll insulation is less convenient to install; it is much easier to attach the slabs.
Roll and slab insulation
Fastening the guide elements
You need to set the guides correctly under the siding. If the panels are installed horizontally, then the profiles are installed vertically. The elements are placed evenly, and the distance between them matches the distance between the holes in the perforated edge.
For panels that are installed vertically, horizontal lathing is suitable. In this case, all parts are also placed evenly. Do not fasten the guides too close to each other. The optimal distance would be 40-50 cm. During fixation, be sure to check how smoothly both the profiles and subsequently the siding panels are attached.
Types of insulation
The most popular insulation materials for siding today are:
- mineral wool;
- based on polystyrene foam;
- blow-in insulation (ecowool, penoizol, polyurethane foam).
Mineral wool, according to GOST 52953-2008, is divided into three types - stone, slag and glass wool.
GOST R 52953-2008 - download for free. THERMAL INSULATION MATERIALS AND PRODUCTS
GOST R 52953-2008
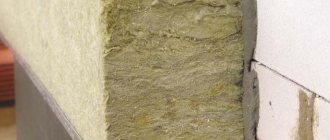
To produce the first type, basalt and silicate rocks, as well as their mixtures, are used; slag wool is made from metallurgical waste, glass wool is made from waste from the glass industry. These insulation materials are very thin fibers compressed into thick sheets, which are produced in the form of rolls and mats of various sizes and densities. Additionally, they can have a foil coating. As a rule, to insulate a house under siding, only stone and glass wool are used, since slag insulation is less water resistant.
Mineral wool insulation with foil layer
An example of using mineral wool for insulation under siding
Expanded polystyrene insulation, polystyrene foam and EPS, are lightweight, dense sheets formed from a large number of air-filled closed cells. Thanks to this structure, these insulation materials practically do not absorb water. They are produced only in the form of slabs, differing in density, size, and degree of flammability.
Insulation based on polystyrene foam
Extruded polystyrene foam is perfect for the Russian climate
Blown-in materials are those that are applied to the base using a special installation under high pressure. After drying, they form a durable, seamless coating with excellent thermal insulation properties.
Blown-in insulation - ecowool
Seamless home insulation
Advice from professionals
To insulate a house using penoplexes, there is absolutely no need to select special weather conditions. It is enough that it does not rain or snow. The duration of drying of the adhesive solution will depend on the ambient temperature, but the quality of adhesion does not affect.
Before you buy material and do everything yourself, still consult with professionals. Maybe for a particular building it is better to choose a different insulation or finishing material. In addition, a master who knows his business will help you accurately calculate the amount of materials and the thickness of the insulation.
Characteristics of mineral wool insulation
Stone wool
Technical characteristics of basalt wool
Material properties
Of all the varieties of stone wool, basalt insulation is considered the most popular. It is distinguished by the lowest content of binding components, which includes formaldehyde resins and phenol, which are hazardous to health, and therefore is one of the most environmentally friendly materials. The fibers that make up the insulation are not scratchy and quite smooth, so they do not cling to clothing, do not cause irritation on the skin, and you can perform work without protective gloves.
Basalt insulation
Technical characteristics of basalt wool
| Options | Values |
| Thermal conductivity | 0.035-0.041 W/(m K) |
| Water absorption | no more than 2% |
| Vapor permeability | 0.55 mg/mhPa |
| Density | 30-225 kg/m3 |
| Working temperature | from -180 to 700 ᵒС |
| Flammability degree | non-flammable material |
| Material thickness | from 30 to 150 mm |
| Dimensions | 500x1000 mm, 600x1000 mm, 600x1200 mm |
Manufacturers produce stone wool in the form of mats, soft, semi-rigid and hard slabs, and in rolls. For installation under siding, rigid and semi-rigid slabs are most convenient, but roll insulation is more suitable for horizontal and inclined surfaces.
Advantages of stone wool:
- the material is easy to cut, light in weight, and does not create difficulties during installation;
- does not burn and does not emit harmful substances;
- microorganisms, including fungi, do not develop in it;
- reduces noise level by up to 20%;
- service life is 40-50 years without loss of basic characteristics.
Minuses:
- the production of the material requires high costs; accordingly, prices for stone wool are quite high;
- when cutting and shaking the material, thin fibers break and form very fine dust, which easily penetrates the respiratory tract. As a result, a respirator should always be used during thermal insulation work.
There are many manufacturers who, to reduce the cost of the manufacturing process, use various industrial wastes instead of pure rocks, but at the same time pass off their products as high-quality basalt insulation. It is very difficult to visually recognize a fake, especially for an inexperienced person, so buy stone wool from well-known, time-tested brands. Nowadays the following manufacturers enjoy a high reputation in the market of thermal insulation materials:
- Rockwool;
- Knauf;
- Ursa;
- Isover;
- TechnoNIKOL.
Insulation manufactured by Technikol
Mineral wool ISOVER
Glass wool
The popularity of glass wool has dropped noticeably with the advent of basalt and slag insulation on the market, but it is still used in various fields. In appearance, it is not very different from stone wool, but it is more fragile, so many manufacturers additionally reinforce the material by stitching with steel threads. The peculiarity of glass wool is that the glass fibers, at the slightest impact, are destroyed and form fine dust, which easily eats into the skin, penetrates the respiratory tract, eyes and causes severe irritation. For this reason, you can work with glass wool only in protective clothing, a respirator and goggles.
Glass wool
Specifications
| Options | Values |
| Thermal conductivity | 0.039-0.047 W/(m K) |
| Vapor permeability | 0.6 mg/mh*Pa |
| Water absorption | 1,5-1,7% |
| Density | 11-25 kg/m3 |
| Flammability degree | from NG to G1 |
| Material thickness | 50-100 mm |
| Dimensions | 610x1170 mm, 600x1250 mm |
| Working temperature | from -60 to 450 ᵒС |
Advantages of glass wool:
- Due to its low thermal conductivity, glass wool perfectly retains heat in the house. A layer of material 50 mm thick is similar in thermal insulation properties to brickwork one meter thick;
- no toxic additives are used in the production of glass wool, so it does not emit harmful substances even when exposed to high temperatures;
- glass wool boards are lightweight and can be compressed in packaging 6 times their original volume with subsequent straightening, which simplifies the transportation of the insulation;
- the material is easy to cut and install on walls;
- Microorganisms do not develop in glass wool and insects and rodents do not breed;
- Compared to other fiber insulation materials, glass wool is much cheaper.
Minuses:
- the high fragility of the fibers requires enhanced protection and caution in work; increased loads on the material should be avoided;
- the average service life of glass wool is 10 years, then it shrinks severely and does not provide even minimal thermal insulation of the walls;
- glass wool absorbs moisture vapor and water, which leads to a complete loss of thermal insulation characteristics.
Glass wool in rolls
Advice. For siding, slabs covered with fiberglass with a density of about 30 kg/m3 are best suited. To avoid getting low-quality insulation, pay attention only to certified glass wool from leading manufacturers, for example, Knauf, Isover, Ursa, and the domestic brand “Neman”.
Prices for mineral wool
Mineral wool
Characteristics of polystyrene foam insulation
Styrofoam
Polystyrene foam has very low hygroscopicity, in which it is significantly superior to fiber insulation. Walls lined with foam plastic also do not require additional wind protection. This is one of the most budget-friendly insulation options, although not the most effective. Due to the vapor permeability of the material, it is necessary to regularly ventilate the room to prevent condensation from accumulating on the walls.
Styrofoam
Pros of polystyrene foam:
- affordable price;
- low thermal conductivity;
- light weight;
- ease of installation.
Minuses:
- In terms of sound absorption, foam plastic is inferior to other types of insulation;
- sheets of material break easily, so care is required during transportation and installation;
- foam is damaged by rodents;
- It is a flammable material and produces toxic smoke when burned.
Insulation of facades with foam plastic
EPS (extruded polystyrene foam)
This material has characteristics similar to polystyrene foam, but in all respects it is much better. EPS is widely used in industrial and private construction; its installation does not require much effort or special skills.
Extruded polystyrene foam
Pros:
- high density and strength of the material;
- almost zero hygroscopicity;
- excellent thermal insulation properties;
- good noise absorption performance;
- long service life;
- relatively light weight.
Minuses:
- the cost of EPS is approximately 20-30% higher than that of polystyrene foam;
- does not allow the walls to “breathe”;
- can be damaged by rodents;
- refers to flammable materials.
| Options | Styrofoam | EPPS |
| Thermal conductivity | 0.035 W/(m K) | 0.028 - 0.032 W/(m K) |
| Water absorption | 0,5 — 1% | 0,1 — 0,4% |
| Density | 11-35 kg/m3 | 30-40 kg/m3 |
| Flammability degree | G1 – G4 | G1 - G4 |
| Thickness | 20-100 mm | 40-100 mm |
| Dimensions | 500x500 mm, 600x1200 mm, 1000x1000 mm | 580x1180 mm, 600x1200 mm |
Prices for foam plastic
Styrofoam
Characteristics of blow-in insulation
Ecowool is a new material made from cellulose fibers. It contains a binder - lignin, fire retardants and boric acid as an antiseptic. Ecowool is a loose mass that is applied dry or “wet” method.
Ecowool
Penoizol and polyurethane foam have a cellular structure and are applied to walls in liquid form. They are light in weight, so they exert almost no load on the base, but at the same time cover the entire area with a dense, uniform layer. With this method of insulation there is no need to level the walls and install wind protection, which greatly simplifies installation.
Urea-formaldehyde foam - universal insulation
Insulating a house with foam insulation
Pros:
- absence of cold bridges;
- durability;
- low thermal conductivity;
- speed of installation.
Minuses:
- these materials are more expensive than other insulation materials;
- For application it is necessary to have special expensive equipment and experience working with it.
Thermal insulation with polyurethane foam
| Options | Ecowool | Penoizol |
| Thermal conductivity | from 0.037 to 0.042 W/(m*K) | from 0.031 to 0.041 W/(m*K) |
| Layer density | 28-65 kg/m3 | 5-75 kg/m3 |
| Vapor permeability | 0.3 mg/(mhPa) | 0.21–0.24 mg/(mhPa) |
| Flammability degree | G2 | G1 |
| Working temperature | from -40 to +120 0С | -60 + 80 ᵒС |
Recommendations when performing work
Insulating a house with polystyrene foam followed by siding is the most economical and practical option for exterior finishing of buildings made of any building materials. The method is actively used both in the construction of new objects and for finishing and reconstruction of already built ones.
Must be taken into account during installation. That all window and door openings will be slightly pressed inside the walls. Thus, for their subsequent finishing, additional materials will be required, which are best purchased in advance.
- Internal or external corners (slopes, ebbs)
- Sandwich panels or PVC;
- About window trims, which are offered by the panel manufacturer.
Plastic (vinyl or acrylic) siding is installed only in strict compliance with the technological requirements when working with the material:
- Work on finishing the external walls of a house is permitted only when the ambient temperature is at least 10 degrees above 0. In the cold, the panels lose their flexibility and may crack as a result of installation;
- The fasteners that secure the siding must be made of stainless metal or have a galvanized coating;
- The screws are not turned all the way, this is done so that the panels can move slightly under the influence of temperature changes (in the cold, the siding decreases in size by 1-2 cm, when heated, on the contrary, it increases);
- Screws are screwed in only at a right angle of 90 degrees.
Only by observing all the necessary requirements can you create a high-quality and durable facade that can not only improve the characteristics of the walls, but also modify the entire house.
Installation of insulation under siding
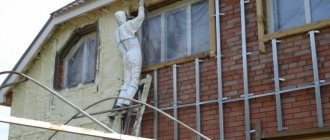
Regardless of the material chosen and the method of fastening it, you first need to properly prepare the surface. To do this, remove everything that could interfere with the work - lighting devices, trim, decorative elements and other objects, and then carefully inspect the walls. There is no need to level the base, but you should definitely seal the cracks and remove the fungus.
Wooden beams or metal profiles are used as lathing for siding. If you prefer timber, you should pre-treat it with antiseptic impregnation to avoid damage to the wood from condensation and the development of mold.
Wooden beam sheathing
Prices for different types of bars
Bar
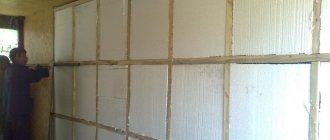
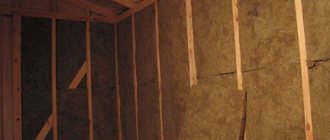
Wall insulation with mineral wool
Step 1. A frame made of timber with a section of 50x50 mm is fixed to the wall. The beams are attached vertically using self-tapping screws and dowels; the distance between the posts should be 1.5-2 cm less than the width of the insulation. It is imperative to control the vertical position of the racks with a building level so that all elements of the sheathing are in the same plane.
We fix the timber frame
Step 2. Mineral wool slabs are alternately inserted between the beams, slightly pressing the edges. After installation, the material easily straightens and tightly fills the cells of the sheathing. If necessary, the slabs are trimmed with a knife or a fine-toothed hacksaw.
Alternately insert the slabs between the beams
Step 3. If the insulation is planned to be installed in two layers, horizontal beams made of timber are attached on top of the racks with self-tapping screws at the same distance. Next, the mineral wool slabs are reattached.
Installing the second row of timber
Step 4. A windproof membrane is attached over the insulation. Since its width is not enough to cover the entire area of the wall, it is secured with horizontal stripes, starting from the bottom of the facade. To fix the membrane, it is most convenient to use a stapler. Each subsequent strip is laid with an overlap of at least 10 cm. To increase the tightness of the coating, the joints are taped along the entire length.
We attach the windproof membrane
Step 5. Next, install the guides under the siding strictly according to the level using mounting plates. The plates are attached with self-tapping screws to the sheathing in increments of 40 cm. An air gap of about 3-5 cm should remain between the guides and the windproof membrane.
Installing guides under the siding
After this, they begin covering the facade with siding panels. As you can see, the technology is quite simple and anyone can do it. The most important thing is to secure the slabs tightly so that they do not dangle between the racks. If there are gaps left, heat will escape and all efforts will be in vain.
Let's start covering the facade with siding panels
Siding prices
Siding
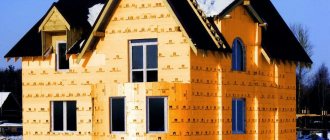
Insulation with extruded polystyrene foam
Step 1. On the wall, mark the location of the hangers for the guides according to the level. The hangers should be attached along the entire facade in increments of 40 cm. Holes are drilled at the marked points, dowels are inserted and the hangers are secured with screws.
Attaching the hangers
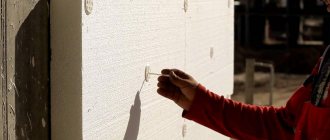
Step 2. Take an EPS board, apply it to the wall and press it a little so that traces of the hangers are imprinted. Using these marks, cuts are made in the insulation with a knife or a special cutter. Next, the slab is again placed against the wall and put on hangers, pressing it tightly to the base.
Step 3 . The remaining slabs are fastened in exactly the same way, trying to make the joints as thin as possible. If gaps have formed here and there during the work, they need to be sealed with polyurethane foam using a gun.
We fix all the EPS boards
Step 4. After covering the facade with insulation, they begin to install guide profiles under the siding. The profiles are attached to hangers that protrude from the heat-insulating layer; a ventilation gap 2-3 cm wide is left between the guides and the insulation. Next, the siding is attached.
Installation of guides
This insulation can also be attached using umbrella dowels and special glue. In this case, it is more convenient to first mount the sheathing to which the siding will be attached. Glue is applied to the insulation, then the plate is inserted between the guides and pressed against the base. Upon completion of installation, the slabs at the joints are additionally fixed with umbrella dowels.
Ecowool insulation
Characteristics of ecowool
Insulating walls with ecowool can be done in two ways - dry and wet. The first method is not reliable enough, since the material is blown through small holes in the protective film, and it is impossible to control the density and uniformity of the filling. In this regard, the wet method is more convenient; the whole process takes place in plain sight. It is this second method that we will consider.
Equipment for installation of ecowool
Step 1. The walls are cleaned of dust, cracks and other defects are eliminated. The guides for the siding will be strengthened strictly according to the level in increments of about 50 cm. The guides must be fastened using mounting plates so that the thickness of the frame is at least 10 cm.
Fixed guides
Step 2. Ecowool is poured into a blowing machine, a water-gel solution is added there, and mixed until smooth.
Step 3. Turn on the installation and apply the viscous mass to the walls in a dense layer. Joints and corners are treated especially carefully so that there are no voids left.
Insulation of walls with ecowool
Applying ecowool to the wall
Ecowool insulated wall
Step 4. Allow the insulation to dry completely, after which the siding panels are mounted to the sheathing.
In a similar way, the house is insulated with foam insulation and polyurethane foam. Many companies rent out spraying equipment, which is much cheaper than purchasing equipment. But in order to do everything efficiently, certain skills are needed, and it is better for a beginner to hire specialists for this.
Video - Insulation for siding
Video - Insulation under siding with mineral wool
Insulating walls with foam plastic from the outside ‒ Preparation of materials
It is recommended to start high-quality insulation of external walls with foam plastic by preparing construction tools and consumables. For construction operations, regardless of the finish (siding or plaster), the following should be prepared:
- Polystyrene foam - sheets or slabs;
- to create a support, starting (from below) thermal insulation profile;
- construction adhesive for fixing the material;
- disc or umbrella dowels.
Glue, for proper fixation of the foam, must be selected carefully. If you choose the wrong one, then defects will quickly appear on the surface of the product, which will significantly reduce the thermal characteristics of the material. The insulation must be attached to glue, which does not contain any solvent additives. Usually, on the packaging of the adhesive composition, there are explanations that say that the adhesive is well suited for such a thermal product.
Installation of the starting profile
The length of the fastening elements is selected based on the thickness of the thermal product and the wall material. As a rule, the dowel fastening must be at least 50 mm. If the base is concrete, then a minimum value of 40 mm is acceptable. For brick walls, dowel fastenings are recommended, 70 mm greater than the thickness of the foam layer.
Mushroom dowel, for fastening foam plastic
It is not advisable to use self-tapping screws and similar elements for finishing with foam plastic under siding or plaster. Such clamps provide rather low grip reliability. In addition, they can cause serious damage to walls and permanent structures.