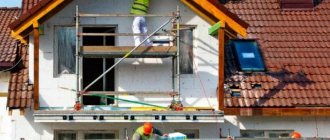
Thermal insulation of any basement is one of the most important points, since it allows you not only to maintain the temperature, but also to avoid the formation of condensation, which leads to the destruction of the structure. Insulating a basement with penoplex or polystyrene foam has many advantages, which is why it is becoming increasingly popular compared to other methods of thermal insulation. But it is worth considering that these materials have their own characteristics, which are very important to take into account. It is necessary to carefully read the instructions, since insulating the basement with polystyrene foam, and doing it correctly, can only be done in compliance with the technology.
wall insulation
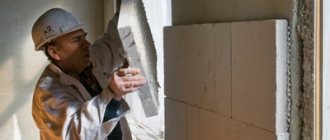
Preparatory work
Installing wool on the ceiling
Before starting insulation work, you should inspect the surface of the ceiling, clean it of dust and identify irregularities, cracks and other defects. In addition, you will need to check for height differences in different areas of the floor. If there are significant discrepancies, it is advisable to choose the frame method for installing thermal insulation.
After cleaning the ceiling from dust and dirt, repair any detected damage using wood putty or cement-based leveling mixtures. After drying, the surface is sanded and treated with special compounds to protect against fungus and mold. Preparatory work is carried out especially carefully when using the adhesive method of fixing the insulation.
Preparing for basement insulation work
Before insulating the basement, it is necessary to find out the characteristics of the soil at the building site. If its water saturation is higher than normal, it is recommended to carry out drainage work in order to drain groundwater from the underground part of the house. The drainage system consists of drainage pipes with holes. They need to be laid alternately on a gravel bed made with a slope of 3-5% below the base of the foundation. After installation, the pipes must be covered with washed crushed stone. When the drainage system operates, groundwater, seeping through the crushed stone, penetrates the laid pipeline, through which it is then discharged to the sewer or to a separate well. To prevent pipes from silting, the crushed stone bedding must be protected with geotextile - a filter material. It allows water to pass through perfectly, retaining small soil particles. Thanks to this filtration, the drainage system will not become clogged for a long time. In addition to draining groundwater from the basement, before insulating it, it is necessary to examine the condition of the buried part of the walls. First, they need to be cleaned of dirt or old insulation. If after this, cracks and chips are found on the basement walls, they should be sealed with sealing mastic. All identified surface irregularities must be smoothed using a cement mixture. Otherwise, the fit of the insulation boards to the basement walls will not be tight.
How and what to insulate a basement with
This operation can be performed in different ways, but the most effective is considered to be insulating the basement walls from the outside. Using this technology, the walls are finished with thermal insulation material at the construction stage. As a result, they do not freeze and condensation does not form on them.
The whole process comes down to finishing the walls, floors and ceilings with thermal insulation material.
Moreover, the overlap should be touched only in two cases:
- If the temperature in the basement is lower than the rest of the house;
- When the room is warm and there is a cold floor above it.
Scheme of insulation of the underground part of the walls
As for the choice of the heat-insulating material itself, there is one condition - it should not absorb moisture. An excellent option is to insulate the basement walls with polystyrene foam. At the same time, waterproofing is also carried out.
Pasting the underground part of the walls with extruded polystyrene
Microclimate in the cellar
Even in cases where the cellar is not located under a country house, but separately from it, insulation must be carried out. Otherwise, the building will not serve you for even several years, gradually collapsing from the effects of surrounding dampness and temperature changes.
In addition, the temperature in the cellar that is optimal for storing food must be maintained year-round (about 2-4 degrees Celsius). High-quality installation of thermal insulation materials will allow you to maintain such a microclimate both in summer and winter. In the summer months, a layer of insulation will not allow warm air to penetrate into the room through the ceiling, and in winter it will protect against frost.
Without insulation and maintaining a constant temperature, moisture will gradually accumulate in the cellar, which will begin to condense on the ceiling and wall surfaces. In addition, when arranging thermal insulation, it is very important to provide for the presence of high-quality waterproofing. After all, even the best insulation and a powerful ventilation system will not be able to provide an optimal microclimate inside the cellar if groundwater systematically enters it.
To create the right conditions for storing food in the cellar, all work must be carried out comprehensively: thermal insulation, waterproofing and installation of a ventilation system.
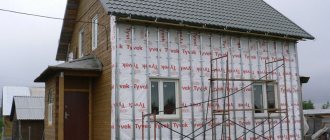
External insulation
Preparatory work
Before insulating the basement from the outside, you need to prepare the walls as follows:
- First of all, you need to ensure a smooth surface of the walls.
- Then the walls should be treated with antiseptic or antifungal impregnation.
- You should also worry about wall ventilation in advance. For this purpose, ventilation holes are made in the base at a distance of 5 meters from each other, at a height of about 15 cm above the soil level.
Walls covered with bitumen mastic
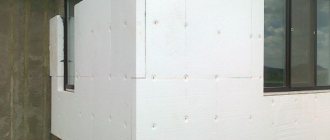
Finishing the underground part of the walls
An excellent insulation material for basement walls is extruded polystyrene foam. It is distinguished from ordinary polystyrene foam by even lower thermal conductivity and compressive strength. In addition, it has a more uniform structure, due to which it has good moisture-repellent properties.
Another advantage of this material is durability, according to manufacturers, it is more than 50 years. However, the price of extruded polystyrene foam is, of course, higher than conventional foam.
Before you glue the walls with polystyrene foam yourself, you need to cover them with a layer of waterproofing.
For this you can use the following materials:
- Bitumen;
- Ruberoid;
- Polyethylene;
- Rubimast et al.
After waterproofing is completed, you can begin gluing the walls. To install extruded polystyrene foam, bitumen-polymer mastic should be used.
The instructions look like this:
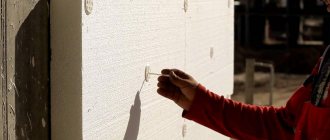
- First of all, the adhesive composition must be applied to the slab. It is allowed to apply mastic in a continuous layer or in spots.
- The panel is then pressed tightly against the wall. Pasting should begin below ground level.
- All other plates are glued in the same way. They need to be mounted as closely as possible to the previous panels. If necessary, polystyrene foam can be cut with a hacksaw or a stationery knife.
- Then, the existing joints are filled with special foam. However, even this operation will not fully prevent the formation of cold bridges. To make the insulation more effective, the foam should be glued in two layers, with the joints offset.
- Despite the fact that the material has water-repellent properties, it must be covered with a layer of waterproofing.
Scheme of external insulation of the above-ground part of the basement
Blind area
The next step is filling the walls with soil. In this case, it is necessary to ensure that there are no stones or other elements in the ground that could damage the waterproofing. After backfilling, the soil should be compacted well and, if necessary, topping up.
Next, a blind area is made, which is designed to drain water from the foundation. It must be said that the blind area can also be insulated with foam plastic.
The work is carried out as follows:
- A layer of clay is laid around the perimeter of the building, which will serve as a water seal, i.e. will not allow water to rise from below.
- Then a layer of sand is poured, which must be compacted well. To do this, the sand can be moistened.
- Thermal insulation material is laid on the sand; for example, you can use the same extruded polystyrene foam that was used to cover the walls.
- Waterproofing is laid on the insulation and a concrete screed is placed on top of it. In order for the blind area to cope with the task, it must be done at a slight slope from the wall.
Insulation of the base and blind area
Base insulation
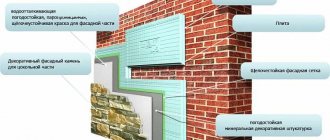
When the concrete has hardened, you can begin insulating the base. Insulating the upper part of the basement is not much different from the operation discussed below. The only difference is that a reinforcing mesh is attached to the insulation and plastering is done on top with cement mortar.
Then the base can be covered with finishing cladding, natural or artificial stone, clinker tiles, etc.
It is important that the facing material not only performs a decorative function, but also protects the base from moisture
Preparatory stage
Insulating a cellar with polystyrene foam or penoplex can be done even with your own hands. You just need to familiarize yourself with the features of the process and its stages.
Before installing thermal insulation, it is very important to familiarize yourself with the characteristics of the soil on which the basement is located. If the humidity is too high, it is strongly recommended to think through and install a drainage system in advance. This will help save significant time and money in the future.
Also, when installing PPS, it is necessary to carefully examine the walls of the insulated room. The wall can be finished only after it has been cleaned of dirt, soil and the previous layer of insulation, if one was used. All chips and cracks must be carefully processed to obtain a smooth surface.
In addition, it is necessary to provide a layer of waterproofing in advance; for this, film or roofing felt is usually used.
basement sectional diagram
We insulate from the outside
Before you begin to insulate the base, thoroughly clean its surfaces of cement, knocking off dirt with a hammer and brushing it off with a brush. Identified surface defects or cracks are sealed with cement mortar. After which it needs to be allowed to dry, and only then do they begin to perform thermal insulation.
Next, the base surfaces are coated with a primer to ensure reliable connection of the adhesive composition to the walls. The base structure of the foundation usually has a height of 0.30-0.50 m, while Penoplex is produced in larger sheets. Therefore, it will need to be adjusted to the base.
For this purpose, measure the height of the structure and mark the insulation sheets accordingly, cutting them with a hacksaw.
Consumables and tools
To thermally protect the base with penoplex, the master must prepare the following tools and accessories:
- metal brush for cleaning the surface,
- pick,
- shovel,
- buckets,
- trolley for excavating soil near the basement structure.
Basic building materials needed to perform thermal insulation work:
- extruded polystyrene foam, usually comes in bags of 4 to 10 sheets;
- waterproofing film;
- fiberglass reinforced mesh;
- adhesive composition for securing insulation sheets;
- dowels;
- putty;
- bitumen mastic.
Finishing technology
Waterproofing is applied on top of the treated and cleaned base surfaces. An indispensable requirement is the deep drying of its cover. Otherwise, the slabs will creep to the sides.
Insulation installation technology:
- The sticker starts from the bottom, the insulation sheets are placed horizontally in one row.
- The next layer of sheets is installed end-to-end and secured to the plane of the previous cover.
- Thermal protection boards must be of equal thickness.
- The next row is made with offset joints, placing the slabs in a checkerboard pattern; the seams between the tiles should be 5 mm.
- Fit the edges of the sheets tightly.
- The glue is applied at a number of points.
Having completed the stages of insulation and external decoration of the base, you will also need to insulate and equip the blind area.
How to insulate the walls of the cellar from the outside yourself?
The basements of modern country houses have long been no longer associated with gloomy and damp rooms that are scary to enter. In an effort to get as much usable space in their home as possible, country homeowners are trying to equip bathhouses, saunas, gyms, workshops and other premises in the basements. During the year, the temperature in the basement changes slightly, due to the location of this room underground. In addition to this, it is very important to provide a microclimate inside the basement that is acceptable for human occupancy. That is why attention should be paid to insulating the basement from the outside.
All insulation work must be carried out during the construction stage of the house. Insulating a basement in an already built house will be extremely difficult.
Approximately 25% of the heat loss that occurs in the most ordinary country house occurs precisely because of poor thermal insulation of the underground part of the building. If the basement or cellar does not have effective insulation, heat loss during the heating season will be simply enormous.
Basement ceiling insulation options
The most common thermal insulation material is expanded polystyrene (EPS). Insulating the basement ceiling with polystyrene foam from the inside is an economical and easy to implement option.
The material has the following properties:
- non-hygroscopic;
- minimal thermal conductivity;
- there is no vapor permeability.
There are many modifications, including EPPS - extruded polystyrene foam, consisting of closed cells filled with an inert gas.
The higher the density of the material, the greater its strength, the thinner the layer required for insulation and the lower the risk of mechanical damage.
For insulation, slabs with a density of 35 kilograms per cubic meter are used, the layer thickness is up to 10 cm. Leaky grades of material are fragile, mice gnaw them to make nests.
All types belong to different flammability groups, from G1 to G4. When burning, foam releases toxic substances. Flammability is reduced due to the addition of a fire retardant: such EPS becomes self-extinguishing. For any construction work, it is recommended to purchase modifications with impregnation.
The sample on the left is polystyrene foam, in the middle is extruded polystyrene foam, on the right is mineral wool
Basement ceiling insulation technology:
1. Attach the slabs to the concrete floor using tile adhesive with additional fixation with umbrella dowel nails.
2. Foam the seams.
3. Cover with plaster using reinforcing alkali-resistant fiberglass mesh.
Before installation, it is advisable to treat the surface of the reinforced concrete floor with a hydrophobic penetrating compound.
Another option for insulating a basement floor is spraying liquid polyurethane foam (PPU).
PPU is more expensive than PPP. Pros:
- fast processing;
- thin layer compared to sheet insulation;
- no hydro/vapor barrier, adhesives or mechanical fasteners are required;
- the material lays down in an even sealed layer, without gaps or cold bridges.
Minuses:
- a spray gun is required for application;
- flammability G1-G2.
Advantages of basement insulation with polystyrene foam and its disadvantages
The experience of thermal insulation of basements with polystyrene foam indicates that even at a foundation depth of more than 7 m, it is reliable, regardless of the brand of this material and the duration of exposure to groundwater under pressure. When deciding to insulate a basement with extruded polystyrene foam, you need to know about its advantages and disadvantages in order to use this insulation as efficiently as possible. The advantages include the following:
- Basement insulation with polystyrene foam creates an excellent coating with low thermal conductivity.
- The weight of the insulation is so small that it does not exert any serious load on the basement walls.
- Compared to other methods of thermal insulation, protecting the basement from dampness and cold with polystyrene foam will cost much less, especially since a lot of material will be required to insulate its walls.
- Thermal insulation 100 mm thick is comparable in thermal conductivity to brickwork one meter thick.
- After installation, the finished coating is slightly susceptible to aging and is stable in shape and size.
The disadvantages of expanded polystyrene include, as mentioned above, its flammability and the release of toxic fumes when the material is heated.
Optimal insulation for wooden floors
There is no point in discussing the best material for thermal insulation of a wooden floor. Almost everything is applicable, from grandfather’s dry leaves to expensive vermiculite. Floors in wooden houses are insulated using loose thermal insulation options, mats and slabs.
Since the list of requirements for any insulation consistently includes lightness, minimal water permeability, durability, and operational safety, all these qualities are quite satisfactory for builders and owners of wooden houses.
The choice mainly depends on the financial capabilities of the owner, the type of base and the method of installation. Owners who are not limited in funds will be able to purchase progressive, easy-to-install materials with detailed instructions on how to insulate the floor in a private house without the involvement of builders and with an accurate indication of the thermal properties of the factory product on the packaging. If you want to save money, you will have to tinker a lot with traditional insulation schemes.
Insulation for thrifty owners
Independent home craftsmen who do not want or do not have the opportunity to invest significant sums in insulation can use the following as a heat insulator:
- dry sawdust, which pleases with a minimal price, but requires reliable waterproofing on both sides of the insulating layer due to the tendency of the material to actively absorb moisture;
- sawdust granules, which are a more practical option, treated with an antiseptic and fire retardant;
- slag, which attracts cost, but is used primarily in floor insulation schemes on the ground;
- expanded clay, used to create a heat-insulating layer of considerable thickness, since its optimal thickness for our latitudes is considered to be 30 cm;
- simple mineral wool without foil and corrugated shells that increase thermal performance;
- roll insulation, created on the basis of glass fibers, slag wool;
- polystyrene foam, which requires measures to protect it from the encroachment of rodents and from fires.
If you follow the rules for installing thermal insulation using the listed materials, heat leakage through the lower ceiling will be eliminated. However, laying them will require impressive labor efforts.
Modernized, expensive insulation materials
If the owner of a country property does not have the main task of how to insulate the floor in a wooden house at low cost, then he has at his disposal:
- Vermiculite is a product of processing hydrated mica, which has excellent insulating qualities and long service life;
- Penoplex is extruded polystyrene foam produced in slab format with increased strength and excellent waterproofing properties;
- Various modifications of insulation with the brands Ursa, Thermolife, Isovent, Penofol, Izolyte, etc., which are mats and slabs with bases made of foamed polystyrene, glass wool and a basalt analogue, optimized by increasing wear resistance, minimizing water permeability, applying foil shells to reflect back heat rays and other methods.
In case of minor heat leaks, you can insulate a wooden floor with ecowool or polyurethane foam, but without special equipment it is impossible to blow in these materials.
This is a significant disadvantage, but the advantage is the creation of a dense water-repellent insulation layer that does not require a device to protect the insulation from steam.
Advantages and disadvantages of the material
What can be distinguished from the advantages and disadvantages of foam plastic boards for insulation?
The material is afraid of high temperatures, which, however, is practically not relevant for the cellar.
The advantages of the material include:
- Good thermal insulation properties.
- Polystyrene foam weighs little, so it does not put stress on the walls and foundation.
- When compared with traditional and modern analogues, polystyrene foam is a very affordable thermal insulation material.
- The material has a high level of moisture resistance.
As for the disadvantages:
- If we consider the option with external insulation, then polystyrene foam is unlikely to be suitable here, because when heated (for example, from sunlight) it begins to release vapors.
- When exposed to fire, polystyrene foam will begin to melt and burn, releasing toxic substances. However, in the case of a cellar, this problem, as a rule, is practically irrelevant.
- Foam plastic is subject to mechanical stress, so before installing the insulation, it is necessary to check the integrity of the installed slabs, because some of them may be cracked.
Experts recommend purchasing foam plastic with a density of 25 for insulating cellar walls.
All work on insulating the basement can be done with your own hands, so there is no need to involve specialists in this process. If the cellar needs to be insulated in an already built house, then it is recommended to insulate the room from the inside, because in the process of carrying out external insulation work, certain problems with the foundation may arise.
Determining the source of the problem
The main factors contributing to cellar freezing are melt water. In some cases, groundwater that rises close to the surface becomes a problem. Therefore, before insulating the cellar from the inside against freezing, it is necessary to determine the source of the problem. Having found out the causes of moisture, you need to determine to what depth the soil freezes during the frost period. And based on the information received, you can decide on the thickness and choice of heat-insulating materials.
The illustration clearly demonstrates critical places for protecting cellar structures from freezing
Preliminary waterproofing of the room
Before insulation, horizontal waterproofing of the room is performed (if it has not already been done). You can choose any insulating materials (the market offers a wide range). Only after the waterproofing is done can you begin to insulate the walls of the basement or cellar from the outside.
It is recommended to additionally treat the surface of the heat-insulating material, which will be located below ground level, with waterproof mastic. In addition, before insulating the basement walls from the outside, these walls need to be leveled. It will not be superfluous to apply antifungal agents.
It is recommended to begin work on external thermal insulation of the basement 5-7 days after you have completed all measures to protect against moisture.
Foundation insulation
In wooden houses, the foundation most often fulfills the purpose of the plinth, therefore it protrudes relative to the walls of the house
When the groundwater level is high, it is important to pay attention to the freezing of the soil around the base
If during the construction stage the foundation was not insulated and waterproofed from the outside, you will have to dig a trench around it to bury the insulation sheets. To waterproof the underground around the house, you will additionally need to make blind areas.
From the outside, the foundation is insulated with cement bonded particle boards 15-20 mm thick or foam plastic. The slabs are attached to the foundation with special glue. Then the insulation is reinforced and plastered, or covered with decorative stone.
To drain water around the base, a blind area of asphalt or concrete is made. The blind areas are mounted at a slope towards the outside of the walls of the house. The presence of a blind area will additionally protect the foundation insulation from moisture penetration through it and subsequent destruction.
DIY basement insulation technology
Let's look at how complex basement insulation is carried out using penoplex (the technology will be similar for polystyrene foam and expanded polystyrene). Note that comprehensive thermal insulation includes external and internal insulation (in particular walls, floors, ceilings).
In addition to insulation for work you will need:
- material for interior decoration;
- polyurethane foam;
- reinforced polymer mesh;
- waterproofing material (bitumen mastic);
- adhesive solution;
- concrete or external plaster;
- tool.
What material is the floor insulated with?
The construction and installation of floor slabs is carried out in various ways, which, like the materials offered, are sufficient. It all depends on the features of the structure, individual requirements, owner preferences and financial capabilities. Many insulating raw materials have high-quality properties, good characteristics, and during operation receive only high marks.
Expanded polystyrene
Industrial enterprises produce several types of special slabs that can be used for insulation.
When choosing a material, you must pay attention to the purpose of the room and the further load on the floor.
At the initial stage of the process, a thick layer of gravel is laid on the base of the prepared surface, which is covered with a concrete screed. Next, the floor is waterproofed. At the last stage, a wide, soft and comfortable roll of material is stretched.
Extruded polystyrene foam
These boards contain more durable materials. Construction raw materials have a high density and are used when it is necessary to support large weights and loads.
Expanded polystyrene practically does not absorb moisture; it is used in places even with high groundwater levels. The easy-to-use material is attractive due to its low price and does not require the help of special equipment during the work.
Polyurethane foam boards
Of the large number of tiled insulation materials offered, the best option is only rigid materials with a uniform structure and closed cells. They perform floor insulation with such building material more efficiently, in a short time and without extra costs.
Some types of insulation are covered with foil
Some types of polyurethane foam boards are covered with aluminum foil or fiberglass. Such additions increase thermal insulation properties, reduce moisture permeability and distinguish foam plastic from other similar materials.
Mineral wool
Rigid cotton wool boards are chosen as thermal insulation in a wooden house. The material is characterized by high resistance to deformation. You can install such an insulation system yourself, since the entire installation process will not take much time. The fibrous material absorbs moisture well; it is laid out over an unheated basement between two waterproofing layers. To insulate floors in residential premises, it is recommended to use ten-centimeter thick mineral wool.
Expanded clay
Bulk air material can replace three layers at once in insulating a home floor: concrete base, gravel, thermal insulation. Fill the drainage in layers, periodically compacting each layer. At the end, the expanded clay is poured with a solution of cement and sand. When the three-centimeter crust has hardened, waterproofing insulation and concrete screed are laid under the finished floor. After the insulation work has been completed, they begin laying the laminate.
Foam glass
Proper insulation with this material is carried out as follows:
- lay out a ten-centimeter gravel layer;
- pour concrete screed;
- a special adhesive composition is applied to the ends of the insulating blocks;
- After the glue has dried, the heated floor structure is installed.
In rooms with high humidity, to enhance waterproofing, roofing felt, two layers of polyethylene film, and a cement screed are laid over foam glass. Such actions are usually carried out if the final flooring is made of ceramic tiles.
Granulated slag
The material has high thermal insulation properties, but the by-product of iron smelting contains harmful impurities. In the construction and insulation of country houses, they use material that has undergone careful processing and has a document confirming compliance with regulatory requirements.
The slag is laid directly on leveled ground, without the use of waterproofing. The thickness of the layer should be 40 cm. Next, lay a layer of insulation. The poured concrete screed completes the process. The flooring can be laid out from any material you like.
Ecological wool
Fluff pulp is convenient in the work process. The environmentally friendly material is not damaged by rodents, insects, or fungi. When wet, it does not lose its protective properties, does not shrink, and when ignited, does not support the fire, but smolders. The material is used in dry form and with a solution.
This wool is easy to install
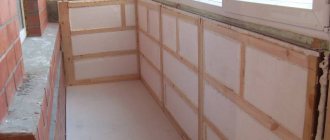
Internal insulation
Any type of expanded polystyrene is most often used precisely to insulate the basement from the inside. Here there are some features for each of the available surfaces: ceiling, floor and walls.
Floor insulation with polystyrene foam
Since installing heated floors in the basement is not the most common event, more traditional methods of insulating the basement from the foundation side are most often used.
To insulate the floor in the basement, you only need a few steps:
- Level the surface.
- The insulation layer must have a certain thickness and fit tightly to each other at the joints. It is optimal to use 5 mm thick material for the floor.
- It is necessary to lay a layer of polystyrene foam on top of the expanded polystyrene slabs.
It is better to insulate the floor in the basement using an additional reinforced screed on top of the insulation layer.
insulation with polystyrene foam
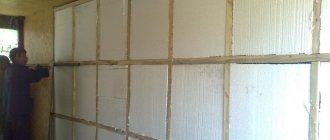
Wall insulation
Insulating the basement walls from the inside helps maintain the temperature in the room. In addition, to avoid condensation accumulation in the basement, it is very important to use high-quality waterproofing materials. This will ensure long service life of the thermal insulation and prevent the destruction of the structure as a whole.
Next, polystyrene foam boards are attached on top of the material chosen for waterproofing. Glue is usually used for fastening. After all the walls are covered with slabs and the glue has dried, additional work is carried out on the surface of the basement walls.
A concrete screed is used to strengthen the structure. To create it, it is recommended to purchase M100 cement and use additional reinforcement. Do not be too zealous; the screed layer should not be too thick.
Since any basement has high humidity, an additional layer of waterproofing material will not be superfluous, but this item is optional. After insulation with polystyrene foam materials, the surface can be covered. For this, you can use various materials, it all depends on the budget and wishes of the owner.
Important! Not a single joint of the thermal insulation material should protrude, since these are the places that are most vulnerable to the formation of condensation.
wall insulation
Ceiling insulation
The technology for insulating a cellar lid with polystyrene foam is not too different from other surfaces, but has some features.
Important! The ceiling is the part of the cellar that is most susceptible to condensation accumulation. Before installing insulation on the basement ceiling, you need to pay special attention to the waterproofing layer.
All insulation work is carried out in several stages:
- Surface preparation. It is necessary to eliminate all cracks and gaps that may be on the ceiling. In addition, if dowels are used for installation, it is necessary to think about their insulation, since a small amount of cold can penetrate through the fasteners.
- Vapor barrier. After the ceiling surface is leveled, it is necessary to additionally use a layer of vapor barrier material. This is necessary to ensure that condensation does not form during operation of the room. It is best to use a layer of penofol, as it has additional heat-insulating properties.
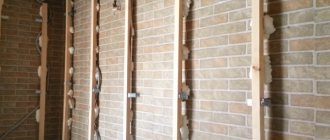
- Installation of hangers. Hangers are necessary for further installation of sheathing profiles. Careful measurements must be taken to ensure that the distance between the profiles exactly matches the dimensions of the slabs.
- Installation of slabs. This is the most important stage. It is also important to avoid gaps here. In addition, it is recommended to additionally insulate the joints using construction foam.
- Additional layer of vapor barrier. Additional vapor barrier is not mandatory, but is recommended to create an optimal indoor microclimate. It is very important that the distance between the polystyrene foam and the vapor barrier layer is at least 40 mm, this will create additional ventilation between the layers and reduce the possibility of condensation accumulation.
If the insulation of the cellar from the inside is carried out in compliance with all technologies, then as a result the room will have an optimal climate, although the functional space will be slightly reduced.
ceiling in polystyrene foam
Ventilation device
The first stage of insulation is the installation of a ventilation system in the underground, which will ensure air circulation inside the room and prevent the formation of condensation on surfaces.
Underfloor ventilation consists of installing two pipes on different sides of the room. The optimal location of pipes is on the south and north sides of the house. The installation of pipes is carried out in accordance with the laws of physics, cold air tends downward, and after warming up it rises.
The supply pipe is located at a height of 20-30 centimeters from the basement floor, and the inlet pipe - 40 cm from the ground. The outer opening of the pipe is covered with a fine mesh - protection against rodents entering the basement.
The outlet pipe is placed 30 centimeters below the basement ceiling. And its upper end is brought out onto the roof of the house. The top of the pipe is covered with a protective cap. This arrangement of pipes will ensure optimal air movement in the underground and protect the room from mold.
Good reasons why it is necessary to insulate a used basement:
- vegetables freeze at sub-zero temperatures;
- storing garden equipment in an uninsulated basement is no different from storing it outside;
- installing a boiler room in such a basement will entail large heat losses and, consequently, additional fuel costs.
The simplest and most inexpensive way to solve this problem is to insulate the basement from the inside with polystyrene foam.
Procedure for installing PPS
1. Seal cracks and voids in the walls with sealant or foam.
2. Plaster over any irregularities that may interfere with the fastening of the slabs.
3. Treat the walls with waterproofing material: bitumen mastic, liquid rubber, roll material.
4. PPS boards are glued to the surface from bottom to top, end to end. The next row is placed on the previous one with the seams staggered.
5. Additionally, fix the material with dowels at the rate of 5 pieces per workpiece: in the corners and in the middle.
6. The seams are foamed.
7. Treat the outside of the slabs with plaster. It is recommended to use fiberglass reinforcing mesh in the process.
8. Apply penetrating waterproofing (Penetron, etc.) to the ceiling of the cellar.
9. Glue polystyrene foam boards and secure them with dowel nails.
10. Fiberglass mesh is glued and plastered.
With reinforced concrete slab base
If there are reinforced concrete slabs at the base of the basement floor:
waterproofing is carried out with a double layer of roofing material with bitumen mastic applied between the layers;
- lay extruded polystyrene foam or polystyrene foam with high density;
- pour the screed.
If the basement floor is earthen
If the floor is earthen (for example, with strip foundations):
- remove the turf and level the surface;
- lay waterproofing material;
- pour a gravel-sand cushion and compact it. You can also use expanded clay or sawdust-clay mixture;
- put insulation;
pour the screed.
The basement is ready for finishing. In this capacity, you can use porcelain tiles, plaster, and paint.
Insulation of basement walls from the outside with extruded polystyrene foam
When it is possible to perform external insulation, they are often limited to it. In this case, labor costs are higher, because excavation work is added: the base from the outside must first be dug out.
In addition to EPS, to treat the outer part of the foundation you will need bitumen mastic or other bitumen adhesive, as well as asbestos cement slabs.
During the preparation process you need:
- level the wall;
- waterproof the wall with bitumen mastic. Wait until it hardens;
- treat with an antifungal compound (slaked lime, copper sulfate).
Approximately 5 days after waterproofing, you can begin insulation:
1. Glue the EPS onto the waterproofed surface with bitumen mastic. Only cold mastics that do not contain a solvent are suitable for this purpose. The mastic is evenly distributed over the entire slab, the slab is pressed against the wall and fixed for half a minute.
2. The slabs are installed from bottom to top, end-to-end, tightly fitting each other. Their thickness should be the same. The height of the masonry above the ground is about half a meter.
3. Foam the seams.
4. Cover the outside of the masonry with asbestos-cement slabs.
5. Fill the ditch with soil.
Is it necessary to insulate the underground?
The path to a warm home starts from the basement. A warm and dry subfloor creates a microclimate throughout the house. If the lower part of the building is not insulated, neither strong walls nor high-quality windows will help maintain a comfortable temperature.
To create an optimal microclimate in the underground, it is necessary to ensure:
- Basement insulation;
- Foundation waterproofing;
- Organization of ventilation;
- Insulation of walls and floors.
The main goal of all measures is to create the correct operating mode for the basement, that is, limiting the access of cold into the room, ensuring the removal of moisture formed inside, and at the same time preventing heat loss. Compliance with these conditions will allow you to solve the following problems:
- Protect the foundation of the house from deformation.
- Reduce the rate of destruction of the foundation of an old house.
- Reduce heat energy consumption.
- Prevent the growth of fungus in the subfield.
- Make efficient use of underground space.
Why do you need to insulate a cellar?
Insulating the cellar will help prevent food from freezing in winter.
The storage facility is built at a distance from buildings equipped with heating appliances and communications. This means that the internal space is less influenced from the outside and is relatively stable. However, temperature differences in winter and summer reach serious values, which cannot but affect the microclimate of the underground warehouse. Sometimes construction is done under sheds and garages in co-ops. These buildings do not have any impact on the underground premises, but protect them from precipitation.
Basement insulation is carried out for the following reasons:
- In the summer heat, the earth becomes so hot that the heat penetrates deep underground, heating the walls of the cellar and its contents. This causes vegetables to sprout, preserves to explode, and pickles to become moldy.
- In cold, snowless winters, the soil freezes heavily. This also affects the microclimate in the underground storage facility. Vegetables and fruits spoil, jars crack, and smoked products quickly disappear after thawing.
- When temperature changes, condensation forms. Dampness promotes the development of pathogenic microorganisms, metal corrosion and the destruction of wooden products.
- Contact with the ground causes gradual destruction of the walls of the structure. Insulating the cellar from the outside protects it from the effects of an acidic environment and the depletion of freezing-thawing material.
Thermal insulation is selected so that it can last for decades. This especially applies to materials that are planned to be used for outdoor installation. Replacing them involves a lot of time and labor.
Features of insulating the basement ceiling of an apartment building
All of the above is true for a private cottage. How realistic is it to insulate the floor from the basement side of an apartment, so as not to spoil the newly renovated floor and not limit yourself in the thickness of the insulation layer (especially important for apartments with low ceilings)?
A basement in an apartment building is not your personal property. In some cases, even entering there is problematic: it is locked with a key, and the technician-caretaker has the key. To carry out work there, you will need permission from the housing administration. Responsible housing and communal services officials will tell you which documents to collect.
The list will likely include a permit from the fire inspector.
note
Therefore, do not rush to purchase PPS or PPU - they are flammable, the likelihood of getting the go-ahead from firefighters is minimal.
Pay attention to basalt wool and foam glass in slabs: both materials belong to the NG group. Serious disadvantages of mineral wool:
Serious disadvantages of mineral wool:
- hygroscopicity;
- when wet, cotton wool loses more than half of its heat-shielding properties;
- vapor permeability.
This is not critical if the basement is dry and well ventilated.
Mineral wool insulation of a basement ceiling from the inside can be done in two ways, frameless and framed. In the first case, installation is carried out similarly to the PPS:
secure the slabs to the ceiling with glue;
secure with “umbrellas”;
plaster with façade plaster reinforced with fiberglass mesh.
This option is feasible only with rigid facade slabs and only in a dry basement. In other cases, a frame one is used:
1. The ceiling is sheathed with plasterboard profiles.
2. Cotton wool is placed between the profiles.
3. Cover with a vapor barrier membrane.
4. Sew up with waterproof plasterboard, fiberboard sheets or other similar material.
Sometimes mineral wool blanks are hermetically packaged in plastic or vapor-proof film before being placed in the frame and the seams are sealed with mounting tape.
The option is energy-intensive, but provides 100% protection of the insulation from getting wet.
Another option is to insulate the ceiling in the basement of the house with foam glass slabs.
This material does not absorb moisture and is alkali-resistant - an important property when used in combination with plaster.
Its disadvantages:
- the weight is on average three times greater than that of mineral wool;
- much higher price.
The maximum permissible thickness of thermal insulation is 10 cm. Within these limits, you can fasten the slabs with glue and dowels with nails in increments of 20 cm. If it is more, you will need a frame, but it should be taken into account that foam glass will create a large load on the floor.
When installing with glue, the slabs are treated from the outside with plaster and fiberglass mesh; when using the frame method, they are sewn up with waterproof sheets.
Step-by-step instructions for insulating a cellar floor
To waterproof the cellar floor, you can use roofing felt.
To ensure reliable protection of the room from groundwater, it is necessary to perform high-quality insulation of the cellar floor. To do this, it is necessary to level the surface and lay waterproofing material on it. Roofing felt is perfect for waterproofing. Next, a layer of insulation is laid. Foam plastic is excellent as insulation for cellar floors, because... He:
- resistant to moisture, retains its thermal insulation qualities even in unfavorable conditions;
- withstands heavy loads. Not every insulation is able to maintain its properties and qualities under the weight of the soil;
- has a long service life and durable structure.
Drainage must be laid around the insulated floor. It is laid on gravel, at the level of the foundation, with a slight slope. Pipes for drainage can be purchased at any hardware store. They will remove most of the water, but will not be able to completely dry the soil.
Penofol is used to construct the topmost layer of waterproofing.
There is also a simpler insulation option: lay a layer of waterproofing, lay a layer of polystyrene foam at least 5 cm thick, and lay thermal insulation (2nd layer). In most cases, penofol is used for the last layer. This material has 2 layers - aluminum foil and polyethylene foam.
The following materials can be used for waterproofing:
- overlapped PVC film;
- similarly laid EPDM membrane;
- coating, continuous waterproofing;
- bitumen roofing felt.
In order for the insulation of the cellar to be as effective as possible, sheets of foam plastic must be fixed on all planes of the basement, including on its ceiling.
Insulation of the foundation of multi-storey buildings
Polyurethane foam is used to insulate not only private households, but also apartment buildings. This material is sprayed onto any type of foundation of high-rise buildings - slab, pile, strip, combined. Nowadays this is done already at the construction stage. For such work, only high-density closed-cell polyurethane foam is used.
But buildings built many years ago do not have such insulation, so it has to be carried out separately. Insulation is applied to the outside of the house wall and inside the basement. Dried and hardened polyurethane foam is covered with facade plaster or other finishing materials.
Work is carried out at a temperature of at least 5 degrees in dry, windless weather. Since the spraying speed is quite high, in one or two days you can insulate the entire foundation of even a large house.
The procedure for insulation work
To insulate outside walls, special slab insulation materials are usually used, which are easy to install. The slabs are fixed to the waterproofing layer using adhesive mixtures or mastics. Treating the entire surface of the insulation board with mastic reduces the risk of the insulation shifting when the ground moves.
Related article: How to stick photo wallpaper on a wall with wallpaper
It is recommended to carry out insulation immediately during the construction of the house.
Cold mastic must be applied to the surface of the slab, then pressed against the wall and held until the adhesive hardens (usually 30-40 seconds).
The laying of thermal insulation slabs should begin from the bottom (strictly along the perimeter); the slabs can protrude 30-40 cm above the ground.
It is important that the insulation boards are of the same thickness. In addition, it is necessary to ensure that they are tightly adjacent to each other. It is recommended to immediately seal all resulting voids with construction foam. In the future, the slabs will be securely supported by a layer of soil. The main thing is that they do not move apart or move.
Insulation of basement walls, as noted above, should be carried out during the construction phase of the building. If for some reason this was not done, then it is better to insulate the basement yourself only from the inside. External insulation in a built house can only be done efficiently by professionals. It is not recommended to do such work yourself without the appropriate skills due to the high risk of weakening the foundation and walls of the building.
What type of insulation should I choose?
Many experts agree that external thermal insulation is much more effective. In addition to insulation, this approach guarantees resistance to soil heaving. But it is not always possible to carry out work outside. This is due to their labor intensity. All that remains is the internal insulation. However, it cannot be called bad.
The premises are insulated, the microclimate is leveled out, and heat stops escaping outside. In addition, thermal insulation from the inside is simpler than from the outside. There is no need to dig up a foundation, install a drainage system, or compact sand layers. All activities take place inside the basement, boiling down to working with the walls.
Insulate inside or outside?
The basement can be insulated from the outside and from the inside, but external thermal insulation will have a much stronger effect than internal insulation. Insulating cellar walls from the inside is appropriate in cases where it is not possible to do it from the outside. The outer layer of insulation will protect the wall and moisture-proof coating from temperature and mechanical influences. In turn, internal thermal insulation can contribute to the appearance of water at the point of contact of the insulation with the basement wall.
External thermal insulation has many advantages over internal insulation.
External insulation of a cellar or basement has many advantages:
- The overall microclimate in the basement will be improved.
- The surface of the walls of the basement or cellar will become warmer.
- Condensation will stop forming on the walls.
- The dimensions of the basement will remain the same after all work has been completed.
- A more profitable solution from an economic point of view.
- In a properly made thermal insulation layer, cold bridges will not form.
- External waterproofing will be protected from mechanical stress.
Necessary materials and tools for carrying out such work
Scheme for carrying out work with insulation
Required materials:
- Heat insulating sheets;
- Special tile adhesive;
- Painting corners made of aluminum;
- Painting mesh for reinforcement;
- Materials for finishing surfaces;
- Facade primer;
- A board whose thickness is 3-4 centimeters.
Required tools:
- Nails and dowels designed for working with foam plastic.
- Saw for cutting foam sheets.
- Ax and hammer.
- Stapler.
Floor insulation
If the floor or ceiling of the cellar does not have thermal insulation, then all work related to insulating the basement walls from the outside becomes useless.
Thermal insulation material for the cellar floor must have high resistance to mechanical loads. In addition, insulation must be done with materials that are resistant to moisture. A striking example of such a heat insulator is ordinary polystyrene foam or modern polystyrene foam.
A layer of expanded clay under a concrete screed.
Often homeowners use thermal insulation materials based on mineral wool. However, such insulation allows moisture to pass through and deteriorates quite quickly. Also, bulk thermal insulation materials are often used when insulating a cellar.
First of all, you need to prepare the base for the floor. To do this, broken brick or coarse crushed stone is poured onto the leveled and dried soil. If it is not possible to dry the soil completely, then crushed stone (or other drainage) must be used (it should also be soaked in greasy clay or bitumen).
Expanded clay, peat or even coal are often used as thermal insulation materials for floor insulation.
The floor itself is made from a finished reinforced concrete slab or poured from cement mortar. Any decorative coating can be laid on the finished concrete surface.
The process of installing and insulating the floor in the cellar can be represented as follows:
- The soil level in the cellar is deepened by 20-30 cm, after which it is carefully leveled.
- A layer of crushed stone 10-15 cm thick is poured and compacted well. This is the so-called “drainage layer”.
- A sand cushion no more than 10 cm thick is laid on the crushed stone layer, and everything is compacted again.
- The resulting “pie” is filled with hot bitumen composition.
- A layer of expanded clay is poured on top for insulation.
- Reinforcement is made and concrete solution is poured.
Website editor-in-chief, civil engineer. He graduated from SibSTRIN in 1994, since then he worked for more than 14 years in construction companies, after which he started his own business. Owner of a company engaged in suburban construction.