Home / Solid fuel boilers
Back
Published: June 26, 2019
Reading time: 5 min
1
2979
Pellet boiler (PC) is a heat generator that is used to generate hot water for heating and hot water needs and uses solid fuel - pellets in granules.
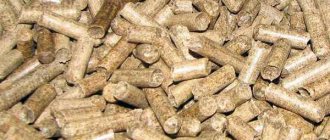
They are made by pressing wood waste: shavings, sawdust, straw, sunflower and buckwheat husks with dimensions of 5-10 mm in diameter and up to 7 cm in length . The calorific value of pellets is 4500 Kcal/kg , which is almost equal to that of low-calorie coal and some wood output.
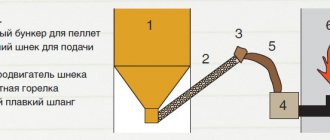
Modern PCs differ from conventional coal or gas boilers and consist of four main components: a boiler with a pellet burner for combustion, a pellet storage hopper, a fuel supply mechanism to the furnace and an accumulator tank.
The installation of a pellet boiler is carried out by a specialized installation organization. It is equipped with an automatic fuel loading system, which allows it to operate autonomously for several weeks.
- 1 Technical conditions for installing a pellet boiler
- 2 Requirements for the premises under the boiler
- 3 Installation location
- 4 Necessary tools and materials
- 5 Installation of a pellet boiler
- 6 First start of the boiler
Preparing the premises
When installing a pellet boiler, first of all you need to properly prepare the room where the heat generator will be located. It is better to use an area away from housing (basements, outbuildings, garages are suitable, sometimes boilers are placed in attics).
If the room with the boiler will be located next to the living rooms, it is better to take care of a waterproof door and cover the floors and doors with washable materials (wood dust and ash will constantly settle on them). The optimal cladding option is standard tiles.
The area of the room for a boiler with a capacity of 15-18 kW should not be less than 2.5-3 sq.m, otherwise it violates fire safety rules. The temperature in the room was not lower than +10 degrees; for this, the walls and ceiling can be insulated with foam plastic (a layer of 10 centimeters is enough). There is no need for radiators.
Humidity above 40% is not recommended, as this will shorten the life of the system: if water enters the room from the roof or through the walls, it will be necessary to cover the perimeter with a waterproofing membrane material.
A few more important conditions when preparing the room:
- Forced ventilation. A hole with a diameter of 12-15 centimeters is sufficient. No particularly complex air conditioning systems are required. You can make a hood to make the room comfortable to be in.
- Having access to a chimney or organizing a new one. For pellet boilers, only a sandwich type chimney (with a layer of insulation) is suitable. The height of the pipe must be at least 5 meters. It is recommended to use a condensate drain to prevent accumulated moisture from interfering with the operation of the oven.
- Availability of electricity supply in the premises. Pellet boilers require electricity to automate their operation. It is also recommended to bring light into the room, which will make cleaning the oven much easier.
General diagram, but more details below
Operating principle of a pellet boiler
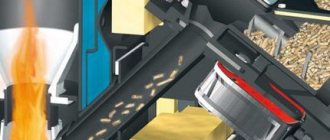
The basic principle of operation of a pellet boiler is a dosed supply of fuel into the combustion chamber in the volume necessary to obtain a certain amount of thermal energy at a given point in time.
Unlike a wood-burning solid fuel boiler, where all the fuel is already in the firebox and burns everything or burns out on one side, fuel is supplied into the combustion chamber of a pellet boiler in portions.
This is done through the mechanism of a pellet burner, which comes in three types:
- explosion or glow,
- retort or mass combustion,
- into a line or conveyor.
Flare burners can be with forced supply of pellets from an auger and with gravity flow, in which the pellets are “unloaded” under their own weight in the working area of the burner in a place free from already burnt pellets.
As for boilers equipped with burners with forced supply of pellets, fuel is supplied to them by auger or pneumatically from the hopper to the burner in portions precisely dosed by the controller. The serving size depends on the temperature you currently want to maintain in your home and the outside temperature.
The burner fan forces air into the combustion zone. The amount of air is also calculated by the controller.
The heat from the burnt pellets is removed by a tubular, plate or smoke-fired boiler heat exchanger, depending on the design of its firebox. The best pellet boilers use vertical tube heat exchangers and horizontal multi-pass heat exchangers.
In general, the concept of “the best pellet boiler” depends on many factors, and under different conditions one or another heat generator will be the best boiler.
For example, in the absence of electricity, the best boiler would be a non-volatile Pelletron pellet boiler. Under these conditions, only the simplest pellet boiler scheme will work.
And in conditions of reduced fuel economy, the best pellet boiler will be an expensive boiler with good automation, which allows optimizing the combustion of pellets.
After the vapors transfer heat to the heat exchanger, they are discharged into the chimney.
Solid fuel pellet boilers with automatic fuel supply
Latest pellet boilers with automatic fuel supply are an excellent choice for country cottages where there is no central gas line. This heating equipment is reliable and durable. The security system here is thought out to the smallest detail, so you do not need to constantly monitor the operation of the heating equipment. When the flame in the burner goes out, fuel leakage is absolutely excluded. If there is a power outage in the house, the boiler will not stop working, using the loaded pellets to the end.
In other words, for pellet boilers, automatic fuel supply is an innovative development that significantly simplifies the operation of this equipment.
Pellet installation: TOP installation rules
If there is no heating in a private house, you can use a pellet system. While multi-storey buildings are already equipped with such a benefit of civilization as heating, this problem remains a problem for a private house or country house, but many solutions can be found that will save the situation. A factor influencing the choice of method for heating a room is the savings of the future heating system. At the moment, the cheapest and most profitable option is main gas, but the only thing is that it is practically not supplied to country houses and private houses. Therefore, their owners have to look for other options, for example, a pellet production plant.
Installing a pellet boiler: step-by-step instructions
Before you start installing a pellet boiler yourself, it is very important to prepare a separate room, floor and walls, in which they must be made of non-combustible material. The floor is best made of concrete or ceramic tiles. Make sure that the distance between the device and the walls is sufficient for servicing and that the surface on which it stands is perfectly level. As for the space between the front side of the unit and the wall in front of it, it must be at least one meter. The permissible temperature in the room where the boiler is located is not lower than +10 degrees.
Another important condition during installation is the correct layout of the boiler room, that is, exhaust and ventilation, since the boiler furnace absorbs a large amount of air during combustion, and all combustion results are distributed outside.
When installing and designing, 6 rules must be observed:
- The diameter of the fitting for the chimney should be smaller than that of the chimney section; it is calculated based on the power of the boiler;
- The chimney must be at least half a meter higher than the roof;
- The chimney must be made exclusively of material that does not burn and does not allow gas to pass through;
- Make sure that the gas outlet is at the bottom of the chimney;
- Be sure to protect the chimney from possible precipitation and provide additional thermal insulation;
- There should be a fabric in the chimney that will close the hole and provide access for timely cleaning from the inside.
If the system for combustion products is not made correctly, this can lead not only to a decrease in the efficiency of the work process, but also to a threat to human health.
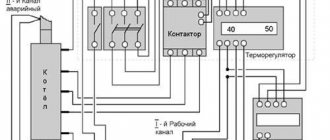
Pellet boiler wiring: basic requirements
Basically, the installation of heating boilers is carried out according to the standard scheme. It includes a number of stages.
It means:
- Installation of diffusion combs;
- Installation of the necessary circuits;
- Installation of fuses;
- Installation of expansion tank;
- Installation of valves;
- Connecting the unit to the supply and return circuits;
- Equip the circuits with refrigerants;
- Check the operation of the installation.
It must be said right away that very high requirements are placed on the piping of the pellet system. This is due to the fact that the moisture content of the fuel must be low, and since it is heated to very high temperatures, quality performance may be impaired and the unit will stop working.
Taking into account fire safety standards, it is better to use non-flammable pipelines to connect a pellet boiler. It is better to avoid polypropylene materials. As practice has shown, such use is dangerous and unprofitable, because the outlet temperature is sometimes much higher than what the material can withstand.
Installation of pellets is quite complicated, so experts do not recommend doing amateur work and entrusting the installation and piping to those who work in this field.
But knowing the main stages of tying and some of the nuances of this matter, you will be able to check the quality of the work of the specialists you called.
High-quality strapping includes the following steps:
- Installation of boilers;
- Installation of a suitable burner;
- Installation of a pellet hopper;
- Connecting the fuel auger;
- Remote control connection;
Once all the previous steps are completed, you can move on to the next ones, which are the main ones.
These include:
- Installation of pressure gauge, automatic air release and ventilation valve;
- Installation of thermal valve sensor;
- Chimney installation;
- Installation of devices that control and support backflow;
- Installation of the circulation pump and thermal head.
The connection diagram is not complicated, all actions are combined. The technician can easily install and configure any boiler. It is strictly forbidden to use a pellet system if the coolant is at a low temperature. A temperature of 55 degrees is called the “dew point”, at this indicator a large amount of condensation is formed, as a result the amount of soot in the heat exchanger will increase, and the equipment will reduce its power.
Chimney for a pellet boiler: the importance of correct installation
Thanks to good draft, the efficiency of the pellet system increases. If the chimney is made, however, it will be able to provide the necessary draft, despite the weather conditions. The appearance of a homemade fireplace can be seen in the photo.
It is very important to remember that the diameter of the chimney pipe must match the outlet pipe.
A device is installed in this chimney that will remove condensate. The correct approach to installing a hood will provide protection from aerodynamic pressure or pipe clogging.
Most often, metal pipes are chosen for the chimney, which are equipped with hatches for cleaning and insulation. Speaking about the gap between the outer surface and the roof, it should not be more than 13 cm. It would not be out of place to say that both a small draft and too much draft are dangerous for a pellet boiler. To prevent this from happening, additional installation of a damper and gate stabilizer will be required.
Setting up a pellet boiler: common mistakes
Those who have not yet gained sufficient experience in installing pellet boilers very often make a number of mistakes.
Here are the most common:
- Failure to install a return water temperature control device will result in increased condensation and the appearance of tar and soot;
- Poor sealing of the boiler, chimney or bunker, which leads to loss of pyrolysis gas and reduced efficiency;
- The lack of thermal insulation when installing the base will lead to the fact that in winter the boiler will begin to release harmful condensate;
- Installation of a bowl not intended for this type of work;
- Small room size, which does not allow removing the auger with pellets and cleaning the hopper;
If you are sure that the installation was carried out correctly and the boiler continues to smoke, goes out or there are unburnt pellets, then after starting the boiler it was not configured correctly or no adjustments were made. Do not rely on the factory settings, they must be adjusted taking into account the fuel and boiler power.
Connecting a pellet installation (video)
Installing and adjusting a pellet system is a very serious matter. You shouldn't do this if you don't have certain skills and knowledge. It is better to familiarize yourself with the theory and check the actions that specialists will perform. Entrust this activity to professionals. The correct approach to installation is the key to proper operation and long service life of the boiler.
We make it ourselves
Having decided to do everything yourself, you should first develop a project. Guided by the drawings, you should purchase everything you need, as well as prepare the tools.
What will you need?
It is better to purchase the most complex elements already assembled. Thus, a factory-assembled pellet burner is always preferable to one assembled by yourself. The same applies to sensors and programmers, a fan, an electric motor for the auger, a grate, two oven doors, if you do not plan to manufacture them yourself. You will also need:
- steel sheet 3mm and 6mm thick;
- steel square and round pipes (wall thickness 4 mm);
- asbestos sheet and in the form of a sealing cord;
- fireclay brick for the combustion chamber;
- round bar (20 mm);
- electrodes.
To carry out the work, you need to prepare a grinder, a welding machine, a ruler, and a drill.
Pellet supply unit
We are preparing a bunker for pellets. We connect it to the auger shaft. The latter can be in the form of a pipe. If a fuel dispenser is provided, install it at the entrance to the auger shaft and connect it to the electric motor.
Heat exchanger
Square pipes are used as front pipes, round pipes are used as connecting pipes. In the front ones, round holes are cut for supply and removal of coolant.
The spatial arrangement of the connecting pipes at the time of welding is carefully controlled. After completing the welding work, check the tightness of the seams by filling the heat exchanger with water.
Case manufacturing and assembly
The body is made from sheet steel 6 mm thick. We provide two doors for subsequent maintenance of the equipment, located in the front and rear parts. We lay fireclay bricks inside the chamber.
We place the heat exchanger inside the housing, providing a small gap between the outer surface of the first and the inner surface of the second. Install the fan at the top of the case.
In many regions, the problem of heating private houses still remains relevant. Of course, the modern market offers a huge range of equipment that uses a wide variety of materials as fuel, be it gas, firewood, electricity or oil, etc. However, access to gas mains and stable power grids is not available everywhere, so solid fuel heating remains the most preferable in many regions.
One of the best options for a solid fuel heating unit is a pellet boiler, which you can assemble with your own hands.
Contents of step-by-step instructions:
Choosing a location for installation
After the room is prepared for the heating system, you need to decide where to install the boiler. Here are some requirements:
- The floor on which the boiler stands must be level. Only a strictly vertical position of the device without any tilt is allowed.
- The platform under the boiler must be strong enough to support the weight of a fairly heavy appliance (some models weigh more than 200 kg).
- The boiler can only be placed on a fire-resistant surface. Tile or concrete are best. Installation on a raised thermal insulation base is allowed.
- The distance between the front wall of the pellet generator and the wall of the room must be at least 1.5 meters.
- The floor under the boiler should not cool down very quickly when the device is turned off, so that condensation or ice does not form.
In order to subsequently use the system as conveniently as possible, the installation of a pellet boiler must be carried out with the expectation that it will need to be constantly approached. A free space of at least 1.5 m is required in front of the front wall of the boiler (for adding fuel, checking the flame, draft and cleaning). If this is not taken into account, then sooner or later it will be necessary to disassemble the device.
How is such equipment connected?
The general installation scheme for heating boilers consists of the following series of stages:
- installation of distribution manifolds;
- installation of appropriate pumping circuits for each user;
- installation of safety devices;
- installation of an expansion tank;
- installation of valves;
- connecting the boiler to the supply and return circuits;
- fill the circuits with coolant;
- testing equipment and checking its operation.
In practice, everything depends on the power of the equipment, the number of consumers, the design features of the boiler, etc. It should be noted that quite high requirements are placed on the pipes of pellet boilers. Firstly, because the moisture content of the fuel must remain quite low, and secondly, because both the fuel and the coolant are heated to very high temperatures. Poor quality piping can lead to violation of the operating conditions of the equipment, and the boiler will quickly fail.
In accordance with fire safety standards, it is recommended to use non-flammable metal pipes for piping pellet boilers. The use of polypropylene structures in practice is not only dangerous, but also unprofitable, since the temperature of the coolant at the boiler outlet often exceeds that of polymer materials. As a result, pipes will need to be replaced in a couple of years.
A pellet boiler is a rather complex device. Experts strongly do not recommend that inexperienced beginners install and repair such devices. However, knowledge of the main stages of tying and some of the nuances of this process will allow you to effectively control the work of the invited installation team.
The diagram shows one of the options for connecting a pellet boiler: 1 - MK pump; 2 — mixing valve MK; 3 - pump TK1; 4 — mixing valve TK1; 5 - water recirculation in TK1; 6 — pump TK2; 7 — mixing valve TK2; 8 — water recirculation in TK2; 9 - hot water pump; 10 - DHW heat exchanger; 11 - supply of running water to the hot water supply system
To piping a pellet boiler you need:
- install the boiler;
- connect the appropriate burner (when using a combined boiler model);
- install a pellet tank;
- connect the auger for fuel supply;
- connect the boiler automatic control panel.
Next you should run:
- Installation of a boiler power safety group, which includes a pressure gauge, automatic air vent and exhaust valve.
- Installation of a thermal valve sensor, if required by the design model;
- Installation of a chimney whose diameter and height meet the technical requirements.
- Installation of a system of devices to maintain reverse flow: two pressure gauges for pressure and return, a circulation pump and a thermal head.
- If there is a high risk of sudden power outages, it is recommended to supplement the system with a suitable UPS model.
The backflow holder allows you to check the heating level of the coolant before it enters the system. Until the return temperature reaches the required level (usually 60 degrees and above), the coolant will remain within the small circulation circle. Only when the coolant heats up to the required level will the thermal head open and cold coolant will begin to flow through it, and the hot coolant will begin to circulate in the main circle.
Under no circumstances should you use a pellet boiler with a low coolant temperature. A temperature of 55 degrees is the so-called “dew point”, upon reaching which a significant amount of condensation occurs. As a result, the volume of soot in the chimney and heat exchanger can increase significantly. The equipment will require additional maintenance efforts and its power will drop significantly.
This is what the combustion chamber of a pellet boiler looks like after exposure to excessive amounts of condensate resulting from errors in installing the recirculation system.
The video shows in detail the process of piping a combined pellet boiler:
Many manufacturers of pellet boilers recommend supplementing the design with a special storage tank that allows heat to be accumulated. In this case, fuel savings can reach 20-30%. In addition, using a boiler prevents it from overheating and ensures the highest possible efficiency.
How to check the quality of the granule and choose it correctly, read our material: https://aqua-rmnt.com/otoplenie/documents/toplivnye-granuly-pellety.html.
What to look for when choosing a boiler unit
Coefficient of efficiency (COP) is the most important point to pay attention to, because
It is this that shows the efficiency of the heating device. Manufacturers usually indicate an efficiency of 85–98%, but in reality it depends on the correct settings, the quality of the granules and design features.
Main characteristics of automatic pellet boilers:
| Burner type | |
| retort (meat grinder) - “omnivorous” vertical burner, but the use of less heat-intensive fuel reduces efficiency | stoker (flare) – horizontally directed burner, efficient, but demanding on fuel quality |
| Heat exchanger material | |
| steel is durable, but (with a thickness of up to 6–8 mm) material subject to burning | cast iron is a durable, but fragile material if used improperly |
| Control system | |
| built-in controller - a control unit located on the boiler controls the processes of loading granules and heating | full automation - options for feeding, ignition, heating, self-cleaning, thermal and photosensor, timer and protection system |
| Maximum power | |
| The boiler power required for heating a house is calculated individually, but in any case it is recommended to buy the device with a small margin of 10–20% | |
| Heating circuit | |
| single-circuit - intended only for heating the space of the house itself | double-circuit – allows you to heat water for sanitary and domestic needs |
It is also worth paying attention to equipping the boiler with a device for swirling fuel gases: thanks to it, part of the heat does not go into the chimney, but is transferred as much as possible to the heating system, which increases efficiency, and also prevents ash formation, because pellets burn out almost completely
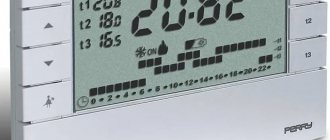
How to choose a room thermostat for a heating boiler and save up to 30% every month
Strapping scheme
Pellet boiler piping diagram (click to enlarge)
Installation of a heat generator consists of the following steps:
- installation of distribution manifold;
- installation of consumer pumping circuit;
- installation of safety devices;
- installation of an expansion tank and shut-off valves;
- connecting the unit to the supply and return circuits;
- starting the coolant in the circuit;
- test launch of the boiler and quality control of its operation.
The installation of a heat generator has its own characteristics. It all depends on the type of boiler, its power, characteristics of the heating system and hot water supply. It should be borne in mind that high demands are placed on the palace. There are reasons for this.
First of all, it should be noted that for the installation to operate, it is necessary to use fuel with a low moisture content. It is also important that the structural elements of the boiler are heated to a high temperature. An incorrectly executed pipeline can cause a malfunction of the heat generator and lead to rapid wear of its individual parts and assemblies.
According to fire safety rules, piping of a pellet boiler must be done with non-flammable pipes. Today, polypropylene pipes are considered the ideal solution. But in practice this is far from the case. At the outlet, the coolant has a high temperature, which significantly exceeds the temperature limits for heating polypropylene pipes. As a result, this leads to rapid wear of the system.
A pellet boiler is a rather complex device; the installation and laying of pipelines must be taken very seriously. In this regard, it is not recommended to do it yourself. Of course, if you have certain skills and knowledge, then anyone can do this kind of work. However, if possible, it is better to use the services of specialists.
To complete the piping of the heat generator, you must perform the following steps:
- install the boiler;
- connect a suitable burner;
- install a bunker for storing a certain amount of pellets;
- install a screw through which fuel will be supplied to the combustion chamber;
- installation of a control panel for equipment operation.
After completing all these steps, you can move on to the next steps:
- install a pressure gauge, air vent and air vent;
- if necessary, install a thermal valve sensor;
- install a chimney whose dimensions will meet all requirements;
- installation and connection of all devices that will support the reverse flow of coolant;
- installation of an uninterruptible power supply, which will prevent interruptions in the operation of the boiler.
Polypropylene pipes in heating systems
Fittings and pipes made of polypropylene (PPR) are popular due to their low cost and ease of installation. They are not subject to corrosion, have smooth internal walls and serve no less than the 50 years declared by the manufacturer.
There are several types of these pipe products, which differ in technical characteristics and purpose. In the construction of heating systems, as well as in the installation of hot water supply circuits similar to them in operational parameters, the following is used:
- Pipes marked PN 25. Products with reinforcement made of aluminum foil. Used in systems with nominal pressure up to 2.5 MPa. Operating temperature limit +95º C.
- Pipes marked PN 20. Reinforced version used in DHW branches of double-circuit heating boilers. They will work for the period stated by the manufacturer if the coolant temperature is not higher than +80º C and the pressure is not higher than 2 MPa.
- Pipes marked PN 10. Thin-walled polymer products. They are used if the boiler supplies coolant to the water heated floor system. Operating temperature not higher than +45º C, nominal pressure up to 1 MPa.
Polymer pipes are suitable for all known installation methods: open and hidden. But this material has a high coefficient of thermal expansion. When heated, such products begin to slightly increase in length. This effect is called thermal linear expansion and must be taken into account when constructing pipelines.
The boiler should be tied with polypropylene pipes, which are marked as operating class 5, operating pressure of 4–6 atmospheres and nominal pressure PN of 25 and above
To prevent destruction of polypropylene heating pipelines, compensation loops can be installed. But it’s easier to take multilayer pipes, the reinforcement in which is specifically designed to compensate for this stretching. A layer of foil inside PN 25 polypropylene pipes reduces their thermal elongation by half, and fiberglass by five times.
Image gallery Photo from Welding of polypropylene pipes with a diameter of 63 mm or more is carried out using the butt method using a specialized device. The advantage of butt technology is the absence of connecting parts
Welding of wide pipes for assembling pipelines of single-pipe systems and risers of two-pipe circuits can be carried out using couplings, if available.
In the assembly of pipelines with a diameter of up to 63 mm, socket and coupling connections are used. If it is necessary to provide a threaded connection, a coupling with a socket is used
Connecting pipes with a diameter of up to 40 mm is usually carried out using a manual welding machine. Welding of pipes larger than 40 mm is performed using a device with centering devices
Large diameter PP pipe welding machine
Features of welding wide plastic pipes
Connection of narrow polypropylene pipes
Apparatus for connecting small diameter PP pipes
Features of installation of PPR pipelines
Fittings with polypropylene pipes into a single heating system when piping the boiler are connected using the threaded method, as well as by cold or hot welding. Screwing on is much more convenient, but because of them, assembling the system will cost significantly more. True, if you want to connect a polypropylene pipeline to a metal counterpart, you cannot do without threaded fittings.
An extensive line of fittings is produced to form linear and nodal connections of polypropylene pipes
“Hot” welding is done with a special apparatus (soldering iron, “iron”). The pipes are heated using a suitable nozzle to a melting temperature of 260 degrees, and then the parts with softened edges are pressed against each other. The result is a reliable and monolithic connection.
Before welding, the foil must be cleaned. Otherwise, it will interfere with the connection of polymer products, making the seam fragile. With fiberglass, these unnecessary steps will not be required. It melts easily along with the plastic.
PPR soldering technology is extremely simple, all work can be done with your own hands (+)
Cold welding involves the use of a specialized adhesive composition. In recent years, this method has rarely been used, because the result is not reliable enough.
In heating systems, threaded connections should be sealed with paronite or high-temperature sealant. Do not forget about the fairly high operating temperature of the coolant.
There is one more nuance of using polypropylene for piping a heating boiler. Antifreeze and plastic are a pretty bad combination. It is recommended to use water as a coolant for a system of plastic pipes.
Design and principle of operation of pellet boilers
To assemble such a solid fuel installation yourself, you will have to work hard and first you need to understand how it works and what it consists of. The heart of the pellet unit is the burner, which performs almost all the main functions and is connected to the boiler controller, acting on its commands. There are two types of pellet burners:
The difference between them is as follows. A retort pellet burner is a reservoir (retort) filled with fuel from below using a screw, and air is supplied to the combustion zone by a fan through holes on the sides of the bowl. During operation, the flame column is directed upward, which should be taken into account when designing the boiler. The torch burner is a tube, it is also a combustion chamber, in which a pellet auger passes from the end, and the burner is a combustion chamber, from the other comes a powerful flame torch directed horizontally. This is achieved by forcing air into the chamber from the same side as the fuel.
Note. Flare burners are used more often than retort burners, since the latter have problems with feeding low-quality pellets. To assemble a boiler system with your own hands, it is also advisable to use a torch burner; below we will explain why.
In the future, we will consider operating the unit with a flare burner, as this design is more suitable for our purposes. Thus, a tubular combustion chamber is located inside the boiler, and the outer part of the burner consists of a housing with a feed screw and a fan for forcing air. To operate the electric ignition and maintain the flame, the project also includes a control board, a photosensor and an incandescent element. At the top of the housing there is a fuel supply pipe.
The process is as follows: at the command of the controller, the auger delivers a small amount of granules into the chamber and stops. The glow plug turns on and the fan turns on at the same time, causing the fuel to ignite. The appearance of a stable flame is detected by a photosensor and the control unit notifies about this, and the latter turns off the light element. Then normal operation begins, the screw conveyor resumes operation and the fan pumps the required amount of air. At the command of the same controller, pellets are poured through a nozzle into the burner, which is supplied there from the loading hopper by an external screw conveyor.
Note. Many manufacturers use a fuel hopper installed directly above the burner nozzle, which allows you to pour pellets yourself without an additional conveyor.
Now it’s worth considering the design of the pellet boiler as a whole. The design of the unit housing is typical for all solid fuel systems; This is an inner chamber made of steel or cast iron, enclosed in an outer shell filled with water - a water jacket. To remove heat from smoke, the project can provide two types of heat exchangers:
In a water-tube heat exchanger, the refrigerant flows through pipes washed by combustion products and giving them its heat. But such a device is rarely found in solid fuel boilers, usually the opposite is true - flue gases pass through pipes, releasing combustion energy into the water jacket, this is the chimney heat exchanger. In order for the boiler to operate efficiently, the heat exchanger is made with two or three passes. This means that the vapors passing through the fire pipes reverse their direction two or three times, making 2 or 3 movements. This allows them to heat the water jacket and the chimney outlet as much as possible to achieve a temperature of no higher than 150 ºС.
The operating process is as follows: the burner burns fuel and heats the walls of the chamber and heats the coolant. In turn, combustion products, under the influence of natural draft and fan operation, pass through the flame pipes, also transferring heat to the water jacket, and enter the chimney. The burning rate is regulated by the controller based on a signal from a temperature sensor immersed in the coolant at the outlet of the unit. This is the operating principle of pellet boilers, which allows you to automatically regulate the combustion process and, if necessary, increase or decrease the supply of fuel and air to the burner.
Alternative options for DIY
In addition to solid fuel and electric boilers, a number of alternative heating units are suitable for self-production:
- Induction boilers
They are transformers consisting of a primary and secondary winding. In such a boiler, the electricity on the external winding is converted into an eddy current, and the created magnetic field is transferred to the internal winding, which transfers energy to the coolant.
- Condensing boilers
They retain the thermal energy of condensate, therefore they are considered more efficient than gas and even solid fuel ones. Steam condensation occurs in a heat exchanger with a special design - it is this that provides such boilers with a 15-20% efficiency advantage over traditional gas equipment.
- Liquid fuel boilers
Such units evaporate waste and then burn its vapors. The energy thus obtained is transferred to a heat exchanger, which heats the heating agent of the heating system. Equipment of this type has two significant disadvantages - low efficiency and a large amount of emissions into the atmosphere.
- Combination boilers
This equipment is universal in use, but to manufacture it yourself will require remarkable skill and excellent knowledge of the operating principles of various types of heating equipment. The individual components of such units can be quite expensive, but in general, combined boilers can pay for themselves in no more than 5-6 seasons.
Required materials and tools
If you plan to install and then connect a pellet boiler yourself, without involving a specialist, then first you need to take care of the availability of the necessary materials and tools. For work you will need:
- The very structure of the pellet boiler and fuel bunker.
- Metal pipes, distribution tank, circulation pump, air valves and shut-off valves for system piping.
- Heat meter, pressure gauges, safety valves, flow meters (these devices do not need to be installed, but they make the boiler operation easier and safer)
Expansion tank
To heat a small one-story house, no additional devices are required, except for an open-type expansion tank, which is installed immediately after the boiler.
A membrane expansion tank is installed in a closed heating system. In this case, it contains an air space that contracts when water or other coolant is heated
In order for the system to work normally without creating excess pressure, it is important not only to connect the heating boiler correctly, but also to calculate the volume of the tank - at least 10% of the total volume of the coolant
The expander is installed with the hose facing up so that the air entering the water can escape. To insert the tank, select a straight section of the pipeline in front of the circulation pump.
A few words about the chimney
The efficiency of a pellet boiler largely depends on good draft. A properly designed chimney will provide sufficient draft in any wind and air temperature. First of all, remember that the diameter of the chimney must be equal to the size of the outlet. In such a chimney it is necessary to install a condensate drainage device. A properly installed hood will not create aerodynamic draft and will not block the pipe section.
The photo shows two options for installing a chimney for a pellet boiler. The wrong version is shown on the left, the chimney is installed correctly on the right
For chimneys, metal pipes are usually used, which should be equipped with hatches for cleaning and also carefully insulated. The distance between the outer surface of the chimney and the ceiling and roof elements must be at least 130 mm. It should be remembered that too much draft and too little draft are dangerous for pellet boilers. To fix this problem you will need a gate damper or traction stabilizer.
Requirements for the premises under the boiler
The PC is installed in a separate building or annex. Having a PC with a power of more than 30 kW, it is located in a separate building - the oven.
To organize its operation, boiler owners draw up regulatory documents on operation and fire safety.
Size to withstand
Basic requirements for placement:
- The floor for installation must be made of non-combustible materials: concrete or sheet metal.
- The base under the PC should be reinforced concrete with a height of 10-20 cm.
- Emergency and operational passages must be provided, with a distance of at least 1 m between the boiler and the walls of the building.
- The room must be dry and heated, with an internal air temperature above + 10 C.
- The power supply and exhaust ventilation in the building must be calculated based on the power of the PC; the data can be clarified from the technical and design documentation of the boiler room.
- If the boiler room is installed in a separate room, then the heating networks to the heating facility are laid underground, with laying below the soil freezing level or through the air. In both cases, the heating network must be well insulated from heat loss to the environment.
- The height of the chimney must be at least 5 m and protrude at least 0.5 m above the roof level; It is recommended to install a traction stabilizer or a conventional rotary damper.
- The chimney diameter is calculated based on the boiler power. For pellet boilers it must be at least 150 mm.
- Installation of a condensate siphon is required.
- The roof has been washed by a master; the gap is filled with non-flammable mineral wool.
What is a pellet boiler for heating a private country house?
A pellet boiler is a type of solid fuel boiler that runs on special combustible granules - pellets. Fuel pellets have a number of advantages:
- Budget.
- Convenient storage. Fuel pellets do not take up much space. Their length is 7 cm and diameter is 5-10 mm.
- A few bags of fuel will last you all winter.
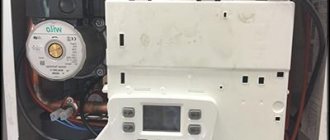
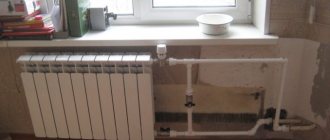
Photo 1. Pellet boiler installed inside. A supply of pellets for burning in the apparatus is stored nearby.
Unit design and operating principle
A pellet boiler consists of 3 elements:
- from a tank equipped with a burner for burning fuel;
- from the convective system in which the heat exchanger is located;
- from a bunker containing a combustion reservoir.
The device requires a nozzle for timely refilling. The pellet boiler is equipped with a control unit, with the help of which the operating parameters of the device are set.
The heat exchanger is made of steel or cast iron. Foreign manufacturers prefer to use cast iron. It does not rust, but this material does not react well to sudden changes in temperature and weighs a lot. In Russia, models are equipped with steel heat exchangers. They quickly respond to temperature changes, weigh little, but are susceptible to corrosion. Therefore, most manufacturers coat boilers with an anti-corrosion agent.
The granules are placed in the boiler firebox, where they are completely burned. Due to this, the coolant is heated, which distributes heat throughout the room.
The loading time for pellets depends on the size of the hopper. Periodically it is necessary to clear the channels of accumulated emissions.
Advantages
- The operation of the device is environmentally safe. Combustible materials do not contain impurities.
- The device is cheap. Pellets in the boiler burn completely and are consumed in minimal quantities.
- The range of solid fuel boilers is varied.
- The operation of the device is automated.
- With proper operation, the boiler will last for many years.
Flaws
- High price. Although the pricing policy of many manufacturers is democratic, not everyone can afford to buy a pellet boiler.
- Some models of pellet boilers are powered by electricity, so you should take care of a power source or generator in advance.
Application of buffer tank
The wiring diagram for a solid fuel boiler with a battery tank is not widely used. It is quite cumbersome, but allows for more correct heating operation. Its advantages:
- Stabilization of temperature in the system due to the increased volume of water in the circuit;
- Possibility of reducing the number of approaches for adding fuel to the boiler furnace due to the accumulation of excess heat in the storage tank;
- Possibility of accumulating clearly unnecessary excess thermal energy when using too powerful a boiler or excessive stacking of firewood.
The heat accumulator circuit has one drawback - it is necessary to allocate space for the device itself. The volume of the container used reaches several hundred liters, so you will need free space to place the tank.
There are many schemes for connecting buffer tanks. The simplest of them involve the use of the same coolant in the boiler and in the heating system. A more efficient scheme is using a three-way valve with a thermostat, which ensures a more uniform and economical consumption of thermal energy from the buffer tank.
Schemes with two circuits are also used. In this case, heat accumulators of heating systems are equipped with heat exchangers connected to solid fuel boilers. Heat exchangers heat the water in the tank, which is the coolant of the heating circuit. This option is distinguished by its efficiency and more uniform heating.
This scheme with a buffer tank is gentle for solid fuel boilers that are not designed for high heating pressure. And in this case, the coolants will be separated, the pressure in the tank and in the radiators will not in any way affect the pressure in the boiler itself and the heat exchanger.
Using a single-circuit solid fuel boiler often forces you to look for schemes for organizing hot water supply. For these purposes, you can adapt a storage or instantaneous water heater. It is also possible to use a more advanced heat storage tank with a built-in DHW circuit coil. This piping scheme will be an optimal and profitable solution, as it will solve the problem with hot water supply.
Step-by-step installation description
Experts do not recommend installation and wiring of pellet heating boilers according to Internet diagrams to beginners who have never encountered heating and plumbing systems. But knowing how installation is carried out and what nuances are important to observe in the work will allow you to control the work of contractors.
The system is installed according to the following scheme:
- Installation of main equipment:
- Installing the boiler in a suitable location.
- Installing the fuel tank away from the boiler.
- Installation of pellet screw feeders in the bunker.
- Fixing the pellet supply pipe with clamps.
- Installation of burner, suction pipe and hose.
- Pellet boiler pipes.
- Filling the system to the specified operating pressure.
- Connection to the chimney. The cross-section of the chimney must correspond to the cross-section of the boiler chimney. Natural draft must be at least 12 Pa.
- Installation of additional elements, such as safety valves (they are not necessary, but increase practicality and safety of use).
- Electrical connection. If there is a greater risk of regular power outages, it is recommended to equip the system with a suitable UPS model.
Attention: the article presents a general installation diagram. Installation details may vary depending on the specific model. A more detailed diagram is given in the instructions, which must be completed when purchasing the boiler.
EXAMPLES OF THEMATIC ILLUSTRATIONS:
Installation of the boiler base and fuel tank
Two options for connecting to the chimney
Pellet boiler connection diagram
The connection diagram for a pellet boiler to the home heating system is identical to the connection diagram for any heat generator, be it a gas boiler or an oil boiler.
The lower pipe of the boiler cuts off the return, and the upper pipe cuts off the supply. The combustion of pellets in the boiler burner is strictly controlled by two factors:
- filling with auger,
- air supply through a fan.
Therefore, overheating of the boiler in normal mode is impossible. This means that there is no need to tie the boiler supply with metal. The pellet boiler design with polypropylene or metal-plastic pipes has worked great for many owners for many years.
And in case of emergencies caused by accidents in power lines or failure of the boiler controller, it is worthwhile to provide for an emergency shutdown of the fuel and air supply to the boiler combustion chamber. The amount of pellets that will be in the boiler firebox during an accident can no longer cause overheating of the coolant in the heating system.
Naturally, to power the boiler there must be a safety group with a pressure gauge and an emergency valve.
With such simplicity of piping, the installation of pellet boilers can be carried out not by a specialized organization, but by any licensed construction organization.
Just don’t trust the installation of pellet boilers at the first “shabashniks” you encounter. This is a heating device designed for burning wood, which is a source of increased fire hazard. This means they can install a pellet boiler. But setting it up and ensuring fire safety is almost impossible.
Production technology
For any owner, the idea of turning waste into fuel, or even making money from it, is attractive.
In principle, it is possible to make pellets with your own hands, but you should not expect industrial quality from them. It is unlikely that you will be able to make an imported pellet boiler using homemade pellets work, but a homemade or solid fuel unit does an excellent job with them. Equipment necessary for the production of pellets from sawdust or wood chips
The wood pellet production technology consists of several successive stages:
- Large crushing of raw materials. Fragments should be no more than 1.25 cm3. This is preparation for better drying. For this operation you need a crusher.
- Drying in a drying chamber. The raw materials are brought to a moisture content of 8-12%. There are different types of chambers, some use direct heating (hot air from the firebox is supplied to the drying chamber), others heat the heat exchanger, and from it the air in the dryer is heated. The second option is less effective, but in this case the possibility of soot getting into the raw materials is excluded. Even a small amount of soot can stain wood chips. As a result, the quality of the pellets can be classified as “white” (if the appropriate raw materials were used), and the color – gray.
- Fine crushing. The dried wood is fed into crushers (usually hammer type). The resulting wood fragments measure more than 1.5 mm for white and gray pellets, and 4 mm for industrial ones.
- Hydration. Wood fibers with low moisture content will not be able to stick together. That's why they are moisturized. If pine or spruce waste is used, water is injected. Raw materials from hardwoods - oak, birch, beech - are processed with hot steam.
- Pressing. There are presses of different designs working here. The raw material is pressed through a matrix (flat or round), which forms cylinders of given sizes.
- Cooling. Under the influence of high pressure, pellets heat up to 70-90°C. In this state they crumble easily, so they are left to cool.
- The finished granules are sifted (from the remnants of non-glued particles) and packaged.
As you can see, the process is multi-stage and requires quite a large amount of equipment. However, if cheap or free raw materials are available, it is profitable to make pellets yourself.
Features of straw pellet production
Making pellets from straw is easier. It initially comes dry, so there is no drying stage. If there is wet straw, it is dried naturally in the sun, and then crushed and mixed with dry straw, thereby achieving the required moisture content of the raw material before pressing.
Grinding is also easier. This requires a straw cutter, which immediately cuts the raw material into fragments of the required length. So the grinding also takes place in one go. After bringing the mass to the required humidity, it is pressed through a press. And here everything is simpler: since the raw materials are softer, less effort is required. Less powerful equipment means lower costs. At the same time, the line productivity can be high.
As you can see, less equipment is required for the production of straw pellets, and less time and energy is also required.
Setting up a pellet boiler: common mistakes
Those who have not yet gained sufficient experience in installing pellet boilers very often make a number of mistakes.
Here are the most common:
- Failure to install a return water temperature control device will result in increased condensation and the appearance of tar and soot;
- Poor sealing of the boiler, chimney or bunker, which leads to loss of pyrolysis gas and reduced efficiency;
- The lack of thermal insulation when installing the base will lead to the fact that in winter the boiler will begin to release harmful condensate;
- Installation of a bowl not intended for this type of work;
- Small room size, which does not allow removing the auger with pellets and cleaning the hopper;
If you are sure that the installation was carried out correctly and the boiler continues to smoke, goes out or there are unburnt pellets, then after starting the boiler it was not configured correctly or no adjustments were made. Do not rely on the factory settings, they must be adjusted taking into account the fuel and boiler power.