Insufficient thickness or poor choice of wall material often leads to undesirable consequences - the walls are cold, moisture condenses on them, heating costs become too high.
The solution to the problem is to insulate the walls.
The event is not too complicated, but it requires an understanding of the meaning of the actions, otherwise you can achieve the completely opposite effect.
Moreover, choosing the most correct method is sometimes impossible, but somehow you need to get out of the situation. Let's try to figure it out.
Advantages and disadvantages of expanded polystyrene
The technical characteristics of expanded polystyrene indicate the maximum suitability of the material for internal insulation:
- Light weight. The material is 98% gas.
- Vapor tightness. Polystyrene is an excellent vapor barrier, and extruded polystyrene foam - EPS - almost completely eliminates the penetration of water vapor through its thickness.
- Low thermal conductivity. The presence of air bubbles ensures high heat retention.
- Lack of response to moisture.
- Durable, easy to cut, produced in an easy-to-work form - slabs.
- In terms of fire resistance, the material is neutral; it burns only in the presence of an initiating flame; it itself cannot be a source of fire.
- Low price (for XPS this point is not entirely correct, but the quality of the material is worth it).
There are also disadvantages:
- With sufficiently high strength, EPS is fragile and breaks or crumbles under deforming loads.
- Does not withstand contact with solvents such as gasoline or acetone.
- When heated above 60 degrees, PPS can release phenols.
- It is afraid of fire, therefore it is not recommended for indoor installation.
Comparison of thermal insulation materials
The last point is quite significant, since the insulation of external walls is carried out around heating radiators, which can significantly heat the insulation areas located in the immediate vicinity. Another disadvantage of PPS is its vapor permeability, but in the case under consideration this is precisely an advantage.
Do you need hydro- and vapor barrier?
The presence of waterproofing in a wall pie using EPS is not required . Vapor barrier is present in the form of the insulation itself, which in itself is an excellent insulator, although in exceptional cases, when the room has a high content of water vapor, a layer of vapor barrier is laid on top of the EPS layer.
At the same time, simultaneously with laying a vapor barrier or insulation, it is necessary to take care of high-quality ventilation in order to organize the replacement of internal air and the removal of steam to the outside. Then the house will become much more comfortable, in addition, the passage of vapors through the cake material will be reduced.
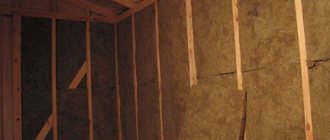
Preparing the wall and installing the sheathing
Before starting work, it is necessary to prepare the surface of the brick (or other) wall. It is necessary to remove old paint, peeling plaster, and clean from oil stains or other contaminants. Then you should evaluate the quality of the surface and, if necessary, apply a leveling layer of plaster. After it has cured, you can begin installing the sheathing.
The location of the sheathing bars is perpendicular to the future sheathing strips - for vertically located wall panels (for example), the sheathing is placed horizontally and vice versa. The pitch of the bars corresponds to the size of the insulation boards in order to avoid wasteful loss of material.
The thickness of the bars should correspond to the thickness of the PPS or be slightly larger. It is recommended to coat the bars with an antiseptic to protect against mold or mildew.
Installation of wooden sheathing
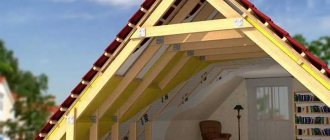
Preparing the attic roof for insulation with penoplex
Attic floors with different layouts also have different insulation laying patterns. For example, an inhabited attic is insulated according to the same scheme as the roof. The material is placed in the space between the rafters and attached to the sheathing. In the classic version of the attic, which has both vertical and inclined sections of walls, the process becomes somewhat more complicated.
Putting up the frame
First of all, you will need to assemble the frame of a vertical section of the wall, on which, in fact, the insulation and cladding of the room will be attached. It can be made from a steel profile, but a regular wooden beam is best suited. Initially, a horizontal cross member is attached at the level of the future upper edge. It is stuffed from pediment to pediment along the entire length of the slope. Vertical posts are attached to the crossbar in 0.6 m increments.
Advice! The transverse size of the beam is chosen equal to the thickness of the first layer of future insulation.
According to reviews, it happens that craftsmen tend to simplify the process and lay sheets of polystyrene foam directly on the rafters, directly on the roof lining. You can't do this. According to the execution technology, in order to insulate the attic with penoplex, it is necessary to sew additional sheathing on the inside of the slope. Thus, an air channel will appear between the roof structure and the attic insulation. This will remove water vapor from the space between the attic insulation and the roof frame.
Vapor barrier for future attic
The next step is to stretch a vapor barrier film over the rafters and the assembled frame. If penoplex is laid directly between the rafters of a cold roof, then the sheathing is sewn end-to-end with a board, or moisture-resistant plywood is used, and the film is sewn directly to the sheathing.
The fabric is stretched overlapping and glued with tape. The film is needed primarily to protect the wooden frame parts from moisture.
Characteristics:
- has a small weight,
- standard overall dimensions,
- quickly installed,
- environmentally friendly,
- has high resistance to mechanical stress,
- service life more than 50 years.
To fasten the sheets, you can use foam adhesive, mortar or special-purpose plastic dowels. It will be very convenient to lay thermal insulation with locking grooves that do not create seams.
Proper wall insulation with Penoplex and the technology for carrying out the work will help determine the types of materials, taking into account their compatibility, quality and price. Since installation work using expanded polystyrene is most often carried out outside, the moment of selecting everything necessary is very important for the long service of the entire insulating layer.
Useful video
Video instructions for insulating walls with polystyrene:
Increasingly, modern builders recommend that buyers use penoplex to insulate their homes.
Penoplex with penoplex glue gained its popularity not so long ago, because it was invented only in the middle of the last century, but during this time it has spread throughout the world and began to occupy a position on a par with mineral wool, ordinary polystyrene foam and other well-known materials for thermal insulation.
Penoplex in original packaging
However, you can often hear that there is harm from penoplex, and very significant. Is it really? Let's try to figure it out.
Insulation of walls using the electric floor method
If you decide to abandon the installation of extruded polystyrene foam, replacing this method with wall insulation using the electric floor method, you must weigh all the positive and negative aspects of this technology. Experts say that good heat transfer cannot be achieved. The heating components will be located in the wall, and the heat will have to work its way through the trim or drywall. In this case, the space only a few tens of centimeters from the wall will warm up, while the heated air will immediately begin to rise upward. The result will be the need to install an additional electric heating device, which will entail costs.
If wallpaper and decorative tiles are pasted on the walls as a finishing touch, you may encounter the fact that the materials will move away from the surface under constant heating. With such a heating arrangement, it will not be possible to place furniture or electrical equipment against the wall, as they will quickly fail and, in addition, will block the air flow.
Having installed such a heating system, you will be faced with impressive heat losses, because energy will go not only inside the room, but also outside the house. Foil thermal insulation is placed under the infrared fabric (to prevent such phenomena), but this only aggravates the situation, and heating is even reduced. Such walls, where the electrical cable is laid, can no longer be used for hanging equipment and furniture. The same condensation will form between the warm and cold surfaces of the wall, which cannot but become a serious obstacle to installing such a heating system.
Areas of application
Expanded polystyrene is a building material that has a wide range of applications:
- In renovation work as external and internal insulation of buildings, houses and apartments.
- During the construction of bridges and floating structures.
- In gardening.
- In the production of building materials and furniture.
- In architecture to create decorative elements.
- For packaging equipment and food products.
- In mechanical engineering. Polystyrene foam is used to create structures for casting.
Construction
In construction, expanded polystyrene is used to insulate roofs, water pipes, floors and walls.
To create a high-strength thermal insulation layer with low water absorption, extruded polystyrene foam is used.
What kind of material is this?
At its core, expanded polystyrene is foamed, i.e. saturated with gas, polystyrene and belongs to a large group of similar polymers, collectively called polystyrene foam. In this case we mean expanded polystyrene foam. There are 2 types of such plastic: pressed and extruded polystyrene foam. In the practice of private construction, the insulation of a residential building from the inside is carried out with extruded (so-called unpressed) polymer, brand PSB.
The main positive qualities of the material include the following characteristics:
- excellent thermal insulation properties;
- sufficient resistance to deformation;
- operating temperature in the range from – 50º to + 72-78 ºС;
- water resistance;
- low specific gravity;
- ease of processing and installation.
Low thermal conductivity allows you to reduce the required thickness of the insulation. It has been established that the same protection is provided with the following thicknesses of common materials: polystyrene foam - 20 mm, wood - 16-28 mm, brick - 36-40 mm, mineral wool - 37-39 mm.
What limits insulation with extruded polystyrene foam in living rooms? The risks of internal insulation with foam plastic are primarily associated with dangerous emissions for the human body when heated above 80º C. Combustion of the material is especially dangerous, because The toxic gases released can cause serious poisoning of the body.
That is why, when furnishing your home or apartment, it is necessary to use polystyrene foam from well-known manufacturers, where the content of harmful components is minimized, and also not to place such insulation near heating devices, stoves, fireplaces, etc. It cannot be used in steam rooms of baths and saunas.
The disadvantages of any foam plastic include low mechanical bending strength and the ability to crumble under mechanical stress, which requires appropriate protective covers. In addition, the material is impermeable to steam, and therefore condensation on the surface of the polymer should be avoided.
To insulate walls with extruded polystyrene foam, several types of polymer can be used: Primaplex, Teplex, TenoNikol, Bateplex and others. Foamed plastic is sold in the form of slabs (sheets) of different thicknesses and sizes
When choosing a material, special attention is paid to the density of the foam, because... this characteristic determines the strength and thermal insulation properties, and they have an inverse relationship
Insulation with expanded polystyrene from the inside is usually provided by a polymer with a density of 25 kg/m³ (PSB-S-25, where “C” means self-extinguishing). The question of how to attach the insulation to the wall is solved with the help of an adhesive composition specially designed for this purpose.
Features of the material in comparison with other types of insulation
The main feature of extruded polystyrene foam can be called its production technology. It differs significantly from the production of conventional polystyrene foam, which is why it has a number of significant differences that prevail over its predecessor:
- The structure of the material consists of a solid mass of cells filled with gas molecules, therefore the density and strength of the panels is much higher than that of polystyrene foam; Thanks to its molecular structure, finishing with extruded polystyrene foam allows you to retain heat inside the building much longer - its service life is longer; Excellent frost resistance, low coefficient of vapor permeability and thermal conductivity increase its service life outside the house; In comparison with mineral or glass wool, insulation of facades can be done without protective clothing. The material does not pose any harm to humans.
Thanks to this video, you can learn how to distinguish high-quality material from counterfeit.
Analytical comparison table of conventional polystyrene foam with extruded polystyrene foam:
Comparison criteriaExtruded polystyrene foamPolyfoam Moisture absorption, for 30 days, m3 0.44Moisture absorption per day, m3 0.22 Vapor permeability, mg/m, h, Pa 0.02—Thermal conductivity, W/ (m*K) 0.03-0.0350, 035-0.45 Bending strength, kg/cm 0.5-0.90.08-2 Compressive strength at 10% deformation, N/mm2 0.26-0.60.06-0.3 Sheet density, kg/m3 29-4615-30 Operating temperature interval, C -45..+70-50..+70
Is it worth it to insulate a house with polystyrene foam?
The main advantages of polystyrene foam include:
- Decent thermal insulation properties;
- Light weight - foam boards are easy to mount on the wall, you can even use glue for this purpose;
- Polystyrene foam has good soundproofing qualities, which makes it possible to provide high-quality soundproofing of rooms;
- The material is easy to process. Foam plastic is cut with a string and an ordinary knife; using a special device, you can create decorative elements for facades from it;
- Foam is waterproof, so it is not afraid of atmospheric influences;
- It has a low price, much lower than other thermal insulation materials.
You should know that polystyrene foam is different from polystyrene foam.
The higher the density of the foam, the less air there will be inside it. Consequently, as the density of the foam increases, its thermal insulation properties decrease, but its strength to mechanical damage increases.
Is extruded polystyrene foam harmful to people?
We suggest you find out whether extruded polystyrene foam is harmful to human health? To do this, let’s break down the composition of the material into its components and consider the main dangerous component – styrene.
- Styrene – 0.05%. This figure is tens of times less than what is allowed by sanitary standards for residential premises in the Russian Federation. At the same time, the maximum permissible concentration of styrene in the EU countries is at the level of 0.002 mg/m3. But, do not forget that styrene tends to accumulate in the body. It demonstrates a cumulative effect (concentration increases 600 times over 20 years). And styrene is released already at a temperature of 25°C.
- The damage to polystyrene foam when exposed to high temperatures is another important aspect. In this case, toxic substances are released: vapors of styrene, benzene, carbon monoxide, carbon dioxide and soot. In this case, the combustion temperature of styrene is 1100°C. At this temperature, even metal melts, which leads to the destruction of the building.
- Time is another indicator. The decomposition period of expanded polystyrene is more than a century. During intensive use (20-25 years), its harm to health increases. After all, during this time, about 60% of the decomposed styrene is released.
- Oxygen, upon interaction with which formaldehyde and benzaldehyde are formed.
Why is styrene harmful?
- phenylethylene (styrene) accumulates in the liver and is not excreted from the body;
- adversely affects the functioning of the heart;
- exposure to styrene is critical for pregnant women, in particular for the fetus;
- entails irritation of the mucous membranes and respiratory tract.
Thickness and density for home insulation
First of all, polystyrene foam is distinguished by density. Based precisely on the nuances of this property, the foam grades were assigned: 15 - the loosest polystyrene, the most fragile and least thermally conductive; 25 – has sufficient density, is easy to use, and is used for construction work and insulating a private house with foam plastic; 35 is a very dense foam that can be safely used in areas where some load is expected.
The density mark number is the thickness of the foam board in millimeters.
In addition to the above standards, foam sheets can have a density of 100 mm. Ten centimeters thick! This is already an almost ready-made fairly strong wall. This type of foam is used to create special conditions in a building. For example, if a full-fledged cellar cannot be dug due to the proximity of groundwater, an above-ground storage facility for products is built with decently thick walls, supplemented with foam and paste protection.
Is polystyrene foam harmful or not to human health?
What insulation should you use to avoid turning your home into a time bomb? After all, any thermal insulation material, with the exception of moss or flax, which is used to insulate wooden log houses, is a synthetic material, which means it contains toxic substances that are potentially dangerous and can harm human health. Particular discussions among users are caused by such questions as “is polystyrene foam harmful as insulation indoors” and “does the harm of extruded polystyrene foam exceed the harm caused by compressed polystyrene foam (ordinary polystyrene)”?
Is the buyer doing the right thing by giving preference to such an easy-to-use, relatively cheap and popular polystyrene foam?
It is dangerous for health to insulate a balcony from the inside with polystyrene foam
Pros and cons of insulation from the inside
Before doing the work yourself, you need to study all the nuances. Thermal insulation of indoor walls is not the right solution from the point of view of such a science as heating engineering. This method becomes only acceptable if it is impossible to use another. The disadvantages of insulating the walls of a house from the inside are as follows:
- reduction of usable area of internal premises;
- the measures taken do not prevent the walls from freezing, and therefore do not protect them from destruction;
- the point of dew (condensation) appears inside the load-bearing wall of the house (there is a high probability of moisture accumulation).
The dew point is at the junction of the wall and the foam, so to avoid condensation it is extremely important to apply a vapor barrier
Insulation with foam plastic from the inside can only be done if there is a serious need for it. Most often, DIY work should be done in the following cases:
- Thermal insulation of premises in a multi-storey building. To insulate an apartment with polystyrene foam from the outside, you will need to hire industrial climbers. Such services are expensive, so an alternative option is to use protection from the inside.
- Insulation of house walls with new cladding. When doing work with your own hands in a private house, it is necessary to take into account the condition of the facade finishing. If the external work was completed relatively recently, dismantling the cladding is not practical from an economic point of view. In this case, it is also possible to fix the thermal insulation from the inside of the walls.
Internal and external thermal insulation - which is better?
In practice, internal and external (external) methods of wall insulation are used. If we consider both methods from a physical point of view, we can get an amazing conclusion: only the external method can rightfully be called insulation.
There are several options for insulation:
- mineral wool;
- Styrofoam;
- penoizol;
- extruded polystyrene foam;
- penoplex;
- polyurethane foam.
IMPORTANT!
The reason for cold walls is the lack of thermal energy to warm them up due to large heat losses. If the insulation layer is located outside, then the wall is separated from the external space, causing heat loss to be significantly reduced.
The temperature of the inner surface of the wall rises, eliminating the possibility of moisture condensation, and the dew point - the area with a temperature that causes condensation - is moved outside the wall. Thus, all problems with heat retention and wetting of the wall material are solved.
Insulation from the inside works in the opposite way. A layer of insulation cuts off the wall from contact with the warm air of the room. It becomes even colder, the outside temperature meets virtually no resistance and cools the wall.
At the same time, water vapor present in the internal air, under the influence of partial pressure, gradually passes through the insulation layer. When it encounters cold wall material, it immediately condenses, causing the wall to get wet, which threatens subsequent freezing and destruction.
Differences in insulation methods
Thus, insulation from the inside is, rather, cutting off the wall from contact with warm air . The method is insidious in that the sensations indicate that the house has become warmer - the wall is not cold to the touch, the presence of moisture between the insulation and the wall cannot be seen, and it does not become noticeable immediately.
It may seem that the issue is resolved. At the same time, steam escape through the wall material has not stopped, it is simply not noticeable. However, the use of this method is quite common, since work is possible at any time of the year and everything can be done with your own hands.
If insulation from the outside is not possible, then you should choose the most vapor-impenetrable insulation, which is expanded polystyrene (EPS). It to some extent eliminates the problem of the presence of steam, creating a barrier to contact between the wall and penetrating particles.
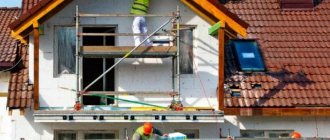
Facade insulation
Wall insulation is most often carried out outside the house, and there are more than enough reasons for this. Firstly, the internal usable area of the housing does not suffer. Secondly, insulation is not difficult to carry out both at the stage of building a house and during its operation. Thirdly, smooth polystyrene foam slabs perfectly smooth the surface and serve as an ideal basis for applying the finishing coating.
The thickness of polystyrene foam sheets for external insulation should be about 10 cm. If you purchased thinner sheets, they will have to be applied in several layers. Only with a thickness of 9-10 cm can you create reliable protection from cold and wind, as well as reduce the flow of heat from the room by 50%.
How to insulate walls with polystyrene foam from the outside:
First of all, you need to prepare the wall - remove or clean the old coating and level the surface. If plaster is applied to the wall, then you can leave it, but if the coating is old, cracked and crumbling in places, you need to get rid of it and fill all the holes. Perhaps the only significant drawback, or rather, the difficulty of working with polystyrene foam, is that it is necessary to level the walls. Sheets of material will stick firmly only to a flat surface. When the wall is prepared, you can begin gluing the polystyrene foam boards. For fixation, special weather-resistant glue and mushroom dowels are used. Before gluing the sheets to the wall, you need to scratch them with something to make the surface rougher - then the glue will stick well. To fix the first bottom row of polystyrene foam boards, you should attach a base profile whose width is equal to or slightly exceeds the thickness of the insulation. The installation pitch of the profiles is 30 cm. To ensure that it fits tightly to the wall, it is screwed with special washers, and the ends are joined with connecting elements with a gap of 2 mm. Corner profiles are used at corners.
Installation of polystyrene foam should begin from bottom to top from the corner. This way the sheets will not slide down while the adhesive mixture is setting. However, even professional builders cannot escape small improvements. For this case, there are specific standards - the maximum permissible shift value is 10 cm.
Laying is done end-to-end and as tightly as possible, but under no circumstances should glue get into the joint. When the entire wall is covered with polystyrene foam, it must be covered as soon as possible so that direct sunlight does not damage the material. For this reason, it is not recommended to interrupt work at this stage
A special adhesive mastic is applied on top of the slabs, in which a fine façade reinforcing mesh is embedded. Important: When choosing a mesh in a store, be sure to check with the seller whether it is suitable for outdoor use. The mesh is needed to strengthen the surface and increase rigidity before applying plaster. If you plaster a wall directly over polystyrene foam (even if it’s rough), it won’t hold up and will eventually fall off under its own weight, maybe even along with the insulation. When the mastic dries and the mesh is securely held inside, the wall is covered with another layer of mastic to level the surface. A primer is applied over the mastic so that the plaster holds as firmly as possible. Only after this can you begin finishing the facade - covering it with decorative plaster, artificial or flexible stone, siding, etc. We recommend that you read an interesting article on the related topic “Cladding facades with stone.”
We recommend that you read an interesting article on the related topic “Cladding facades with stone.”
Thermal insulation of the house outside should be carried out in not too hot, but not rainy weather. Despite the fact that polystyrene foam is not afraid of water, other materials can become saturated with moisture, and as a result, the quality of work will significantly decrease. The air temperature should be no lower than +5C. It is recommended to carry out the work promptly, but do not rush and wait until the layers of material have completely dried before applying subsequent ones.
The video about insulating walls with polystyrene foam shows in detail all stages of the work:
https://youtube.com/watch?v=yYClVc3ptLg
Do-it-yourself technology
Insulation of walls with polystyrene foam can be done independently, without special training or skills. There are the following methods of thermal insulation with foam plastic:
- Foam boards are attached to the wall, covered with a vapor barrier film on top, then a sheathing is made onto which finishing panels made of plasterboard or other materials are attached. In this case, careful treatment of the walls is not required; all defects are hidden under the finishing materials.
- The second method is less time-consuming and expensive, if the wall is smooth and does not require much leveling work. In this case, it is cleaned, processed, and the slabs are glued directly to the wall with a special mastic. Then finishing work is carried out.
Let's consider the second, simpler method.
Surface preparation
If the wall is painted and the paint layer is strong enough, then in this case you can simply clean the surface of dirt, fill cracks or uneven areas with putty, and treat it with an antiseptic to protect against the formation of mold. After this, you can glue the foam boards.
Alignment
When the wall is uneven and the paint is peeling off, you need to carry out the necessary work to prepare it:
- remove the entire paint layer;
- clean from dirt;
- level with plaster and putty;
- prime;
- treat with an antiseptic and only then glue the foam.
Most antiseptics are very toxic. Therefore, you need to work in a well-ventilated area, wearing gloves.
Insulation
Foam boards must be glued from the bottom row. Adhesive mastic is applied to each of them along the entire perimeter and a few more dotted strokes are made along the inner area. The slabs must be arranged according to the principle of brickwork, so that the vertical seam of the next row falls in the middle of the previous slab.
After 3 days, when the mastic has dried, you need to secure the foam to the wall with special fasteners with wide heads. There are 6 pieces for each slab (at the edges and in the middle). To speed up the work, instead of mastic, you can choose a special glue that dries in a few hours.
Sealing seams
When installing the slabs, there are gaps between them through which cold air will pass. Therefore, they need to be sealed with special compounds that, when dry, create elastic seams, or treated with polyurethane foam.
Then the seams need to be leveled, carefully cutting off the excess with a knife and sanded. Construction tape cannot be used, because it will not be possible to seal the cracks hermetically.
Reinforcement and plaster
To strengthen the insulation, you need to cover the wall with a painting mesh. To do this, glue is applied to the surface and a mesh is attached to it. After the glue has dried, plaster and primer are applied to the walls.
Decorative finishing
The treated surface can be painted with acrylic paint, wallpapered or decorative plaster applied.
Distance to green spaces
Since the land plot can contain not only buildings, but also green spaces, there are regulations for this case too
Leaving a gap between the fence of the site and flower beds is not as important as between trees and bushes. Here, too, it is necessary to comply with the rules in order to avoid penalties and claims from neighbors with possible legal proceedings.
Distance to trees
Tall trees growing close to the border of two plots of land are another subject of dispute between neighbors. To avoid legal disputes with residents of neighboring houses on this basis, maintain the recommended interval of 2 meters between medium-sized trees and the fence, and 4 meters if the trees are tall. The distance is calculated from the center of the trunk.
You need to maintain a distance not only from buildings, but also from trees to the fence
How to understand which trees grow on the site - medium-sized or tall? This is not stated in the laws, however, there is an unspoken rule - tall trees with a height of more than three meters. There are no restrictions or additions depending on the type of tree - apple trees, cherry plums, birches, tall pines, as well as wild or exotic trees can grow at the permitted distance.
Distance to bushes
The minimum gap between shrubs and the fence at the border of the site is 1 meter. The distance regarding flower beds and flower beds is not mentioned at all in the building rules and regulations. This means that you can plant flowers even close to the fence - this is legal. As with trees, there are no restrictions on the types of shrubs - the main thing is to keep your distance.
Where is it safe to use polystyrene foam?
- in places where there are no potential sources of fire;
- in non-residential premises;
- use for external insulation of the base, foundation, insulation of a frame house with polystyrene foam from the outside.
As you can see, insulation inside the house is unacceptable, and polystyrene foam installed under the slate will not cause harm only if it is installed in a non-residential attic with good ventilation.
Let us note once again, answering the question of whether polystyrene foam is harmful indoors, it is not the styrene itself that is harmful, but its concentration. Expanded polystyrene is a completely safe decor, but is not recommended as insulation for residential premises.
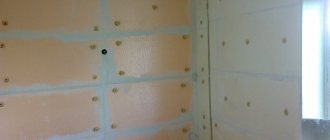
Preparing the wall and installing the sheathing
Before starting work, it is necessary to prepare the surface of the brick (or other) wall. It is necessary to remove old paint, peeling plaster, and clean from oil stains or other contaminants. Then you should evaluate the quality of the surface and, if necessary, apply a leveling layer of plaster. After it has cured, you can begin installing the sheathing.
The location of the sheathing bars is perpendicular to the future sheathing strips - for vertically located wall panels (for example), the sheathing is placed horizontally and vice versa. The pitch of the bars corresponds to the size of the insulation boards in order to avoid wasteful loss of material.
The thickness of the bars should correspond to the thickness of the PPS or be slightly larger. It is recommended to coat the bars with an antiseptic to protect against mold or mildew.
Installation of wooden sheathing
Tips and tricks
The walls of the attic can be plastered, but most often customers prefer cladding with plywood or plasterboard. The walls and ceiling of the attic are in rigid connection with the rafter frame of the roof, so any attempt to plaster or cover with liquid wallpaper eventually results in cracks and peeling of the finish. With drywall, as a rule, such problems do not occur.
According to reviews, the most common mistake in insulating attics with polystyrene foam is failure to follow the rules for spacing the seams. The inter-plate joints of the previous layer should be at least 30 cm away from the seams of the next row. In this case, it is advisable to glue both the locks and the surface of the insulation.
Installation
Installation work when insulating the facade of a wooden house depends on the nature of the material used.
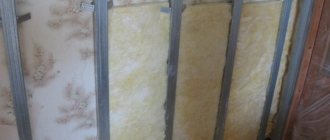
Securing mineral wool
Thermal insulation made of mineral wool or expanded polystyrene is attached to the lathing, which is fixed to the wall. This fastening procedure will be correct when insulating both an old and a new house with a flat or log surface.
The sheathing is made from wooden slats or metal profiles, laying them vertically. A frame of slats is made around the window openings. Material in the form of slabs or rolls is fixed to the sheathing. To further protect wooden walls from moisture, a vapor barrier membrane can be placed under the sheathing.
After fixing the sheathing, the installation of insulation is carried out, starting the process of attaching the mats from below, and the rolls from above. Each horizontal fragment must be reinforced with a lath. In the middle of expanded polystyrene or mineral wool slabs, special nails with wide plastic heads are usually driven in.
After laying the insulation on top, a vapor barrier layer is fixed on top or additional thermal insulation is made, for example, penofol, which also has hydro-, vapor- and sound-proofing properties. The insulation of a wooden house is completed with decorative finishing in the form of lining or siding. This is the most common installation scheme.
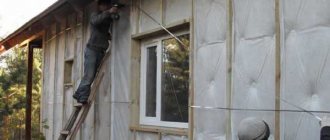
Installation of expanded polystyrene
Expanded polystyrene panels can be attached using the method presented above to the sheathing or directly to the wall using glue and special fasteners.
Installation takes place in several stages:
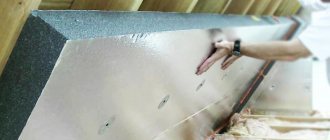
cracks in wood and gaps between logs are caulked or sealed with sealants; then the outside of the wooden walls are coated with an antiseptic and the solvent is allowed to evaporate; to increase adhesion, dry walls can be brushed, as a result of which the surface should become slightly rough; installation of slabs should begin from the lower left corner, in which the profile is pre-attached
The width of the profile must be equal to the width of the insulation; you need to pay attention to this in advance; then the adhesive should be applied to each slab in turn and immediately pressed against the wall.
Facade insulation is carried out according to the brickwork pattern, but without the formation of seams between the slabs. After the glue has completely dried for 4 days, several pieces of fastenings in the shape of fungi are introduced into each slab. The round head of the fastening should not protrude above the surface of the plate. After fixing all the slabs, a reinforcing thin plastic mesh is fixed to the wall, and a special corner mesh is placed at the corners. After drying, a primer is applied on top in stages, then plaster, for example, based on vermiculite, in a finished decorative form or as a base for siding or lining. All insulation from slabs and rolls is fixed in a similar way.
Foam application
Insulation of a wooden house from the outside with foam means is carried out differently. Ecowool and polyurethane foam are sprayed onto the walls using special equipment. If the procedure is carried out correctly by experienced craftsmen, the insulation can preserve the walls and gable of the house for half a century.
Bars are nailed onto wooden walls, the thickness of which corresponds to the future thickness of the insulating layer. The foam is sprayed from a pneumatic gun under high pressure. It polymerizes and hardens in 3 seconds.
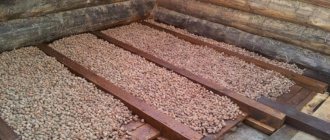
To spray ecowool, you need a unit with a container for bulk substances. The moistened, loosened mixture is applied to the wooden walls from the outside using a gun. This is not so difficult to do if you have special equipment.
Preparatory activities
When installing polystyrene foam wall insulation with your own hands, you will need the following tool:
- fine-toothed hacksaw or string;
- sharp knife;
- scissors, rubber and metal spatula;
- paint roller;
- paint brush;
- construction mixer;
- measuring container for preparing glue;
- tape measure, metal ruler;
- plumb line;
- construction level.
Thermal insulation of walls from the inside with polystyrene foam includes the following main stages: preparing the wall surface, attaching polystyrene foam to the wall, applying finishing coatings. The entire technological process can be seen in the video. At the preparatory stage the following activities are carried out:
- Preliminary preparation. Insulating a house begins with thoroughly cleaning the surface of the walls. It is necessary to remove the previous coating, especially paint and varnish materials. This is important because the solvents present in such coatings can destroy polystyrene foam. A complete inspection of the condition of the wall surface is required, and if necessary, large damages are repaired; large cracks can be filled with polyurethane foam.
- Surface leveling. A smooth wall is an important condition for high-quality finishing of a room. In the case of brickwork, plastering will be required, but if there are concrete walls, you can do without it. In any case, preliminary preparation includes fine leveling. It is provided in the following order. An acrylic primer is applied to the wall surface, for which you can use a paint roller. After drying for 21-24 hours, all irregularities on the surface are eliminated using a putty composition. Surface preparation ends with the application of another primer layer. An antifungal ingredient is usually added to the finishing primer.
What is the best way to insulate the walls in an apartment?
When choosing a material for thermal insulation of walls, you should pay attention to such characteristics as:
- Weak thermal conductivity
- Moisture resistance
- Fire safety
- Harmless to health
Styrofoam
Advantages:
- Cheapest material
- Easy to install
- Takes up minimal space
- Does not require a frame for installation
- Does not absorb moisture
Flaws:
- When exposed to moisture, it loses its thermal insulation properties.
- Is a flammable material
- Does not have high sound insulation
Minvata
Advantages:
- Non-flammable material
- Has a high level of vapor permeability
- Soundproofs well
Flaws:
- Cotton wool absorbs moisture well and can create dampness
- Installation of mineral wool is somewhat labor-intensive
Penoplex
Advantages:
- Has a low thermal conductivity coefficient
- Has high moisture resistance
- Durable
- Is a self-extinguishing material
- Easy to install
Disadvantages: expensive compared to other options
Distinctive features of foam as a material
The insulation in question has a fairly low strength. When exposed to moisture and cold, the material can crumble into small balls. For this reason, it is not recommended to insulate the walls of a house with foam plastic from the outside without protective cladding. You can use this method indoors without fear.
Polystyrene foam as wall insulation has the following positive characteristics:
- low cost;
- accessibility, it can be easily purchased at almost any hardware store;
- light weight;
- ease of transportation;
- ease of installation;
- good thermal insulation performance;
- safety.
The disadvantages when used from the inside of the wall of a house practically do not appear, since the material is most afraid of moisture and freezing temperatures.
Finishing
Frame method
The foam inserted into the grooves between the frame does not affect the finishing work in any way.
Panels, forcing, drywall and other finishing materials are fixed to the frame in the most common way - with self-tapping screws using a screwdriver.
You can then continue finishing as you wish.
Glue method
After applying the glue to the reinforcing mesh, time must pass until it dries completely. Then rough irregularities and glue deposits are removed. The surface is sanded using sandpaper.
Now you can use decorative plasters or paint. To hang wallpaper, the surface is primed again.
An option with preliminary application of drywall is also possible, but if the surface turns out to be smooth, you should not weigh it down with an additional layer.
Important nuances
Since creating high-quality and beautiful facades requires a flat surface, the walls must be leveled before attaching the insulation.
Protruding parts are removed; in some cases, additional plastering of the building outside may be required in order to achieve the desired result. Differences of 1-2 cm are allowed. This difference can be compensated for by the adhesive composition.
In addition, the following points should be taken into account:
Fixing with disc dowels can only be done after the glue has completely dried. If they are installed early, there is a possibility that the thermal insulation slab may move to the side or be pressed inward.
This will lead to increased consumption of decorative plaster; Before attaching the reinforcing mesh, the plastic caps of fungi - umbrellas need to be puttied; If there is a need to insulate the house in two or three layers, the sheets are arranged strictly in a checkerboard pattern. Stitches stacked on top of each other are not allowed. Fixation is performed only to the main surface of the load-bearing walls; Panels are joined only with cut sides.
So, the gap between them will be minimal. The resulting seam is sealed with liquid foam. The use of polyurethane foam is strictly prohibited; its use may lead to peeling of sheets from the surface of the walls and, accordingly, damage to the thermal insulation layer.
Installation of the reinforcing mesh and puttying is carried out only on the last layer, on the one located outside the structure. There is no need to process internal ones.
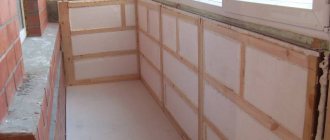
An example of using insulation inside a wall structure
The photo below shows a fragment of thermal insulation work during the construction of a non-residential premises.
After the publication of the article, during its discussion, different points of view were expressed on the use of this method of insulation. Now, after six years of using this premises, I can only confirm that from the point of view of “efficiency - price” I had no other alternatives. Moreover, structurally this room is almost closely adjacent to the house. It is almost impossible to carry out external insulation of a room along a wall adjacent to the house. If I had left one wall without any insulation, the temperature in the boiler room would have been noticeably lower. Now, depending on the frost, the temperature remains stably around (10-15) degrees in the absence of heating devices in the boiler room and entryway.
Since my house is wooden, I’m not talking about the main method of using polystyrene foam as external facade insulation. Moreover, there are many publications on this topic. I will note only a few of the most important points.
- Firstly, despite the higher performance of extruded polystyrene compared to foamed polystyrene (in terms of thermal insulation, mechanical properties, etc.), extruded polystyrene cannot be used when insulating the facade of a brick building. This is explained by the fact that it has such vapor permeability indicators that it is practically impossible to select a wall material with the appropriate vapor permeability in private construction.
- For external facade insulation of a brick building, only foam plastic is suitable. It is recommended to use foam plastic specially designed for this purpose, type PSB-S-25F (facade). Although, as practice shows, an ordinary one is quite suitable. Do not use foam with a lower density (such as PSB-15).
- Another important point that actually takes place in practice when insulating the facade of a house with polystyrene foam is the use of polystyrene foam in one layer, usually 50 mm thick. For most regions of the Russian Federation, from the point of view of insulation efficiency, such a layer of thermal insulation is clearly not enough. In addition, when insulating with polystyrene foam in one layer, the number of unclosed joints when installing PSB sheets along the entire facade of the house will be quite large, which will further reduce the quality of thermal insulation work due to the formation of cold bridges. Those. foam plastic must be insulated in two layers in a checkerboard pattern (with overlapping joints).
How to protect walls from dampness
As has already become clear, with such insulation, the formation of dampness is almost inevitable. Therefore, you should consider the basic rules that will help you cope with the question of how to get rid of dampness that appears as a result of freezing of the wall.
Thus, in order to eliminate dampness in the wall, it is necessary to use only vapor-tight insulation. This is where the first, most serious mistake of many people arises, namely, insulation with mineral wool using an additional layer of vapor barrier (which in reality is practically useless).
In addition, the complete absence of seams or joints during insulation becomes an important factor, since they also allow steam to pass through, and even in greater quantities than the material itself. And also any joints are a risk of condensation entering the room.
Thus, only good, and most importantly, proper insulation and ventilation will help in solving the question of how to remove dampness. In this case, the following absolutely do not fit the category of good and correct:
- Warm plaster.
- Cork covering.
- Mineral wool.
- Liquid ceramics.
The first two options can only be used as the last element of insulation, nothing more. Let us repeat, any insulation that is performed with vapor-permeable materials is absolutely not suitable.
Almost the best option for insulating walls from the inside in a panel house is to use polystyrene foam. Of course, it is also difficult to achieve maximum tightness with it, especially without using additional solutions, but it wins compared to other materials. Penofol is also a good choice, we will also talk about it a little.
Thus, in order to get rid of dampness in the house, as has already become clear, it is necessary to carry out high-quality insulation. And then we will look at how to make it and what you need for this.
Stages of home insulation
In each specific case, the technology of work will differ depending on the base wall material and the finishing decorative coating chosen by the homeowner. The easiest way is to plaster insulate the walls from the outside with penoplex or equip a ventilated façade of the house.
Plaster insulation system
Plaster insulation of a house from the outside with penoplex can be done with block, brick and wooden walls, and simple or figured plaster can be used as a decorative coating. The advantage of this technology is its simplicity, as well as the ability to give the building an attractive appearance.
Plaster insulation of the walls of a house involves the following work:
- Surface preparation.
- Installation of the starting bar.
- Insulation fastening.
- Trimming corner foam boards.
- Strengthening internal and external corners of openings.
- Installation of reinforcing mesh.
- Finishing.
Due attention should be paid to the correct preparation of the walls of the house for insulation, since the durability of the insulator used largely depends on this. If the facade of the house is plastered, it is necessary to determine where the plaster is peeling off and repair problem areas
The wall is treated with primer, which increases adhesion and strengthens the base.
The starting strip is secured with dowels approximately 2 centimeters below the calculated horizontal line of the junction of the wall and the foundation. The horizontality of the starting strip installed around the entire perimeter of the house must be checked with a building level.
Next, they begin to prepare the glue, which must be diluted in water in full accordance with the instructions for it. You can also use foam adhesive, which is applied directly from a can or using a spray gun.
The slabs are glued staggered around the perimeter of the building. The next row must be started offset to prevent the four slabs from meeting at one corner. The seams between the plates must be sealed with sealant or foam.
After the glue has dried, it is necessary to additionally secure the slabs with dowels with plastic disc-type heads. It is not recommended to use ordinary metal dowels for such work, as this leads to the formation of cold bridges. The hole for the dowels is drilled with a hammer drill, after which the fasteners are screwed in using a screwdriver, firmly fixing the foam sheets to the walls of the house.
All corners, openings and problem areas should be additionally reinforced with strips of mesh, for which zinc corners or special glue for plastic are used.
Installation of insulation
After completing the alignment of the wall, the question of how to attach polystyrene foam is resolved. In general, the following instructions for installing insulation can be suggested:
- In order to secure polystyrene foam boards to the wall, a special adhesive mixture is used. The composition is purchased dry and prepared by mixing with water immediately before finishing work. The thickness of the glue should be optimal.
- The adhesive can be applied with a brush or roller to the wall surface or applied to the corners and edges of the polymer sheet.
- Installation of slabs starts from the bottom. They are first cut to size and applied to a dry wall. Cutting polystyrene foam is done using a well-heated string or a hacksaw with fine teeth.
- Having installed the first row along the entire wall, you can begin laying the next row. The slabs in it are shifted relative to the lower sheets in such a way that the seam between the sheets of the first row falls in the middle of the upper slab.
- Drying of the adhesive composition is ensured within 34-42 hours under natural conditions.
- It is advisable to additionally secure the installed insulation with dowels. To do this, the wall is drilled directly through the plastic, after which the plastic dowel is driven in. Thermal insulation is attached using self-tapping screws. Large polystyrene foam sheets are fixed at 6 points: in all corners and 2 dowels in the middle part.
- Sealing seams. If the seams between the sheets exceed 30 mm, then pieces (trimmings) of polystyrene foam are glued into them. Finally, all seams are filled with polyurethane foam, which should not contain toluene, which can dissolve plastic. The excess mass is cut off with a knife, and then the seams are treated with adhesive.
Conclusion
To perform high-quality insulation of walls from the inside, you don’t have to turn to specialists for help: all the work can be done yourself if you have experience working with simple materials and tools.
You can carry out work on laying polystyrene foam both in the house and in utility rooms that are not heated. If heat leakage continues, it is necessary to insulate the ceilings and floors: only a set of measures will help protect the house from the penetration of cold.