Concrete is the main building material all over the world, especially in monolithic high-rise residential construction.
But, despite the fact that it has enormous advantages, it is a cold material because it has a high thermal conductivity coefficient.
For this reason, heat from a hotter source - the internal wall of the house, quickly goes to a less heated source - the external wall.
To maintain the thermal balance in such a house with an internal temperature of +20 C, significant financial costs will be required for the heating system to ensure such significant heat losses through the walls.
The only possible way to maintain the optimal internal temperature in the house of +20 C is to insulate the wall structures. It can be carried out both outside the walls and inside the rooms. Depending on the climate zone, the characteristics of the wall and insulation, it can be complex, that is, it can have additional layers in the form of noise protection, hydro- and vapor barriers.
Insulation instructions
Regardless of the materials used for thermal insulation of the apartment, it is important to take into account a number of rules and nuances:
You can start insulating work only in the warm period, when it is dry outside. Before fixing the insulation, you need to dry the surface
For such purposes, the use of a heater is allowed. Next, you need to completely clean the structure, paying special attention to places where moisture and fungus accumulate. Treat with an antiseptic and apply a layer of primer. Before each subsequent stage, you need to wait until the previous layer has dried.
Expanded polystyrene
The material is popular due to its availability and ease of gluing yourself.
To apply insulation you need to follow these instructions:
- Apply adhesive backing to the back of the tile. It is advisable to do this pointwise, maintaining intervals of 30-35 cm.
- When gluing products, do not allow the seams in the rows to coincide.
- Next, apply fiberglass mesh and an additional layer of glue.
- A steel profile is used to strengthen the corners.
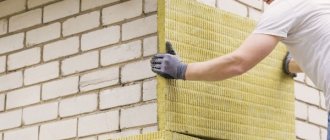
In addition to glue, disc-type dowels are used as fixing elements. The reinforcement mesh should have cells of 3-5 mm and an overlap of 10 to 12 cm. If the building was built according to the old plan, the insulating layer should be 8 cm thick.
Polyurethane foam
Surface treatment with polyurethane foam has the following advantages:
- The material does not require the additional use of plaster or other protective compounds, since it is not afraid of the influence of ultraviolet rays and mechanical stress. This helps to extend the service life.
- During operation, polyurethane foam does not lose its presentable appearance and competently masks all defects in the walls.
- A technical endoscope is used to check the quality of the pouring.
- Using polyurethane foam you can insulate various structures with a hollow structure.
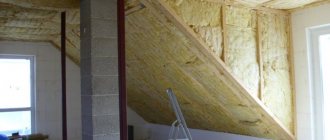
Mineral wool
The technology for installing the slabs involves fixing a special metal or wooden frame, as well as following the following instructions:
- The installation is carried out in 2 stages: in the first, the space between the frame and the surface is filled, and in the second, the gaps in the frame are filled.
- Products made from polyurethane foam must have a thickness of 50 mm and a density of 75 kg/m³.
- After completing the fixation of the slabs, it is necessary to fix the vapor barrier film.
- The film is fixed with an overlap on the edges of the slabs.
- The points to which the film adheres are treated with sealant.
- Finally, drywall is attached and finishing work is carried out.
Thermal insulating plaster
Often the insulation layer is made on the basis of heat-insulating plaster. To maintain evenness of application, special indicators are used.
The fixation process is carried out in 3 stages:
- Spray - the first layer is 10 mm thick. It is a liquid consistency for covering cracks and irregularities.
- The primer is a key part of the 45-60mm thick thermal insulation.
- The finishing coating is 5 mm thick and is a combination of chalk powder with water to properly mask defects.
Other materials for insulation
In addition to the materials listed, other solutions are used to insulate facades. This can be siding insulation, thermal panels, penofol or foam glass.
Thermal panels
Such products are particularly easy to apply, since the sheet is fixed to the surface only with glue.
Foam glass with fiberglass coating
Most boards based on this innovative raw material have a density of 100-150 kg/m³. To fix them, glue and dowels are used. Drywall is fixed on top of the slabs or a finishing layer of plaster is applied.
Penofol
The insulation is characterized by high resistance to steam penetration, and with a thickness of 10 mm, it has the same thermal insulation properties as 3 cm of mineral wool. However, for more effective heat conservation, penofol is applied in several layers.
In most cases it is used as an auxiliary material.
Installation
There are different methods for installing insulation. When choosing a suitable option, you need to take into account the complexity of its implementation and financial capabilities.
Insulation
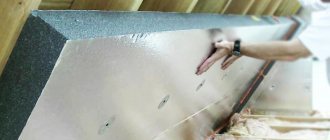
To attach the polystyrene foam sheet, an adhesive mixture of Ceresit and dowels are used. First of all, you need to dilute the adhesive base with water to obtain a uniform consistency. The quality of this mixture determines the reliability of fixation of the material.
Having completed the preparation of the glue, you can begin to apply it evenly to each sheet of polystyrene foam or PSB foam. 10-20 cm are left between portions, and 5-10 cm between the edges of the material. Particular attention should be paid to the central part of the insulation.
After applying the glue, proceed to fixing the material. The sheets are glued from the bottom corners. It may take 2 to 4 days for the mixture to dry. To improve the strength properties of the structure, dowels are driven into the wall. The formed joints are treated with plaster or construction foam.
Mesh and rough finish
After making sure that the adhesive base has completely dried, you can proceed to the next stage - fixing the reinforced mesh using the same Ceresit glue.
The base must be evenly distributed over the slab, pressing the mesh with reinforcement on top, moving from the upper parts to the lower ones. After this, another layer of glue, putty and primer are applied. At the last stage, siding panels are installed.
Tips and tricks from experts
One of the key difficulties of insulating a room from the inside is that the insulated wall does not become warmer, on the contrary, it begins to cool even more. In this state of affairs, the dew point shifts closer to the inner section of the wall. Condensation appears, leading to an increase in humidity, and the wall itself and the finishing layers suffer from this. The insulating characteristics of the insulation are significantly reduced. In fact, the level of heat loss remains the same, but increased humidity is formed. Brick surfaces suffer especially greatly from such exposure.
Fortunately, this problem is solvable. One has only to choose a heat insulator with a reduced level of moisture absorption and vapor permeability. The structure of such insulation should not contain fibers. During installation, avoid the formation of joints or gaps that will allow condensation to enter the room and air to penetrate into the interlayer space.
The following types of insulating materials do not meet the above criteria:
- warm plaster;
- cork covering;
- liquid ceramics;
- drywall;
- mineral wool.
GKL and plaster can only be used at the final stage of thermal insulation of the room.
This type of material such as penoplex or expanded polystyrene also does not cause delight among experienced builders. This is due to the fact that this slab material is difficult to perfectly join. If you do not use special adhesive solutions, it will not attach well to the wall. As a result, the level of tightness decreases, which leads to the difficulties described above.
Why is it necessary to insulate?
According to modern requirements, single-layer insulation is practically not performed. The composition of the heat-protective cake is determined by:
- installation location: outdoor/external;
- characteristics of the wall;
- the type of insulation chosen.
If you ask a professional how it is preferable to insulate the walls of a residential building, from the outside or from the inside, the answer will be unequivocal - from the outside.
Internal thermal insulation is installed only as a last resort, when there is no other possibility, for example, the building is an architectural monument or the small distance between adjacent walls does not technologically allow the installation of insulation.
The installation of internal insulation must be treated with great care, this is primarily due to the occurrence of a dew point at which condensation begins to flow along the wall, and in addition, the insulated wall is no longer protected by heat from the in-house heating system, since the heat barrier will not be able to transmit heat to it .
External insulation protects at cold temperatures, and to prevent household moisture from getting on the thermal insulation material , waterproofing is installed, in this case the dew point moves much further from the room to the street.
To prevent water from collecting between the wall and the heat insulator, a vapor barrier will need to be installed. Innovative heat-protective building materials are produced with a pre-installed vapor barrier layer.
In cases where the heat insulator is applied to the outside of wall structures, a wind barrier made of a vapor-proof membrane must be installed on top. It fences off the heat insulator from cold air masses hitting it.
Many novice craftsmen believe that there is no such thing as excess thermal insulation; this is not entirely correct. In thermal protection of buildings, the term used is excessive or excessive insulation.
A thick layer of insulation can disrupt the ventilation system of building structures . In connection with this, condensation will begin to accumulate, increasing the humidity in the room, which contributes to the occurrence of rotting processes and the formation of mold.
Features of internal wall insulation
Comparison of wall blocks by thermal insulation properties.
Usually, major insulation of walls from the inside is carried out out of urgent need, because external insulation is impossible. Internal insulation has a number of specific disadvantages that must be taken into account when choosing an insulation method. First of all, applying wall coatings changes the overall indoor climate. Creating an insulating layer does not allow the wall to “breathe,” which increases moisture condensation and requires additional ventilation of the room. Inside the wall, due to changes in heat exchange conditions and moisture transfer, moisture accumulates, which can lead to the formation of fungi and mold. These phenomena can reduce the load-bearing capacity of the wall.
Additional thermal insulation enhances the effect of internal drafts in the room. Finally, internal wall cladding reduces the usable area of the room. In addition, changes in wall design must be taken into account when creating the overall design of the room. The specific conditions that arise when insulating a concrete wall from the inside dictate the basic technical requirements. The internal coating of the wall should be a good heat insulator and create a reliable vapor barrier, provided that the room is well ventilated.
Advantages
Sometimes insulating concrete walls from the inside is the only way to eliminate the problem of cold walls.
This happens for a number of specific reasons:
- The first reason is that not all rooms can be thermally insulated from the outside.
- The second reason is the possibility of thermal insulation of internal walls at any time of the year and at any external air temperature, as well as the absence of the need for finishing work, in contrast to the technology of thermal insulation work on the outside of the house.
- And the last advantage of internal insulation over external insulation is the preservation of the appearance of the structure in its original state, which is important when carrying out work with complex historically valuable building facades.
Thermal insulation plaster
The secret of heat-insulating plaster lies in polystyrene foam bubbles with air, they create thermal insulation. Plaster must be applied to a prepared base; this is the simplest and most common method of fastening. The product is expensive and in demand; it is best to purchase plaster in specialized stores; purchasing it on the market risks purchasing a fake. You should check the documentation and certificate of conformity to be sure of the effectiveness of the composition when used.
Technologies for carrying out insulation work come in two options: external and internal methods. The main technological procedures are:
- Wet method - gluing sheets to a pre-prepared base with special glue, followed by plastering. Plus – the simplicity of the installation process itself.
- The dry method (frame) is more complex; hiring professionals is the most appropriate solution.
External treatment of the facade is much more effective, but for a number of reasons, internal thermal insulation is often carried out. In any case, comfort and coziness in the living space is ensured.
Application of ceramic-isol
In the modern market, new promising technologies are replacing traditional building materials; production produces universal products that have increased efficiency when used. Keramo-izol is an environmentally friendly composition and does not pose any danger to human health, which is an important aspect in its application. Installation does not require complex preparatory processes, application is simple with a long service life. Liquid thermal insulation suspension successfully protects against cold, creating coziness and comfort in the rooms.
Keramo-izol is used for everything that can be painted. Application is carried out with a brush, spray gun, or foam roller. The suspension has good adhesion and is easily applied to the surfaces of monolithic structures. The environmentally friendly product has advantages that are appreciated in the construction industry.
• good thermal insulation properties – reduction of heat loss by 1/3;
• easy to use, application can be done independently;
• can be applied to structures of different shapes;
• the range of shades for painting is varied;
• resistance to ultraviolet radiation;
• has anti-corrosion properties.
Keramo-izol is a universal means for creating an atmosphere of warmth in your home.
What materials and tools need to be purchased?
Tools for installing thermal insulation.
- Thermal insulation in the form of sheets, slabs or liquid.
- Deep penetration primer composition.
- Antiseptic.
- Sealant or mastic.
- Special plaster mixture for bathrooms or swimming pools.
- Metal construction mesh.
- Wooden slats.
- Brick or plasterboard sheets.
- Waterproofing materials.
- Vapor-proof film.
- Metal profile for installing drywall.
- Drill with mixer attachment.
- Needle roller.
- Rule.
- Plastic beacons.
- Spatula-comb.
- Building level.
- Screws, dowels, plates for suspension.
To insulate concrete walls, you can use different materials and methods of installation. It all depends on the financial capabilities of the apartment owner. Desire alone is not enough in this matter. It is best to insulate walls in summer, when it is hot. Then you won’t need to dry them using heaters. When work is completed, the owner of the premises must be prepared for the fact that the area of his apartment will decrease somewhat, but in winter the desired temperature will be maintained in it.
At the same time, our floors are quite warm; there is no cold coming from below. So it's the walls?
Tell me, maybe there are other ways to insulate concrete walls. Tired of freezing and paying large sums for heating. It's better to spend this money on repairs.
I will be very grateful for the answer. Irina.
Your problem is quite clear and can be explained simply: you did almost everything wrong. Namely: they insulated from the wrong side, choosing the wrong thermal insulation material. Let me explain.
How and with what to insulate a wall in a corner apartment from the inside
https://vk.com/id188753612 Nina Anisimova
I inherited from my grandmother an apartment on the fifth floor of a brick building. The corner room was cold and felt somewhat damp, although there was no fungus. There was no way to insulate the wall from the outside, so we decided to do it from the inside. They covered it with plasterboard, and mineral wool between the wall and the building block. It became warm and cozy.
https://vk.com/id188395771 Tatyana Vyalaya
We also suffer from this problem and want to insulate a corner in the bedroom. We don't have any problems with freezing, but the walls are very bloomy. The wallpaper is always moldy no matter how much you re-paste it. I didn’t want to insulate myself with polystyrene foam, I thought it was harmful, but it turns out mineral wool is toxic. My husband wants to run more batteries along the wall, like a snake, so that they warm up better. In general, let's think about it now.
I think the approach of insulating the wall from the inside is fundamentally wrong. Let's figure out what happened. Your wall is frozen or frozen. Clearly the design does not meet the requirements. The consequences are obvious. Microbes or microcracks will soon simply destroy the wall. You are protecting yourself, but you need to eliminate the cause. After all, no matter how much you insulate from the inside, you will not change the dew point, even if you lose half the room for insulation. Sooner or later, the destroyed wall as the main barrier to the external environment will remind itself. The fungus will come out next to your insulation and the destroyed wall will crack away from your insulation. And then major repairs cannot be avoided. What am I talking about? If you seriously decide to overcome the problem, insulation should be carried out only from the outside. I'm not even talking about the lost space and the harm of any insulation. Don’t be fooled by advertising; there are no safe materials.
There was such a problem in a large room, five corners. Three of them were near the windows and the corners there were constantly freezing. So they solved the problem easily - they insulated it with polystyrene foam, it is very easy to install and disguise with wallpaper.
Tips and tricks from experts
One of the key difficulties of insulating a room from the inside is that the insulated wall does not become warmer, on the contrary, it begins to cool even more. In this state of affairs, the dew point shifts closer to the inner section of the wall. Condensation appears, leading to an increase in humidity, and the wall itself and the finishing layers suffer from this. The insulating characteristics of the insulation are significantly reduced. In fact, the level of heat loss remains the same, but increased humidity is formed. Brick surfaces suffer especially greatly from such exposure.
The following types of insulating materials do not meet the above criteria:
- warm plaster;
- cork covering;
- liquid ceramics;
- drywall;
- mineral wool.
Content
Freezing of the walls of a house or the formation of condensation on them is a very unpleasant moment, so in such cases it is necessary to insulate the facade in a timely manner, and it is advisable to do this from the outside.
Thermal insulation of concrete buildings is carried out only on the street side. Internal insulation leads to condensation forming between the surface of the walls and the insulation. Subsequently, it will contribute to the formation of mold. This will negatively affect decorative finishing (wallpaper, plaster), and can also cause serious illnesses.
Causes of moisture
The first thing you need to figure out is why moisture began to appear on the walls of your home. There may be several reasons for this phenomenon and each of them requires its own solution. Most often, the walls begin to sweat in the following cases:
- There is poor or no ventilation in the room.
- The structures are freezing.
- The waterproofing is broken.
- The room was recently renovated.
The only scenario in which you should not worry and take radical measures would be the case of repairs. When performing various finishing works, mixtures are used that contain water and it actively evaporates. After a certain time this passes and everything becomes normal. If the water appeared for another reason, you will need to urgently take some action.
Even if the reason for the appearance of water is a recent renovation, it is better not to aggravate the situation and ventilate more often. Of course, you should take into account the recommendations of manufacturers of finishing materials and in some cases it is better to avoid ventilation. Then you should ensure the best possible air distribution throughout the entire area of the house - open all doors wide.
Consequences of the lack of protective layers
Thin insulation that does not have important protective layers or excessively thick insulation cause equal damage to a home. In this case, a distinction is made between mechanical and chemical destruction of concrete structures.
The absence of a heat insulator leads to the following mechanical damage:
- temperature changes, freezing/thawing cycles of building structures;
- frequent cycles of drying/wetting walls;
- destruction of concrete under the influence of wind and water.
Chemical damage includes bimetallic corrosion, the action of acid and alkaline vapors in the air, as well as corrosion from stray currents, as a result of which the carbonization process occurs on concrete, when alkalinity around steel embedded parts and reinforcement units is lost.
Thus, the reasons for the destruction of concrete partitions are complex with a number of factors, but most of all they are associated with the appearance of humidity, which contributes to the appearance of dampness in the room and black mold, which is extremely harmful to people, which is one of the strongest allergens.
Preparation
Each building material differs in its reaction to environmental influences. Concrete is no exception. In terms of performance, it is superior to brickwork and wood, but requires good thermal insulation. Before you start insulating concrete walls from the inside with your own hands, you need to take into account the following nuances:
- At high density, the monolith remains a water-permeable material, which negatively affects both the condition of the insulation (if they are not able to withstand moisture) and the walls - in cold seasons, condensation will begin to freeze, triggering deformation processes.
- Before carrying out work, concrete is treated with an antiseptic agent, which will prevent the formation of fungi and mold.
- Thermal insulation should cover the entire facade, and not individual parts of the building.
- The amount of insulation is selected taking into account the thickness of the walls.
From inside or outside?
Having decided on the material for insulating a concrete wall from the outside or arranging thermal insulation in an apartment from the inside, you need to consider the features of each method. Experienced experts recommend putting the main priority on external insulation, since without it, internal insulation will be ineffective and will only aggravate the problem.
Work can begin in warm periods and dry weather. To increase protection against heat loss, the home is covered with insulation on both sides.
Material counting
The consumption of insulating materials depends on a lot of factors. First of all, the evenness of the surface of the wall that will be insulated is taken into account - this indicates the amount of glue for fixing the foam.
Calculations are carried out for smooth walls according to the following principles:
- To glue foam boards onto the “pads” (without an adhesive layer around the edges), you will need to use 5 kg of polystyrene foam glue.
- The dimensions of the slabs must correspond to the parameters of the walls without taking into account openings (windows and doors). The thickness of the material is determined by the region of residence.
- To strengthen the plaster, reinforcement with facade fiberglass mesh is used. The number of reinforced concrete structures is selected taking into account the parameters of the wall.
- If the facade will be covered with decorative plaster, then to level the surfaces you will need to purchase a primer with quartz sand. The consumption of this composition is 300 g/m².
- Before painting structures, they must be treated with a deep penetration primer - 200 g/m².
- The consumption of plaster is determined by the size of its grains.
- The consumption of the coloring composition depends on the application method (spray gun, roller and brush).
Surface preparation
After purchasing materials for wall insulation, you can proceed to surface preparation. To do this, you need to clean them of old paint, mold and dirt, and then cover them with an antiseptic.
This will ensure a dry and smooth surface. If there are cracks or chips, they need to be covered with plaster. The composition must also be used to level surfaces.
In the upper part, the wall is coated with a primer, which will increase the adhesion of the material to the adhesive base.
Peno-izol insulation
Peno-isol has several names, scientifically it is urea-formaldehyde foam (UFP). The insulation is also called liquid or poured, due to the consistency when used. Peno-izol, according to technological estimates, reduces the time of construction and installation work, has a number of its own advantages and features, as well as disadvantages that you need to be aware of.
- density from 5 to 35 kg/m3;
- thermal conductivity coefficient 0.028-0.047 W/m*K;
- flammability group G2 – moderately flammable, does not support independent combustion;
- decline does not exceed 5%;
- vapor permeability – 0.21-0.24 g/m*h*Pa;
- temperature range – from -50 to +90°С;
- water absorption – 6-8% in 24 hours.
In its liquid state, peno-isol resembles an airy soufflé or shaving foam; after hardening, it has a fine-cellular structure.
Use of polystyrene foam
Insulating a concrete wall from the outside with polystyrene foam is economical and practical; reducing heat loss will reduce financial costs, regardless of the type of heating. The use of the material has a beneficial effect on optimizing the microclimate in the house. It feels warm in winter, pleasantly cool in summer. How to insulate a cold loggia wall, the answer is obvious - this material is perfect for arranging thermal insulation for a small space. The advantages of slabs are multifaceted:
- the functional area remains dry, without the appearance of fungus and mold;
- the product has soundproofing properties;
- the material is moisture-resistant and does not lose its characteristics when wet;
- due to its minimal weight, massive metal fastenings are not needed;
- minimal load on the foundation;
- external installation of thermal insulation does not reduce space;
- After installation, the sheets can be painted in the desired color, transforming the facade.
The fastening technology is suitable for cottages and apartments in high-rise buildings. To install sheets at height, it is better to involve industrial climbers, this will help avoid investing in special equipment or installing façade formwork.
Mineral wool
The insulation is available in the form of rolls or in a modern version in the form of slabs. The benefits consist of many factors that deserve the consumer's attention.
- thermal conductivity is low;
- the product is environmentally friendly;
- Rodents do not like mineral wool;
- fire-fighting properties - not susceptible to persecution;
- long service life.
- moisture resistance at a low level;
- installation requires preparation in choosing a waterproofing coating;
- When compressed, it loses its thermal insulation properties.
Due to the price/quality ratio, mineral wool is in consumer demand.
Insulation instructions
If you don’t take into account the option of using polyurethane foam, then all the work is done yourself
It is important to familiarize yourself with some nuances and begin the task:
Insulation of concrete walls is carried out in dry weather, at temperatures from +5 to +30 degrees. The wall is well dried, not damp. It is important to clean the surface, remove all excess, seal cracks and level it. Mold, mildew, and greasy stains are removed... At the end, all that remains is to treat the concrete with an antiseptic and get to work
At the end, all that remains is to treat the concrete with an antiseptic and get to work.
Using polystyrene foam
The advantages of polystyrene foam are considered, as is the technology for creating a wet facade. But, there is a second option - frame. Sequence of work:
- The sheathing is placed on the surface.
- The distance between the slats is identical to the width of the foam sheet.
- Insulation is installed in the created cells.
- Everything is covered with lathing and the structure is finished with finishing panels: block house, lining, siding.
For insulation in cold regions, the layer thickness is from 10 to 20 cm.
Using mineral wool
Mineral wool is an excellent material with excellent characteristics. However, she is afraid of moisture. Therefore, when thermally insulating concrete, it is necessary to create a ventilation gap so that the wool dries. Here we need the frame technology described above.
Features of the work: after creating the sheathing, mats or rolls of mineral wool are installed
It is important to lay them tightly, without forming joints. To do this, the distance between the slats is made 5–10 mm less than the width of the wool
All that remains is to fix the vapor barrier, glue the joints and sheathe the frame with the selected material. An apartment can be insulated with mineral wool both from the outside and from the inside.
Using thermal panels
Thermal panels are a multilayer material. It is made of insulation and decorative material. The manufacturer has simplified the task; a concrete house can be insulated with such panels, and not have to think about additional finishing. Typically used for exterior decoration. Installation is simple - just apply glue to the surface and fix it on the wall.
Using foam glass and fiberglass
Foam glass is an insulating material in the form of slabs, the density of which is from 100 to 150 kk/m3. Such insulation is fixed to the wall using glue. The structure can be strengthened with dowels, as is the case with polystyrene foam. The finishing layer is different, ordinary plaster, drywall or decorative panels.
The peculiarity of the material is that it is not afraid of moisture, is environmentally friendly, and is not damaged by rodents. Cutting mats is quite simple. The surface can be strengthened and secured with reinforcing mesh and corners. The disadvantage of such insulation for concrete is that it has a high cost.
Using penofol
This is foil insulation. It is environmentally friendly, efficient and practical. The thickness is small, which allows you to quickly fix it on the wall. The layer is vapor-proof. However, penofol is not suitable as the only insulation material. It is better to combine it with other heat insulators or use it as a heat-reflecting layer and vapor barrier material. Installation is carried out on the wall or on the lathing.
Before insulating concrete walls, it is important to think through the sequence of work in advance, choose what to insulate the structure with, comparing all the pros and cons, and then get to work. But, if you are unsure of your abilities, it is better to overpay, but entrust the work to specialists who will do it efficiently and without errors
Cost of work
Table with approximate prices:
| Thermal insulation grade | Size | Material price, rub. | Cost of work, rub. Moscow | Cost of work, rub. Yaroslavl | Cost of work, rub. Voronezh |
| Akterm Concrete | 20 l | 7000 | 350 m2 | 200 m2 | 230 m2 |
| Polyurethane foam spraying method | Packaging, 4 m3 | 5300 | 900 m3 | 790 m3 | 800 m3 |
| Basalt mineral wool GREENGUARG | 0.288 m3 | 510 | 300 m2 | 250 m2 | 270 m2 |
| Insulation: Expanded polystyrene boards. extrusion TECHNONICOL | 0.273 m3 | 1356 | 500 m2 | 350 m2 | 300 m2 |
| Penoplex Facade, glue, doweling | 1185 mm x 585 mm x 50 mm, pack of 4 pieces | 1370 | 600 m2 | 450 m2 | 430 m2 |
Basic methods
Modern manufacturers delight customers with a wide range of various thermal insulation materials that meet the basic quality parameters of these products.
However, experts with sufficient experience in the construction industry give advice on how to insulate a concrete wall in an apartment using only three main methods, which are considered the best:
- Insulation using foam plastic,
- Insulation with mineral wool,
- Insulation using a warm plaster solution.
Application of foam plastic
Today, foam plastic is considered a popular insulation material (for example, Penoflex insulation). It is lightweight, easy to use and low price make it the most common insulation material.
Insulation of premises from the inside with polystyrene foam
This method of thermal insulation is both the simplest and cheapest:
- Carefully plaster the concrete wall.
- Let the solution dry completely.
- We begin to level the surface by applying one layer of putty.
- Upon completion of puttying, we lay waterproofing material around the entire perimeter.
- Next we move on to installing the insulating layer:
- we treat the walls with special glue,
- We lay the sheets of foam plastic end-to-end, one to the other, avoiding the formation of cavities between them.
Method of internal insulation with foam plastic
- We complete this stage of work by installing the vapor barrier material on the foam layer.
Application of mineral wool
The second method of insulating concrete walls and increasing their thermal insulation capabilities is more difficult to implement. In addition, insulation with mineral wool can only be done if there are wooden slats. Lath lathing “steals” some space in the room due to its thickness, so it is difficult to use if you want to insulate a loggia. Therefore, thermal insulation experts advise against plastering walls if this technique is used. However, no consensus has been found on this issue.
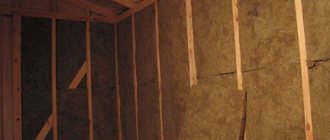
Photo of insulation with mineral wool
The following are instructions for insulating walls with mineral wool:
- we install wooden slats vertically on the walls, using a level for accuracy,
- we fill the distance between them with waterproofing material, fixing it directly to these slats.
- We proceed to laying the insulating material on top of the waterproofing material. Monitor the density of the insulation in the space between the slats. There should be no gaps between the slabs of material and the wooden slats. To do this, the distance between the slats is made less than the width of the insulation material.
Laying without gaps between slabs and slats
Application of plaster solution
The use of a plaster layer as a thermal insulation material is not a new technology. However, even today it remains quite popular. However, one should not think that this method of thermal insulation is too simple. It also has its own characteristics, including a three-layer plaster layer.
So, how does insulation work using plaster:
- Applying the initial layer with your own hands is carried out by uniformly spraying the surface with a liquid plaster solution. This is done so that the solution penetrates as deeply as possible into the walls having microscopic cracks.
- The second layer, 50-60 mm thick, is soil. Moreover, it is applied not in one, but in 2-3 layers. This takes time and patience.
How to apply plaster
Flaws
However, insulating a concrete wall from the inside of a building is not without its drawbacks, and quite noticeable ones at that:
- As a result of covering a room with insulating material, the walls increase in thickness, and, as a result, the area of the room itself decreases.
- Another disadvantage of internal thermal insulation is the deterioration of the climate in the room. This occurs due to the fact that part of the wall, which has a high ability to accumulate heat, after internal insulation ends up in a zone with low temperature.
Note! A prerequisite for the effective implementation of thermal insulation work is compliance with the physical characteristics of heat and moisture transfer.
- The outer wall of a building behind a layer of internal insulation significantly loses its heat-saving properties. As a result of this, as well as the large gap in partial pressure units inside and outside the building, condensation occurs behind the insulation layer in winter.
Correct fastening
Under such conditions, the walls begin to become damp, which does not stop even in the summer, and become covered with a layer of fungi, the presence of which indicates violations of the sanitary and hygienic standards of the living space.
- Another disadvantage is the formation of a number of thermal bridges along the perimeter of the building frame due to the rigid connection of partitions and ceilings with the load-bearing wall, as well as due to the absence of cut-off thermal insulation liners between them.
Types of adhesives
To fix the insulation, adhesive compositions on various bases are used. This determines their possible area of use and the order of installation. If you use a composition for interior work to insulate the walls outside the house, the assembled structure will not last long. To avoid this, it is worth understanding the distinctive features of each type and listening to the opinions of experts.
Polyurethane
It is supplied ready-made in pistols and aerosol cans, simplifying the application process. For the composition to set, 0.5 - 1 minute is enough after pressing the foam board to the base. Because of this, the foam board must be leveled immediately after being placed on the base.
Can be used to fix thermal insulation material on different surfaces. Allows you to fix the slabs on a wooden base and on brickwork. Features increased adhesion.
The adhesive is easy to apply - like polyurethane foam. Source banyabest.ru
Mineral
Effective and inexpensive foam adhesive for outdoor use. Can be used for attaching insulation to a concrete base, walls, and aerated concrete and sandstone.
Supplied in the form of a dry mixture, packaged in paper bags of various capacities. Before use, a certain amount of water is added to the composition according to the manufacturer’s instructions until a solution with a homogeneous structure is obtained. A notched grater is used for application.
Mineral glue is characterized by:
- increased adhesive characteristics, allowing the slabs to be securely fixed to the base surface;
- plastic;
- frost resistance, making it possible to use the composition outdoors;
- moisture resistance;
- versatility: ready-made glue can be applied to different substrates.
Before application, the composition is diluted with water. Source regkom77.ru
Polymeric
Polymer composition - adhesive for penoplex for interior work. Allows you to fix foam boards on any surface. They have a limited service life. They are sold in special cylinders, from which the adhesive composition is supplied under pressure.
Application is carried out using a special gun. The adhesive composition sets quickly enough, which makes it difficult to use when doing work on your own. Adjustment of the position of the heat-insulating mat is possible in the first half a minute.
Waterproofing
The composition of the adhesive may vary significantly. To maintain the integrity of the thermal insulation material, for attaching the slabs you should choose a waterproofing adhesive that does not contain aggressive components. These include solvents, petroleum products and a number of others.
Bituminous
The most common material. It is easy to use and accessible. Bitumen mastics are able to retain their properties at sub-zero temperatures. Sold ready-made. It is used for thermal insulation of plinths of various buildings operated in unfavorable conditions.
Bitumen mastics allow you to protect the baseSource kraski-net.ru
Used for fastening penoplex and sealing joints between heat-insulating boards. The packaging contains instructions that describe how to attach penoplex using bitumen mastic. The composition is applied around the perimeter of the insulating board and in the center. For application, use a spatula or brush. The mastic is distributed in a thick layer. When installing the second and subsequent elements, the space between the slabs is filled with bitumen mastic. For reliable fixation, the insulation is pressed for some time, having previously ensured the required spatial position.
Liquid Nails
An expensive option compared to other formulations. Supplied in convenient packaging - in special tubes. The composition is applied to the sheets in strips in the form of snakes. It takes 10 - 20 seconds for liquid nails to dry.
Differs in increased adhesive properties. Allows you to attach heat-insulating boards to any base. If liquid nails will be used as fasteners for penoplex mounted outside, an adhesive composition that can withstand negative temperatures is selected. Due to the high cost, they are used only for small areas.
Liquid nails are an expensive but high-quality optionSource remontkit.ru
Acrylic
A universal option. Allows you to fix heat-insulating sheets on surfaces made of metal, wood, concrete, brick. Used when performing work outside and inside the house. The composition of the acrylic adhesive allows you to form a layer with waterproofing properties. It has low consumption.
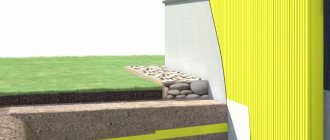
Pipeline insulation
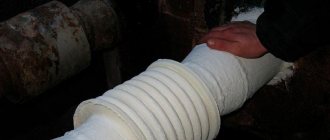
Sewerage and water supply are those systems that are connected outside the house. In some cases, they are not provided with thermal insulation at the required level, which is why the water in the riser freezes or the drain becomes clogged. To insulate communications, foil insulators, polystyrene foam, penoizol, polyurethane foam or basalt sleeves are used. To carry out the procedure, you need to dig out the place where the pipes are inserted into the house. The further process is performed according to the following algorithm:
- the pipe is cleaned of plaque and dirt;
- heat-insulating material is applied;
- cover the joints with the wall with polyurethane foam;
- wrap the heat insulator with polyethylene.
If you were excavating a pipe, you need to fill the hole with expanded clay and compact it with soil on top. After completing all procedures for thermal insulation of a private residential building, the temperature in the room during cold times will increase noticeably and will remain for a longer period after heating. If it is not possible to isolate the house from the outside, the entire procedure can be carried out from the inside, but this option will take up some space from the room.