Insulation of the foundation base from the outside should be considered as a stage of general work on thermal insulation of the building. Each enclosing surface has its own characteristics in terms of the nature of operation, the physics of heat transfer and influencing factors. This affects the choice of materials and insulation methods. What “works” well on the roof or attic is completely unsuitable for the foundation and its visible part - the plinth.
General scheme of complex insulation of the foundation of a house Source stroy-dom-pravilno.ru
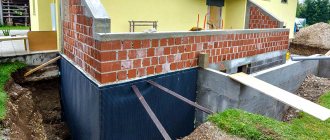
How and how to insulate the basement of a house from the outside
It is better to use materials that have zero water absorption and do not change their properties in a humid environment to insulate the basement of the house from the outside and inside.
Penoplex and extruded polystyrene foam are exactly such materials. Preference should be given to penoplex, because... in the future there will be no rodents in it. Before insulation, it is worth treating the surface with waterproofing. Insulating the basement of a house with penoplex
For protection against moisture, Penetron waterproofing is perfect, preventing moisture from penetrating into the material. To apply it, you need to clean the surface from dust and debris, and also slightly wet the surface to be treated. When working, be sure to use gloves and overalls.
Underground part of the base
In the recessed part, the use of dowels for attaching the insulation is not required; the backfilled soil will reliably press the glued insulation from the outside.
Aboveground part of the plinth
Above the ground level, polystyrene foam or penoplex is attached with glue that ensures good adhesion of the insulation sheets. Here it is already necessary to install dowels at the rate of 4 dowels per slab.
The seams between the insulation boards, both underground and above, should be filled with polyurethane foam. If you are laying insulation in two layers, then it should be overlapped so that the seams of the first layer do not coincide with the seams of the second layer of insulation. Using the same technology you can insulate from the inside.
Formulation of the problem
Let's say you need to thermally insulate a section of the base in such a way that you can subsequently cover the surface with the same stone of non-natural origin. The building has a so-called “ground floor”. The latter is well heated. The base rises 1 m above the ground. The only thing is that the brickwork of which it consists is not laid out too evenly.
Let the insulating “pie” include the following elements - wall structures, extruded polystyrene foam, foam-type fasteners, reinforcing mesh, plastic dowels. The artificial stone is installed using glue. Does the given system have a right to exist? Will she be able to cope with constant stress?
Base insulation
Purpose
Application of polyurethane foam to the basement structure.
Why is it so important to insulate the basement? To answer this question, you should understand the operating features of this building unit (see also the article “Insulating the base from the outside - reliable protection of the foundation”). The plinth is located at the bottom of the wall, between the first floor and the basement
Often the base is the top crown of a strip foundation, but traditionally it is laid out between the foundation and the main walls
The basement is located at the bottom of the wall, between the first floor and the basement. Often the base is the top crown of a strip foundation, but traditionally it is laid between the foundation and the main walls.
The masonry creates a gap between the base and the floor, which allows for ventilation of the underground space and avoids direct contact of the house structures with the basement.
The photo from the thermal imager clearly shows how thermal energy is lost through the base.
This gap becomes a kind of buffer that does not allow moisture to penetrate from the thickness of the concrete into the masonry of the walls by capillary suction. In addition, the air gap between the floor of the first floor and the ceiling of the basement creates additional thermal insulation of the room.
Thus, it turns out that the base takes on a number of negative impacts:
- Due to capillary suction, moisture concentrated in the concrete foundation structures penetrates the basement masonry and accumulates in it;
- Under the influence of gravity, moisture absorbed into the walls gradually sinks and penetrates into the base material. For the same reason, it accumulates water that flows down the surface of the walls during rain;
- In winter, snowdrifts accumulate around the house, which, during the spring melting, flood the lower part of the house and saturate the base structure with water;
- The basement space is not heated by anything, so during winter frosts it can freeze. As a result, drops of water enclosed in the pores of the brick crystallize and, expanding, destroy the structure of the material;
- Add to this the rather impressive pressure of the entire house, which creates enormous stresses in the base structure and leads to its increased wear.
Competent builders always insulate the basement masonry.
Materials
Expanded polystyrene is the most popular insulation material.
Various means are used to insulate the base.
The modern construction market can offer a very wide range of materials suitable for the role of insulation:
- Mineral or stone wool. They use high-density boards, which, due to their rigid structure, adhere well to a vertical surface and do not wrinkle;
- Expanded polystyrene and polystyrene. Excellent for the role of wall insulation, it does not allow moisture to pass through or absorb it. Easy to install and inexpensive;
- Polyurethane foam. One of the best insulation materials, it adheres perfectly to the surface, creating a monolithic continuous coating that does not have “cold bridges”. The main disadvantage is the too high price of the material and the work required to apply it;
- Plasters, wood paneling and other additional cladding layers. These products can hardly be called thermal insulation, since the listed materials have a fairly high thermal conductivity coefficient compared to classical insulation materials.
Foam can be mounted on the wall alone.
Insulation of the blind area and its role in the external insulation of the basement
“The blind area is the name given to the underground part of the foundation or an additional structure fixed to it, designed to prevent its destruction by groundwater.”
The blind area is carried out either when the foundation is initially cast, or it is “topped up” like an asphalt or concrete pad. When the blind area is done correctly, it greatly reduces the impact of moisture on the foundation. It must be remembered that it is necessary to plan insulation before it is poured, when the blind area has already been made, it will not be possible to insulate it; you will have to tear it down if the need for insulation arises. To fulfill its function, this structure must be 30 cm wider than the roof overhang.
Styrofoam
Polystyrene foam is cheap and therefore excellent for thin and light blind areas; it has little compression resistance; it will not be possible to pour a thick layer on it without cracks.
Crushed stone is laid in the dug ditch, roofing felt is placed on top of it and foam plastic slabs are laid, it is necessary to ensure that they are laid as end-to-end as possible, where any cracks remain they are “blown out” with polyurethane foam.
Polyurethane foam
Much more expensive than polystyrene foam, but it allows you to lay heavy decorative solutions (artificial, natural stone, paving slabs). Formwork is built in the ditch, into which sand (10 cm) and crushed stone (10 cm) are poured in layers, foam is blown in (5–10 cm), and a blind area (5–8 cm) is poured.
If you fill the entire blind area using this method, then cracks will inevitably appear on it. To avoid them, the blind area is poured several meters at a time, reinforcing the edges. In this case, cracks can only appear at the joints, but with a well-constructed work process, there should be no cracks.
Installation of insulation
When laying polystyrene foam, a special cement adhesive is used.
If you decide to insulate the basement with your own hands, then we have compiled step-by-step instructions with photographs especially for you:
- We clean the walls from dirt and debris, carefully seal all seams, eliminate imperfections and defects;
We clean and tidy up the walls.
- We cover the walls with a deep penetration primer;
We prime the walls.
- We take a sheet of expanded polystyrene (or polystyrene foam), cut off the locks from the left end (if installation is carried out from left to right) and apply glue to the sheet with a dosing spatula with teeth;
Apply glue with a notched trowel.
- We press the sheet against the wall and fix it with dowels. We hammer the disc-shaped dowels into the left corners and in the middle;
We press the sheet against the wall and fix it.
- Take the next sheet, apply glue, press it to the wall. We make sure that the locks on the edges of the sheet coincide, and each subsequent sheet should cover the locks of the previous one, and not be inserted under them. We hammer in the dowels in the left corners and in the middle;
We hammer the dowels into the covering lock.
- We complete the first row. We start the second row with half a sheet to offset the seams. Here, when fixing, we hammer in only two dowels - in the lower left corner and in the middle, the remaining corners will be pressed by the following sheets, which will cover the locks near them;
Remember about the displacement of seams.
- We cover the entire wall. We move on to the next wall and gradually complete the installation of insulation throughout the entire room. We cover the foam plastic with a reinforced fiberglass mesh, which we coat with a thin layer of glue;
Coat the mesh with glue.
- Using the grid, we plaster the walls, onto which we apply the previously selected finishing coating (wallpaper, putty, decorative plaster, etc.).
Using the grid we carry out the finishing of the walls.
The main stage is the formation of the base of the thermal insulation surface
At the preparatory stage, a number of works should be performed:
- Clean the base surface from dirt.
- Seal cracks and level out uneven areas.
- Cover the surface with penetrating primer.
To seal local defects, gypsum, cement-sand or lime plaster is used. Apply the plaster composition in an even layer and clean it after drying.
The work of cleaning the surface from contaminants begins
Where to place the insulation outside or inside
The greatest effect is achieved by insulating the base at the stage of foundation construction; permanent formwork of polystyrene foam can be used. This combination reduces the cost of the foundation when making a blind area. Placing insulating material outside protects the walls from freezing and moisture. The insulation layer absorbs the negative influence of the environment, extending the safe operation life of a private home.
If the distance from the foundation to the ceiling of the first floor is small, it is covered with expanded clay. When constructing a basement floor, the walls are insulated with foam or expanded polystyrene slabs. Liquid waterproofing is applied to the leveled surface, and after it hardens, insulating sheets are glued. The seams between the plates are blown with foam. A fiberglass mesh is attached to the finished surface and a layer of plaster is applied. The finishing coating will not only give the insulation a neat appearance, but will also provide protection from fire.
The occurrence of condensation on the inside of the base is a serious problem for home owners. The appearance of fungus and mold creates an unfavorable indoor microclimate. Material installed from the inside will not prevent freezing, and moisture will appear between it and the wall. External insulation is more effective in protecting the surface from dampness. Another disadvantage of placing insulation from the inside is the loss of free space. For reasons of practicality and expediency, it is better to focus on external insulation.
For houses built in difficult climatic conditions, combined insulation is used. This method is more expensive, as it involves installing insulating materials on both sides of the base. First, insulation is carried out with polystyrene foam on the outside of the building. The inner part is covered with a vapor barrier membrane, then mineral wool is laid between the guide strips. As a final finish, install and putty drywall.
Benefits of thermal insulation
Insulating the basement in a private house from the outside protects it from the negative influence of underground groundwater and precipitation, thereby improving the microclimate not only in residential premises, but also in the basement of the house.
Thermal insulation protects the base from freezing and mechanical damage
Such a structure will last much longer without major repairs. Condensation does not form on the walls of the insulated basement ; this saves building materials from premature destruction.
Internal thermal insulation performs similar functions. As practice shows, external and internal insulation has the same result. The difference between them is only external.
For internal insulation, finishing from decorative materials is used for greater attractiveness. Whereas the inner lining is often left simply plastered.
You will see how to properly insulate a foundation with polystyrene foam yourself from this video:
Do-it-yourself insulation of the base
When choosing mineral slabs for basement insulation, you should consider the following advantages:
- The shape of the plates does not change depending on temperature and, when installed correctly, is durable;
- Chemical resistance;
- The slabs can be cut with a knife or hacksaw, which simplifies installation; insulating the basement of a house with your own hands is quite possible;
- The low thermal conductivity of the foundation reduces the cost of heating the house;
- Fire safety.
It should be borne in mind that during installation it is important to use hydro- and vapor barriers to isolate the insulation from moisture. Thermal insulating properties of mineral wool decrease when in contact with water
The low thermal conductivity of the foundation reduces the cost of heating the house.
Preparing the base
Preparing walls before thermal insulation is an important procedure:
- We clean the walls from dust and dirt using a spatula, a brush with metal bristles and a spray bottle.
- All cracks and irregularities on the cleaned wall must be repaired. If the surface difference exceeds 1 cm, then the insulation will not fit tightly, so the walls should be as smooth as possible. They can be leveled with gypsum plaster, having first verified the presence of curvature using a building level. We apply the level vertically and determine the difference between the extreme points. If there are large deviations, you will have to plaster, placing beacons.
- Lighthouses can be made from wooden slats. There is also a beacon profile for plaster on sale. First, beacons are placed vertically on the plaster mixture according to the level. The distance between beacons can be 1.5 meters. The working mixture is applied to the wall from bottom to top between the slats - a spatula is used for this. Afterwards you need to level the plaster along the beacons and leave it to dry.
- We apply two layers of coating waterproofing to rid the house of dampness and mold. Such an insulator can be bitumen mastic or a modern insulating mixture - in this case you will need a roller or brush. In order for all layers to dry well, work must be carried out at an ambient temperature above 5 degrees.
Tools and materials for work
To carry out insulation with mineral wool, as well as with polystyrene foam or penoplex, you must have in stock:
- Mineral wool boards;
- Dowel fungi;
- Assembly knife;
- Roulette;
- Level;
- Putty knife;
- Roller/brush;
- Drill with attachment;
- Round capacity 20-25 liters.
Tools and materials for do-it-yourself basement insulation work
Installation of thermal insulation boards
Mineral wool should not be subjected to prolonged loads, as this negatively affects the thermal conductivity of the material. Therefore, when insulating the base, it is necessary to use lathing:
We install steel brackets on the prepared surface. To minimize heat dissipation at the points of contact between the metal and the wall, you can use a gasket made of paronite or any other heat insulator. We fasten the sheathing elements to brackets - these can be wooden beams with an antiseptic or U-shaped steel profiles
The elements are fastened with stainless steel screws. We lay mineral wool slabs in the sheathing, paying attention to the high density of the material - at least 130 kg/m3, this is the kind of mineral wool that is recommended for facade work. We fix each slab using disc-shaped dowels - four units of fasteners for each slab. The gaps between the plates must be filled with self-expanding foam, which will make the insulation layer monolithic. After this comes the finishing stage, most often mineral wool slabs are covered with basement siding - such insulated panels on a steel base must be at least 20 mm thick
In this case, thin slabs of mineral wool can be used for insulation.
Do-it-yourself methods for insulating the base
Builders use a wide variety of technologies for insulating foundations and plinths. Some have been known for a long time, while other methods began to be used after the emergence of new materials. The base of the house should be insulated around the entire perimeter to reduce heat loss and protect the foundation from freezing.
Insulating the base of a house with your own hands The base is usually divided into two parts: above and below ground level. It is in constant contact with the ground, moistened by rain, melt water and splashes, so it is in a wet state. This means that to insulate the foundation base, you should use moisture-resistant insulation.
If the thermal insulation system is based on a non-waterproof material, for example, you decide to insulate the base with polystyrene foam or mineral wool, then the insulation should be located more than 30-40 cm from the top edge of the ground so as not to be negatively affected by melt water.
There are several technologies for thermal insulation of the foundation - ideally, external insulation has priority over internal insulation, since the structure of the base in this case will be completely protected from the cold. However, due to various circumstances, this is not always possible - so we will consider each method of insulation separately.
Manufacturing of concrete blind area
Any foundation requires a concrete blind area. It varies from 80 cm to 2 m, it all depends on the characteristics of the soil. If the trench is filled with sand and gravel mixture, the blind area is made 1 m wide.
Concrete blind area is necessary to protect the foundation from moisture
First you need to make formwork , which prevents the concrete solution from spreading. The mixture of gravel and sand is leveled with a rake. Next, pegs are driven around the entire perimeter, and a frame of boards is installed in front of them.
The blind area is made with a slope so that water does not linger at the foundation and moves away from the wall of the building. Then they begin to fill the blind area with concrete. If desired, tiles are laid on top of the concrete base. The foundation is finished with decorative stone or tiles after the plaster has dried. You can limit yourself to simple painting.
It is not difficult to insulate the basement from the outside. This work will take no more than 3-4 days, but the result will please you for many years. The house will be reliably protected from bad weather and rapid destruction.
Choosing insulation for the base
The following materials can be used to insulate the base.
Expanded polystyrene foam
Foamed polystyrene or polystyrene foam is a popular option for base insulation. It holds its position despite the advent of more modern materials. Such insulation has low thermal conductivity, is not hygroscopic, can be cut without problems, weighs little, and therefore does not cause problems during transportation and installation. You can install such insulation yourself without additional help.
A material such as polystyrene foam has increased strength and is well suited for insulating the base because... tolerates mechanical loads, the thickness of the plate can be in the range of 20-100 mm. The colder the climate, the thicker the insulation layer should be. In some cases it is laid in two layers. The operating temperature of the foam is from -60 to +80 degrees Celsius - within these limits the material does not change its characteristics. Polystyrene foam will work for at least 25 years; if you properly arrange the thermal insulation cake, you can count on 35 years of operation.
Extruded polystyrene foam
Extruded polystyrene foam or penoplex is in first place in the list of thermal insulation materials for insulating the foundation base. According to its characteristics, such insulation for the basement of a house from the outside is similar to polystyrene foam, but is more rigid and durable, so it can better withstand soil pressure without sagging. The benefits include the following:
- Low thermal conductivity ensures good thermal insulation properties
- Does not absorb moisture due to the closed-cell structure
- Shows good compressive strength
- Designed to last at least 50 years
- Does not attract biological objects, be it rodents or mold
- No installation or processing complexity - all necessary work can be carried out on your own
- Affordable price
- Additional sound insulation
Does not absorb moisture due to the closed-cell structure
Additionally, it is worth noting the material’s resistance to fire - it is due to impregnation with fire retardants. This material also has disadvantages, which include a large number of joints. This drawback is typical for any other tile materials for basement insulation. In order for the insulation layer to become monolithic, it is necessary to treat the joints - they can be covered or foamed. Interlocking tile materials are also available to ensure a tight joint. At the same time, the likelihood of cold bridges appearing is reduced.
This material is quite strong and elastic, so it can bend. However, it can be cut without any problems with a special knife, and the material will not crumble like polystyrene foam. It is preferable to install insulation in dry weather at high temperatures. You can also use extruded polystyrene foam to insulate the blind area.
Spray insulation
Foamed polyurethane foam has an ideal set of qualities for insulating a basement. This material is applied with special installations, inside which the polyol and isocyanate are mixed, which provokes the synthesis of the polymer, as well as the release of carbon dioxide. It is the gas that provides the foamed structure of the material. In this case, the bubbles do not connect with each other - this guarantees the absence of hygroscopicity. This material is sprayed in a thin layer onto the prepared base; some of its positive properties include:
- Resistance to mold, mildew
- Excellent thermal insulation material with low thermal conductivity coefficient
- Due to spraying, the layer becomes monolithic without cracks and defects, seams and other fluctuations
- The material is tough, elastic, light and durable
- Excellent maintainability - any crack can be repaired with a portion of polymer
- Minimum application time - the base can be treated in one day
Any crack can be sealed with a portion of polymer with such insulation of the base.
Among the disadvantages, one can note the high cost of such finishing of the base. You will also have to hire a specialist and rent equipment.
Having completed the insulation, it is important to promptly complete the finishing of the facade, since such material does not tolerate sunlight
Requirements
The base is the main part of the base, located above the surface of the ground. From below it is in contact with the ground, which freezes. It is characterized by dampness. The side faces are constantly exposed to precipitation and sudden temperature changes. Heat loss increases. The room cools down quickly. Feels damp. Mold appears on the floor and walls. Rapid wear and deterioration of building materials is observed. The surface of the structure is covered with cracks. Cracks form in the coating. The foundation needs major renovation.
Destruction
Insulating the base will eliminate the problem with cold bridges. The outer surface is protected from increased levels of moisture, freezing, and mechanical damage. The house will last much longer without major repairs.
Insulation
Building materials for insulation must meet the requirements:
- low level of thermal conductivity;
- minimal water absorption;
- maximum compressive strength;
- resist microorganisms.
The better the insulating coating, the longer it will last without repair. There are no strict requirements for environmental friendliness. The coating will be located on the outside of the building among sheets of waterproofing and decorative cladding.
Characteristics table
Installation of sheathing on the plinth
You can insulate the basement of a house from the outside with your own hands both during construction and during operation of the house. Stages of installation of thermal insulation:
Surface preparation. A trench at least 1 m wide is dug along the perimeter of the foundation. The base of the house is cleaned of dirt and flaking concrete. The part that was underground is treated especially carefully. First you need to walk over the surface with a wire brush, and then rinse with water from a spray bottle. After this, allow the foundation to dry completely for several days. Arrangement of drainage. If groundwater flows close to the house, it often floods, so it is necessary to install drainage. The bottom of the dug trench is covered with sand, then a layer of geotextile is laid out, and then a layer of gravel. The last stage of drainage is the installation of a perforated pipe, its end is brought to the collector. Next, the pipe must be wrapped in geotextile and covered with a mixture of sand and gravel. Priming the base
It is important to check for potholes and cracks in the walls. To seal irregularities, use a latex-based composition
The primer will fill all the depressions present on the surface, and will also better connect the sheathing layer to the foundation. Basement waterproofing. It must be carried out so that moisture does not get on the concrete. It is convenient to use polyurea for the waterproofing layer; it is easy to apply and can last more than 30 years. After applying a liquid layer of this insulation, a thin but durable film is formed on the surface. You can also use liquid rubber for waterproofing. Its service life is shorter, but it costs much less. The product is sold ready for use; it must be applied to the surface of the base with a spatula. Insulation fasteners. The insulator sheets begin to be installed from the corner of the foundation from bottom to top. It is recommended to glue the insulation in a checkerboard pattern so that the seams do not coincide with the previous layer. The insulator coated with glue is pressed well against the base and held for several seconds. On the lower part of the foundation, which is then covered with earth, the material is not further strengthened. On the part that remains open, the insulation must be secured with dowels. Use a drill to drill holes in the insulator and concrete so that the dowels extend 4 cm into the foundation. The size of the nails can be different, it all depends on the thickness of the insulation. Upon completion of installation of the insulator, all seams are treated with bitumen putty or polyurethane foam.
Backfilling the trench. After all the cracks and gaps have been sealed, the trench is backfilled. It is necessary to lay out the first layer of coarse sand. A mixture of gravel and sand is poured over it. Plastering the surface. To protect the insulation from moisture that accumulates after rains at the base of the foundation, a fiberglass mesh is attached to the walls, which acts as reinforcement. Then the foundation is plastered.
Insulation methods
Internal insulation of the base
To prevent humidity from damaging the insulation and it, in turn, not losing its thermal characteristics, it is necessary to use moisture-resistant insulation, for example, penoplex.
When insulating the base, two methods are used:
- External insulation. With this type of insulation, it is preferable to use a material that has zero water absorption. Penoplex has similar properties. This work can be done with your own hands, without the help of specialists. Additionally, you will need to make a good waterproofing of the foundation, for example, from roofing felt, or treat the surface with bitumen mastic.
- Internal insulation. The procedure for insulation is similar to the steps in the first method. The only difference is that the base is lined from the outside. The advantage of the internal arrangement is that:
- protection from groundwater occurs;
the microclimate improves.
However, there is also a drawback: the appearance of condensation between the insulation and the wall.
We insulate the base
Insulating the basement from the outside allows you to solve the following problems:
- reducing heat loss allows you to reduce heating costs;
- preventing the formation of condensate, thereby increasing the service life of the foundation;
- protection of the waterproofing layer from external factors;
- protection of the foundation from freezing soil.
One of the options for thermal insulation of the base: diagram
Materials for insulating the base
The most widely used materials are:
Polystyrene foam is produced by heating polystyrene granules. During processing, the molten mass is foamed. The material has high thermal insulation properties, low weight and low price.
That is why external insulation of the base on your own is most often carried out using polystyrene foam. However, the disadvantages of this technology include flammability and susceptibility to mechanical loads.
Insulation of the base with polystyrene foam.
Penoplex (photo) is obtained by melting polystyrene granules. After this, the mixture is passed through an extruder and foamed under the influence of inert gases. During processing, a polymer is formed that has a cellular structure, which helps protect walls from moisture.
The advantages include a long service life while maintaining the original properties, strength, fire resistance and unattractiveness to microorganisms. Therefore, the insulation of the basement in a private house from the outside is often carried out using it.
Insulation of the basement of a private house with penoplex.
Polyurethane foam has high hydro- and heat-insulating properties. In addition, the material is characterized by high soundproofness. Special devices are used to spray the base with polyurethane foam.
A layer thickness of 5 cm will create optimal conditions, while the thickness of polystyrene foam to obtain the same properties should be 12 cm.
The base can be insulated with polyurethane foam by spraying.
- Mineral wool is distinguished by its low price, however, it is used more often for wall insulation. Its use for insulation is impractical, since it loses its original properties when exposed to moisture.
- Plaster, which allows the installation of a reinforcing layer, can also act as insulation. This layer contains a dry adhesive mixture and a mesh made of fiberglass. This helps prevent cracks from occurring in the thermal insulation layer.
Finishing the base with plaster.
Sequence of base insulation
The following instructions describe the main stages of work on organizing thermal insulation.
- First of all, you should prepare the surface of the base and foundation. To improve the adhesion of the adhesive mixture, it is necessary to level the walls. Unevenness can be eliminated using a knife or other tool designed for this work. Small notches made in the wall, in which the glue will collect, will allow you to better hold the insulation.
The walls, previously cleaned of dirt, need to be leveled, puttied, and primed.
- Next, you need to dig a trench around the perimeter of the entire house. A screed is then placed on its bottom, consisting of the following components: sand, water, cement and expanded clay in a ratio of 3: 1: 1: 6. To improve the wettability of expanded clay, add a spoonful of liquid soap to the water.
- After the screed has hardened, you can begin laying the foam sheets. An adhesive is applied to the boards. After which its material is applied to the wall. To ensure reliable fastening, it is recommended to use dowels with a disc-shaped head.
A disc-shaped dowel can be used as a fastener for insulation.
- At the next stage, we begin the reinforcement, which consists of two layers. First, polystyrene foam is treated with an adhesive solution, onto which a plaster mesh is applied.
After waiting for the first layer to dry, lay the reinforcing layer.
- At the final stage, the base is lined, which not only acts as a decorative element, but also helps protect the thermal insulation layer. The choice of a particular material depends on your own preferences and financial capabilities.
Covering the base, attaching the reinforced mesh to the wall.
The result should be an insulation system that allows you to maintain a temperature of about ten degrees above zero even in the most severe cold.
Plastering technology
We apply a layer of plaster - the entire wall is plastered in one step, as is the subsequent stage of painting.
Instead of cladding, the base can be plastered - to do this, follow the following steps:
- We install the starting strip at the level of the base, protecting the thermal insulation layer from below.
- To prevent mechanical damage, we cover the layer of mineral wool with a reinforcing mesh, placing it on the adhesive mortar.
- At the corners we use special corner profiles - they are squeezed into the solution, after which they can be covered with reinforced mesh on top
- Next, we apply a layer of plaster - the entire wall is plastered in one step, as is the subsequent stage of painting. Otherwise, the joints of the old and new layers will be visible on the wall surface.
- When applying each of these layers, you must allow the previous one to dry.
Which foundation insulation to choose?
Natural materials, such as mineral wool, are not usually used for foundation insulation. The insulation quickly absorbs and accumulates moisture, and shrinks under the mechanical influence of the soil. All this leads to the fact that thermal insulation cannot perform its intended functions.
A good option for such work would be to use synthetic insulation. For example,
- Expanded polystyrene.
- Extruded polystyrene foam.
- Polyurethane foam.
Expanded polystyrene
This material is often used not only as insulation for facade walls, but also for foundations. The base is covered with polystyrene slabs with high densities and a thickness of at least 5 cm. The main advantages are called:
- Light weight, which simplifies transportation and installation.
- The rectangular shape allows both an experienced craftsman and a beginner in this field to quickly and efficiently complete the installation process.
- Low thermal conductivity.
- Soundproofing properties.
- Chemical and biological inertness.
- Moisture-repellent properties.
Extruded polystyrene foam
This is the closest relative of polystyrene foam. During the manufacturing process, another stage is added - extrusion, which gives the insulation improved characteristics. Therefore, extruded polystyrene foam differs from polystyrene foam:
- Greater density for the same slab thickness, which means that it can be used less under equal conditions.
- Absolute impermeability to steam and moisture.
- Increased strength characteristics.
- Possibility to install slabs vertically and horizontally.
- Biological inertia.
Builders call this insulation penoplex, but this is just one of the brands that produces extruded polystyrene foam.
Polyurethane foam
Insulation of the foundation of a house from the outside is also carried out using liquid insulation, which is sprayed onto the base using special equipment and quickly hardens. Polyurethane foam is able to protect concrete well from negative impacts, since in addition to standard characteristics it has a number of advantages:
- It is applied in a continuous layer without joints or gaps, which makes thermal insulation more effective.
- Foam fills all cracks and potholes that may have appeared during operation.
- The composition hardens quickly, so the base can be sheathed with finishing materials immediately after thermal insulation work is completed.
- Performs the function of waterproofing.
- It adheres to concrete, brick and wood bases because it has excellent adhesion properties.
Thanks to these advantages, polyurethane foam is gradually replacing polystyrene foam and penoplex in private construction. But there is one difficulty. It is impossible to apply insulation without special installation.
Expanded clay
Before the advent of modern synthetic materials, expanded clay and slag were used. These materials are inexpensive and have low thermal conductivity.
But in order to properly and effectively insulate the foundation with expanded clay, it must be used in large quantities. In addition, the process of arranging bulk thermal insulation is multi-stage and labor-intensive. There are, of course, some advantages:
- Economy option - affordable price.
- Everything can be done with your own hands without the help of professional craftsmen.
- Expanded clay is a cheap material.
- Used for horizontal (on the ground) and vertical insulation.
- Safety for human life and health, as well as the environment.
Material characteristics
The foundation, along with other structures of the house, needs to be insulated. It is important to choose the right insulator, taking into account the structure of not only the base, but also the house. Materials for thermal insulation of the base:
- Expanded clay. Frost-resistant material made from baked clay. It is used as bulk insulation around the perimeter of the base. Strong, durable, has high thermal insulation properties, does not burn or rot. Environmentally friendly and inexpensive. Disadvantages of expanded clay: additional preparation is required when working, high material consumption.
- Mineral wool (stone, slag, glass wool, ceramic wool). Used to insulate the base from the inside. Doesn't burn, holds heat well, absorbs noise. Does not rot, does not deform, does not shrink. Mineral wool is resistant to chemicals, is easier to install, and has a reasonable price. Disadvantages include vapor permeability and the need to use special protective materials. Cotton wool crumbles and can cause irritation to the skin and respiratory tract when working with it.
Mineral wool is fire-resistant, does not rot, and has excellent thermal insulation properties. - Warm plaster. A viscous mixture, which may include polystyrene, vermiculite, and sawdust. Advantages of the material: allows you to create an even layer without seams, has an acceptable cost. The work can be carried out independently, in a short time. Plaster cladding has several disadvantages. The coating is heavy and creates a load on the foundation. If you apply a layer of more than 5 cm, the plaster will begin to crumble over time. Absorbs moisture, so waterproofing is required. This insulation cannot be left without finishing; it is primed and facing materials for the foundation (stone, panels) are used.
- Styrofoam. The material is cheap, durable, easy to process. Retains heat well and allows for sheathing work to be carried out in a short time. It has some disadvantages: fragile, able to absorb moisture, smells unpleasant when burning, freezes at too low a temperature, is damaged by rodents, loses its properties when exposed to ultraviolet radiation.
- Polystyrene, penoplex. Foam material. This type of insulation has many advantages. It has good thermal insulation qualities, is not afraid of temperature changes, and almost does not absorb moisture. The material is dense, durable, and can withstand mechanical loads. With proper installation, the service life is more than 25 years. Inexpensive and lightweight penoplex is easy to transport and install (it is easy to cut into pieces of the desired size). The material has significant drawbacks. It is vapor permeable, so additional protection is required. Fire hazardous; when ignited, it emits a pungent odor.
Penoplex - heat-resistant and moisture-resistant, but vapor-permeable material - Foamed polyurethane (polyurethane foam). Lightweight, durable, resistant to temperature changes, exposure to oils, solvents and acids, does not mold. The service life of polyurethane is more than 40 years. It is easy to install and does not require careful surface preparation. Disadvantages of polyurethane foam: flammable, melts, produces unpleasant smoke.
- Thermal panels. Multilayer material with insulation inside, usually in the form of slabs. Consists of polyurethane foam with a special protective coating. On the outside, the decorative layer can imitate any facing material. When installing, you need to coat the material well with adhesive and additionally secure it with dowels. If the foundation is uneven, you need to make a sheathing. Thermal panels are an expensive facing material.
For independent work, polystyrene foam is most often chosen.
Why is it important to insulate the basement?
The basement, located between the main walls and the foundation, takes on a number of negative impacts:
- The basement area is not heated during winter frosts, so it can freeze. Drops of water that get into the pores of brick or wood at sub-zero temperatures crystallize, expand and destroy the material.
- During the winter season, snowdrifts accumulate around the house. In the spring, they begin to melt, and the resulting water is absorbed into the foundation and base structure, flooding the lower part of the building.
- During rains, water flowing down the surface of the walls gradually penetrates into the area of the house located above the foundation.
- Due to capillary suction, moisture concentrated in the concrete foundation penetrates into the base and accumulates in it.
In addition to all of the above, an impressive structure puts pressure on the plinth, due to which enormous stress is created in it, which leads to its increased wear.
The unprotected basement space gradually becomes damp and begins to collapse. Repairing this element of the house is a complex, time-consuming and expensive task. It is better to exclude this possibility by thermally insulating the basement foundation at the stage of building the house.
(no votes yet)
