Incorrect hydro- and vapor barrier is one of the most common technological mistakes when installing siding. It can lead to mold and mildew underneath the trim, which homeowners unknowingly blame on their siding.
How to properly protect walls and insulation from steam and moisture? How is vapor barrier different from waterproofing? And in what cases are they needed, and in what cases can you save money and do without insulating films and membranes? Let's find out!
What is a vapor barrier?
Siding protects the walls of the house from rain and wind. However, the panels are not sealed, so moisture somehow penetrates under the finish. To protect the walls and insulation from its negative effects, a ventilation gap is left between the ventilated facade and the wall (insulation), and a vapor barrier and wind and moisture protection are installed.
The vapor barrier is installed between the wall and the insulation. To describe the principle of its operation, let’s first figure out where the steam and water come from.
Almost all walls “breathe”, that is, they allow air and steam to pass through to a greater or lesser extent. Steam penetrates from a warm room to the street, where most of the year the air is much colder. Accordingly, the temperature inside the wall is not uniform: near the inner surface it is higher, near the outer surface it is lower. At a certain level of cooling, steam turns into water - this is the so-called dew point. To calculate it, special tables are used.
The location of the dew point depends on the temperature and humidity indoors and outdoors. If it is on the inner or outer surface of the wall, condensation will form there. If the house is insulated from the outside, the dew point moves closer to the insulation. As a result, the resulting condensate will penetrate into the structure of the material. This is not a problem for foam plastic (it itself has low vapor permeability and is often used as a vapor barrier). And mineral wool and mineral slabs will get wet. At the same time, their thermal insulation properties deteriorate significantly. In practice, it has been proven that increasing the humidity of insulation by just 5% reduces its effectiveness by half.
In addition, wet insulation becomes an excellent habitat for fungus and mold, facilitating their spread to the walls of the building. If this is not dealt with, then in the future moisture will cause their premature destruction.
Now it becomes clear why a vapor barrier under siding is needed. Firstly, it protects the insulation from condensation. Secondly, the vapor barrier film does not allow steam to reach the dew point, which means condensation does not form not only in the thermal insulation material, but also on the inner surface of the walls.
The issue of vapor permeability
The building wall in SNiP is described as a multi-layer enclosing structure. Interior decoration - wallpaper, for example, plaster, the wall - monolithic, with voids, double, and exterior decoration - this is the simplest version of its construction. If thermal insulation is assumed, the design becomes much more complex.
Obviously, the ratio of different materials in such a “pie” cannot be random and is subject to a certain pattern. It sounds like this: the ability of a material to remove steam should increase from layer to layer from the inside out.
Why is this necessary? In a residential building, a constant source of steam formation is not only a gas stove or water in a sink, but also people, animals and plants. Steam released through breathing or during washing and cooking is removed using a ventilation system or simply through an open window, but also through the walls of the building. If this does not happen, moisture accumulates in the room, and condensation falls on surfaces - walls, furniture, clothing.
- This case is best illustrated by a bathroom in a multi-story building, where there is almost never good ventilation. After taking a bath or even a shower, the entire room from the ceiling to the handles on the washing machine becomes wet. Why? The bathroom is finished with tiles or tiles; this material is completely vapor permeable, and therefore moisture is not removed at all. The dew point is condensation, located inside the living space on the walls.
- Option two is thermal insulation inside. A solution that builders try their best to avoid. Compared to a brick wall, the vapor permeability of insulation is much higher, therefore, in the design - finishing / insulation / wall, the most vapor-permeable element is mineral wool or polystyrene foam. Condensation falls in the thermal insulation area and quickly destroys the material, which makes waterproofing necessary.
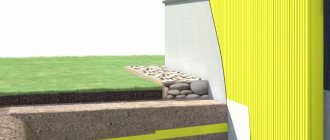
- If insulation is carried out from the outside, then the “pie” looks like this: wall/insulation/cladding, and, again, the dew point falls on the thermal insulation layer, since the cladding absorbs moisture much less. To prevent this from happening, the insulation is protected with hydro- and vapor barrier. Then the dew point ends up in the air gap between the wall and the insulation, for which purpose a substantial ventilation gap is left here during installation.
Installation of siding without insulation
- But if the walls of the building themselves have high thermal insulation characteristics - a brick wall of sufficient thickness, for example, then there is no need to additionally insulate them, but they do need to be protected from wind and rain. Do you need waterproofing and wind protection for siding without insulation?
The design looks much simpler: wall/cladding. However, the vapor permeability of the wall is higher than that of both metal and vinyl finishes, that is, the rule for increasing vapor permeability occurs and the dew point ends up in the area between the wall and the finish.
To avoid moisture accumulation, a ventilation gap is left between the finish and the wall. Therefore, installation of finishing without thermal insulation is quite possible, but without sheathing - not. If there is an air layer, then condensation accumulates on the inner surface of the finish, which is insensitive to water; if not, then directly on the wall, which leads to its destruction.
- Is waterproofing required here? It is not needed, since during sheathing its task is to protect the insulating layer, which in this case is not used.
- Do you need a vapor barrier for siding without insulation? Vapor barrier or wind protection is a vapor-permeable membrane that allows steam to pass in both directions, but water only in one direction, away from the heat-insulating layer. Again, if it is not there, then there is nothing to protect. Siding technology without insulation
Installation without heat and vapor barrier is much simpler.
- The surface of the facade is cleaned. Old finishing, if any, must be removed. If you plan to cover a wooden house with siding without insulation, then before work you should caulk the cracks between the beams or logs - this procedure will significantly reduce heat loss.
- A sheathing is fixed to the surface - made of a galvanized metal profile or a wooden beam treated with an antiseptic. The thickness of the timber should not be less than 50 mm, despite installation without thermal insulation.
- The pitch between the frame elements, as well as the direction - vertical or horizontal, are determined by the type of siding - lamellas, panels, and installation method.
- The material is fixed to the sheathing using the usual method: first, the starting strip is fixed, then the corner elements and near-windows, and the connecting profiles are fixed, if necessary.
- Then the panel is inserted into the groove of the starting strip and fixed to the sheathing. The fastening is not rigid; a film under the siding without insulation is not needed.
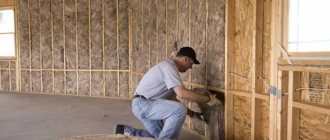
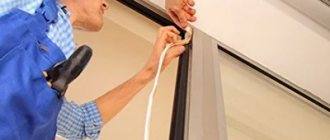
The photo shows one of the working moments.
Is a vapor barrier under siding always necessary?
Another important question: is it possible to do without a vapor barrier? And if so, in what cases?
Vapor barrier of walls under siding in the presence of insulation is required. But is a vapor barrier necessary for siding without insulation? No. Without it, wind and hydro protection is sufficient.
In addition, a vapor barrier is not required if:
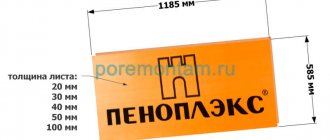
- the house is insulated with expanded polystyrene (including as part of SIP panels);
- the walls of the house are very thick and retain heat well (in this case, the thickness of the insulation is minimal - no more than 50 mm, and there is no need for vapor barrier);
- A vapor barrier is installed on the inside of the house.
Selection of thermal insulation products
Various types of siding are used for cladding buildings made from a variety of materials. It is better to select insulation for a specific type.
House made of foam concrete or aerated block
Although such facade materials themselves act as insulation, their thickness is not always sufficient. In addition, the unattractive appearance requires cladding, which siding does an excellent job of.
Thermal insulation material for buildings made of foam block and aerated concrete must have high vapor permeability
Frame and panel buildings
The choice of thermal insulation material for these houses must be approached carefully; they need reliable insulation. The recommendations are as follows:
External activities with such houses imply taking into account the thermal insulation material that was used for internal processes.
It is impossible to say exactly which insulation is better; you need to proceed from the specific situation. Compliance with existing requirements and recommendations will help you make the right choice.
How to properly protect your home from moisture and steam?
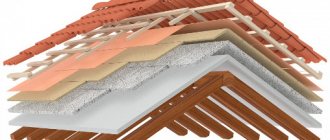
In most regions of Russia, the house needs insulation, and therefore a vapor barrier. The correct moisture protection technology in this case resembles a layer cake and looks like this:
Layer 1. Vapor barrier.
The vapor barrier film is attached directly to the wall of the house. To ensure high-quality protection of the insulation, it is mounted with an overlap. By the way, modern vapor barrier films are made according to the membrane principle: steam does not penetrate into the insulation, but at the same time can be removed from it. When using such material, it is important to lay it on the correct side.
Layer 2. Insulation.
Insulation is installed on the vapor barrier film. Detailed technology for installing it with siding sheathing can be found in the instructions on our website. We especially note that it is important to avoid cold bridges.
Layer 3. Wind and hydro protection.
To protect the insulation from moisture during rains and snowfalls, wind and moisture protection is installed on top of it.
Layer 4. Ventilation gap.
To prevent moisture from stagnating under the finish, there must be a ventilation gap between the panels and the insulation. Freely circulating air promotes moisture evaporation and prevents the formation of fungi.
Layer 5. Siding or facade panels.
The final stage is the installation of siding or facade panels. The technology for their installation is described in detail in the instructions. By the way, if you have not yet chosen which siding to use to decorate your home, take a look at our catalog. In it you will find a huge selection of finishing materials. You can try them on for your home in the Alta-Planner online program. It's easy to do - the results are very clear!
The pie is ready. The insulation is protected from moisture on all sides and will retain heat even in harsh winters.
Assortment and calculation of materials
To determine the amount of materials, you first need to choose the type of finish. How to install siding with your own hands with insulation of a wooden house, consider an example of installing the system, since their fastening system is universal
When choosing a finishing style, pay attention to the area of the panels
We recommend making a sketch of the future cladding with dimensions. It will allow you to calculate the area and number of joints. You will know the number of panels accurate to one or two pieces.
The rich assortment can be an example of a skillful combination of profiles and fasteners.
- Vertical panels S7 have a useful area of 0.55 m², length - 3050 mm.
- Horizontal panels D4.5 “Ship timber” (S - 0.85 m², L - 3660 mm).
- "Blockhaus" (S - 0.88 m², L - 3660 mm.).
- D5C “Herringbone” (S - 0.78 m², L - 3050 mm.).
“Hurricane-proof” lock (high-strength) ensures that the panels will not come apart even in the strongest gust of wind. The finishing of window and door openings is done with complete profiles: slopes, platbands, near-window profiles. Corner elements, starting and finishing strips, moldings and an H-shaped profile allow you to fix the ends of the panels.
The calculation of the lathing is made taking into account the distance between the slats - 20 cm. The thickness of the bars should be no less than the thickness of the insulating materials by 0.5 cm, and the width should be 3-4 cm. If you want to increase the space between the plastic and the insulation to 2-3 cm, you will need a thin lath (2-3 cm) the same width as the bar. It is sewn onto each batten over the waterproofing. A small space will make air circulation with water vapor more active, which is useful for mineral mats.
The bars must be dried to 15-20% humidity and treated two to three times with protection against rotting and fire. Nails should be 3 times longer than the thickness of the bar. To fasten siding and other elements, purchase galvanized screws with a wide flat head (length 25 - 35 mm, head up to 0.8 cm). Starting and corner elements are fastened after 20 cm, and the main casing can be screwed after 40 cm, but we recommend purchasing 20% more fasteners.
Instead of PS
Now you know whether you need a vapor barrier under your siding and how to install it. All that remains is to do the job correctly. Contact the certified Alta-Profile team so that the vapor barrier is installed in compliance with the technology. Ready? Your home is now warm and comfortable at any time of the year!
Good afternoon I'm going to install vinyl siding on a wooden facade (the building is old - clapboard). Part of the wall area is planned to be insulated, and part will be done without insulation. The siding will be mounted on a galvanized profile with screws. Actually question 3. Question No. 1: What screws should I use to install siding? Profile 60X27.
Question No. 2: Is it necessary to sheathe the façade of a building with glassine (or vapor barrier) under the siding? I read the following comment from the Internet: “However, in the case of reconstruction of an old facade, it is strictly not recommended to install a vapor barrier, since the walls must breathe. Vapor barrier prevents the penetration of air and the vapor contained in it from the room, and water from the insulation inside. The insulation does not interfere with this: its vapor permeability should be higher, so it is recommended to use insulation based on mineral fiber, preferably basalt.”
Question No. 3: How to fix the insulation, install wind protection and make windproofing in areas with insulation? The insulation is basalt wool – ROCKWOOL. In theory it’s clear (from the wall side) - insulation, wind insulation, air gap, siding. How to attach wind insulation to a metal profile and then create an air gap?
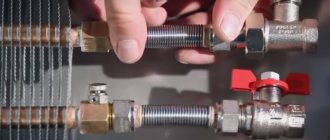
Windproof membranes for walls entered construction technology with the development of ventilated facades. This material today is presented in several main forms: as a vapor barrier or waterproofing, or a material with combined properties (the material removes excess moisture in the form of steam from the insulation from the inside, and does not allow moisture to enter from the outside). Most materials in this category are represented by films and membranes; vapor barrier boards are less common.
Types and properties of insulation
Dense slabs of mineral fiber (“basalt wool”) are an ideal insulation material for a wooden house under siding. The thermal conductivity indicator is not inferior to either brick or wood. Good air permeability allows cotton wool to “breathe” as well as wood. Standard sizes allow you to accurately determine the amount and area of insulation.
Plates marked PZh-150 (semi-rigid), PZh-175 (rigid) and PZh-200 (increased rigidity) are intended for insulation of external walls (the numbers indicate the average density of the material in kg/cub.m). The first and second are more often used in insulation, the second are usually used for enhanced fire protection. The dimensions of the slab are 60×125 cm and thickness from 2 to 12 cm depending on the density. For a wooden house, PZh-175 with a thickness of 5–8 cm is suitable. The insulation can be covered with paper or fiberglass, stitched with thread. Mineral fiber does not decompose, does not burn, and does not shrink. Depending on the binder pressed with the fiber, the hygroscopicity changes. The only drawback of the slabs is that when they get wet, the thermal conductivity decreases. Therefore, two types of protection are required: a vapor barrier membrane is laid between the wall and the insulation, and a waterproofing layer (thick film) is laid under the siding.
In Russia, the most popular, and well-deserved, insulation materials are URSA (Izhevsk), Technonikol (Nazarovo). For fastening to walls, long nails and round plates with a diameter of 3-4 cm for caps are required. There is a special fastener on sale.
Windproof film for walls: purpose, structure
Facade insulation film is used for:
- protection from atmospheric moisture when installing the so-called thermal cake;
- stopping cold (warm) outside air in order to reduce heat loss in the building;
- as a barrier - in ventilated facades it protects the insulation from snow blowing in and its accumulation under the facing material.
Water vapor barrier films for facades have the following structure:
- Waterproofing vapor-proof films consist of two layers. The inner layer is a non-woven artificial material, among the fibers of which moisture accumulates and condenses, and is removed by gravity down this layer. The outer layer is waterproofing and waterproof. It is made by spraying a thin layer of polyethylene (such films are cheaper) or acrylate (expensive branded films). They are installed with a small gap (up to 30 mm) from the insulation; there should be holes at the bottom to remove condensate.
- Vapor-permeable membranes (diffusion) – a higher class of wind protection. They consist of three layers: the outer layers do not allow moisture and air to pass through, but allow water vapor to pass through. In the center between these layers there is a vapor-conducting layer, which removes excess moisture to the outside. The outer layers are made of non-woven polyester, the inner layer is made of acrylic fabrics with a hygroscopic response mechanism. They can be installed hermetically close to the insulation material.
For high-rise buildings, reinforced films with a thicker coating can be used, which provides them with additional tensile strength. Such films can be mounted on umbrella-type mounts. The main condition is to ensure sufficient tension so that the wind protection does not “flap” under increased wind pressure in bad weather.
All films are installed taking into account the continuity condition: there should be no gaps between the wind protection strips, the joints are overlapped or sealed using construction tape. On high-rise buildings and tall structures, the film is placed vertically along the facade; on one-story and two-story facades, the roll can be rolled out horizontally, forming an overlap to ensure drainage (the lower one is launched under the top sheet).
When else is a ventilation gap necessary?
In what other cases will you need a ventilation gap between the wall and the decorative covering:
- The material of the decorative layer promotes the formation of condensation.
- The wall material under the decorative layer can deteriorate from moisture (rot, cracks, etc.).
Let me give you a simple example. If you are planning to cover a wooden house with a metal profiled sheet, then you cannot do without a ventilation gap.
Otherwise, all the moisture that will condense on the inner surface of the corrugated sheet will be absorbed by the wooden walls, which will collapse as a result.
In the case of a ventilation gap, moisture, of course, condenses on the inner surface of the profiled sheet - this is metal. But it does not have direct contact with the surface of wooden walls. And the air current that is present in the ventilation gap carries away this moisture in the form of steam and removes it from the space between the decorative layer and the wall.
Consider which of the above cases is yours and choose whether you need a ventilation gap or not. Look at what kind of insulation you have, what wall material.
Wind protection for the walls of a frame house
Wind protection of a small frame structure is done using wooden planks. According to the main structures, when the insulation is installed, a windproof fabric is stuffed and fixed with a counter-batten (pressure strip). For fixing, a rail with a section width from 20 to 40 mm is selected and placed in increments of up to 600 mm. The pitch depends on the material and its properties: if it is a durable, high-quality diffusion membrane, then the pitch can be increased to the maximum, if the material is based on polyethylene, inexpensive acrylate, it can be reduced to 300 mm. If you use a waterproofing film, then it should be 20...30 mm away from the insulation. The gap is formed by vertical slats with the required cross-sectional width, which are packed along the main structure.
It is recommended for use when cladding buildings with vinyl siding, siding panels and other common materials. Wind protection for small buildings plays an important role in combating moisture in the off-season and the accumulation of snow under the cladding in winter. Dampness, which develops in the off-season, has the most detrimental effect on the structures of frame houses: wooden parts rot, mold grows under the facade cladding. All this reduces the service life of the main structure and makes the house less comfortable.
A simple measure - installing even an inexpensive windproof film increases the service life of a building by 20-25%, increases the time between repairs to at least 10 years.
Wind bar
Of no small importance when installing siding panels is the wind board or wind strip. It helps to restrain gusts of loads from the wind. Standard versions of boards or planks, like most additional elements, are created with the purpose of redistributing any loads. The wind strip, or additional board for finishing siding panels, is a kind of retainer that takes significant loads from gusts of wind. The absence of a wind strip accelerates the wear of the siding finish and reduces the durability of the facing structure.
What is the difference between a vapor barrier and a wind barrier?
When people talk about vapor barriers, they usually mean vapor barrier films for protecting roofs and roofing coverings. These materials provide only protection from atmospheric moisture. They are thin, light, and relatively inexpensive.
Wind protection has a vapor barrier function, but has a more massive structure; often these types of films are made on a polyamide frame to withstand the effects of wind. In addition, they use additives that protect the material from the destructive effects of ultraviolet radiation - ventilated facades can be mounted from cladding slabs with a gap of up to 20 mm and these gaps create access to sunlight (on the sunny side, the total illuminated spot under the cladding can be 300% of the gap width or more , depending on the design). These films are much heavier, more tensile strength, and more expensive.
Important! Do not use materials not intended for this purpose as windbreaks. You can disrupt thermoregulatory processes, the process of removing excess moisture from the main structures, thereby activating the destruction of materials under the influence of condensation.
Step by step procedure
When carrying out the technological process of installing wind protection with your own hands, the contractor must be extremely careful, following all the manufacturer’s instructions. Rolls of windproof membrane should be mounted horizontally, in the direction from bottom to top.
It is very important to strengthen it with the right side. As a rule, the external one is considered to be the one that has the manufacturer’s brand on it. In other cases, you simply need to carefully study the factory instructions.
It is very important for any type of protective membrane to maintain the overlap size: vertically/horizontally, respectively, 150/100 mm.
The film must adhere extremely tightly to the plane of the heat insulator - this is a fundamentally important condition for its high-quality operation.
Fix the film to the heat insulator frame with galvanized nails or a construction stapler. The joints are taped with specialized tape so as to prevent even the smallest gaps. At the bottom, the membrane should not contact the ground. In this place, a drain is provided to remove condensate moisture formed on the outside of the membrane.
Outside
External installation of wind protection depends on what material will be used - roll or sheet.
There is a general order in which the layers of laminated timber walls are laid out. All outer layers are placed on a wooden frame made of timber. A vapor barrier and then insulation are placed behind the load-bearing wall . Next, after the ventilation gap, there is a wind barrier in one or several protective layers, then it is secured with a counter-lattice, after which the façade finishing goes through the ventilation gap.
Features of installing rolled wind protection for a wooden house:
- Work begins after completion of construction work on the building frame and its complete shrinkage for log and lumber objects, as well as after the walls have completely dried from treatment with fire-resistant and antiseptic impregnations.
- There is no need to cut the rolled material initially.
- The layer needs to be fixed from bottom to top, while gradually unwinding the roll.
- Secure the film with a construction stapler.
- Control the film tension level. It is considered optimal if you can make a fold of no more than 10 mm.
- You need to cut the material as the work progresses, immediately after fixing it with a stapler, using a stationery knife for cutting.
- Seal the membrane joints with construction tape.
Important! You need to purchase windproof roll films with a reserve to ensure a technological overlap of the material of 100/150 mm.
Installation technology for sheet wind protection for a wooden house:
- Before installing windproof boards, all wall surfaces must be completely dry, after treatment with special impregnations or atmospheric precipitation.
- The slabs are installed only when the installation of insulation is completed.
- The material is cut into a series of slabs of the required size with a vertical orientation and taking into account the tongue-and-groove joints.
- Such a sheet, as a rule, has one rough surface and one smooth surface. For the practicality of the following repair and cladding work, place them with the rough side inward.
- The slabs must be strengthened using large-diameter dowels; the installation norm is 5 pieces per 1 m2.
- Fix the sheets vertically.
- After this, finishing is done.
From the inside
Wind protection from the inside is installed only in exceptional cases, for special rooms with a high content of water vapor, for example, baths and swimming pools. The feasibility of installing internal wind protection should be confirmed by calculations for selecting the necessary layers of multi-layer wall protection.
In such cases, wind protection is performed in combination with thermal insulation on ventilated frame systems, which are fastened to the main wall material. For these purposes, a membrane is selected that has a universal action and has vapor and waterproofing protection.
The procedure for installing the membrane from the inside:
The inter-crown seams are carefully sealed with caulking or sealant in order to ensure 100% wind protection of the external walls.- The profile guides are fixed at 60 cm intervals along the perimeter of the walls; they are fixed to wooden structures with self-tapping screws.
- Mark the profile axis so that the insulation can be laid between them without trimming or jamming.
- Hangers are attached to the wall in increments of 60 cm.
- To install the profiles to the hangers, 9 mm metal self-tapping screws are used.
- Unoccupied edges of the hangers must be folded.
- Basalt wool in slabs is placed between bars installed according to the principle of a ventilated facade.
- Cutting the slabs is done with a regular sharp knife.
- The membrane device is applied from bottom to top with a vertical/horizontal overlap of 150/100.
- Fix the film with a stapler.
- To create tight joints, all joints are taped.
- Install lining made of natural wood.
- A small gap and gaps of 2 cm are left between the lining and the membrane along the edges of the ceiling, and additionally at the top and bottom of the walls.
Branded wind protection
- ROCKWOOL is a vapor-permeable membrane from a well-known brand. The price of a roll of 70 m2 is about 1000...1200 rubles. Used in professional construction.
- “Ondutis” is a brand spun off from the famous manufacturer Ondulin. The classic (simplest) version of wind protection - retail is offered at 600 rubles per roll of 35 m2 (all prices as of February 2022). Diffusion membranes for walls from this manufacturer cost about 4,000 rubles/roll. Today it is actively advertised for promotion in the market - the brand is relatively new.
- Wigofol is a Polish brand, relatively inexpensive. Simple windproof films based on non-woven fabric. The price starts from 500...600 rubles. per roll. More suitable for small buildings.
- TechnoNIKOL is a well-known Russian brand. Provides films at a price and quality similar to imported manufacturers.
- The Izospan brand is one of the oldest manufacturers of water vapor barrier materials in the Russian Federation. The cost of membranes is about 2300 rubles. per roll.
- Elite films and membranes are presented by European manufacturers. The price can exceed the figure of 10 thousand rubles per roll. But they guarantee the quality of the products. If you need real fire resistance indicators, purchase products from this category.
Unnamed windproof films produced in other countries (and even “membranes”) can be found below 500 rubles/roll. We do not recommend purchasing it - no one will return your wasted money.
Basic rules for waterproofing ↑
When installing a waterproofing film, certain rules must be followed:
- When laying the film, the joining of the edges should be done with an overlap of at least 150 mm, gluing the joint with tape. In this case, it is necessary to check that there are no areas not covered with waterproofing to avoid the insulation getting wet.
- The film should be attached in such a way that it cannot be damaged when installing the siding.
- The film is secured using galvanized nails with a wide head or staples using a mechanical stapler.
- A gap of about 30 mm is required between the film and the siding to allow natural ventilation. In addition, when installing some types of films, it is necessary to leave a gap between them and the insulation: this requirement must be specified in the instructions from the manufacturer.
- It is necessary to ensure the correct orientation of the film: if it is laid on the wrong side, the material will not function correctly.