You can create a comfortable microclimate in the bathroom with the help of high-quality thermal insulation. Do not forget that the bathroom is a room with high humidity, so the choice of insulation, finishing materials and the thermal insulation work itself must be taken with due responsibility.
It is advisable to insulate a bathroom located in a private house, as well as all walls of a private household, from the outside. On the scale of an apartment, it is impossible to carry out external insulation of a bathroom, so all thermal insulation work is carried out from inside the room.
For what reasons can the bathroom be cold?
One of the walls in the bathroom is external - or opens into an unheated room. Usually there is external insulation of the house, but sometimes it is not always effective, and if in other rooms there may be no elementary cold bridges, or due to the radiators this deficiency is not felt there, then in an unheated bathroom everything is different.
Often the cause of low temperatures is poor performance of the heated towel rail, the presence of powerful natural draft that simply removes air from the room, or the presence of cracks in wall structures. If the latter are present, it is necessary to seal, and perhaps this will be enough to prevent unnecessary heat loss.
Important! In apartment buildings, usually the walls of bathrooms and toilets are not combined with the outside, but open into the entrances. The latter are usually not heated, and in winter they are often quite cold. And if the fate is that the internal walls of the house are usually made thinner, then large heat losses are not surprising.
Foamed polyethylene
You can soundproof your bathtub yourself using polyethylene foam or so-called polyethylene foam, abbreviated PPE, which is an excellent sound, heat and waterproofing material. This material is a layer of bubbles filled with air.
A little about suitable material
The process of soundproofing a metal bathtub made of a steel alloy with your own hands involves the use of modern modifications and developments of foamed polyethylene, which has an additional foil or metallized layer, such as isolon, peonozol, etc. Such materials have the property of additionally retaining the heat of a filled bathtub.
Features of the work
The simplest method of soundproofing is the use of self-adhesive mats, but if such elements are missing, then you will need to use a high-quality adhesive. At first glance, the gluing process itself does not present any difficulties and is extremely simple. To do this, the bathtub must be treated with glue, then apply and press the prepared insulation. In fact, when using this method in practice, it is quite difficult and labor-intensive to soundproof a bathtub yourself, since this process takes a lot of time.
What are the dangers of low temperature in the bathroom?
It doesn’t matter whether we are talking about the walls in a wooden house or concrete structures - the combination of the high humidity characteristic of a bathtub with low temperatures, as well as insufficient ventilation, leads to the formation of fungus. And the active growth of mold on the walls not only spoils their appearance, but can also have a detrimental effect on human health. We wrote about this, as well as about methods of combating mold, in one of our previous articles.
Costings
The estimate for installing the system includes the following costs:
- materials - basic and heat-insulating: damper tapes, films, adhesive tape and others;
- components: sensors, thermostats, fasteners, hardware and others;
- screed solutions, glue, etc.;
- surface preparation;
- installation work, installation of wiring, sensor, thermostat;
- screed and cladding.
This is a very approximate list, rather a rough diagram, since the list is individual for different types of sex. This will be discussed in more detail below. It is difficult to name exact costs, since the price of different types of materials fluctuates significantly. And the cost of installation depends on many factors. We can say that the entire set can cost 2–5 thousand rubles per “square”. Laying can cost about one and a half thousand rubles per square. Consultants on our website polaremont.ru will help you choose the appropriate option and outline its cost.
The harm from electromagnetic radiation from heating mats is greatly exaggerated
Features of internal wall insulation in the bathroom
In addition to the fact that internal insulation is always less preferable than external insulation, in the case of a bathroom there is another difficulty - a high level of moisture. Consequently, the material used for this must not be afraid of moisture and not become saturated with it, reducing its performance characteristics.
Important! It is often necessary to insulate not only the walls, but also the ceiling, since large heat losses also occur through it.
In addition to this, you must also keep in mind the following:
- When insulating walls in a bathroom, the vapor permeability indicator is often violated, so you should install a good ventilation system in the room;
- Before finishing with insulation, walls should be treated with antifungal impregnations. It doesn’t matter whether we are talking about a wooden wall structure, or brick or concrete, the risk of mold formation is equally high;
- The formation of cold bridges must not be allowed, so pay close attention to the absence of gaps between the insulating boards;
- To prevent moisture from affecting the insulation, it is necessary to use a water barrier.
Polyurethane foam
Many consumers are wondering how to thoroughly insulate a steel bathtub. To solve this problem, polyurethane foam is used, which is used in construction and repair work to seal doors and windows.
Let's look at how to soundproof a bathroom using polyurethane foam with your own hands. For this:
- We turn the bathtub container over and slowly apply a layer of polyurethane foam, having previously degreased the surface. For this purpose, an alcohol-containing composition is used, which should be used to treat the outer surface of the bathroom.
- For ease of use, we turn the container over from its legs and place it on the side of the bathtub, using some kind of soft surface to prevent accidental scratches and any damage.
- We apply the mounting foam evenly, in a continuous layer, and carefully ensure that there are no gaps. Since polyurethane foam has the property of fluidity, the layer must be applied very slowly. After the coated foam has dried, the bathtub must be turned over to the other side.
Before you start treating the outer surface of the bathtub with polyurethane foam, you need to familiarize yourself with some recommendations:
It is much more practical to use polyurethane foam to treat a bathtub in the summer, since this product is resistant to high temperatures and swells better; polyurethane foam must be used only for indoor use; to form a uniform layer without sharp gaps, bumps and drips, it is preferable to use a special nozzle for applying foam; for this, a construction gun is used; Do not treat the overflow area with polyurethane foam; Before starting treatment with foam, it is recommended to heat the container under running hot water and shake well - with this procedure, the largest yield of foam will be observed, and at the same time it is very economical; it is not recommended to cover the siphon installation area and the area adjacent to it with a layer of foam, since at any time, if necessary, this part must be accessible for replacing the siphon; When processing with polyurethane foam, be sure to pay attention to the expiration date, after which the used product loses its performance properties.
Foam selection rules
When purchasing cans of foam for soundproofing a bathtub with your own hands, pay attention to its type. For planned processing, the ideal option is polyurethane foam, also called polyurethane sealant
After hardening, such foam expands from 1.5 to 2 times. This is very convenient, since the created layer slightly increases the size of the bathtub container and does not complicate subsequent installation.
With this application, a dense, uniform “casing” is ultimately formed. When treating with polyurethane sealant, having reached the location of the drain system fastening, this area can be left free. At the same time, you not only save foam, but in the future you do not have the problem of cutting it off. These tips will help you soundproof your bathtub yourself without making mistakes.
The advantage of soundproofing a bathtub with polyurethane foam
Carrying out high-quality sound insulation and insulation of a bathtub using polyurethane sealant is a profitable solution:
- The minimum amount of money and time spent is characterized by such an option as a budget option, which can be used by everyone.
- Unlike vibroplast, this product does not require any special effort to process the bathtub.
- If you strictly follow the above recommendations and preview the video of the master class, then every owner will be able to use this technique without any problems. The only condition is the correct and careful selection of the foam needed for the job.
We insulate the walls in the bathroom with various materials
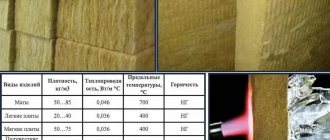
First of all, you should abandon mineral wool, as it absorbs moisture and increases its heat transfer capacity. If you use rolled material, it is better to use basalt wool, which is mounted in a similar way, but almost does not absorb moisture. However, such material still needs an effective vapor barrier. And therefore, after reading the construction forum, you will find advice to take a closer look at other methods. Now let's look at other insulation materials:
- Styrofoam. An excellent option for the bathroom. The high fire hazard in the case of this room does not play a role, since fires almost never occur in the bathroom. But low cost, environmental friendliness and ease of installation are the undoubted advantages of this choice. Its thermal insulation qualities are excellent, and the foam is not afraid of moisture. However, the material almost does not “breathe” - it has low vapor permeability. Placed on pre-cleaned and leveled walls using an adhesive composition;
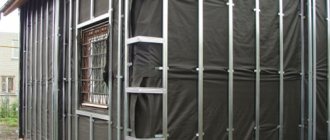
- Polyurethane foam. This polymer layer is sprayed using a special apparatus, and it is better to trust the process to professionals. Like polystyrene foam, polyurethane foam is not afraid of moisture, and its adhesion is great with almost all materials. On the material side there is high vapor permeability, fire resistance, insulating qualities and environmental friendliness. Usually sprayed on walls with a pre-arranged frame. The latter helps in further finishing;
- Warm plaster. It differs from the usual one by the presence of filler in the form of polystyrene foam, vermiculite or sawdust. The goal is to reduce thermal conductivity by using less dense materials or air cavities. The advantages are that we not only insulate, but also at the same time level the walls for further finishing. Manufacturers talk about the high thermal insulation quality of their products, but in reality the effectiveness of such plaster is not so high, and it should be applied in a thicker layer, which is more difficult and expensive;
- Cork insulation. Before use, the material is waxed to make it more moisture resistant. Mounted on pre-prepared walls using a special adhesive composition. The disadvantage of such insulation is its high price;
- Extruded polystyrene foam. The most attractive insulation for indoor and outdoor use, and not just for the bathroom. Low thermal conductivity, minimal moisture absorption, low specific gravity. It is superior to regular foam in almost every way.
Instructions on how to properly foam a steel hot tub?
Typically, this method is used to insulate and soundproof steel bowls, but it can also be used for acrylic bathtubs.
Be sure to read articles about other methods of insulating and soundproofing bathtubs.
STEP 1: Place the bathtub upside down on the floor. Don’t forget to first place pieces of cardboard underneath it so as not to scratch the enamel surface.
STEP 2. Be sure to thoroughly wipe off dust from the surface on which you are going to apply foam. Then you need to degrease it; for this you can use a universal degreaser, alcohol or dishwashing detergent.
STEP 3. Before use, it is better to prepare the balloon. It needs to be shaken well and heated a little by placing it under running warm water for 5 minutes. It would be enough.
Under no circumstances should you heat the cylinder in a kettle or boiler, as many resources advise. Due to a significant increase in pressure, it can explode.
STEP 4. Spray the bath generously with water using a spray bottle. This way the foam will stick to the surface much better. If the bowl dries out during application, repeat the procedure.
STEP 5. Place the can on the gun and get to work. It is better to apply the foam in dense layers using a snake. Start with flat surfaces and gradually work your way up. There are no special recommendations for the sequence of surface coating
It is important not to leave any spaces
Sometimes the drain needs to be replaced, so it's best to leave a little space around the hole.
STEP 6. Now you need to leave the font until completely dry for 5-6 hours. After the foam has completely dried, cut off any excess foam at the leg attachment points using a knife.
Insulation of the ceiling in the bathroom
Important! If we are talking about a private house, then the ideal solution would be to insulate the floor on the floor above. In this case, when finishing the ceiling directly in the bathroom, you can limit yourself to a vapor barrier followed by hanging drywall, taking into account the ventilation gap.
For interior ceiling decoration, the best material would be polystyrene foam or polystyrene foam. The process looks like this:
- The ceiling is pre-leveled, cleaned of dirt and old finishes;
- Special glue is applied to the insulation sheets. It is better to coat the elements around the perimeter with a slight deviation from the edges, as well as in the middle with a zigzag;
- The sheets are pressed against the ceiling and fixed for a minute until the glue sets. It is better to carry out further work, including processing of cracks, no less than an hour later;
- A fiberglass mesh is installed on the material and putty is applied with a waterproof compound;
- The final finish can be water-based paint. It dries quickly and withstands high humidity well.
How to insulate a metal font with your own hands
Below are detailed step-by-step instructions for insulating an iron bathtub using foil polyurethane foam (penofol).
For detailed instructions on thermal and sound insulation of a bathtub using polyurethane foam, see our special article.
Step 1. Place the bathtub against the wall or lay it upside down on the floor, after covering it with cardboard or cloth. This is necessary to avoid damage to the enamel.
Step 2. The next step is to degrease the surface. A universal degreaser is perfect for this. But if you don’t have it, it doesn’t matter, you can use alcohol or regular dishwashing detergent. Wipe the entire surface thoroughly and let it dry for 10-15 minutes.
Step 3. If you have insulation in rolls, cut a piece of the required length so that the bowl is covered crosswise from side to side, as shown in the photo. Don't forget to peel off the film from the adhesive layer.
After you have glued the sheet to the bathtub, you need to trim off the excess and once again iron the insulation tightly with your hand so that there are no bubbles.
Step 4. Measure the width of the most even areas and cut strips of 15-25 cm. Then glue them to the bowl in the same way, cutting off the excess.
Step 5. Next, glue the remaining empty spaces with the same small strips.
Don't forget to cut a hole for the drain.
Step 6. Tape the insulation joints with reinforced tape.
Step 7. Remove the insulation from the mounting points of the legs.
Insulating the floor in the bathroom
This part of the bathroom can be insulated using heated floors, but we will consider the option with foam plastic. For this purpose, you should choose foam with a density of 25 kilograms per cubic meter or higher. We will mount the sheets on the floor with tile adhesive, after gluing damper tape on the sides. In this case, reinforcement in the form of a mesh is laid on top of the foam plastic and the screed is poured with a layer of at least 3 centimeters. The latter will be the basis for the final finishing - most often with tiles.
Before pouring the screed, it is important to make sure that the foam sheets do not spring, otherwise the finish here may crack in the future.
https://www.youtube.com/watch?v=xc7T99cXd6E
Determining the power of the heating system.
To obtain the most accurate information regarding the optimal operating mode of an electric floor, you need to consult with a specialist, however, the vast majority of companies that produce underfloor heating elements recommend equipping bathrooms with heating systems with a power of 160 W/m2.
By means of simple mathematical calculations, namely multiplying the area of the heated surface by the heating power of one square meter, we obtain the total power that must be provided when installing an electrical “warm floor” system in the bathroom.
Insulation materials
Penoplex is in wide demand in the building materials market. Among its advantages are good thermal insulation characteristics, long service life and ease of installation. We’ll look further at how to insulate bathroom walls with penoplex.
Table of contents:
- Wall insulation with penoplex: advantages and features of the material
- Insulation of walls with penoplex - technology and types of material
- Insulation of walls from the inside with penoplex in the bathroom
- Insulation of walls with penoplex under siding: insulation installation technology
Wall insulation with penoplex: advantages and features of the material
Penoplex is classified as a material that performs the function of protecting a room from heat loss. Its installation can significantly reduce the thermal conductivity of the area of the building on which it is installed.
Penoplex is produced as slabs, which are extruded polystyrene foam. In appearance and structure, this material is often confused with polystyrene foam. However, penoplex has a higher level of rigidity and strength.
In addition, this material has the following advantages:
- low level of thermal conductivity, thanks to which the material is able to retain heat in the room;
- high level of strength both before bending and compression;
- resistance to moisture is ensured by the low moisture absorption of the material, this advantage reduces the level of development of mold and mildew on the insulation and increases its service life;
- low level of vapor permeability;
- duration of operation, which is more than 50 years;
- resistance to fire and high level of fire safety;
- environmental safety, absence of substances harmful to human health;
- Possibility of operation at temperatures from -40 to +70.
In addition, installing penoplex does not require special skills or special equipment. One day is enough to complete the work. The cost of the material, compared to other types of insulation, is average, therefore, by comparing the quality and price of penoplex, it is possible to obtain high-quality insulation for a moderate amount of money.
However, the use of penoplex for external insulation of a building, and in particular for facade systems, leads to its gradual delamination. This is due to the fact that the material has a high density, which does not allow it to absorb glue, therefore, some time after installing the penoplex, under the influence of moisture and other external factors, it peels off from the surface and the appearance of the facade deteriorates.
Therefore, to prevent this unpleasant factor, you should use special fasteners - fungi. It is also possible to replace penoplex with polystyrene foam, which is more practical for external insulation.
Insulation of walls with penoplex - technology and types of material
There are several types of penoplex, which differ in relation to density and scope of application. The slabs have a standard size, but if necessary they can be easily cut and installed on the surface. Depending on the thickness of the penoplex for wall insulation, penoplex from 2 to 10 cm is distinguished.
In addition, there are the following types of penoplex:
1. Used for wall insulation - allows you to insulate the walls of a building both inside and outside. In addition, it helps insulate the basement and interior partitions. The material is suitable for constructing walls using the well masonry method.
If the walls are insulated from the outside with penoplex, then siding is laid on top of the heat-insulating material, the tiles or the wall are plastered.
2. Penoplex for foundation insulation. Used in the process of building basements. This material has zero moisture absorption and increased density.
3. Roof insulation is also possible using penoplex. It is used to insulate roofs of both flat and pitched types. The material has excellent thermal insulation characteristics and, due to its lightness, does not load the structure.
4. Insulation of roads and runways - even in such cases, the use of penoplex is mandatory.
5. Another version of penoplex is intended for internal insulation of a house or apartment. With its help, it is possible to insulate the walls, floor and ceiling of any room.
To insulate walls using penoplex, follow these steps:
1. Preparing the base.
This stage involves preparing the surface for attaching insulation to it. The surface, regardless of its type, must be clean, dry, free of finishes and paint. Use plaster to level the walls. Next comes the process of treating the surface with a primer with an antiseptic effect.
2. Installation of slabs using glue.
In order to glue the slab, we recommend using a special glue that comes with the insulation or is recommended by its manufacturer. The glue is applied directly to the surface of the slab.
3. Mechanical installation method.
After gluing the slab to the surface, the process of its mechanical fixation follows. This is necessary so that the plate, when peeled off, will still stick to the surface. For one square meter of slab, the installation of four dowels will be required. If the slab is installed near a window, door or in a corner, then the number of fasteners must be increased.
4. Fixing the insulation with plaster mortar.
In order for the insulation to adhere better to the plaster, we recommend using a carriage brush, which will help make its texture more rough. On the first layer of reinforcement, a polymer mesh is embedded with a reinforcing effect. Then the plaster solution is applied a second time and further finishing of the walls is carried out.
5. Installation of insulation indoors.
It is possible to use penoplex to insulate external walls; it is also used indoors. We recommend, if possible, installing penoplex outside. However, when installing internal insulation, after installing the insulation, install a foil-coated polyethylene film on it. It will provide proper vapor barrier. Next, the drywall is installed and finishing work is carried out. To install the frame for installing drywall, use dowels, which, after passing through the foam, will reach the wall and fix the profile on it.
Insulation of walls from the inside with penoplex in the bathroom
The bathroom is a place with a high level of humidity, and proper insulation will prevent the formation of condensation, which has a detrimental effect on the finishing of the room. There are several options for insulation that are used in the bathroom, among them the following are noted:
- cork is a material in roll form, which is easy to use and can be easily installed on the surface of walls and in a heated floor system; among its advantages, it is noted that it is not susceptible to rotting, is resistant to moisture and has a long service life;
- mineral wool is more popular than the previous option, however, it is hygroscopic and unstable to moisture, therefore, during its use, proper waterproofing must be ensured;
- although polystyrene foam is cheap, it also absorbs moisture due to its porosity; after its installation, it is necessary to install plywood or drywall with moisture-repellent properties;
- penoplex has low thermal conductivity, but at the same time has a high density; it is used to insulate both screeds and bathroom walls.
Preparing for cleaning
Before you start cleaning, you need to prepare the room:
- remove bottles with cosmetics, hygiene products and household chemicals from shelves and put them in drawers;
- take out the rug and shower curtain;
- remove robes and towels from hooks;
- clear the bathtub, the surface of the washing machine and the floor;
- check the availability of household chemicals for cleaning surfaces (depending on the cleaning plan);
- Prepare rags, sponges and brushes.
To save time, you can put towels and bathrobes in the washing machine, and soak the mat and shower curtain in a solution of vinegar or disinfectant.
Schedule and cleaning
Separation of tasks allows you to constantly maintain the required level of cleanliness, spending 15-20 minutes on it for daily cleaning and 2-3 hours for monthly and general cleaning. The regularity of cleaning a particular surface depends on the frequency of its use and hygienic requirements.
Daily cleanliness
What tasks need to be performed daily:
- remove splashes from mirrors and faucets;
- clean metal mesh on drains;
- wipe switches and door handles with a disinfectant or soap solution;
- dry bathrobes and towels;
- wash children's toys after bathing;
- clean up the shelf above the sink where frequently used cosmetics are stored;
- wipe the toilet rim;
- Clean the surface of the sink and bathtub with a soft sponge without soap or with a small amount of gel.
Once every 1-2 days it is necessary to wet clean the floor. If there is a cat litter box in the bathroom with bentonite, wood or silica gel filler, then you need to sweep the area around it 1-2 times a day.
Keeping things clean on a daily basis can make spring cleaning easier and save time on the weekends.
Weekly treatments
The list of weekly procedures includes the following procedures:
Cleaning tiles in the most used areas. There is no need to wash the walls throughout the entire room every week, but it is recommended to wipe with soap those areas that are located near the sink, toilet and above the bathtub. They become exposed to the maximum amount of splashes, bacteria and traces of detergents, which gradually turn into plaque. Cleaning the bathtub, sink, shower head and stall. Soap and cosmetic deposits are removed using soft gels and a sponge. The use of powders and aggressive chemicals increases cleaning efficiency, but can damage the coating. Cleaning rugs, washing shower curtains, rags, brushes and sponges. Even with regular drying, rugs, curtains and household items are breeding grounds for bacteria. When cleaning, microbes from the pores and microcracks of the material spread throughout the room. For disinfection, you can use solutions of bleach or white vinegar. Microfiber cloths and napkins can be cleaned in the washing machine. It is recommended to wash towels 2 times a week. Thorough cleaning of the floor. For daily wet cleaning, you can get by with only warm water, but once a week you need to wash the flooring with a chemical - Synergetic, Mr. Proper, Sano, Grass Floor Wash, Bagi, etc.
Particular attention should be paid to seams, corners and places where the tiles meet the walls. Disinfection of bath toys. Despite the fact that they often come into contact with soap solutions, they need to be regularly treated with antiseptics
If the child is less than 3 years old, it is recommended to repeat disinfection once a week, if more - 1-2 times a month. Treating mirrors and faucets with special products. Daily wiping removes splashes, but does not completely remove traces of hard water, paste and soap. Reflective surfaces are wiped with liquid glass spray, and metal surfaces with creamy products. Cleaning glass shelves and countertops. Smooth elements near the sink quickly become covered with a coating of soap solution, dust and other contaminants. If you do not wash them regularly, you will need to use abrasives after a few months.
Along with other activities, once a week you need to wipe dust from lampshades and doors, wash thresholds, towel hooks and lamp stands.
Cleaning once a month
The following tasks should be performed at least once a month:
- Clean the siphon under the sink.
- Flush pipes with liquid or powder to remove blockages.
- Wipe bare metal surfaces from rust.
- Clean wood and chipboard cabinets.
- Treat seams and joints against mold.
- Clean the washing machine drum.
- Sort bottles and check expiration dates.
General (more than a month)
General cleaning of the bathroom is carried out every 3-6 months.
Just a few tasks are added to the activities described above:
- Cleaning ventilation from cobwebs and dust.
- Washing all bottles in the bathroom.
- Cleaning the floor and walls behind the washing machine and cabinets.
- Washing the inner surface of the tank.
- Change of bathroom curtains and rubber mats.
- Removing dust and other contaminants due to hidden pipes, radiators, etc.
- Cleaning lampshades.
If you have a boiler, general cleaning can be combined with appliance maintenance. It is recommended to disassemble the heater, wash the tank and check the condition of the heating element and electrode once every 6-9 months.
Liquid acrylic
The significant difference between it and all of the above materials is the consistency of the substance - it is liquid, and also in the use. Liquid acrylic is freely sold at any hardware or construction store.
How to use - it is used to treat the inner surface of a steel bathtub. The only downside is its pungent odor and the long time it takes to dry (48 hours).
For sound insulation, a mixture of components is usually used:
- semi-finished product from acrylic enamel;
- hardener No. 144.
Plus - in addition to sound insulation, the material improves the external aesthetic qualities of the bath.
Processing technology:
- finish the surface using sanding paper or cleaning material;
- wash away dirt;
- degrease the walls with a simple alcohol-containing solvent;
- dry the surface;
- remove the siphon and carefully wrap the taps with film;
- apply acrylic using the pouring method, covering the inner surface;
- Perform processing continuously, making circular movements.
As the mixture drains, it will leave a thin (about 6 mm) layer. Acrylic is durable and wears out slowly. The procedure itself, if done by hand, takes 2 hours. There are many shades of the substance on the market, it’s easy to choose your own.
Pros of acrylic:
- no drips;
- absence of stains (during and after treatment);
- high strength;
- durability;
- no bubbles;
- improving the external aesthetic qualities of the bath;
- ease of application;
- reduced slipperiness.
Let's sum it up
Insulating a bathroom is a very responsible job. How warm and cozy the room will be depends on the quality of its implementation. You should not rely on your own strength and do thermal insulation yourself. Inexperienced craftsmen make many mistakes, which then result in big problems. Therefore, it is best to contact specialists.
We employ professionals who thoroughly know the nuances of this work. We will choose the optimal method of insulation, taking into account the design features of your home, select a good insulation material, and carry out quick and high-quality installation. You can completely rely on our experience and professionalism.
To contact us, go to the "Contacts" page, there you will find all the necessary information.
Calculate the cost of painting and insulating your home right now
Select types of work:
Select materials:
Creation of a polyurethane foam thermal insulation layer
When insulating a floor with polyurethane foam, there is no need to lay vapor and waterproofing layers, since the insulation itself is a vapor-permeable, moisture-repellent material.
When insulating a floor with polyurethane foam, there is no need to lay vapor and waterproofing layers, since the insulation itself is a vapor-permeable, moisture-repellent material. The liquid thermal insulator is sprayed directly onto the existing base; the high adhesion of the material ensures reliable adhesion of the polyurethane foam to the insulated surface. As a result of spraying a liquid thermal insulator, a monolithic thermal insulation layer is obtained that has no seams or joints.
Due to the low thermal conductivity coefficient, the thickness of the insulation layer is minimal and allows you to save the usable area of the room. After the liquid thermal insulator has hardened, a concrete screed is applied on top of it and the floor covering is laid. Polyurethane foam is highly durable, therefore, there is no need for additional reinforcement of the thermal insulation layer.
The only difficulty when installing a polyurethane foam thermal insulation layer is the need for special spraying equipment, so thermal insulation work cannot be carried out independently. It is best to seek help from specialized companies whose specialists have the necessary skills in working with polyurethane foam.
Drawing up a plan and procedure
Once you have decided on all these issues, have chosen plumbing and finishing materials, begin to draw up a plan. After all the old finishing has been removed, the dimensions of the room are measured to the nearest centimeter and the dimensions are transferred to the plan. On this plan, all communications are drawn, the distances to all their exit points are indicated, and plumbing fixtures and furniture are drawn to scale. After all, the location of the water supply and sewerage outlets depends on the position of the plumbing and its size. The following is the work plan:
- Dismantling of equipment: bathtub, washbasin, electrical appliances.
- Removing old finishes from walls, floors, ceilings.
- Replacement of water supply and sewerage systems, installation of new shut-off valves. When replacing the water supply, if necessary, you can install filters; sewer check valves are often installed on the sewerage system in apartments to prevent the appearance of an unpleasant odor.
- Electrical wiring. The wires are mounted in the walls, grooves are made under them, into which corrugated hoses or plastic cable channels are laid.
- Wall decoration. Here, the sequence of renovations in the bathroom depends on the type of finish chosen and the original condition of the walls. For tiles, the walls need to be leveled with plaster; for painting and wallpaper, finishing leveling is also required using putty. When laying tiles, they are laid starting from the bottom, but not from the first, but from the second row. The first row from the floor is laid later, after the floor is made.
- Ceiling and lighting installation. In most cases, built-in lamps are used; for the bathroom they must be in a special sealed housing.
- Floor finishing. If there are large differences in height, a leveling screed is poured before finishing work begins (after laying the electrical wiring). While all other work is going on, the concrete is gaining strength. At this stage, the selected finishing material is laid on a pre-leveled base. Afterwards the first row of tiles is laid (with trimming as necessary).
- Installation of washbasin, bathtub, and other plumbing fixtures.
- Installation of furniture.
This is a step by step bathroom renovation plan. There is only one nuance: when to install the doors. Usually the door frame is installed after the walls are prepared for finishing. In this case, the wall decoration will fit close to the box
This is important if platbands are not provided from the inside. The door leaf can be hung later - after finishing all the “dirty” work or immediately, but protect it with thick plastic film. Otherwise, it is advisable to follow the sequence of renovations in the bathroom without changes.
Otherwise, it is advisable to follow the sequence of renovations in the bathroom without changes.
Preparation
To properly insulate a steel washing container with your own hands, you need to carefully prepare the bathtub for use. If you apply polyurethane foam or glue thermal insulation material to an unprepared surface, you will not be able to achieve the optimal result. Before performing insulation, perform the following operations:
- You need to put cardboard, soft material or wooden blocks on the floor of the bathroom to place the washing container on them.
- Disconnect the font from the drainage system, disconnect the siphon and overflow.
- Turn the bowl upside down, and then lower it onto the prepared bars.
- Clean the outer surface of the bowl from dust or dirt.
- To degrease steel baths, use gasoline, alcohol or solvent.