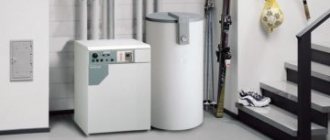
- At the location of the water tank
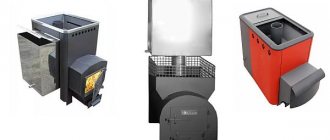
- Sauna stove with boiler
- What you need to know about operation
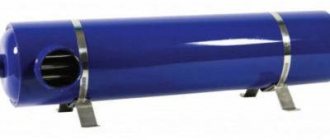
- Coil for furnaces
Having made the right choice of heating equipment, you can steam and wash without purchasing and installing a boiler. A reliable, modern, spacious heat exchanger for a bath will perfectly cope with the role of a heater: it will be able to supply the required volume of hot water to the storage tank. In this article you will learn about the options and operating features of the technical tool that exist today, practical advantages and the most popular models.
A sauna stove with a heat exchanger: what is it?
The idea of using as much heat as possible from a stove is not new. A good application is to use it to heat the coolant. For your information! The principle of any heat exchanger is to ensure maximum contact of an insulated liquid carrier with a heated surface to increase heat transfer between them.
Many designs have been invented to implement this. Let's look at them according to the purpose of the heated liquid.
Drying the bath
There are two components to quickly drying wet rooms: heating and ventilation. They should not be considered separately, because together they work most effectively. You just need to combine them in a specific case.
How to dry: ventilation methods
The ventilation system is laid at the stage of construction of the bathhouse (see here about the diagrams and design of the bathhouse ventilation). Therefore, if something is forgotten, it may be too late to redo everything.
For example, vents are usually made in the foundation - these are through holes lined with sewer (most often) pipes that lead to the underground space. They have plugs on the outside that allow you to open and close them at the right time.
For more details about the scheme, see
Such vents are opened only after procedures. And they serve for better ventilation and drying of the bath.
Also, another through hole is usually made in the wall of the steam room under the shelves, leading to the street. On the inside it has an adjustable plug. This hole is also used to speed up the drying of the steam room.
You can dry the bathhouse in winter with the help of ventilation by opening the windows and doors wide - after all, the air inside is much more saturated with water vapor. But you shouldn’t think that all the moisture will leave the bathhouse only thanks to open doors and windows.
In addition to ways to create a draft simply by opening holes, there is also a method where ventilation actively cooperates with heating and works when the stove is on - this is bastu, which you can read about.
Well, don’t forget that even if natural ventilation is not installed correctly or its power is not enough to ventilate the bathhouse, you can always install fans in the air ducts. Forced ventilation, although noisy, is still effective.
BY THE WAY! Heat guns can help here too.
For those who believe that heating alone is enough, and ventilation becomes optional, we recommend watching the video by Konstantin Bely:
After washing: methods of heating
Heating is just as necessary for drying as ventilation. You understand the mechanism: by heating water molecules, you make them more mobile, transform the water into a gaseous state (steam), and it is easily carried away by the breeze. What will the breeze do if the water is cold? Nothing. And if there is no breeze, the steam will cool over time and calmly settle as condensation.
So, the easiest way to dry a bathhouse after washing in winter is to put one or two logs in the firebox and let them burn out. All ventilation openings must be open.
This is for an iron stove. A brick stove is a heat-storage stove, so its heat is enough to dry the bathhouse after the procedures (together with open ventilation).
***
Well, as you can see, you have to invest some money and make an effort in order to use a large bathhouse in the winter. The smaller it is, the easier it is to warm it up even in cold weather. The power of the sauna stove is calculated for the steam room; it is difficult to fit other things into its responsibilities, because there is summer when all this is not needed. So it is better to use autonomous heaters.
Application area
Wasted heat can be used for two purposes:
- for heating water to be used for washing;
- for heating rooms.
Of course, such goals can be combined if the stove is powerful enough. After all, we will, in fact, be taking away part of the heat that would otherwise be used to heat the steam room (or atmosphere)).
Scheme of heating water in a remote tank with a samovar-type heat exchanger (video with explanation, see below)
Bath stove with water heat exchanger
This is the first time. We are talking exclusively about water (no antifreeze), the consumption of which depends on the number of people who can wash in the bathhouse at the same time and other factors. In any case, you can’t do without a spacious tank. And here again you have options for where to place it:
- some place the tank directly on the stove , which must have an appropriate design for this. Water is supplied to the washing room from the steam room;
- others use a heat exchanger , and the tank itself is placed in an adjacent room, from where it is connected by two pipes to the heat exchanger.
Both designs of stoves with a tank have a right to exist, and the choice is yours.
Bath stove with heat exchanger for heating
If instead of a tank you connect a heat exchanger with a radiator, you get an autonomous heating system .
Here again you have two options):
- or create a design that is based on phenomena such as convection and gravity;
- or force the coolant to forcefully move in the system - for this you will need a pump, and therefore electricity (! A separate section is devoted to electric stoves).
If the bathhouse is small, then there is no need to bother with even the simplest system, because usually the stove is enough to heat adjacent rooms . But what matters here is what kind of winters you have. It happens that a small bathhouse needs additional heating.
It was already mentioned above that it is possible to combine heating of water for washing and heating. In fact, you can make two parallel systems, and use antifreeze rather than water for heating. For this purpose, one heat exchanger will need to be placed inside the stove, and the second - on the chimney. From the point of view of increasing the efficiency of the furnace, this option is simply excellent.
On a note! When creating a heating system, do not forget about the expansion tank , which will absorb excess coolant.
Brick or metal
The choice of furnace material matters only from the point of view of individual preferences and conditions:
- Price . Based on the cost of the final product, purchasing a metal furnace will be cheaper than purchasing material and paying workers to build a brick furnace. If you do the masonry yourself, the final cost will decrease due to the deduction of payments to hired workers, which will significantly affect the price.
- Bath area . Metal stoves take up less space, so if the area is small, the choice is definitely in favor of a metal product.
- Difficult to install . A brick stove requires a separate foundation, which lengthens the installation period; a metal stove is installed on a lighter base. The wood-burning sauna stove is quite popular and is practical.
- Sometimes the decisive factor is a photo of a factory-made metal stove - the range of modern manufacturers is distinguished by functionality and attractive design.
Whatever material the stove is chosen from, installing a heating circuit will make the choice more successful.
Types of devices
The furnace provides several options for placing heat exchangers:
A coil or water circuit is a steel structure that can be located both inside the furnace and outside , for example, between the furnace wall and the casing. Its use is not limited to metal stoves - water circuits can also be built into brick ones.
The shape and size can vary significantly from a simple C-shaped, once bent tube with fittings , which is located inside the firebox, to a water jacket around the entire body.
IMPORTANT! The correct location of the metal pipe inside the furnace is always such that the open flame does not touch it in any area. It should be remembered that even stainless steel is subject to oxidation in a flame.
A large tank that touches the walls of the furnace with a wall or bottom (or both) can also be considered a type of heat exchanger.
For your information! By taking heat away from the stove body to heat water, you reduce the operating power of the stove.
But in the design of all furnaces there is an element that in most cases (but not in all!) becomes the cause of significant heat loss - this is the chimney, where very hot furnace gases are sent (if the furnace does not have a smoke circulation system).
The second type of heat exchangers tries to correct this shortcoming. For this purpose, either a small flow-through tank of 5-10 liters , communicating with a large tank outside the steam room, or a full-fledged tank, from where hot water is supplied to the washing room. (In the latter case, there are more difficulties with fastening.)
Photo: samovar-type heat exchanger
Photo: heat exchanger tank on a pipe
By the way! The external tank, among other things, also serves as a heater for the room in which it is installed (dressing room or washing room).
How to calculate the heat exchanger area
It is not uncommon for home craftsmen to undertake making such a device with their own hands. To do this, they should learn to calculate the necessary parameters related to providing the bath room with sufficient heat and the volume of hot water for washing.
When calculating the dimensions of the device, rounding is allowed. So, when installing a heating system with a power of 5 kW, you will need a device whose useful area is defined as 1 m². This example is quite approximate, since a device with similar parameters will also be provided with heat using a stove with a power of 9 kW. In this case, it is still better to calculate the size of the area, leaving some margin. During cooling of the unit, the power is significantly reduced, and the reserve allows you to maintain the temperature in the room until the next heating of the stove.
When choosing a heat exchanger, the last thing you should pay attention to is the shape of the device. There are no special requirements for this parameter, so you can safely rely on your imagination. Often, heat exchangers, like the pipe system, are made of stainless steel. This is a fairly durable and efficient material. The only negative is that some difficulties arise when performing welding work.
How it works
It is easy to guess that in the case of a flow-through water circuit or a tank mounted on a chimney, it is necessary to ensure constant circulation of liquid between it and the storage tank outside the steam room.
This can be done either through the natural laws that water obeys (and such a system is considered open), or with the help of a pump that provides forced circulation.
IMPORTANT! Natural circulation based on gravity and convection is preferable. Connecting pipes must have a diameter of at least one inch and a length of no more than 3 meters.
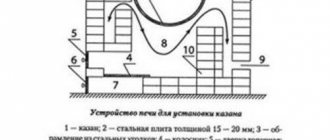
Look at the diagram above, which clearly shows how the pipes should be positioned so that the water rises and falls freely. Below is a video explaining the diagram.
DANGEROUS! Before lighting the stove, make sure there is water in the system!
Video
Watch a short video that explains the above diagram of a stove for a bath with a heat exchanger for water (this principle can also be used for heating) and shows an example of its budget implementation:
A little about connection
When installing a heat exchanger in a stove, you need to understand that it is primarily intended for heating a steam room, and heating water is a secondary function. It is impossible to control two processes at the same time; the steam room is a priority, so it costs nothing to boil the water in the tank or coil. This means that it is necessary to ensure good heat extraction or sufficient storage capacity. For the same reason, it is not recommended to use circulation pumps in such systems; the flow of the hot medium must be natural.
Having a heat exchanger such as a coil or economizer, you need to place an external tank in the bathhouse, hanging it above the level of the stove and connecting it with pipes, as shown in the diagrams:
For installation of the system, you can use both metal and polymer pipes, excluding polyethylene. The diameters of pipelines for gravity networks should be taken at least as large as the dimensions of the heater nozzles, or better yet, one size larger. In this case, the distance from the tank to the furnace should not exceed 3 m.
Popular furnaces with heat exchangers
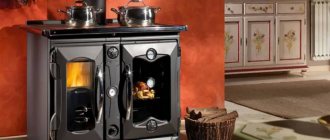
Cast iron stoves are deservedly popular among lovers of Russian baths, but how are they combined with heat exchangers? As it turns out, they combine perfectly.
Cast iron stove
To get started, we recommend visiting the website of the Petrozavodsk stove manufacturer Karelia. Among the products offered to visitors are components, among which there is a disk-shaped heat exchanger, apparently attached to one of the walls of the furnace. Thus, you can purchase both a stove and an exchanger at once. As an option, they also sell mounted tanks for the chimney.
Cast iron stove with heat exchanger for a bath. Photo source
Vesuvius stove
Vesuvius stove with heat exchanger for a bath
The stove manufacturer Vesuvius also provides the opportunity to simultaneously purchase a stove (and in its catalog you will find both steel and cast iron stoves) and a heat exchanger . The buyer has a choice of three models - two “samovars” for the chimney, differing in capacity, and one rectangular heat exchanger, which takes heat from the stove wall.
photo of heat exchangers on the Vesuvius website
Stoves for baths "Termofor"
There is a message on the Termofor website that the manufacturer took into account customer preferences and produces the most popular models - Tunguska 16 and Tunguska 24 - with already installed heat exchangers , which require an external location of the storage tank. The material of the exchangers is high-quality food grade stainless steel, 2 mm thick . Depending on the buyer’s choice, the placement can be varied by installing it either on the right or on the left wall of the stove.
Useful video
Termofor sauna stoves with a heat exchanger may be built well, but there are negative reviews. Watch the video and see what it looks like:
Warm floor system
This option for heating a bathhouse is one of the modern methods, which has been used frequently in recent years. It is quite difficult to install special equipment without the appropriate experience.
It is much easier to install an electric floor system and you can do this work yourself:
- First of all, a waterproofing material is laid, on which a layer of mortar is placed.
- Next comes the installation of thermal insulation.
- An electrical cable is mounted on top of the thermal protection layer and the screed is refilled.
The technology for creating a floor with water heating is similar, but in this case they do not use a cable, but rather lay pipes to circulate the hot coolant.
DIY making
Despite the availability of different options for sale, you can try your hand at making a heat exchanger yourself. It's not that difficult if you have welding experience. In any case, it’s easier than making a stove from scratch.
But before you get started, you need to do a little calculation.
Calculation of heat exchanger power and area
It was already mentioned above that heat exchangers connected to the body take away part of the furnace power. Therefore, the first rule will be the following:
IMPORTANT! The heat exchanger power should not be more than 1/10 of the furnace power.
The second rule is related to the length of the pipes: if the system is gravity-fed, then you should not extend the pipes further than three meters. The pump in the system eliminates such restrictions. But the pump is installed more often when the coolant is used to heat rooms. However, if the storage tank is not located too high, you can only wash with a hose. If this is inconvenient, then you need to either take the tank into the attic and insulate it, or install the same pump.
The third rule concerns the volume of the heat exchanger (if it is a small flow-through tank and not a coil). The water in it should heat up within a couple of hours. If it’s longer, then the volume is too big. If it is faster, then it is better only at first glance - the water should not boil, this will cause scale, steam, testing the expansion tank, and other problems.
Now, actually, the calculation itself:
The power of the heat exchanger depends on its area: 9 kW for each square meter of exchanger . The area is quite simple to calculate: if it is a coil, then multiply the circumference (3.14 * diameter) by the length of the pipe. If this is a “samovar” heat exchanger, then take the diameter of the inner pipe, multiply it by the number Pi, and multiply it again by the height of the “samovar”.
Power = resulting area in sq. meters * 9 kW.
If the exchanger hangs on the chimney, you can ignore the rule of deducting its power from the power of the stove. Only if he is on or in her body.
You can calculate the power required to heat a room using the same principle as for a steam room, that is, based on the volume of the room. In the steam room, a kilowatt per cubic meter is taken, but the adjacent ones do not need high temperature, so focus on half the value.
Knowing how many kilowatts are needed to heat a washing room, you get the area of the heat exchanger, and from it the length of the pipe for the “samovar” or coil.
Let's consider a couple of options for self-manufacturing heat exchangers.
Let's assume that you decide to increase the efficiency of the stove by installing a heat exchanger on the chimney.
- The thickness of the steel required for this is 2.5 mm.
- In addition to the sheet material, you will need two pipes with different diameters.
- The smaller one should be adjacent to the chimney pipe, the larger one should be 5-10 cm wider than the first one.
- Two circles are cut out of sheet metal to fit the diameter of the larger pipe, then a hole is cut in the center to fit the diameter of the smaller one and everything is carefully welded.
- You also need to make holes for the pipes through which water will come and go.
- The pipes are threaded and must match the diameter of the connecting pipes.
ADVICE! After checking the tightness of the seams, installation on the chimney and routing of pipes, it is recommended to insulate the heat exchanger using mineral wool and foil - this will dramatically increase the rate of water heating.
Another option for a heat exchanger for a chimney is a coil made of a copper tube with a diameter of 10 mm, which is made to tightly wrap around the chimney pipe. 1.5-2 meters of pipe is enough. The ends of the coil are inserted into the nuts, flared under the fittings, and then the fittings are screwed to the nuts.
Note! The copper tube must be flared exactly under the cone of the fitting so that they eventually fit tightly against each other. Be careful because this is where leaks can occur in the future if you flare at an uneven thickness.
Here are a couple of videos on the topic:
Video
How to bend a copper tube yourself with a pipe bender.
Without pipe bender.
Features of installation and operation of the heat exchanger
Installed between the firebox and convector:
- built into the oven;
- attached to the chimney;
- or built into it.
The productivity of the device with a capacity of 5 liters is enough to quickly fill a 120-liter tank with hot water. It’s easy to use – just organize a timely supply of liquid (uninterrupted operation can be ensured by using a circulation pump) and “feed” the firebox with firewood.
When installing a heat exchanger (recuperator) for a bath, the following points must be taken into account:
- the total length of pipes for water supply should be laid at 3 m, which minimizes heat loss;
- with a connecting pipe diameter of 1 inch, it is permissible not to use a circulation pump.
The longer the heat exchanger is in use, the more justified the installation is from an economic point of view.
Principles of installation, connection and safe operation
- Installation options depend only on the choice of location of the exchanger. The most difficult thing will happen if you decide to place it inside a finished oven , where it was not originally planned. For this you will have to disassemble the case and make holes. It is much easier to use a hanging structure or put a coil or a “samovar” on the chimney pipe.
- As for the pipes that connect the heat exchanger to the tank, for a gravity-flow design it is important to observe slopes, and also remember that the fastening of the pipes should not be rigid - allow them to “walk” freely during thermal expansion.
- The material for pipes is best copper , and connections are brass . When purchasing seals, pay attention to their ability to withstand high temperatures.
Operating safety depends on your awareness. The main thing is not to forget about two things:
- when leaving the bathhouse, you need to drain all the water from the system;
- You should not start heating without making sure that the storage tank is full of water.
If a brick oven with an internal water circuit is flooded and you forgot to add water in time, it is better not to do this when the oven is heated.
It is also important to prevent the liquid from boiling in the system.
What you need to know about using the device
An equally important task is choosing a stove equipped with a similar device. When considering different models, you need to be extremely careful not to miss the smallest nuances. We invite you to familiarize yourself with the basic rules that determine the safe operation of devices:
- Fastening due to movable joints compensates for temperature deformation and changes in the dimensions of the apparatus components during their heating.
- Net power is an important indicator that must be taken into account when making all necessary calculations.
- It is desirable that the dimensions of the heat exchanger correspond to the characteristics of the furnace. Only a tenth of the total heat generated in the heating unit should be allocated to perform the functions of the device.
- It is necessary that the remote tank contains as much water as can be heated in just two hours from the moment the stove is lit.
- All seals installed at the joints of system elements must be made of materials that are resistant to high temperatures.
There are few basic requirements, but compliance with them is mandatory when installing and operating the device. This contributes to a significant increase in the durability of the device.
Sauna stoves with a heat exchanger: reviews
Reviews from consumers whose washrooms receive hot water from a heat exchanger in a steam room or whose bathhouses are heated with its help are usually positive.
According to one of the users, he kept a boiler in the bathhouse for some time to heat water, but for the sake of saving money he decided to switch to a cheaper design. And after thinking a little more, I didn’t buy a ready-made one at all, but twisted the coil myself and installed it inside the oven. I'm pleased with the result.
Also, those who purchased a stove with a built-in water circuit do not complain, because the water becomes hot in an hour and a half, and the steam room arrives in two.
There are no problems with the heating systems either - the radiators installed in the cold dressing room by another bathhouse owner solved the problem of cold, the stove copes well with heating the combined washing room and steam room, and with heating the dressing room.
***
Are you convinced that a sauna stove with a heat exchanger is better and more profitable than a boiler? It will heat the adjacent rooms and provide hot water for washing. And at the same time, the efficiency of the stove will increase if you hang the exchanger on the chimney pipe. Exchangers are inexpensive, but it’s easy to make them yourself. In general, we recommend an affordable solution.
Video description
Five advantages of a built-in heat exchanger for a sauna stove over a universal one.
Open-type structures, compared to containers built into the furnace firebox, are convenient in that, if necessary, they can be removed and cleaned of scale, which gradually (as it accumulates) reduces the efficiency of heat transfer of hot gases passing through the chimney. Another advantage of an open heat exchanger is the fact that it can be hung at any height, regardless of the height of the oven, or even moved from the steam room to the washing compartment. For a heat exchanger of any design, it is important to take into account that when the firebox is burning, there must be water in the container - this way it will last much longer.
Operating principle of an open heat exchanger
Previously, the usual scheme for connecting a heat exchanger in a bathhouse was as follows: a heat exchange circuit in the form of a coil was mounted inside the firebox or on the chimney pipe so that as much liquid as possible came into contact with an open flame or a hot chimney. For this purpose, a copper or steel pipe was used, and sometimes a stainless steel tank was welded. Water flowed into such a heat exchanger from an external tank by gravity, and it was installed, as a rule, not far from the furnace. Due to the low circulation rate, the liquid had time to warm up to 85-90°C, but this was quite enough.
A sauna stove with a built-in heat exchanger has become the main source of hot water for country or country holidays Source 2proraba.com
Gas heating
The implementation of such a heating system has several options.
- Firstly, as I wrote above, it is possible to install a “classic” heater, in which a gas burner will be used instead of firewood.
- Secondly, you can use a standard gas boiler (the same as in residential buildings). But in this case, you will have to take care of the equipment of heating systems (installation of heating radiators, laying pipes, connecting a gas-carrying pipe to the bathhouse or a cylinder connection system).
- Thirdly, there is the possibility of installing heating from the house. In essence, this is the same option as the previous one, but with its own characteristics and disadvantages. A separate heating main is laid from the boiler used to heat the house to the bathhouse. This option is very convenient if your steam room is adjacent to the house or is very close to it.
Gas heating baths
If the distance to the bathhouse is relatively large, then in order to use this system in winter it is necessary to bury the heating main below the freezing level of the soil and insulate it well. This will prevent the possibility of defrosting and help reduce heat loss.
True, the undoubted advantage of this option is the complete elimination of the problem of maintaining a constant positive temperature in the bathhouse. In addition, you can do all the necessary work (if you have a certain skill) with your own hands.
Water heating is rightfully considered one of the most convenient and effective methods of heating. In such a situation, there are also several options for manufacturing a system, which in any case will be powered from a furnace with a water circuit.
Fortunately, today in specialized stores you can easily select stoves that are ready for installation, equipped with a heat exchanger. This greatly simplifies the task of any builder of his own bathhouse. And now directly about the options.
Water heated floors
- External heating. It is done very simply and, in fact, is arranged in the same way as a brownie. Pipes located along the walls are connected to the furnace. Depending on the area of your bathhouse, a certain number of heating radiators are connected to the pipes. Hot water passing through them heats the structure and, when cooled, returns back to the boiler.
- Water heated floor. The principle of its operation is the same as in the first option. The only difference is that the pipes are hidden in the floor, which was previously insulated (I wrote about insulating floors in a bathhouse in more detail in other articles). This design is considered non-separable (although, of course, there would be a desire to break everything), and therefore requires a very careful approach to the procedure for its manufacture. In this case, I would recommend seeking help from specialists.
Tank location options
Water tanks can be placed anywhere: on the wall of a washroom or shower, in the attic, near the stove in the steam room. It is always better to insulate external options, otherwise the water will heat up for a very long time and cool down quickly.
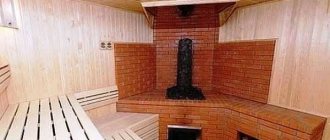
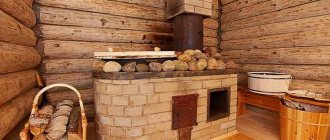
The option when the tank is located directly next to the sauna stove is the most optimal, since the water is heated by the flame. This visually makes the bathhouse smaller, but holds the heat well.
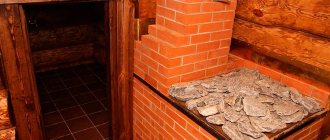
Often the stones are placed in the chimney, and the tank is placed under the firebox. This design takes a long time to heat up, but also maintains the temperature for several hours. The heat from such a stove will be good, as will the steam.
The external location option is more expensive in terms of fuel. In this case, you will have to heat it longer, since you need to warm up the water in the pipes. However, the external location is very convenient for the shower room, when you need to rinse off after the steam room.
Both options have their drawbacks - their water pressure is very low due to the small installation height, and the ceiling height in the bathhouse is rarely higher than two meters. It will be difficult to install a shower, and you will have to wash no higher than one and a half meters. This problem can be solved by moving the tank, for example, to the attic. Then the pressure will increase; you just need to add water in a timely manner. You can’t run around with buckets; it’s better to install a water supply. It is made with a float so that when the tank is full, the water supply automatically stops.
As the tank is moved to the external circuit, heat loss increases. It is necessary to insulate the heat exchanger itself and the pipes that are supplied to it. Calculations should be carried out based on the design features of the bathhouse. For example, the over-pipe option, when a coil encircles a pipe, is well suited for a shower room. But there are volume restrictions - you can heat no more than 50 liters of water this way.
If it is possible to install a water supply, it is better to automate this process. Then the tank will always be full and the water in it will be hot all the time while the sauna stove is burning.
Selecting a water tank
When choosing the volume of a hot water tank, you can use the rule: 10 liters per person and 10 liters for steaming a broom.
It is calculated that the optimal tank volume for hot water in a barrel bath is 50-55 liters. This is enough to wash all family members or a small group of friends.
In the tank on the chimney, the water is heated to 70-75°C by the time the air in the steam room is heated to a temperature of 90°C. For stoves equipped with a steam generator, we recommend installing a stainless steel tank with two fittings. The tank is installed on the stove so that the fittings are above the funnels of the steam generator.
Making containers for warm water
There are several options for containers - from expensive stainless steel to cheap store-bought plastic ones. We will not consider these options; we will focus on the most successful, from our point of view, metal made from sheet iron
Its advantages are not only its relatively low cost (although this is important), but also the ability to make a tank that is ideally suited in terms of linear parameters to each room of the bathhouse. As for appearance, there is a large selection of durable paints; surfaces can be painted in any color or covered with self-adhesive decorative polyethylene film
Simple water tank with lid
Table. Calculation of tank volume
| Stage | Description | Scheme |
| Find the volume of your tank | Multiply length (l), width (w) and height (h) | |
| Calculate filled volume (d) | For rectangular tanks, the filled volume is the same length and width, but less height. The new height is the filling height of the tank. | Tank fullness D |
Table. Making a tank
Step, No. Description of work Step 1. Prepare materials. You will need sheet iron with a thickness of at least 0.5 mm. We suggest making a rectangular tank, length 80 centimeters, height 40 centimeters, width 20 centimeters. The tank holds 64 liters of water, but you need to fill no more than 60 liters. You need to weld three metal pipes with threads into the tank; they are sold in stores. It is better to take the nominal diameter of the pipes at least 3/4 inch. This is the most commonly used diameter of pipelines and ensures normal natural circulation of water. To fully install the heat exchanger, you will need to have additional plumbing fixtures and fittings; we will talk about this below when considering installation issues. Step 2. Mark the tank on a metal sheet. You will need two plates 80x60 cm, two 40x20 cm and one 80x20 cm. We specially made the tank rectangular. The fact is that the distance between the inlet and outlet pipes should be increased as much as possible. This will allow warm water not to immediately mix with cold water; a significant difference in their temperatures will be achieved, which has a decisive influence on the speed of water flow in the pipelines. And not only the efficiency, but also the safety of using the heat exchanger largely depends on this criterion. Step 3. Cut the blanks to size. You need to use a grinder; when working with this tool, strictly follow the safety rules - it is very dangerous. Try to keep the cut as even as possible. Check the quality of cutting of each edge on a flat surface, eliminate large flaws. Step 4
Assemble all the parts of the tank in pairs, making them absolutely identical. Pay special attention to the corners, they should only be rectangular. Step 5. Place the front part of the tank on a flat surface, and weld the side of the tank in several places with a short seam. Do the same operation on the other side
Check their position; they will definitely move as the seam cools. Step 6. Place the second large part on the welded sidewalls, check its position, and adjust the sidewalls if necessary. Grab the elements. Make sure that the gap between the individual parts does not exceed 2–3 millimeters, otherwise during welding you will have to put wire in them, and this is undesirable. Step 7. Place the structures upside down and grab the bottom. Check and correct its position. Step 8. If everything is fine, weld all the elements. Monitor the quality of the seam; omissions are strictly excluded. You can “cheat” a little on the thickness of the weld seam; the container does not carry significant loads, but omissions are prohibited. Step 9. Weld metal pipes into the bottom. We have already said that the input and output should be removed from each other as much as possible. It is better to place the water intake pipe for the shower not in the middle, but closer to the drain; the water intake will speed up the circulation in the tank. Step 10. Burn holes for the pipes. For the pipes, you must first burn holes in the bottom of the tank; this can be done more conveniently by electric welding. Step 11. Come up with a way to attach the tank to the wall. You can weld special brackets to the back wall or install it on a stand. If you have the desire and the material, make a removable lid. Step 12. Using a cylindrical grinder, clean all seams, pour water and check their tightness. Seal holes if necessary. Step 13. Prepare the front surfaces of the container for finishing.
Video - Making a stainless steel tank
That's it with the water tank, you can install it in any room in the bathhouse. Now let's talk in more detail about heat exchangers.
Difference by type
There are several types of heat exchangers for equipping sauna stoves. They are distributed:
- by design;
- by location.
Depending on the design features, there are:
- coil. which is a fairly simple option. Both ends of the heat exchanger are removed from the tank to take in cold water and release heated water;
- connection of two metal containers. cylinder and parallelepiped. When heated, water from such a heat exchanger flows through pipes to its destination.
The second version of the heater is considered the most common, because with its help not only the water becomes hot, but also all the rooms of the bathhouse are heated. This saves fuel and, accordingly, money.
The location also determines two types of heat exchangers:
- mounted that is, located on the chimney;
- built into the furnace design.
A wall-mounted device receives the necessary heat not from the stove itself, but from the chimney by heating the emitted gases. Due to the significant capacity of the box, the liquid quickly heats up in the tank and remains hot throughout the entire heating time of the bath. As a drawback, it is worth noting the massive appearance of the device. Sometimes, when installing a chimney, a heat exchanger of the so-called samovar type is first installed. and then the chimney pipe.
It is imperative to ensure that the heat exchanger is filled with water, since in a dry state it can overheat and lose its sealing properties.
When assembling a system for water circulation, you should stop using plastic pipes in the steam room. The high temperature of such a room affects the plastic, as a result of which this material begins to release substances that are harmful to human health.
The heat exchanger built into the furnace design has the form of a sealed flat tank with a capacity of up to 5 liters. Two pipes with threads cut at their ends are welded into this tank. They are connected to water pipes leading to a large volume remote tank (up to 100 l)
In the furnace, the heat exchanger has a place between the convector casing and the firebox. In this case, the device does not come into contact with fire at all.
It is necessary to fill the system with water just before starting to fire the stove, since a heated dry heat exchanger under the influence of cold water loses its tightness and simply begins to leak. In order to prevent the appearance of air pockets in the system, water must be pumped from below using a pump.
Heat exchangers for stoves of these types deserve great attention because of the opportunity to save on fuel, because for their normal functioning they require heat accumulated from the combustion of wood. Thus, a built-in type device is heated by thermal energy used to heat the steam room and stones
The heat exchanger is located on the chimney. It is powered by heat, which simply goes out into the pipe. Its efficiency and heating rate are much higher due to the larger capacity of the device. In this case, the tank into which hot water is drained can be removed a significant distance from the stove.
Open siphon type heat exchanger
A very interesting and effective option is to heat water on a stove, but, unfortunately, not very common. An inclined pipe, sealed at the end, is welded into the furnace. Its second end - an open cut - is welded at the bottom of the water tank. When water is poured into the tank, some of it flows into a pipe located in the oven, where it is heated until it boils.
Siphon heat exchanger. Effective option, but rarely used
One of the practical implementations of such a heat exchanger is shown in the photo. The design has been slightly changed, but the principle remains the same.
In this option, the tank is located on a stand in the next room. A hole was made in the wall and in one side of the stove (the stove stands on its side). The length of the pipe is such that it almost reaches the opposite wall of the firebox. The pipe is sealed at the end, the hole in the furnace is slightly larger than the diameter of the pipe, and is not insulated or sealed.
How to connect a heat exchanger to a water tank
The owner of such a siphon-type water heat exchanger has been using this unit for more than 6 years. He says that smoke does not enter the room. Sometimes, if you close the door to the steam room too quickly, a small portion of smoke may escape, but this happens very rarely and does not cause any trouble.