- At the location of the water tank
- Sauna stove with boiler
- What you need to know about operation
- Coil for furnaces
Having made the right choice of heating equipment, you can steam and wash without purchasing and installing a boiler. A reliable, modern, spacious heat exchanger for a bath will perfectly cope with the role of a heater: it will be able to supply the required volume of hot water to the storage tank. In this article you will learn about the options and operating features of the technical tool that exist today, practical advantages and the most popular models.
What it is
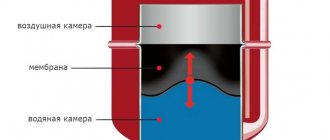
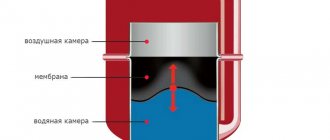
The device is used to heat water in the bath. Its operating principle is based on the physical properties of hot water, expanding and rising upward, while cold water remains below.
Typically the heat exchanger is small in size, so the liquid in it heats up quickly. Two pipes are connected to it - below and above. Thus, hot water through the upper pipe, replaced by cold water from below, rises into the tank, which can be located either in the steam room or in an adjacent room, usually in the sink. In this case, low-temperature water is constantly added to the heating device through the lower pipe without forced supply.
Options for heating water in a bath from a stove
The following models are distinguished:
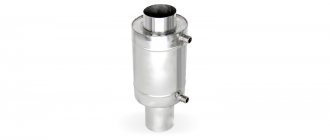
1. Samovar-type container - installed on the outlet pipe of the chimney. Heating occurs due to the heat of the flue gases escaping into the chimney. A tap for dispensing hot water is connected to the fitting at the bottom of the tank. If you don’t have a washing machine, then this option will be an excellent solution for heating. We recommend paying attention to the following operating conditions:
- the use of a samovar-type tank is allowed only with bathhouse stoves;
- It is prohibited to operate an empty tank while the stove is operating;
- If you want to get a “Finnish sauna”, this option for heating water will not suit you, since if the steam room is heated for a long time, the liquid will begin to boil, which is why heavy steam is formed.
2. A samovar-type heat exchanger (small in size with the ability to connect to a tank), which can be located anywhere. It is convenient because, if available, the tank can be placed in the washing room. One of the obvious advantages over other options is that it quickly heats the water.
3. Heat exchanger, which is installed on the starting chimney.
4. Starting chimney + tank-backpack - an option with being in a steam room and the absence of controlled convection to warm up the room. The container comes into contact with the wall of the chimney pipe, due to which the liquid is heated. Among the disadvantages, it can also be noted that this model does not have protection from hard infrared radiation, and in case of strong heating, the water begins to boil.
5. Convector chimney with a heater built into it.
Features: the register is located inside a pipe from which 2 identical ¾-inch fittings with internal thread come out. Using pipes, the device is connected to a tank hanging in a convenient place.
May be:
- Built into the oven - when scale appears, it loses efficiency.
- Located near the chimney (on it) - it provides heating to the required temperature more slowly, but nothing settles on its inner surface, it is easy to access, and its repair is not difficult.
The choice depends on the user: what to give preference to, performance or ease of maintenance, saving usable space or fuel.
Stage four: connecting the unit to the gas pipeline
Connecting to a gas pipeline is an extremely important matter. The slightest mistake can be very costly. If installation work is not performed properly, serious emergency situations may arise that can lead to gas poisoning or explosion. There should be no small details when connecting the boiler to the gas pipeline.
The first step is to connect the pipe from the boiler to the gas pipe branch. There must be a shut-off valve on the gas pipe. A special filter for heating is also installed on it.
When connecting the gas pipeline to the boiler, you need to carefully ensure that all joints are airtight. Here, for sealing, you cannot use FUM tape or sealing thread, which do not provide high-quality insulation. The use of tow and paint is recommended.
Rubber hoses for connecting gas boilers to the gas pipeline are prohibited. Rubber may lose its performance properties (crack), this will inevitably lead to a dangerous gas leak. The hoses are attached to the unit nozzle using union nuts and paronite sealing gaskets. Seals are mandatory here, because they are the ones who will ensure sufficient sealing of the connection.
As for connecting the Baksi boiler to the heating system, you cannot do without the help of specialists. In this case, you can only complete the initial stages of its installation yourself. The boiler will work for a long time and efficiently when its connection is done professionally.
Difference by type
The simplest designs of heat exchangers are coils with ends removed from the tank: one takes in liquid at room temperature, the other releases hot liquid.
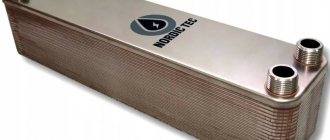
More complex ones are a system consisting of two metal tanks with anti-corrosion properties - cylindrical and rectangular in shape with connecting pipes.
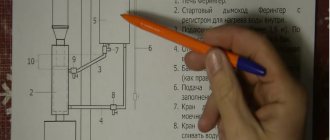
At the location of the water tank
There are two ways:
- This photo shows an option for installing a heat exchanger in a steam room and a tank in a wash room.
- The second option is to install a heat exchanger with a tank inside the steam room.
Advantages of installing a heat exchanger in a steam room
- high water heating speed;
- saving free space in the steam room;
- Wide range of options for installing the tank - in a steam room or in a shower room.
Recommendations from experienced professionals
When installing a heat exchanger for hot water in a bathhouse, you need to remember that:
- A remote water tank should be selected in accordance with the power of the sauna stove - a container that is too large will take a long time to heat up. In a small tank, the water will boil early and fill the washer with unnecessary steam.
- The heat exchanger must also match the furnace - too large a design will reduce the efficiency of the furnace. The optimal option is when the system takes 10 percent. on the power of the stove.
- The system pipes should not be fixed rigidly to the walls - their linear dimensions change when heated.
- For threaded connections of the system, only a sealant that can withstand high temperatures is used.
- In a system with natural heat exchange (without using a pump), it is necessary to maintain a slope of 2 - 5 degrees for the upper and lower contours of the pipes.
- The sauna tank with a heat exchanger should not be empty when the stove is fired.
After heating the system to high temperatures, it is undesirable to add cold water - a sharp drop will negatively affect the service life
A sauna stove with a heat exchanger will allow you to get maximum comfort and, at the same time, preserve the charm of this favorite traditional procedure.
Features of installation and operation of the heat exchanger
Installed between the firebox and convector:
- built into the oven;
- attached to the chimney;
- or built into it.
The productivity of the device with a capacity of 5 liters is enough to quickly fill a 120-liter tank with hot water. It’s easy to use – just organize a timely supply of liquid (uninterrupted operation can be ensured by using a circulation pump) and “feed” the firebox with firewood.
When installing a heat exchanger (recuperator) for a bath, the following points must be taken into account:
- the total length of pipes for water supply should be laid at 3 m, which minimizes heat loss;
- with a connecting pipe diameter of 1 inch, it is permissible not to use a circulation pump.
The longer the heat exchanger is in use, the more justified the installation is from an economic point of view.
Second stage: connection to the heating water circuit
To find out how to connect a gas boiler to heating, you need to figure out where its pipes are located, from which there is an exit to the heating circuit. Almost all models are designed identically. At the bottom of the unit (usually in the center), there is a pipe for the gas pipeline, and to the right and left of it there are pipes for connecting to the water supply network. Closer to the end part there are outlets for connecting the water circuit: return and supply of coolant to the radiators.
Manufacturers of gas boilers warn about the danger of small debris getting into the system. This can happen when the water in the system is contaminated. If this is allowed, the gas unit may become operational. There is a simple solution: install a coarse filter on the return water pipe. It will significantly increase the “life” of the boiler and increase its productivity. When the coarse filter is already installed in front of the water meter, there is no need to place it in front of the gas boiler.
Therefore, before connecting a double-circuit gas boiler to heating, you need to purchase the necessary filters in advance.
When installing the boiler, it is necessary to install shut-off valves. Plumbing fittings are installed on the water supply pipes to the system and on the return pipes. Without these devices, repair work will be very difficult. If shut-off valves are not provided, then when a malfunction in the system is eliminated, the air remaining in the pipes will block the circulation of the coolant. As a result, the radiators heat up poorly and fail. That is, saving on valves is not advisable.
Rules for installing a heat exchanger on a sauna stove
The following rules must be followed:
- The heat exchanger must consume no more than 10% of the total energy produced by the furnace, then the latter will operate with good efficiency.
- The pipes must be laid so that the water flows by gravity, that is, at a 250-degree slope on the direct supply and 30-degree on the return one.
- It is important to reserve power for cooling after fuel burns.
- It is necessary to provide a sufficient volume of water for each individual model, because if there is too little of it, it will boil quickly, which can lead to the formation of deposits on the walls and a fire hazard, and if there is too much, you will have to wait a long time before taking a shower.
How to connect a heat exchanger if the tank is in a steam room:
- The entrance to the hot water tank should be at least 5 cm higher than the upper register fitting. This is necessary for better circulation.
- The upper register is from 1.4-1.5 m from the floor, despite the fact that the podium under the stove is 15 cm. The bottom of the tank in the steam room should be at least 1.5 m, and preferably higher.
- If the tank is 0.5 m high, then we have a total installation of 2.0 m. That means there is still half a meter to the ceiling. And here the question arises: how to fill the liquid. If there is a running water supply, then water will flow without problems.
Second connection option: we place the tank lower, and place the fitting for the supply circuit on the side. But there is a nuance: if the water level is below the upper fitting, there will be no circulation. It will stand in the heat exchanger and periodically reach a boil, but in the tank it will remain cool.
If you need to place the tank in the wash room, you should follow the same principles as when placing it in the steam room.
Some general tips
When using heat exchangers, some problems arise that can “spoil your mood.” What are these problems and how can they be solved?
Temperature of heating water in the tank
Temperature of heating water in the tank
You need to “catch” the moment when it will be acceptable, but such a “moment” is almost impossible to catch. The fact is that while taking a shower, the stove continues to burn, and accordingly, the water temperature constantly rises. What to do? Putting out the fire in the stove? This, of course, is not an option.
We suggest solving the problem using a mixer. If there is a water pipe in the bathhouse, great; it will help not only create a comfortable temperature, but also, using simple automation, make filling the water container automatic. It will be possible to wash without saving water, and the risk of it boiling in the heat exchanger will be somewhat reduced. If there is no water supply, we recommend installing an additional container for cold water next to the warm water tank. It must be connected to the shower through a mixer.
Connection diagram
How and how to connect the external tank to the heat exchanger
Remember that the elements in contact with the stove become hot, their surface temperature exceeds 100 0C. Therefore, the pipes must be made of stainless steel (cast iron will not work, as it is susceptible to corrosion). But ordinary pipes are allowed to be made of metal-plastic; they can even be replaced with flexible hoses. The main thing is that the diameter is 1 inch or 3/4, otherwise the circulation will be poor.
Use tangit for seals, and paronite for fittings. Feel free to replace factory elements with non-standard ones, but made of heat-resistant material. Don't forget about the drain valve - it is simply necessary to preserve the system for the cold season or to quickly remove stagnant liquid. Otherwise, during frosts, the remaining water will freeze and burst the pipes.
Cast iron, steel or stainless steel?
Quite a lot depends on the material from which the tank is made - both the rate of heating and cooling of water, and the durability of the tank itself.
Cast iron: hot water all day long
For a long time, the tank in the bathhouse was made of heavy cast iron - the water took a long time to heat up, a lot of firewood was consumed, but it was hot until the evening and the whole family could wash all day. In addition, cast iron is not afraid of either corrosion or high temperatures. But its considerable weight is, of course, an obvious drawback.
Stainless steel sauna tanks: lightweight and durable
But today, a stainless steel sauna tank is becoming increasingly popular - there is no need to isolate moisture from it, it has excellent thermal conductivity, and the deformation coefficient due to sudden temperature fluctuations is negligible and cannot be compared with the properties of ferrous metals.
The best brands for such tanks are 8-12X18H10 (304) and 08X17 (430), which are also used for making dishes. They are resistant to even extreme temperatures, hygienic and do not corrode or deform.
Such bath tanks are made from durable and thin stainless steel sheets, into which special ball valves are installed to enter and supply water. Caring for such tanks is extremely simple.
Enameled tanks - good if handled with care
Enameled tanks will also get rid of unpleasant rust. Their only drawback is possible chips, which will lead to corrosion. But they can be treated with special heat-resistant paint - unless the tank itself is inserted into the oven.
Review of furnaces with heat exchanger
There are built-in models of heat exchangers. Below we will look at the popular ones.
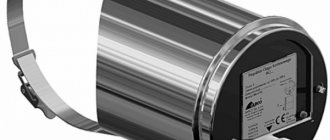
Sauna stove with boiler
Let's start with how justified such a decision is from an economic point of view. Installation of this device increases the efficiency of the equipment used. With it, exhaust gases not only fly away uselessly into the atmosphere, but also simultaneously heats water, which can then be used for bathing or other household needs. Therefore, it repeatedly justifies the fact of its installation in the long term.
Vesuvius Skif 16 VChT
Powerful and fast, with a right- or left-side location of the water heater, equipped with a mesh. It boasts a steel firebox with thick walls (8 mm), thanks to which it is not afraid of even constant exposure to high temperatures.
Tornado 20M2
Productive, heavy (125 kg). Equipped with a cast iron door, built-in heat exchanger and a spacious side casing designed for 240 kg of stones. Must be installed on a reinforced foundation. But the efficiency is impressive.
Harvia 20SL Boiler
A heater from a Finnish manufacturer, weighing 75 kg, with 40 kg of stones. Modern, with a recuperator in the form of a tank, with a remote structure and a built-in condenser, designed for a steam room with an area of up to 20 m3. It has stable legs and a stainless frame, has smooth shapes and an attractive design.
Our opinion on water tanks
In our opinion, the most convenient to use is . Once you have spent money on its purchase and gone to the trouble of installing it, you will enjoy the comfort that this type of water heater can provide for a long time.
On the other hand, mounted and mounted tanks are attractive due to their ease of installation. If we talk about tanks on the pipe, then they allow you to save thermal energy by preventing the heat from evaporating along with the escaping smoke.
Thus, all types of tanks have their advantages and disadvantages. Only you should decide which of them is most acceptable, based on the conditions existing in your bathhouse.
Some details of installing a remote tank can be found in the following video:
Installation and connection of the heat exchanger and tank in the bath
- Find a suitable location to mount the remote tank. If all the structural parts are located in one room, it is most often hung on the wall closest to the heating unit, 200-300 mm above the recuperator.
- Secure the wooden dies with dowels - these are the guides on which you will hang the tank. This is necessary so that the container does not touch the interior elements with its hot surface.
- Strengthen the assembly with brackets for greater reliability.
- Equip the remote tank with 4 pipes, then, using fittings, connect the first two with the corresponding ones at the tank (for direct and reverse water supply), close the third with a valve, and connect the shower (faucet) to the fourth.
- Install (at the lowest point) a valve on the reverse line to drain the water.
- Connect all elements and check the system for leaks.
What you need to know about operation
If you have read the instructions and purchased a heat exchanger for your bath, make sure that the following conditions are met:
- Fastening connections must be movable - this will help minimize deformation of the recuperator components under the influence of high temperatures.
- Seals must be made of heat-resistant materials.
- The capacity of the remote tank is selected so that it can accommodate the volume of water heated in 2 hours.
- It is important that full compatibility with the heating unit is maintained.
- The device should consume no more than 10% of the energy generated by the oven.
Operational safety
To prevent emergency situations, observe the following precautions:
- do not attach pipes directly to walls;
- Make sure that there is always enough water in the tank, otherwise you will quickly encounter a scale problem or even a fire hazard;
- constantly check the operation of the device and sound the alarm if it suddenly breaks down;
- Use only heat-resistant gaskets and regularly pay attention to their condition.
Stage one: boiler installation
Installing a gas appliance is usually not difficult. This is the simplest stage of installation of a heating system. Manufacturers have developed detailed installation instructions for each type of boiler.
It is easier to install a floor-standing one, despite the fact that it is heavier in weight and larger in size. For wall mounting you need special brackets. They come included with the device. The diagram for connecting a wall-mounted boiler to the heating system is indicated in the instructions for the device
The most important thing is to choose the right location for installing the boiler, while also considering how the pipes will be connected to the boiler.
When choosing the location of the unit, not only ease of maintenance is taken into account. It is necessary to comply with the standards and requirements that apply to gas appliances. Their implementation guarantees the efficiency and safety of using the heating unit.
Two basic rules to follow:
- The room where the boiler will be installed must be provided with a window or window that can be easily opened if necessary.
- No devices or objects should be placed near the gas unit.
The connection diagram for a floor-standing boiler requires careful preparation of the base. The wall-mounted boiler is placed at a height of 80 cm from the floor, no closer than half a meter from the walls. These are standard operating safety requirements.
To know how to properly connect a double-circuit boiler, you need to become familiar with the conditions required for the installation of a chimney and ventilation system.
Turbo boilers greatly simplify the task because they do not require the installation of bulky chimneys and exhaust systems. This type of boiler is becoming increasingly popular today. The peculiarity of turbo boilers is the device for the forced removal of exhaust gases and the simultaneous influx of street air, like a “pipe in a pipe”. This is the safest system, as it allows you to install gas units in almost any room.
There is another type: floor-mounted parapet boilers. These are chimneyless, energy-independent units. They are used where it is impossible to build a large chimney. Parapet boilers have a closed combustion chamber, it is completely isolated from the room. In such boilers, the coolant circulates by gravity, without an electric pump. This is their main difference from turbocharged boilers with a coaxial chimney.
The simplest heat exchangers
To make choosing a unit easier, we suggest you familiarize yourself with the following options.
Coil for furnaces
The simplest version of a heat exchanger is a pipe (made of aluminum, copper or other ductile and anti-corrosion metal), bent into a spiral or, less commonly, of a different shape. The carrier effectively moves along it by gravity if its total length is less than 3 m. It is heated by hot air, and not by contact with fire. At the ends of this design, threads are made (external) for a fitting connection with the tank.
The coil can be placed directly in the firebox, inside or outside it. Its shape can be very different, starting from the simplest U-shaped horseshoes, continuing with the already mentioned spirals with different numbers of turns, and ending with complex welded registers. The latter are done to increase reliability and reduce energy losses, but since they are large in size, they are usually placed in spacious heaters.
Rectangular tank on a pipe
This is another type - no longer an internal cylindrical container, but a structure consisting of an airtight body made of stainless steel.
The principle of operation remains the same - the heated liquid rises into the reservoir, the cooled liquid goes back. In implementation, a chimney with a diameter of Ф115mm (without the use of an adapter) or 110mm (with use) is suitable for it, and exhaust steam entering the room is almost excluded. True, the system must be sealed; it is important to replenish the structure with water in a timely manner.
Recommendations from experienced professionals
Here are some more tips on how to install a heat exchanger in a bathhouse as rationally as possible:
- If you do not plan to use a circulation pump, make the pipeline at a slope of 50 so that the liquid moves due to gravity.
- Do not take a tank that is too large and/or do not pour too much water into it, as it simply will not have time to reach a comfortable temperature in the time you need.
- Pay maximum attention to sealing - during assembly, do not hesitate to check the quality of each connection several times.
Choose durable materials and a suitable design, make the calculations correctly, and strictly follow the instructions and recommendations. A competent master knows how to make and connect a heat exchanger in a bathhouse, because correct installation will be the key to safe operation of the equipment, and therefore a comfortable bathing after the steam room.
Finally, a video about how the universal heat exchanger model works:
How to make your own device
It’s easy to make a simple coil yourself from a copper tube. For a chimney with a diameter of 100 mm, a copper pipe with a diameter of ¼ inch and a length of 3-4 m is suitable. Threaded fittings should be soldered to the ends of the pipe. Then the tube is filled with fine sand, twisted and wrapped around the chimney.
It is advisable to leave a small distance between the turns - then the pipe from the chimney will be heated by both heat transfer and infrared radiation. It is convenient to do this work with an assistant. The sand is then washed out of the pipe with water under pressure. Connect the pipes leading to the radiators and expansion tank.
The Kuznetsov heat exchanger is made using welding. The simplest option is to make a housing from a gas cylinder or large diameter pipe.
For manufacturing you will need the following materials:
- Gas cylinder, large diameter pipe (300 mm) for the housing.
- Pipe with a diameter of 32 mm (it is better to take one piece with a larger diameter - up to 57 mm). The length of the blanks is 300-400 mm, the total quantity should be sufficient for cutting the blanks.
- Two small pipes of the same diameter as the chimney; It is advisable to use a chimney pipe - if the chimney is prefabricated, then on one side of the structure the pipe will have a socket, which is necessary for installing the heat exchanger.
- Two pieces of steel sheet, sufficient to cut out the end caps of the housing.
Air heat exchanger manufacturing technology:
- A large pipe or cylinder is cut to the required size.
- 9 blanks of the same length are cut from thin pipes.
- Circles are cut out for the plugs.
- 9 holes for small diameter pipes are cut in the circles; if one tube of larger diameter is taken, then a hole for it is cut in the center.
- Thin pipes are inserted into the holes of the plugs, attached by welding, and then welded.
Holes with a diameter equal to the diameter of the chimney are cut in the sides of the body.
A structure of thin tubes and plugs is inserted into the body and welded at the junction of the plugs and the body of a large pipe.
The pipes are inserted into the holes on the sides of the body and also boiled.
Alternative option:
What materials can be used
The ideal option is stainless steel (for example, food grade austenitic stainless steel 08Х18Н10 or AISI 304) or copper. Industrially produced products are sometimes made from titanium. But the price of these materials is quite high. But they are durable, do not rust, are reliable and durable. If you have a potbelly stove in the garage or a homemade heater from scrap materials in the bathhouse, it is quite possible to use ferrous metal (carbon steel).
You can use a high-quality corrugated stainless steel pipe. Galvanized corrugation is an undesirable and short-lived option. Aluminum pipes can also be used for the coil (just not for chimneys of solid fuel stoves).
Sometimes galvanized steel is used, but it should be borne in mind that during welding work the zinc layer evaporates, and all the advantages of galvanizing (corrosion resistance) come to naught. At temperatures above 400 °C, zinc begins to evaporate (zinc vapor is toxic), so you should not use galvanization for heat exchangers on the chimneys of solid fuel boilers.
Flaws
Despite many advantages, the installation of a heating element on a chimney pipe also has disadvantages. One of them, the most important, is a sharp decrease in the smoke temperature at the installation site of the heat exchanger. This can lead to deterioration of traction and the formation of condensation, increased soot deposition inside the pipe.
In addition, when connecting a heating system, for example, a garage, you need to calculate the volume of coolant to avoid boiling water and bursting pipes. Welds must be completely sealed.
Any heat exchanger design significantly increases the efficiency of the furnace. For trouble-free operation of the system, it is necessary to carry out a visual inspection of all its elements at least twice a year, and, if necessary, timely repairs, descaling, replacement of gaskets and other necessary maintenance work. In this case, water heating and heating systems will operate flawlessly for a long time.
Tags: steam room, heat exchanger, install
« Previous entry
Operating principle
There's nothing complicated here. Water is one of the most heat-intensive substances, so heating it requires a lot of energy. We can take this energy either from the stove body or from the chimney.
Brick stove for a bath with a water tank
It is clear that inside the stove there is “working” heat that is used to heat the steam room, but in the chimney it is already considered a loss, because the gases do not have time to cool while passing through the pipe, and in this form they escape into the atmosphere.
It follows from this that the idea of purchasing a sauna stove with a water tank can be useful for increasing the efficiency of the stove - for this you need to take a model with a tank on the chimney.
DIY making
Despite the availability of different options for sale, you can try your hand at making a heat exchanger yourself. It's not that difficult if you have welding experience. In any case, it’s easier than making a stove from scratch.
But before you get started, you need to do a little calculation.
Calculation of heat exchanger power and area
It was already mentioned above that heat exchangers connected to the body take away part of the furnace power. Therefore, the first rule will be the following:
IMPORTANT! The heat exchanger power should not be more than 1/10 of the furnace power.
The second rule is related to the length of the pipes: if the system is gravity-fed, then you should not extend the pipes further than three meters. The pump in the system eliminates such restrictions. But the pump is installed more often when the coolant is used to heat rooms. However, if the storage tank is not located too high, you can only wash with a hose. If this is inconvenient, then you need to either take the tank into the attic and insulate it, or install the same pump.
The third rule concerns the volume of the heat exchanger (if it is a small flow-through tank and not a coil). The water in it should heat up within a couple of hours. If it’s longer, then the volume is too big. If it is faster, then it is better only at first glance - the water should not boil, this will cause scale, steam, testing the expansion tank, and other problems.
Now, actually, the calculation itself:
The power of the heat exchanger depends on its area: 9 kW for each square meter of the exchanger. The area is quite simple to calculate: if it is a coil, then multiply the circumference (3.14 * diameter) by the length of the pipe. If this is a “samovar” heat exchanger, then take the diameter of the inner pipe, multiply it by the number Pi, and multiply it again by the height of the “samovar”.
If the exchanger hangs on the chimney, you can ignore the rule of deducting its power from the power of the stove. Only if he is on or in her body.
You can calculate the power required to heat a room using the same principle as for a steam room, that is, based on the volume of the room. In the steam room, a kilowatt per cubic meter is taken, but the adjacent ones do not need high temperature, so focus on half the value.
Knowing how many kilowatts are needed to heat a washing room, you get the area of the heat exchanger, and from it the length of the pipe for the “samovar” or coil.
Let's consider a couple of options for self-manufacturing heat exchangers.
Let's assume that you decide to increase the efficiency of the stove by installing a heat exchanger on the chimney.
- The thickness of the steel required for this is 2.5 mm.
- In addition to the sheet material, you will need two pipes with different diameters.
- The smaller one should be adjacent to the chimney pipe, the larger one should be 5-10 cm wider than the first one.
- Two circles are cut out of sheet metal to fit the diameter of the larger pipe, then a hole is cut in the center to fit the diameter of the smaller one and everything is carefully welded.
- You also need to make holes for the pipes through which water will come and go.
- The pipes are threaded and must match the diameter of the connecting pipes.
ADVICE! After checking the tightness of the seams, installation on the chimney and routing of pipes, it is recommended to insulate the heat exchanger using mineral wool and foil - this will dramatically increase the rate of water heating.
Another option for a heat exchanger for a chimney is a coil made of a copper tube with a diameter of 10 mm, which is made to tightly wrap around the chimney pipe. 1.5-2 meters of pipe is enough. The ends of the coil are inserted into the nuts, flared under the fittings, and then the fittings are screwed to the nuts.
Note! The copper tube must be flared exactly under the cone of the fitting so that they eventually fit tightly against each other. Be careful, because this is where leaks are possible in the future if you flare with an uneven thickness.. Here are a couple of videos on the topic:
Here are a couple of videos on the topic:
Materials
When choosing a tank for a bathhouse or when making it yourself, an unmistakable choice of the material for its manufacture is extremely important. The heating time of the liquid, the period of its cooling and the duration of operation of the device itself will depend on this. Among the most widely used materials, cast iron, stainless steel and enameled steel are widely used.
Previously, only cast iron tanks were used for hot water tanks. Cast iron containers have been tested by time and have a number of positive aspects. In particular, a cast iron tank will keep the water hot for a long time. There is no corrosion on them and the water in this tank will always be clean. This material is very resistant to temperature changes. And finally, the shelf life of a cast iron tank is very long, since this material is not susceptible to corrosion. Currently, not many manufacturers are engaged in the manufacture of cast iron tanks. But it is quite possible to buy a used tank at a lower price. In this case, you will need to process it and give it a pleasant appearance.
One of the disadvantages is the rather long time it takes to heat the water in the tank. Cast iron tanks are heavy and sometimes need to be installed on a special foundation. If the tank is located above the stove, its fastening requires additional reinforcement. Making such a tank yourself will also be a very problematic undertaking.
Stainless steel containers are now used quite often. This material replaced cast iron tanks. The owners of the baths appreciated their high positive qualities. Such tanks do not require additional protection from high humidity. The water in a stainless steel tank heats up in an extremely short period of time. Stainless steel has good resistance to sudden temperature changes and, accordingly, does not rust, as its name already implies. The only downside that can be noted is that the water in it cools down quickly.
Tanks made of enameled steel are also a popular option for this design. A special enamel coating on such tanks reliably protects them from corrosion. The main thing is to prevent damage to the enamel, otherwise the tank may begin to rust. Although damaging the enamel layer is quite problematic, since such a coating is resistant to various types of damage. If necessary, a tank made of this material can be very easily cleaned. Enamel of various colors is available on the market.
For cold water, separate tanks are now rarely used, since it most often enters the room through the water supply. But if there is a need to install a container for cold water, then there is much less hassle with it than with a tank for hot water, since there are no particularly strict requirements for it. You can even use wooden containers, such as an oak barrel. Plastic containers for cold water are also popular. But such containers cannot be placed in a steam room, much less near a stove, because plastic is sensitive to high temperatures and can become deformed when heated. You can also make such a tank yourself.