Good afternoon, dear reader! We have already learned to be careful when installing and operating gas supply pipelines and gas appliances, but water supply seems absolutely safe to us.
However, various kinds of troubles can also arise in water supply systems - shutdown of pumping equipment, leaks, drop in water pressure in one of the areas, to protect against which a check valve is installed on the water.
Purpose and scope of application
The main purpose of this device is to protect the water supply system from changes in water flow parameters to critical values. Water pressure when pumping equipment stops can lead to its breakdown. The operating mechanism of the valve prevents water from flowing in the opposite direction and protects pipeline systems and plumbing fixtures from water hammer.
It is recommended to install a check valve:
- after a submersible pump in a well or well;
- on the water supply;
- after a water meter;
- in front of the water heater;
- into the main sewer line;
- in front of each plumbing fixture;
- in autonomous heating systems with several separate circuits, inside which the coolant has different pressures.
If the utility is equipped with a pumping station, the installation location for the check valve may be a section of pipeline located directly in front of this equipment, or behind the ratchet on the suction line.
When equipping the water supply network with a vibration pump, the valve is installed before the receiver on the discharge pipeline.
The device can also be installed on the water supply of country houses, where it is used only in the warm season. In this case, it is necessary to insert a tee into the lowest point of the system and attach a valve to it to drain water for the winter in order to prevent the pipes from defrosting and failure of the check valve.
Materials, markings, sizes
The check valve for water is made of stainless steel, brass, larger sizes are made of cast iron. For household networks, brass is usually used - it is not too expensive and durable.
Stainless steel is, of course, better, but it is usually not the body that fails, but the locking element. This is where you should approach your choice carefully.
For plastic plumbing systems, check valves are made from the same material. They come in polypropylene and plastic (for HDPE and LDPE). The latter can be welded/glued or threaded. You can, of course, solder adapters to brass, install a brass valve, then again an adapter from brass to PPR or plastic. But such a unit is more expensive. And the more connection points, the lower the reliability of the system.
For plastic and polypropylene systems there are check valves made of the same material
The material of the locking element is brass, stainless steel or plastic. Here, by the way, it’s hard to say which is better. Steel and brass are more durable, but if a grain of sand gets between the edge of the disk and the body, the valve jams and it is not always possible to return it to functionality. Plastic wears out faster, but it doesn’t jam. In this regard, it is more reliable. It’s not for nothing that some manufacturers of pumping stations install check valves with plastic discs. And as a rule, everything works for 5-8 years without failures. Then the check valve begins to “poison” and is replaced.
What is indicated in the labeling
A few words about the marking of the check valve. It states:
- Type
- Conditional pass
- Conditional pressure
- GOST according to which it is manufactured. For Russia, this is GOST 27477-87, but there are not only domestic products on the market.
Return valve for water: marking according to GOST
The conditional diameter is designated as DU or DN. When choosing this parameter, you need to focus on other fittings or pipeline diameter. They must match. For example, you will install a check water valve after a submersible pump, and a filter next to it. All three components must have the same nominal diameter. For example, all should have DN 32 or DN 32 written on them.
A few words about conditional pressure. This is the pressure in the system at which the shut-off valves remain operational. You should definitely take it no less than your working pressure. In the case of apartments - no less testing. According to the standard, it exceeds the working one by 50%, and in real conditions it can be much higher. You can find out the pressure for your home from the management company or plumbers.
What else to pay attention to
Each product must come with a passport or description. It indicates the temperature of the working environment. Not all valves can work with hot water or in a heating system. In addition, it is indicated in what position they can work. Some should only stand horizontally, others only vertically. There are also universal ones, for example, disk ones. That's why they are popular.
Opening pressure characterizes the “sensitivity” of the valve. For private networks it rarely matters. Only on supply lines close to the critical length.
Also pay attention to the connecting thread - it can be internal or external. Choose based on ease of installation. Don't forget about the arrow that indicates the direction of water movement.
Dimensions of check valves for water
The size of a check valve for water is calculated according to the nominal diameter and they are produced for all - even the smallest or largest pipeline diameters. The smallest is DN 10 (10 mm nominal bore), the largest is DN 400. They are the same sizes as all other shut-off valves: taps, valves, drains, etc. Conditional pressure can also be referred to as “dimensions”. The lowest is 0.25 MPa, the highest is 250 MPa.
Each company produces check valves for water in several sizes.
This does not mean that any of the valves will be in any variant. The most popular sizes are up to DN 40. Next come the main ones, and they are usually purchased by enterprises. You won't find them in retail stores.
And also, please note that for different companies, with the same nominal diameter, the external dimensions of the device may differ. The length is understandable. Here the chamber in which the locking plate is located may be larger or smaller. The diameters of the chambers also differ. But the difference in the area of the connecting thread can only be due to the thickness of the walls. For private houses this is not so scary. Here the maximum working pressure is 4-6 Atm. But for high-rise buildings it can be critical.
How to check
The easiest way to test a check valve is to blow into it in the direction that is blocking it. No air should pass through. At all. No way. Also try pressing on the plate. The rod should move smoothly. No clicks, friction, distortions.
How to test a check valve: blow into it and check for smoothness
Also inspect the seat and disc. Especially in the place where they are adjacent to each other. Everything should be even/smooth. The tightness of this type of fitting depends on how accurately everything fits. In more expensive models, a rubber/polymer/plastic sealing ring is installed on the plate. Needless to say, it should lie flat, without waves, and there should be no scratches or burrs.
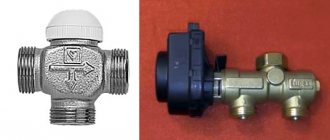
Device
The design of any type of check valve includes a collapsible cylindrical body consisting of:
- reception areas (connections to the pipeline);
- limiter (one or two doors, ball, etc.);
- mechanism for fixing the limiter;
- outlet zones (fastenings with pipeline).
For the manufacture of body parts the following is used:
- brass;
- bronze;
- titanium;
- cast iron;
- steel (including alloy and stainless steel);
- non-metallic materials;
- high temperature ferritic steel.
The necessary tightness of the locking element on the seat is ensured by sealing surfaces, for the manufacture of which the following is used:
- durable rubber;
- plastic;
- corrosion-resistant steel, deposited in a thin layer.
Principle of operation
The operating principle of this type of locking device is quite simple and is as follows:
- water entering the device body under pressure affects the shutter and presses the spring, which holds it in the “closed” position;
- as long as the flow pressure level is high enough, the spring is in a compressed state and holds the locking element in the “open” position and water can flow freely through the device body in the required direction;
- when the pressure decreases or the direction of water movement changes, the spring mechanism of the valve returns the valve to the “closed” position.
By working in this way, the check valve prevents unwanted movement of fluid in the opposite direction.
Valves classification
The equipment differs in design, material, and size. Each has its own installation characteristics.
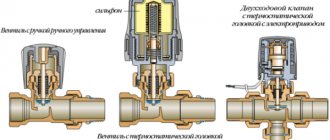
The design features of the device are as follows:
- With lift-type locking element. The valve is equipped with a shutter that rises or falls to block the water flow. When liquid enters, the shut-off part goes up and lets it through. When the pressure decreases, the shutter is directed downwards and blocks the reverse flow of the water jet. The movement of the mechanism occurs using a spring.
- With ball-type shutter. Under pressure, the ball moves and water flows through the system. After the pressure drops, the shut-off element returns to its place.
- With disc lock. The disc blocks reverse flow thanks to a spring device.
- With two shutter doors. They fold under pressure, and return back when the pressure decreases.
In everyday life, equipment with a lifting mechanism is most often used. It is easy to repair by replacing the spring.
Devices are made from various materials. Brass elements are not subject to corrosion, are easy to maintain, and can be installed on all types of pipes. Locking devices in a cast iron body are not used so often. This material rusts and deposits settle on it quite quickly. Such valves are only suitable for wide lines.
Stainless steel cases are the most reliable, but also the most expensive. Steel valves do not rust and are not affected by aggressive environments; deposits do not accumulate inside them.
Most of the elements are mounted using a coupling connection. To do this, you will need two threaded adapters, selected according to the cross-section of the pipeline system. Flange connections secured with bolts can also be used. This type of fastening is used for small devices when there is not enough space on the pipes for another fastening. They are usually equipped with valves made of large cross-section cast iron.
The price of the product depends on the combination of these parameters, as well as the brand. The average cost is 700 rubles.
Types and designs
In addition to differences in the material of manufacture, water check valves have design features.
Spring coupling
The valve body of this type forms two cylindrical elements connected to each other by a threaded method. The locking mechanism consists of a plastic/metal rod, upper and lower spool plates, and a sealed interdisc gasket. The opening of the lock when the water flow pressure reaches the required value occurs due to the weakening of the spring. When the pressure level decreases, the spring presses the plate against the seat, blocking the passage.
The tightness of the body parts is ensured by sealing gaskets installed at the points of their connection.
Rotary paddle
The device is equipped with a special locking element - a spring-loaded plate in the shape of a petal. Its rotation axis is located above the passage hole. Under the influence of water flow, the petal folds back and opens the passage channel. If the pressure drops below the permissible level, the plate falls and closes the hole. This method of operation leads to water hammer, so products with a diameter of more than 400 mm are equipped with a soft closing mechanism.
In the absence of this device, a large valve petal will slap heavily on the seat, which will lead to rapid wear.
Ball model
In it, the shutting element has the shape of a ball, which, when the water pressure decreases, lowers, locking the passage hole. It is also driven by the force of compressing the spring when opening the passage or unclenching it when the shutter returns to the closed state.
Ball valves have a removable cover, which allows them to be serviced without dismantling.
Lifting type product
In a lift-type valve, the shut-off element is a spool, which rises under pressure and does not interfere with the flow of water. When the pressure drops, the spool drops onto the seat, preventing the flow from moving back. Such devices are intended for installation only on horizontal pipelines, since their axis must always be strictly vertical.
The presence of a removable cover on such a valve allows it to be repaired and cleaned without dismantling it from the pipeline system.
How to choose a reliable valve
In the design of the heating system, it is necessary to clearly define the maximum permissible pressure values. The productive capacity of the boiler or pump, volume, and circulation features of the temperature of the working environment are also taken into account. Based on this, the type and design features are selected. Of the previously listed types, users are recommended to use spring-loaded safety valves . They are perfect for boilers with low power. Low or medium lift devices are also used for hot water systems.
If the working fluid is discharged into the environment, an open type device should be selected. If the discharge occurs into the drain, then a housing design with a threaded outlet outlet is used.
It is prohibited to install a protective device with an excessive response threshold. It won't work when it needs to.
The traditional blast valve is affordable and easy to install. This device protects well a closed heating system with a gas or electric boiler, since if an accident occurs, heating stops immediately. It is also not recommended to purchase cheap Chinese fittings. It is unreliable and leaks immediately after the first explosion.
Differences
Disc or spool lifting models are distinguished by a wide range of possible operating temperatures and high network pressures, therefore they are recommended for installation on larger diameter pipelines. Systems with small pipe diameters can be equipped with ball or lift valves.
Wafer devices are suitable for installation on polypropylene pipes. When the pump stops, a water hammer may occur in the system, which leads to damage to the hydraulic system.
A two-leaf valve must be installed in front of it. When the water flow rushes back, the flaps will not allow liquid penetration, as they can fold.
Professional installation advice
Even such a simple procedure as installing shut-off valves is based on the implementation of certain rules. For example, the design of a room often requires camouflage of the pipeline and security group.
You can hide devices, but subject to three conditions:
- the length of the flexible line or pipe from the fuse to the tank should not exceed 2 m, otherwise there will be excessive additional pressure on the valve spring;
- the ideal installation of the fuse is directly to the boiler fitting, and if this does not work, then installing a tee is still excluded;
- To service the fittings, a technical hatch should be equipped.
Many people worry when they see drops of water on the valve connection. This is a normal phenomenon and indicates that the device is working properly.
From time to time, small pressure surges occur in the line, which provoke a minimal discharge of liquid. You need to worry when water either does not appear at all or pours continuously.
It should be remembered that independent modernization of safety devices is strictly prohibited. If you need a 0.8 MPa valve, then you need to purchase just such a new product, and not try to somehow remake or adjust the 0.7 MPa device.
If there is any doubt about the functionality of the safety valve, you should dismantle it and check whether the spring or seal is clogged. Are you having problems with your water heater itself and don’t know what to do? We recommend that you familiarize yourself with common boiler breakdowns and repairs. If you lack skills, invite a specialist from the service center.
Advantages and disadvantages
Installing a check valve will allow you to effectively solve the following problems:
- stabilize the operation of the water supply system;
- minimize the risk of air entering the system;
- reduce energy costs if such a device is equipped with a hot water supply system heated by electrical appliances;
- ensure water supply for some time, even when the pump is turned off.
In addition, such devices have the following advantages:
- low weight and length;
- high degree of tightness and reliability;
- ease of installation.
The disadvantages include the fact that the device requires regular maintenance.
Make it yourself or buy it
You can make a water return device yourself. However, ensuring its reliability, tightness of connections and long service life is hardly possible for a home craftsman who does not have experience and skills in plumbing work. It will also be difficult to buy components of the required quality. When manufacturing the actuator, a factory-produced product uses special spring steel and stainless seals.
All body parts and their connections are subject to quality control at all stages of assembly.
In addition, the manufacturer provides a long-term guarantee for trouble-free operation of its products.
Selection tips and approximate price
You need to select shut-off valves for water depending on the parameters of the hydraulic system itself, the contamination of the flowing medium, installation dimensions and method of fastening. For heating systems assembled from rolled metal pipes, a rotary check valve model is more suitable. They are less sensitive to pollution, which is exposed to water flowing through steel pipes that rust over time. Modern metal-plastic pipes are not subject to contamination, so a disk device with a coupling can be connected to them.
The material from which the device is made is also of great importance. Polypropylene structures cannot be installed on hot water supply pipelines, as they exhibit poor resistance to high temperatures. A model made of durable metal would be a suitable option here. Plastic products are more suitable for cold water. A useful video on choosing a pump model can be viewed in the video:
Manufacturers have different prices for products and are set depending on the nominal diameter, design and features of the production process.
The approximate cost of devices from the most well-known manufacturers is given in the table:
| Manufacturer | Design Features | Diameter, mm | Price with VAT |
| Danfoss | Brass, spring, coupling | 15 | 530 |
| 20 | 694 | ||
| 25 | 908 | ||
| wafer, stainless steel housing, disk | 15 | 4385 | |
| 20 | 4838 | ||
| 25 | 5310 | ||
| double-leaf, wafer, cast iron | 50 | 7580 | |
| brass, with external thread | 15 | 3298 | |
| 20 | 3310 | ||
| stainless steel, spring, flange | 40 | 2261 | |
| 50 | 2292 | ||
| 65 | 2997 | ||
| Valtec | with brass spool, spring | 15 | 230 |
| 20 | 298 | ||
| 25 | 500 | ||
| spring | 15 | 195 | |
| 20 | 270 | ||
| 25 | 400 | ||
| Itap | MET horizontal | 20 | 206 |
| Spring, coupling - coupling | 32 | 484 | |
| 80 | 3369 |
Scheme of water supply for a house with a storage tank
The presented scheme can be easily integrated into existing piping, both in water supply with one central pipeline and with several. Its compactness is due to the use of free space above the tank, in which the pumping station is suspended on brackets.
Figure 1 shows a water supply diagram for a private house with two central pipelines consisting of:
- 1 - tank 500 liters;
- 2 - pump;
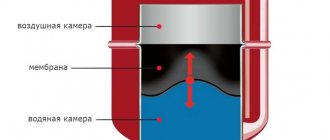
- 3 — receiver (membrane tank);
- 4 - pressure switch;
- 5 — bronze five-point adapter;
- 6, 17 — pressure gauge;
- 7 — hose with reinforcing braid;
- 8 - check valve;
- 9 — float valve;
- 10 - American with external thread;
- 11 — American with internal thread;
- 12 - bronze transition from the container to the external thread;
- 13, 14 — MRN (male thread coupling);
- 15 — МРВ (internal thread coupling);
- 16 - bronze transition from external thread to internal thread;
- 18 — flow meter;
- 19 — mesh filter;
- 20 - 26 shut-off valves.
The suction discharge and distribution line is made of polypropylene pipeline and transitions with diameters of 32 mm (suction) and 20 mm.
Making and installing a check valve yourself
The price of appliances for household needs is quite low; people with any level of income can buy them. But you can also make it yourself from ordinary fittings for connecting pipeline systems.
Required tools and materials
To make a valve with your own hands, you will need to first prepare the following materials:
- a standard coupling with external thread - will serve as a seat for the valve;
- tee with thread on the inner surface to form the body;
- steel spring of sufficient rigidity;
- a steel ball with a diameter slightly smaller than the nominal diameter of the tee;
- plug - a plug with a thread;
- FUM tape.
You should also have tools at hand such as:
- a set of plumbing keys;
- roulette;
- hacksaws for metal;
- dies for thread cutting.
Work progress
The valve is assembled as follows:
- The coupling is screwed into one of the branch pipes of the tee located on the side of its body. It should cover the central hole by 2 mm so that the ball does not pop out into it when the product is working;
- a ball is inserted into the side hole on the reverse side, then a spring;
- this pipe is tightly sealed with a plug on the FUM tape.
An important point in manufacturing is that the spring must be correctly adjusted so that it does not deviate when the pressure decreases, but it is not too tight and does not become an obstacle to the normal functioning of the system.
The installation of both home-made and factory-made products is carried out in the same sequence:
- stopping the supply of the transported medium to the water supply system as a whole using a valve, or turning off a certain area where installation will be carried out;
- cutting out a part of the pipe corresponding to the size of the purchased device;
- cutting threads at the ends of pipes or connecting flanges (wafer type of connection);
- screwing the product into the threads on pipes or clamping the valve between flanges with the installation of sealing gaskets;
- checking the tightness of connections and the immobility of the housing position.
Rules for installation and operation of the device
The general rules for installation and operation for all types of check valves are:
- the need to take into account the movement of the working fluid and correctly place the device so that the arrow on the housing is directed in the same direction as the flow;
- The installation location of the device must be with free access in case of repair, maintenance or replacement;
- lifting rotary mechanisms should only be installed correctly in a horizontal position;
- for threaded connections, additional sealing is required using FUM tape, a skein of flax or silicone;
- if the device works with dirty liquids, then a coarse filter should be installed at the inlet, since a medium with large inclusions can damage the actuator of the water valve;
- Before installation, the device must be checked for leaks.
Connection diagram
Options for placing a check valve are shown in the photo:
- To protect the water meter
- To adjust the operation of pumping equipment
Installation of valves with a pumping station
When choosing a check valve, it is necessary to take into account its nominal pressure, flow capacity and bore diameter. All this data is contained in the technical passport. You can do the installation yourself, following the instructions for the pumping station. The manufacturer must indicate in it the recommended locations for installing all the necessary fittings.
Option for installing OK on a centrifugal pump:
Image gallery Photo from We select the part according to the size of the hose/adapter (for example, 1 inch), check the workmanship: there are no scratches, chips, or internal damage
The direction in which the water should flow is usually indicated by an arrow. If it is not there, then you can use the blowing method
Screw the check valve onto the adapter. To create a tight connection, use FUM tape or linen strand
To make the connection as strong and tight as possible, tighten the valve using a gas wrench
Step 1 - Selecting and Testing a Check Valve
Step 2 - Determine the correct installation direction
Step 3 - screwing the valve onto the threads of the adapter
Step 4 - tightening with a gas wrench
The main thing here is to find out the presence/absence of a check valve in the pumping station block. If it is already a standard element of the water supply installation, then there is no need to install this additional fittings. In this case, constipation will only reduce the throughput capabilities of the pipes, and there will be no benefit from it. It’s not worth spending money and time on installing an unnecessary element, which will also create even minor difficulties in the flow of water.
The standard installation locations for check valves are the lowest point of the suction pipeline and the entrance to the pressure line immediately after the pumping station
If the design of the water supply system assumes the possibility of emptying the pressure line or operating the pump in reverse mode, then the upper check valve cannot be installed after the water pressure unit. He simply will not allow such actions, blocking the flow of water to the water pumping unit.
The installation sequence of the “valve + valve” combination depends on the pump starting technology. There are models that are initially designed to be launched on a closed valve. In these cases, the check valve must be installed after the shut-off valve.
Manufacturers recommend installing a check valve in the “lower” position in all cases together with a coarse strainer. The water must first be purified from sand. The internal parts of the system will wear out faster from contact with abrasive particles.
It’s better to immediately take a reverse lock with a removable or non-removable mesh. It will protect the device from sand, and you won’t have to install an additional filter.
When choosing an installation point for a check valve, you must consider:
- direction of water flow;
- availability of fittings for subsequent repair and maintenance;
- restrictions on the strict horizontal or vertical installation of certain types of check valves;
- the presence of sand in the water, which can lead to clogging.
Spring check valves with a lifting shut-off element are least susceptible to contamination. The fastest and easiest way to install pipe fittings is with a wafer type connection. But more often, inexpensive analogues with flange or coupling mounting are chosen for water supply systems in private homes.
When using a submersible pump, a check valve is mounted at the end of the pipe lowered into the water intake, in front of the pumping device
When installing a check valve, it is important to install it correctly. The spool axis must be located strictly in a vertical position
And when installing a rotary product, the axis of rotation of the “flap” should always be above the center line of the water flow.
The arrow on its body allows you to control the direction of water flow and the correct location of the check valve. It is difficult not to notice it, and even more difficult to make a mistake with installing the locking device in the desired position.
Frequent errors and problems during installation
Among the most common mistakes made when installing a check valve on water are:
- placement of the device without taking into account the direction of flow;
- insufficient tightness of the connection points, which may result in leakage of medium when the valve is closed;
- The diameter of the device is too large, so it knocks during operation;
- the valve is placed too close to the pump, which leads to a rattling sound;
- use an excessively large amount of tow when packing a threaded connection - the coupling may burst;
- During installation, they forget to remove the through hole plug or the valve lock.
Expert advice
- For plumbing, it is better to choose devices made of brass or stainless steel, due to their resistance to corrosion and a fairly long service life;
- The location of the device in sewer systems without a drain should be chosen in an area that is located above the highest point of drainage and not lower than 35 cm from the floor.
- In houses with autonomous heating, the product should be placed on the return line before entering the heating device.
- In multi-storey buildings where separate water supply is provided, this type of shut-off valve should be installed after the water meter.
Installation instructions for boiler piping
Installing a safety safety valve is one of the stages of boiler piping. The minimum set of parts for supplying the cold water line is a polypropylene pipe and a safety valve.
But we will consider another option, in which, in addition to the named elements, a tee, a drain valve and an American connection are involved. In addition, PP fittings will be required in order to move the water supply lines towards the wall.
A complex security node is not always used. Some installers believe that one safety valve is sufficient. This is the minimum option for piping a boiler.
If tees or other adapters are not used, the fuse is fixed directly on the boiler pipe. It can be hidden behind the body or lowered 1-2 cm, which is more convenient for connection.