Who needs it?
The answer is obvious: for those who do not have a connection to the hot water supply network, and this, unfortunately, is not uncommon in our country. But in each specific case, hot water can be used for washing or for heating , or for both, therefore, for specific circumstances, stoves with different types .
In addition, in the steam room itself there is also a need for hot water - it is not good to apply cold water to the stones , because they cool sharply and may crack; then the temperature will go down, but until it rises again, that’s time. So, although small, a tank for hot water in a steam room is appropriate even if there are water supply networks.
IMPORTANT! The temperature of water that can be applied to the stones can be from 70 degrees.
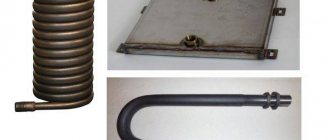
Installing a coil on a chimney
For small steam room ovens, heat exchangers can be installed directly on the chimney. The design of a water heating coil is practically no different from built-in heat exchangers; the only inconvenience is the need to install an additional storage tank for hot water.
Many owners of steam rooms install both types of heat exchangers on the heater stove, the internal one made of alloy steel and the external one made of copper or a copper alloy. The first water circuit is used to produce hot water and boiling water, the second is constantly filled with liquid and looped into the heating system.
Operating principle
There's nothing complicated here. Water is one of the most heat-intensive substances , so it takes a lot of energy to heat it. We can take this energy either from the stove body or from the chimney.
Brick stove for a bath with a water tank
It is clear that inside the stove there is “working” heat, which is used to heat the steam room, but in the chimney it is already considered a loss , because the gases do not have time to cool down when passing through the pipe, and in this form they escape into the atmosphere.
It follows from this that the idea of purchasing a stove for a bath with a water tank can be useful for increasing the efficiency of the stove - for this you need to take a model with a tank on the chimney.
Kinds
Depending on the location of the tank relative to the furnace, they are divided into the following subtypes:
With mounting tank
Wood-burning stove Zhara-Malyutka 700PU. Dobrostal Photos
The most ancient method of heating: the oven was made in such a way that on its upper surface or even a special recess was made for a container of water.
The water warmed up well, located in a container directly above the firebox . And the heater was next door to it.
Today you have at your disposal many models of stoves that allow, if necessary, to install an upper tank, which, by the way, can most often be purchased from the manufacturer at the same time as the stove.
An example is the Zhara-Malyutka 700PU oven . It is equipped with a 50-liter water tank (there is a 30-liter option).
With mounted or attached
Sauna stove with water tank - a hinged type of tank
The location in this case is the same, but the fastening may be different . Such a tank receives heat from the side wall of the furnace. At the same time, manufacturers let the owner decide on which side of the stove the water tank will be located - this is essential for baths with a small steam room space.
The side tank can either be hung on special hooks , or simply placed on a pad - heat transfer will take place in any case, but not very much.
An example is Ermak stoves, which can be equipped with mounted tanks.
With built-in
It is difficult to classify such tanks as a separate type, because in practice it is still the same container located on the side, only without the possibility of removing it. Some manufacturers continue to make similar designs. As an example, let's take the Siberia stove , which is made by NMK.
Sauna stove with water tank Kastor - built-in tank
With external
Regardless of which room the hot water tank will be placed in, the design will be the same. If all previous tanks were in one way or another in direct contact with the furnace, then this type is located at a considerable distance, so heating is carried out using a heat exchanger.
You can read about the types of heat exchangers on our website in the article dedicated to them.
Most often, remote tanks are used to not only supply the washroom with hot water, but also to heat the room in which the tank is located. By the way, there are several options:
- some prefer to take the tank to the washing room ;
- others place it in the dressing room ;
- still others are left in the steam room ;
- the fourth are taken to the attic.
If the first three differ little from each other, then the last option has functional significance. You probably know that for gravitational pressure you need to raise the water tank as high as possible . If you just hang the tank on the wall, you are unlikely to be able to wash yourself in the shower. But if you lift the tank into the attic , then washing in the shower, which is usual for a city dweller, becomes quite possible.
ADVICE! The heat loss from an uninsulated tank in the attic will be too great. Therefore, such a tank is usually lined with one or another heat insulator, maybe even with foil.
There are many examples of remote tanks. Almost every manufacturer has them .
Wood-burning sauna stoves with a tank are a remote type of tank.
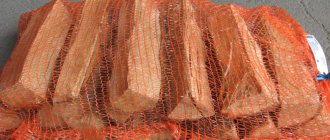
With a tank on the chimney
Sauna stove with a tank on the chimney.
We have already mentioned the advantages of such tanks above. Now it's time to clarify their design. The fact is that you always have a choice: attach to the chimney a full-fledged tank of tens of liters or a small one of 5-10 liters, which will serve as a heat exchanger , that is, transfer heat further to a large tank.
Both options increase the efficiency of the furnace, but there will still be some heat loss when transferred to a remote reservoir.
Building a stove
It makes sense to take on the task of building a stove with a heating circuit yourself if you have plenty of cheap or free firewood. Using a more energetic fuel (for example, coal), a stove with significant heat transfer to the side will acquire properties close to a long-burning stove, see above. For it to work correctly, the project must be carefully calculated, simulated, finalized on a prototype and subjected to comprehensive testing. In addition, a wood-burning stove with a water circuit must be built in brick. Everything is poison, and everything is medicine - its high thermal inertia will make the design not so sensitive to matching the parameters of the heat exchanger and the structure of the furnace. Next, we will look at the manufacturing features of both, taking into account which will make it possible to simplify calculations or build a furnace without them according to a known model.
Register
The heart of the furnace is the heat exchange register or simply the register. The first step in its manufacture is calculating the thermal contact area. Then the register configuration is selected (see below), its material and location in the furnace. Then either a firebox or a duct system is designed for the register, and then the entire furnace is designed according to it. In the latter case, the generally accepted scheme for designing a furnace - from the firebox to the pipe - is violated, so recalculation may be necessary at the design stage.
Thermal contact area
The register must receive as much heat from the stove as is calculated to heat the house, excluding the room with the stove. The heat flow into the register is determined at first glance without difficulty: Q = kS(ΔT), where:
Q – heat flow, W/s;
k – heat transfer coefficient for heat exchanger material of a given thickness;
S – area of thermal contact of the register with the heat-releasing zone of the furnace;
ΔT is the effective temperature difference between the heat-transfer zone and the coolant in the register.
The last parameter is the trickiest, because... ΔT is a complex function of the dependences of temperature changes both in the space occupied by the register and in time throughout the combustion chamber and the subsequent heat transfer of the furnace. With sufficient accuracy in our case, we can calculate when the register is located in the firebox ΔT = 800 degrees, when it is placed in the bell furnace hood ΔT = 550 degrees and in the smoke ducts of a channel furnace ΔT = 350 degrees. Then 1 sq. m of register made of steel 3 mm thick will transfer 12, 8.25 and 5.25 kW of coolant, respectively, and cast iron with walls 4 mm - half as much.
Material and shape
The furnace firebox is cramped, and a register made of steel that conducts heat fairly well is placed there. An ordinary structural one with a thickness of 3-4 mm will do; in an area where temperatures are above 1000 degrees, a properly designed heat exchanger will not work. An acid-resistant cast iron register must be installed in the channels. There is no need to build bell-type furnaces with a heating circuit without precise calculations: the circulation of gases under the bell is a delicate matter. If a register made at random knocks it out, the efficiency of the stove will drop significantly and it will have to be cleaned very often.
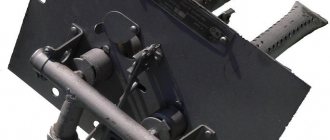
Heat exchange registers for furnaces with a water circuit
The roof-shaped “house” register (items 1 and 2 in the figure) has the largest heat-receiving surface relative to its size and material consumption, but the firebox under it needs to be high so that the “hot” supply manifold does not cool the afterburning zone of the pyrolysis gases. When designing a furnace with such a register, an imaginary plane is taken as the level of the furnace roof, cutting the places where the vertical branches of the pipes turn into converging ones. The size of the receiving surface of the register-house is considered equal to the geometric area of its outer surface.
A register welded from a steel sheet (item 3) is not an option. Its heat-receiving surface is almost half the size of the geometric one, and thermal stresses from large planes in contact with the flame will “flow” to the seams and will soon damage the register.
Drawings of a heat exchanger (heat exchange register) for a furnace with a water circuit
In a low firebox, you need to install a more metal-intensive box register (item 4), and at least 15 cm should remain from its top to the arch of the firebox. A drawing of a box register “for all occasions” is given in Fig. on right. During its technical design, the calculated size of the receiving surface is multiplied by 1.25.
An old accordion battery, pos. 5 in Fig. higher. The size of the radiating surface of one section of cast iron batteries (in this application - receiving heat) is in reference books on heating engineering and public utilities. Any search engine will give you a summary right away, you just need to measure the one you have and decide from the table what size it is. And along the surface of one section there is either the required number of them, or the total area of the available battery.
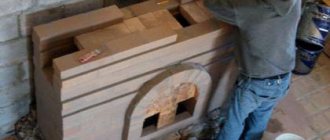
Construction of the furnace
The firebox of a furnace with a water circuit must be fireclay, easily heated and retains heat well. A stove with a brick firebox will cool the register and make it smoke, even if it is somewhere far away in the ducts. In the latter case (a cast-iron register in a channel furnace), it is advisable to line the entire thermal core of its structure with fireclay, and place the register closer to the heil (exit from the firebox to the first well), so that the temperature at its end closest to the firebox is not lower than 400 degrees.
Construction of a furnace with a water circuit
A furnace with a water circuit is built “from the register”. After laying the foundation of the furnace and laying its bed (the first 2-4 continuous rows of masonry for the furnace structure), the register is measured in place (on the left in the figure), mounted and rigidly fastened in the system, and the furnace is built around it (in the center). It is impossible to attach the registers temporarily (on the right) and finally install the system after building the furnace - it is very easy to damage both! It is also unacceptable to secure the register in the oven in any way: it must lie freely in it. The outlets of the register pipes outside the furnace structure are under no circumstances covered! After the oven has completely dried, they are tightly stuffed with asbestos cord to create a gas-tight connection. If air “siphons” into the stove, it will definitely smoke, and fumes will come out of it. For more information on building a stove with a roof-shaped register in the firebox, see the story
Video: brick oven with water circuit
The cast iron register from an old battery is low-power. A stove with it is more suitable for heating a summer house, for example, with a residential attic. An all-season house stove with a heating circuit will already be a very solid structure.
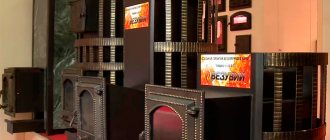
The design diagrams of such furnaces are shown in Fig.:
Schemes of stoves with a water circuit and winter-summer switching for heating a summer house and a residential building.
On the left is the country house. Since country stoves are heated mainly with waste fuel, which still cannot achieve maximum efficiency of the stove, the stove is entirely made of brick. To switch to summer operation, the upper valve is opened and the lower valve is closed. In the home oven on the right in Fig. (the winter-summer switch is not shown) large area steel registers are used in the channels. To prevent acid rain from falling out (if the furnace is fired correctly, of course), its entire thermal core is made of fireclay, i.e. increased heat capacity. In this design, the likelihood of acid condensate formation is minimal.
Pros and cons of different designs
Depending on the circumstances, individual advantages may outweigh the disadvantages. It is clear that if the tank is located on the stove or attached to the side , then three unpleasant things follow from this:
- Constant heating of water will lead to the formation of steam , but it will not be that steam heated over 100 degrees, which is called light - it is obtained only from overheated stones. And the usual heavy steam will pour out of the container, which makes it difficult to stay in the steam room.
- Using heated water for washing is problematic if the steam room is not combined with a steam room. You will have to carry hot water to the washroom and wash the way your ancestors washed).
- In tanks built on the side of the stove, heating occurs the worst, because the walls of the stove do not heat up as much as the top or chimney . Plus, over time, the wall of the tank itself will lose thermal conductivity due to scale, and the wall of the furnace will lose its thermal conductivity due to scale. Therefore, the water does not warm up well, remains cold at the bottom, and must be stirred manually.
such structures also have advantages they are easy to fill with water precisely because the container is not located high. But this is if there is no cold water supply either. Otherwise, the plus is leveled out.
By the way! The larger the contact area between the container with water and the oven, the faster the heating. But this is not always worth striving for - why do you need clouds of heavy steam in an unheated bathhouse?
Of course, you still have the opportunity to set up a shower from any tank. And, although stove makers do not recommend using a pump, the forced circulation of liquid in the system will calmly take water from either the manual or the attached tank. The main thing is not to forget to add more.
A pump is not needed only if gravitational and convection circulation between the heat exchanger and the remote tank is properly organized . (We recommend reading the article where the diagram is given.) But even here, if the remote reservoir is not located too high, you can only wash yourself with a hose. If you take it up into the attic, you may break the rule that says that the length of the connections should not exceed three meters . That is, everything is based on nuances and specific circumstances.
ourselves consider the optimal system to be one in which the tank is mounted on the chimney. Whether it will be a large tank or a heat exchanger depends on how you are more accustomed or comfortable to wash. Well, or whether there is a pump in the system or not.
Photo: samovar-type heat exchanger
However, the optimal system also has its drawbacks. In particular, traders admit that the connection between the tank and the pipe at the inlet below can suffer greatly from overheating, for example, in a situation where water is poured after the stove has been lit. Then the seam splits and needs to be welded. Another drawback is that the pipe burns out when the furnace heats up too much.
Pay attention to the dimensions of the filler hole . For some tanks it is large, it even has a hinged lid, while for others it is small and round. Still, you will have to fill tens of liters, and also wash the inside of the tank !
On a note! The stove should not be heated to the limit of its capabilities. This shortens the service life of the metal , which inevitably oxidizes and turns into scale, and then it crumbles and holes remain. The bottom piece of the chimney will also burn out if you heat it like this. If you don't want this, insert a piece of black structural steel pipe of the required diameter inside. It will take away some of the heat and add strength to the structure.
Useful video
This video explains in more detail about strengthening the chimney with pipe cutting:
You can learn more about the disadvantages of a hinged and chimney-mounted tank from the following videos:
https://youtu.be/S5TRvRjgmLs
What does the boiler consist of?
Before choosing a ready-made boiler for a wood-burning sauna or its design for construction, you need to familiarize yourself with the internal structure of the system and its components.
The overall efficiency of the design depends on the coordinated work of each component with the others. The following elements are necessarily present in the scheme of homemade boilers for a wood-burning bath:
- The base part is a heater. It promotes the accumulation of heat generated by the system. The duration of retention depends on the total volume of the stone fill capable of retaining the thermal energy generated by the firewood.
- Central chimney. Its basis is a vertical pipe through which light combustion products are discharged. It also generates traction, ensuring the circulation of air currents.
- Boilers for wood-fired saunas in Voronezh, Orel, Samara or another city cannot do without a water heat exchanger. Its function is to heat water for later use.
- A passage tunnel with a small door will allow you to heat wood-fired sauna boilers, the price of which depends on the design, from the dressing room or from an adjacent room. This door is often made of heat-resistant glass.
- Firebox (firebox), the area in which firewood or other available solid fuel is heated. In this zone, heat is released from combustion products. The lower part is equipped with a grate of grates on which fuel is placed for various types, including cast iron boilers for wood-fired saunas. You will need to mount the door opposite the firebox, and also form bevels to automatically roll off combustion residues.
- In the lower part, the boilers of wood-burning baths (photos are presented on the page) have an ash pit. They are located under the grate and serve to collect burnt ash falling from the firebox.
We suggest you familiarize yourself with How to clean a wooden floor in a bathhouse. Each water boiler for a wood-fired bathhouse, installed by yourself, may differ from its analogues in the structural arrangement of individual elements. At the same time, dimensional parameters affect its performance.
How to choose the optimal design
In essence, we have already answered this question in the previous chapter, but the answer referred to the specifics of a particular bath.
Let's look at the defining points again:
How to calculate the required volume of container? Assume that one washable item requires at least 10 liters of water.
How are adjacent rooms supposed to be heated? If there are no other options, you can use a remote tank for this purpose. It goes without saying that in this case it should not be thermally insulated. Another option is to use a furnace to heat the antifreeze in a separate heating system.
Are you ready to create forced circulation? If yes, then there are no obstacles to choosing any of the described designs. In this case, you will receive not only a shower, but also, if desired, heating through radiators. True, you will have to organize the system according to all the rules.
For example, do not forget about the need to install an expansion tank , which absorbs excess fluid in the system.
How to install a wood stove with a tank
If the stove is not homemade, then the details of its installation are described in the passport . Just in case, let us remind you that there is a significant difference between preparing to install a metal stove and laying brick.
Stove for a water bath: heat exchanger on a pipe
In the first case, a relatively light foundation is made, without a separate foundation , which is designed to ensure both stability and fire safety. These are 1-3 rows of bricks that are laid below the finished floor level.
refractory sheet is placed on top of the base , followed by an iron sheet that protrudes significantly in front of the firebox to avoid fire from flying sparks.
If the firebox is remote , then the duct is routed through the wall and must be thermally insulated. a gap is left between the channel and the wall , where a heat insulator is inserted (not any, but only one that can withstand very high temperatures). The wall itself is made of non-combustible material, for example, brick. Read more about remote fireboxes here; you may also need material about portals and fireplace stoves.
After installing the stove (see here and here), the chimney is installed. This is a separate topic. We are only interested in the case when the tank is located on the chimney. There is already a chimney pipe inside it , so it is simply placed on the outlet section of the pipe from the stove , and a regular chimney is mounted on top.
In other cases, the tank is either placed/hung on board, or pipes/hoses are attached heat exchanger a remote tank fixed in the washing room or dressing room.
Installing the tank should not cause much difficulty, especially when it is not a remote model. The hinged one, as the name suggests, is simply hung with hooks on the side of the stove , the mounted one is placed on top . The chimney tanks are simply placed on the outlet piece of pipe from the stove. For greater reliability, it is worthwhile to provide a stronger mount if you do not want to drop a tank weighing half a centner, or even more.
The remote tank may have loops for wall mounting : watch the short video where they are shown.
Making a potbelly stove
Initially, it is necessary to draw up a drawing diagram indicating all the dimensions of the parts and prepare the necessary tools for performing metal work (welding, grinder, pliers) and materials.
After cutting the metal, the following actions are performed:
The main elements are welded at right angles: the bottom and walls. Except for the front.
It is important to know! It is recommended to install the bottom of the heating structure at a distance of at least 30 cm from the floor level. Installed metal legs will help reduce the strong temperature effect on the floor covering
The furnace space is subject to zoning, namely, a grate or a sheet of metal is welded between the firebox and the ash pit, in which backlashes are drilled to remove ash.
- It is necessary to make an opening on the front wall to mount the doors. Now the front part can be welded to the remaining elements.
- Hinged hinges are added to the sides, after which the doors can be installed according to the location diagram.
A chimney pipe must be welded at the top of the stove structure. After completion of the work, all seams are cleaned and checked for defects. The next stage is the installation of the water jacket.
Safe Operation
We have already mentioned the danger of the tank installed on the chimney overturning if it is not secured additionally.
It is equally important to observe the following rules for operating a water heating system:
IMPORTANT! Check the presence of water in the system before starting to light the stove. At least in this case, you can count on longer operation of the equipment.
In winter, the rule about draining water in the system becomes especially relevant:
DANGER! Drain the water before leaving to prevent it from freezing and bursting the pipes.
Well, don’t neglect the following advice:
ADVICE! Joints and connections are the most unreliable places in any structure, so they require good insulation and constant attention in the future.
Fight heavy steam by filling the tank half-full so that you can then add cold water to eliminate the steam.
Heat exchanger connection diagrams
Within the framework of this publication, we will not describe methods for making stoves, but will immediately move on to the binding. If you want to make a water heating stove yourself, we recommend that you read the separate manuals:
- homemade heater for the garage using solid fuel and waste;
- instructions for fireplace and stove laying;
- diagram and order of a hob with a water boiler.
If you purchased a factory-made stove with a heat exchanger, carefully study the attached instructions. The documentation always indicates the diameters of the pipes and methods of connecting the water circuit to heating devices. Usually 2 schemes are used:
- An open system with gravitational (convective) coolant flow.
- Closed radiator network with forced movement of water from a pump.
It is not necessary to use a circulation pump in this scheme, but the forced movement of water noticeably speeds up heating
Note. In gravity circuits, circulation pumps installed on the bypass are often used. The goal is to reduce the temperature difference between supply and return, increasing the coolant speed and heating efficiency. In the absence of electricity, the system will continue to operate in gravity mode.
Gravity flow is organized by increasing the diameters of highways and the slopes of horizontal sections. The minimum cross-section of the distribution manifold with a gravity scheme is 32 mm (inch and a quarter), the slope is 3...5 mm per 1 linear meter. The open expansion tank is at the top point, where all the air entering the system goes.
The safety group on the feed is not shown, but it must be present
With the closed circuit shown in the figure above, the coolant is under pressure (at least 1 bar “cold”) and moves under the pressure of the pump. The membrane expansion tank is located at the lowest point and is connected to the return line through a shut-off valve. It is mandatory to install a safety group with an air vent, pressure gauge and relief valve.
Advice on choosing a scheme. When buying a stove for a home with water heating, the homeowner obviously expects the system to operate autonomously. Hence the conclusion: for joint work with a hot-water furnace, a gravity-flow scheme is best suited. After turning off the light, circulation in the circuit will not stop and the heat exchanger will not burn out.
An example of a gravity circuit powered by a brick stationary stove
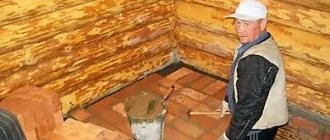
How to install brick ovens with a water tank
Brick sauna stoves with a water tank can have different designs. The general thing is that the tank is located either above the firebox or on the side of it, next to the heater. a protrusion of appropriate size is made under the tank, which has a rectangular shape .
For independent work on the construction of a brick kiln, you need experience . The “recipe” may seem simple, but this simplicity is deceptive. Read more about brick kilns here.
It all starts with choosing a design , and there are quite a few of them. When the choice is made and the orders are found (for example, on the Internet), the number of bricks and the weight of the stove with all its components are calculated - the depth of the foundation depends on this parameter. If the weight of the finished stove is more than 700 kg (and it will definitely be more and do not forget to include a tank filled to the top with water), then a foundation is automatically required . Read about how foundations for furnaces are made on our website.
Having prepared the base, you can begin laying. But first you need to prepare the right solution .
IMPORTANT! Cement mortar is not used for laying stoves. Only clay and sand. There is also masonry without mortar.
First you need to soak the clay. To do this, take equal amounts of water and clay and mix them. After a couple of days, wipe the solution through a fine grid (3x3 mm is good). Then take the sand , sift it and add it to the mixture so that you get something like thick sour cream. The masonry mortar should be neither too fat nor too thin.
Alternatively, you can buy a ready-made clay-sand mixture in bags at a hardware store; just dilute it with water and you can lay the stove (follow the instructions on the bag).
The masonry itself follows the order of the chosen furnace design . You will need two types of bricks: regular solid and fireclay . To help those who decide to do it themselves, we have selected a video where the essential nuances are explained (the voice is boring, but you can be patient):
We also recommend useful materials about stoves:
- Installation in a steam room and a protective screen;
- Inexpensive;
- Which is better;
- With a steam generator.
***
Well, the topic is covered sufficiently fully so that you can decide on the choice of the right type of tank, its volume and location. Good luck with the installation!