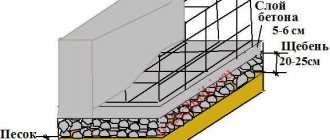
For those who are seriously passionate about hiking, there is no need to talk about what it’s like to wash in a bathhouse after several days in nature. But camp baths can also be an end in themselves, when people go into nature solely for the purpose of steaming and swimming in a beautiful place. For both, we will talk about what a mobile sauna and stoves for it can be.
What is a camp sauna?
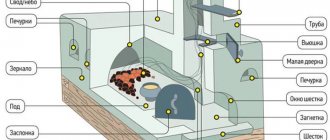
A camping sauna is a convenient tourist attribute that allows you to wash yourself in the field. The design of a portable sauna consists of a frame and an awning stretched over it. Inside or outside the tent there is a stove-stove, which is necessary to heat the room and create steam. In a simplified version, the stove consists of stones and firewood; to protect tourists from fire, it is covered with sheets of metal. A tank is placed on the fire in which water is heated.
A camping sauna is an indispensable thing for lovers of long hiking trips.
Bath procedures can be organized in any weather, even at sub-zero temperatures - a warm microclimate is maintained inside the portable room. The steam room is used not only for hygiene procedures, but also to keep warm during the cold season. If you set up a bathhouse on the shore of a pond, you can plunge into cold water after a steam bath.
With this hiking equipment, camping in the wild becomes much more comfortable. A portable sauna will significantly improve the conditions of being outdoors. The device will be useful for fishermen, hunters and just travelers.
In terms of physical sensations, a bathhouse in a tent is not much different from a regular bathhouse. Up to 4 people can be inside the bathhouse at the same time, standing at full height.
The camp sauna can accommodate 4 people
Conclusion
How to make a camp sauna and what to use for it depends on your desires and capabilities. Naturally, if you travel on foot, carrying a ready-made stove and a tent with a frame is quite expensive. In this case, the easiest way is to carry only a ready-made awning, and build the frame and stove on site (see also the article “Do-it-yourself camping sauna - in nature with comfort”).
If you are a fan of car travel, then you can carry a complete set and build a mobile steam room in a matter of minutes. Moreover, its size can be very impressive, which is important when vacationing with a large group.
In order to understand all the intricacies even better, we recommend watching the video in this article, which clearly shows the beauty of using a bathhouse on a camping trip.
Did you like the article? Subscribe to our Yandex.Zen channel
Safety
Using a tourist bath involves working with fire, so you need to remember the safety rules. If the fire escapes the stove and spreads to the tent, there will be a fire, so it needs to be monitored closely.
The place to install the bathhouse should be cleared of grass, dry leaves, and brushwood - when the stove is lit, they can catch fire and set the tent on fire. The tent is usually made of flammable materials, so they need to be kept away from fire. It is worth installing a spark arrestor on the pipe of a camp sauna. Furnaces are equipped with protective screens that protect against burns.
To prevent sparks from flying out, a spark arrester is installed on the bathhouse chimney.
The frame of the tent must be reliable and durable, able to easily withstand gusts of wind and mechanical loads. It is best to make it from flexible metal rods: hollow pipes are easy to bend, as a result of which the structure becomes unusable, and the rods break with great difficulty.
To prevent the metal base from breaking, it needs resistance to corrosion processes, severe frosts and high heat.
Stones suitable for building a fireplace
The selection of stones should be approached with the utmost seriousness. When making a stove for a camp sauna with your own hands, it is advisable to use materials of dense rocks with rounded shapes. It is necessary to lay down the largest boulders that can be moved, as they will serve as the basis for the future furnace.
The higher the fireplace wall rises, the smaller the stones should be used. Usually the stones are laid out in the shape of a circle, gradually increasing the walls upward. It is necessary to ensure that each next circle of stones fits tightly enough to the previous one, since if the stones lie unsteadily, the walls may fall apart when heated, and everything will have to start over again. For the same reason, you should not build walls that are too high. A sufficient height would be 50-70 cm.
If there is a large number of relatively flat stones, you can assemble a structure similar to a fireplace. Lay out an elongated hearth, fenced with such stones. Leave part of the hearth open, and in the second part, make a small overlap and build a structure resembling a pipe. This will increase the draft when burning wood and, accordingly, the temperature of the stones.
And the amount of steam you can get directly depends on this. If you have a collapsible metal stove, the task is greatly simplified. You will only need to collect everything about a bucket or two round pellets, cover the metal of the stove with them and you’re done. Do not use layered, heterogeneous or chipped stones to build a fireplace or surround a stove. When heated, they may begin to burst and cause injury to vacationers.
Ready-made camping sauna designs
You can purchase a modern camp sauna in a tourist store. The factory device consists of several structural parts:
- prefabricated metal frame;
- polyester awning;
- heating device.
Diagram of a mobile bathhouse (MB-5)
Assembling and disassembling a portable bathhouse will take no more than 15 minutes.
The most convenient and compact mobile bathhouse has the fifth modification (MB-5). This model has small dimensions and weighs only 19 kg. To transport a sauna tent, two bags are used: the stove is placed in one, the awning and frame are placed in the other. For the manufacture of frame racks, duralumin alloys of aluminum D16T and V95T1 are used.
Replacing glass-ceramic inserts in fireplace stoves
In case of damage to the glass-ceramic screens, metal plates are supplied with the Fireplace stove to replace them.
The replacement process consists of the following steps:
1. Place the oven in working position;
2. Unscrew the fasteners, remove the plate securing the transparent screen;
3. Carefully remove the glass ceramic insert. Do not remove the heat resistant seal;
4. Insert the metal plate in place of the transparent glass-ceramic screen;
5. Install the fasteners to fix the insert in its original position.
Detailed video instructions for replacing the glass-ceramic insert with a metal plate.
Features of installing a camp bath
There are two options for installing a camp bath: traditional (black) and safer (white).
Installing a black sauna
With the black installation method, the stove-heater is placed inside the tent. In such a bathhouse there is a truly hot atmosphere, the room warms up much more efficiently. At the same time, this means that the steam room will be smoky all the time, and the tourists inside will get dirty in soot.
The wood stove is constructed from rounded medium stones. It is worth selecting smooth stones without defects on the surface.
The difference between the “black” sauna design is the location of the stove inside the tent
The larger the stones, the longer they will heat up and at the same time retain it longer.
They are arranged in a pyramid and firewood is placed on top. After the stove is assembled, you need to light a fire in it and wait 2-4 hours until the stones heat up until reddened.
While the stones are heating up, assemble the frame away from the fire so that the flames do not touch the awning. Next, they clear a place for the sauna structure: remove coals and firewood from the fireplace, and fill the area around the stove with water. Place a mat of pine branches around the stove to prevent catching a cold while walking on the cold, bare ground. After preparation, the frame is covered with hot stones.
The floor inside the tent is made of pine branches
Installing a bath in white
When installing a white sauna, the stove is located outside the tent. Heated stones are carried inside - all the dirt associated with lighting a fire remains outside. The design of the furnace and the method of constructing the frame are changing:
- The stove is installed at a safe distance from the steam room. 10 m is enough to prevent sparks from reaching the tent and setting it on fire.
- A well is built from massive flat stones and lined with long thick branches. The firewood must completely cover the well.
- Light a fire and wait 1-2 hours for the stones to heat up.
- They take a sapper shovel and carry the hot stones inside the bathhouse.
- The frame is made from felled branches, film and tape. They place 8 poles in the shape of a parallelepiped: two are buried in the ground, two are placed parallel, the sticks are connected on top and the figure is completed. Tape the joints with tape. On the side they create a place for stones. The frame can also be built from three poles connected at an angle to form a tepee.
- Wrap the finished frame with film and secure it with tape. Press the ends of the film with stones on three sides, leave space for the entrance on the fourth and secure the film with clothespins at the top.
Making a camp bathhouse “in white”
Spruce branches are laid on the floor. To make it possible to sit in the tent, you can bring logs there.
Technologies and methods
A homemade stove for a camp sauna can be made without any problems. The simplest version of this design is based on the use of gratings made of a thick steel rod or a welded product similar to a taganka. In this case, the assembly is carried out like this:
- lay flat stones in the base;
- allocate space among them for the firebox;
- lay a grate or rods;
- cover them with pebbles.
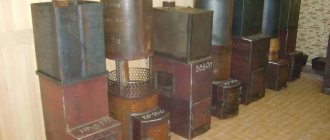
In this case, the following will be useful for a mobile oven:
- unnecessary steel boxes;
- parts of masonry mesh;
- pipe sections.
All steel frames are filled with stones of suitable size. Then they just need to be laid on the fire. Such a solution is beneficial due to:
- maintaining cleanliness;
- minimal risk of stones falling off;
- reuse possibilities;
- speed of preparation;
- quick warm-up.
A do-it-yourself metal stove made in this way will have to be placed at a short distance from the walls of the camp bathhouse. This will prevent burning of the canopy. You can prevent the spread of ash and cinders throughout the tent by digging the fireplace to a shallow depth. In winter, the bottom is covered with spruce branches or special heat-protective mats. When placing a stove in a camp sauna, you need to choose a place with a flat and solid base, close to a water source and away from the entrance.
What you need to assemble a camp sauna
The structure needs a frame, that is, a base on which the tent will be mounted. To create it, metal pipes or rods are used. They are fastened with large bolts or using a pin connection. There must be space in the back wall to build in the stove.
The awning can be made from classic tarpaulin or use more modern fabrics (nylon, polyester, waterproof fibers). When cutting off the required piece of fabric, you need to focus on the dimensions of the frame.
For the awning you can use natural tarpaulin or synthetic fabric with PVC coating
It’s impossible to set up a bathhouse without a heater. There are several options for homemade and ready-made stoves with different placement of stones and firewood:
- A U-shaped fireplace with firewood stacked inside it.
- A pyramid of stones lined with firewood.
- Layer-by-layer arrangement of firewood and stones (3-4 layers).
- A frame made of metal rods on which stones are placed and a fire is lit inside.
- The metal structure consists of a pallet and a firebox. The outer part is made of metal sheets (3-5 mm), stones are laid inside. The main part of the stove is located in the steam room, the firebox goes outside the tent.
"U-shaped hearth"
"Pyramid"
Layer-by-layer arrangement of firewood and stones
Frame made of metal rods
The described bathhouse structure can be quickly built on a suburban area before building a stationary bathhouse.
Preparatory work
Selecting a gas cylinder
For work, it is better to use a propane tank. It is most suitable for this design due to its dimensions. You can buy a cylinder at any scrap metal collection point, the main thing is that it is intact, without holes or large dents.
It doesn’t matter when the cylinder was produced or when it was tested. Do not pay attention to the uniformity of the paint coating on the walls of the container; it will still burn out immediately during the first tests of the oven
The main thing is that rust does not eat through the walls; it is better if they remove the tap before you and release the gas from the cylinder.
Gas cylinder
Expert opinion Pavel Kruglov Stove maker with 25 years of experience
You should not purchase a new vessel; it is better to use these funds to purchase sheet metal and other materials. Ask your neighbors and friends if they have an unnecessary cylinder collecting dust, which they will gladly give you as a gift or sell it for a small fee.
Materials and their quantity
It is difficult to indicate the exact quantity of materials. Much depends on the size of the water container or the size of the compartment for stones. Here is a list of the necessary materials, and how many you will need is up to you:
- gas cylinder;
- sheet of metal, 2-3 mm thick;
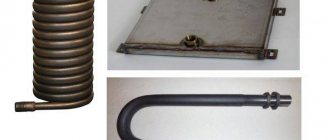
- if after construction there are pieces of reinforcement or rods left over, you can use them to make a grate and handles for doors;
- for the legs you can use a corner or a profile pipe. If the farm has a piece of large diameter pipe, you can cut a piece 60-70 mm wide, cut it in half and weld it to the cylinder;
- pipe, cross-section 120 mm, length 400 mm for the chimney outlet;
- rod or reinforcement for making a mesh in which we place stones;
- bricks for the foundation of the bathhouse stove.
Do not use mica stones or granite. In the first option, carbon monoxide will be released when heated, and granite will quickly collapse when exposed to high temperatures. It is better to lay the heater with diabase.
Tools
You will need:
- welding machine with hand and eye protection;
- workbench with a vice;
- clothing with long sleeves made of thick material;
- electrodes for welding structural steels. An inexpensive option is ANO-21 or MP-3, with a diameter of 3-4 mm;
- Bulgarian;
- cutting and cleaning discs;
- metalworking tools;
- sandpaper, metal brush.
Important Terms
To burn a fire and create steam in the sauna, you will need firewood. Typically, bath procedures last 3-4 hours, so the fire in the steam room is lit for the same time period. It is in the interests of tourists to light it up quickly, so you should not select too thick firewood for a camp bath - it burns out slowly and heats up the coolant poorly. Their diameter should not exceed 10-15 cm, then they will immediately heat the stones and allow you to feel the atmosphere of the bathhouse.
The maximum diameter of firewood for a camp bath should be 100-150 mm
The frame is constructed either from metal posts prepared before the trip, or from thin trunks/thick branches cut down on site. If tourists decide not to take a folding frame with them, a sufficient number of young trees or dead wood should grow near the camp. To install a tent, poles 3-4 cm thick are suitable. You need to think in advance about how to connect the parts of the frame and take care of the fastenings.
There should be a lot of stones in the place where the sauna tent is set up. It is necessary to immediately discard layered stones, as well as stones with chips and cracks - when heated, they can crack and suddenly fly into pieces with traumatic consequences for those present. You need to select solid cobblestones of medium size and flat shape. Stones that are too large will take a long time to heat up, small ones will not be able to retain the heat. The ideal diameter is 10-12 cm.
Stones for a camp bath can be collected not far from the chosen place
There must be a source of water nearby - this is a prerequisite for bathing procedures. If possible, it is worth placing a camp bathhouse on the shore of a reservoir.
Decoration
To create a unique, attractive appearance that will decorate the site, decor is used. The most common methods of decoration:
- Plants are planted at the bottom of the pond. They are usually sold in ready-to-use containers;
- Plants in tubs and pots that are installed on the shore. The advantage of this option is the ability to change the location of elements and thereby create a unique design;
- Placing fish with bright colors;
- Creating compositions from natural materials, such as stones.
To prepare a more beautiful composition, it is better to alternate the sizes of stones and their shapes.
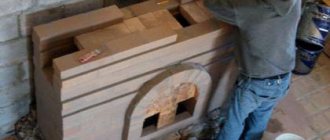
The main stages of constructing a bath using improvised means
You can build a bathhouse in camping conditions right on the spot, using available materials.
Selection of location
The bathhouse should be located in a place where you can conveniently and quickly collect water. Typically, a camping steam room is installed on the banks of a river or lake. You need to make sure that there are cobblestones nearby (otherwise you won’t be able to build a stove) and a sufficient number of young trees.
The ideal option for a camp bath is a place on the bank of a river or other body of water
Construction of the stove
For the furnace, you need to collect a pile of small boulders (about the size of a head or two human fists).
Next, create a place for the stove foundation by digging a wide niche 20-30 cm deep with a shovel. The edges can be made slightly beveled.
Fill the hole with firewood and cover it with a layer of stones. You need to do this 2-3 times. (This is one of the options for creating a stove).
Light a fire inside and heat the stones for 1-2 hours until they are red hot.
A stove-stove for a camp bath is built on site from large cobblestones
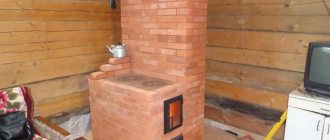
Frame structure
To construct the frame, you need to chop thin trunks or long thick branches (3-4 cm thick and 2.5 m long) with an ax. Polyethylene or tarpaulin (approximately 25 m2) is used as covering material. To secure the awning, you can use tape/wire/cord/bast.
Install a frame around the heating center of a homemade bathhouse. It can be given a rectangular or triangular shape. The poles are spaced at a two-meter distance. Pull the awning over the frame and secure it.
An overlap of 30 cm is left on one side for the entrance to the room.
Solid frame of a camping sauna made of poles
Canopy for camping steam room
In order for the awning to be securely fastened, it must have sufficiently long edges. The canopy is pressed down with stones or buried in the ground. You can dig a trench around the perimeter of the tent, place awning fabric there and fill it with soil. We cover the floor with spruce branches, creating a warm covering. You can lay a rug on top.
Projects
A transportable bathhouse made of timber can be selected in accordance with the finished project, which differs in size and layout, or ordered according to your own project.
In addition, ordering a finished bath involves delivering the goods to the client with full installation and assembly on site.
We invite you to read: Installation of beacons for plastering walls
An important point is the fact that the cost of the project is affected only by the number of partitions, doors and other components, and not by their location. If you want to move this or that element, the cost should not change.
Among standard projects, the most popular are baths with dimensions:
- 3 by 4 m;
- 4 by 4 m;
- 5 by 3 m;
- 6 by 4 m;
- 6 by 5 m;
- 6 by 6 m;
- 6 by 8 m;
- 8 by 9 m;
Special stoves for camp baths
There are several options for factory models of camping stoves from different manufacturers.
One of them is a Poshehonk stove from the PoshehonStar company. There are three models in the line with different sizes and power:
- small (volume 15 l, weight 3.5 kg, overall dimensions 23x23x50 cm);
- medium (30 l, weight 5 kg);
- large (volume 45 l, weight 6.5 kg, overall dimensions 30x30x65 cm).
Long-burning camp stove-poshekhonka made of stainless steel from the PoshehonStar company.
Wall thickness - 0.5 mm, length of chimney pipes (5 straight and two corner) - 1.5 m. Manufacturing material - stainless steel.
The device has a prefabricated structure, including removable legs, screen and doors. There are protective removable screens on the sides of the case. There is no built-in steam generator - to create steam you need to place stones on the body. The stove can burn from 5 to 10 hours. It will take a few minutes to assemble the pot.
The Bereg stove is also made of stainless steel, but of a different grade, with a heat resistance of 850 degrees. Has the following parameters:
- the thickness of the front and rear walls is 1 mm, the side walls are 0.8 mm;
- chimney length – 50 cm, width – 80 mm;
- firebox dimensions – 520x195x180 mm;
- stove dimensions – 700x280x415 mm;
- weight – 11.5 kg.
The “Bereg” camping stove is an excellent tool for organizing a camping sauna.
The role of the heater is played by a convection casing - stones are placed in this part of the stove. Hot air rises along the walls, transferring some of the heat to the stones, thereby creating thick steam. There is a glass on the door that regulates the air temperature. The kit includes a spark arrester.
The products of the Gorynych brand are known on the market of portable stoves. The stoves are made from the same steel as the previous manufacturer. The line is represented by three models:
| “Gorynych”: weight 6 kg, volume 12.5 l, dimensions 400x280x300 mm | |
| “Yarilo”: weight 8 kg, volume 20 l, dimensions 460x360x380 mm | |
| “Thug”: weight 9 kg, volume 25 l, dimensions 520x380x400 mm |
The set includes a steam generator, a spark arrestor, a protective casing, a gate and a poker.
For these stoves you can purchase a water tank, corner chimney elements, diesel and gas modules. The built-in steam generator allows you to do without stones: the device begins to generate steam already at the beginning of kindling. Different parts of the structure have a thickness of 0.4-0.8 mm.
Take the traffic rules knowledge test for a cyclist!
Time limit:
out of 15 tasks completed
Questions:
- 1
- 2
- 3
- 4
- 5
- 6
- 7
- 8
- 9
- 10
- 11
- 12
- 13
- 14
- 15
Information
To be able to obtain rights, please click Next
You have already taken the test before. You can't start it again.
The test is loading...
You must log in or register in order to begin the test.
You must complete the following tests to start this one:
results
Correct answers: out of 15
Your time:
Time is over
You have scored
a maximum of 15 points
| Place | Name | Recorded | Points | Result |
| Table is loading | ||||
| No data |
Your result has been recorded on the leaderboard
Captcha:
- 1
- 2
- 3
- 4
- 5
- 6
- 7
- 8
- 9
- 10
- 11
- 12
- 13
- 14
- 15
- With answer
- With a viewing mark
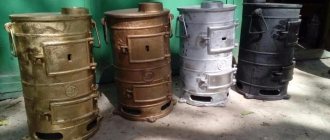
How should a wood chipper work?
The wood chipper has a simple device and lightweight design without unnecessary parts and equipment. The metal case is installed on the ground, the bottom has holes for ventilation through which air flows. This allows the coals to smolder for a long time and not disperse throughout the space, heating the container to the maximum. Stacked firewood instantly flares up. At the same time, the stove hardly smokes.
The wood chipper is a portable stove designed for heating and heating purposes.
Find out the price on AliExpress
This type of camp stove can be made from a tin can (for example, peas, condensed milk or paint). The fire lasts approximately 20-25 minutes:
- make holes in the bottom of the jar;
- fill the jar with branches and pieces of bark;
- remove the branch from the center, creating a hole;
- insert paper or a bunch of dry grass there.
Stages of making wood chips from a can
The device takes up almost no space and is easy to carry. It is easy to place in both a tent and a hiking backpack. Travel stores sell collapsible models - when assembled, they are no larger than a gadget or a large pack of cigarettes.
Advantages and disadvantages of setting up a portable sauna on vacation
Among the disadvantages of a homemade portable bathhouse are:
significant costs of time and effort for assembly; the importance of preliminary preparation and the availability of a number of materials; difficulties with dismantling the structure and moving the wet awning.
The use of factory products is associated with the following difficulties:
- high cost of the finished structure;
- mandatory availability of transport to move equipment.
For more domesticated steam room lovers, the option of installing a mobile sauna-tent on a personal plot is suitable. There you won’t have to periodically assemble and disassemble it. Although, not everyone will agree to exchange unity with nature on the banks of the river for a simple relaxation at their own dacha.
Tips for using a camp sauna
- Ready-made, purchased tourist baths and mobile stoves are much more convenient and safer than home-made structures. The tent is made of heat-resistant materials, the stove is equipped with a chimney and a protective casing. If you don’t want to buy a portable camp sauna, you can rent one.
- When arranging a camp sauna with your own hands, you do not need to chase the large size of the steam room. A small tent is faster and easier to set up and heat. It is not at all necessary to steam with the whole group - you can do it in turns.
- Instead of polyethylene, tarpaulin and other artificial materials, you can use spruce branches to cover the tent. They need to be laid in 2-3 layers - then they will retain heat well and allow smoke to escape.
Have you ever made a bathhouse with your own hands? How did you do it? Share your experience in the comments.
Preparatory work
Since a homemade iron sauna stove is made from a material that is prone to incandescence, it must be hardened before assembling the device. After all the necessary parts have been cut out, they must be heated in any way until the metal turns red. When this moment comes, you can begin to slowly cool the material. It often happens that after the raw material release procedure, it warps. It's not a problem. You can return the shape using a hammer. It is also worth measuring all the sheets again. If some are too far out of bounds, then you need to trim them again to the required dimensions. This is a very important point, as it will eliminate the possibility of metal warping during operation of the furnace.
What options are possible?
It is worth recalling that in any case, the camp stove must be assembled strictly according to proven drawings. Otherwise, the safety of its use cannot be guaranteed.
When building stoves from scratch (as well as when choosing ready-made versions), special attention should be paid to the design of the chimney. It directly affects the safety of structures and the efficiency of the entire fireplace as a whole.
A home-made stove can save money and is also somewhat lighter than pre-fabricated ones. Store-bought options are quite expensive (pay for high-quality stainless steel), but they fully meet the needs of travelers.
There is a completely original version - in it hot air is supplied through a long pipe. The scheme is as follows: a fire is lit at a low point in the terrain, and the tent is placed higher - where the pipe itself can be stretched. The opposite end is brought closer to the fire, and air is drawn there naturally. This is also a kind of metal stove, albeit very conventionally. However, in most cases, this term means something completely different.
A fairly simple version of a homemade hearth would be a structure made from a profiled pipe. Its dimensions are 0.2x0.2 m, while the length of the section will need 0.45 m. It makes no sense to make the wall thinner than 0.06 cm, because it will quickly burn out. A pipe with a diameter of 0.16 m is sufficient for inserting firewood. The grates can be replaced with semicircular perforated sheets.