Here you will learn:
- What is a heat pump
- Advantages of heat pumps
- Principle of operation
- Types of heat pumps: nuances of operation of the freon-water heat exchanger
- Pros and cons of homemade equipment
- Heat pump from air conditioner
- How to make a DIY heat pump from an old refrigerator
- Manufacturing of geothermal installation
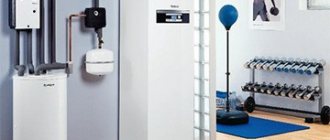
You can make a heat pump for heating your home from an old refrigerator or air conditioner. We offer simple instructions for assembling and installing heat pumps.
What is a heat pump
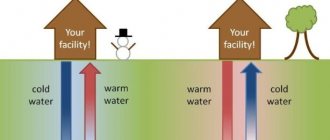
It is easiest to use the natural heat of the earth to heat your home if there are geothermal waters in the region (as is done in Iceland). But such conditions are very rare.
And at the same time, thermal energy is everywhere - you just need to extract it and put it to work. This is what a heat pump is used for. What it does:
- takes energy from low-temperature natural sources;
- accumulates it, that is, raises the temperature to high values;
- gives it to the heating system coolant.
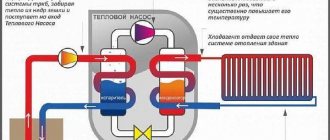
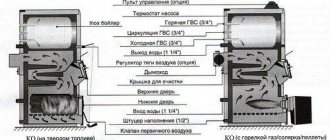
In principle, the standard compressor refrigerator circuit is used, but “vice versa”. Natural coolant circulates in the primary circuit. It is closed to a heat exchanger, which acts as an evaporator for the second circuit.
1 - earth;
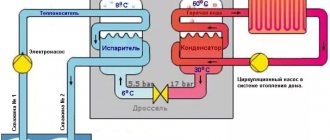
2 — brine circulation; 3 - circulation pump; 4 - evaporator; 5 - compressor; 6 - capacitor; 7 - heating system; 8 - refrigerant; 9 - throttle The second circuit is the heat pump itself, inside of which there is freon. The heat pump cycle consists of the following stages:
- In the evaporator, freon is heated to boiling temperature. It depends on the type of freon and the pressure in this part of the system (usually up to 5 atmospheres).
- In a gaseous state, freon enters the compressor and is compressed to 25 atmospheres, while its temperature rises (the greater the compression, the higher the temperature). This is the phase of heat accumulation - from a large volume with a low temperature to a small volume with a high temperature.
- The gas heated by pressure enters the condenser, in which heat is transferred to the coolant of the heating system.
- After cooling, the freon enters the throttle (also known as a flow regulator or thermostatic valve). The pressure in it drops, the freon condenses and returns as a liquid to the evaporator.
Solutions
You can get around the problem of power outages by simply installing larger diameter pipes into the existing system. The liquid in this system circulates naturally - due to the force of gravity. However, such a system is not convenient to regulate.
You can also use a generator. However, the generator requires special operating conditions: maintaining the same fuel level and having a special place. All this, as a rule, requires finance, and besides, it is unsafe. During operation, there is a possibility of power surges, which can lead to breakdown of the electronic control system of the boiler.
It is much more convenient and easier to solve the issue using a UPS - an uninterruptible power supply. “Uninterruptible power supply” automatically turns on when there is no power, so the system will work in any case. UPS equipment can be installed in any room without any special maintenance - the batteries are replaced every 2-3 years. This device operates almost silently. It should also be noted that installing a UPS is much cheaper than buying, for example, a generator.
Advantages of heat pumps
The advantages of heating systems with heat pumps include the following:
- Economic efficiency. By spending 1 kW of electrical energy, you can get 3-4 kW of heat. These are average indicators, because... The heat conversion coefficient depends on the type of equipment and design features.
- Environmental Safety. When the thermal unit operates, combustion products or other potentially hazardous substances do not enter the environment. The equipment is ozone safe. Its use allows you to obtain heat without the slightest harm to the environment.
- Versatility of use. When installing heating systems powered by traditional energy sources, the home owner becomes dependent on monopolists. Solar panels and wind generators are not always cost-effective. But heat pumps can be installed anywhere. The main thing is to choose the right type of system.
- Multifunctionality. In the cold season, the installations heat the house, and in the summer heat they can operate in air conditioning mode. The equipment is used in hot water supply systems and is connected to underfloor heating circuits.
- Operational safety. Heat pumps do not require fuel, their operation does not emit toxic substances, and the maximum temperature of equipment components does not exceed 90 degrees. These heating systems are no more dangerous than refrigerators.
There are no ideal devices. Heat pumps are reliable, durable and safe, but their cost directly depends on their power.
High-quality equipment for complete heating and hot water supply to a house of 80 sq. m. will cost approximately 8000-10000 euros. Homemade products are low-power, they can be used for heating individual rooms or utility rooms.
The efficiency of the installation depends on the heat loss of the house. It makes sense to install the equipment only in those buildings where a high level of insulation is provided and heat loss rates are not higher than 100 W/sq.m.
Heat pumps can last 30 years or more. Their use is especially cost-effective for hot water supply, as well as in combined heating systems that include heated floors.
The equipment is reliable and rarely breaks down. If it is homemade, then it is important to choose a high-quality compressor, preferably from a refrigerator or air conditioner of a trusted brand.
Options for providing autonomous circulation
Circulation pump 12 volt
This option is good for a small home. The effective length of the heating circuit should not exceed 100 m, the required circulation speed is about 0.6 cubic meters. m per hour (boiler up to 20 kW).
I installed a 12 (twelve) volt circulation pump from a Bosch car 0392020034.
Disadvantages of the pump:
- The pump is quite noisy. The room where it stands must be soundproof. My pump is installed in a boiler room that is separate from the house.
- The documentation for the pump does not say anything about its ability to operate continuously. In general, the 25 thousand hours between failures promised by the instructions is quite enough (that’s five years of actual operation), but it is unknown whether it can be driven continuously without turning it off. It has been working for me since 10/01/2011. I bought two at once, installed one, and kept the second as a reserve in case of combustion.
Pump connection diagram
Important! Install the pump exactly as shown in the diagram, with the outlet pipe facing up. Otherwise, air may accumulate in the pump, which will impede circulation. Don't forget to install the fuse shown in the diagram. The pump may short out, and then, if there is no fuse, a fire is inevitable.
From a 75 A/h car battery, taking into account the fact that a trickle-type water pump is also connected to this battery through a converter, the pump operates autonomously (without external sources of electricity) for more than three days. Power outages for longer periods of time are extremely rare in our country. And if it happens, the battery can always be recharged from a car or a backup electric generator.
Added 01/10/2012 . Brushed electric motors, of course, are not suitable for continuous operation. Based on the results of the experiment, it turned out that graphite dust, which is formed when the brushes are activated, begins to accumulate in the pump commutator and leads to unstable operation. In a car environment, this problem does not arise, since vibration shakes off the dust. To prevent this problem from occurring in the heating system, the pump had to be rearranged. Until I moved it, I had to shake it regularly to shake off graphite dust from the collector. It must be placed with the contacts facing up. Then the graphite dust falls off and does not accumulate on the collector. The experiment continues, the pump has been operating for the third month.
Added on 03/01/2012 . The pump stopped. I replaced it because I was ready for it, I had a spare, and the system has taps for quick replacement. Turned off the taps and replaced. The old pump was opened. The brushes worked completely. This was the reason for the stop. Changed the brushes. I bought graphite ones for the drill and cut them into the desired shape. Installed and checked. The old pump is ready to go back into service. We draw a conclusion. The brushes on this pump last for 5 months. Then you can simply replace it with a new one, since the pump is not very expensive, and you can change the brushes.
Now 12 volt circulation pumps without brushes, with electronic control, are on sale. I will study the issue. I will write an article based on the results. Subscribe so you don't miss out.
Principle of operation
All the space around us is energy - we just need to be able to use it. For a heat pump, the ambient temperature must be greater than 1C°. Here it should be said that even the ground in winter under snow or at some depth retains heat. The operation of a geothermal or any other heat pump is based on transporting heat from its source using a coolant to the heating circuit of the house.
Scheme of the device operation point by point:
- a heat carrier (water, soil, air) fills the pipeline located under the ground and heats it;
- then the coolant is transported to the heat exchanger (evaporator) with subsequent heat transfer to the internal circuit;
- in the external circuit there is a refrigerant - a liquid with a low boiling point under low pressure. For example, freon, water with alcohol, glycol mixture. Inside the evaporator, this substance is heated and becomes a gas;
- The refrigerant gas is sent to the compressor, compressed under high pressure and heated;
- hot gas enters the condenser and there its thermal energy passes to the coolant of the home heating system;
- The cycle ends with the transformation of the refrigerant into liquid, and due to heat loss, it returns back to the system.
The same principle is used for refrigerators, so home heat pumps can be used like air conditioners to cool a room. Simply put, a heat pump is a refrigerator with reverse action: instead of cold, heat is generated.
Bosch 0392020034: was an automobile, now a heating one
A 12-volt Bosch 0392020034 circular pump would work well with the heating system of a small house if the length of the heating circuit did not exceed hundreds of meters, the boiler power was no more than 20 kilowatts, and the flow rate was 0.6 cubic meters per hour.
Everything would be fine, but there are significant shortcomings in the car design:
- It makes loud noise, so the boiler room should be well insulated or even located in a neighboring building. Then it will be comfortable to live in the house.
- It cannot work continuously, but it will serve its 25,000 hours properly.
If we translate it into years, it will be less than 5 years. If you don't drive it 24 hours a day, it will last longer.
If it fails (read, burns out) - buy a new one, since it cannot be repaired, but it is better to buy two devices at once, so as not to torment yourself with searching for something that cannot be returned.
Types of heat pumps: nuances of operation of the freon-water heat exchanger
The natural energy source can be a borehole, ground or reservoir type system. Each option is unique. The operating principle and installation differ.
When the source of energy is a well, it is necessary to drill a corresponding hole in the ground. In 1 m of the source you can extract 50-60 W of energy. For normal operation of the heat pump, 20 m is required.
Features of obtaining energy from a well:
- The main advantages are compactness and high heat transfer;
- The downside is the difficulty of drilling a well.
When the heat source is soil, the pipe lies at a depth below the freezing level of the ground. To lay the pipe, you can dig a pit or trench.
Extracting energy from the ground is a rather difficult process that requires a large area that will not be available for exploitation.
If there are bodies of water nearby, you can place the pipe in the water source. The main requirement is sufficient depth. In 1 square meter of water you can get 30 watts of energy. To fix the pipes at depth, a weight is attached to them.
In some cases, air is used as the source. This pump contains refrigerant. In this case, freon from the refrigerator is suitable. The substance takes heat from the air and releases it to the room.
All components of a solar battery are available and not expensive. And you can assemble the structure yourself.
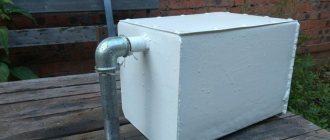
Autonomous heating device
This heater is designed for 12 volt current. Thanks to this, it can be connected to a battery. It can be used in rooms where there is no heating and where renovations are being carried out, as well as in the garage or any room in the house. Its power is not enough to heat the entire room. It does not create infrared rays. It only heats the air.
To make it you need to take:
- Metal can. It could be a coffee can. Its height and diameter should be 20 and 10 cm, respectively. These values may deviate upward or downward. not use a jar made of plastic, cardboard or any other material . This is because they are poor conductors of heat.
- Bracket. It can be a U-shaped part of a children's metal construction set.
- Bayonet cartridge.
- Car brake light lamp. It is designed for 12 volts. Its power is 25 W.
- 2 A fuse.
- Sleeve made of insulating material.
- Cable. The cross-sectional area of one wire must exceed 1 mm².
Sequence of manufacturing an autonomous heater
A 12 volt device is made as follows:
- Drill 20-30 holes in the side wall of the can. Their diameter should be 3 mm.
- Make a hole in the bottom of the jar. It is drilled in the center of the bottom. The diameter should be equal to the diameter of the bolt that will secure the bracket.
- Fix the bracket at the bottom of the can.
- A cartridge is secured to the top of the bracket. This element must be positioned so that the lamp does not touch the walls of the container.
- A hole is drilled in the side wall of the can at the level of the top of the bracket so that the bushing for the cable fits in it.
- A sleeve is inserted into this hole and an electrical wire is pushed through it, through which a current of 12 volts will flow. The cable will be connected to the socket.
- Screw in the lamp and close the jar with a lid.
- A fuse is connected to the cable break.
The 12 volt heater is ready. Now all you have to do is connect it to the battery and wait 10 minutes. During this time, the homemade garage heater will warm up. When using a device with an operating voltage of 12 volts, you need to monitor the battery voltage. It should not fall below 10 volts. Otherwise, the current source cannot be restored.
Pros and cons of homemade equipment
A heat pump is a device that does not produce heat, but moves it from one place to another, increasing the temperature through compression. This process proceeds according to the principle of the Carnot cycle, which consists in the movement of the working fluid (refrigerant) through a closed system. When its state changes from liquid to gaseous and vice versa, a large amount of energy is released or absorbed. This principle is used in the design of refrigerators, but the mechanism of action of a heat pump is to absorb heat from outside and transfer it to the room.
Stages of the Carnot cycle:
- liquid freon flows through the tube into the evaporator;
- interacting with the coolant, which is water, air or soil, the refrigerant evaporates, taking on a gaseous state;
- the working fluid passes through the compressor and is compressed under pressure, which increases its temperature
- then it enters the condenser, which acts as a heat exchanger;
- transfers the resulting heat to the coolant and again takes the form of a liquid;
- in this form, freon enters the expansion valve, where at low pressure it again moves to the evaporator.
An industrial production device is expensive, the payback period is on average 5-7 years. The popularity of a heat pump from an old refrigerator is due to minimal material investments in the manufacture of the unit and the possibility of saving energy costs during its operation.
Attention! To obtain 3-4 kW of thermal energy, an average of 1 kW of electricity is consumed.
Additionally, the following advantages of using homemade equipment are highlighted:
- absence of noise, foreign odors;
- no installation of auxiliary structures or chimney required;
- the operation of the equipment does not harm the environment, since it does not involve the release of combustion products into the atmosphere;
- the ability to install the system in a convenient location;
- multifunctionality. In winter the device is used as a heater, and in summer as an air conditioner;
- safety. Operation does not involve the use of fuel, and the maximum temperature of the unit components does not exceed 90 0C;
- durability, reliability. The service life of the unit when using high-quality components is 30 years or more.
The main disadvantage of homemade devices is their low productivity, so they are often used as an additional option for heating individual rooms in the house. It is recommended to assemble such a system in rooms with good thermal insulation and a heat loss level of no more than 100 W/m2.
Brief installation instructions
A common option is to install the pump on a bypass. This is due to two good reasons: it becomes possible to quickly dismantle or temporarily disconnect the device from the network, for example, if problems arise with electricity.
Bypass piping: 1 – central station; 2 – “American”; 3 – filter; 4 – shut-off valves; 5 – main pipe, “return” or supply; 6 – valve that redirects the coolant to the bypass
Various modifications of ready-made pumping units are available for sale: for welding or flange connection, with places for installing taps or valves, with a special area reserved for the pump.
But if you cannot purchase a ready-made unit or there is not enough space for its installation, you can independently organize the bypass piping and fix all the parts in the places allocated for them.
The following tools and materials are required for work:
- a set of open-end or adjustable wrenches for assembly;
- pliers:
- linen thread or tow;
- Unipak sealant.
American nuts are usually supplied with the pump, but taps, adapters or fittings will also have to be prepared. Attention should be paid to more reliable materials for making fittings and the diameter of the products.
Procedure:
- Assembling units with taps . Two will be located on the edges of the pump, the third will become part of a straight pipe. It is important to measure the “return” section in order to accurately weld the fragment with the tap.
- Assembling the pump loop. Tightening the nuts must be postponed until the final stage of installation, but for now they just need to be screwed on.
- Trying on the bypass loop . Mark the places where the units are welded into the pipe.
- Welding should be left to a qualified welder.
- Assembly of the lower unit is on the “return” side.
- Connecting the pump to the power supply.
As an example, install the GRUNDFOS .
Image gallery
Photo from
Circulation pump GRUNDFOS UPS
Installation location – supply from a gas boiler
Pump and parts layout
Result of installing a circulation pump
Maintenance of the installed pump is carried out in operating mode. It is necessary to clean the filter more often and check the pressure gauge readings.
If the values do not correspond to the norm, the device must be removed and adjusted. It is better to do this in a specialized workshop.
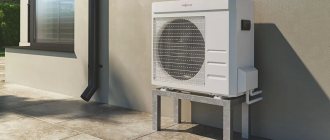
Heat pump from air conditioner
Modern split systems, especially the inverter type, successfully perform the functions of the same air-to-air heat pump. Their problem is that their operating efficiency drops along with the outside temperature; even the so-called winter kit cannot help.
Home craftsmen approached the issue differently: they assembled a homemade heat pump from an air conditioner, which takes the heat of running water from a well. In fact, only a compressor is used from the air conditioner, sometimes an internal unit that plays the role of a fan coil unit.
By and large, the compressor can be purchased separately. You will need to make a heat exchanger for heating water (condenser) for it. A copper tube with a wall thickness of 1-1.2 mm, 35 m long, is wound to give the shape of a coil onto a pipe with a diameter of 350-400 mm or a cylinder. After which the coils are fixed with a perforated angle, and then the entire structure is placed in a steel container with water pipes.
The compressor from the split system is connected to the lower inlet to the condenser, and the control valve is connected to the upper inlet. The evaporator is made in the same way; an ordinary plastic barrel will do for it. By the way, instead of homemade capacitive heat exchangers, you can use factory plate heat exchangers, but this will not be cheap.
Assembling the pump itself is not too complicated, but it is important to be able to solder the connections of copper pipes correctly and efficiently. Also, to fill the system with freon, you will need the services of a specialist; you will not specifically buy additional equipment. Next is the stage of setting up and starting up the heat pump, which does not always go well. You may have to tinker a lot to achieve results.
How to serve?
To extend the life of a homemade filtration circulation unit, you need to pay attention to its maintenance.
Sand
A homemade sand filter requires weekly cleaning. To do this, backwash the filler with water. The water used during the washing process is not suitable for use in the pool - it must be thrown away.
Maintenance recommendations:
- the pump must not be covered with any materials;
- do not allow children to play near the installation;
- Clean the pump every month, as bacteria and dirt accumulate on the impeller;
- the place where the pump is located must be well ventilated.
The big disadvantage of sand fillers is their high rate of contamination. After 2-3 weeks, the sand collects in lumps, causing gaps to appear in the container - water passes through the voids without being purified. There are no such problems with coal and graphite.
Cartridge
For the cartridge type, regular cleaning of the filtrate is a prerequisite for maintenance . The contaminated cartridge is removed from the system (by removing the angle adapter), and cleaned by rinsing under running water, then mounted in place.
How to make a DIY heat pump from an old refrigerator
Before you begin manufacturing a heat pump, you need to select a heat source and resolve the issue with the installation’s operating diagram. In addition to the compressor, you will need other equipment and tools.
Execution of diagrams and drawings. To install a heat pump, you need to make a well because the energy source must be underground. The depth of the well should be such that the ground temperature is at least 5 degrees. Any body of water is also suitable for this purpose.
The designs of heat pumps are similar, so regardless of what the heat source is, you can use almost any circuit found on the network. When the scheme is selected, it is necessary to make drawings and indicate in them the dimensions and joint locations of the nodes.
Since it is quite difficult to calculate the power of an installation, you can use average values. For example, for a residential area with low heat loss, a heating system with a power of 25 W per square meter will be required. meter. For a building that is well insulated, this value will be 45 W per square meter. meter. If the house has sufficiently high heat losses, the installation power should be at least 70 W per square meter. meter.
Selecting the required parts. If the compressor removed from the refrigerator is broken, then it is preferable to purchase a new one. It is not recommended to repair an old compressor, as this may negatively affect the operation of the heat pump in the future.
A thermostatic valve and 30 cm L-shaped brackets will also be needed to make the device.
Additionally, you will need to purchase the following parts:
- sealed stainless steel container with a volume of 120 liters;
- plastic container with a volume of 90 liters;
- three copper pipes of different diameters;
- metal-plastic pipes.
To work with metal parts you will need a welding machine and a grinder.
Assembling components and installing a heat pump
First of all, you should install the compressor on the wall using brackets. The next step is working with the capacitor. The stainless steel tank must be divided into two parts using a grinder. A copper coil is mounted in one of the halves, then the container must be welded and threaded holes made in it.
To make a heat exchanger, you need to wind a copper pipe around a stainless steel container and secure the ends of the turns with slats. Attach plumbing transitions to the terminals.
It is also necessary to attach a coil to the plastic tank - it will act as an evaporator. Then secure it to a section of the wall using brackets.
As soon as the work with the components is completed, you need to select a thermostatic valve. The structure should be assembled and the system should be filled with freon (grade R-22 or R-422 is suitable for this purpose).
Connection to the intake device. The type of device and the nuances of connecting to it will depend on the circuit:
- "Water-earth". The collector should be installed below the ground frost line. It is necessary that the pipes are at the same level.
- "Water-air". Such a system is easier to install, since there is no need to drill wells. The collector is mounted anywhere near the house.
- " Water-water." The collector is made of metal-plastic pipes, and then placed in a reservoir.
You can also install a combined heating system to heat your home. In such a system, the heat pump operates simultaneously with the electric boiler and is used as an additional heating source.
It is quite possible to assemble a heat pump for heating a house yourself. Unlike purchasing a ready-made installation, this will not require large financial costs, and the result will definitely please you.
Selection of circulation pump unit
The electric circulation pump must be selected for the specific indicators of a separate heating system. Selection criteria that you need to pay attention to when purchasing a unit:
- nutritional tension. For home use, it is enough to choose a model with a voltage rating of 220 V and an alternating current frequency of 50 Hz;
- power consumption. Depends on the mode and nature of the work. Average power ratings for household pumps range from 50 to 70 W. In models that can change the speed of pumping liquid, there is a special table on the body with the indicated consumption capacities.
- indicator of the maximum permissible temperature of the pumped water. For household units, the maximum is 110 degrees Celsius;
- installation length of the pump and diameter of the threaded section;
- international classification. For modern pumping units, IP44 protection class for electrical appliances is provided;
- The maximum outlet pressure is usually 10 bar;
- unit performance. Represents the amount of water pumped per unit of time.
Today you can find on sale a wide variety of pump models from both domestic and foreign manufacturers. One of the most popular and reliable manufacturers today is the Danish company Grundfos. The range of pumping units is quite wide, so choosing the right model will be easy.
Manufacturing of geothermal installation
It is quite possible to make a geothermal installation with your own hands. In this case, the thermal energy of the earth is used to heat the home. Of course, this is a labor-intensive process, but the benefits are significant.
Calculation of the pump circuit and heat exchangers
The circuit area for HP is calculated at the rate of 30 m² per kilowatt. A living space of 100 m² requires about 8 kilowatt/hour of energy. This means the contour area will be 240 m².
The heat exchanger can be made from a copper tube. Inlet temperature 60 degrees, outlet 30 degrees, thermal power 8 kilowatt/hour. The heat exchange area should be 1.1 m². Copper tube with a diameter of 10 millimeters, safety factor 1.2.
Circumference in meters: l = 10 × 3.14 / 1000 = 0.0314 m.
Quantity of copper tube in meters: L = 1.1 × 1.2 / 0.0314 = 42 m.
Necessary equipment and materials
In many ways, success in the manufacture of heat pumps depends on the level of preparedness and knowledge of the contractor himself, as well as on the availability and quality of everything necessary for installing a heat pump.
Before starting work, you need to purchase equipment and materials:
- compressor;
- capacitor;
- controller;
- polyethylene fittings intended for assembling manifolds;
- pipe to the earth circuit;
- circulation pumps;
- water hose or HDPE pipe;
- pressure gauges, thermometers;
- copper tube with a diameter of 10 millimeters;
- insulation for pipelines;
- set of seals for sealing.
How to assemble a heat exchange block
The heat exchange block consists of two components. The evaporator must be assembled according to the “pipe-in-pipe” principle. The inner copper tube is filled with freon or other rapidly boiling liquid. Water from the well circulates through the outside.
Before assembling the capacitor, it is necessary to wind the copper tube in the form of a spiral and place it in a metal barrel with a capacity of at least 0.2 m³. The copper tube is filled with freon, and the barrel of water is connected to the home heating system.
Construction of the soil contour
In order to prepare the required area for the soil contour, a large amount of excavation work is required, which should preferably be carried out mechanized.
You can use 2 methods:
- With the first method, it is necessary to remove the top layer of soil to a depth below its freezing. At the bottom of the resulting pit, lay the free part of the outer pipe of the evaporator in a snake and reclaim the soil.
- In the second method, you first need to dig a trench across the entire planned area. The pipe is laid in it.
Then you need to check the tightness of all connections and fill the pipe with water. If there are no leaks, you can fill the structure with earth.
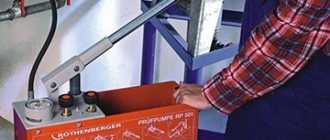
Refueling and first start
After installation is completed, the system must be filled with refrigerant. It is best to entrust this work to a specialist, because special devices are used to fill the internal circuit with freon. When filling, you need to measure the pressure and temperature at the compressor inlet and outlet.
After refueling is completed, you need to turn on both circulation pumps at the lowest speed, then start the compressor and monitor the operation of the entire system using thermometers. When the line warms up, frosting is possible, but after the system is completely warmed up, the frosting should melt.
How to connect?
Before starting the filter pumps for the first time, it is important to check that they are connected correctly.
Sand
Connection steps:
- Lower two hoses into the pool - one suction, the other outlet. The farther they are located from each other, the better the circulation.
- Connect the pump to the network. Using the lever, bring it to the “on” state.
The circulation pump must be installed at a distance of at least 2 m from the pool. Do not allow drops of water to come into contact with the equipment.
Cartridge
The cartridge filter is connected without additional pipes and hoses.
You need to proceed as follows:
- Place the filter system in water.
- Hold the pump at a depth of 0.5 m so that it begins to capture water and feed it into the hose.
- Leave the pump with the cartridge to move freely throughout the entire area of the artificial reservoir.
The cartridge-type filter system processes about 2.5 thousand liters per hour.
Design #2 - manual pump with direct spout
A very simple device for pumping water from a barrel or a shaft well. The advantages of this design: speed of assembly, low cost.
Required parts:
- PVC pipe d.50mm – 1 pc.;
- PVC coupling d.50mm – 1 piece;
- PPR pipe d.24mm – 1 pc.;
- PPR branch no. 24 – 1 piece;
- PVC plug d.50mm – 2 pcs.;
- piece of rubber, diameter 50mm, thickness 3-4mm – 1 piece;
- check valve 15mm – 1 piece;
- empty silicone bottle 330ml – 1 piece;
- tightening screw clamp – 1 piece;
- screw-nut or rivet – 1 piece;
- union nut no. 15 – 1 pc.
We begin the assembly of the entire structure with the manufacture of a check valve.
Construction of a check valve. We prepare a check valve from a Ø 50mm plug. We drill several holes around the perimeter of the plug Ø 5-6mm. In the center we drill a hole of suitable diameter for a screw-nut pair or rivet.
On the inside of the plug we place a rubber disk Ø 50mm. The disc should not rub against the walls of the plug, but should cover all drilled holes. We tighten it in the center with a screw-nut or rivet; a screw will not work. If difficulties arise with materials or manufacturing, you can replace it with a factory-ready check valve.
What a factory-made check valve used to operate a pumping station is is described in detail in the article we recommend.
Preparing the pump sleeve. The length of the sleeve should be commensurate with the depth of the well or container with water. We cut the PVC sewer pipe Ø 50mm to the required length, from the narrow end. We insert the newly made valve into the pipe socket. For reliability, we fasten it on both sides with self-tapping screws.
For the second end we prepare a plug with a pre-drilled hole Ø 25mm. This hole in the plug is made according to the diameter of the PPR pipe Ø 24. Great precision is not required, the plug serves as a sliding support.
Piston assembly procedure. Cut off the spout of an empty silicone container. Next, you need to heat the balloon and insert the sleeve into the PVC so that the diameter of the balloon exactly matches the diameter of the sleeve. Place the silicone can on the valve from the reverse side of the arrow (the arrow on the check valve shows the direction of water movement).
We cut off the excess balloon. We secure it with a union nut no. 15.
Pump rod design. The length of the rod should be 50-60 cm greater than the length of the sleeve. You need to heat one end of the rod and insert a check valve. The arrow on the check valve should point towards the inside of the stem. Until the pipe has completely cooled down, we tighten it with a screw clamp.
Final assembly of the pump. We insert the rod into the sleeve and attach a plug (sliding support) through the coupling on top. To top it off, we attach a 24mm PPR bend to the end of the rod pipe. All you have to do is connect the hose and you can pump water.
The pipe material can be any, and the cross-section is not necessarily round. It is important to select the appropriate piston for the liner
The outlet serves as a support for the hand. For convenience, you can take a tee and plug one side of it.
Design #12 - “homemade” for a small stream
This pump can operate on an ultra-low amount of energy. Of course it’s good if there is a river or lake. But what to do if the river becomes very shallow in the summer? A swing type pump will help.
Such a pump allows you to use very small amounts of energy from a small stream.
The main part of the structure is two buckets rigidly connected to each other through blocks (4). It is necessary to make a drainage system from the stream from galvanized steel (3). In order to reduce wear, a piece of plastic is placed under it. The drainage system is rigidly connected by a leash to a rope (5).
Leash 6 is made of rigid wire and the length is calculated so that the drainage system moves to the desired angle
The entire system must be adjusted so that when one bucket is filled, the drainage moves to the second bucket. The energy of the buckets is transmitted through the crank (8) to the pump (10).
Classification of “uninterruptible power supply”
There are several types of UPS:
- linear type is the simplest, it does not have a voltage stabilizer. If there is a power outage, the device automatically connects to battery power;
- Line-interactive uninterruptible power supply. It contains a simple stabilizer and from one to four batteries, the charge of which the system controls independently. These types of devices have lower internal voltage.