Insulation of the foundation of a wooden house
Many owners of wooden houses are faced with the fact that in winter the floor freezes on the 1st floor. This phenomenon can only be eliminated in one way - to insulate the foundation of a wooden house from the outside. The foundation of a wooden house is built from different materials. The method of insulating the foundation of a wooden house depends on the type of supporting structure of the building. Modern thermal insulation materials are used to insulate the foundation of the house. This article presents options for insulating foundations of various designs.
Technology of external insulation of the foundation of a wooden house
Insulating the foundation of a wooden house and insulating the basement from the outside will not only protect the foundation of the house from the negative effects of seasonal temperature changes, freezing, and groundwater, but will also help you reduce heating costs, because on average, about 25% of the total heat loss occurs at the foundation of the building.
Insulated columnar foundation of a wooden house
From this article you will learn how to insulate the foundation of a wooden house, what material is best suited for this, as well as the features of doing all the work yourself, both for strip and column foundations.
Differences for different base options
Whatever the foundation under a wooden house, it is necessary to insulate its base and then veneer it. The method of action chosen depends on the condition of the soil under the building, as well as the type of foundation constructed:
- At the strip foundation there is a strip of reinforced concrete located under all load-bearing walls. It is buried in the soil. Insulation is done using several methods: vertical, horizontal or mixed:
- with the first method, the side surfaces of the fill are protected;
in the second case, a blind area is built around it to prevent soil heaving.
- if the climate is not harsh, a mixed type is used.
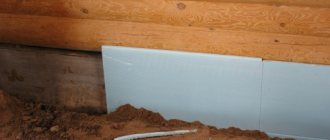
- With a columnar foundation , the building is well ventilated and there is a minimum humidity level.
However, in winter, the air gap allows the heat to quickly escape, and the soil begins to swell. Such problems can be prevented by insulating the soil around the buried supports, installing a layer of waterproofing on them, and reliably insulating the space under the structure from the penetration of cold air. It is better to carry out such an event simultaneously with the construction of the structure.
The wooden base must be protected in all directions to prevent it from deteriorating due to the aggressive influence of the atmosphere.
Basic methods of thermal insulation of a structure
Consideration of the question of how to insulate the base of a wooden house from the outside should begin with the simplest methods. We will list the main types of work, and you will decide which option is optimal for your conditions.
Backfilling with soil
This method was also used by our ancestors. It is quite simple and unpretentious, earth is poured around the base, and this is where the work ends. It is worth noting that for the best effect, the entire base should be covered, and this does not look very good, especially in combination with modern buildings.
It should be noted that although this technique has almost zero price, its effectiveness also leaves much to be desired. Therefore, this method should not be considered as a solution to the problem. It can only be used as a temporary option.
Insulation using expanded clay
This method was widely used before the advent of modern heat-insulating materials, but is sometimes used now.
Its essence is as follows:
This method allows you to fairly well protect the base from freezing, but it is more suitable for installations below ground level. Therefore, let's consider more practical methods of thermal insulation.
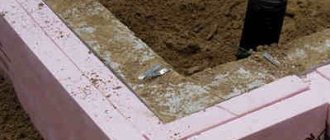
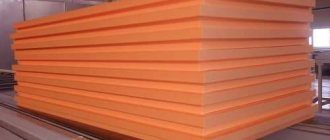
Insulation with foam plastic and extruded polystyrene foam
We can say that this is the most common method of thermal insulation of the base in a wooden house.
This group of materials has a number of advantages:
A disadvantage is the flammability of the material, but modern manufacturers can offer an option with a fire retardant additive; it will be a little more expensive, but its fire resistance is much higher.
Advice! Extruded insulation retains heat better, so its layer can be thinner than that of polystyrene foam. This can be very important in some cases where a too thick base is not desired.
Features of the work:
Recently, extruded polystyrene foam has been increasingly used; it is much more effective than polystyrene foam for a number of reasons:
It is worth noting that when insulating the foundation base with your own hands, this type is more reliable and convenient, but its cost is slightly higher. In any case, you should not save on your own home.
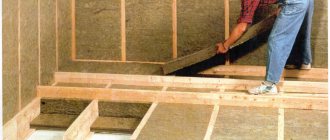
Insulation with mineral and stone wool
This option is also widely used for insulating bases. Mineral wool is a natural material, harmless to health. In addition, this insulation does not burn and is not damaged by rodents, which is also important.
The instructions for installing this type of insulation are no different from the above chapter. All operations are similar to working with foam plastic. The only caveat is that the insulation is much heavier, and more attention should be paid to its fastening.
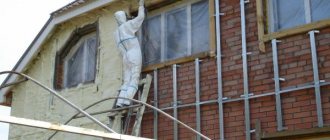
Polyurethane spraying
The newest method today, which, however, has already collected many of the most positive reviews from developers due to many positive factors:
Advice! Polyurethane foam is especially good on thin, cold foundations due to its high properties; it is also important that it fits perfectly even on the most uneven surfaces.
The disadvantages of the material include the high cost, although if compared with the quality of the material, the price is completely justified. It is also worth noting that it is impossible to apply it yourself - this requires special equipment. Another factor is that the material does not tolerate solar ultraviolet radiation, so it must be covered with some kind of finishing material.
Possible mistakes
After the construction of the fence, the columnar foundation becomes closed.
If you do not provide for vents in advance, you will have to install them, disrupting the entire installed structure. It is important to choose dry insulation , especially for more permeable materials (such as mineral wool or expanded clay). Otherwise, the insulation will pick up moisture even faster and will have to be replaced.
Attention should be paid to the control of insects and rodents. Most modern materials are not to the taste of living creatures, but they are excellent as nests. Special preparations and equipment will help in the fight against this scourge, as well as careful insulation, making access to the insulation inaccessible.
Attention! During installation, it is better to pre-treat the materials adjacent to the insulation with fire-fighting and antifungal impregnations. This will provide protection from possible fire and rot.
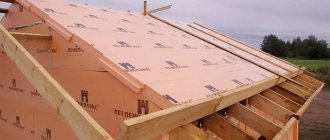
How to insulate the basement of a house from the outside
Insulation must be comprehensive, and if the walls are insulated, the roofing system and foundation cannot be ignored. One of the most vulnerable areas is the basement of the house, through which up to 20% of the heat escapes. It is possible to protect the base from moisture and freezing both at the construction stage and during the operation of the building, the main thing is to choose the right materials for this.
How to insulate the basement of a house from the outside
Expanded polystyrene
The material is widely used for processing facade walls. But you can insulate the foundation of a house from the outside with polystyrene foam. To do this, you need to choose dense and thick material (at least 5 cm).
Pros of expanded polystyrene:
- Small mass. Thanks to this, transportation and installation of the material does not cause difficulties.
- Resistance to chemical and biological factors.
- Convenient shape. Small rectangles are easy to maneuver for both professionals and beginners.
- Low thermal conductivity.
- Provides sound insulation.
- Resistance to humidity.
Insulating the foundation with polystyrene foam will help increase the strength of the foundation and extend its service life. You can install the plates yourself.
Requirements for basement insulation
The base is a part of the foundation located above ground level. From below, it is constantly in contact with damp and frozen soil, and the side walls are exposed to precipitation and sudden temperature changes. All this leads to an increase in the cost of heating the interior, the appearance of dampness and mold in the house, and a decrease in comfort for household members. In addition, the materials from which the base is built wear out faster, cracks and crevices form in the walls, and here it is impossible to do without major repairs.
A typical example of the destruction of an uninsulated base
When the basement is insulated, the cold bridges are blocked, the outer walls are protected not only from water and freezing, but also from mechanical damage, the structure lasts longer and does not require repairs.
It is important to properly insulate the base
But this is only the case when the insulation fully meets the following requirements:
Not least important is the durability of the insulation, because the longer the service life of the material, the less often it will have to be changed and the base repaired. As for the composition of the insulation, especially its environmental safety, there are no strict requirements, because the material will be located on the outside of the building, between the layers of waterproofing and decorative coating.
Table of efficiency of using insulation
Comparison of insulation and various materials
Polyurethane foam
You can insulate the foundation of a house by spraying. The base is treated externally with a liquid product. When working, special equipment is used. It takes a minimum amount of time for the material to harden. The insulation provides high-quality protection for the foundation.
Advantages of polyurethane foam:
- Thermal insulation is characterized by maximum efficiency, since the product is applied in a monolithic layer without gaps;
- Foam penetrates into all cracks and small gaps;
- The hardening time of the material is minimal, so you can quickly finish lining the base;
- Provides protection from moisture;
- The insulation is able to interact with any materials: brick, concrete, wood.
Polyurethane foam is considered the best insulation. It wins against the background of polystyrene foam and penoplex. Difficulties arise only when applying the product. You need to have special equipment to process the foundation.
Choosing insulation for the base
Among the wide variety of modern insulation materials, only slab and sprayed polymer-based materials fully meet the above requirements. Let's take a closer look at their characteristics.
Expanded polystyrene foam
Foamed polystyrene (foam plastic) has been used as insulation for a long time, and still does not lose its position. It retains heat excellently, does not accumulate moisture, is easy to cut and is lightweight, which allows installation without much effort. In addition, polystyrene foam has the lowest cost among other polymer insulation materials, and this is a strong argument in its favor when thermally insulating large areas or on a limited budget.
Base insulation with polystyrene foam
Despite all the advantages, foam plastic also has disadvantages: it has low bending strength, that is, it is quite fragile and is often damaged by rodents.
Mice gnawed through the insulation
In addition, in the absence of waterproofing, moisture penetrates into the upper layers of the material and, freezing, causes the slabs to crumble.
Extruded polystyrene foam
EPPS has a denser structure than polystyrene foam, and its cell size does not exceed 1 mm. This results in almost zero water absorption and greater mechanical strength. Extruded polystyrene foam is also more resistant to chemical attack, microorganisms, and shrinkage deformations. Due to low vapor permeability, this insulation is not recommended for use on wooden surfaces, but it is ideal for thermal insulation of plinths.
TechnoNIKOL extruded polystyrene foam
Thermal insulation Ursa XPS
The disadvantages include the flammability of the insulation - almost all brands of EPS have flammability classes G3 and G4. When melted, the material releases toxic substances.
Another disadvantage is the high cost. However, properly executed thermal insulation quickly pays for all costs when the heating season begins.
Spray insulation
Insulation of PPU base
Polyurethane foam is both heat, sound and waterproofing for a home. It is suitable for insulating all parts of a building, from the roof to the foundation, and has excellent adhesion to all types of foundation. Its main advantage is the absence of seams, since spraying forms a continuous coating that is strong and durable.
Seamless insulation of the base
The insulation process takes very little time, the material hardens in seconds and you can immediately begin finishing.
The only difficulty is that applying the insulation requires a special installation and skills to work with it. The services of a specialist, as well as the rental of an installation, are not cheap, but if you take into account the durability of such thermal insulation, there are still benefits. A layer of polyurethane foam 50 mm thick with a density of 36 kg/m3 replaces a 120 mm thick EPS layer and lasts at least 50 years.
External insulation of the foundation and plinth
Video - Insulating the base with polyurethane foam
Prices for thermal insulation materials
Extruded polystyrene foam
The material has similar properties to polystyrene foam. But insulating the foundation from the outside with polystyrene foam has improved characteristics due to extrusion.
Differences between extruded material and foam:
- Increased density, although the thickness of the slab remains unchanged. This allows you to take less insulation under equal conditions.
- Resistant to moisture and steam.
- Great strength of the material.
- Installation can be done both vertically and horizontally.
- The boards are resistant to biological pests.
Among builders, extruded polystyrene foam is called penoplex. But in fact this is the name of one of the brands. Insulating the foundation with penoplex will help strengthen the foundation and prevent contact with water.
Do-it-yourself thermal insulation
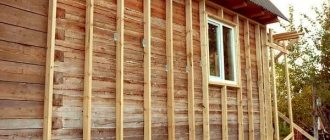
Insulating the basement part is not difficult to do yourself, the main thing is to strictly follow the technology. One of the most important conditions is high-quality preparation of the base. If the house is new, the basement and blind area are in good condition, then the work process will not take much time, which cannot be said about old buildings.
The facade of the house before insulation and finishing. In the photo the base does not need preparation
Base close up
Preparing the base
The work of cleaning the surface from contaminants begins. If the base is finished with tiles or facade panels, the covering will have to be dismantled. They clean off the old plaster, knock down the protrusions and dried mortar, and thoroughly treat the base with a stiff brush.
The photo shows a method for removing old plaster manually
In a brick plinth, it is necessary to carefully clear the seams to reveal voids.
The crumbled mortar from the seams must be cleaned out
Next, they carefully inspect the base, repair the cracks, and treat the areas affected by the fungus with special means.
Cracks must be thoroughly cleared and expanded before repair.
If the blind area is old, covered with deep cracks, it must also be completely removed, otherwise it will not be possible to properly insulate the base. Next, a layer of soil about half a meter wide and 10-15 cm deep is removed along the perimeter of the house. If the blind area is in good condition and fits tightly to the wall, it is enough to clean the joint along the entire length with a metal brush to remove debris and dirt.
For a tight fit of the slabs to the base, the walls of the base must be as smooth as possible. If there are differences of more than 10 mm, the surface should be leveled by plastering. To do this, you can use a regular cement-sand mortar, but it is better to purchase a dry cement-based mixture.
Sand-cement mixture for plaster
Factory mixtures are more expensive, but they do not shrink and are more resistant to negative influences. The plaster is applied to the wall with a spatula and carefully distributed over the surface in a thin layer.
Applying repair mortar
After drying, the walls are treated with a float and emery cloth, removed from dust and coated with a waterproof primer with quartz filler.
Tools and materials for work
For insulation you will need:
Construction mixer price
Calculating the amount of insulation is very simple: you need to measure the length of the base along the entire perimeter, multiply by the height and divide by the area of one foam board. The material should be purchased with a small reserve, since trimming of the slabs will be required when joining. The amount of reinforcing mesh required when plastering the insulation is calculated in the same way.
Installation of thermal insulation boards
Step 1. Try the slabs to the surface, trim if necessary. The lower edge of the insulation should rest on the concrete base of the blind area or on tightly compacted soil, covered with a layer of sand.
Step 2. Glue is applied to the back side of the first slab in a continuous line around the perimeter and in the middle.
They begin gluing the insulation from the corner: apply the slab to the surface, level it vertically, and press firmly over the entire area.
Step 3. Take the next slab, apply glue to the back and side edges, apply it to the base and fit tightly to the first slab. If glue comes out at the joint, it must be removed with a spatula. The remaining sheets are fastened in the same way, controlling their location with a level.
Advice. If the distance to the corner is slightly greater than the length of the insulation, it is better to fasten the last sheet in the row close to the corner of the base, and close the resulting gap with a piece of the appropriate size. It is undesirable to attach pieces of insulation in corner areas due to increased wind loads.
Step 4. After installing the slabs, you should blow out the gaps between the insulation and the wall, as well as at the joints of the sheets, with foam. The dried foam is carefully trimmed with a mounting knife so as not to damage the insulation or move the slabs.
Step 5. When the glue dries (usually it takes from 24 to 48 hours), the insulation is fixed with mushroom dowels.
Prices for popular electric drill models
Drilling a hole for a dowel
Unlike the underground part, where the material is firmly pressed by the soil to the foundation, the above-ground part is constantly exposed to wind and mechanical load, and additional fasteners are simply necessary. Holes for dowels are drilled in the center of each sheet and in the corners, going at least 40 mm into the wall. You need to work very carefully, as the insulation is easily damaged by a drill.
Installing dowels and driving metal rods
The joints between the plates are glued with polyurethane foam
Polyurethane foam that was used during work
Plastering technology
Step 1. Mix the plaster-adhesive solution, diluting the dry mixture with water according to the manufacturer’s instructions. It is recommended to mix with a mixer at low speeds, since it is more difficult to achieve homogeneity of the mass by hand.
Step 2. Apply a corner with a mesh to the upper edge of the insulation, measure the required length, cut off the excess. Next, apply the solution in a continuous strip with a spatula, lay the corner, and be sure to check the horizontal level. Having leveled the profile, smooth the mesh on both sides, sinking it into the solution. Excess mixture is removed with a spatula. In the same way, the profile is attached to the corners - internal and external.
Applying glue to EPS with a spatula
Applying glue to the mesh
Installing and gluing the corner vertically
Step 3. The reinforcing mesh is cut in width so that it is a couple of centimeters larger than the height of the base. You don’t have to cut it into pieces along the length, and attach it with a whole sheet on a flat surface - since the width of the roll is small, the mesh holds up perfectly. So, apply an adhesive solution to the surface, spread it in an even continuous layer about 10 mm thick, apply a mesh so that the top edge is 5-7 mm below the edge of the insulation. Next, smooth the mesh with a spatula, deepening it into the solution by several millimeters.
The mesh is pressed against the applied glue
Apply another layer of glue on top of the mesh with a spatula.
It is important to observe the overlap of adjacent paintings
Step 4 . A day later, when the surface has dried, the plaster layer is treated with a grater and emery cloth, removing small irregularities, sagging, and tool marks.
Leveling dried glue, removing sagging
Then the surface is dust-free and coated with a waterproof primer in 1 or 2 layers.
After this, the dug trench is filled with fine crushed stone or gravel, and a blind area is installed. The next stage is the finishing of the base: the surface can be covered with tiles, artificial stone, pebbles; mosaic plaster looks good.
Decorative finishing of the base
Prices for various types of decorative plaster
In the photo the base is covered with decorative plaster SPS granite plaster
Plastering the base and covering with bark beetle
Materials
Materials for insulating the foundation of a wooden house must meet the following criteria:
- low thermal conductivity;
- vapor permeability;
- wet strength;
- high wear resistance;
- ease of installation.
The most important characteristics are thermal conductivity, vapor permeability and moisture strength. The less the material conducts heat, the warmer the house will remain. Wood is characterized by the ability to absorb excess moisture and, if necessary, release it
This is why it is so important to use “breathable” insulation materials that can remove excess moisture vapor, preventing them from turning into droplets of water directly on the surface of the walls or insulation. The vapor permeability of the insulation should be close to the vapor permeability of the foundation material; if this is not possible, it is necessary to use a vapor barrier
Among the most popular materials for insulating wooden bases, there are several types.
Expanded polystyrene
This is a well-known polystyrene foam. However, today experts recommend using its best option - extruded polystyrene foam. The latter is characterized by low thermal conductivity, resists moisture better than foam plastic, and has a large margin of safety.
Such insulation disadvantages as environmental unsafety (a certain amount of styrene is released during use) and flammability (depending on the type of product, the material belongs to class G1-G4) when installed on a foundation become insignificant.
The ease of fixation also attracts users - polystyrene foam is produced in the form of rectangular slabs and has a flat surface
For fastening, a special adhesive composition is used (it is important that it does not contain solvents), and umbrella-type dowels are used as additional fastening.
A type of polystyrene foam insulation is penoplex, made on the basis of extruded polystyrene foam. In terms of its performance characteristics, it slightly exceeds the latter, but outwardly it is no different.
Expanded clay
Natural insulation, which is small, air-filled “pebbles”. It is characterized by low thermal conductivity, environmental friendliness, fire safety, good vapor permeability, but absorbs moisture. As you know, wet insulation loses its technical characteristics. High-quality waterproofing can avoid this.
As a rule, expanded clay is used in log houses, as well as houses with ground floors. In this case, a kind of heap is organized - a blind area is made at a height of 50-60 cm from the ground, the walls of which are waterproofed and covered with expanded clay.
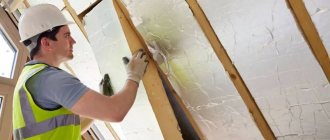
Polyurethane foam
Modern insulation with thermal efficiency indicators similar to polystyrene foam materials. In addition, it is moisture-resistant, safe, environmentally friendly, and non-flammable.
Insulation with polyurethane foam involves spraying it over the surface in a layer 3-10 cm thick. Like polystyrene foam, the material is not resistant to ultraviolet radiation, so it is necessary to protect it after setting. In addition, contact finishing cannot be installed in this case, so even before spraying the composition, you should take care of the lathing on which the plinth materials will be fixed according to the principle of a ventilated facade.
Penofol
Rolled material based on foamed polyethylene, which has good thermal insulation characteristics. In addition, one of the sides of the product is equipped with a foil layer, the peculiarity of which is the ability to reflect heat. In other words, the insulation acts on the principle of a thermos - in the cold season it retains heat inside the house, in the summer heat it provides coolness inside the room, preventing it from overheating.
In addition, the presence of a foil coating improves the moisture resistance and strength of the materials. The release form ensures ease of installation.
Step-by-step instructions for the device
So, you have read our article, in which we spoke in great detail about all types of foundations for frame houses, and you have definitely decided to choose a columnar foundation for your frame house. Let's start setting up.
- In accordance with the plan, we make markings, marking the places where the pillars will be installed. These are the corners of the house, load-bearing walls and under floor beams. The distance between the pillars should be no more than 2-2.5 meters.
- We dig holes in the marked places, the depth of which depends on the depth of the pillars + a cushion of gravel and sand.
- Some people pour the cement mixture directly into the soil, using pit walls instead of formwork. However, this method is not justified - moisture from the soil will come into contact with the cement surface, and the cement will be destroyed.
- Therefore, it is necessary to make the hole wider and install formwork, which you can make yourself from boards and film. Do not forget to strengthen the walls of the formwork with jibs, resting them on the walls of the pit. This will prevent you from collapsing the formwork, which happens often.
- Before installing the formwork, we make a sand cushion.
- We pour the sand mixture into the formwork and install anchor bolts to secure the grillage or frame. We are waiting for the foundation pillars to dry completely.
- We remove the formwork if you used removable formwork or plank formwork that you put together with your own hands.
Residential building on a columnar foundation
A prefabricated foundation is made of bricks or blocks, and a brick foundation is considered the most economically and practically unprofitable. The foundation blocks are installed on a sand cushion, which must be well compacted. The evenness of the surface is checked by a level.
Don’t forget to check the geometry after installing all the pillars - all surfaces should lie in the same plane, and the skew should not be more than 1 cm. To do this, we use a long staff and a level, or a construction laser ruler.
Best video:
Furniture in contemporary style
Functional furniture, which is the basis of the style, was and is created in order to accommodate all the necessary things, but at the same time not take up much space.
Therefore, characteristic interior items have appeared that allow you to save space in an apartment or house:
- Folding transforming tables. When folded, it looks more like a small shelf or chest of drawers, but if necessary, the structure transforms into a huge table, where it is convenient to seat many guests.
- Modular furniture - these can be pieces of upholstered or cabinet furniture, which consist of separate modules-parts of the correct geometry. It is convenient to unfold and connect as required by the position. For example, you can assemble 3 armchairs from a soft sofa or turn it into a bed.
- Folding sofas and folding chair forms. Such furniture could be found in every Soviet home, and it is still relevant today. Such items are easy to arrange or assemble to add a sleeping area or expand the room.
- Wall. Whatever you say, furniture walls significantly save space and accommodate many things and objects. Today, the walls do not look like one continuous line with a desk, but more like a suspended structure.
In an interior designed in contemporary style, it is not customary to install furniture made of expensive materials. And therefore: inexpensive types of wood, MDF panels, glass or plastic served as an excellent option for the execution of products.
Items made from these materials will last longer, are moderately environmentally friendly, and reliable. Their streamlined shapes will always be relevant and are easy to replace or complement.
The main slogan of the style is inexpensive furniture, but beautiful design and excellent wear resistance.
Installation
Attaching beacon profiles to the wall can be done using devices or using the adhesive method. The most famous devices are:
- "Kremmer";
- "eared";
- clip.
Latch "Kremmer"
This type of fastening is made in the form of a rectangular galvanized plate with a slot in the middle designed to capture the head of the screw. Attached to the profile plane by bending the ends onto the beacon.
The presence of slots at the ends of the plate makes it possible to bend the ends by hand, without the use of special tools. When all the fasteners are installed, the beacon is pressed against the screws, and the Kremmer is pushed onto the hardware until the head of the screw is fixed in it.
Having many advantages over other types of fastenings:
- quick installation - the ends of the fastening can be bent by hand without using pliers;
- thin, which is why the plaster layer in many cases is not as thick as, for example, when using a clip, which significantly saves dry mortar.
Kremmer mount.
- can be used on any type of hardware (self-tapping screw, screw, dowel-nail);
- tensions the beacon guides well.
It is not as popular as the other two devices. The reasons are the shortcomings. Minuses:
- self-tapping screws should be installed at a distance of 30 cm from each other, which increases their number on the beacon line, and this means additional time for installing dowels and screwing in self-tapping screws;
- a slight deviation of the hardware head from the vertical line does not allow the Kremmer latch to grab it;
- It is difficult to attach it to the profile so that the cutout for the screw head is exactly in the middle of the beacon.
"Ushastik"
This type of fastening, like the Kremmer latch, is made of galvanized steel. It is a rectangular plate with a hole in the middle for a self-tapping screw and ears for bending onto a metal profile.
How to install beacons for plastering walls on the “eared”? The technology is the simplest:
- when screwing the screws into the dowels, the “eared ear” is passed under its head - the hardware is screwed in together with the fastener;
- after bringing all the screws into one plane, the profile is tightly applied to their heads, and the fastening ears are bent, fixing the beacon.
"Eared" fastening.
Clip
This type of fastening is made of polypropylene. Consists of two parts:
- a base that is attached to a self-tapping screw and holds the profile;
- plugs - fixes the entire structure motionless.
The clip (abbreviated as KDM-2) has a thickness of 6 mm, which is most acceptable for rough plaster, when its layer should be at least 12 mm (6 mm clip + 6 mm profile).
How to attach beacons to a wall under plaster using clips? The plug is removed from the mount. Its base is fixed on the head of the screw. The beacon is inserted into the clip and closed with a plug. The operation on the entire profile takes 3-4 minutes.
Fastening with glue (plaster mixture)
In a situation where there are no special mounts for beacons, you can use:
- ordinary plaster (cement mortar) with the obligatory addition of PVA glue (to speed up the setting process);
- gypsum dry mixture;
- tile adhesive.
How to install beacons for plastering walls with mortar? For this you will need:
- dry plaster mortar of any kind;
- plasticizers (PVA glue to speed up the setting process, liquid soap to slow it down);
- mixer;
- container for mixing the solution;
- trowel.
The instructions for this technology contain only 5 points.
- The guide beacons are cut to size using a grinder.
- The solution is mixed (each type of mixture has its own recommendations printed on the packaging).
- Along the lines of the beacons, between the screws, a solution is applied to the wall every 15 cm.
- The profile sits on the screws with the straps down until it fits snugly to the heads of the hardware.
- The solution that has come out from under the lighthouse is removed with a trowel.
The walls can be plastered only after the adhesive has completely dried. For gypsum this is 2-3 days, for other types of mortar - at least 8 days. Therefore, professional plasterers very rarely use this method of attaching guide beacons. If the apartment is being renovated on its own, the extra few days do not play any role.
Mortar beacons
If you want to save money and not bother with removing metal beacons from plaster, beacons can be made from mortar.
How to place beacons under plaster walls made of mortar? There is nothing complicated here either. The only requirement is that the beacons must be made from the same mortar that will be used to plaster the wall. The step-by-step process looks like this:
- Along the line of beacons, after 1 m, self-tapping screws, pre-lubricated with oil or soap, are screwed into the dowels;
- All screws are brought into the same plane with the first hardware, already aligned in accordance with the calculations;
- The solution is being prepared;
Mortar beacons.
- Using a trowel, the solution is transferred to the wall between the screws. A solid shaft is formed, from bottom to top, covering the screws by 1-2 mm;
- A rule, also lubricated with oil, is placed on the solution (so that the solution does not stick) and pressed until it comes into contact with the heads of the screws;
- Excess mortar that has come out from under the rule is removed with a trowel or spatula;
- After the hydration process is completed, the screws are unscrewed.
Work can be continued only after the mortar beacon has gained strength. If you do this earlier, the possibility of destruction of the lighthouse during leveling of the plaster with the rule cannot be ruled out.
Attentiveness and strict implementation of all recommendations will allow you to correctly install the beacons, which will serve as the key to well-executed plaster.
Instructions for calculating the number of piles for a pile-screw foundation.
As mentioned earlier, in order not to make a mistake with the piles and correctly calculate their length, it is necessary to determine the difference in height of different points on the site. If you are convinced that such a difference exists and, according to the density of the soil, piles 2.5 m long are suitable, then they must be mounted in the topmost row.
Those supports that will be fixed in lowlands should be longer by the difference in height between the points of their installation. The difference is calculated using a water level or level using a plumb line and tape measure. If there is a significant difference in height (more than 0.5 m), it is recommended to add 50 cm to the resulting length of the foundation piles, since in the lowest places their height may not reach 20 cm.
Pile foundation calculation of piles.
Accounting for height differences.
Advantages and disadvantages of NSF
Like any building structure, non-buried point supports have their own advantages and disadvantages.
The reasons why developers choose a shallow columnar foundation are explained by the following advantages over other types of foundations for buildings and structures:
- the simplicity of the design allows land owners to build supports with their own hands, without involving professional builders and special equipment;
- columnar supports can be installed on almost any soil, except for soils with active heaving processes and in places with a high groundwater level (swampy grounds);
- non-buried pillars are erected in areas with differences in elevation, for example on hillsides;
- there is no need to arrange complex and expensive waterproofing of foundation structures;
- the maximum period for erecting supports does not exceed 2 weeks;
- there is no need to carry out excavation work to level the landscape;
- made in compliance with the rules and regulations of construction, the foundation of the building can last 50 years or more;
- The main argument in favor of shallow columnar foundations is the low cost of materials and work.
Compared to the impressive list of advantages, only 2 disadvantages can be noted - these are:
- impossibility of constructing basements and basements;
- intended only for light buildings and structures.