- 1 Attaching foam to concrete with glue
- 2 Using dowels
- 3 Gluing with liquid nails
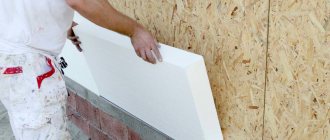
- 4 Bonding with foam
- 5 Additional recommendations
- 6 Conclusions
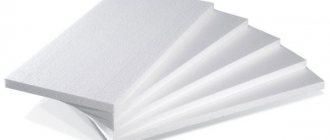
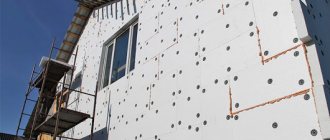
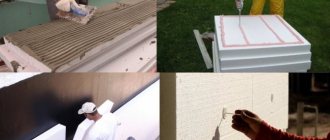
Polystyrene foam is used as insulation, since its thermal insulation properties are higher than those of natural materials, and the cold buildings in which it is used are mainly made of concrete. Often polystyrene foam needs to be attached to surfaces where it is impractical to assemble rigid sheathing (walls, ceilings, facades). In such situations, sheets of material are attached using a variety of methods and adhesives. The right technological solutions make the work easier. So, how to glue foam to concrete?
Attaching foam to concrete with glue
It is optimal to use special glue in powder form with polystyrene foam. You can also use adhesive compositions for ceramic tiles and facades (frost-resistant). Their basis is cement with the addition of binding polymers. The glue must be diluted with warm water before use. Such compositions reliably adhere to concrete, are moisture resistant, do not react to temperature changes, and last a long time.
Limitation - adhesives are used at positive air temperatures. It is better to knead using a drill with an attachment to prevent clumping. After settling for 5 hours, the mixture is stirred again. Then the glue must be used within 2 hours. The fastening mixture is applied to the insulation material. The slab should be glued by pressing it to the surface and holding it in this position for several minutes.
It is necessary to exclude the formation of an air “plug” under it. After installing the slab in an interval of 2 - 3 minutes, it is possible to correct its position on the surface. The final hardening period is 3 days. The method of applying glue depends on the height of the differences in irregularities on the surface. When they are within 50 mm, the composition is applied in wide dashed stripes (gaps for air to escape).
If the deformation differences are up to 15 mm, the substance is laid in intermittent strips with a protective distance of 20 mm from the edges of the slab. A little glue is applied to the middle of the area. When the concrete surface is almost flat (height difference is about 3 mm), a notched trowel is used to lay the adhesive on it so that it covers the entire surface. The excess squeezed out from under the slabs is removed with a dampened cloth. Adhesive compositions can be in ready-to-use form.
Bitumen adhesive has hydrophobic properties, frost-resistant, and flammable. Needs heating to 20 degrees at an air temperature of about 0 degrees. Apply with a notched trowel and provide adhesion within 20 minutes. Bitumen-latex emulsion mastic does not heat up before application, is resistant to low temperatures, and can be laid on a wet concrete surface. It hardens in a time interval from 3 hours to one day.
Another alternative is an adhesive, dense liquid based on rubber (dimethylpolysiloxane), which vulcanizes in air within 24 hours to form strong compounds. The temperature range for its vulcanization is from minus 60 to plus 300 degrees.
Return to contents
Adhesive mastic
Coating adhesive mastic is made from a mixture of petroleum bitumen, mineral fibers, organic solvent and various technological additives. It looks like a paste-like mass of uniform consistency.
This composition has the following advantages over analogues:
- Mastic does not lose its properties in conditions of high air humidity.
- Available in ready-made form, does not require dilution.
- Allows you to create an additional waterproofing layer between the foam and the wall.
- Dries completely in 20-25 minutes.
- Provides a durable, reliable connection between the foam and the concrete wall.
Mastic is a flammable material. Its use near open sources of fire is not allowed.
Features of application
Before starting work, you need to carefully prepare the walls. To do this, they are cleaned of dirt and dust, and a layer of primer is applied. If there are traces of plaster or whitewash on the surfaces, they must be removed with a spatula.
The mastic is applied to the slabs in a thin layer. A comb spatula helps with this. The composition can be applied in strips or in separate sections.
Each sheet is pressed against the wall for 20 minutes. For this purpose, temporary supports are used. If the surfaces are uneven, the plates are additionally secured with dowels.
All work is carried out in calm, dry weather. The ambient temperature must be at least -5 degrees Celsius. It is prohibited to use mastic in a room where natural or forced ventilation is not equipped.
The range of products for gluing foam plastic to concrete is huge. When choosing, you need to focus on the size and characteristics of the visit, as well as financial capabilities. You should purchase glue from a trusted store with a good reputation. Only there you can buy safe and high-quality goods.
Using dowels
Fastening polystyrene foam using dowels.
A simple, inexpensive, quick and durable glueless method of fastening polystyrene foam, however, requiring the use of a hammer drill and the required number of umbrella dowels. Their length is selected sufficient for reliable fastening of the slabs to the concrete base (taking into account the thickness of the sheets). On a clean, flat surface, a lower starting level is set, from which installation begins.
Each sheet is fastened with three dowels: one in the middle and two in the corners, so that their “umbrellas” press the corners of adjacent slabs. A gap of 3 mm is formed between the sheets - a deformation-temperature seam, which eliminates mutual deformation of the plates during daily and seasonal changes in temperature and humidity. Sealant is applied to the seams.
Return to contents
Consumption per 1m²
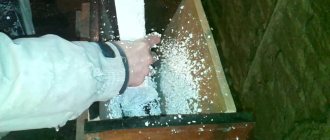
The amount of consumption of adhesive compositions depends on the method of application. Adhesive foam is distributed pointwise. This will also save material.
The consumption of foam adhesive from 1 cylinder is for 10-12 m² of concrete base. Depends on the brand of product and method of use.
Video: how many sheets of polystyrene foam can be glued to adhesive foam.
Powdered substances are sold in 25 kg bags. Shelf life 6 months. They differ in properties and consumption. Dry materials for gluing thermal insulation are used at a rate of 6 kg/m². The minimum amount that can be applied is 3 kg/m². Application depending on brand:
- “Ceresite” will need 6 kg/m²;
- “Knauf” - 4 kg/m²;
- "Titan" - 6 kg/m².
Consumption will be less if applied in a thin layer. Using a notched trowel will also help save material.
Bonding with liquid nails
Another alternative way to glue polystyrene sheets. Suitable only for smooth concrete surfaces. The offer of liquid nails is extensive, so it is advisable to familiarize yourself with their purpose, conditions of use and operation indicated on the packaging. Compositions are created for various pairs of materials to be bonded, including the pair polystyrene foam and concrete. This product is a polymer paste composition to which components have been added that improve adhesive properties.
Fastening with liquid nails.
Thanks to this, liquid nails are stronger than powder adhesives and harden even at high humidity. However, there is a significant drawback - the compounds are poisonous, so you should work with gloves. Such adhesives are packaged in oblong tubes, which are inserted into mounting “guns”. The benefits of using them include:
- the highest strength of materials connection;
- heat resistance;
- low technological consumption;
- complete hardening of the joint within 24 hours;
- frost resistance;
- efficiency and ease of installation;
- absence of odors and short setting time (from 20 to 40 minutes).
The latter increases the labor intensity of the work when the slabs are to be mounted on the ceiling (equipment, patience and skills are required). The composition will firmly adhere to polystyrene foam when the surface of the concrete is leveled, cleaned and dried. The substance squeezed out of the tube with a “gun” is located on the foam plastic in a small volume at several points, and not over the entire sheet area, as, for example, in the case of applying polyurethane foam. The slabs should be glued, providing pressure over the entire surface for a sufficiently long time so that the liquid nails set. Then the seams between the sheets are treated with polyurethane foam (sealant).
Return to contents
A few important tips before starting installation
Regardless of which method you choose for installing foam plastic on concrete, remember that you absolutely always need to clean the insulated surface from unstable areas and dust particles, which in the future can reduce the adhesive properties of the surfaces. In addition, it is important to carry out high-quality work to remove deep cracks and strongly protruding irregularities, as well as carry out soil work over the entire area of the working surface in order to achieve the best results.
So, as you can see, today it is impossible to unambiguously decide on the choice of material for installing polystyrene foam insulation material on concrete, since there are a huge number of parameters that at any time can change the need to use any method. Remember that you need to choose an adhesive solution in accordance with the operating conditions, the characteristics of the wall, as well as your financial capabilities.
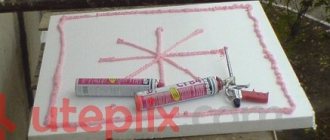
Bonding with foam
Foam adhesive for polystyrene foam.
You can glue polystyrene foam to a flat concrete surface using a special foam adhesive. This takes a little time. This method is relatively inexpensive. At the same time, the material can also be glued to regular polyurethane foam. However, this will increase the work time, since you will have to press the slabs against the surface with force for a long time.
If this is not done, due to the increase in foam volume, the sheets will swell and rise above the surface, and the seams will separate. Before using foam adhesive, you should make sure that the contents of the tube are intended for foam plastic (and not foam concrete) and find out the conditions of use. The use of special foam is possible even without priming; it is enough to clean the concrete surface from dirt and moisten it for better adhesion.
The advantages of this composition are:
- acceptable adhesion;
- the ability to glue slabs at low temperatures inside and outside buildings;
- no odors;
- moisture resistance;
- the ability to take long breaks during editing;
- frost resistance;
- no shrinkage;
- biological resistance;
- safety (fire, chemical);
- ease of use.
The disadvantages of this substance are that the foam needs protection from UV rays, it requires washing the mounting “gun” during long breaks in work, and also that the adhesion force (holding capacity) with smooth concrete surfaces is weakened.
You should also be careful not to get the composition on the mucous membranes of the eyes. Special foam is filled into standard cylinders filled with a polyurethane compound. Before use, it is installed in a mounting “gun”, which regulates the release of the substance. The can is shaken first and can be heated in warm water. The temperature for using the cylinder is approximately plus 20 degrees.
The foam can be placed on concrete or foam, covering at least 40% of the area under the sheet. The patterns for its application are stripes along the perimeter of the slabs or in a checkerboard pattern (with indentations from the edges), in the center it is squeezed out in a zigzag manner (necessary when the surface is not flat enough). Then a little time is given for the mixture to soak into the surface to improve adhesion. Any foam that appears is removed. This composition is used to foam the seams between sheets of material.
Return to contents
Requirements
Some adhesives contain substances that destroy foam. Mixtures containing:
- ether;
- petrol;
- kerosene;
- alcohol;
- ketone.
To know how to properly glue polystyrene foam to concrete, you also need to take into account the scale of the work and the installation location. Some mixtures cannot withstand low and high temperatures.
Some adhesives are not profitable to use in large volumes. Before buying a chemical, you need to carefully read the composition. It is recommended to pay attention to the properties and advice of specialists.
Additional recommendations
Installation of the material must begin from the bottom up.
Expanded polystyrene is not hygroscopic, so free water should not be a component of the adhesive, otherwise the boards will separate from the load-bearing surface. You should also prevent their contact with adhesives containing solvents (gasoline, acetone), which destroy the structure of the material. The purpose of adhesive compositions and the conditions for their use should be determined from the manufacturer’s recommendations on the packaging.
Work begins with ensuring high adhesion of concrete surfaces (cleaning from dust, building materials, greasy stains, priming) with an adhesive applied to the insulation boards. Before they begin, deep defects and cracks are widened and sealed with sand-cement mortar, then the surface is primed again.
Expanded polystyrene sheets are glued from the bottom up from the level line. Adhesive compositions are applied in such a way as to avoid the formation of air plugs under the surface of the sheets. The joints between the plates are not specially glued, since they are subsequently filled with sealant.
In some cases (due to the long setting time of the mixtures), it is necessary to forcibly hold the slabs pressed with their entire plane to the concrete surface until the mixture sets. All thermal protection after the glue, foam or liquid nails have hardened can be additionally secured with dowels. Their number on a sheet can be more than five (center and 4 corners) if it has a significant area.
Return to contents
Rules for choosing an adhesive composition
Today, dozens of types of adhesive compositions are presented in stores. Not everyone is suitable for polystyrene foam. Some substances simply corrode the material. You cannot purchase glue that contains the following components:
- Alcohols.
- Ketones.
- Amines.
- Gas derivatives: hexane, propane.
- Substances obtained as a result of hydrocarbon processing: kerosene, gasoline.
- Ethers.
When choosing glue, the location of the work is taken into account. Some compounds cannot withstand low temperatures and are therefore not suitable for insulating building facades. The means for fixing foam plastic to a concrete wall are liquid nails, dry mixtures, mounting adhesive - foam, PVA, adhesive mastic.
Manufacturers: list of verified brands
Penofol can be glued to concrete using different compounds; there are several manufacturers on the market offering proven substances.
The best options for compositions for gluing penofol to concrete:
- Weicon Easy-Mix PE-PP 45
– two-component adhesive that provides high quality fixation. The base is methyl acrylate.
- Moment
– two-component sealant, prepared from two substances according to the instructions, must be used within the specified time.
- Tilit
– Suitable for joining seams, but can also be used for gluing sheets.
- Titanium
– easy to use, lightweight composition, exhibits high adhesion to concrete, one-component, glues foil penofol well.
- Ceresit (CT83)
– universal composition for all types of surfaces.
- Atlas Stopter K-20 glue
– exhibits high technical characteristics and ensures high-quality connection.
- Allfix
– the composition is universal, suitable for all types of bases, provides a high level of adhesion.
- Facade
– one-component composition, frost-resistant and waterproof, suitable for outdoor work.
- Luxe-88
– three-component adhesive, antibacterial and absolutely safe, provides instant adhesion.
- T-Avangard-K
– not only glues, but also provides additional waterproofing.
Secret. How to glue foil insulation to a wall.
Kind. Somehow I encountered a problem with gluing foil insulation to the wall. There is a lot of information on this matter on the Internet. But I didn’t try what kind of glue I used, and in the end it didn’t work out. Everything was falling off. And the secret is simple. The insulation is covered with a thin polyethylene film, to which the glue does not stick (to a smooth surface, there is nothing for it to catch on). The manufacturer did not take this into account, or did not want to. It is enough to make the glue application areas rough, that is, sand them with sandpaper. You can use any glue, as well as polyurethane foam. And you won’t need a stapler, nails, dowels, or military-strategic toxic liquids - as mentioned in many construction forums. Good luck everyone, keep at it.
Minor observation. But many do not see the little things. Hence the big problems.
It is enough to make the glue application areas rough, that is, sand them with sandpaper.
And most importantly, why waste money on this and other materials and glue something that will not bring any effect.
jekasus wrote: And most importantly, why waste money on this and other materials and glue something that will not bring any effect.
I’ll support it. Apparently TS just has free material and needs to kill time.
jekasus wrote: And most importantly, why waste money on this and other materials and glue something that will not bring any effect.
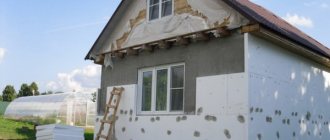
Yes, I agree with you. But this effect does not consist in preserving heat; there is enough of it; water heating comes from the house. If you look more closely at the last photo - this is an extension to the future greenhouse on the north side, of course there will not be enough light for the plants. Reflective paint is not available. So the foil serves to reflect it. Even with artificial lighting, when entering a room at night it is impossible to look; the eyes are hurt by the bright, dazzling, iridescent light. (Checked, a few electric lamps are enough) This is a plus for energy saving. In general, the issue was not considered regarding the construction of greenhouses and where and why to glue foil insulation. The meaning is how to glue it!
How to attach isolon to the wall
Kind. Somehow I ran into a problem **gluing** foil insulation to the wall. There is a lot of information on this subject on the **Internet**. But how and with what kind of glue I haven’t tried - in... - photo - Mastergrad Forum
Types of foil penofol
There are 3 types of penofol with foil on sale. Each is marked with Latin letters, which indicate the packaging.
Folgoizolon for external and internal work
TYPE A – heat insulator made of polymer, foil layer on one side. Produced in different thicknesses. Suitable for complex insulation of buildings inside. Glass wool is used together with this insulation. They also produce foil insulation with perforation. It is installed in log houses to allow the wood to “breathe.”
TYPE B – foil is located on both sides. This is maximum protection against heat loss. Penofol type “B” is used for thermal insulation of the attic, supporting structure, basement, and floor. As well as insulation of the pipeline and heating system.
TYPE C - on one side there is foil, on the other there is a thin layer of glue protected by film. Self-adhesive penofol is easy to install without spending a lot of time. For installation, cut into pieces of the required length and glue to the prepared surface.
TYPE R – a complete comparison to type “A”, but with a pattern on the foil. Used as decor for indoor walls. And also with multi-layer insulation, creating an air gap.
TYPE ALP – high degree of reflection. This insulation is used in agriculture, for example, to insulate incubators or buildings for calves.
Where is the foil insulation method used?
Foil insulation reflects infrared rays, which are essentially thermal rays. But there is no need to use the material everywhere. In some places it will not work properly.
It is mainly installed near thermal energy sources:
- heating devices - batteries, air heaters. The insulation is mounted on the wall with foil in the room;
- boiler, fireplace stove.
It is also used when installing “warm floors”. The reflective layer will direct the heat in the desired direction.
Small spaces where every centimeter plays a role. Here, thin insulation would be appropriate on the walls and ceiling.
In the attic. Here the insulation is installed on the roof. Apply 2 layers to combat heat and cold.
In baths and saunas. The heating of the room is not constant; foil material is suitable for such purposes.
Garages, hangars, outbuildings - an installed radiator or potbelly stove.
They also insulate heating pipes, air ducts, wells and wells.
How is installation done?
Don’t be alarmed, the installation of insulation has already been done independently by a variety of people. There is a proven step-by-step scheme that will allow you to make durable and reliable insulation
To begin with, the technology for laying insulation requires some precautions - the work should be carried out in:
- respirator;
- glasses;
- cap or hat;
- hood;
- You should always wear gloves on your hands;
- After completing the work, the clothes are washed separately from the rest.
Laying insulation
It is not difficult to follow these rules, but they will raise the level of comfort and safety in the work being carried out to the limit. Let us note that many people ignore the use of a respirator, which is a big mistake - there is something to breathe in, and then you will need to seek help from a doctor, and it is difficult to imagine what this can lead to. The key instructions for laying insulation on walls are the following sequence of actions:
- We start by very carefully foaming all the seams and cracks, of which there are usually a very large number on the outer sides of the walls. Polyurethane foam is perfect for this and is easy to use, so you will be satisfied with the result;
- Next, we must take care that the insulation fits very tightly to the heated part of the house and fills all the space inside the frame. If there are any voids along the edges of the wooden frame, everything is corrected, even if this place is made of small cut pieces of insulation;
- then we check that the edges of the insulation do not wrinkle inward - everything should be strictly parallel;
- we check all connections - the insulation is laid end-to-end, even a small gap is a huge loss in the quality of insulation. If the insulation is laid in several layers, this is done as in: a new layer overlaps the previous joint;
- Next, you need to take care of placing the insulation even behind the junction box, behind wires and other elements - there should be no gaps or gaps at all;
- you need to spend more time cutting the insulation - take measurements and cut it so that it fits snugly against the various wires, installation boxes and other elements. If you do the calculations correctly and approach this procedure carefully, you will get an excellent result that will be both reliable and look very stylish;
- When laying insulation with your own hands, do not be afraid of contact with heated surfaces; the same insulation made from classic staple fiberglass will melt only at a temperature of +426 Celsius, which is an unattainable mark in simple home conditions. Basalt wool will melt at +1000 Celsius. If you got to the bathroom from the outer wall, then you don’t need to go around it - no empty areas, no matter what is located on it, but here we just need steam-resistant drywall;
- then you will encounter fairly narrow gaps that are not at all scary in terms of airing the house, but they must also be filled, this is where condensation will form, which will give rise to mold, which is dangerous to health. Special care is needed for the corners of the house - we don’t let anything pass by;
- if the house has more than one floor, it is necessary to fill the interfloor ceilings;
- fiber insulation is not suitable for insulating gaps between windows, doors and walls - we will use polyethylene foam cord, which has proven itself in this matter;
- at the stage of insulating the floor, we must take care that there are absolutely no gaps left, which are often missed - between the heated and unheated rooms;
- there is no need to be afraid of electrical wires - usually people leave large voids around them, fearing that something might happen to them, but they are more likely to suffer without insulation than with it;
- Laying insulation in a private house involves installing a vapor barrier. This procedure is not complicated, but remember that everything must be secured very evenly and carefully - no bends, crumples or similar defects;
- We will even insulate the hatch to the attic, for which we will need 20 cm of insulation. This simple procedure will allow you to achieve ideal comfort in your home; even through such a small gap nothing will blow in.
If you acted carefully and responsibly, you will need to cover the insulation with the material that you chose for this, but this is a completely different task, it has its own subtleties and rules - the insulation for your home is completed and a comfortable winter awaits you.
Choose waterproof wood glue for exterior use.
If your product or structure may be exposed to water, use special wood glue. If an adhesive is labeled as “moisture resistant,” it will be suitable for products that are only occasionally exposed to moisture. For external work, a “waterproof” glue is needed, which can be made on the basis of PVA or polyurethane. Both of these varieties provide a fairly strong connection and are resistant to weather influences.
However, polyurethane has an additional benefit: it can also bond materials such as stone, metal and glass. However, this is a pretty dirty job, so it's best to use gloves.
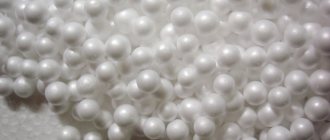
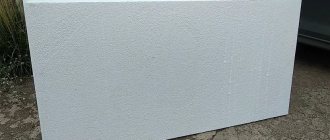
Differences between polystyrene foam and polystyrene foam
Foam adhesive for polystyrene foam and compositions for polystyrene foam have differences in structure. Foam plastic is foamed plastic. There are dozens of types of plastic, therefore there are also many subtypes of foam.
Every foamed plastic is foam plastic, and polystyrene foam is its subtype. Sometimes in construction stores they can be passed off as the same material, but this is wrong. Builders, on the contrary, urge to distinguish them by separate names. Yes, they are similar in appearance, but they differ in structure and properties. Therefore, different adhesive foams are needed for such materials.
Foil insulation for walls and floors
Foil insulation has relatively recently appeared on the construction market, but is rapidly gaining popularity for various reasons. Next, we will consider the types of this material, the advantages in comparison with traditional insulation and how to use it correctly.
What is rolled foil insulation
This is a combined material for insulating walls, floors and ceilings, consisting of several layers:
- Insulation made from familiar materials.
- A layer of foil.
The material is rolled, therefore it has a relatively small sheet thickness. How does heat retention occur?
- A thin working layer delays the penetration of cold air from outside,
- The foil reflects heated air into the room.
Varieties
Roll insulation materials are classified according to the main material:
- Foamed polyethylene with foil that can be attached on one or both sides.
- Folgoizol is created on the basis of bitumen/rubber, mineral fillers and antiseptic.
- Mineral wool rolls with one-sided foil surface.
- Basalt lamella insulation,
- Expanded polystyrene boards with one aluminum surface.
Each of the presented materials is intended for use in certain conditions.
Application
Penefol (closed cell polyethylene foam) is versatile in use. They insulate walls and floors in residential premises.
Reply to reader
We welcome you, Peter, to the vastness of our website! You are right, indeed, the foam will corrode if you use acetone-based compounds, so do not use them under any circumstances. Now we will name the 3 most common ways to solve the problem assigned to you. But first…
Preparing the concrete surface
Regardless of what type of glue you use, the surface must be properly prepared to obtain a reliable connection.
The procedure will not take much of your time, but it must be done.
- First of all, take a hard spatula and go over the entire surface of the ceiling, removing small debris and possible growths from it. If there are frozen pieces of concrete, you may need the help of a hammer drill. All protruding metal parts are cut off with a grinder.
- Mark the ceiling with a brush and prime it thoroughly - preferably in two layers.
- After the primer has dried, seal the seams between the concrete slabs with gypsum or cement plaster. An option with polyurethane foam is possible, the main thing is to ensure insulation from drafts and prevent large unevenness (excess foam is cut off with a sharp knife).
- Separately apply primer to the dried plaster.
All! The ceiling is ready for further work.
Dry mixes
The first way we will consider how to glue polystyrene foam to concrete is to use a dry cement-based mixture.
These adhesives contain special polymers that provide reliable adhesion between these materials. Before use, the mixture is diluted with water in the proportions indicated by the instructions for use on the label.
What is so special about this method?
- Cement adhesive has a long service life;
- Concrete and foam grip quite reliably;
- The hardened composition will be resistant to temperature changes and possible humidity in the room;
- During installation, you can adjust the position of the foam boards within a few minutes, which is very convenient;
- The price of such a solution will be low, and therefore beneficial for the consumer.
The disadvantages are insignificant, but they are worth knowing.
- Do not perform work at sub-zero temperatures;
- You need to carefully monitor the consistency of the glue - the ease of application and the quality of the adhesion depend on it.
- Complete drying will occur only after three days.
A similar method is used, mainly if the ceiling has some unevenness, and depending on their size, three methods of applying the adhesive mixture are used:
- If the differences do not exceed 3 mm, then a continuous application method is suitable. It involves spreading the mixture using a spatula-comb. Having received a uniform layer over the entire surface of the foam slab, we lift it to the ceiling and press it tightly. The force should be enough to squeeze out the glue a little, but be careful not to push through the foam itself. Press evenly over the entire surface of the slab
- The second method, cavity, is used if the concrete surface has unevenness from 3 to 5 mm. The glue is applied in strips, retreating 1.5-2 centimeters from the edges - first along the perimeter, leaving small gaps, and then inside. The gaps are needed to ensure that there is no air pocket under the foam.
- The latter method is called beacon method and is used if differences reach 15 millimeters. The glue is applied in strips 5 centimeters wide and 2 centimeters high. There should also be gaps.
Protective covering
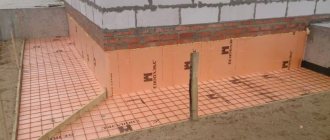
Scheme for attaching penoplex to a brick or concrete wall
In order for the surface of the insulation to look beautiful and be durable, it must be protected. The simplest and cheapest way to protect insulation is plastering, which is carried out in stages.
- Selection of plaster mortar.
- Selection of reinforcing mesh for plaster mortar.
- Fastening the reinforcing mesh using a certain technology.
- Laying the mortar, leveling the surface, grouting with a plastic float.
- Primer the surface for the finishing coat.
- Finish plaster. After drying, painting is done or a transparent protective layer is applied.
Video instruction:
In general, attaching penoplex to concrete and brick walls, as well as insulating the foundation of a building, is not difficult. It is enough to follow the installation technology and carry out the work carefully to ensure that the insulation is attractive and durable.
Advantages and disadvantages of the method
Insulation with foil has a number of features and a minimum of negative aspects. Advantages:
- Foil reflects heat. Thus, the heat remains in the house, on the other hand, it does not allow heat to enter the house in the summer.
- Increased wear resistance.
- Partially applicable as a waterproofing material.
- Easy installation, light weight, simple dismantling.
- The insulation does not allow cold wind to pass through. Maximum insulates from external influences. Resistant to deformation due to sudden temperature changes.
- Keeps out noise from the street.
- Does not rot or mold.
- This material is thinner than others, but is 20-30% more effective.
- The insulation does not emit substances harmful to health and prevents the smallest irritants and allergens from getting inside.
- There is no rigidity, so the top cannot be covered with plaster or wallpaper.
- Special adhesives are required for fixation.
- Sometimes insulation with foil is not enough to insulate a room.
Despite the disadvantages, foil material is widely used for various purposes.