The base of the bathhouse must be reliable and durable, but in addition to all the indicators, the heat-saving characteristics are also very important. There is an opinion that it is not necessary to spend time and money on insulating the foundation of a bathhouse, but it is wrong. Of course, steaming more than twice a week is harmful, and you can heat the steam room longer, wasting a large amount of firewood. But when the foundation begins to collapse and the walls begin to give way, it will be too late to think about the problem. You should not be afraid of labor-intensive and expensive work, especially since everything can be done on your own. We will tell our readers how to insulate the foundation of a bathhouse with your own hands using various materials in today’s article.
The foundation of the bathhouse must be insulated, otherwise heat loss will be high and it will take a long time to heat the steam room.
Thermal protection method
You can insulate the foundation in two ways - before and after laying.
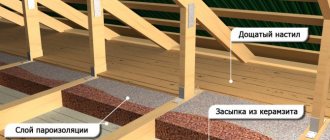
The first method is used before pouring cement. Insulation materials are laid on the outside of the foundation wall above the ground and underground (if there is a tunnel). The insulation of the underground part of the foundation block in contact with the ground is additionally covered with a protective layer. If the foundation block is shallow, its base is also subject to thermal insulation. After casting the cement mortar, in addition to finishing the interior with heat-insulating material, a blind area is laid - the outer layer that holds the base. Before filling the blind area, a heat-retaining layer is laid under it.
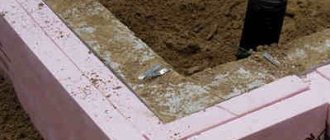
Often builders use formwork instead of an insulating layer. The structure is mounted not from wood, but from polystyrene foam. Therefore, it does not need to be removed after the concrete solution has dried. It is a good thermal insulation material and does not deteriorate under the influence of environmental factors. Wooden boards, unfortunately, are susceptible to rotting.
The second method is used after the construction of the building. In essence, it is equivalent to insulating the height of the base. The base, as with internal insulation, is protected with a blind area. This method is simpler, more economical, but less effective, since it is applied only to the front side of the foundation.
Best answers
Cat's smile:
There are two options: 1) Drain water from all pipes between the fireboxes. ,
2) Heat with electricity.
It is better to arrange a drain, but if this is a problem, arrange an insulated box for the inlet faucet and part of the inlet pipe up to the faucet, and place a low-power light bulb in the box; its heat will be enough to prevent the faucet from freezing. , Drain the rest of the water inside the bath itself.
VD-23:
asbestos cord or cardboard
Massi:
try filling it with foam
Alexander:
there are many materials. old glass wool, new fiber materials.
Yuri Morozenkov:
there is a wire. or, more correctly, a thermal cord. it raises the water temperature by several degrees. Type it into a search engine. I saw him with my own eyes. but dear bastard
Vasily Zadov:
You can insulate it with anything, BUT, if there is no heat supply, and this is either a constant flow of water (water from the ground +4 somewhere), or additional heating, you can try a heating cable if you don’t mind electricity. But if there is no additional heat supply, then even a meter of insulation will still freeze within a week. If there was a diagram, I would advise in more detail.
Bathhouse foundation insulation technology
The method of foundation insulation depends on the structure of the soil and the foundation design itself. For a bathhouse, most often, strip, columnar or slab foundations are built.
Insulation of strip foundations
- heaving soils - distance the process of freezing of adjacent soils from the foundations and minimize the depth of their freezing in winter;
- non-heaving soils – reduction of heat losses occurring directly through the foundation.
Traditional methods of reducing the effects of frost heaving consist of making a 10 cm thick sand preparation under the base of the foundation and backfilling the perimeter of the foundation with non-heaving soil.
But it is practically possible to completely eliminate the occurrence of frost heaving only by eliminating the very cause of soil freezing by insulating the foundation along its entire perimeter.
These works are performed in the following sequence:
- A trench is cut along the entire perimeter of the bathhouse, the depth of which is 0.5 m, and the width should be equal to the depth of regional seasonal freezing, which can be found for your specific area in building regulations or reference books or on construction Internet sites. For example, this value is 1.4 m for the Moscow region.
- Coarse-grained sand is placed at the bottom of the trench in a layer of 20 cm, thoroughly compacted and poured with water.
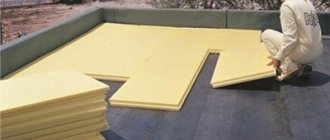
- Insulation is laid on the sand, with the seams carefully sealed with metallized tape. The slabs should have a slight slope away from the foundation. The thickness of the slabs is calculated using a special formula. For extruded polystyrene, there are tables that make it easy to determine the required thickness. Such tables are available in reference construction literature and on the Internet.
Since heat loss in the area of external corners is greater than in flat areas, in these places at a distance of 150 cm from the corners it is necessary to lay insulation 1.5 times thicker than in areas along the walls.
- Extruded polystyrene slabs with a thickness of at least 100 mm are attached over the entire surface of the underground part of the foundation and plinth. The insulation is fastened using special types of mastics and dowels with umbrella-type screws (with a wide head). In the underground part of the foundation there is no need for careful fastening, since this area will subsequently be covered with sand. The insulation slabs are fixed to the base at a rate of approximately 5 - 8 dowels per slab. Thermal insulation of the basement is protected by basement siding, porcelain tiles or cement plaster on a grouse mesh.
- A 30 cm layer of sand is placed on the insulation with careful compaction.
- On top of the sand, around the perimeter of the bathhouse, a concrete or asphalt blind area is made.
Such insulation effectively eliminates soil freezing around the foundation, preventing the occurrence of frost heaving, and reliably ensures a significant reduction in heat losses.
If there are any problems with performing insulation from the outside, insulation is performed from the inside. The fastening of heat insulators on the inside of the foundation is carried out similarly to that described above for external insulation.
Insulation of slab foundations
If the bathhouse is being built on weak, subsiding or silty soils, then the best solution is to install a slab foundation.
Thermal insulation boards are laid directly on the waterproofing layer. The protection of insulation slabs from the liquid components of the concrete mixture depends on the method of reinforcing the reinforced concrete monolithic slab.
If reinforcement is done by tying reinforcing bars, then it is sufficient to use a polyethylene film with a thickness of more than 200 microns laid over the insulation.
When reinforcing using welding work, it is necessary to install a protective screed made of lean concrete or cement mortar on top of the film, which is laid with an overlap of 15 cm. The seams of the film must be sealed with double-sided tape.
It is most effective and efficient to use extruded polystyrene foam as insulation. The use of other types of insulation will cost much more with less effective effect.
Reinforcement
The armored belt is made of thick reinforcement (>12 mm longitudinal and 6-8 mm transverse, vertical reinforcement). To work, you will need a grinder, wire for tying the armored belt, a welding machine, and a tape measure.
Reinforcement
The belt consists of longitudinal (four or more), transverse and vertical reinforcements. In this case, the entire structure must be 5 cm away from the formwork, soil and the top point of the foundation, and be reinforced in the corners of the building. The cross section of the armored belt is a rectangle or square.
The reinforcement is cut to the required length. Longitudinal and transverse rods are laid out on the ground and tied with wire at the points of contact. Welding the frame is not recommended, since the welded frame may lose its integrity when compacting the poured concrete or operating the constructed bathhouse.
The longitudinal rods are laid out and tied to each other with an overlap of about 30 cm.
Knitting longitudinal rods
The distance between the transverse and vertical rods should not exceed 50 cm. If the strip foundation is up to 120 cm wide, then it makes sense to make the frame not from two, but from three longitudinal reinforcement bars. If the foundation height is high, it is also worth increasing the number of longitudinal rods. The frame is also reinforced on top with U-shaped clamps, designed to increase the strength of the structure and reduce the risk of cracking of the strip base.
Clamps
At the corners of the bathhouse, the frame is additionally strengthened with reinforcement located at an angle of 45 degrees relative to the horizontal rods.
Corner reinforcement
Corner reinforcement
The finished connected frame is installed on plastic supports. To prevent movement during the pouring of concrete, plastic fasteners are inserted between the formwork and the reinforcement.
Strip foundation reinforcement
Reinforcement and laying of communications
Insulation of walls inside a bathhouse made of blocks
Insulation of a bathhouse made of expanded clay concrete blocks
Expanded clay blocks are an inexpensive and accessible building material. But its thermal insulation qualities are significantly inferior to those of natural wood, so a bathhouse built from expanded clay concrete needs insulation.
- Preparation for thermal insulation
- External insulation of the bath
- Facade
- Foundation
Internal insulation of the bath
- Floor
- Walls
- Ceiling and roof
Expanded clay concrete blocks have a porous structure and consist of sintered granular clay, cement and sand. Hollow and lightweight products containing a large fraction of expanded clay are used for the walls of the bathhouse. The insulation of enclosing structures is divided into external thermal insulation and internal. All walls of the bathhouse made of expanded clay concrete blocks are subject to external insulation, and internal insulation is required for the steam room to create a “thermos” effect in it. In this case, various insulation materials are used, the properties of which we will consider below.
Materials for insulating baths made of expanded clay concrete
Functionally, the bathhouse is intended for healing procedures, therefore all materials used for its construction must be of high quality and environmentally friendly. This also applies to insulation materials, whose action is aimed at maintaining a comfortable temperature in the premises. The negative impact of samples that are not resistant to its changes and emit harmful substances is greatly enhanced by the extreme “climatic” conditions of the bathhouse. Such materials are prohibited for use in such structures. Today, several excellent “qualities” claim to be insulation for bathhouses made of expanded clay concrete.
Foundation slab
When insulating the foundation slab, thermal insulation boards are laid on top of the waterproofing.
When reinforcing a monolithic foundation slab in a bathhouse using knitted reinforcement, a polyethylene film having a thickness of 200 microns or more is used to protect the insulation from liquid concrete.
When performing reinforcement work using welding, a protective screed is made on top of a film of cement-sand mortar or low-grade cement. In this case, the film sheets are laid on double-sided tape with an overlap of 130-150 mm.
Only in this way can you save the foundation from freezing and premature destruction. Take care of it today, otherwise tomorrow may be too late!
How necessary is it to insulate a bathhouse from the outside?
If we limit ourselves to only external insulation, then a situation will arise when, when heating a bathhouse, only the walls, floor and ceiling will heat up first (insulation for the ceiling is presented and analyzed here).
And only after they warm up will the air inside begin to warm up. And this automatically causes increased fuel consumption and time for heating the bathhouse.
When might this be needed?
As a mandatory recommendation, when external insulation of a bathhouse is required, we can name a situation when the bathhouse combines its purpose with residential use, i.e. The bathhouse is additionally used as a place to stay. In this case, yes, external insulation is appropriate for the above reasons.
In addition, the insulation of the bathhouse from the outside goes well with the treatment of the building with finishing materials, which will allow you to create a single ensemble on the site with other buildings in terms of design and design.
Advice! To summarize, we emphasize: if the bathhouse is not residential, there is no need, and even moreover, it may be unreasonable to insulate the bathhouse from the outside!
Useful video
Watch the video where the principles of insulation of internal and external insulation of a bathhouse are clearly explained, it is very instructive:
https://youtube.com/watch?v=Y1B3toWKgBE
Ventilated facade method
If the bathhouse is built using frame technology or the walls are made of timber or logs, the outside can only be insulated by installing a ventilated façade. For thermal insulation it is better to use basalt slabs. Rolled mineral wool sags over time, slides, and does not hold well between the sheathing elements.
Insulation from the outside begins with preparing the walls. First, they caulk the cracks and crevices between the crowns. The wood is treated with a protective impregnation. Rotten areas must be replaced. A vapor barrier is attached to the prepared wooden wall of the bathhouse.
The location of the sheathing elements is drawn using the vapor barrier material. Along the marked lines, brackets in the form of U-shaped perforated plates are attached to the walls. Pieces of roofing felt are placed under each element. The lathing is assembled from a galvanized profile or wooden blocks. The elements are fixed to perforated brackets with self-tapping screws.
When the sheathing is ready, they begin to insulate the walls of the bathhouse. Basalt wool is placed between the vertical elements. The slabs must fit tightly without gaps. The top of the insulation is covered with wind protection. The film is fixed with a stapler to the sheathing elements.
To create a ventilated space under the cladding, slats are nailed onto the vertical elements of the sheathing on top of the windbreak, forming a counter-lattice. The cladding is attached from any panels you like. To insulate the outside of a bathhouse, the Block House, which imitates a log house, is most often chosen.
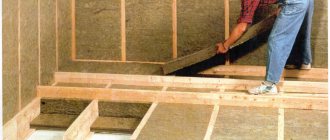
Insulation of the ceiling and roof of the bathhouse
At least 2 times more insulation should be laid on the ceiling (floors) than on the walls. This is explained by the fact that heated air rises. Thus, more condensation will accumulate on the ceiling. And if you let the hot air escape, then all efforts to heat the bath will be nullified.
Before laying the insulation, lathing is done, that is, wooden slats are attached to the ceiling.
Here it is important to distinguish between the concepts of “thermal insulation” and “vapor barrier”. The first is done to maintain the desired temperature, the second is to maintain the required level of humidity.
After the sheathing is ready, a vapor barrier is laid. Some experts advise adding a layer of rolling paper and then a layer of foil. Next, the insulation is installed. The most popular materials for this are mineral wool and polystyrene foam.
The lathing is done only after the material has already been purchased, because the distance between the slats must correspond to the dimensions of the material that is laid between the slats. The entire structure is covered with wood. The simplest cladding option is lining. You can also insulate from the roof side, which is much more convenient. If the roof space is to be used, then boards are laid on top of the insulation layer.
Here is a video on how to properly insulate a bathhouse with your own hands.
You can read more about insulating the ceiling and roof (attic) of a bathhouse in our article.
Types of wallpaper
- Paper ones are the most democratic. They are cheap, can be found in any repair store, they come in embossed and smooth. However, they have one significant drawback - they are not durable at all and cannot be repainted often (no more than 5 times during their service life). To increase strength, some craftsmen coat them with a special varnish composition. This adds durability and gloss. However, it exposes all the irregularities of the wall. In addition, to repaint, the varnish will have to be removed, which can lead to very disastrous consequences.
- Vinyl is more durable. Consist of vinyl and foamed PVC. They can withstand up to ten repaints without losing integrity, but are afraid of mechanical damage. On sale you can find this type of wallpaper with an interesting texture - a pattern or imitation. They are well suited for the kitchen or hallway.
- Non-woven ones - created on the basis of a more technologically advanced material than those mentioned above. The composition includes three or even four different layers, which make the material very durable and unpretentious. They are elastic, withstand wet cleaning, as well as repainting up to 15 times. You can also come across negative statements, which mainly boil down to the non-environmental friendliness of this type of coating. The fact is that when heated strongly, non-woven fabric releases a certain amount of formaldehyde vapor. However, if you stick them on the walls of the hallway or hall and do not plan to set them on fire, you have nothing to fear.
- Fiberglass wallpaper is the most expensive and most technologically advanced type of wall covering in our review. It is obtained by processing glass with special additives. The high cost is more than covered by its excellent appearance, environmental friendliness and durability. In addition, they do not burn and do not emit any odors or harmful substances. If you intend to surprise your guests and plan to change the color of the walls often, this is the best option for you.
Liquid wallpaper. To complete the picture of the possibilities of decorating walls in residential premises, this type cannot be ignored. Essentially, it is a dry mixture of various materials, which just needs to be diluted with warm water, spread on the wall and wait until it dries. In terms of painting, they can be compared with paper ones, i.e. They practically cannot be painted and are very afraid of being treated rudely.
Polystyrene foam insulation technology
The cheapest and fastest way to insulate the foundation is to use polystyrene foam. To install it, you will need a minimum set of tools: a knife, a hammer drill, a construction mixer. You will also need to purchase glue for PPS, primer, plaster, construction mesh, and disc dowels.
The work is divided into several key stages:
- If the house has already been built, then its foundation will have to be dug up. To do this, a trench is made around the perimeter of the building about a meter wide and equal to the height of the foundation. Remains of soil are removed from surfaces. Leave for a week to allow the moisture to evaporate.
- Surfaces are primed with a latex-based composition. This will help protect cracks and cavities from moisture. For this purpose, you can use mastic.
- Expanded polystyrene sheets are attached using glue. You need to press them lightly with your hand so as not to damage the material. In areas of the foundation located above the ground level, the sheets are fixed with disc-shaped dowels. You will first have to drill holes for them using a hammer drill. The sheets are very light, so insulating the foundation of a house with expanded polystyrene from the outside can be done alone.
- The seams formed between the EPS boards are sealed with polyurethane foam or rubbed with glue.
- The last step is filling the trench with soil. The soil is thoroughly compacted.
PPS, which is located above ground level, does not look aesthetically pleasing, so it will have to be plastered. Before this, a construction mesh is placed on it. Drying time of the layer is 2 days.
Formwork reinforcement
After hardening, concrete becomes completely inelastic; in order for it to withstand the effects of various natural factors well, it is necessary to give it additional rigidity and strength using reinforcement - steel rods connected according to certain rules.
Approximate layout of fittings
It is more convenient to install the reinforcement after the formwork has been assembled. To do this, pieces of reinforcement are driven into the bottom of the trench in two rows. They should be 5 cm apart from the formwork panels, and their height, after they are driven in, should be 5 cm less than the height of the foundation. Then horizontal reinforcement bars are placed on the bottom. They are tied with wire to vertical supports at a height of 7-10 cm from the bottom of the trench (to make it more convenient, you can place bricks under the reinforcement - this will be the desired height). The upper reinforcement belt should be buried 6-8 cm into the future foundation.
This is what foundation reinforcement looks like
After the reinforcement is completed, all that remains is to provide technological openings for the supply/discharge of water, light and ventilation. To do this, you need to cut a piece of plastic pipe and attach it to the reinforcement in the right place. To prevent the pipe from becoming clogged with concrete, it can be covered with sand.
After installing the reinforcement, it is necessary to provide technological holes
Key requirements for insulation
The choice of insulation for the foundation must be approached responsibly. Mineral wool left over from interior decoration cannot be used for this purpose. Water will accumulate in it, which will lead to rapid destruction of the entire structure.
The material must meet the following requirements:
- low thermal conductivity;
- resistance to sudden temperature changes;
- sufficient mechanical strength;
- resistance to aggressive environmental influences;
- waterproof.
Vapor permeability does not play a big role. But it is better to give preference to materials with low throughput
Do not pay attention to the flammability of the insulation, as it will be covered with soil
How to insulate the foundation
Based on the above, insulation should be carried out from the outside of the foundation. To solve this problem, you can use sheet foam - an excellent material with very low thermal conductivity. It does not absorb moisture, so it deteriorates quite slowly.
But not slow enough. The insulation must “live” as long as the object it insulates. The durability of foam plastic is much inferior to the foundation material.
Foam glass is much more suitable - foam glass, which has thermal conductivity comparable to foam, but is much more durable. However, it is much safer to use extruded polystyrene foam specially created for such purposes.
This material is much lighter than foam, but much stronger.
Video: finishing and insulating the bathhouse
Thus, waterproofing a bathhouse from the inside is not difficult, although labor-intensive
It is important that this approach allows you to protect the structural elements of the bathhouse from the effects of excess humidity. In order for waterproofing measures to be most effective, it is necessary to use high-quality and suitable materials, and when choosing them, focus on the design features of the building
Waterproofing a bathhouse is the best way to increase its durability and functionality. The correct combination of materials and methods of carrying out waterproofing measures will significantly increase the service life of the structure.
Advantages of expanded polystyrene
As a foundation insulation, polystyrene foam has the following invaluable advantages:
- High strength qualities, comparable even to the main material used to build the entire bath structure. The service life of the heat insulator is at least 40 years.
- Extruded polystyrene foam is not exposed to rodents, insects, birds;
- Very low thermal conductivity, which means the best ability to retain heat indoors;
- Resistance to moisture, frost, high temperatures, aggressive physical and chemical environments;
- High elasticity of the material, allowing it to be used for structures of various shapes and sizes.
- Fire safety.
Varieties of expanded polystyrene are used as insulation, differing in thickness and density, which depends on the climate of the area where the bathhouse will be used, as well as on the size of the entire building. Typically, expanded polystyrene is produced in the form of sheet material of a certain size; the compressive strength should not be less than 300 kilopascals. As a rule, when externally insulating a foundation, thermal insulation of two or more layers of polystyrene foam is used, which is again related to the weather conditions of the area, especially in the coldest season.
Perhaps this video about foundation insulation will also help you:
https://youtube.com/watch?v=7mNC4LIX75I
Process description
Many people consider insulating a bathhouse made of timber from the inside to be an unnecessary undertaking, or they focus their attention only on arranging the insulation of the ceilings and foundation. However this is completely false
However, this is completely false.
The fact is that insulating the walls in a bathhouse made of logs or timber may be necessary for many reasons.
For example:
- Small diameter of the crown in the log house;
- Poor insulation or its absence at all in the foundation of the building.
Important! With high-quality and comprehensive insulation, the cost of heating a bathhouse will be reduced by three times!
The structure of a well-insulated wall is as follows:
- A carefully prepared and clean wall;
- Hydrobarrier;
- Insulation layer;
- Vapor barrier membrane;
- External wall cladding.
Internal insulation of a bathhouse will be done quickly and without problems if you choose the right material. It must be environmentally friendly, not susceptible to rotting and insects, and also have fire-resistant properties.
Step-by-step instruction
The process of insulating a bathhouse from the inside with your own hands has a certain sequence, an algorithm of actions that you should familiarize yourself with.
- The first step is to prepare the surface of the walls. To do this, all cracks that exist on the surface should be treated with plaster. Sealant can also be used for these purposes. By the way, when plastering, the thermal insulation properties of the walls become better;
- After this, all structural elements must be treated with antiseptics and fire retardants to prevent fire and the spread of fire;
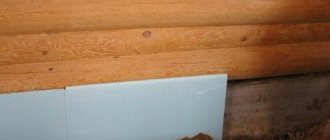
- Next, wooden blocks (50x50 in size) are attached to the walls of the bathhouse using self-tapping screws, for which holes have been prepared in advance both in the walls and in the bars. They must be placed in a vertical position with a step width of 55 cm. The bars must be in the same plane, for this you can use a guide cord;
- Next, insulation boards must be placed in the cells between the bars. It should be noted that the width of the insulation should not exceed the width of the cell too much;
- After the insulation boards are placed in place, it is necessary to install a vapor barrier layer. To do this, you can use foil, which must be attached to wooden blocks using a construction stapler. The resulting joints must be glued with metallized tape;
- Wooden blocks are nailed vertically on top of the carefully secured foil, onto which decorative lining is then attached.
Covering with penoplex
Penoplex is an excellent insulation for a bathhouse under the lining, which has many advantages:
- Moisture resistance;
- High strength;
- Light weight;
- Ease of installation;
- Low level of thermal conductivity;
- Vapor tightness.
Due to these characteristics, penoplex is often used to insulate bath buildings.
However, it also has disadvantages, since when heated it emits toxic fumes.
That is why it is not recommended to insulate a bathhouse with foam plastic, as well as penoplex, in a steam room.
Let's consider how the process of thermal insulation with penoplex occurs in a rest room or dressing room:
- First of all, the surface of the walls must be carefully prepared and leveled. To do this, you need to cover them with a double layer of primer and let them dry;
- Next, a layer of vapor barrier is laid;
- After this, a thick layer of glue must be applied to the foam sheet. It should be noted that the adhesive composition can only be used based on cement, polyurethane or bitumen;
- Fix the penoplex sheets over the vapor barrier, additionally secure them with nails;
- Once the entire surface of the walls is covered, you can begin installing the second layer. The foam sheets should be positioned so as to cover the seams of the first layer;
- After the glue has completely dried, it is necessary to treat all gaps with polyurethane foam;
- Next, a reinforced fiberglass mesh is installed over the surface of the penoplex;
- We cover the “pie” with a layer of waterproofing, and you can finish the walls using clapboard or wooden boards.
How to insulate a brick bathhouse from the outside?
Scheme of wall insulation in a bathhouse.
The high thermal conductivity of this material requires additional thermal insulation. Otherwise, you will either need to build thick enough walls or spend more money on energy.
Insulation of the walls of a brick bathhouse from the outside involves the use of ventilated facade technology. After the outside insulation is completed, the wall will be a kind of pie consisting of brick, insulation, waterproofing layer and external finishing.
If you are planning to insulate the walls of a brick bathhouse from the outside, pay attention to mineral wool. It is best suited for such work
The very insulation of the walls of a brick bath from the outside involves the following technology:
- the corner brackets are being strengthened to the wall;
- insulation is inserted between the corners of the mats;
- the joints between the mats are glued with tape or a special adhesive solution;
- the walls are covered with a waterproofing layer;
- Special guides are installed at the corners for additional retention of the heat-insulating material.
If you are going to insulate the walls of a brick bathhouse from the outside, you can also use polystyrene foam for this, however, it is not suitable for insulation from the inside, as it is toxic and unstable to high temperatures.
DIY thermal insulation
An individual application technology has been developed for each insulation. Before you get started, you need to study the step-by-step instructions.
Expanded clay and sand are similar in their characteristics and laying technology:
- Trenches are dug from the outside of the base. They are needed for soil drainage.
- The bottom is covered with geotextile, crushed stone is poured on top. Then perforated pipes are laid around the perimeter, connected and led into the prepared well. A layer of crushed stone is applied on top.
- The foundation is cleaned and dried.
- The trench is filled with sand or expanded clay. When placing, each layer is compacted.
Thermal insulation technology with mineral wool:
- Defects are removed from the surface of the base, cleaned, and dried.
- A frame is built from a metal profile.
- Mineral slabs are mounted on the structure.
- The open surface of the mineral wool is covered with a special film that protects the mats from wind, water, and steam.
- The mineral wool structure is covered with a brick wall (or ventilated slabs).
The technological process of applying bitumen mastic is simple - the surface of the foundation blocks is coated several times with a bitumen mixture, covered with a roll of waterproof material that will act as a heat insulator.
Foam application technology:
- Digging under the base, cleaning, drying, removing residual particles of oil, bitumen, fats.
- Applying a waterproofing layer.
- Foam boards are mounted using construction adhesive (dry mixture).
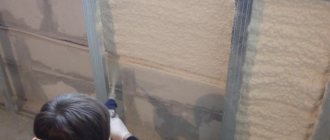
- Using the same glue, a fine metal mesh is applied to the surface of the foam plastic, designed to protect against pests. For reliability, the mesh is secured with plastic dowels.
- The foundation dug around the perimeter is covered with sand.
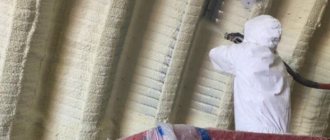
The technology of using sheet polyurethane foam insulation is similar to foam insulation. There is another way to protect the foundation from temperature changes - layer-by-layer application of polyurethane foam. In this case, a liquid polyurethane foam composition is used. The composition is applied in layers with a total thickness of 5 cm. Such a gasket is equivalent to a layer of extruded polystyrene foam 12 mm thick. Spraying polyurethane foam requires special equipment.
Working with tape base
Such a frame needs to be insulated from the outside, since it is important to preserve more free space for the underground room. Baths are sometimes equipped with basements, which serve as utility rooms. In this case, double-sided sealing will not hurt. To eliminate the unwanted greenhouse effect, the room is provided with vents.
The tape base allows the use of horizontal and vertical types of thermal insulation.
The insulation procedure requires a long time, since it involves following the instructions step by step:
- Undermining – 10 days of settling (moisture evaporation period).
- Cleansing, drying.
- Waterproofing - 5–7 days (drying).
- Treatment with mastic.
- Installation of EPS (extruded polystyrene foam) or polystyrene foam.
- Additional fastening of the above-ground part of the insulation.
- Reinforcement, treatment with plaster - 1–2 days (drying).
- Final leveling, sanding.
- Backfilling with sand, expanded clay, earth and compaction.
- Casting a concrete blind area - 1–2 days (drying).
How to insulate the base of a bathhouse with penoplex?
The bathhouse is no exception. It is especially important for her:
- Good underground ventilation to remove condensation;
- Isolation from the environment to reduce energy losses;
- A decorative function that gives the bath a beautiful, proportional appearance.
The insulated foundation is filled with soil, and the base is finished with a material that harmoniously combines with the material of the bathhouse walls. Dense foam or penotex can be plastered. A reinforcing polymer mesh is first glued onto it. A good effect is achieved by using decorative polymer or asbestos-cement boards that imitate the texture of natural stone or brick.
Reinforcement of insulation before pouring concrete
The foundation and base of the bathhouse are close, like nothing else, to damp and cold soil; the structures are most susceptible to constant exposure to negative factors, and therefore collapse faster. The base and above-ground part of the foundation are always carefully waterproofed and insulated so that dampness and cold do not penetrate into the steam room.
Insulation of the base in the bathhouse from the inside and outside
Moisture can transfer to walls and logs if you do not waterproof it yourself, and without insulation, the cold from the ground will make it uncomfortable to be on a cold floor. That is why high-quality insulation of the basement of the steam room, reliable insulation of the floor in the bathhouse and in the dressing room is necessary.
If the log bathhouse has a cold floor and dampness, it’s time to efficiently and cheaply insulate the base of the log bathhouse from the outside. Of course, it is also possible to insulate the base of a bathhouse from the inside, but this requires disassembling the floor inside the room. It is more convenient to do insulation from the outside; in addition, structures should be insulated from the outside.
Insulating the base from the inside is justified when you do complex insulation of a bathhouse with your own hands - insulation of the walls and floor in the room. In another case, the insulation must be laid on the cold side so that the structure does not freeze, but is exposed to warm air.
Inexpensive do-it-yourself basement insulation
1. Dig around the perimeter of the bathhouse 40 cm wide. We remove all rotten logs.2. We treat new logs with an antiseptic, drying oil or used motor oil.3. We put jute inter-crown insulation - the best way to insulate the walls of a bathhouse.4. We wedge the logs.5. We caulk the seam with jute tape and cover it with gypsum putty and sawdust.6.
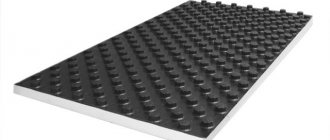
Insulation of the bathhouse base with penoplex
Since extruded polystyrene foam does not absorb moisture and is not afraid of insects and rodents, this method is more durable. In addition, you can save money and not additionally protect the structure with waterproofing; you just need to independently treat the base of the bathhouse from the outside with liquid or roll waterproofing.
1. We lay a waterproofing membrane on top of the foundation.2. We fasten foam boards up to 120 mm thick.3. We lay an additional membrane on top of the insulation as drainage.4. We lay geotextiles as a filter layer.5. We insulate the foundation blind area and make a concrete blind area around the perimeter.
Insulation of bathhouse base with foam plastic
With polystyrene foam, the base of the bathhouse will be well protected from the cold. It is better to take foam plastic with a density of at least 25 kg/cub.m. Please note that rodents love to live in polystyrene foam, especially if the insulation is located close to the ground. When insulating the base from the inside, you should take care to protect the thermal insulation from rodents and insects.
1. Mark the base. Insulation will increase the volume of the base, and therefore it needs to be marked.
2. Prepare the surface. We clean it from dust and dirt and prime it with waterproofing.
3. Glue the foam. We start work from the corner. Apply glue to the wall with a notched trowel and apply foam boards. Having glued several plates, we make holes with a drill and fix the sheets with dowels.
4. Reinforcement of the structure. Using glue, it is necessary to glue the reinforcing mesh onto the foam. Apply glue to the insulation with a wide spatula, apply a mesh and recess the mesh by going over it with a spatula.
5. Finishing the base. When the glue dries, apply the façade putty solution with a spatula. Apply a primer to the dried layer of putty and paint with acrylic facade paint. PVC panels are also suitable for cladding.
Repair of wooden base
Diagram of one type of foundation for a bathhouse made of blocks.
Sometimes the foundation for a bathhouse is prepared from thick timber, concreted directly into the ground, and sometimes a monolithic version is installed. You need to know some little things before you properly repair the foundation of a bathhouse or build a new foundation for a bathhouse with your own hands:
- For example, a wooden structure made from sleepers or a log frame is tightened from the outside with brackets in places where they settle. You can calculate how to tighten the frame, how many staples are needed. With other foundations it’s a little more complicated. You need to know how long it takes for the concrete itself to dry, and only then install the frame or beams. If the load-bearing blocks burst during installation and their height is small, you can add a reinforcing layer of concrete around the blocks, filling in all the cracks formed in the column.
- By deciding to make the foundation of the bathhouse yourself, you will not only save a lot of money, but also get a good experience. It’s not difficult to build a monolithic or any other foundation with your own hands; you just need to go through all the stages of construction one by one and not violate the technology.
- Make the correct calculations, markings for construction, soil development, reinforcement, and insulation. Do all necessary waterproofing work. It would be a good idea to consult with builders (developers) who have been building this type of foundation for a long time and have good experience.
Decide what material to build the foundation from, logs, sleepers, what the height of the building will be, how many sleepers or timber you need. Do you need a monolithic or concrete foundation for a log house, a wooden one made from sleepers, or a permanent foundation for a building made of foam blocks?
Knowing how to make a foundation for a bathhouse is not everything; you need to make preliminary calculations, and only then can you confidently begin its construction. It’s up to you to decide which foundation is best for a bathhouse, but it’s better to calculate how much materials you will need for this in advance and draw its structure. Having carried out a simple calculation, you can do everything perfectly, because you won’t need heavy equipment here, except perhaps a concrete mixer with a wooden chute and a concrete drain.
Materials for thermal insulation of foundations
Of course, we need to start with insulation. What can be used today to insulate the foundations of a bathhouse? In principle, the range of models is not that large, because the foundation is not floors or walls; the operating conditions are completely different here. Namely: large vertical and horizontal loads, high temperature changes, negative effects of the soil in terms of chemical and mechanical influence.
Therefore, experts offer several interesting options for insulating the foundation of a bathhouse.
- Expanded polystyrene boards.
- Foam glass blocks.
- Brickwork with a lining made of expanded clay, polystyrene foam balls, perlite.
Many may wonder what is mineral wool or glass wool. No one has canceled them, but, as practice shows, more effective insulation materials have appeared that can better withstand the loads below the ground. This mainly concerns moisture. Therefore, anyone who is going to insulate the foundation of a bathhouse should choose the simplest and cheapest option - installing polystyrene foam boards.
Practical recommendations
You can determine what brand of concrete is needed for the foundation of a bathhouse without weighing and complex calculations. The method is based on meeting the conditions under which the most durable material is obtained. The cementitious emulsion should fill all the free space between the solid fractions of the mixture.
To do this, take a measuring container and a 10 liter bucket. The sand and gravel mixture is poured into a bucket and filled with water, measuring the volume using a measuring cup. When the water rises to the surface of the mixture, record the measured volume of water. This will be the volume of cement that needs to be added to the solution.
If you managed to pour 2 liters of water into the bucket with the filler, then to obtain concrete, mix a bucket of sand-gravel mixture and 2-liter measures of cement. The cement-mixture proportion will be 1/5. Water is added to the dry mixture in portions until a plastic mass is formed.