In situations where the walls of a house cannot retain a sufficient amount of heat, heating it will be extremely difficult, even with the installation of modern and efficient heating systems. According to experts, walls account for about 30% of the total heat loss of a building. Therefore, the topic of how to insulate a house with polystyrene foam from the outside, a video of the process of which can be seen below, does not lose its relevance. This material is easy to use and low cost, while guaranteeing a good effect.
Preparing the wall surface
In order to easily insulate walls with foam plastic with your own hands, you need to study this topic and the video will tell you all the features of this process. Work begins with preparing the working surface.
The wall must be assessed for defects in the form of chips or cracks, as well as formations of moss, fungus and others. All elements that do not hold well enough will have to be removed, including old plaster if it has begun to move away from the wall surface. The same rule applies to paint and growing moss.
If serious defects are detected, including deep cracks, they are first eliminated. Typically, construction foam or cement mortar is used for this purpose.
The preparatory stage of work is completed by priming the wall. Any solution with universal properties that is characterized by deep penetration is suitable for this. This treatment will not only increase the adhesion of the working surface, but will also provide the wall surface with protection from all kinds of biological activity in the future.
Important! To assess the quality of preparation of the working surface, it is enough to carefully glue a 10*10*10 mm block of foam plastic to it using a special solution. If after three days it comes off easily, the preparation was carried out incorrectly.
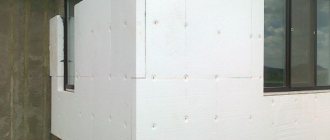
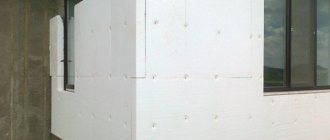
Preparatory work before insulating walls
For quick and high-quality external thermal insulation of a house with your own hands, it is recommended to take care of the necessary materials and tools in advance.
For work you will need:
- primer;
- putty;
- Styrofoam;
- glue;
- perforator;
- disc dowels;
- hammer;
- smooth and serrated spatula;
- reinforced mesh;
- polyurethane foam;
- hydraulic level;
- base (starting) profile with dimensions along the width of the foam;
- plastic grater.
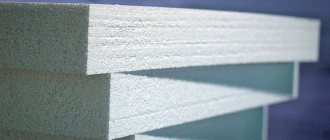
It is most convenient to use sheets with dimensions of 1x0.5 m during installation. The recommended thickness of the material should be 5 cm, and its density should be 25.
Particular attention should be paid to the glue with which the foam will be attached to the outer walls. The glue must be special. You can choose CT83 from the manufacturer Ceresit. In this case, you should pay attention to the fact that ST85 is used for reinforcing polystyrene foam boards. Before starting work, the glue will need to be diluted with water so that it is not very thick. Otherwise, the insulation may simply not stick.
To properly insulate a house from the outside, you will need to carefully prepare the surface with your own hands. This work is not easy and long, but it must be done. If the walls are poorly prepared and chips and cracks are left on them, the effect of insulation will be significantly reduced.
How to prepare walls for thermal insulation with your own hands
It is easier to prepare a new building for insulation, since some points need not be carried out.
Wall preparation:
- From the outside of the building, you need to remove everything that could interfere with the installation of insulation. These could be lamps, air conditioners, grilles, drainpipes.
- Oil paint that can be used to paint the facade must be peeled off.
- Be sure to remove rust, grease, mold and salt deposits from the walls.
- If there is plaster, it needs to be checked for strength. If it does not hold well, it must be removed.
- Large irregularities and cracks should be primed using a deep penetration primer. After it dries, you will need to apply cement putty to the cracks.
- If the unevenness is very large, then after priming, a plaster composition is applied to it.
During do-it-yourself insulation work, some communications are covered with heat-insulating material. To avoid damaging them with the dowels with which the foam will be attached, it is recommended to draw up a plan for their location.
Glue selection
In the video on how to insulate a house with polystyrene foam from the outside, you can clearly see how it is done correctly. But first you need to select the appropriate glue and prepare the surface for gluing foam sheets.
The glue itself is prepared in accordance with the instructions on the packaging - traditionally the mass is diluted until it reaches a creamy state. The finished solution should not drain from the spatula when it takes a horizontal position.
When insulating walls with foam plastic, you can apply glue to the surface of the insulation in different ways, depending on its characteristics:
- Glue from a balloon is applied to the central part of the slab and along its perimeter;
- If the working surface of the wall is uneven, the solution is applied not only around the perimeter, but also in the central part;
- To ensure uniform application of the solution when insulating a house with polystyrene foam yourself, it is better to use a notched trowel.
Preparing the building for cladding work
What needs to be done before insulating the facade of a house with polystyrene foam correctly? The first step is to clean the walls from dirt and make them as smooth as possible. Permissible differences from the plane - concavity and convexity - should not exceed two centimeters, so that in the event of an accidental impact, deformation of the sheet does not occur. If possible, paint should be completely removed from the wall and rusty stains should be removed. If there are metal parts, coat them with an anti-corrosion agent.
It’s easy to check the wall’s readiness for cladding by running your palm over it. If small particles fall off, you need to continue cleaning the surface. If this does not help, you should prime the surface or apply a thin layer of putty with PVA glue. It is better to apply the primer with a brush, but if it is very liquid, you can use a sprayer.
Finishing the facade with your own hands using ordinary foam sheets does not require preparation. As for extruded ones, they need to be processed for better adhesion to the wall surface. You can use a drywall needle roller, a stiff wire brush, or a simple utility knife to cut small grooves. It is even easier to purchase corrugated slabs, but such material is more expensive.
It is advisable to sew up the external slopes with your own hands and install flashings before installing polystyrene foam boards on the façade of buildings. For the first, choose sheets that are thinner than for the main work. The insulation should protrude beyond the slopes by about 2 cm. Then the façade cladding will fit with it quickly and accurately.
You should not cut sheets of expanded polystyrene on slopes flush with the facade wall. It is recommended to leave a protrusion for better joining with the main plates when installing it yourself.
Attaching the starting profile
The next stage in insulating a house with foam plastic with your own hands is applying markings and attaching the starting profile. You need to push off from the bottom border of the wall, which should be covered by the insulation. It is marked using a hydraulic level at each corner of the building. To mark a line, a rope or cord is pulled through the indicated points.
At this level, the installation of the so-called starting profile begins, which will serve as the basis for the lower row of polystyrene foam. It will prevent the foam sheets from moving while the glue has not had time to harden.
For external insulation, the dimensions of the starting profile are determined based on the width of the foam. Fastening is carried out using dowels, the edges are joined using the oblique cut method or using corner joints.
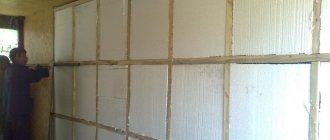
How to properly insulate a frame house with foam plastic with your own hands
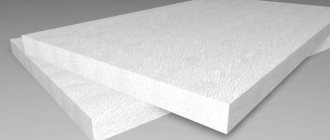
This is what sheets of foam plastic look like.
The main condition for successful insulation with foam plastic is to accurately fit the sheets of insulation between the frame posts. If this part of the work is performed efficiently, warmth and comfort in the room will be guaranteed.
Pros and cons, which foam to choose
Polystyrene foam as insulation has the following advantages:
- Moisture resistant. Even when the material is completely immersed in water, it absorbs a minimal amount of it. It is due to this fact that polystyrene foam is often used to insulate basements or basement floors, where materials are often exposed to moisture.
- Noise absorption. Thanks to this characteristic, there is no need for additional sound insulation in the house.
- Low cost. If the entire house is insulated with polystyrene foam, the savings can be significant.
- Low thermal conductivity.
- No need for additional vapor barrier.
- Saving dimensions. The insulation does not shrink and does not change dimensions when the temperature changes.
- Easy to install. Fixing the material on the walls can be done even if there is no experience in carrying out such work.
The only disadvantages include the need to comply with fire safety standards. To do this, materials that do not support combustion are laid on top of the insulation. In addition, modern types of foam and polystyrene foam insulation are impregnated with fire retardants, which make the material non-flammable.
However, experts claim that in the fire at the notorious Lame Horse nightclub, it was polystyrene foam that caused the death of a large number of people. At high temperatures, polystyrene releases toxic fumes.
If the moisture level in some areas of the house exceeds the norm, it is necessary to ensure adequate ventilation.
When choosing polystyrene foam, its density is first taken into account. Boards with a density of 15, 25 and 35 are often used. When insulating walls outside, foam plastic with a density of 25 is used. Expanded polystyrene of 15 density is not recommended for use in a residential building due to its reduced thermal insulation characteristics.
A material with a density of 35 can be used to insulate a house, but this will result in a high cost. Its use makes sense only in regions with harsh winters.
Technology, scheme
The technology of insulating a frame house with foam plastic involves laying foam plastic between the frame posts, then covering it with finishing on both sides.
Step-by-step instructions consist of the following steps:
- Clean the frame posts from dirt and cement build-up, remove sharp objects, and treat with protective impregnations.
- Install waterproofing on the outside of the wall. The waterproofing is laid with an overlap of 10 cm, the seams are carefully taped with construction tape.
- Install foam boards between the frame posts. The slabs should be placed as tightly as possible between the racks. For a more precise fit, determine the required panel size and cut it with a slight allowance. Then firmly insert the panel between the studs, trimming the excess edges in place with a particularly sharp knife or hacksaw. Fill the remaining gaps with construction foam.
- Lay a vapor barrier layer on the inside of the wall. Since polystyrene foam almost does not absorb water, experts say that vapor barrier is not needed when using it. In our case, the vapor barrier serves to protect the frame racks.
- Cover the walls on both sides with finishing panels.
When choosing the thickness of the insulation, it is better to use 3 layers of 50 mm each than one layer 150 mm thick. When installing, overlap the seams of the previous layer with subsequent layers.
Scheme for insulating the walls of a frame house with foam plastic
All work must be carried out in dry weather without wind. If insulation is carried out at the level of the second floor and above, scaffolding must be used. Window sills are removed from windows before work is carried out.
From the inside
This type of insulation installation is carried out if it is necessary to arrange additional insulation in an already built house.
Before starting work, you need to measure the dimensions of the walls, and then cut the waterproofing material into appropriate strips and attach them to the studs with a construction stapler. Waterproofing should be overlapped. After this, you need to secure the vapor barrier film. This is necessary to protect against steam from the frame elements, and not from the insulation itself.
To install the insulation, a wooden frame is created so that the distance between its elements corresponds to the width of the foam sheets. After this, the heat insulator is laid. The walls are covered using OSB boards or plasterboard, after which the room can be finished.
Outside
Insulation from the outside occurs when the frame house is already lined with clapboard from the inside.
A vapor barrier is attached to the outside of the lining. Foam plastic slabs are laid between the frame posts, and polyurethane foam is poured into the remaining gaps between the materials. The waterproofing is fixed. After this, OSB boards are fixed to the racks, on which the frame necessary for external finishing is created.
Various materials can be attached to the external cladding bars, but a house block is often used.
Foam plastic as additional insulation
If the frame house is already insulated with mineral wool, but this is not enough, you can fix the foam from the outside using a wet method. To do this, the following work is performed:
- Prepare the surfaces of the OSB boards. If external finishing was attached to the slabs before insulation, thoroughly clean the surface.
- Glue the foam boards using a special adhesive and additionally secure with dowels.
- Reinforce the foam slabs with a special mesh.
- Do the exterior finishing.
Ceiling
Insulation of ceilings with polystyrene foam is carried out in two ways:
- Using glue. In this case, first carefully level and clean the ceiling. After this, apply special glue to the prepared polystyrene foam slabs and press each slab against the ceiling. Remove any excess glue leaking from the joints immediately. After such work, all that remains is to attach the vapor barrier film to the wooden frame and install the finishing material.
- On a wooden frame. This method is similar to wall insulation work. It involves creating a wooden frame and then laying foam boards between its elements.
The first method differs in that after insulation there are no cold bridges left.
Attic
Attic floors need to be insulated by laying sheets of foam plastic between the rafters. The insulation sheets are attached to the rafter legs using glue and special nails. Additionally, the foam sheets rest on the bottom sheathing. Waterproofing is laid on top of the foam, and vapor barrier is placed below.
Scheme for insulating the roof of the attic floor with polystyrene foam or polystyrene foam
Since the insulation is laid between the rafters, the thickness of the rafter legs must be no less than the thickness of the insulation.
Methods for insulating the roof of a frame house with various insulation materials can be found in the article “How to insulate the roof and ceiling of a frame house correctly with your own hands.”
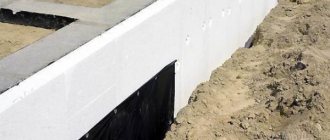
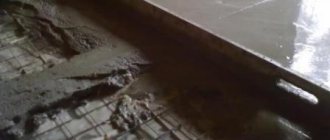
Base
Before work, it is necessary to thoroughly clean the surface of the base and level it with a primer. If the differences are more than 2 cm, you need to use beacons. When the composition has dried, you can begin gluing the foam. The glue is applied both to the insulation and to the surface of the base. But the difference is that a smooth spatula is used for foam plastic, and a serrated spatula is used for spreading it over the base.
2 days after gluing, the foam boards are additionally secured with dowels. You need to use 5 pieces for each.
After the work has been completed, the surface is reinforced as follows:
- First you need to apply putty.
- Without waiting for it to dry, you need to press the reinforcing mesh and level the surface with putty.
- At the last stage, all that remains is to apply plaster to the surface.
To strengthen the structure and improve the appearance of the house, you can line the base with brick.
Floors
Insulation of a wooden floor with polystyrene foam for a frame house is carried out between the joists.
- Create a waterproofing layer. To do this, lay plastic film or other waterproofing on the floor, then secure wooden floor joists on top. In this case, the distance between them must correspond to the dimensions of the foam plates.
- Lay the foam. The insulation is not secured with glue and dowels, since its position does not imply displacement to the side. In this case, the slabs are laid between the logs in such a way that there is a minimum distance between them.
- Attach chipboard panels and finishing material to the joists.
When insulating the floor of a frame house, foam plastic is placed between the joists
How to insulate the floor of the first floor of a frame house on stilts with polystyrene can be seen in the article “Methods of insulating the floor in a frame house on screw piles: electric heated floor, water heated floor and others.”
Foam thickness for insulating the walls of a frame house
To insulate the house, slabs with a thickness of 50 to 150 mm are used. The choice of thickness depends on the region of residence. In the southern regions, insulation of the smallest thickness is used and this is enough to maintain a comfortable temperature. In regions where the air temperature in winter does not drop below 25 degrees, 50 mm thick foam plastic is more often used for insulating extensions, and 100 mm slabs are used for walls. In areas where severe frosts are observed, the house is insulated with foam plastic 150 mm thick.
In Siberia
Since in Siberia a temperature of -30 is considered normal for winter, the house should be insulated using foam plastic 150 mm thick.
Reviews of people who insulated a frame house with polystyrene foam
Postnikov Igor, builder
I built a frame and insulated it with polystyrene foam. Very satisfied. I don’t understand why mineral wool is advertised everywhere and nowhere is it recommended to insulate with polystyrene foam or expanded polystyrene. I think this is wrong. Polystyrene foam or polystyrene is superior to cotton wool in many respects. The only drawback is that it can be chewed by mice. But mice also love mineral wool: they make holes in it, especially in the attic.
I only see advantages in insulating the frame with polystyrene foam. It was much cheaper than insulating it with cotton wool. In terms of thermal performance, foam plastic is better. I saved on vapor barrier because it does not absorb moisture. In addition, polystyrene foam is more durable than cotton wool and does not deteriorate over time.
Victor, businessman
I built a house at the dacha and made external insulation with polystyrene foam. Keeps warm perfectly, cool in summer, no smells, very comfortable.
I recently made an opening in the wall and was convinced that the polystyrene foam was absolutely intact, although 5 years had passed and the structure had not changed in any way.
The inside was lined with imitation timber. I did not create a vapor barrier or gap. The wood on the polystyrene side is in excellent condition. I laid the sheets between the racks without mounting foam, but adjusted them very precisely and cut them on the spot with a very sharp knife. And I cut the sheets in advance according to the markings with an allowance and then cut them more accurately.
I did the dressing in layers. I laid 3 layers of 50 mm each, more than enough for the Moscow region, density M15. I installed waterproofing on the outside.
Valery, economist
I built a frame addition to the main house using brick. Winter house. I did everything with great savings. I insulated it with 50 mm polystyrene foam - laid it tightly between the frame posts. The inside was finished with chipboard on inch boards, and the outside was lined with clapboard. I didn't install any waterproofing at all.
So this wall is the warmest of all. 15 years have already passed. Everything is perfectly preserved - I recently replaced the chipboard with lining and checked the condition of the foam - everything, as it was, was in good condition, both the foam and the racks. Yes, there was never any trace of condensation inside the room.
Anna Levina, civil engineer
They built a frame house and insulated it with polystyrene foam. We were exhausted in “adjusting” the insulation sheets to the frame studs. It turns out to be a lot of cracks. They were foamed with foam, but you can go broke on foam. Almost the same cost as insulating with mineral wool.
Ella Mislik, housewife
The winter house was insulated with extruded polystyrene foam. There was a lot of foam left, but there was no blowing anywhere and we were happy with the result. Sometimes they say that with polystyrene foam the house does not “breathe” - I cannot agree. You can breathe freely, there is no stuffiness.
Steam, wind and other films were not laid. We've been living here for 5 years.
Foam insulation
You can begin directly insulating the house with polystyrene foam 1-3 days after applying the primer (depending on its characteristics). Work is carried out in the direction from the bottom corner upward. If you work from above, then the sheets of polystyrene foam, which are poorly held by fresh glue, will simply slide down.
Important! Experts advise starting external insulation of a house with polystyrene foam from the wall that is least noticeable to others. Even if some shortcomings are made during its pasting, they will certainly be taken into account on the front side.
Each subsequent row requires vertical displacement of the foam slabs relative to each other, according to the same principle as brick is laid. Therefore, the first blocks in odd rows that end up in the corner must be divided in half.
The remaining gaps between the sheets can be sealed with special foam.
It takes about 3-4 days for the glue to completely harden, securely holding the foam on the wall surface.
In order to prevent unnecessary heat loss, special attention during external insulation of walls with foam plastic should be paid to the finishing of slopes.
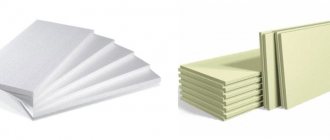
Polystyrene foam or extruded polystyrene foam
The main difference between two seemingly identical materials is the manufacturing technique.
Polystyrene foam (foamed polystyrene) is made from white polymer slabs with a granular structure by foaming. The reaction is produced by steam under the influence of high temperature: the molecules swell and join together.
Each hollow grain in the slab is filled with carbon dioxide, which provides excellent thermal insulation not only for walls and roofs, but also for household appliances (refrigerators, freezers).
The advantages of polystyrene are resistance to moisture, the ability to regulate cold and heat like a thermos, low cost, and installation of polystyrene foam is much simpler.
The material is very light, does not allow fungi and bacteria to develop, is durable, can last more than 50 years, can withstand cold down to -40-50°C, and heat up to +70-75°C.
Density depends on the brand of material.
Extruded polystyrene foam
The slabs are distinguished by a bluish or pink color, have closed pores and perform the same protective function as polystyrene foam - they provide thermal insulation for roofs, foundations, walls, and maintain a water barrier.
Raw materials are loaded into a machine to soften the materials and give them uniform shapes through pressing. Inside the machine, the material heats up and loses its connection with the polystyrene molecules.
The result is a homogeneous liquid without grains or cavities, which passes through a special hole and takes on the shape specified by the program.
The main differences are higher density and strength (at low density the material is looser and crumbles), the presence of recesses for adjusting sheets, crumbles less when cutting, and is more waterproof.
The extruded polystyrene shell helps regulate humidity and reduces air leakage through the walls, which not only improves the home's energy efficiency, but also overall comfort.
The quality of insulation depends on proper installation and taping of seams. As for the joints, extruded foam has much fewer of them, which means that the cold does not penetrate inside (there are no cracks).
What to look for when choosing a material
The main thing is the composition: carbon dioxide must be non-flammable.
The disadvantages of the two materials are that if installed incorrectly, mold may appear on the walls; the sheets become discolored or turn yellow if the surface is left uncoated for at least one season. When the material is heated, toxic substances are released.
The cost of extruded polystyrene foam is much higher (about 2 times) and it is more difficult to manufacture.
Pros: the thermal conductivity of extruded foam is higher, it almost does not shrink when heated, and due to its monolithic structure, it does not absorb moisture at all. Conventional foam plastic is significantly inferior in these indicators.
As for flammability, both materials contain a fire retardant, which is responsible for self-extinguishing (in the event of a fire, the fire goes out in 3-4 seconds).
The choice is obvious, but if it is not possible to purchase extruded polystyrene foam, then polystyrene foam will be an excellent replacement. However, it is more common to insulate the outside of houses with polystyrene foam, so it does not lose popularity.
Additional insulation fastening and external finishing
To improve the fastening of foam sheets to the wall, they are additionally fixed after pasting. For this purpose, special dowels are designed, the head of which does not go deep into the material. The number of additional fastenings is determined by the quality of the wall surface - the smoother it is, the fewer dowels will be required.
The final stage of work on external insulation of the walls of a house with polystyrene foam is the external finishing. It involves grinding the surface with a special tool designed for foam plastic. Next, additional elements are installed on the slopes and corners of the house. For the latter, a perforated corner element with a reinforcing mesh attached to it is suitable. Glue is also used to attach it.
At the end, all that remains is to perform facade plaster on the insulation, primer and finish the wall by painting it or finishing putty.
Reinforcement and plastering of foam plastic
The most difficult part of the work is done, all that remains is to put a protective mesh on the walls and cover the entire surface of the sheets with plaster.
You can leave the façade for the winter without final finishing with brick or paint, but only after you have applied a leveling layer to the sheets. If this is not done, the sheets will turn yellow and may collapse (in the spring you may find broken pieces of slabs on the ground or cracks along the entire perimeter of the building).
Then you will have to re-attach the foam to the facade.
Making the adhesive mixture
Extruded polystyrene foam cannot be left for the winter without plaster; it even needs to be stored in unopened bags.
Polystyrene foam as insulation in this case is not so capricious.
How to properly apply a leveling layer
To plaster sheets, you need to make the solution not thick, but slightly liquid. The liquid solution smoothes out more easily, and if the first layer was applied correctly and evenly, then very little mixture will be needed.
Treatment of window slopes
Installing mesh on the corners of windows
After application, wait until the mixture dries and walk over the surface with sandpaper (it is better if it is not new, then there will be no streaks).
Preparation for reinforcement
The first step is preparing the adhesive solution. It is better to use a mortar composition designed specifically for reinforcement, rather than a regular dry mixture.
Dilute the powder according to the instructions indicated on the bag of dry mixture, but it is better to make it a little liquid, so it will stick better.
Add water in parts, break up all the lumps with a mixer with an attachment (run the drill only at low speeds).
Gluing blanks around the perimeter of windows
Installing fiberglass mesh at corners
Apply the prepared solution in a thin layer to the foam on the inside of the window and level the mixture.
Installation of facade profile with mesh
Then place the façade reinforcing mesh on top (it will protect against shedding and cracking). The principle of operation is the same as when insulating window and door openings. The mesh should “sink” in the adhesive solution.
Place another layer of mixture on the mesh (at least 3 mm thick), level the glue. The reinforcing mesh will improve the “adhesion” to the blocks.
Install metal profiles.
Additional mesh reinforcement at corners
Make a “kerchief” over the corners of windows and doors: coat the sheets at a 45° angle with the adhesive mixture (should be in the shape of a rectangle), apply strips of glue along the frame or doorway. Press the reinforcing mesh onto the mortar on all sides.
Installation of window sill profile
Processing the slopes of the remaining windows
The mesh should be placed both on the inside of the corners and on the outside of the frames or door frame. Cover the reinforcing mesh with another layer of the mixture, remove the excess.
The next step is to apply the mixture to the lower part of the house (around the perimeter).
Processing of internal slope angles
Installation of cable profile
Installation of a profile with a dropper
On top of the protective layer on the bottom of the house, install a corner profile with a drip edge. Feature of the profile: a facade mesh with a protrusion along the entire length is glued to the plastic corner, which does not allow water to flow onto the plaster and reduces the appearance of rust to a minimum.
The drip tray performs many functions:
- Protects the building from cracks and damage.
- Suitable for decorative protruding elements.
- Makes the corners of the house nice and even.
- Replaces the base profile if it is not possible to purchase it.
- Suitable for façade restoration.
Installing profiles on external corners
Installation of armored fiberglass mesh
Having installed a profile with a drip around the perimeter, pull out the mesh and press it to the glue strip. Place another protective layer on the mesh and cover it completely. Remove excess mortar with a flat spatula. Wait for it to dry a little (but not completely). If you remove residue from a damp wall, the solution will simply spread across the surface.
Using the same method, lubricate the remaining corners of the insulation and tighten the reinforcement.
Only after all corners of the building have been reinforced can you proceed to covering the foam sheets in the middle. Don't forget to indicate where the mesh will be stretched.
Applying the adhesive mixture
Leveling with a toothed trowel
First, apply the solution to the wall, level it, then stretch the mesh and press it into the mixture. Be sure to overlap the mesh. The overlap of the mesh should not exceed 10 cm.
Apply another layer. Do not leave any voids when leveling the glue.
Installation of facade fiberglass mesh
Overlap of facade fiberglass mesh
Before completing the work, check the level to see if there are any differences left.
If you don’t have a dropper, you can use a regular mesh; just cut it into strips to size (it will be cheaper, but it’s easier to work with ready-made corners).
Irrigation with water
Additional alignment of window slopes
How to install blocks in two layers
Foam plastic for facade insulation can sometimes differ in thickness.
If you decide to insulate the house not with one, but with two blocks of polystyrene foam (if the thickness of one layer does not reach the required standard, it needs to be supplemented), then first you need to glue the first row, and then the second.
It is important that the joints of the second row of blocks do not coincide with the joints of the first.
Correction of irregularities
When installing the second row, apply a thin layer of adhesive directly to the square of foam, not to the wall.
There is no need to cut off excess polyurethane foam or grind down the unevenness of the first row - the blocks will still be covered with new layers, and the defects will not be noticeable.
Note: if there is nowhere to rush, wait until the first row has dried; if there is no time, then immediately proceed to install the second (to avoid displacement, install the sheet no higher than 2 m in height).
Foam insulation of external walls is often made from one layer of blocks.
Solid alignment
Final protective and finishing work
Polystyrene foam does not tolerate direct sunlight, so it is necessary to carry out external work to isolate it from the external environment. To do this, a special adhesive mixture is applied to the insulation, and a fiberglass mesh is placed on top of it, with an overlap of 6–7 cm. To strengthen the corners, the reinforced mesh should overlap the adjacent wall by 10–15 cm. If heavy finishing is planned, then the corners are reinforced metal corner. After completely covering the house with mesh, the layer is allowed to dry for 1–2 days.
When the mesh is fixed, it is sanded and primed. While the primer dries, fix the roof drainage system. After the primer has been absorbed, apply putty in a layer of 3–4 mm, or external plaster, and allow the layer to dry for 3–4 days.
Insulating a house with polystyrene foam is quite simple; the main thing is to choose substances compatible with the material so as not to dissolve the granules. It is also important to create a finishing layer that protects polystyrene foam from exposure to the sun.
Myth - Insulating a façade is expensive
If you decide that it is absolutely necessary to insulate the facade and there is no return to your decision, the time will come to purchase materials. In order to cover the entire house, you will need relatively large amounts of money.
To reduce heating costs, many owners of houses and apartments are thinking about insulation. One of the possible options is insulating the facade with polystyrene foam (PPS or EPS). The work is not the easiest, but you can do it with your own hands. It is important to know the technology. We will talk about it in detail further.
Proper insulation of the facade with polystyrene foam will give good results
Styrofoam harbors mice
And one more fact that needs to be pointed out when assessing the pros and cons of foam insulation is that mice breed in the material.
Expanded polystyrene is an ideal habitat for them, because it is warm and soft. Therefore, when insulating with polystyrene foam, block the access of mice. To do this, you can finish the places where rodents can enter with mineral wool, which mice do not like.
Therefore, although polystyrene foam has a number of positive qualities, we should not forget about its disadvantages. Therefore, it should be used thoughtfully and in accordance with all the technological features of the material.
Installation of foam sheets on the facade
Installation tools:
- bucket 2–5 l;
- spatulas 8 and 20 cm;
- construction mixer;
- drill;
- building level.
The plate for applying the adhesive composition should be rough; if it is smooth, then brush it with a brush with metal bristles. The glue is diluted according to the instructions, mixed with a mixer, the finished consistency should be thick enough to support the weight of the slab. But if the mixture is too dry, it will not adhere the foam properly. In order to understand what the consumption will be, mix 50–100 g of dry glue, gradually adding water.
The first stage of installation is the starting profile
Installation begins with attaching the bottom plank or corner to the wall, at a level of 20 cm from the edge of the ground or blind area. The profile will serve as support while attaching the slabs to the wall, and after drying, allow the foam to support more weight of the plaster.
The finished adhesive mixture is applied along the perimeter to the rough side of the polystyrene foam, retreating from the edge by 3-4 cm, after which several patches are made in the middle of the sheet and applied to the wall. The surface of the sheet should be covered by approximately 40%. The first row starts from the bottom corner of the house, the next one is laid so that the edges fall in the middle of the previous row. If the walls are insulated in several layers, then the second layer is applied so as to overlap the joints of the previous one.
Apply glue and glue
If there is a gap between the insulation boards of more than 3 mm, it is sealed with polyurethane foam, the protruding parts of which are cleaned off after hardening. The same is done with the protrusions of the sheets. An adhesive composition is applied to the seams and fasteners to eliminate unevenness.
Video: the result of insulating the facade of a house with foam plastic after 2 years
Why is it better to insulate walls from the outside?
Carrying out work on thermal insulation of facade walls ensures:
- reduction in energy costs;
- minimizing heat loss.
All this together leads to lower utility bills for the home owner. The issue of wall insulation is relevant for people who live in old houses. The wall structures in such houses are dilapidated, which is why they are the main source of heat loss .
If you do not insulate the walls yourself, then even with an effective heating system, you can suffer from cold penetrating into the interior of the house. A positive aspect of insulating façade walls from the outside, which you should know about, is that high-quality work ensures the creation of a favorable microclimate in the rooms of the house. This is achieved mainly through the accumulation of processes within the household. In simple terms, in winter, the heat created by the heating system is stored in the rooms, and in the summer, a pleasant coolness reigns inside the home, which is achieved due to the absence of excessive warming of the surface of the walls by the sun's rays.
Features of the material
Polystyrene foam is 98% air, which allows it to retain the maximum amount of heat in rooms. Therefore, this material is used not only for insulating the walls of residential buildings, but also for ceilings, floors, basements, foundations and warehouses.
Is there really one reason why polystyrene foam has become so popular? Not at all. There are other positive qualities inherent in this material.
Advantages
Let's start, as usual, with the advantages, because it is thanks to them that home owners choose polystyrene foam for insulation:
- Sound and thermal insulation of premises.
- Light weight, which helps reduce the load on load-bearing walls. This means that expanded polystyrene is also suitable for very old buildings.
- Versatility of use. It can be used for both interior and exterior work, for residential and non-residential premises.
- Moisture-repellent properties.
- Affordable price. The cost of polystyrene foam is quite low compared to other materials.
- Duration of operation. This advantage can be considered relative, since unprotected foam is quickly destroyed when exposed to sunlight. But if it is covered with facing material immediately after installation, the service life will be up to 30–35 years.
- Safety. The foam is coated with antipyrines, which prevent the heat insulator from smoldering and releasing caustic substances.
- Prevalence. This insulation can be found at any hardware store. At the same time, slabs of different densities and thicknesses are presented at one point.
As we see, there are really a lot of positive aspects, and now it becomes clear why those who want to insulate themselves buy polystyrene foam.
Flaws
Pros are pros, but each material also has several disadvantages. They should not be ignored at all, and sometimes a few disadvantages can outweigh a large number of positive aspects. Polystyrene foam also has its disadvantages:
- fragility. A slab of any density and thickness breaks easily. This must be taken into account during the cutting and installation process; it is advisable to be as delicate as possible with this material;
- low vapor capacity. You should not rely on natural ventilation if the house is lined with foam plastic. Vapors will accumulate in the rooms, and this will lead to a deterioration in the microclimate. This material is categorically not suitable for insulating wooden buildings;
- does not tolerate exposure to ultraviolet radiation and some paints and varnishes;
- if the foam is not coated with fire retardants, it easily ignites and produces acrid smoke;
- love of rodents and birds. Rodents settle in slabs and make their own nests. Birds pick holes in slabs that are not covered with facing material.
Having familiarized itself with all the advantages and disadvantages, the buyer makes his choice whether or not to purchase this insulation.