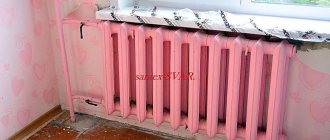
Major home renovations often involve replacing pipes. After the installation of pipes or radiators is completed, it becomes necessary to hide communications to create a favorable appearance for the walls in the bathroom, toilet or any other room. A lot of work done during the renovation period using expensive tiles, heated floors and attractive plumbing fixtures, and a lot of effort put into creating a pleasant interior can be in vain if you do not think through the camouflage of communications.
For such work, various materials are used, but the most acceptable is the use of plasterboard, from which the box is made. Why does the choice fall on drywall?
The advantages of a plasterboard box for covering pipes are due to the following:
- affordability of drywall;
- ease of production of plasterboard structures.
- environmental safety of drywall, characterized by the absence of harmful substances in its composition. This is especially true in the manufacture of boxes for batteries and heating pipes that generate heat when heating rooms.
Features of drywall
Some information about drywall. This popular building material is characterized by a multilayer structure with alternating gypsum and paper layers. Drywall sheets are available for sale in sizes of 2.5 by 1.2 meters. One sheet of drywall will be enough to make a box for the fan riser.
Note!
To construct a box in rooms with high humidity, such as a bathroom and toilet, you should use a moisture-resistant type of plasterboard.
How to sheathe pipes with plasterboard - do-it-yourself finishing options
Many apartment owners, after completing the installation of pipes or heating systems in the house, are wondering how to cover them with an outer box and what kind of cladding to use for this. Everyone has their own preferences in this matter, but the material that is most often used for this purpose is drywall. True, it is necessary to provide for possible breakdowns: for example, buy reliable fittings on the website https://alfastars.msk.ru/.
Advantages of plasterboard boxes
In general, the construction of an outer box can serve various purposes, for example:
- Give structures an aesthetic appearance.
- Provide protection from accidental mechanical and other damage.
- Achieve a soundproofing effect (especially in the case of sewer pipes).
Plasterboard sheets meet all these requirements well, and although other materials can be used to construct the box, they are preferable for a number of reasons:
- Low price.
- Easy to assemble structure.
- Excellent environmental performance.
- High sound absorption rates.
Working with this material is not difficult, and therefore the involvement of professionals is optional, and if you have some skills, you can cover the pipes with plasterboard yourself.
Preparation for covering pipes with plasterboard box
Before sheathing the pipes with plasterboard, you should do some preliminary work, which is as follows:
- Preparation of the necessary materials, including metal profiles (guides, racks), screws, dowels and the plasterboard sheets themselves.
- Preparation of the necessary tools (knife, screwdriver, hacksaw, plumb line, level, pencil).
- In the case of metal pipe products, it is advisable, before covering the pipes with plasterboard, to clean their surfaces of old paint and repaint. After covering the pipes with plasterboard, access to them becomes very difficult or impossible.
Upon completion of the above work, before covering the pipes in the room or bathroom with plasterboard, you must first prepare a reliable frame for its fastening.
Preparatory work and marking
Have you decided to sew up the heating device yourself? Any finishing work requires serious preparation. Let's start with the selection of tools:
- building level;
- metal knife;
- drill (a screwdriver attachment is welcome);
- pliers;
- perforator;
- dowels and screws;
- angle ruler;
- pencil;
- roulette.
In addition, you will need the plasterboard sheets themselves, putty and U-shaped metal profiles. Then you need to select a design sketch. You can build a cabinet under the heating device (standing option), or make the box hang above the floor. Make sure the battery is in good shape. If the old paint has peeled off, it must be completely torn off and the device repainted.
[my_custom_ad_shortcode2]
DIY frame installation
The material for constructing the frame structure to which the plasterboard sheathing will be attached is usually metal profiles (racks and guides) made of galvanized sheet.
These products are resistant to corrosion and rust, and therefore their use ensures a long service life and the absence of serious problems during operation.
Work on the manufacture of a frame structure consists of the following stages:
- Marking the lines and contours of the frame on the floor, walls and ceilings, made with a simple pencil using a level and plumb line.
- Installation of guide profiles in accordance with the marks and their fastening to the wall using dowels.
- Installing three vertical rack profiles and measuring the distance between them.
- Inserting rack profiles into the guides and attaching them to each other using small special screws called “bugs”.
After the specified work is completed, the frame for the planned cladding can be considered ready, and it is possible to begin the construction of the box itself from plasterboard sheets.
Sewage pipes: fastening pipes in plasterboard construction
Sewage pipes laid horizontally require fastening with special clamps; they are designed to be two clamps per full bend of the sewer pipe (2 meters) or one clamp per part of the bend. When laying vertically, the number of clamps is reduced to one per elbow.
To fasten the clamps themselves, wooden branded traverses (photo) or simple boards are placed into the structure, which are attached to the vertical posts of the partition (structure). The clamps are attached to the wooden embedded screws.
Installation of plasterboard box
- Sheets of plasterboard are prepared for assembling the sheathing, after which they are cut into fragments of the required size.
- The blanks are inserted between the profiles and placed for subsequent fixation.
- The plasterboard blanks are attached to the frame using self-tapping screws. The heads of the screws should sink into the drywall no more than 1 millimeter. Drywall sheets are screwed to the frame on both sides.
- Using a hacksaw, the ends and edges of the used sheets protruding beyond the structure are sawed off. The edges in the places of cuts are leveled using a diamond mesh No. 100.
At this point, the assembly of the box itself can also be considered complete, and the next stage is the transition to its lining and additional work.
Which is better: heated floors or radiators?
Warm floorBatteries
Processing and finishing of plasterboard sheathing
If we are talking about how to cover heating pipes with plasterboard, or you need to enclose the heating system as a whole with a duct, then it becomes important to have holes in the casing for heat to escape into the room. It is desirable that such thermal holes have a diameter of five centimeters or more, but they can be replaced by a large number of small holes.
During the summer period, the thermal openings are not used, and in order to prevent dust and other particles from becoming clogged in them, it is recommended to close them until the next winter. A convenient option is commercially available rotary lids that can be left open in cold weather and closed during the spring and summer seasons.
If it is necessary to enclose ordinary household pipes in a box in the kitchen or toilet, or the question is how to cover the pipes in the bathroom with plasterboard, then the presence of such holes is not required.
In addition, the lining and additional arrangement of the plasterboard box involves several types of work:
- Sealing fastening points, slots and seams. As a rule, ordinary polyurethane foam is used for this purpose.
- Strengthening the external and internal corners of the box with steel corner profiles, which not only helps align the corners, but also provides additional protection from accidental mechanical damage.
- Inserting a flange for the hood into the upper part of the mounted box.
- Putty work followed by sanding with a trowel mesh or sandpaper.
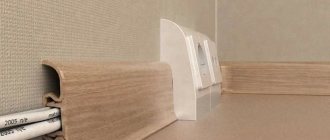
- Decorative finishing of the erected cladding structure. There are quite a lot of options to choose from here. For example, the box can be covered with wallpaper, painted in the desired color with paint or emulsion, covered with self-adhesive furniture tape, the use of liquid wallpaper, decorative plaster, etc. Which option or style to choose depends on the imagination, taste and preferences of the home owners .
As you can see, covering pipes with plasterboard does not present any particular difficulties and does not require high professionalism or sophisticated equipment. This explains the popularity of plasterboard boxes for enclosing pipes and other structures. Any self-taught home craftsman can make them if he carefully reads the instructions and observes accuracy and thoroughness in his work.
Gas
- Is it possible to hide gas pipes in an apartment??
Where there are no threaded connections on them - absolutely. Gas-powered steel pipes, provided the paint on their surface is preserved, do not rust or wear out, and their service life is almost unlimited.
Exception: do not close the steel gas pipe at the entrance to a private house. In winter, when the temperature outside is noticeably lower than in the house, cooling the input during gas flow will cause condensation to form on it. On an open pipe it will quickly evaporate, and on a closed pipe it will lead to rust over time.
- Is it possible to cover gas pipes with plasterboard on a galvanized frame??
The material of the box or niche at a distance from the stove does not matter. Absolutely any finishing materials can be used - gypsum plasterboard, gypsum fiber board, wall panels, plywood, OSB, etc. But near the slab, it is better to use non-combustible materials for the box, including drywall.
- Is it possible to sew a gas pipe at the connection to the gas meter??
No. All threads, taps in front of gas appliances and the meter itself must be accessible for dismantling and maintenance. If there is a leak at any connection, the accumulation of gas in the box is simply dangerous, and it will also interfere with identifying the leak and carrying out repair work. Don’t forget about the need to check the meter: after a few years it will have to be removed.
The valve, threads and counter (if available, of course) must be accessible.
How to cover pipes with plasterboard
Major home renovations often involve replacing pipes. After the installation of pipes or radiators is completed, it becomes necessary to hide communications to create a favorable appearance for the walls in the bathroom, toilet or any other room. A lot of work done during the renovation period using expensive tiles, heated floors and attractive plumbing fixtures, and a lot of effort put into creating a pleasant interior can be in vain if you do not think through the camouflage of communications.
For such work, various materials are used, but the most acceptable is the use of plasterboard, from which the box is made. Why does the choice fall on drywall?
The advantages of a plasterboard box for covering pipes are due to the following:
- affordability of drywall;
- ease of production of plasterboard structures.
- environmental safety of drywall, characterized by the absence of harmful substances in its composition. This is especially true in the manufacture of boxes for batteries and heating pipes that generate heat when heating rooms.
A little information about drywall. This popular building material is characterized by a multilayer structure with alternating gypsum and paper layers. Drywall sheets are available for sale in sizes of 2.5 by 1.2 meters. One sheet of drywall will be enough to make a box for the fan riser.
Note!
To construct a box in rooms with high humidity, such as a bathroom and toilet, you should use a moisture-resistant type of plasterboard.
Final finishing
Now you know how to cover a battery with plasterboard. In order for the box to acquire a finished look, it must be properly finished. Algorithm of actions:
- The joints between sheets of drywall are carefully sealed. You should have a smooth surface ready for further processing. First, you will need to apply a sickle mesh to the joints. After this, the surface is puttied.
- The places where the fasteners are installed are processed in a similar way.
- Want to strengthen corners and sharpen lines? Place perforated corners on the drywall.
- The box is puttied.
- After drying, the walls are leveled.
- The final stage is sanding (fine-grained sandpaper is used for this).
Having completed the finishing touches, you can begin decorating your box. The finishing technique will depend on the features of the interior and the overall color scheme.
[my_custom_ad_shortcode6]
Materials and tools
Before you start making a box, you should consider a set of tools and materials.
Materials and tools:
- sheet plasterboard;
- metal profile (guide and rack);
- dowel-nails, self-tapping screws for fastening parts of the box;
- special knife for cutting drywall.
You will need materials such as polyurethane foam, shock-absorbing tape, putty to level the surface of the box. Tools that will be useful are a drill, a hammer, a screwdriver, a tape measure, a level, a plumb line, and a pencil.
Preliminary work
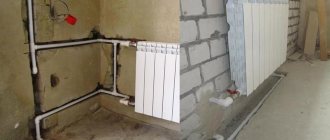
Preparatory work includes processing steel heating pipes and radiators (heating radiators), from which old paint is removed and, if necessary, new paint is applied. Paint as an insulating material will protect metal pipes from premature damage by rust. These works must be completed before installing the box, which will subsequently block access to the pipes.
The above work will not be required if the box being manufactured will be used for sheathing plastic water pipes.
Note!
You can continue installing the box only after the paint on the pipes or batteries has completely dried.
Advantages and disadvantages of a protective box
Having a box covering the pipelines has its pros and cons. The advantages include:
- Ability to hide unattractive pipelines from view.
- The decoration of the room is carried out in the same style, there are no unnecessary elements in sight.
- Communications are protected from accidental damage, mechanical impact and other unwanted contacts.
- The tightness of the box allows you to protect the room from sewer gases.
- The surface of the walls and boxes can be easily and efficiently cleaned of dirt and treated with detergents and disinfectants.
The disadvantages include:
- Access to pipelines is difficult.
- Repair work becomes impossible without dismantling the box.
- The occurrence of leaks, cracks, and other deficiencies in the water supply or sewerage systems become visible only at a later stage, when considerable damage has been caused to the premises or to the neighbors below.
Note! To reduce the negative consequences, it is recommended to create collapsible structures that can be removed without harm to the facing materials. As an option, it is recommended to install inspection hatches to allow access to the pipelines to perform the necessary actions.
Inspection hatch in the box
Installation of the frame and its covering
The plasterboard box is fixed to a strong metal frame with vertical and horizontal elements made of profiles.
Note!
When alternating horizontal elements, a step of 60 cm must be observed.
The finished frame is sheathed with sheets and strips of plasterboard, pre-cut to fit the dimensions of the frame. Plasterboard parts are fixed to the profiles using self-tapping screws. They are screwed into the drywall with a small recess so that they can be hidden under a layer of plaster.
There are several methods for covering pipes with plasterboard:
1. Carry out “preservation of the vent riser pipeline: remove rust from the pipes, replace damaged sections of the pipeline, prime or paint the pipes, seal the joints between sections of pipes.
2. Work on installing the casing box should begin from the bottom. This means that the dimensions of the box, taking into account its contours, should be marked by drawing straight lines using a corner, starting directly from the floor surface - to the left and right of the pipe. Sections of profiles of the required length are fixed horizontally using dowels along the lines drawn on the floor. Horizontal profiles are installed in the same way on the ceiling (or in another place at the top of the future box). Vertical profiles are attached to installed horizontal ones. Next, the remaining horizontal profile elements are added in increments of 60 cm.
Note!
The vertical profile elements are attached to the horizontal guides using special self-tapping screws.
3. Cutting plasterboard blanks is carried out after the final installation of the profile frame. Drywall is cut with a special knife, often used for cutting wallpaper. On the front side of the plasterboard sheet, lines of the external dimensions of the individual sides of the box of profiles are drawn. Furrows are applied along these lines with a knife, one at a time for each workpiece. The cut plasterboard blank is simply broken and then cut on the back side of the plasterboard sheet.
Note!
Plasterboard blanks are secured to the box frame using ordinary metal screws.
4. Arrangement of a window (ventilation hole) in a plasterboard box opposite the fitting (taps and connecting devices on pipelines). The need for such a window is obvious - during operation, regular inspection and repair of the sewer system is necessary.
Only after you have learned how to cover pipes with plasterboard and have completed all the work on installing the box, can you begin finishing work. They may include applying plaster to the surface of the box and then painting it, or lining the box with ceramic tiles.
The common property includes an in-house engineering drainage system, consisting of sewer outlets, fittings (including bends, transitions, pipes, revisions, crosses, tees), risers, plugs, exhaust pipes, drainage funnels, clearings, branches from risers to the first butt connections, as well as other equipment located in this system. Many apartment owners, after completing the installation of pipes or heating systems in the house, are wondering how to cover them with an outer box and what kind of cladding to use for this. Everyone has their own preferences in this matter, but the material that is most often used for this purpose is drywall.
Horizontal routes
Horizontal water supply and sewerage routes can pass through:
- Inside the partitions are made of plasterboard;
- Walk along the wall and cover it with a plasterboard structure.
The second option, wall mounting, is carried out according to the standards, with fastening on clamps or clamps and traverses. See the tables above for horizontal mounting distances. The distance from water supply and heating pipes to plasterboard structures should not be less than 35 mm. (clause 3.3. SNIP 3.05.01-85).
If water supply (heating) pipes pass inside a plasterboard structure (partition), then cross-beams are installed along the route of the pipes for fastening. The distance between the traverses is 50-60 cm for polypropylene pipes and 1.5-2 meters for steel pipes. Pipe diameter up to 20 mm. See the tables above for other mounting distances.
Crossbars for horizontal pipes are mounted vertically. To attach the crossbars themselves to the partition structure, it is necessary to install horizontal profiles (PN) of plasterboard. If there are a large number of pipes, PN profiles must be replaced with traverses or UA profiles.
How to sheathe pipes with plasterboard - do-it-yourself finishing options
The material for the construction of the frame structure to which the plasterboard sheathing will be attached is usually metal profiles (racks and guides) made of galvanized sheet. Plasterboard sheets meet all the specified requirements well, and although other materials can be used to construct the box, they are preferred in a number of ways reasons: Working with this material is not difficult, and therefore the involvement of professionals is optional, and if you have some skills, you can cover the pipes with plasterboard with your own hands. Many apartment owners, after completing the installation of pipes or heating systems in the house, are wondering how to cover them with an outer box and what kind of cladding to use for this. Everyone has their own preferences in this matter, but the material that is most often used for this purpose is drywall.
Upon completion of the above work, before covering the pipes in the room or bathroom with plasterboard, you must first prepare a reliable frame for its fastening.
Other solutions
You can cover radiators in a room not only with sheets of drywall. Some apartment owners install standard boxes from this material, and change the front panel to something more original. Here are the most typical solutions:
- Radiator grille (plastic or metal). Among the advantages of such designs, it is worth noting good heat transfer and constant access to the battery. The main disadvantage is the trivial design.
- Built-in niche. The pipes are covered with casing, and the battery itself is hidden behind a folding screen. The main advantages are the easy accessibility of the unit in case of breakdown and minimal heat losses. A good option for a kitchen where saving space is important.
- Wooden lattice wall. It harmonizes with classic interiors and allows you to quickly get to the battery in an emergency. Cons: cumbersome, low functionality.
The technique of installing a plasterboard box is quite simple; anyone can master it in a short time. Don't let radiator pipes ruin your interior.
[my_custom_ad_shortcode1]
Is it possible to cover heating pipes with plasterboard?
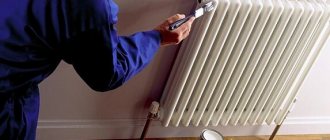
Use a galvanized metal profile that is not susceptible to corrosion due to high humidity. It is better not to use wood for the frame. Before hiding the heating radiator, it must be prepared. It is very convenient when modern batteries are used, but with cast iron ones you will have to tinker. Usually, through the holes in the structure covering the battery, it is still partially visible, so you cannot ignore the finish of the device itself
- Streams of warm air should not encounter obstacles on their path. This ensures uniform heating of the entire room.
- All threaded connections and air and water relief valves must be easily accessible.
- When the box is joined to the flooring, three main lines are immediately measured and marked - two side and the front.
- If it hangs, then remove the distance from the floor. Mark a line on the wall and check it for level.
Let's start with a question regarding the heating riser. Not everything is so categorical here; if you really want to, you can cover it with drywall. But at the same time, a number of certain factors must be observed. When carrying out repair work, remember that heating pipes and radiators should never be covered with plasterboard boxes and partitions.
But with a riser it’s a little easier, the main thing is to follow the recommendations described above.
- clearing the site for future work;
- wall primer. If you need to close the gas pipe, prime it with an anti-mold and fungal agent;
- We apply markings on the walls corresponding to the drawing.
Note! The drawing needs to include the dimensions of the frame and the thickness of the plasterboard sheets. The drawing will help you accurately calculate the amount of materials needed for the job.
Technology for assembling gypsum plasterboard structures - step-by-step instructions
The general technology for assembling frames consists of three main stages of work:
- Creating a frame.
- Sheathing the frame on the outside with plasterboard.
- Finishing the surface of the box.
Video - How to make a box for pipes in the toilet
Let's look at these stages in more detail.
Frame making
The pipe box consists of two mutually perpendicular planes, attached to the wall and the floor (for horizontal distribution) or to two adjacent walls (for a vertical riser). Therefore, the frame is also made of two gratings perpendicular to each other, fixed to the corresponding surfaces of the walls or floor. The order of assembling the frame is determined by the configuration of the room and the location of the pipelines.
First, you need to attach the main guides to the load-bearing surfaces of the walls or floor, to which the rack elements will be attached, connected by an edge from another main profile. They are connected using special self-tapping screws; at the joint areas, the side shelves are cut with metal scissors and bent to connect the elements more tightly. If wooden blocks are used, first assemble two gratings, which are then attached to the wall on one side and to the floor on the other (or an adjacent wall if you need to cover the riser).
Wooden frame for the box
Step by step procedure:
Step 1. Surfaces are freed from foreign objects (hooks, hangers, mirrors, etc.).
Step 2. The frame is carefully marked. The position of all lines is controlled by a building level or plumb line. The distance to the edge of the frame is determined by the area where the pipes protrude further from the walls, plus 5 cm for the width of the guides or wooden blocks.
We make markings
Step 3. Using an electric drill or hammer drill, prepare sockets for installing dowels. The installation step of fasteners is determined by the size and location of the box, but not less than 0.7 m.
Making holes for dowels
Step 4. Cuts are made on the side walls of the metal main guides where the crossbars are attached.
Step 5. The main guides are installed on the walls and fixed with self-tapping screws.
Fixing the guides
Step 6. Install pre-cut cross members.
Step 7. Both sides of the lattice are connected with an external rib from the main profile, in which cuts have been made in advance for attaching the crossbars.
Metal frame for vertical pipes
Installation must be done as firmly and accurately as possible. It must be taken into account that any mistake made when assembling the frame will subsequently affect the appearance of the box. Distortions will become noticeable when laying tiles or wall panels that have clear geometric shapes.
Important! To connect metal elements, you will need a screwdriver and a bit that matches the size of the screw slot. It is almost impossible to screw a self-tapping screw into a galvanized metal profile by hand, allowing it to fit under the drill bit. Alternatively, you can use an electric drill. Two fasteners are installed at each connection.
Self-tapping screws for metal with a drill tip
Drywall installation
After completing the assembly of the frame, they begin to cover it with plasterboard. First of all, you need to cut pieces of material corresponding to the sides of the box. It should be noted that the first will exactly repeat the shape of the frame, and the width of the other will increase by the thickness of the sheet. It is best to cut off and immediately attach one of the pieces (either horizontal or the one without inspection hatches) so that the size of the second piece can be measured without errors.
Attention! Drywall is a fragile material; if handled carelessly, it can crack or break in half. Before starting work, you should prepare a workplace where the sheets will be reliably protected from mechanical influences. The gypsum board should be cut on a level, flat support so that it does not sag.
To cut drywall, use a hand saw with fine teeth and a slight spread, a jigsaw, and sometimes a regular stationery knife. They cut the sheet along a ruler, break it along the smooth edge of the table and finally cut it off along the fault line.
Cutting drywall with a utility knife
The resulting edge is rarely perfectly smooth, so it is additionally processed with a plane or a special grater. During cutting and processing, a large amount of gypsum dust is raised, so you should work with safety glasses and a respirator. In addition, you cannot work in rooms where computers are installed - fine gypsum dust has a fatal effect on fans, completely depriving them of their functionality and jamming the bearings.
The material is fastened to the frame using phosphated plasterboard screws. They are black with a fine thread pitch. You can also use ordinary wood screws, but you need to be more careful at the final stage - they have a larger thread pitch, so the head may go too deep into the surface of the gypsum board. It is recommended to make the distance between adjacent fasteners in the range of 10-15 cm.
Self-tapping screws for drywall
A socket for installing an inspection hatch or a window for taking meter readings is cut in place. First, mark the surface and drill holes in the corners. Then a hole is cut out of them according to the markings, the dimensions of which correspond to the size of the hatch frame.
How to cover walls with plasterboard if heating pipes are in the way
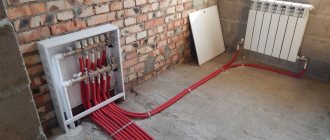
A good alternative to corrugated stainless steel would be copper on soldered joints, but the problem is that it forms a galvanic couple with aluminum, which leads to electrochemical reaction of one of the metals, and aluminum radiators are often used in heating systems. The structure of rack profiles is fastened with transverse inserts for strength. Sometimes a shock-absorbing tape is laid. It is believed that it absorbs vibration, due to which the frame will last longer. First you need to install rack profiles. Their number and length will depend on the room where the renovation is being carried out. For example, to insulate pipes in a toilet (where the riser is usually located in the corner), three profiles are required; if the pipes are located vertically or horizontally in the middle of the wall, then four rack strips need to be fixed. That is, the pipes are placed either in a square or in a triangle - it depends on the wishes of the owners and the characteristics of the room.
If necessary, then upon completion of the installation of the metal structure, we attach soundproofing materials. It is best if you carry out these actions simultaneously with covering the walls with plasterboard. Once the installation of the frame is complete, you can begin to cover it with plasterboard. Sheathing
happens as follows: To obtain clear and even corners, use a metal corner. A putty solution is placed inside it and, pressing the corner tightly to the edge of the box, stretch it over the entire surface. Then the wall is leveled with a thick spatula, cleaned and primed.
The resulting surface becomes suitable for subsequent finishing with paint, wallpaper, tiles, and tiles.
Marking for the box
After waiting for the paint to dry, start marking. You will have to take accurate measurements of the battery (errors within a millimeter are allowed). Use the following tools for this:
- roulette;
- building level;
- ruler-square;
- pencil.
The width and depth of the structure depend on the size of the radiator. The minimum margin along the edges should not exceed 10 centimeters. Narrow window sills need to be dismantled, since the gap between them and the battery must be at least 3 centimeters. Drawing markings is divided into three stages:
- Drawing horizontal lines. You will draw a line along the hanging level. If you plan to install a “standing” box, draw three lines at once (depth and leading edge).
- Applying vertical markings. Attach the square to the bottom edge and draw a perpendicular. Use a level to mark the required size.
- Marking connection. The lines should meet above the battery. The unifying function is carried out by the horizontal segment.
Make sure that in front of you is a square (or rectangle) whose vertical lines correspond to a plumb line. Double check the accuracy of the markings - you will not be able to correct any defects later.
[my_custom_ad_shortcode3]
How to cover heating radiators and pipes with plasterboard: 12 pressing questions during repairs
Steel pipes are known to be susceptible to corrosion. The first through fistulas appear where the metal is thinner - on the threads of the connections and on the welds.
- The connections between the radiator and the hoses are detachable and leak from time to time. Carrying out repairs inside a box that does not allow you to turn the union nut or radiator cap with a wrench is not an option;
- On the upper floors, radiators are equipped with air vents. The box deprives the owner of free access to the Mayevsky crane;
Use a removable decorative screen. It should be dismantled as simply as possible, without tools if possible, and be mesh or lattice on all sides, including the top. However, it is much easier to clean grease plugs not with a cable, but simply by disassembling the pipes and shaking out the grease in the trash. Of course, this can only be done with an open sewer line.
If you cover steel pipes or any material with serviceable connections (for example, metal-plastic on compression fittings), you will create problems for yourself. The box will have to be disassembled at the first leak.
Additional information on the topic:
- How to calculate the number of profiles for drywall on a ceiling calculator
- Distances between profiles when installing plasterboard ceilings
- Photo of beautiful plasterboard ceilings in the hall with lighting
- Forms of plasterboard ceilings for a room photo
- Is it possible to seal seams in drywall with gypsum plaster?
How to treat the surface → Room decoration → How to choose the right paint → Surface treatment technologies → Leveling and finishing the walls → Selecting and applying a primer → Removal from the surface → Stretch ceilings and technologies → Reviews and testimonials
Useful tips
In order not to deteriorate the quality of heating and to disguise the battery as beautifully as possible, it would be a good idea to listen to a few useful tips:
- It is better to install a decorative screen made of plastic or metal. The material has good thermal conductivity. The wooden lattice looks beautiful. However, such a screen is bulky, heavy, and has low thermal conductivity.
- When the heating is running, warm air from the battery, according to the laws of physics, is directed upward, where it encounters an obstacle in the form of a window sill or the upper edge of the box. For better convection under the window, it is optimal to make a false wall where the lower and side ends of the niche will be closed. The upper end is not closed so that warm air is directed to the window sill, and a decorative ventilation grille is cut into it. The front part of the niche is similarly covered with a screen.
- To improve heat transfer, the surface of the niche is covered with foil material.
None The video shows an example of battery casing:
[my_custom_ad_shortcode5]