Laying heating pipes in the wall
In previous articles we talked about what kind of pipes can be used for a home heating system, and today we’ll talk about attaching heating pipes to the wall.
Attention, here is useful information and answers to the questions of whether heating pipes can be hidden in a concrete wall and what devices are available for attaching heating pipes to the wall.
How to hide heating in a concrete wall
To hide heating pipes in the wall, you can go in two ways:
- cut grooves in a concrete wall;
- erect a new false wall.
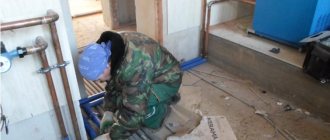
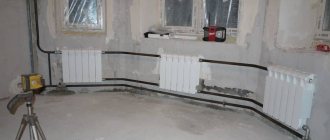
Let's consider a method for laying heating pipes in the wall of a multi-story building. Naturally, this is possible if a new circuit is assembled, or structural changes are made to the old one. Since initially the wall and the heating system are in different planes. In order for them to be located in the same plane on the wall surface, you need to cut out channels and place communications in them. What you need to pay attention to:
- Before removing the heating pipes, the riser is closed in the wall to cut off the old heating. There is no need to make hasty decisions. Make sure to turn off the required riser, as using an electric angle grinder can result in an electric shock. This is the case if water begins to flow like a fountain from the cut;
- wall thickness - if you decide to hide communications in thin walls and the depth of the groove will be more than half the thickness of the partition, it is better to abandon this idea. For example, in the bathroom. In a panel house, the bathroom is a separate concrete block. The thickness of its walls is not enough;
- groove sizes. They should not be end to end and in no case should they restrict the contour, resting against the ends or walls. It must be cut taking into account the mounting for the heating pipes, its diameter and insulation;
- isolation of communications. Before walling up heating pipes in a wall in a panel house, they must be insulated from concrete, since condensation may form on their surface;
- fastening communications in the groove. Before attaching heating pipes to the wall, identify key locations. These are connections and segments that change the vector of coolant motion.
To make it easier to tap walls, you need to use a grinder and a hammer drill. First you need to mark where the heating will be hidden, and then use a grinder to cut along the marking lines to the required depth. Then use a hammer drill to knock out the concrete between the slots. Please note that when working with an angle grinder there is a lot of dust and noise too. There are modern professional tools for cutting grooves that are connected to a construction vacuum cleaner. There is no dust at all when working with such a tool in the room.
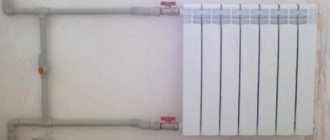
When bricking communications into a wall, they must be securely secured in channels cut into the concrete (grooves). The fastening of heating pipes to the wall is selected to a certain diameter.
According to the rules, all docking points must be freely accessible. Naturally, these include equipment installation sites: meters, filters, pumps, taps, etc. That is, only those areas in the wall remain where leakage is minimized.
Methods for masking pipes
Before hiding heating pipes, you need to answer several questions. For example, what dimensions do they have, what is the temperature of the room during the heating season, since if it is low, then you need to use a material that will conduct heat well, and also how much money you are willing to spend on masking them. Depending on this, you can choose to hide a plasterboard structure, build a false wall, or hide heating pipes in an existing wall.
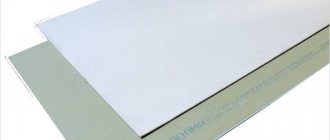
We use drywall
Plasterboard structures are perhaps the most affordable and quickly erected today. They help not only to hide communications, but also provide trouble-free access to them if necessary. Moreover, if you provide for the presence of a door in a plasterboard structure, then in the future during repairs you can do without dismantling it. How to create a plasterboard box?
Before hiding heating pipes in drywall (see photo), they must be inspected for defects. If they exist, shortcomings must be eliminated immediately. Next, for communications it is necessary to make a special waterproofing shell, for example, from foamed polyethylene. Only after this can you proceed to the construction of the box. It is best to attach plasterboard sheets to metal profiles, and use self-tapping screws as fasteners, the pitch between which is usually about 30 centimeters.
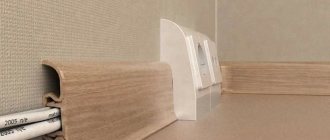
If for some reason a plasterboard box cannot be used, a great solution to hide communications would be to build a false wall, as in the photo. It can be made from ordinary wall panels, inside which soundproofing material is placed. The only drawback of this method is that the false wall takes up quite a lot of space, which is not suitable for small rooms. In order to somehow use this space, in such a false wall you can make shelves and niches in which to place interesting interior details or books.
Hiding in the walls
You can hide heating pipes in a more radical way. During repairs, they can be recessed into the wall (see photo). But it is worth noting that this option requires quite serious and difficult work. To disguise heating pipes in the wall, a recess is made according to their size. Usually a hammer drill is used for this, but if necessary, you can also use a simple chisel and hammer. Before masking, communications are hidden in special polystyrene foam insulation, which allows heat loss to be reduced to a minimum. After the work is completed, the recess is sealed with alabaster, and the wall itself is leveled.
Pipes of various communications passing through an apartment, office, in the premises of schools and kindergartens undoubtedly spoil the appearance of any room, and the question often arises of how to hide heating pipes during repairs.
How to hide pipes is an easily solved question these days. You can hide them:
Let's consider methods and means of masking heating system pipes in more detail.
Examples of hidden heating pipes
How to hide communications behind a false wall
Heating hidden behind a false wall
Everything is quite simple here. You need to build a structure from metal guides and sew it up with any material you like:
- drywall;
- blockhouse;
- lining and others.
There is a myth that this reduces the usable area of the apartment. Fortunately, this remains a myth. If you need to hide pipes, these are usually places under or next to a window. All the space that is above a meter in these areas is absolutely not used in real life. The maximum that can be lost is 15 cm under the windowsill. At the same time, the window sill itself will accordingly become 15 cm wider. Agree that adding to the width of the window sill is much better than the same unused space under it. You can also insulate the walls from the inside.
There is an option to leave everything as it was originally, that is, the communications are attached to the wall and there is no need to hide anything. But, if we are talking about high-quality modern repairs, this option is unacceptable.
Finish price
Many people who have decided to decorate pipes in their apartments have a question about which method is the most economical. Answering this question, we can immediately talk about painting. If, for example, you choose alkyd enamel as a painting material, then a can will cost you no more than 200 rubles.
Drywall is also an available material for decoration. The cost of sheets of this material starts at 200 rubles. But they alone will not be enough to decorate heating pipes. You will also need profiles, the average price tag for which starts from 50 rubles. You will also need skirting boards, the cost of which starts from 20 rubles.
In order for the plasterboard structure, behind which the pipes are hidden, to look aesthetically pleasing, putty is necessary. Prices for such compositions start from 100 rubles. If you decide to build a false wall, then in this case you will have to spend much more on material. You can't get by with drywall. You will also need to purchase wall panels, prices for which start at 150 rubles. for 1 sq. m. You will also need screens for radiators, which cost 300 rubles in stores.
You can also decorate heating pipes in an apartment by using jute rope. This material is quite inexpensive. The maximum price for it is 120 rubles. for 1 linear meter. You can also use hemp rope, prices for which vary from 10 to 880 rubles. The most expensive method is stained glass. If you choose this option for decorating pipes in your apartment, you will have to pay several thousand rubles for this pleasure.
To isolate or not
If we consider the insulating material only as insulation for heating pipes in the wall, then it need not be used. Let's decide why we need to insulate walled-up communications. Obviously, so that the heat does not go to God knows where. And in the case of walls, it can only evaporate through surfaces in contact with the street. If communications are hidden in the internal wall, then the problem of heat loss is not a problem at all. All the heat that the coolant will give to the concrete, and it, in turn, will give off heat to the air in the room.
At the same time, insulation of communications is carried out not only for thermal insulation. It is important to create a barrier to liquid - waterproofing. After all, the temperature in the heating is quite high and condensation can form when interacting with the wall. Where there is moisture, there is fungus, which is absolutely unacceptable. Another very important function of insulation is protection against mechanical stress. For example, when a groove is sealed. But the most important thing is the thermal and linear expansion of the pipes when heated. That is, when heated, they change their geometry, becoming larger in diameter and longer.
Options for insulating heating pipes in the wall, pros and cons:
- polyurethane foam.
In principle, any one will do, but better, of course, is a professional one with a low expansion coefficient. Such foam is more expensive, but it will secure the communications in the groove and will not change their location. While ordinary foam, if the heating is not sufficiently fixed, can disrupt the geometry of the system;
- foamed polyurethane or expanded polystyrene.
Foamed polystyrene insulation
This material is resistant to high temperatures and does not allow water to pass through. In addition, it creates the necessary buffer zone for thermal expansion. Such materials include Energoflex. It is produced in rolls or in blanks in the form of pipes. In the latter case, the internal diameter coincides with the standard pipe sizes and there is a slot along the product. The outer part can be made of foil for greater thermal insulation. The insulation must be put on in such a way that the slot faces upward and before the heating pipes are attached. If condensation occurs, it will not leak out or be absorbed into the wall;
- corrugated pipe
A product made of plastic or metal that only protects against damage and provides space for thermal and linear expansion, which is accompanied by pressure changes.
Before bricking the heating into the walls, it is necessary to insulate it. It's not about thermal insulation or even protection from mechanical damage. The main task is to give the system space for thermal and linear expansion.
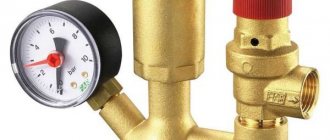
When the insulation and strengthening are completed, all that remains is to check the circuit for tightness and resistance to loads. To do this, pressure testing of the heating system is carried out. These are hydraulic or manometric tests that are carried out in accordance with regulatory documents and SNiPs. After this, you can think about how to seal the heating pipe in the wall. Plaster or cement will do.
Features of decorating pipes in a private house and apartment
There are more options for hiding heating pipes in a private home. Internal communications of private buildings are in no way connected with neighboring ones and, accordingly, if necessary, can be laid and re-routed as they please. If changes to the configuration of the heating system are planned in an apartment building, then the interests of all residents must be taken into account and agreed upon with the operating organization.
Pipes can only be completely hidden during construction or major repairs. For this purpose, hidden gaskets are used in the walls or floor. Pipelines with thermal insulation are placed in grooves and covered with mortar or hidden under moldings. In individual heating systems, floor heating can be arranged. In private houses, it is convenient to hide communications between the logs of wooden flooring. All that remains is to cover the intersections of the pipes with the floor with decorative overlays, as shown in the photo.
The biggest inconvenience for apartment residents is the main transit pipelines, which, due to their large size, are difficult to hide. In addition, if you overdo it with the shelter, you can lose some of the heat entering the room. To disguise them, only external decoration techniques are suitable.
When decorating heating pipes in your home, you don’t have to worry about changes in their heat output. In individual systems, room heating will remain the same, only the ratio of the amount of heat supplied from pipes and radiators will change. But in apartments with centralized heating, you have to save every kilocalorie of thermal energy and leave the pipelines as open as possible.
One way or another, any actions in relation to the elements of the heating system affect its functioning. Before taking drastic measures to move pipelines out of sight, you should study the complete layout of the existing wiring and analyze the possible consequences.
Important! Hidden laying can only be used if new high-quality pipes without threaded connections are used. All dismountable areas and fittings must remain accessible for maintenance
This is especially important in apartments, where the occurrence of an emergency situation is fraught with flooding of neighbors.
In some cases, the best option is to decorate openly laid pipelines and radiators. This allows you to make them invisible at minimal cost, without compromising the integrity of the walls and floor and without changing the configuration of the heating circuit. At the same time, all design parameters of the heating system and free access for ease of operation are preserved. When choosing how best to decorate a heating pipe in a room, you should be guided by both aesthetics and functionality considerations.
How to attach it to the wall
Various devices are used to attach communications to the wall. They are rigid and sliding (floating). The fixed support for the heating pipes holds with a death grip, and there is no possibility for the contour to move. In sliding fasteners, the pipe may move slightly during linear expansion. In the circuit, rigid and sliding fasteners should alternate.
Types of fastenings:
- metal clamps.
Clamps
These are fasteners that consist of two half-rings connected by bolts. Tightening is done using a screwdriver. A screw is soldered to one half-ring, which is screwed into a dowel inserted into a prepared hole in the wall. Clamps come with or without a rubber insert on the inner surface of the ring;
- clips.
Designed for fastening plastic heating pipes to the wall. They have a simple design. First, the fasteners are installed, and then the circuit assembly begins. Communications are easily inserted into the mount; fixation is accompanied by a click. This type of fastening cannot be considered the most reliable, since the pipe can jump out of it even with little force. They are not used for products with a cross-section larger than 50 mm;
- plastic tightening clamp.
Unlike metal clamps, these heating pipe fasteners have only one attachment point. Thus, it turns out not two half rings, but one broken one. It is molded in such a way that there is a plastic dowel at the bottom. It is inserted into the drilled hole, and the screw that is screwed into it simultaneously secures the clamp in the wall and tightens the ring around the pipe;
- dowel-hook.
Plastic clips and hooks
It is designed for attaching communications to a flat, straight surface. It looks like a plastic screw with half-arcs at the head. It is twisted or lightly hammered into the prepared hole;
- crab systems.
Used for fastening steel heating pipes to the wall and to each other. Comes in three different forms:
- in the form of the letter “T”;
- in the form of the letter “G”;
- in the form of the letter "X".
It holds communications no worse than welding seams, and has the advantage of being quickly dismantled.
Do-it-yourself installation of a plasterboard box
In order to close the battery, you need to measure it, and then buy metal profiles and other additional products.
- What materials are needed: 12 mm plasterboard sheet, metal profiles 27x28 and 60x27, self-tapping screws for plasterboard and metal, dowel-nails 6x40 in size, construction sickle, perforated corners.
- Tools: screwdriver, hammer drill, metal scissors, craft knife, stapler, pencil, tape measure, building level.
Attention, for the construction of a plasterboard box there is an important requirement: the window sill must extend beyond the radiator by at least 3 centimeters.
Work order:
Installation of the frame. The profile should be mounted on three adjacent sides: floor, wall, window sill. Press the 27x28 metal profile to the base with your hand, drill a hole using a preforator both in the profile and in the wall. Using a screwdriver, screw the dowel-nail into the hole. At the bottom of the window sill, a 27x28 metal profile is mounted on self-tapping screws; the length of the screws should not be greater than the thickness of the window sill. Next, you can install jumpers made of metal profile 60x27.
Selecting the grid size. This hole must be made slightly smaller than the grid size. You can focus on three recommended sizes: 60x120, 60x90 or 60x60.
Installation of drywall. Plasterboard sheets can be cut with a utility knife. Screw it in with a screwdriver.
Installation of corners. They must be secured at the corners with a construction stapler, or attached to gypsum plaster. Serpyanka should be applied to all seams of the plasterboard box and covered with plaster. Before painting or wallpapering, the plasterboard box must be puttied, sanded and coated with primer.
Advantages and disadvantages
To be honest, laying heating pipes in a concrete wall is nonsense. The question is why? What is the purpose of this complex, costly and risky procedure?
The advantages of embedding heating into the wall cannot be called objective. But here are the obvious disadvantages:
- complex installation. Before laying heating pipes in the wall, think about the fact that connecting the elements is very inconvenient. Metal communications are extremely difficult to properly solder in a groove;
- risk of leakage. Moreover, in order to eliminate the leak, you will have to break the entire wall, not to mention the fact that it is almost impossible to directly determine the location of the leak if there is no wet spot on the wall;
- the need to perform complex, labor-intensive processes, such as installing heating pipes in the wall.
If you decide to hide communications in concrete walls, it’s better to think a little more, maybe this idea will go away on its own. Another thing is a false wall:
- convenient access to key system components;
- wide window sills;
- saving money and time.
To summarize, let's highlight the main points. Firstly, there is no need to bury communications in concrete walls; it is better to hide them behind a false wall. Secondly, you need to insulate the pipes and thirdly, securely fasten them using special clamps and clips.
Advantages of external installation of chimneys ↑
The external method of wiring the outlet pipe has the following obvious advantages:
- Removing the main part of the drainage channel from the house allows you to increase the usable living space of the room. The installation of a combustion product exhaust system can be carried out upon completion of the main construction activities. External installation of a chimney will not require you to spend a lot of time and effort.
Easily removable disadvantages of this approach include:
- The need for mandatory insulation of chimney pipes. Possibility of significant heat loss with low quality thermal insulation. The difficulty of combining the design of the chimney with the architectural style of the building.
Despite all these difficulties, when deciding how to make a chimney through a wall, preference is usually given to its external placement (full or partial).
Use decorative elements
There are several ways to beat a riser:
- Make it in a marine style - wrap it with twine, cover it with shells, pebbles and other attributes associated with the marine theme.
- “Nature” style – decorate batteries with twigs, artificial flowers/fruits, glue miniature birds and butterflies.
- A very original solution is to “hide” the riser in bark or bamboo, thus giving it the appearance of a real tree.
- A useful device - make a scratching post for your beloved pet from pipes with your own hands. It is necessary to first pack them with polystyrene foam, then wrap them more tightly with twine. A satisfied animal is a complete piece of furniture.
Each method is good in moderation. The main thing is not to overdo it with the decor, remember about the thermal conductivity of the batteries.
DIY materials
Resources for homemade protective installations for smoke ducts are selected depending on the characteristics of the planned work. Most often, galvanized steel sheets or corrugated stainless steel are used. If the process of arranging a gas duct indoors or on the attic floor is to be done, fire-resistant plasterboard is used. For brick chimneys, wooden protection is sometimes made in combination with basalt insulation and steel cladding. At the same time, do-it-yourself galvanized and corrugated chimney casing models are positioned as durable and effective options.