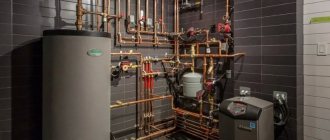
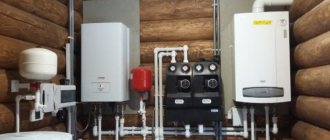
Heavy cast iron and steel engineering systems have been replaced by lighter communications made of polypropylene. Polymers are used for water supply and heating installations in cottages, mansions and even in the country. Connection technology allows you to create reliable networks.
Therefore, it will be useful for developers and future owners of real estate to become familiar with the types and diagrams of systems. This will allow you to control the work of master plumbers or independently create an effective and durable thermal circuit at the site.
Pipe selection
The specific operation of heating circuits also determines the characteristics of the lines used. It is the pipelines that ensure the reliable connection of all devices and elements, forming a single system.
Pipes for heating circuits vary according to the manufacturer, raw materials used, and a number of technical parameters. In the production of pipes for heating networks, various structural materials and their combinations can be used, but it is customary to distinguish several main types.
Plastic
In the production of plastic highways, various types of polymers can be used: polyethylene, polypropylene, polybutene, polyvinyl chloride and other innovative plasticizers based on polyfinyls. The use of polymer pipelines is justified only in low-temperature, low-pressure circuits.
To give plastic components the necessary strength characteristics, polymers are usually used in their production in combination with some kind of reinforcing component.
Polypropylene
Most thermal systems use reinforced polypropylene pipes. This is due to the fact that polypropylene has a relatively high coefficient of linear expansion when heated. The main reinforcing components are aluminum foil and fiberglass. The main purpose of reinforcement is to prevent pipelines from deforming when heated. In addition, there is no need for a large number of expansion joints over long sections.
Solid or perforated aluminum foil between layers of polypropylene perfectly protects the heating main from destruction under the influence of oxygen and significantly increases its service life.
Cross-linked polyethylene
Another type of plastic pipelines are coolant channels made of cross-linked polyethylene. The polymer received its name because of the production method in which the process of cross-linking the links of ethylene molecules occurs.
Pipes made of cross-linked polyethylene are designated PEx and stands for: PE - polyethylene, and the index “x” indicates cross-linking. Sections made of cross-linked polypropylene bend well and are resistant to mechanical loads, so they are often used when laying hidden heating circuits for heated floors.
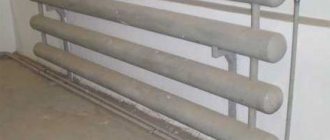
Steel
Pipelines made of steel pipes are giving way to more progressive and less costly types of organizing heating systems. However, almost all apartment buildings, industrial and administrative buildings of old construction have heating systems based on metal pipes.
Steel components of heating networks can withstand relatively high pressures and temperatures, so in some cases their use cannot be avoided.
In private homes they are used less often, but are excellent for laying main pipelines.
Two-pipe heating systems
In a two-pipe heating system, the batteries are no longer connected to one common line, but to two - supply and return. This way the heat distribution throughout the building occurs more evenly. The water reaches each heat exchanger at approximately the same temperature. It is not for nothing that such a scheme is usually used in high-rise buildings with a large number of heated rooms. But it is also often installed in cottages, especially if they are large and have several floors.
The two-pipe heating system has the following advantages:
- Possibility of precise adjustment of room temperature;
- Uniformity of heat distribution in individual rooms;
- High operational reliability;
- It is permissible to repair one battery while continuing to operate the entire system.
The two-pipe heating scheme for private houses has only one serious drawback - price. Its high cost is often mentioned in comparison with its single-pipe analogue. However, pipes in this case require a smaller diameter. Their length doubles here. At the same time, due to the reduction in cross-section, the final estimate turns out to be not as inflated as it might seem at first glance.
By analyzing the types of foundations, we can immediately say unequivocally that a monolith will be more expensive than a strip foundation. When arranging heating for private houses, everything is not so simple and easy. When installing it, pipes of different diameters, various fittings and thermostats are used. The total cost of each variety must be calculated individually for the actual structure and for the specific parameters of the required temperature regime.
With bottom wiring
With the bottom scheme, both pipes are laid above or in the floor. And a pair of taps are connected to the batteries from below. This type of connection is often used to hide heating pipelines behind finishing. This is more of a design decision; it does not provide any special advantages in terms of heat transfer.
Two-pipe with bottom wiring
On the contrary, the lower method of connecting radiators involves the highest heat loss. It is generally not recommended for use in heating systems with natural (gravity) circulation. If this wiring is chosen, you will have to take care of the availability of special equipment for pumping the coolant, and choose a battery with more power. A boiler without a circulation pump cannot supply heat throughout the house alone.
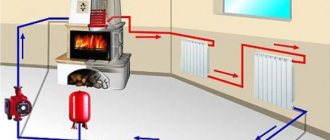
With top wiring
In the upper heating distribution, the connection of radiators to the pipes can be diagonal or lateral. This is not the most important thing here. The main distinguishing feature of this type of water heating is the presence of an expansion tank.
Two-pipe with top wiring
The expansion tank is placed in the attic. The water heated in the boiler actually first enters this storage tank. The coolant flows into the supply pipe naturally from top to bottom. And then the water, after releasing heat in the radiator, is sent through the return line back to the heater.
Which pipes are better
It is impossible to unequivocally answer the question of which material is better. It all depends on the parameters of a particular heating circuit and the capabilities of the developer. If it is better to entrust the design and assembly of the entire heating system to experts in this field, then you can install small sections of polyethylene pipes yourself. The undeniable advantages of polymer structures include:
- simplicity of technology for connecting parts;
- no need to use expensive and bulky equipment;
- smooth inner surface;
- the possibility of using water and various antifreezes as a coolant, which practically do not react with polypropylene;
- low cost and long service life.
Steel pipes differ for the better:
- resistance to high temperatures, pressure, ultraviolet radiation and mechanical stress;
- low coefficient of specific expansion;
- Possibility of direct threading.
Classification of polypropylene hoses
Depending on the conditions of use, in accordance with GOST (ISO 10508), polypropylene pipes for heating a private house or other facility have 5 classes. The third group of long elements is practically not used in the construction of thermal circuits of buildings.
Fragment of heating made of PP pipes
Polymer hoses are classified depending on the operating temperature and coolant pressure:
- Class 1 - used when installing water supply networks with water heated to 60 °C and a pressure of 0.4 MPa;
- Class 2 - used for the installation of water supply systems that can withstand 0.6 MPa and are capable of moving coolant up to 70 °C;
- Class 4 - used when installing low-temperature radiators and underfloor heating up to 70 °C and 0.8 MPa;
- Class 5 - used during the installation of high-temperature radiators with heat resistance up to 90 °C and 1.0 MPa.
Rarely used, class 3 is produced by manufacturers for the installation of low-temperature radiators and underfloor heating systems up to 50 °C.
The maximum temperature for the first and second groups can be 95 °C, for the third category - 65 °C, and for types 4 and 5 - 100 °C. With these values, communications are allowed to operate for a maximum of 100 hours over the entire period of operation.
DIY assembly
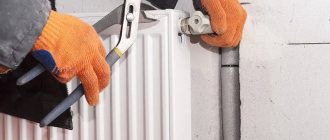
Fastening heating pipes to supporting structures (in an open manner) using special fasteners can be done quite quickly on your own when carrying out repairs.
Quite often, wiring requires cutting walls with laying pipelines into prepared recesses. This method is most often used during the construction phase.
Required tools and materials
For the purpose of installing heating, welding generators, various types of soldering irons, sets of adjustable wrenches, and sealing materials for threaded connections (tow, fumlente, paste) can be used. Joining metal-plastic parts and cross-linked polypropylene pipes may require special crimping tools. The most cost-effective way to lay heating pipes is to connect polypropylene pipes. The only special equipment required is a soldering iron with nozzles of 20, 25, and 32 sizes, which can be purchased for 1000-1500 rubles.
When using foil-reinforced pipes, a shaver may be needed to clean the ends, the cost of which does not exceed 700 rubles.
Drawing and diagrams
Heating is always installed on the basis of preliminary calculations with the drawing up of plans and diagrams. Design determines all subsequent technological operations, so this stage should be treated with special attention.
At the design stage, it is necessary to decide on the wiring diagram, which can be one- or two-pipe, horizontal or vertical, dead-end or with counter-movement of the coolant. Quite popular in low-rise construction is the wiring diagram, called “Leningradka”.
Work order
All installation work must be done in stages. Each stage corresponds to a certain preparation, including calculations, acquisition of parts, and marking of the elements to be connected. To connect polypropylene thermal sections it is necessary:
- cut and strip parts of the pipeline to the required length and prepare fittings;
- install a nozzle of the required diameter on the soldering iron;
- heat the soldering iron to a temperature of 260 degrees. Celsius;
- for a few (5 to 9 seconds) seconds, place the pipe and the element to be connected on the appropriate nozzle in order to melt the polyethylene layer;
- combine the elements and compress until they “set” when cooling;
- connect the sections with the installed heating equipment, perform rigid fixation using fasteners.
Markings on the wall
Installation of PP pipes for cold and hot water supply to the wall is done using clips or clamps.
The correct step size depends on the application of the system and the maximum media temperature.
Comparative table of fastening pitch in centimeters relative to the diameter and temperature of the liquid
| Pipe diameter | Step at 20°C | At 50°C | At 70°C |
| 16 mm | 75 cm | 65 cm | 55 cm |
| 20 | 80 | 80 | 60 |
| 25 | 85 | 90 | 70 |
| 32 | 100 | 95 | 75 |
| 40 | 110 | 100 | 85 |
| 50 | 125 | 110 | 90 |
| 63 | 140 | 125 | 105 |
| 75 | 155 | 135 | 115 |
| 90 | 165 | 150 | 125 |
| 110 | 185 | 165 | 140 |
When marking on the wall, select the appropriate values from the table, obtaining a standard, durable mount.
READ ALSO: PVC Pipes What is this Sign
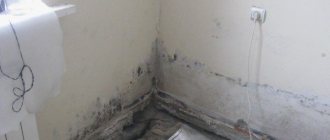
Main mistakes
All stages of organizing heat supply must be carried out with the utmost care.
Soldering of polypropylene joints must be carried out at the recommended temperature, which guarantees that joints with the required characteristics are obtained. Failure to comply with these conditions may result in the need for a complete rework of the system.
Internal and external gasket
Internal laying rules:
- The risers are mounted from pipes with a diameter of 100-110 mm;
- Bends – 40-50 mm;
- Make a slope towards the central collector of at least 3°;
- If mounted under a panel, be sure to wrap it with anti-noise material;
- The distance between the clamps is 50 cm;
- For risers – 1.3 meters.
- Assembly is carried out in closed collectors on a sand bed or box.
- The thread level is laid below the freezing point of the soil.
- The load on the road surface is taken into account.
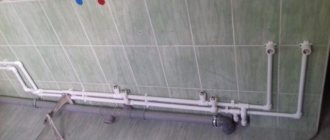
Installation of serial wiring
Sequential wiring consists of laying a main line to which household units are connected using tees. The disadvantage of the scheme is that it reduces the pressure when several consumers are turned on simultaneously. The wiring is installed open or hidden behind false panels.
Do-it-yourself installation of polypropylene pipes includes the following operations:
Drafting
Count the number of points of plumbing equipment (bathtub, toilet, bidet, washbasin) and household appliances (washing machine, dishwasher, boiler) connected to the water supply. Calculate the volume of constant consumption and determine the diameter of the main pipe. The width of the connection tees will be 2-4 mm smaller.
Preparing tools
You need to stock up on a soldering iron, pipe cutters, a chamfer remover, a tape measure and a marker for marking.
Selection of polypropylene fittings
The components must be made of the same polymer as the main pipeline.
Selecting a connection diagram
The wiring is carried out together with connections for sewerage and hot water.