Hi all! Agree that a house made of wood is a warmer structure than its brick and concrete counterparts. But thermal insulation is needed here too. Therefore, today we are discussing the insulation of a wooden house from the inside with mineral wool.
This is a fairly popular insulator. In general, insulation of a log house from the inside can be done using different materials. But until now, mineral wool remains the optimal and most acceptable solution. Yes, if there are flax and hemp insulation, although this is a completely different conversation.
Mineral wool has certain advantages over its competitors. Therefore, the answer to the question of whether it is possible to insulate a wooden house from the inside with mineral wool has an obvious answer. Yes, this can be done. And often it is necessary. It’s just important to do the work correctly.
High-quality insulation of a wooden house from the inside
Construction science recommends external insulation of buildings, since in this case the dew point is located outside the room in the insulation or in the outer layer of the walls.
With such insulation, moisture will not condense on the walls in the rooms. But there are still cases when insulating a wooden house from the inside is the only right solution. For example, if the owner of the house wants to preserve the beautiful appearance characteristic of houses made of rounded logs, or the laws require preserving the historical appearance of the building.
Modern construction science makes it possible to do internal insulation of wooden houses, but for this you need to use the right materials and follow the technology.
Summarizing
Insulating walls with mineral wool, both outside and inside, is the best way to retain heat in your home.
The undoubted advantage of this material is its environmental friendliness. Mineral wool does not cause allergic reactions, its service life is unlimited.
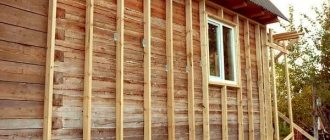
Insulation of wooden walls from the outside using mineral wool is carried out in the same sequence, but without the use of drywall. Here it is better to use external facade siding. It is often recommended to insulate external walls using more modern types of insulation, but this will require completely different technology and other materials, which can cost several times more. In this case, the help of specialists will be necessary. And insulation with mineral wool can be done independently with significant savings in money and time. All work can and should be done in advance.
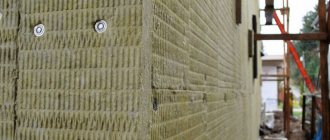
Insulation with mineral wool outside
It is better to insulate external walls with mineral wool on summer days, when the walls are completely dry. There are practically no seasonal restrictions for such repairs within the season. The main thing is that the room is dry and the temperature is at 16-20 degrees. In this case, both wall treatment and mineral wool insulation will be easy.
Technology of thermal insulation of walls with plasterboard from the inside
The technology of insulating the walls of a room with plasterboard from the inside does not require special training of workers or expensive equipment. General construction skills and a universal tool are enough.
Tools and materials
During the work you will need:
- guides (metal profiles or wooden bars);
- gypsum boards;
- insulation in slabs or rolls;
- double sided tape;
- vapor barrier membrane;
- screws, dowels and other fasteners;
- anti-mold agents;
- putty;
- drill;
- screwdriver;
- hand tool.
The floor in the room must be cleared of debris and foreign objects.
Design
At this stage, the type of insulation, gypsum board and guides is selected.
If you are insulating a kitchen or bathroom, you should choose moisture-resistant plasterboard. For the boiler room, it is recommended to use fire-resistant.
Wooden guides are cheaper, but they are at risk of drying out and deforming in the event of temperature changes. The metal profile does not have such disadvantages. The number of guides is calculated based on a standard step of 60 cm.
When calculating the volume of materials purchased, a 5% reserve should be made in case of damage to gypsum boards and for cutting complex elements of walls and ceilings.
Stages of work execution
At the first stage, it is necessary to perform a number of preparatory work:
- clean the walls from dirt and mortar drips;
- dismantle all protruding objects: fasteners, remnants of fittings, sockets, lamps, etc.;
- fill all cracks and irregularities;
- treat with a composition against fungus and mold;
- dry the surface.
Next, marking work begins. Use a plumb line or a laser rangefinder and a chop cord
special attention should be paid to:
- parallelism of the marking of the mounting points of the guides;
- marking in corners and junctions of building structures: arches, window and door openings, columns, bay windows, ceiling beams.
After marking, they proceed to the installation of frame guides.
- The starting profile is glued to the floor using double-sided tape; the adhesive tape will improve sound insulation and protect against drafts;
- vertical profiles are attached to the starting strip with metal screws, and to the wall with screws on dowels.
The process of insulating walls with plasterboard.
A very important stage is laying insulation into the guides. The quality of insulation will directly depend on the accuracy of the work:
- insulation sheets are placed in the guides from bottom to top;
- they should fit between the profiles without gaps, with some effort;
- the sheets are additionally attached to the wall with adhesive or disc-shaped dowels;
- All cracks and gaps must be tightly filled with scraps of material or sealed with foam.
Now it's time to install a vapor barrier:
- penofol is mounted with foil inside the room;
- The vapor barrier membrane is attached with the rough side inward; double-sided tape is used for installation.
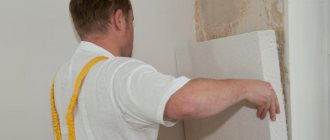
And the final stage is the installation of drywall sheets. They are mounted horizontally, from bottom to top. Before screwing the sheet to the guides, you need to use markings and a level to make sure that it is positioned strictly horizontally. After the first layer is secured along all the guides, the next one is installed on top of it. Here you also need to ensure that the position is horizontal and that the gaps between the sheets are minimal.
As a rule, the size of the room does not allow installing only whole sheets of drywall. Pieces have to be mounted in corners and under the ceiling. Drywall should be cut on the floor, in a horizontal position, on a flat surface. It is enough to cut through the top layer of paper with a mounting knife. Now the cut piece can be broken off along the cut line.
Upon completion of installation, all joints between the sheets should be thoroughly puttied. After the composition has dried, it is leveled with fine sandpaper, achieving a completely flat surface of the wall or ceiling.
Now the surface of the insulated wall is ready for final finishing. Two main types are used:
- wallpaper;
- water-based paint.
When insulating rooms with high humidity with plasterboard, moisture-resistant types of plasterboard with special hydrophobic and antifungal impregnations are used. These panels are easy to distinguish: they are painted green. In wet rooms it is also necessary to arrange supply and exhaust ventilation to prevent air stagnation and mold formation.
What does the cost depend on?
The average price of work in the Russian Federation is from 200 rubles per square meter . The work includes several successive stages. Insulation is carried out separately:
- ceiling;
- walls;
- attic;
- gender;
- attics.
The cost of installing thermal insulation depends on the materials, technology, and location of the work . Insulation of the ceiling, interfloor ceilings, and floors in the presence of an unheated basement is carried out from below. This option is the most labor-intensive, installation of the material is carried out at a height, prices per m2 are calculated taking into account the increased coefficient.
Types of plasterboard insulation
All gypsum board is produced in sheets of size: 2.6 – 3.0 m*1.2 m. There are two thickness options:
- 12.5 mm wall;
- 9 mm ceiling.
Depending on the purpose, the following types of plasterboard are distinguished:
- ordinary;
- waterproof for wet rooms;
- hardened;
- windproof for outdoor use;
- fireproof.
The following methods of insulation with plasterboard are widely used:
Sticker directly on the wall. An adhesive composition based on gypsum or polymer is used. In this case, the area of the room is not “eaten up” and sound insulation is improved. There is no need to talk about any noticeable insulation. The method is applicable only in regions with warm climates.
Mounting on frame guides. The guide system consists of vertical metal profiles or wooden blocks fixed to the wall. Sheets of gypsum board are attached to them with self-tapping screws. This method leads to a reduction in the usable area of the room and provides good sound insulation. The air gap between the gypsum board and the wall plays the role of thermal insulation. The impact of such insulation depends on the windproofing of the space under the sheets - if there are drafts in it, the efficiency will drop to zero. This way you can insulate walls in regions with a temperate climate.
Laying a special heat-insulating material into the guide system under the gypsum board. Only this method is a real insulation of walls with plasterboard; it will work in any region. The thickness of the slabs of thermal insulation material is selected based on the depth of the frame in order to lay them with the highest possible density. In particularly cold regions, insulation is laid in two layers. In narrow places, for example, behind the radiators of a heating system, sheets of foamed plastic are attached.
The most widely used materials for insulating internal walls under plasterboard are:
- Polystyrene foam, or polystyrene foam. Effective, easy to install and cheap material. Its disadvantage is high fragility and chipping. When smoldering and burning, it emits toxic gases and aerosols.
- Extruded polystyrene foam, PPE. Does not crumble, has high strength. Not susceptible to getting wet. It costs more than polystyrene foam and has better thermal insulation. Also, when smoldering, it releases harmful substances.
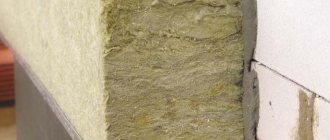
- Basalt wool. Good thermal insulation performance, ease of installation. Does not burn, does not emit harmful substances. Needs vapor barrier.
- Glass wool. The indicators are comparable to basalt. It has an important drawback: when wet, it loses its thermal insulation properties. Requires special attention to vapor and waterproofing. During installation work it emits dust that is harmful to the respiratory system and mucous membranes; it is necessary to work in protective clothing and a respirator.
- Penofol. Foamed polyethylene sheets are flexible and ideal for installation in hard-to-reach places. On one side it is laminated with a layer of foil, which reflects heat back into the room. Does not require additional vapor barrier.
Basalt wool is used under drywall to insulate walls
To protect the insulation layer from water vapor, synthetic membrane materials or thin sheets of foam foam are used.
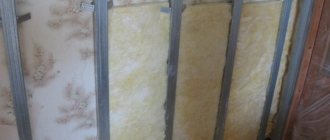
Mineral wool is supplied in slabs measuring 600*1200 mm or in rolls. The slabs are more convenient for laying into guides mounted with a standard pitch of 600 mm. Bowl rolls are used for thermal insulation of floors and for laying in guides with non-standard pitches.
Installing mineral wool
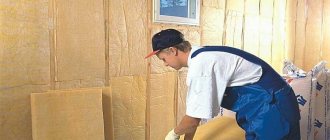
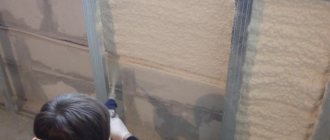
To install insulation on any surface, a working frame or additional partitions are required. The simplest and most effective partition for mineral wool is best made from plasterboard sheets. Builders and ordinary people, depending on their preferences, lay mineral wool in one of two existing ways. In the first case, it is placed behind the drywall, in the second, the insulation is placed in the partition. We will now look at how this is done specifically in each case.
First way
Special fastening brackets are installed on the wall for the profiles to which the drywall will be attached. They are placed vertically with a distance of approximately 50-60 centimeters from each other and screwed to the surface. Almost four to five fastening brackets will be installed on the same line, which is quite enough for both the CD profile installed under the frame assembly and the fastening of mineral wool sheets. We bend the screwed brackets in the shape of the letter “P”. Ultimately, there will be peculiar horns on the entire surface, ready to accept mineral wool. We unravel the roll or take out layers of mineral wool from the bale (depending on the form of the material) and measure out the required fragment depending on the need. At the same time, we give some tolerance. For example, for a wall 2.6 meters high, you should add a margin of ten centimeters - after all, this is not a rigid material, wool can be deformed, so if there is no margin, it may happen that some part of the space will not be covered with insulation.
We place the prepared strip of cotton wool on the mounting brackets protruding from the insulated surface. Considering the properties of cotton wool, it can easily be pierced by a staple and will hang securely in a vertical position. Similarly, we adjust and install the material in a horizontal position. The next strip is installed like an accordion. By installing mineral wool in the recommended way, you will continuously and tightly cover the entire planned surface with insulation.
After completing the installation of thermal insulation material in the inner surface, it should be remembered that we still have to install profiles for installing plasterboard sheets, and mineral wool, despite the fact that it is already on the wall, continues to be a source of danger for humans - it continues to be present in its composition a certain concentration of carcinogen and formaldehyde. So you should not relax and all further work must be carried out with extreme caution and in compliance with the above safety measures.
So, we stopped at the stage of installing profiles for covering the installed mineral wool with plasterboard sheets. The LED profile is installed using the usual method (described above), however, we again protect our hands with gloves from the effects of material particles. If we use mineral wool without foil, then first we install a waterproofing barrier on top of the insulation and profiles (there is a large selection of waterproofing materials on the construction market). Thanks to this, the room will receive additional protection from the side effects of mineral fibers. To completely complete the wall insulation using this option, all that remains is to cut out the necessary fragments from the plasterboard sheets and attach them to the profile.
Second way
We make a working frame on the wall surface for attaching drywall. In the usual, previously described way, we mount metal profiles. Now you can fill the frame space with mineral wool. But since we have already used the mounting brackets, the insulation strips should be laid in a different way. In this case, it is assumed that the distance between the profiles does not exceed 40 centimeters, and the width of the mineral wool strip is in the range of 50-120 centimeters. Thus, you can use the often used “accordion” method - the insulation should be passed under the profiles one strip after another. With a small distance from the profile to the wall, the wool can be layered to the desired size. No gaps should be made; the entire surface should be tightly covered with insulation! Even minimal holes in a constructed, albeit very warm, blanket can significantly reduce the thermal insulation of a room.
When carrying out work on stretching strips of mineral wool under the profiles, care should be taken not to spoil the insulation with fastening brackets placed on the surface.
Having completed the installation of mineral wool, some people are in no hurry to cover the insulation with plasterboard, but on top of the mineral wool, for the purpose of additional protection from carcinogens and formaldehydes, they apply a layer of dense cellophane film and only after that they cover the structure with plasterboard.
Vapor barrier in different rooms
There are different levels of moisture evaporation in the bathroom, bedroom or kitchen. Therefore, you should consider how to install the vapor barrier material on the frame.
Step-by-step process of waterproofing a bathroom
In the bathroom
Watch the video: waterproofing in the bathroom.
When working in the bathroom, the sequence of actions is as follows:
- First, the frame of the selected type is installed.
- Then a heat-insulating layer of material is mounted into the frame (if provided).
- After this comes the moment of fixing the vapor barrier layer into the frame structure.
- Depending on the selected material (vapor barrier film or membrane film), the sheets are secured either with a profile or immediately fixed with a sheet of plasterboard. When installing vapor barrier material on the surface, you should be extremely careful. It is necessary to check that there are no cracks or gaps between the sheets.
The installation of vapor barrier material in other rooms is carried out in the same way.
It is preferable to opt for waterproofing the bathroom using mastic.
Necessary places for waterproofing in the bathroom
In wooden houses
There are some differences in the process when installing a vapor barrier layer in a wooden house. Plasterboard coverings are popular in wooden houses. The main thing is to adhere to the process technology in order to do everything correctly.
Vapor barrier in a wooden house under a wooden frame
The wooden facade of the house is prone to corrosion and fungi. Therefore, it is best to install a vapor barrier coating on both sides of the insulation so that moisture and dampness coming from the wood do not reach the surface of the plasterboard sheets. To do this, you can first fix the vapor barrier sheets on both sides before installing the insulation into the frame. This will remove excess moisture from the surface of the drywall and wood.
Vapor barrier in a wooden house under a metal frame
It is not difficult to install vapor barrier material under plasterboard floors. The main thing is to weigh the important nuances and decide what materials you need to buy and which installation option is most relevant.
Selecting raw materials to provide vapor barrier properties is a fairly simple task.
The main thing is to decide what goals are set, and you also need to pay attention to the cost of the material. A narrow selection of vapor barrier materials prevents you from getting lost in a multitude of ideas
Watch the video: attaching a vapor barrier in the attic under a metal profile and to aerated concrete walls.
Which basalt wool is better to choose?
The effectiveness of wall insulation with basalt depends on the correctly selected insulation and compliance with insulation technology. Among the criteria by which it is necessary to choose insulation: the thickness and density of the mats, as well as the manufacturer.
Thickness. The thickness of stone wool for wall insulation depends on the climatic zone in which the house (the apartment is located) is built and on the type of walls: concrete, brick, wood or frame.
For central Russia, an indoor insulating layer of basalt 50 mm thick copes with its function perfectly. For a facade, a thickness of 100 mm is needed, for a frame house - 150-200 mm.
If you wish, you can use an online calculator to more accurately calculate the thickness of the insulation.
Density. The thermal conductivity of the material (the lowest for insulation with a density of 60-80 kg/m3) and the rigidity of the slabs depend on the density indicator. The rigidity indicator is very important when insulating a frame house, where a lot of pressure is applied to the bottom row and when finishing work is carried out directly on the insulation (decorative plaster).
The density of basalt wool for wall insulation should be within:
- 50-75 kg/m3 for frame houses;
- 80-130 kg/m3 for walls with a gap for ventilation;
- 130-160 kg/m3 with the “wet” method of insulation;
- 150-175 kg/m3 for a concrete facade.
It is better to buy basalt fiber wool from reputable manufacturers on the market. At the same time, it is not necessary to strive to purchase mats with the brand “PAROC” or “Rockwool”. They have high quality, but the price is also very high.
Other manufacturers' quality fully complies with European and Russian standards, and the cost is an order of magnitude lower. Therefore, why overpay for a trademark if there are products from TechnoNikol, Isover, URSA, and Beltep (Belarus).
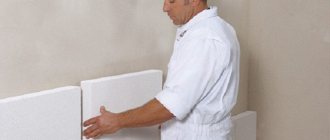
Insulation without frame
Insulating walls with plasterboard from the inside is not always possible with the assembly of the frame. You can carry out insulation without a base.
Initially, the walls are prepared for fastening insulation sheets. All fragile areas are restored, and surfaces are treated with an antiseptic.
Application of antiseptic
Polystyrene foam or cotton wool is attached as in the previous version, that is, an adhesive mixture and plastic dowel nails.
Sheets of plasterboard are mounted using a gypsum mounting mixture of the “perlfix” type. The glue is prepared by adding water and thoroughly mixing with a mixer. The mounting mixture is applied pointwise to the surface of the plasterboard, and the material is pressed against the insulated wall. Additionally, fixation is provided with self-tapping screws.
Insulation of walls without installing a frame made of profiles
However, this method of covering with plasterboard with insulation should be used only as a last resort. The presence of a frame base ensures a higher level of structural reliability, despite various influences: humidity, tension and other loads.
Installation methods
Whatever material you choose for internal wall insulation, it must be covered with a false wall. The only exception can be polystyrene foam, which can be plastered, but that’s not what we’re talking about.
Insulation of the loggia with mineral wool followed by cladding with plastic panels
Since the false wall is attached to a frame rigidly attached to the main wall, it should be used for installing mineral wool. There are two ways to do this.
Mounting on hangers
This method is convenient for installing rolled mineral wool.
The sequence of work is as follows:
- Having made preliminary markings, attach straight hangers for metal profiles to the wall. Fasteners are selected depending on the wall material. The hangers are installed one below the other in increments of 40-60 cm; the horizontal distance between them when facing walls with plasterboard is taken to be 60 cm.
Attaching hangers
- Bend both halves of the hangers forward, giving them a U-shape.
- Measure the height of the wall and cut a strip of mineral wool from the roll with a margin of 10-15 cm.
- Having applied the insulation to the wall with a slight overlap on the ceiling, pierce it with the protruding shelves of the hangers, as if putting it on them.
- Install the next strip so that the edges of the strips fit snugly against each other, leaving no gaps. To do this, you can make a small overlap, then slightly crumple the edge of the second strip and press it into place.
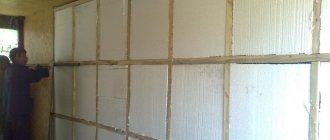
- Next comes the installation of a frame under plasterboard sheets, consisting of horizontal guides and vertical rack profiles. They are attached level to previously installed hangers on top of the insulation.
Photo of an insulated wall, ready to be covered with plasterboard
- The insulation should be covered with a vapor barrier film over the profiles. It is overlapped and attached to the profiles with small self-tapping screws.
The foil should face the inside of the room
After completing all this work, you can attach drywall to the frame, followed by puttying the joints and decorative finishing.
If you have already assembled the frame and only then decided to insulate the wall, you should not dismantle it. Rolled or slab mineral wool insulation can be slipped under the racks, still observing the principle of tight installation without gaps. But, since the mineral wool will no longer be held by the hangers, it will be necessary to secure it with horizontal inserts.
Laying into a finished frame
It should be noted that the previous method has one significant drawback: metal hangers in direct contact with the outer wall become cold bridges through which it is transferred to the inner lining. This is one of the reasons why it is preferable to insulate walls with mineral wool from the outside rather than from the inside.
However, this can be avoided if you use wooden blocks as frame elements. This material also has its drawbacks: wood is afraid of moisture, which can cause it to rot, and when temperature changes cause it to warp.
Treating the bars with antiseptic compounds and drying them well before installation helps to minimize the risk of such troubles.
Warming occurs as follows:
- Mount the frame from bars with a cross-section of 40x50 mm.
- Even if you are going to cover the wall with plasterboard, the frame should consist not only of vertical posts, but also of horizontal jumpers on which the insulation will rest.
- Lay mineral wool into the resulting sections of the frame, cutting it to size so that it completely fills the gaps between the bars without gaps.
Mineral wool can be easily cut with a regular sharp knife
- As in the previous case, stretch a vapor barrier film or foil penofol over the frame, securing them to the bars with a stapler.
There should be no gaps between the vapor barrier strips
The same scheme is used to insulate frame walls with mineral wool. But, since this material absorbs moisture well, while losing its thermal insulation properties, it is necessary to ensure its waterproofing and provide an air gap between it and the outer cladding of the building.
Installation of mineral wool slabs in the frame
Advantages and disadvantages
The main advantage of thermal insulation of the walls of a house using plasterboard is
- ease of installation;
- high efficiency of insulation;
- ideal surface for walls and ceilings for finishing.
The disadvantages include:
- the system of frame guides takes up space and volume, this is especially noticeable in compact rooms;
- low mechanical strength of the coating, does not withstand impacts;
- You cannot hang heavy objects without installing additional guides.
Insulating walls with plasterboard has a number of advantages and disadvantages.
Nevertheless, more and more rooms are being finished with gypsum board. Working with it does not require high qualifications or expensive specialized equipment.
Drywall
Today it is difficult to imagine renovation without the use of drywall.
It is multifunctional and is used for finishing walls, ceilings, creating partitions, and various decorative elements. Some types, due to their water-repellent properties, are used in finishing bathrooms and toilets.
Before using drywall, you need to understand its positive and negative characteristics in order to understand the specifics of handling it.
Advantages of drywall:
- Flexibility and lightness. The use of this material allows you to implement the most daring design solutions. It is easy to make various geometric shapes from it - from banal rectangular to complex semicircles, arches, columns;
- Thermal insulation properties;
- Fire resistance. Drywall doesn't burn. When it is exposed to fire, only the top paper layer suffers.
- Water resistance. Special types of gypsum boards have been developed that are recommended for use in rooms with high humidity.
Disadvantages of drywall:
- The main disadvantage is its fragility. A sheet of drywall can easily be damaged during transportation, installation, and subsequent operation;
- Soundproofing characteristics. Drywall does not have soundproofing properties. Behind a simple gypsum board partition all sounds will be heard.
Drywall
Using drywall as insulation
Drywall, or gypsum board, is a thin sheet of gypsum, lined on both sides with layers of thick paper. Drywall has good strength and a perfectly flat surface, which is convenient to paint or wallpaper. It is easily mounted on prepared guides; you can cut the sheet into pieces of the required size and shape with a regular mounting knife.
All this makes gypsum board one of the most popular finishing materials. Can it also serve as insulation? By itself, no. Its thermal conductivity is determined by the thermal conductivity of gypsum, it is only half that of brick and ten times higher than that of mineral wool or other thermal insulation materials. In order for drywall to effectively retain heat, its layer must be several tens of centimeters.
However, the structure of the guides, which are mounted to install gypsum board on walls or ceilings, can be effectively used to place real insulation in it - sheets of mineral wool or foamed plastics. The surface of the plasterboard sheet will cover the thermal insulation from mechanical influences.
Requirements for insulation. Mistakes made when insulating
Let us consider in detail the requirements for insulation
.
To carry out insulation from the inside of a room, it is necessary to select materials that meet the established environmental friendliness characteristics. As a result, it is better to give preference to well-known manufacturers of materials for room insulation. It is unacceptable to select thermal insulation materials that may have a detrimental effect on human health.
Mineral wool laid from the inside must be covered with a finishing material, which is usually used as plasterboard sheets
But due to the fact that the material is in a confined space, it is not possible to monitor its condition and, as a result, it is important that it does not deform, which may affect the thermal insulation characteristics of the insulation
The selected mineral-based insulation must have a minimum thermal conductivity coefficient. High-quality insulation can be achieved not so much due to the thickness of the material as to its basic characteristics. The smaller this parameter, the thinner the layer of material will have to be installed under the drywall
, which is very important in small rooms.
_
Coefficient of thermal conductivity
- the ratio of the thickness of the tested material sample to its thermal resistance. (GOST 7076-99)
Thermal conductivity
- the ability of a mortar to transfer heat through the thickness from one surface to another. (GOST 4.233-86)
Now let's take a closer look at the mistakes that are made when insulating
.
In order for the insulation of the walls of the house, from the inside, done on your own with mineral wool, which will be covered with plasterboard on top, to last as long as possible, it is important to avoid common mistakes:
- laying mineral wool with various types of defects;
- an attempt to save money when purchasing thermal insulation material from little-known manufacturers;
- non-compliance with the sequence of thermal insulation work;
- there are gaps between adjacent sheets of material;
- improperly installed vapor barrier or its complete absence.
Homeowner forgets to install drywall
e sockets or switch, it often happens that when doing the work on your own.
therefore, this procedure must be carried out in advance. The insulation can be significantly damaged if installation work on installing electrical products is carried out later after the drywall
.
_
Homeowner
- owner of premises in a real estate complex - condominium, he is also a participant in shared ownership of common property.
Installation work
- equipment basic work on assembling and installing machines, units, devices and other equipment into the design position, securing it, connecting to it various communications supplying raw materials, water, steam, electricity, finished products, control and management equipment. (MDS 81-29.2001)
Installation
- energy the conventional name of an object in power structures for which a diagram is issued, for example, main circuits. (GOST 2.701-84)
As you can see, insulation with mineral wool
under drywall, the process is not the most complicated, the main thing is not to forget about high-quality vapor barrier and distribute mineral wool in an even layer from the inside over the entire surface of the walls. This procedure will make it possible to maintain heat in the house and eliminate the formation of drafts and other troubles.
Insulation of walls from the inside with mineral wool plus plasterboard
IMPORTANT! Any thermal insulation work should begin with surface preparation. All irregularities and depressions must be plastered and puttied.
Walls that are to be insulated are treated with anti-mold preparations and primed
All irregularities and depressions must be plastered and filled. Walls that are to be insulated are treated with anti-mold preparations and primed.
Insulating a brick wall from the inside with mineral wool:
- Using the method discussed above, a sheathing is created in addition to securing the load-bearing posts;
- insulation is being prepared. The method of its fastening depends on what kind of mineral wool you are dealing with. It is convenient to string cotton wool in the form of mats onto brackets installed in the wall. Laying should be carried out so that there are no gaps between the mats. ;
- after filling the walls with insulation, load-bearing racks are installed;
- If mineral wool is purchased in rolls, its installation can be done after installing the racks. It is easy to fill the space between the racks and the wall;
- the surface of the insulation and sheathing is covered with overlapping rolls of vapor barrier membrane. The membrane joints are glued with mounting or plumbing tape.
Insulation scheme
Laying the material
This way there is a prepared surface for mounting plasterboard sheets.
Some good tips
- To avoid mistakes, you must follow the instructions exactly;
- For high-quality installation of the material, the slab must have a width of more than one meter;
- In order for mineral wool for wall insulation to last longer, it is necessary to create a high-quality vapor barrier;
- The material should lie tightly and evenly on the surface. When filling the grate with insulation, it is important to avoid gaps;
- Insulating walls with mineral wool slabs is much easier than using mineral wool in rolls;
- The wall on which the insulation is applied must not have cracks or defects.
Well, I would like to hope that this article will help the reader understand and understand what mineral wool is, what properties it has, and how to use it correctly to save heat in the house. Let insulating walls with mineral wool seem like an easy job with a positive result for everyone!
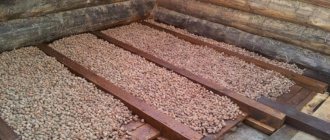
Types of mineral wool
There are many legends regarding a simple question: can it be used indoors? We have all heard about the harmful environmental and physical properties of mineral wool. But let's figure out what is true and what is not.
There are three types of wool, depending on the raw materials of production:
- Glass. This type is made from molten glass. It is characterized by high fragility and causticity. If it comes into contact with the skin or eyes during styling, it causes severe itching. Not subject to rotting. Has a low degree of flammability. This type is not recommended for internal insulation work.
- Stone. The raw materials for its production are igneous rocks, mainly basalt is the most durable. Does not cause reactions upon contact with skin, does not support combustion. Another advantage is the form of release - slabs or mats are extremely convenient to install. This type is recommended for interior work.
- Slag. This type is made from waste from the metallurgical industry. The main disadvantage is the increased ability to absorb moisture. For this reason, it sags and becomes deformed. The moisture inside the cotton wool has a beneficial effect on the formation of fungi and microorganisms. Just as glass wool is characterized by its causticity and fragility, it is not recommended for internal insulation.
The production process uses formaldehydes, which are harmful to health, but they are used in such small quantities that they do not affect health in any way. And modern technologies have left their mark on this issue. Some manufacturers have replaced formaldehyde with bitumen in the technological process. However, we still recommend taking some preventive safety measures when insulating. The main one is to separate the room with a partition. We recommend using plasterboard or sheets of chipboard, OSB.
Mineral wool, what is it?
Mineral wool is a fibrous or layered material based on mineral raw materials. Hence the name. There are three types in this category:
- glass wool;
- slag;
- stone wool.
Firstly, all insulation materials differ from each other in raw material. Secondly, each of them has different fiber sizes, so the quality characteristics are also different.
Glass wool
It is based on the raw materials that are used to make glass; even cullet and glass production waste are used. Dimensions of insulation fibers: length – 14-50 mm, thickness – 4-15 microns. Thermal conductivity – 0.028-0.052 W/m K. Operating temperature from -60 °C to +500 °C.
Slag
The raw material is blast furnace slag. Fiber sizes: length – 15-16 mm, thickness – 4-13 microns. Thermal conductivity – 0.45-0.48 W/m K. Maximum heating temperature up to +300 °C. This species is very hygroscopic.
Experts warn that slag wool should not be used on metal surfaces. The thing is that residual acidity is always present in slags. When interacting with moisture, the acid begins to corrode the metal.
Stone wool
This is the most common type in this category. And when it comes to mineral wool, it means stone wool. Therefore, in what follows we will not distinguish between these two concepts.
So, let's start with the fact that mineral wool is made from different types of stone. Therefore, it has different characteristics in terms of density and thermal conductivity. If the insulation is made of limestone, dolomite, and so on, that is, non-solid rocks, then the thermal conductivity can vary from 0.077 to 0.12 W/m K. If the insulation is made of basalt (diabase or gabbro), then the thermal conductivity of such a material is 0.03 -0.05 W/m K.
At the same time, soft rocks contain many impurities in their structure, which means that the fibers are weakly connected to each other. Therefore, more formaldehyde is added to them during the production process. Such materials can withstand temperatures up to +600 °C. Basalt mineral wool up to +1000 °C. Stone wool today is sold in mats (blocks), in rolls and in loose form.