Heating radiators are elements of engineering plumbing systems that are functionally designed to heat the air in a room. According to SNiP (2.03.01-84), radiators that comply with heat balance calculations should be used in any room. They are quite sufficient to maintain normal temperatures inside buildings.
However, for a garage or small workshop it is better to make a heating register yourself. In terms of dimensions and heat transfer, this device goes beyond the parameters of classical designs, but is much more suitable for these premises. The article we presented describes in detail the technology of its manufacture.
Homemade heating registers
By increasing the heat exchange area and the volumetric component of the coolant, of course, it is easier to achieve the desired temperature in the room. Therefore, quite a lot of property owners, taking advantage of the lack of control over heat extraction at each specific point, increase heat removal by manufacturing radiators of non-standard designs.
In fact, this is prohibited, as it is seen as an irrational approach to energy consumption. In practice, they think less about resources than about their own well-being. The following article will introduce you to options for economical garage heating, the contents of which we recommend that you familiarize yourself with. However, closer to the point.
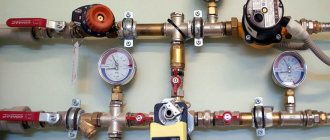
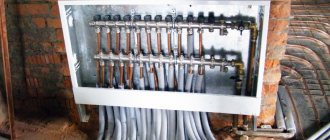
A heating register made by yourself and installed in one of the utility rooms. This is a four-pipe circuit solution with coolant inlet and outlet on one side
Making a heating register with your own hands is a relatively simple task, especially if you have welding skills and have a welding machine at hand. All that remains is to purchase the required quantity of pipes of suitable diameter and sheet metal.
What are the advantages of heating registers over traditional radiators?
All types of registers have distinctive features and have unique properties:
- Due to the intensive exchange of heat with the environment, rooms of a sufficiently large area can be heated;
- Despite the modest and compact dimensions of the register itself, the device does not require high-tech production - an angle grinder and electric welding are sufficient;
- Low price - in the production of registers, steel, cast iron or stainless steel is used, i.e. inexpensive and accessible materials, due to which it is possible to achieve a low price. The cost of these devices is significantly lower than other heat exchanger options;
- They are able to withstand high coolant pressure;
- The register can operate on oil, water and other liquids;
- Manufacturing of the device is possible either according to the customer’s drawings, or independent manufacturing, in which you can use various plugs, configurations, and fittings.
How to calculate heat transfer?
The required amount of material can be calculated based on the temperature parameters that need to be obtained in the room. At the household level, this step is usually skipped - they make heating registers with their own hands “by eye” according to the principle “the more, the better.”
But it is better to make simple calculations of heat transfer, for which you do not need to be a mathematician. All you need is:
- Calculate the area of the room.
- Learn about the heat transfer properties of steel.
- Select the optimal pipe diameter.
The area of a room is calculated by multiplying its length by its width (S = L*W). However, for more accurate calculations, it is recommended to calculate the volumetric parameter by adding the height (H) value to the calculations.
So, the final calculation formula takes the form:
V = L*W*H
For example, you need to calculate V of a room where the length is 5 m, width is 3 m, height is 2.15 m. The volume of the room is obtained: V = 5*3*2.15 = 30.25 m3. Based on this basic value, further calculations should be made to determine the amount of heat, the size and number of heating registers to make with your own hands.
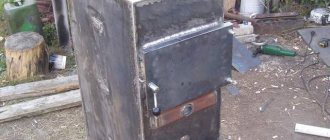
Self-welded heating registers are blocks consisting of six steel pipes with a diameter of over 100 mm. Such batteries, made without proper calculations, can overheat the room being served.
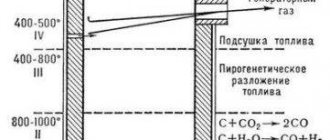
First of all, the required amount of heat per calculated volume of the room is calculated to achieve the required internal temperature (W):
Qп.т = V * k (Tin – Tout),
where V is the volume of the room; k – heat transfer coefficient of the building walls; Tin – temperature inside; Tout – outside temperature.
The amount of heat generated by one register can be calculated using the formula:
Qр = q * L * (1-n),
where: q – heat flow from each horizontal and vertical pipe of the register (approximately 20-30 W/m); L – length of vertical and horizontal pipes of the register (m); n – coefficient of unaccounted heat flows (for metal pipes – 0.1).
The category of unaccounted heat loss also includes the hood in the garage. If the mechanical type is installed, the coefficient n must be increased to at least 0.2.
The number of registers, accordingly, is determined by the formula:
Nр = Qп.т. / Qр
Such a calculation method will most likely be assessed by design specialists as a simplified and crude form. However, this approach still seems to be a more rational action than calculating and making registers with your own hands by eye, without any calculations.
What you will need to assemble and install a heating radiator
As a rule, batteries are purchased already assembled, after which all that remains is to install it on the wall and connect it to the supply and discharge pipes. In addition to the radiator, you will have to purchase a number of additional accessories.
You will definitely need:
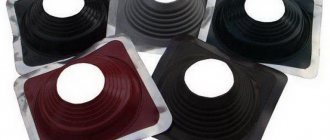
- pass-through radiator plug (at least 2 pieces). There are threaded holes on both sides of such a device;
- plugs, they are simply screwed into the heating device so that water does not flow out of the radiator;
- It will be necessary to install a Mayevsky valve (to bleed air from the heater);
- You will also need metal anchors to install the radiators themselves.
Anchor and bracket
Note! If desired, you can increase the length of the radiator, or vice versa, remove excess sections.
Recently, you can immediately purchase a set of all the necessary accessories for installing a battery; this is much more convenient than purchasing everything separately. In addition, in this case, you can choose the color of the listed components to match the color of the heating radiator.
Also, when purchasing a kit, there will be no problem with incompatibility of materials. For example, plugs for cast iron heating radiators, as a rule, are also selected from cast iron (although the use of steel is allowed). But in the case of copper batteries, cast iron can no longer be used, so when purchasing, you need to take into account the compatibility of materials.
Metal compatibility table
Note! The combination of materials is based on the risk of galvanic corrosion effects. Some metals can form a galvanic couple, in which case the cast iron radiator plug can turn into a cathode, and the pipe metal into an anode; this will not have the best effect on the longevity of the radiator.
Selecting a heating device configuration
Homemade radiator designs are mainly made on the basis of metal pipes with a diameter of 80 - 150 mm.
Design features are limited to two versions:
- Lattice.
- Snake.
The lattice design of the heating battery differs from the “snake” in a slightly different circuit design, and, depending on the variations in such batteries, the distribution of the coolant may be different.
Options for circuit design of heating registers for their own production: 1 – one jumper and one-sided power supply; 2 – two jumpers and one-sided power supply; 3 – two-way power supply and 2 jumpers; 4 – two-way power supply and 4 jumpers; 5, 6 - multi-pipe
Coil structures actually have a monotonous design, implying strictly sequential movement of the coolant.
Lattice registers are constructed according to different schematics:
- with one or two jumpers and one-way power supply;
- with one or two jumpers and versatile power supply;
- parallel connection of pipes;
- sequential connection of pipes.
The number of pipes in one assembly can range from two to four or more. Rarely, there is also the practice of making single-pipe registers.
A coil assembly usually contains at least two pipes connected on one side by a blind jumper and on the other by a through jumper, which are made from two pipe bends (2x45º). It should be noted that the design of heating registers in the form of a coil is used much less frequently than “grid” designs.
Options for the possible manufacture of “snake” type registers. For coil-type register battery designs, the choice of manufacturing options is limited compared to lattice-type designs.
Both manufacturing options - lattice and coil - can be made not only on the basis of classic round pipes, but also on the basis of profile pipes.
Profile pipes seem to be a somewhat specific material, since they require a slightly different approach when assembling heating radiators. However, registers made from a profile pipe are more compact and take up less usable space, and this factor is also important.
The process of installing a plug
Before installing the plug for the aluminum radiator, you should securely fix the heater to the wall.
In general, you can follow the following instructions:
- First, individual sections are assembled into a single heating device; the number of sections is selected individually for each case. When connecting elements, use FUM tape, which allows you to achieve maximum tightness.
- Next, choose the place where the radiator will be located; most often they are installed under the window. It is very important to adhere to the recommended distances from the wall, floor and window sill.
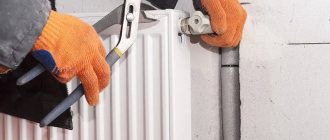
- Then holes are made in the wall using special tools, plastic anchors are hammered into them and metal brackets are screwed in. A radiator is hung on them.
- Now you can install plugs for bimetallic radiators, especially since there is no difficulty in this process. Their body is made in the shape of a hexagon, which allows you to use any key for tightening. Do not overtighten the plug to avoid damaging the threads or body. During the twisting process, an invisible microcrack may form, into which water under pressure can leak. In addition, repairing batteries in winter is no fun for anyone.
- After the plugs are installed, you can connect the incoming and outgoing pipelines. At the same time, the Mayevsky valve is installed in the upper hole of the radiator, and the lower hole is closed with a plug. It is worth noting that the air vent device is inexpensive, and heating efficiency increases significantly. To make it easier for air to leave the system, heating devices are installed with a slight slope of a few degrees.
- Test heating devices and connections. For this purpose, liquid is poured into the system and problem areas are examined.
Instructions for making a radiator
To make a heating register yourself, it is recommended to initially carry out the necessary calculations (methodology above in the text). And the point here is not to save resources, but to make batteries that are really useful in all respects.
Surviving the winter with the windows open - this option is suitable for “walruses”. Everyone else who is not part of the hardened group runs the risk of getting a serious cold. And powerful radiators are just as bad as too weak ones.
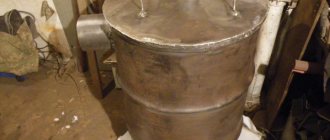
Pipe register for heating, made by hand. This heating battery design is distinguished by a non-standard coolant supply. Water is supplied and discharged through pipe risers, to which the register pipes are directly connected
So, the calculation is done, you can start choosing the material.
An economical and quite suitable choice for a homemade design can be considered steel pipes and fittings for them produced for steel pipes:
- bends (suitable for pipe diameter);
- corners (reinforcement);
- steel sheet (thickness equal to the thickness of the pipe wall);
- pipes (small diameter pipes).
Gates may also be required, which are often not installed directly on the registers. Manufacturing skills and knowledge of gas welding technology would be useful if the future performer has them.
Pipe preparation and welding
According to the calculated length parameters, the pipes of the future radiator are cut to size. A convenient tool for cutting is a circular saw. Then plugs for the ends of the pipes are cut out of a metal sheet. The round-shaped plugs are convenient to cut with an oxygen cutter.
First of all, circles of the required diameter are marked with chalk on the surface of the metal sheet and then carefully cut. Some of the sliced pancakes (the quantity is calculated) are made with holes for the coolant inlet and outlet pipes.
Factory-made plugs for register pipes. Such plugs are more preferable for installation in DIY batteries. A varied assortment allows for a wide choice
It is also immediately recommended to cut holes (one or two, depending on the assembly project) in the wall of each pipe, with a distance of 100 - 150 mm from the end edge. These holes are intended for through-connection of pipes during battery assembly.
After cutting the holes, it is recommended to clean the inside of each pipe from slag and scale. Next, place pancakes at the ends of the pipes and carefully scald them in a circle. One pancake with a hole is welded on the first and last pipe.
Heating battery assembly
Finished pipes must be combined into a battery. To do this, determine the configuration of the radiator (if it is decided to make a lattice structure). Based on the accepted choice of configuration, jumpers are prepared - through and blind.
The material for jumpers is usually small diameter pipes. For example, d = 25 mm or d = 32 mm. Tubes for the supply/return pipes are also prepared (length 150 - 200 mm, diameter 25 - 32 mm).
Work on assembling a heating register with your own hands. For ease of fitting and precise installation, the workpieces are placed on a flat surface. In this case, all the parts are laid on a stone platform
The pipes prepared for the heating register (2 – 3 – 4) are laid out on a flat surface and aligned along the end edges. The first (upper) and last (lower) are laid out with end edges with holes, according to the selected connection diagram: one-sided (input and output on one side) or double-sided (input and output on opposite sides).
All that remains is to carefully weld the through and blind jumpers between the pipes, the inlet and outlet pipes, after which the heating register is ready for installation in the system. Before starting work, a novice master will need to study the rules of electric welding, described in detail in the article devoted to this issue.
Features of the “snake” design
The coil register is assembled a little differently. Here, instead of vertical jumpers, metal bends are used, with the help of which the end parts of individual pipes are connected.
To assemble a register with a snake you need:
- Lay the pipes on a flat surface.
- Weld 45º arc bends from paired bends.
- Connect the paired register pipes on each side with arc bends.
- Close the initial and end ends of the first and last pipes with plugs with branch pipes.
Coil heating registers are large in size due to the limited possibility of adjusting the interpipe distance. In this regard, “snakes” are superior in parameters to lattice structures. However, from the point of view of the efficiency of coolant flow, the “snake” looks like a more preferable option.
An interesting example of a coil register, no longer made by hand, but at a factory. Industrial production conditions make it possible to make more advanced devices (with fins that dissipate heat)
There are practically no air pockets formed inside such registers, which is typical for products of the “grid” type. In addition, thanks to large-diameter arc bends, coil structures have less hydraulic resistance. However, it is quite rare to make such registers with your own hands.
Difference between profile registers
An interesting design compared to those described above is a register made from a profile pipe. More compact, but no less efficient batteries are assembled using almost the same technology.
The only peculiarities of the assembly can be noted in the preparation and adjustment of inter-pipe jumpers. As a rule, welding is not used here. It is enough to have a good metal-cutting tool.
An example of manufacturing a thermal register from profile pipes. The “snake” design is more compact than from smooth round pipes. Meanwhile, the efficiency of the device on profile pipes is no worse than traditional ones
The ends of the interpipe jumpers and the register pipes themselves are cut at an angle of 45º, achieving an exact match along the edges on the connection line. If a “grid” type register is being assembled, the interpipe jumper is made with angular cuts at the ends and straight cuts at the points of supply of the central pipes.
This is the result of a register heating battery made according to a lattice pattern. Neat appearance and quite convenient form for installation in domestic conditions
After preparation, the jumpers are placed in place and carefully scalded. On the “snakes”, blind reinforcing jumpers are additionally installed parallel to the passages.
Homemade registers were widely used for domestic needs in the recent past. Now this type of heating devices is used less frequently.
An alternative to registers, especially if the garage is not connected to a centralized heating system, is a miracle diesel stove. Our proposed article will introduce you to the method of its manufacture.
Rules for the selection and installation of plugs
The simplest element used when installing and assembling radiators is an aluminum plug for heating radiators. But even the simplest device requires special attention, otherwise big problems may arise during operation.
The process of installing a radiator plug cannot be called complicated, since almost all of them are made of the same type; the dimensions or type of thread may be different. Such devices also work on the same principle.
When choosing a radiator cap, it is important to consider the following points:
- The materials of the radiator and plug must be combined.
- The thread of the plug must be of a certain type. For example, for installation on the left side of the battery, it is recommended to use a left-hand thread, and on the right side, install a radiator plug with a right-hand thread.
- The hole in the radiator can be closed with a blind or through plug.
- The device must have an aesthetic appearance and match the color of the heating device.
- The diameter of the threads in a cast iron battery at the inlet and outlet is of great importance; plugs can be used as transition elements.
Most often, the battery is equipped with the following devices:
- Pass-through plugs for radiators in the amount of 4 pieces.
- Brackets for installing the heating device and plastic anchors for installing the fasteners themselves. For a standard size radiator, 2 brackets and anchors are required.
- Mayevsky plug and tap. Sometimes the second element is replaced with another plug.
According to the principle of operation, plugs are divided into two types. In the first case, they simply block the path of the coolant, in other words, they act as a plug. The second type is an adapter from one diameter to another. In this case, the plug has an external thread on one side and an internal thread on the other.
Conclusions and useful video on the topic
You can learn about the sequence of manufacturing a heating register from a profile pipe and the secrets of welding from the video:
Homemade heating equipment continues to be actively made and used in rural areas or in private industries for heating office technical premises. But many refuse to use such irrational structures, especially where metering and monitoring devices for coolant consumption are being introduced.
Would you like to tell us how you assembled a register for your garage or cottage with your own hands? Do you have information that could be useful for DIYers? Please write comments in the block below, share useful information and photos on the topic of the article, and ask questions.