Features of using sawdust for insulation
The materials used for thermal insulation are constantly being improved, and new, more modern products appear on the domestic market every year. Its cost regularly increases and the owners of a private house do not always have enough money to purchase insulation.
For this reason, the so-called “old-fashioned methods”, used for many years for thermal insulation of walls and roofs, are still popular and relevant. Ceiling insulation with sawdust has stood the test of time for many decades, while it is difficult to say what condition, for example, polyurethane foam will be in after a 20-year service life.
The main advantages of this method include:
- environmental cleanliness;
- hassle-free purchase of sawdust;
- symbolic cost;
- simple installation;
- long service life.
At the same time, savings in the case of using sawdust as ceiling insulation consists not only in reducing financial costs, but also in caring for nature, which helps improve the environmental situation and reduce home heating costs.
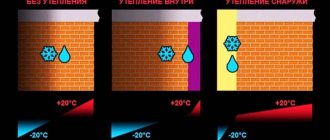
The process of insulating a home consists of several stages, including insulation of the ceiling, walls and floor. Moreover, each type of surface requires a special approach. When the ceiling surface is insulated, the material intended for this can be laid both externally and internally.
It is not difficult to verify the economic benefits of insulating a home with sawdust if you compare the costs of them with the cost of popular materials and the work involved in their installation. Thermal insulation using this wood material is practically free. In addition, you can agree with a woodworking company to deliver it to a specific address for a small fee.
Of course, as with the use of other thermal insulation materials, there are pros and cons to insulating the ceiling with sawdust. The disadvantages of this method include the fact that not all varieties of this type of wood waste are suitable for ensuring heat conservation in the house.
Advantages and disadvantages of the material
Sawdust has successfully passed the test of time and still remains one of the most practical materials for insulation.
Main advantages:
- availability;
- versatility;
- environmental friendliness;
- ease of installation;
- long service life.
The disadvantages of insulating the ceiling with sawdust are that the material quickly absorbs moisture and is considered a fire hazard. Therefore, you should take care of high-quality waterproofing and use only materials treated with antiprenes. The technology of application differs according to the type of placement of the material: from inside the room or outside. But before you start work, you should choose the right sawdust.
Choosing the right sawdust
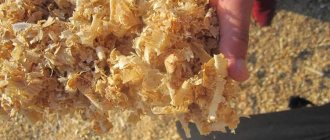
Medium-sized sawdust is best suited for insulating the ceiling in a private household. The fact is that it will be difficult to work with small wood waste, and coarse-grained material does not have a sufficient degree of thermal insulation.
The optimal insulation material is considered to be sawdust obtained as a result of sawing in carpentry production, since it has a low degree of humidity, does not require additional drying and does not begin to rot when used.
If round wood waste, which has natural moisture, is available, then before use it should be spread out under a canopy and thoroughly dried. You should not cover the sawdust, as it will then begin to rot.
Experts advise giving preference to waste from softwood processing. Since such material contains a lot of resinous substances, pests are afraid to settle in it. True, when deciding how to insulate a bathhouse ceiling with sawdust, it is better to use raw materials from deciduous trees.
Before installation, this type of insulation must rest for about a year. During this period, the level of sugars in sawdust decreases significantly, and it is they that contribute to the process of decay. It is necessary to pay attention to ensure that there are no foreign impurities in the insulation. It is advisable to sift the sawdust and remove large debris by hand.
We process sawdust before insulation
Sawdust is used to make thermal insulation; it is prepared in advance in a special way. When an antiseptic is not used and there are inclusions of impurities in sawdust, two shortcomings arise: the flammability properties increase and rodents begin to inhabit them.
Therefore, before starting work, the shavings are mixed with cement or gypsum, lime, and then moistened with an antiseptic substance. The resulting mixture acquires suitable fire safety characteristics and is unacceptable to various pests.
Hemming of floor beams
Work related to how to insulate a ceiling in a private household with sawdust should begin with filing the ceiling; it is performed in a certain sequence:
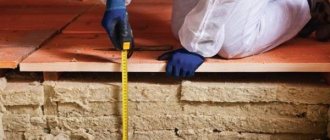
- Prepare boards approximately 2.5-3 centimeters thick - this parameter depends on the distance between the beams. It is desirable that the lumber be tongue-and-groove or with a quarter, and certainly planed and dry, even if their cost is higher than unplaned edged products.
- On top of the assembled vapor barrier layer, boards are attached solidly with nails 10 centimeters deep or screwed with screws 5-6 centimeters long, 2 pieces at each fixation point. In this case, the nails are driven in at an angle relative to the wooden plane. It is necessary to ensure that the direction of the adjacent nails driven in does not coincide, and then the fastening will be strong and most reliable.
- Before starting installation work, boards and beams must be treated with special compounds - antiseptic and fire retardant. This will protect the wood material from fungus and various pests, and will also help reduce its flammability.
Before you start
Before deciding to insulate the ceiling in a private house with sawdust, it is wise to perform evaluation calculations:
- what layer thickness is needed in your region;
- how many materials will be needed;
- what is the approximate complexity and duration of all work (including drying the sawdust and drying the applied thermal insulation layer);
- Do you have the strength to cope with the entire volume on your own or will you have to hire help;
- How much will a square meter of insulation cost?
Despite the cheapness of the components, based on the calculation results, it may turn out that in a particular case, using, for example, mineral wool will be more profitable.
Tool
Tools and equipment you will need:
- drying shed;
- container for mixing the solution;
- shovels or construction mixer;
- construction sieve;
- buckets for supplying the solution to the pouring site;
- trowel and rule for leveling the layer;
- stapler and double-sided tape for attaching vapor-waterproofing membranes to walls and beams.
The work ahead is technologically simple, but requires participants to be in good physical shape. It is quite possible to insulate the ceiling in a bathhouse alone; for the home it is better to involve a partner, or even two.
Ceiling insulation options
When insulating the ceiling with sawdust, you should be careful not to miss the cracks that are always present on the surfaces. To eliminate them, polyurethane foam is used.
There are several options for arranging thermal insulation of the ceiling using sawdust, both using pure wood raw materials and by adding additional additives to it, such as clay, lime, etc.
The most popular methods are:
- use of sawdust in its pure form;
- the use of additives - cement and lime;
- the use of additional components - clay and lime.
Surface preparation
Before insulating with sawdust on flat floors, the following preparations are carried out:
- the wood is treated with an antiseptic and fire retardant or a complex action drug;
- the subfloor is laid out - the surface of the beams is covered with boards;
- the cracks are sealed with polyurethane foam or silicone;
- A vapor barrier film is laid on the subfloor from the attic or upper floor.
ATTENTION! You cannot use ordinary polyethylene - its durability does not exceed 3 years. Selecting the optimal composition of the insulating mixture The choice of binder affects the thermal insulation properties, weight and durability of the insulating mixture.
Ceiling insulation only with sawdust
This method is simple and consists of several steps:
- Ceiling insulation made from sawdust is poured onto the floor of the attic in a layer of 15-20 centimeters and carefully leveled, often to the very level of the beams, but not compacted.
- Furnace ash is poured in one layer on top of the insulation. Now a vapor-permeable superdiffusion membrane is being used instead. Thanks to this coating, moisture is removed from the sawdust without hindrance, and this circumstance prevents the process of rotting. Such films are characterized by one-sided vapor permeability.
- If the attic space is planned to be used, then plank flooring must be secured along the beams. The boards are nailed so that there are small ventilation slots between them.
General
It is worth noting that this material alone is not able to play the role of thermal insulation. Sawdust insulation is supplemented with clay, cement, lime and other similar substances with astringent properties. Before using the mixture, additional processing is also necessary. In such cases, copper sulfate or other substances of a similar type are used. This is done in order to protect the material from rapid combustion, as well as to prevent the appearance of various living creatures, such as termites or ants.
Using sawdust as insulation
Thermal insulation of the ceiling with sawdust and additives
There are several options for how to properly insulate a ceiling with sawdust, if you use additives such as lime, clay, cement and others.
To prepare the insulating mixture according to the first recipe, you will need the following ingredients:
- well-dried sawdust - 10 parts;
- lime and cement - 1 part each;
- water – from 5 to 10 parts;
- a little copper sulfate, used as an antiseptic.
Work on insulating the ceiling with sawdust in a private house is carried out in stages:
- First, cement and lime are mixed.
- Pre-prepared sawdust is placed in a large container; you can use a concrete mixer.
- A cement-lime composition is added to them and all components are thoroughly mixed.
- 3 tablespoons of copper sulfate are poured into 10 liters of water and slowly poured into the previously prepared mixture of sawdust and additives. When working with vitriol, you must follow safety precautions, using a mask and gloves.
- All components are mixed well. The mixture is then considered ready when there is a small amount of it, it will not crumble if you unclench your palm, and when water does not drain from it.
There is another recipe for making a heat-insulating mixture consisting of sawdust, cement and limestone. It is often used to insulate the ceiling in a bathhouse with sawdust. In this case, vitriol is not used, since at high temperatures it begins to release harmful components into the environment.
To prepare the composition, take:
- dry sawdust – 10 parts;
- clay – 5 parts;
- lime – 1 part;
- water - from 7 to 14 parts.
The mixture is made as follows:
- The clay is poured with 2 parts of water and waited until it is completely soaked. The solution is stirred until its consistency is similar to thick sour cream. There should be no lumps in it.
- Lime is mixed with sawdust and added to the clay solution. Mix all the components thoroughly, adding another portion of wood raw materials from time to time.
- To make sure the composition is ready, use a regular wooden stick. It is placed vertically in the solution and waited for a while. It is considered ready if the stick does not fall. When the mixture turns out to be too liquid, it should be left for 24 hours to allow the excess moisture to evaporate.
An alternative recipe can be used. In this case, instead of clay, gypsum is used in the same amount. But this mixture has a big drawback. It lies in the fact that the prepared solution dries quickly and therefore needs to be prepared in small portions.
Sawdust as insulation: pros and cons of the material
Despite the fact that in recent years a wide variety of modern insulation materials have appeared on the market, environmentally friendly waste from the woodworking industry has not lost its relevance as thermal insulation materials. We are, of course, talking primarily about sawdust.
Sawdust as insulation
Sawdust is especially often used as insulation when building houses in regions rich in forested areas, since a large number of sawmills are usually located here. This means that it is possible to purchase material at a low price, and sometimes even find it for practically nothing.
Sawdust as insulation - pros and cons
Sawdust and materials made from it are used to insulate almost any element of the house - attic floors, walls, floors, cellars, etc. In addition, blocks are made from wood waste, which are widely used for the construction of residential and utility buildings.
Sawdust is a waste that has a wide range of uses.
This material does not lose its popularity due to its positive characteristics, which include the following:
- One of the most important advantages can be safely called the absolute environmental purity of sawdust. They do not emit substances toxic to human health, so they can be used in any quantity.
- An important advantage is the already mentioned low price of the material, accessible to everyone, and sometimes the opportunity to get them for free.
Sawdust is great for insulating attic spaces
- Sawdust is an excellent insulation material for a roof, of course, if the installation technology is followed correctly. If the thermal insulation layer corresponds to the required thickness, in accordance with the climatic conditions of the region, then such insulation will be in no way inferior in its effectiveness to other modern materials.
| Material | Specific gravity kg/m3 | Backfill thickness in mm at average winter outside air temperature, °C | ||
| -15 | -20 | -25 | ||
| Wood sawdust | 250 | 50 | 50 | 60 |
| Wood shavings | 300 | 60 | 70 | 80 |
- Sawdust can be used for insulation, both in the usual bulk state and in other forms. For example, these could be slabs mixed with other natural or artificial materials.
The disadvantages of using this insulation in its pure form include high flammability. However, if you use sawdust in clay or cement mixtures, their flammability is significantly reduced.
If we think from the standpoint that the rafters, attic floors and walls of frame houses are made of wood pre-treated with fire retardants, then sawdust will fit perfectly into this building complex, provided that it is also subjected to special treatment. In addition, it will be necessary to provide high-quality insulation for all electrical cables that will cross the insulation layer or be located in its thickness. The thermal insulation of the chimney pipe where it passes through the attic floor or located near the wall also requires special attention.
It should be noted that sawdust is by no means the only natural material that has been used for home insulation for a long time. And if you look at the table below, they are in no way inferior to other natural “thermal insulators”.
| Natural insulation material | Material weight kg/m3 | Coefficient of thermal conductivity |
| Tow | 180 | 0,037-0,041 |
| cotton wool | 80 | 0,036 |
| Different felts | — | 0,031-0,050 |
| The fire is different | 150-350 | 0,04-0,065 |
| Moss | 135 | 0.04 |
| Sphagnum peat | 150 | 0,05-0,07 |
| Needles | 430 | 0.08 |
| Chopped straw stuffed | 120 | 0.04 |
| Straw mats | — | 0,05-0,06 |
| Fine wood shavings in packing | 140-300 | 0,05-1,0 |
| Dry leaves | — | 0,05-0,06 |
| Wood sawdust | 190-250 | 0,05-0,08 |
Of course, not all sawdust is the same - much depends on the type and quality of the wood from which it was processed.
So, the almost unconditional “leader” in this matter is oak sawdust. They are less hygroscopic than sawdust obtained from trees of other species. Even if moisture gets on them, it will not cause them much harm, since oak contains natural antiseptic substances. Therefore, they are not susceptible to rot and do not swell when exposed to water.
However, oak sawdust cannot be called a very common material. It’s okay - waste from coniferous trees: spruce, larch or pine will also work well as insulation. Coniferous wood contains in abundance essential oils that firmly resist the appearance of fungus or rot, that is, nature itself contains antifungal and antiseptic qualities in the material.
Preparing sawdust
Sawdust, in its pure, unprepared form, cannot be considered completely suitable for making blocks or for backfilling as insulation. After final drying, they become a very fire hazardous material. In addition, various insects or rodents may choose them to build nests.
Therefore, you must first work with clean material:
First of all, sawdust is treated with special compounds that have antiseptic and fire retardant properties.
The fire retardant will make sawdust practically non-flammable...
First, the sawdust is mixed with a deep penetration antiseptic, and after drying, with a fire retardant. All processes can be carried out on a ventilated area covered with film under a roof, for example, under a canopy.
... and the antiseptic will prevent biological processes of decay, the appearance of fungus, nests of insects and rodents
- After treatment with a fire retardant, the sawdust is mixed with slaked lime, which will not allow rodents and insects to settle in the insulation.
Lime is added to sawdust in proportions of 1:5, that is, one part lime to five parts sawdust. The measurement can be carried out in bags - for example, pour out five bags of sawdust and one bag of dry lime, and then mix thoroughly. If the work will be done manually, then mixing can be done using a regular hoe and shovel.
- In addition, it is necessary to take into account that sawdust used for insulation in bulk form tends to sag over time, reducing the formed air gap and, naturally, losing its insulating qualities. Therefore, after a certain period, you will have to top them up or lay other insulation on top of them.
Expert opinion: Afanasyev E.V.
Chief editor of the Stroyday.ru project. Engineer.
Taking into account this negative subsidence factor, in order to avoid the need for periodic updating or strengthening of the thermal insulation layer, a mixture is made consisting of sawdust, lime and gypsum in proportions 9: 1: 5. Then the mixture is moistened with water, mixed, and immediately laid on the prepared base .
Since gypsum hardens very quickly, the composition must be prepared in small portions in order to have time to place them in the place intended for them before they harden, otherwise the material will be damaged.
If you don’t want to rush, adjusting to the hardening time of the gypsum, it can be replaced with cement mortar.
When using this insulation method, pre-drying of the sawdust is not required. They can be used immediately after delivery from the sawmill.
Prices for various types of antiseptics
Antiseptics
Methods for insulating a house with sawdust
As mentioned above, for insulation using sawdust, several variants of different mixtures with the addition of gypsum and cement are used, but the most popular still remains the old folk method - a composition with clay.
Sawdust with clay
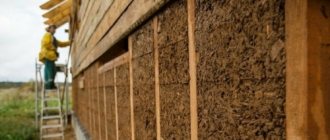
Clay and sawdust are two natural materials that are absolutely safe for the health of home residents. When mixed, they form a material with excellent heat-insulating and waterproofing qualities, so they are well suited for insulating walls and covering baths. After hardening, clay is not affected by hot steam, which cannot be said about most other modern insulation or waterproofing materials. Well, the sawdust in the mixture will create a good thermal insulation effect.
In addition, the clay-sawdust mixture is quite resistant to high temperatures and is fireproof.
The advantages of this composition include the fact that such insulation is perfect for a house built in any region - both where the summer heat reaches critical thermometer levels and where there are bitter frosts in winter.
A mixture of clay and sawdust not only retains heat during the cold season, but also prevents the rooms from heating up in the most extreme heat, so a house thermally insulated with this mixture is warm in winter and cool in summer.
Unlike modern insulation materials, clay-sawdust material can last for centuries without decomposing or losing its original qualities.
Insulating a building using wood waste and clay is not so easy. In order to achieve the desired thermal insulation effect, it is necessary to carry out work in accordance with certain requirements:
- The mixture must be prepared in compliance with certain proportions, otherwise the composition will have low adhesion, and if the walls are coated with it, then after drying, crumbling is possible.
Wall coated with clay-sawdust composition
- To achieve the maximum effect from insulation, the mixture on the walls must be applied correctly and have a certain thickness.
In modern conditions, this composition is rarely used for application to walls - most often sawdust with clay is used to create an insulating layer in the attic floor, where the material will not be subjected to serious load.
Wall insulated with mats made of a mixture of clay and sawdust
If you want to insulate the walls, then it is best to make insulating slabs from clay and small sawdust or from chopped reeds or straw.
Experienced builders who work with this material recommend using reeds, since for some reason rodents absolutely cannot tolerate it.
Plant fibers mixed with clay will become a kind of “reinforcement” for the solution, which will increase the load-bearing capacity of the insulating layer on the walls.
Preparing the mixture
There are several ways to make a clay-sawdust mixture for insulating a house. There are also several methods for laying it. Thus, mats can be made from the finished mixture, which are fixed to the walls and laid on the attic floor.
Another option is to spread the mixed wet mass between the floor beams or apply it to the wall, on a pre-fixed sheathing.
To make an insulating mixture and its further use, it is necessary to prepare certain materials and tools. You will need:
- Sawdust, clay and water.
- Glassine and waterproof tape for fastening.
- A metal box with low sides (or trough) for mixing the mass.
- Large container for soaking clay.
- Bucket.
- Shovel and hoe.
- Smooth boards from which forms will be assembled for the manufacture of block panels.
In order for the mixture to be plastic and not crack upon drying, it is necessary to maintain the correct proportions of the starting materials.
A. In the event that the mass in its raw form will be laid on the ceiling or on the surface of the walls, take ⅔ of a bucket of sawdust per bucket of clay, diluted to a creamy state.
To obtain this consistency of clay, it is placed in a large container, for example, in an old bathtub or trough, and filled with water in a 1:1 ratio. The clay is left to swell for a day or more, depending on the initial dryness of the material.
Clay is prepared for pre-soaking
Then the mass is mixed well until smooth. If the mixture turns out to be very thick, you can add a small amount of water to it, mix well again and leave for another 5 ÷ 6 hours. To make the process go faster, the mass needs to be stirred periodically.
If possible, it is best to soak all the clay needed for the work at once - it will not deteriorate in any way, no matter how long it is in the water. And the solution can be mixed as the previously prepared portion is consumed.
If the farm has a concrete mixer, then the work will go much faster. But it is most convenient to mix manually using a hoe and shovel.
Mixing sawdust with clay
To mix the clay-sawdust solution, you will need another large but shallow container made of thin metal, with sides 150 ÷ 200 mm high. The required amount of sawdust for one portion of the batch is poured there, and, according to the proportions, the clay mixture is laid out. Then the composition is mixed well and laid out on the prepared attic floor or applied to the walls.
B. If it is decided to insulate the house with mats made from a clay-sawdust mixture, then the materials are taken in 1:1 proportions. While the clay is swelling, during this period you need to make molds of the required size into which the finished mixture will be placed.
If the mats will be laid on the attic floor, then it is worth determining the distance between the beams and their height - the forms are made according to these parameters. They are essentially a box with no bottom.
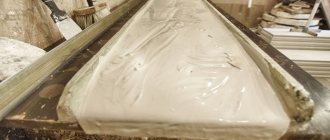
Making clay-sawdust blocks-mats in homemade molds
It is best to make several molds to make several mats at once. To make the blocks even on all sides, it is recommended to do the following:
- One or more plywood sheets are laid on a flat surface and covered with thick plastic film.
- Forms are installed on top.
- The prepared clay-sawdust mixture is laid out in them and, as far as possible, compacted.
- The composition is leveled from above using a rule - in this case, the sides of the form will serve as beacons.
- After the mixture has set and dried slightly, the mats can be removed, and further drying will take place without form, in a well-ventilated place under the roof. They cannot be taken out in the sun, since upon final drying the resulting blocks may crack.
- The emptied molds are filled again with the mixture - and this continues until the required number of mats is made.
The process of insulation with clay-sawdust composition
The technology of insulation with a clay-sawdust mixture is quite simple, both with the help of mats and by laying out the mixture in a wet state.
Insulation with clay-sawdust wet mass
1. When insulating an attic floor using clay-sawdust mass, you must first prepare the surface on which it will be laid out.
- Floor boards and beams are treated with antiseptic compounds. If there are wide gaps between the boards, then glassine can be laid between the floor beams. In the case when several sheets of glassine are laid, they must be overlapped and preferably secured with waterproof tape.
Preparing the floor surface for laying insulation
- Next, a clay-sawdust mixture is laid out on the flooring and leveled using a rule.
Laying and leveling the mixture
- Then the leveled surface can be moistened with water and further leveled using a spatula.
- After the clay has completely hardened, it will become dense and you can safely walk on it.
The work is carried out in sections
2. Insulation of walls can be carried out in two ways - by throwing a wet mixture onto the walls or pouring it into formwork attached to a finished main or frame wall.
- On the main wall, the clay mortar is applied between the installed beacons using a trowel or thrown on by hand and leveled with a rule.
Sketching and leveling the clay-sawdust mixture
- Another option is to throw the mixture onto the wall on which the shingles are attached. But in this case it will not be possible to lay a thick layer. A clay pile of no more than 30 mm can be supported on shingles.
Wooden wall reinforcement with shingles
- After the clay-sawdust layer has dried, it is leveled with sand-cement mortar and then with plaster.
3. The third option for insulating walls with a wet mass is to lay it in formwork installed along the main walls, or fixed on both sides to frame posts.
- Formwork panels are made from boards 1000 mm high. They are fixed on both sides of the frame posts or parallel to the main wall, at a distance of 200÷250 mm from it.
- A sawdust-clay mixture is placed into the formwork with careful compaction. After this, the composition is given time to dry.
- After the mixture has dried, the formwork is removed and raised higher, where it is secured again in the same way.
- The filling process is repeated in the same order until the top of the wall is reached.
Insulating the walls of a frame house
- Since there will be openings on top between the frame beam or wall and the ceiling that cannot be filled using this technology, you will have to make mats of the required size, install and fix them with clay mortar on top of the finished lower sections of the walls.
Insulation of walls and ceilings with clay-sawdust mats
Sawdust-clay mats are laid in the same way as mats of other insulating materials.
- The ceiling insulation scheme looks like this:
Scheme of floor insulation with sawdust-clay mat
1 – Attic floor beams.
2 – Ceiling.
3 – Subfloor of the attic floor.
4 – Glassine is placed on the bottom and top of the insulation.
5 – Sawdust-clay slab.
6 – Finished attic floor boards.
- The preparation of floor boards is carried out in the same way as when pouring clay mass.
- Next, the finished slabs are laid on the covered surface. If large gaps remain between the floor beams and the mats, they will have to be filled with a damp mass of clay and sawdust.
- To insulate main walls, a sheathing made of a block having the size of the mat thickness (if it is not more than 100 mm) is attached to them. The distance between the sheathing bars should be equal to the width of the mat. It will be most convenient to fix the installed slabs with slats, nailing them onto the sheathing bars.
- If insulation is carried out in a cold region, where average winter temperatures reach minus 25 ÷ 30 degrees, the insulation boards must be at least 300 ÷ 400 mm thick. Such slabs, or rather blocks, are mounted on a clay-sand mortar, according to the principle of brickwork.
You can even build a wall from such clay-sawdust blocks
- If frame walls are insulated, then it is necessary to provide for the installation of two rows of bars or boards with a thickness of at least 70 ÷ 80 mm. If two bars are installed that determine the thickness of the wall of the house, then sawdust-clay blocks will be laid between them. To ensure that the blocks fit tightly together in the places where the frame bars are installed, square cutouts are made in their corners, repeating the shapes and dimensions of the block.
Approximate scheme for wall insulation with sawdust mats
- When main walls are insulated, it is recommended to make masonry from blocks at a distance of 70 ÷ 100 mm from the wall.
- After the insulation layer has been raised by 800 ÷ 1000 mm, it is recommended to make a backfill of expanded clay between it and the wall.
- Then the insulating wall rises another 700 ÷ 1000 mm, backfilling is done again - and so on until the very top of the wall.
- Upon completion of insulation, the walls must be plastered with cement or clay mortar.
Sawdust with cement
If instead of clay, cement is chosen as a “partner” for sawdust, then the process of making, applying or laying the mixture is not much different from working with sawdust-clay solution, but the components and proportions are slightly changed.
So, in this case, in addition to cement and sawdust, lime is required. The components are taken in a ratio of 1:10:1. Additionally, copper sulfate or boric acid can be added to the mixture as an antiseptic. These components will require approximately 50 g per 50 kg of mixture. Each portion of the mass will require from 5 to 10 liters of water, depending on the method of insulation.
Preparation of sawdust-cement mortar
If all ingredients are available, mix the mixture:
- All ingredients are poured into a container prepared for mixing and mixed dry with a hoe until smooth.
- Antiseptics are added last, and after that the mixture is immediately filled with water and mixed. It will be better if the antiseptic components are diluted in water poured into the mixture - then they will be absorbed into the sawdust faster.
- The mixed mixture must be checked for readiness. This is done like this: the mixture is taken into the palm of your hand and squeezed. If water does not ooze from the lump and it does not crumble, then the composition is ready for the manufacture of slabs, for laying in formwork or for spreading over the surface of the attic floor.
On the attic floor, just as in the case of clay, glassine is placed under the mixture being laid out, but in this case it can be replaced with plastic film.
After laying the wet insulation is completed, it is left to harden.
Insulation with bulk material
Insulation with dry sawdust is quite simple. Treated and dried sawdust is simply poured onto the attic floor. The thickness of their layer varies depending on the winter and summer temperatures of the region. More precisely, this parameter can be found in the table located at the beginning of the article.
Sawdust for insulation is used dry or in the form of sawdust granules - pellets.
They are made from fine sawdust with the addition of an antiseptic, fire retardant and carboxymethylcellulose glue. The finished granules are practically non-flammable and do not harbor rodents. It should be noted that they are more convenient and practical for insulating floors than just sawdust, since they do not shrink and retain heat well.
- The granules are poured onto the prepared surface - the cracks of the boards are coated with a clay-lime composition, or the subfloor of the ceiling is covered with glassine.
- The granules are distributed in an even layer between the floor beams. If a layer of greater thickness is required, then sides are installed along the perimeter of the attic, with a height equal to the required thickness of the backfill layer - then the granules are laid to their top.
- If you plan to make a floor in the attic from a plank covering laid on top of insulation, then additional sheathing is attached to the floor beams, that is, they are raised in height.
Video: insulating the attic with dry sawdust
Dry sawdust or granules are also used to insulate the walls, filling them inside. If ordinary sawdust is used, then it must be well treated with antiseptics. In addition, in order to make them heavier but maintain their low thermal conductivity, sawdust is sometimes mixed with slag. Walls built and insulated in this way reliably protect the house from the penetration of cold and summer heat.
- The insulation is backfilled as the main walls are raised by 700 ÷ 1000 mm, with obligatory, but not excessively strong, tamping for compaction.
Scheme for insulating a hollow brick wall with sawdust
- After backfilling and compaction, the walls are again raised to a certain height, and so the process continues until the entire required height has been reached.
⃰ ⃰ ⃰ ⃰ ⃰
Conclusion:
With proper pre-treatment, both the sawdust itself and the compositions made using it are an excellent thermal insulator, which is quite capable of replacing any of the modern materials. Using them, you can be 100% sure that none of your household will develop allergies or other diseases associated with the release of toxic substances, which is sometimes the problem with some synthetic insulation materials.
Creating ceiling insulation from sawdust
There is nothing particularly difficult about how to insulate a ceiling in a private house with sawdust. After completing the preparation of the ceiling surface, they begin laying thermal insulation in small layers, leveling and compacting each of them. The height of the insulation should be level with the top of the ceiling.
A thin layer of ash is poured on top of the mixture of sawdust and additives. It will protect the insulation from pests and fungus. A couple of weeks after completing the insulation of the ceiling with sawdust in a private house, when the mixture is completely dry, a vapor barrier layer is laid on top of it. It is necessary to prevent wood waste from becoming saturated with moisture present in the air.
Vapor barrier material, usually polyethylene film, is attached to the floor beams using a mounting stapler. The result of the work done will be a thermal insulation layer covered on both sides with a vapor barrier.
Why sawdust as ceiling insulation has been relevant for so many years
Despite the variety of a large number of materials for thermal insulation of ceilings offered by the modern construction market, sawdust continues to be popular because it:
- the cheapest method to keep warm;
- time-tested method;
- An easy-to-install insulation option that anyone can do with their own hands.
The effectiveness of sawdust insulation is influenced by compliance with the technology of the work performed. The most important thing is to use only well-dried material, wait until the mass consisting of different components has completely dried before you start finishing the floor. A correctly prepared solution and high-quality installation will extend the service life of the insulation and enhance its properties.
Nuances of insulating ceilings in a wooden house
There are a number of nuances regarding how to insulate a ceiling with sawdust in a wooden house. Thermal insulation of floors in this case can only be done from the top side, if the raw materials are not pressed into slabs or mixed with clay.
When using sawdust to insulate wooden floors, you need to make sure that they are dry. Such chips, unlike wet ones, will crunch and crumble when squeezed into a lump by hand.
All cracks on the wooden surface are filled with polyurethane foam. Sheets of cardboard are laid on the ceiling and nailed with a stapler. Then, when insulating the ceiling in a wooden house, the first layer about 10 centimeters thick is filled with sawdust. Larger shavings are also suitable for this. After completing the installation, the sawdust must be compacted by walking on it.
Next, a second layer of the same thickness as the first is poured onto the compacted material. Fine sawdust is used for it. They are compacted again.
Reviews
Let's consider reviews about sawdust insulation. One man shared that one of his friends built a house in one large city. That man knew about construction issues; he used masonry resembling wells and filled them with a clay mixture with sawdust.
As a result, it turned out that he got almost nothing insulating material. The house came out very warm in winter and cool in summer.
Alexander, an experienced builder, shared that no one would argue about ceiling insulation - this is a popular and useful thing. In winter, such a ceiling retains heat, and in summer it is cool in such a house. This results in energy savings. In general, many reviews talk about the benefits of this insulation for house ceilings.
Thermal insulation of bath ceiling
When insulating a bathhouse, the ceiling surface is sheathed with wide boards. To install the chimney, a ceiling cut is performed. Components can be purchased ready-made in a store or made by yourself. In the second case, a circle is cut out in the middle of a stainless steel sheet that completely covers the hole for laying the chimney.
Next, the edges of the cutout in the ceiling are sealed with basalt wool, and strips of metal are stuffed on top of it. The chimney is secured with guide strips so that it can move freely due to thermal expansion. A plate is screwed from below and the resulting passage is thermally insulated.
Insulation of the ceiling in the bathhouse is carried out in the following sequence:
- In the attic room, a vapor barrier is laid with an overlap of 10-15 centimeters with a bend on walls of a similar size.
- The mixture for the sawdust ceiling, prepared in accordance with one of the previously described recipes, is laid in layers, each time, well leveling the insulation and compacting it. If the bathhouse is planned to be used only in summer, then the thickness of the thermal insulation layer can be 5 centimeters, and when in winter, then at least 15 centimeters will be required.
- After finishing laying the insulation, you need to wait until it dries. If cracks have formed on the surface, they are sealed with the same composition. To keep their quantity to a minimum, salt is added to the mixture before installation at the rate of 5 - 6 tablespoons per 10 liters of water.
- It sometimes takes up to a month for the insulation with sawdust to dry. Then a thin layer of lime is poured over the mixture and a vapor barrier is laid. Next, the surface is covered with boards, if desired.
When using a mixture of sawdust and gypsum for thermal insulation, it should be applied in thin layers. When performing work, you must not forget that the gypsum composition dries quickly. By the way, both methods of insulation can be used when working with horizontal and vertical surfaces.
How to determine the thickness of the insulation layer?
All other things being equal, sawdust requires a greater wall thickness than mineral wool and other artificial insulation materials. Which one depends on the region in which construction is taking place, the material of the enclosing structures and a number of other factors. In the most general terms, we can say that houses for year-round use require insulation with a thickness of at least 30-35 cm (for an energy-efficient building, a thickness of 40-50 cm is recommended); for a summer house or house for seasonal use, 25 cm may be sufficient.
Determining the amount of backfill material is quite simple. You need to multiply the perimeter of the house by the thickness and height of the walls, without subtracting the area of windows and doors (so that there is a reserve). If the floors are insulated with the same material, you need to make similar calculations and sum up the numbers. And then multiply the result by two, since sawdust, remember, settles quite strongly.